Oracle® Fusion Middleware
Extending the Administration Console for Oracle WebLogic
Server
11
g
Release 1 (10.3.5)
E13745-04April 2011
Oracle Fusion Middleware Extending the Administration Console for Oracle WebLogic Server, 11g Release 1 (10.3.5)
E13745-04
Copyright © 2001, 2011, Oracle and/or its affiliates. All rights reserved. Primary Author: Ben Gelernter
This software and related documentation are provided under a license agreement containing restrictions on use and disclosure and are protected by intellectual property laws. Except as expressly permitted in your license agreement or allowed by law, you may not use, copy, reproduce, translate, broadcast, modify, license, transmit, distribute, exhibit, perform, publish, or display any part, in any form, or by any means. Reverse engineering, disassembly, or decompilation of this software, unless required by law for interoperability, is prohibited.
The information contained herein is subject to change without notice and is not warranted to be error-free. If you find any errors, please report them to us in writing.
If this software or related documentation is delivered to the U.S. Government or anyone licensing it on behalf of the U.S. Government, the following notice is applicable:
U.S. GOVERNMENT RIGHTS Programs, software, databases, and related documentation and technical data delivered to U.S. Government customers are "commercial computer software" or "commercial technical data" pursuant to the applicable Federal Acquisition Regulation and agency-specific supplemental regulations. As such, the use, duplication, disclosure, modification, and adaptation shall be subject to the restrictions and license terms set forth in the applicable Government contract, and, to the extent applicable by the terms of the Government contract, the additional rights set forth in FAR 52.227-19, Commercial Computer Software License (December 2007). Oracle USA, Inc., 500 Oracle Parkway, Redwood City, CA 94065.
This software is developed for general use in a variety of information management applications. It is not developed or intended for use in any inherently dangerous applications, including applications which may create a risk of personal injury. If you use this software in dangerous applications, then you shall be responsible to take all appropriate fail-safe, backup, redundancy, and other measures to ensure the safe use of this software. Oracle Corporation and its affiliates disclaim any liability for any damages caused by use of this software in dangerous applications.
Oracle is a registered trademark of Oracle Corporation and/or its affiliates. Other names may be trademarks of their respective owners.
iii
Contents
Preface
... viiDocumentation Accessibility ... vii Conventions ... vii
1
Introduction and Roadmap
1.1 Document Scope and Audience... 1-1 1.2 Guide to this Document ... 1-2 1.3 Related Documentation... 1-2 1.4 New and Changed Features in This Release... 1-2
2
Understanding Administration Console Extensions
2.1 What Is an Administration Console Extension?... 2-1 2.1.1 How Do the WebLogic Portal Framework and WebLogic Portal Differ? ... 2-2 2.2 Extension Points in the Administration Console ... 2-2 2.2.1 Hierarchy of UI Controls ... 2-2 2.2.2 The Administration Console Desktop ... 2-4 2.2.2.1 Extending the Desktop ... 2-4 2.2.3 The Administration Console Look and Feel ... 2-4 2.2.3.1 Extending the Look and Feel ... 2-5 2.2.4 The Home Book and Page ... 2-5 2.2.4.1 Extending the Home Book ... 2-6 2.2.5 The ContentBook ... 2-7 2.2.5.1 Extending the ContentBook ... 2-8 2.2.6 Summary of the Administration Console UI Controls ... 2-8 2.3 JSP Templates and Tag Libraries ... 2-9 2.3.1 JSP Tag Libraries ... 2-9 2.4 Example: How Struts Portlets Display Content ... 2-11
3
Setting Up a Development Environment
4
Creating a Message Bundle
5
Rebranding the Administration Console
5.1 Files Used to Create a Look and Feel ... 5-1 5.2 Overview of the Process... 5-1 5.3 Expand the Look and Feel Template... 5-2 5.4 Modify or Replace Files... 5-3 5.4.1 Modify the Administration Console Banner ... 5-3 5.4.2 Modify the Login Page... 5-4 5.4.3 Modify Colors, Fonts, Buttons, and Images... 5-4 5.4.3.1 Style Sheet Properties... 5-4 5.4.3.2 Images Used In Conjunction with Style Sheets... 5-6 5.5 Use a Message Bundle for Your Look and Feel... 5-7 5.6 Create a NetUI Extension File ... 5-8 5.7 Archive and Deploy the Extension... 5-9
6
Adding Portlets and Navigation Controls
6.1 Define a Portlet... 6-2 6.1.1 Define a JSP Portlet ... 6-2 6.1.2 Define a Struts Portlet ... 6-3 6.1.3 Define a Page Flow Portlet ... 6-4 6.1.4 Displaying a Title Bar for a Portlet... 6-5 6.1.4.1 Localizing a Portlet Title... 6-6 6.1.4.1.1 Create a Backing Class for Localizing Portlet Titles... 6-6 6.2 Define UI Controls (Optional)... 6-8 6.2.1 Create a Tab That Does Not Contain a Subtab... 6-8 6.2.2 Create a Tab That Contains Subtabs ... 6-9 6.2.3 Create a Subtab ... 6-11 6.2.4 Create a Control Without Tabs or Subtabs ... 6-12 6.3 Specify a Location for Displaying Portlets or UI Controls... 6-12 6.3.1 Add a Portlet to the Desktop... 6-12 6.3.2 Add a Tab or Subtab to ContentBook... 6-13 6.3.3 Example: Specifying Locations for Portlets and UI Controls... 6-13 6.4 Add Nodes to the NavTreePortlet (Optional) ... 6-14 6.4.1 Append a Single Node to the Root of the Existing Tree ... 6-15 6.4.2 Append or Insert Nodes or Node Trees ... 6-16 6.4.2.1 Create a NavTreeBacking Class... 6-16 6.4.2.2 Invoke the NavTreeBacking Class ... 6-18 6.4.2.3 Example: How a NavTreeExtensionBacking Class Adds a Node Tree to the
NavTreePortlet 6-19
6.5 Navigating to a Custom Security Provider Page ... 6-20
7
Using Oracle Templates and JSP Tags
v 7.2.1.1 Data Model for Forms... 7-3 7.2.1.2 Data Model for Tables... 7-3 7.2.2 Handles for ActionForms and Row Beans ... 7-4 7.3 Create Struts Artifacts for Tables and Forms... 7-5 7.3.1 Create Struts Artifacts for a Form JSP: Main Steps... 7-5 7.3.1.1 Create Struts Action Classes for Handling Form Data ... 7-6 7.3.1.2 Configure Struts ActionForms and Action Mappings ... 7-8 7.3.2 Create Struts Artifacts for a Table JSP ... 7-10 7.4 Create JSPs that Use Oracle Templates and JSP Tags... 7-12 7.4.1 WebLogic Server JSP Templates... 7-13 7.4.2 Create a Form JSP ... 7-14 7.4.3 Create a Table JSP for Monitoring... 7-16 7.4.4 Create a Table Column for Navigating to Other Pages ... 7-18 7.4.5 Add a Handle to Your Row Bean and Action Class... 7-18 7.4.6 Use the column-link Tag... 7-19 7.4.7 Use the column-dispatch Tag ... 7-20 7.4.8 Add Buttons and Check Boxes to Tables... 7-21 7.4.8.1 Add Buttons to a Table ... 7-21 7.4.8.2 Add Check Boxes and Buttons to a Table ... 7-22 7.4.8.3 Example: How Check Boxes and Buttons Process Data ... 7-23 7.4.9 Configure Table Preferences ... 7-25 7.5 Create Other Portal Framework Files and Deploy the Extension... 7-25
8
Adding Online Help for Console Extensions
8.1 Summary of Steps ... 8-1 8.2 Create the Helpset... 8-1 8.2.1 Helpset Files ... 8-1 8.3 Merging Helpsets... 8-2 8.3.1 Directory Structure for Merging Extension Help ... 8-2 8.4 Localizing Helpsets... 8-3 8.5 How Helpsets Are Merged ... 8-4 8.6 Provide Support for Context-Sensitive Help ... 8-5 8.6.1 Provide Help IDs ... 8-5 8.6.1.1 helpid... 8-5 8.6.1.2 helpurlpattern ... 8-5 8.6.2 Map Help IDs to Help Files... 8-6 8.7 Rebranding Help... 8-6 8.8 Deploying Help ... 8-7
9
Archiving and Deploying Console Extensions
vii
Preface
This preface describes the document accessibility features and conventions used in this guide—Oracle Fusion Middleware Extending the Administration Console for Oracle
WebLogic Server.
Documentation Accessibility
Our goal is to make Oracle products, services, and supporting documentation accessible to all users, including users that are disabled. To that end, our
documentation includes features that make information available to users of assistive technology. This documentation is available in HTML format, and contains markup to facilitate access by the disabled community. Accessibility standards will continue to evolve over time, and Oracle is actively engaged with other market-leading
technology vendors to address technical obstacles so that our documentation can be accessible to all of our customers. For more information, visit the Oracle Accessibility Program Web site at http://www.oracle.com/accessibility/.
Accessibility of Code Examples in Documentation
Screen readers may not always correctly read the code examples in this document. The conventions for writing code require that closing braces should appear on an
otherwise empty line; however, some screen readers may not always read a line of text that consists solely of a bracket or brace.
Accessibility of Links to External Web Sites in Documentation
This documentation may contain links to Web sites of other companies or
organizations that Oracle does not own or control. Oracle neither evaluates nor makes any representations regarding the accessibility of these Web sites.
Access to Oracle Support
Oracle customers have access to electronic support through My Oracle Support. For information, visit http://www.oracle.com/support/contact.html or visit http://www.oracle.com/accessibility/support.html if you are hearing impaired.
Conventions
Convention Meaning
boldface Boldface type indicates graphical user interface elements associated with an action, or terms defined in text or the glossary.
italic Italic type indicates book titles, emphasis, or placeholder variables for which you supply particular values.
1
Introduction and Roadmap 1-1
1
Introduction and Roadmap
Administration Console extensions enable you to add content to the WebLogic Server Administration Console, replace content, and change the logos, styles and colors without modifying the files that are installed with WebLogic Server. For example, you can add content that provides custom monitoring and management facilities for your applications.
The Administration Console is a Java EE Web application that uses the WebLogic Portal framework, Apache Beehive, Apache Struts, Java Server Pages (JSP), and other standard technologies to render its user interface (UI) and content. It also uses the WebLogic Portal framework to enable extensions.
The following sections describe the contents and organization of this guide—Oracle Fusion Middleware Extending the Administration Console for Oracle WebLogic Server.
■ Section 1.1, "Document Scope and Audience" ■ Section 1.2, "Guide to this Document" ■ Section 1.3, "Related Documentation"
■ Section 1.4, "New and Changed Features in This Release"
1.1 Document Scope and Audience
This document is a resource for software vendors who embed or rebrand WebLogic Server in their products, software vendors who develop security providers or other resources that extend the functionality of WebLogic Server, and Java EE application developers who want to provide custom monitoring and configuration features for their applications.
It is assumed that the reader is already familiar with using Java, JavaServer Pages, and Apache Struts or Apache Beehive to develop Java EE Web applications. This document emphasizes a hands-on approach to developing a limited but useful Administration
Note: The Monitoring Dashboard is implemented differently than the rest of the Administration Console, and you do not extend it in the same ways. Rather, you can create new views and charts, as described in "Using the Monitoring Dashboard" in Configuring and Using the Diagnostics Framework for Oracle WebLogic Server. However, some changes made to the styles of the Administration Console, as described in Chapter 5, "Rebranding the Administration Console,"
Guide to this Document
Console extension. For information on applying Administration Console extensions to a broader set of management problems, refer to documents listed in Section 1.3, "Related Documentation."
1.2 Guide to this Document
■ This chapter, Chapter 1, "Introduction and Roadmap," introduces the organization
of this guide.
■ Chapter 2, "Understanding Administration Console Extensions," introduces the
building blocks for creating Administration Console extensions.
■ Chapter 3, "Setting Up a Development Environment," describes how to set up your
environment for developing Administration Console extensions.
■ Chapter 4, "Creating a Message Bundle," describes how to encapsulate the text that
your extension displays into properties files that can be localized.
■ Chapter 5, "Rebranding the Administration Console," describes how to create a
WebLogic Portal Look and Feel and deploy it as an Administration Console extension.
■ Chapter 6, "Adding Portlets and Navigation Controls," describes how to add
portlets that contain simple, static content to the Administration Console.
■ Chapter 7, "Using Oracle Templates and JSP Tags," describes how to create an
extension that uses the Administration Console's JSP templates, styles, and JSP tag library.
■ Chapter 8, "Adding Online Help for Console Extensions," tells how to create help
for a console extension and merge that help into the main Administration Console help system.
■ Chapter 9, "Archiving and Deploying Console Extensions," describes how to
deploy your extension.
1.3 Related Documentation
Because the Administration Console uses the WebLogic Portal framework to render its user interface, the process of extending the Administration Console is similar to creating or editing an existing WebLogic Portal application. For information on the WebLogic Portal framework, see:
■ Section 2.1.1, "How Do the WebLogic Portal Framework and WebLogic Portal
Differ?"
■ "User Interface Development with Look & Feel Features" in Portal Development
Guide for Oracle WebLogic Portal.
For information on JavaServer Pages, see JavaServer Pages Technology at http://java.sun.com/products/jsp/index.jsp.
For information on Apache Struts, see The Apache Struts Web Application Framework at http://struts.apache.org/.
For information on Apache Beehive, see http://beehive.apache.org/.
1.4 New and Changed Features in This Release
2
Understanding Administration Console Extensions 2-1
2
Understanding Administration Console
Extensions
The following sections describe Administration Console extensions:
■ Section 2.1, "What Is an Administration Console Extension?" ■ Section 2.2, "Extension Points in the Administration Console" ■ Section 2.3, "JSP Templates and Tag Libraries"
■ Section 2.4, "Example: How Struts Portlets Display Content"
2.1 What Is an Administration Console Extension?
An Administration Console extension is a WAR file that contains the resources for a section of a WebLogic Portal Web application. When you deploy the extension, the Administration Console creates an in-memory union of the files and directories in its WAR file with the files and directories in the extension WAR file. Once the extension has been deployed, it is a full member of the Administration Console: it is secured by the WebLogic Server security realm, it can navigate to other sections of the
Administration Console, and if the extension modifies WebLogic Server resources, it participates in the change control process.
The simplest extension adds content to the Administration Console's home page (desktop). The WAR file for such an extension contains:
■ An Administration Console extension descriptor file, called
netuix-extension.xml, that describes the location in the UI in which you want your extension to display.
■ An XML file that defines a WebLogic Portal portlet, which is a container for JSPs
and other types of content.
■ A JSP file that contains the content you want to display.
The WAR file for more complex extensions can contain any of the following additional resources:
■ If the extension displays content in tabs within the Administration Console UI, the
WAR contains XML files that describe other types of WebLogic Portal UI controls, such as tabs and subtabs (see Section 2.2, "Extension Points in the Administration Console").
■ If the extension uses Apache Struts to encapsulate business logic and navigation
Extension Points in the Administration Console
■ If the extension uses Apache Beehive to encapsulate business logic and navigation
logic, the WAR file contains configuration files and Java classes for Apache Beehive applications.
■ Java classes, image files, or other types of resources that can be used in Java EE
Web applications.
2.1.1 How Do the WebLogic Portal Framework and WebLogic Portal Differ?
The WebLogic Portal framework provides basic support for rendering the UI. The full WebLogic Portal product provides the framework and additional features such as personalization, interaction management, content management, and the ability for end users to customize their portal desktops.
If you have WebLogic Server, then you can use the WebLogic Portal framework when creating Administration Console extensions. If you want your own Web applications to provide a portal interface, you can purchase the WebLogic Portal product.
2.2 Extension Points in the Administration Console
An extension point is a location in the Administration Console UI at which you can add or replace content. The UI for the Administration Console is rendered by groups of specialized WebLogic Portal components called UI controls. Each group of controls is responsible for rendering a specific part of the UI. For example, one group renders the two-column layout that you see after you log in to the Administration Console. Other groups render individual tabs in the tabbed interface.
The Administration Console attaches unique labels to many of its UI controls, and each labeled control is an extension point. You can also use these labels with WebLogic Server JSP tags to forward requests to specific UI controls. If a UI control is not
identified by a label, you cannot extend it or forward to it. You must either interact with its labeled ancestor control or a labeled child control.
2.2.1 Hierarchy of UI Controls
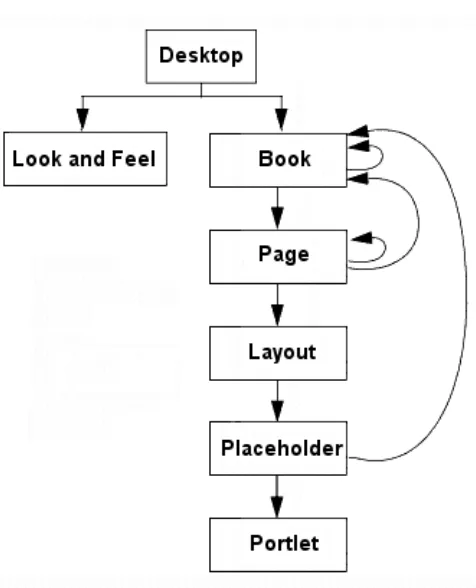
UI controls for an application are defined in an XML file called a portal book file (.book file). The schema for this XML file specifies a hierarchy of UI controls, but some UI controls can be used at multiple levels in the hierarchy. The following list describes the types of UI controls that you will encounter most frequently while developing extensions (see Figure 2–1):
■ Desktop
The top level of the UI control hierarchy. It contains the Look and Feel for the Administration Console and the top-level book control.
■ Look and Feel
A collection of images, cascading style sheets, XML files, and other file types that control the appearance of a portal application.
■ Book
Aggregates a set of pages or other books. It can contain an optional menu control that provides navigation among its pages and books. Many books in the
Extension Points in the Administration Console
Understanding Administration Console Extensions 2-3 Administration Console use this menu control to render tabs, such as the domain's Configuration: General tab.
■ Page
Contains a layout, portlets, or books.
■ Layout
Defines a grid in the UI. Each column in the grid is called a placeholder, and each placeholder can host zero or more portlets or books.
Most pages in the Administration Console use a single column layout, but one of the top pages uses a two-column layout to create the left column that contains the Change Center, Domain Structure, and other portlets, and the right column that contains the tabbed interface.
■ Portlet
Defines static and dynamic content to display. You can add portlets to the
Administration Console that contain JSP files or that forward to Struts Actions or Beehive Page Flows.
For information about the schema for UI controls, see Portal Support Schema Reference.
Figure 2–1 Subset of the UI Control Hierarchy
Extension Points in the Administration Console
■ Section 2.2.2, "The Administration Console Desktop" ■ Section 2.2.4, "The Home Book and Page"
■ Section 2.2.5, "The ContentBook"
■ Section 2.2.6, "Summary of the Administration Console UI Controls"
2.2.2 The Administration Console Desktop
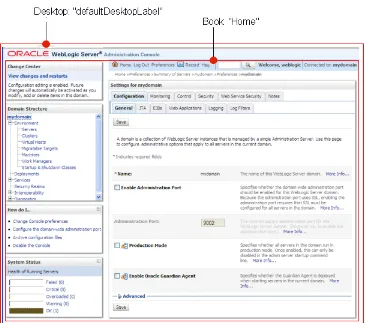
Every WebLogic Portal Web application must have at least one desktop control, and the Administration Console supports only one. Its label is defaultDesktopLabel
(see Figure 2–2).
Figure 2–2 The Desktop
2.2.2.1 Extending the Desktop
The only type of extension that is supported at this level of the Administration Console is a Look and Feel extension, which replaces Oracle's logos, colors, and fonts with yours. See Chapter 5, "Rebranding the Administration Console."
You cannot replace the Home book or add other controls to the desktop.
2.2.3 The Administration Console Look and Feel
Extension Points in the Administration Console
Understanding Administration Console Extensions 2-5
2.2.3.1 Extending the Look and Feel
Creating a simple Look and Feel extension that contains your company's logos, fonts, and color scheme requires you to replace the logos and some cascading style sheet (CSS) definitions in a sample Look and Feel included in WebLogic Server. Making complex changes to the WebLogic Server Look and Feel, such as changing the layout of portal components and navigation menus, requires a more advanced knowledge of WebLogic Portal Look and Feels. If you have Oracle Workshop for WebLogic Platform 9.2 or later, you can use its Look and Feel editor to make these complex changes. For more information about Look and Feels, see "User Interface Development with Look & Feel Features" in Portal Development Guide for Oracle WebLogic Portal.
2.2.4 The Home Book and Page
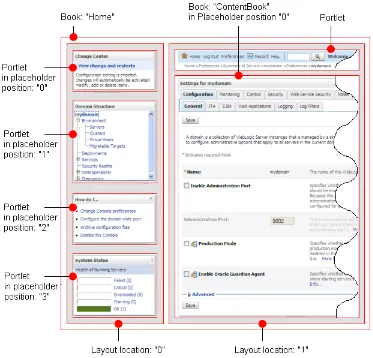
The top-level book in the Administration Console is identified by the label Home. It contains a single page (labeled page) within which resides all of the Administration Console content (see Figure 2–3).
Extension Points in the Administration Console
Figure 2–3 The Home Book and Page
The page page uses a two-column layout. The left column (layout location 0) contains portlets that provide essential services when using the Administration Console. The right column (layout location 1) contains:
■ Portlets:
– The topmost portlet displays a welcome message and contains buttons that launch online help and other services.
– The second portlet displays breadcrumbs, which are a series of hypertext links that keep a history of your navigation in the Administration Console.
– A third portlet is hidden by default and displays error messages and other status messages.
■ A book named ContentBook. See Section 2.2.5, "The ContentBook."
2.2.4.1 Extending the Home Book
The simplest extensions within the Home book add portlets to either column of its
page page. For example, below the System Status portlet, you can add a portlet that monitors your applications.
Extension Points in the Administration Console
Understanding Administration Console Extensions 2-7
2.2.5 The ContentBook
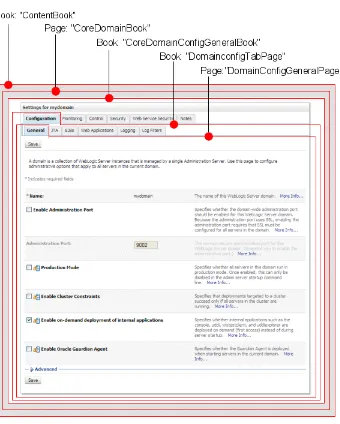
The ContentBook is a book that contains over 40 pages (see Figure 2–4), but it displays only one page at a time. Navigational controls throughout the Administration Console determine which page is displayed.
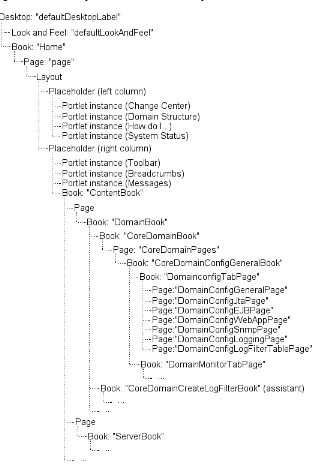
Figure 2–4 The ContentBook
In Figure 2–4, a page named CoreDomainBook contains a book named
CoreDomainConfigGeneralBook. The CoreDomainConfigGeneralBook
contains six child books and a special UI control named singleLevelMenu that renders a tab for each child book (Configuration, Monitoring, Control, Security, WebService Security, and Notes). In turn, each child book (such as
DomainconfigTabPage) contains several child page controls and the
singleLevelMenu control. The Look and Feel causes the singleLevelMenu control to generate subtabs for the page controls at this level (General, JTA, EJBs, Web
Applications, SNMP, Logging, and Log Filters).
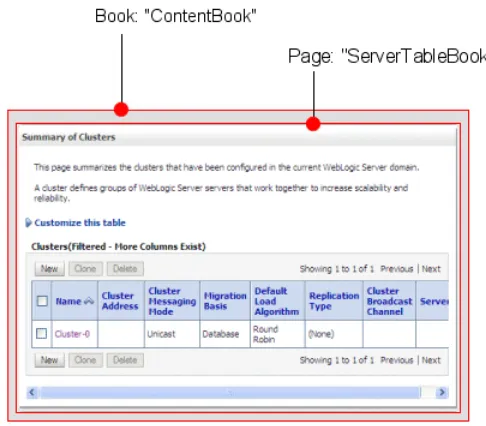
Some content-specific books do not display a tabbed interface for their child books.
Extension Points in the Administration Console
Figure 2–5 ServerTableBook
2.2.5.1 Extending the ContentBook
The simplest extensions within the ContentBook add a child book to create a tab in a content-specific book or add a child page to create a subtab. See Section 6.2, "Define UI Controls (Optional)."
2.2.6 Summary of the Administration Console UI Controls
Figure 2–6 shows the top levels of the Administration Console's labeled UI controls. To see all labeled UI controls, including all of the content-specific books, you can display all the console extension points in the Administration Console, as described in
JSP Templates and Tag Libraries
Understanding Administration Console Extensions 2-9
Figure 2–6 Summary of the UI Control Hierarchy
2.3 JSP Templates and Tag Libraries
Oracle provides JSP templates and tag libraries that you can use to render such UI features as tables, data-entry boxes, and buttons. For information about the JSP templates, see Section 7.4.1, "WebLogic Server JSP Templates."
2.3.1 JSP Tag Libraries
The Administration Console provides its own tag library (console-html.tld) that you can use in your Administration Console extensions. It also provides runtime support for a group of standard, third-party tag libraries that the Administration Console itself uses.
JSP Templates and Tag Libraries
libraries within the WebLogic Server installation. This mapping facility enables Oracle to reorganize its installation directory without requiring you to change your JSPs.
Table 2–1 lists the tag libraries for which the Administration Console provides runtime support and the URIs for importing them into your JSPs.
If you want development support for these libraries (for example, if you use an integrated development environment that provides code completion for JSP tags), you must configure your development environment to include these tags.
Note: You can create custom tag libraries or use additional tag libraries, but you must include all of the necessary support files for custom tag libraries in your extension WAR file. See Programming JSP Tag Extensions for Oracle WebLogic Server.
Table 2–1 Included JSP Tag Library Support
Tag Library and URI Description
Tag library: console-html.tld URI: /WEB-INF/console-html.tld
WebLogic Server JSP tags for creating HTML forms and tables that match the functionality of the forms and tables in the Administration Console.
Use these tags only to extend the WebLogic Server Administration Console.
The documentation for this tag library is in the
Oracle WebLogic Server JSP Tags Reference.
Tag library: render.tld URI: render.tld
Convenience tag for generating a portal
framework URL. See <render:pageUrl> Tag in the Portal Framework JSP Tag Javadoc. .
Tag library: beehive-netui-tags-template.tld URI:
http://beehive.apache.org/netui/tags-template -1.0
Apache Beehive JSP tags for associating JSPs with a JSP template.
You can download the Beehive distribution, which includes the tag libraries and documentation from
http://beehive.apache.org/downloads.h
Apache Beehive JSP tags for binding data.
You can download the Beehive distribution, which includes the tag libraries and documentation from
http://beehive.apache.org/downloads.h tml.
Tag library: beehive-netui-tags-html.tld URI:
http://beehive.apache.org/netui/tags-html-1.0
Apache Beehive JSP tags for generating basic HTML tags.
You can download the Beehive distribution, which includes the tag libraries and documentation from
http://beehive.apache.org/downloads.h tml.
Tag library: c.tld
URI: http://java.sun.com/jsp/jstl/core
JavaServer Pages Standard Tag Library (JSTL) tags which provide core functionality common to many JSP applications.
You can download the JSTL distribution from
http://java.sun.com/products/jsp/jstl /downloads/index.html.
The documentation for these tag libraries is in the
JSTL Tag Library Reference at
Example: How Struts Portlets Display Content
Understanding Administration Console Extensions 2-11
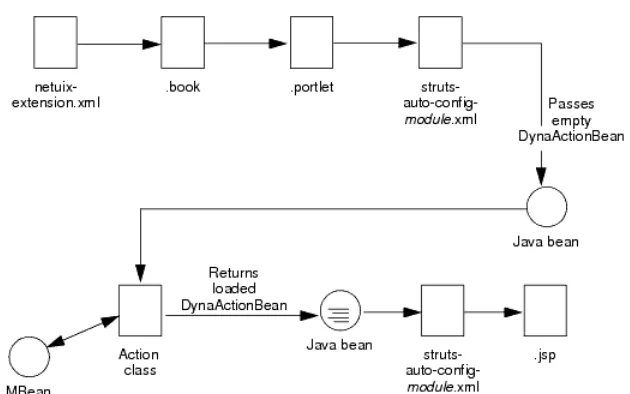
2.4 Example: How Struts Portlets Display Content
The following steps describe how the portal framework uses an extension's source files to find and display a Struts portlet as a tab in ContentBook:
1. The portal framework starts by parsing the extension's netuix-extension.xml
file.
The netuix-extension.xml file in this example specifies that the portal framework should load a .book file named medrecMonitor.book and display its contents as a child of the CoreDomainConfigGeneralBook book:
<book-extension> <book-location>
<parent-label-location label="CoreDomainConfigGeneralBook"/> <book-insertion-point action="append"/>
</book-location>
<book-content content-uri="/controls/medrecMonitor.book"/> Tag library: fmt.tld
URI: http://java.sun.com/jsp/jstl/fmt
JavaServer Pages Standard Tag Library (JSTL) tags which provide core functionality common to many JSP applications.
You can download the JSTL distribution from
http://java.sun.com/products/jsp/jstl /downloads/index.html.
The documentation for these tag libraries is in the
JSTL Tag Library Reference at
http://java.sun.com/products/jsp/jstl /1.1/docs/tlddocs/index.html.
Tag library: struts-bean.tld
URI: http://struts.apache.org/tags-bean
Apache Struts tags for interacting with the Struts framework.
You can download the Struts distribution from
http://struts.apache.org/download.cgi. The documentation for these tag libraries is available from http://struts.apache.org/. Tag library: struts-html.tld
URI: http://struts.apache.org/tags-html
Apache Struts tags for interacting with the Struts framework.
You can download the Struts distribution from
http://struts.apache.org/download.cgi. The documentation for these tag libraries is available from http://struts.apache.org/. Tag library: struts-logic.tld
URI: http://struts.apache.org/tags-logic
Apache Struts tags for interacting with the Struts framework.
You can download the Struts distribution from
http://struts.apache.org/download.cgi. The documentation for these tag libraries is available from http://struts.apache.org/. Tag library: struts-tiles.tld
URI: http://struts.apache.org/tags-tiles
Apache Struts tags for interacting with the Struts framework.
You can download the Struts distribution from
http://struts.apache.org/download.cgi. The documentation for these tag libraries is available from http://struts.apache.org/. Table 2–1 (Cont.) Included JSP Tag Library Support
Example: How Struts Portlets Display Content
</book-extension>
2. The portal framework loads the medrecMonitor.book file, which defines a page UI control and specifies that the page contains a portlet:
<netuix:page markupName="page" markupType="Page"> ...
<netuix:portletInstance markupType="Portlet" instanceLabel="medrecMonitor.Tab.Portlet"
contentUri="/portlets/medrec_monitor_tab.portlet"/> </netuix:page>
3. The portal framework loads the portlet file, which names a Struts Action to run:
<portal:root> <netuix:portlet
definitionLabel="MyPortlet" title="my.portlet.title">
<netuix:strutsContent module="/medrecMBean" action="MedRecMBeanFormAction"
refreshAction="MedRecMBeanFormAction"/> </netuix:portlet>
</portal:root>
In the netuix:strutsContent element, the module="/medrecMBean"
attribute indicates that the definition for the MedRecMBeanFormAction Struts
Action is located in the Struts configuration file for the Struts module named
medrecMBean. The Struts naming convention requires that this configuration file be named struts-auto-config-medrecMBean.xml.
4. The portal framework hands control to the Struts controller servlet, which parses the struts-auto-config-medrecMBean.xml file and finds the following definition for the MedRecMBeanFormAction:
<action path="/MedRecMBeanFormAction"
type="com.bea.medrec.extension.MedRecMBeanFormAction" name="medrecMBeanEJBForm"
scope="request" validate="false">
<forward name="success" contextRelative="true" path="/ext_jsp/form_view.jsp"/>
</action>
5. When the Struts controller encounters the name="medrecMBeanEJBForm"
attribute of the action element, it looks in the same Struts configuration file for the definition of a form bean that is named medrecMBeanEJBForm.
When it finds the following element in configuration file:
<form-bean name="medrecMBeanEJBForm"
type="org.apache.struts.action.DynaActionForm"> <form-property name="name"
type="java.lang.String"/> <form-property name="handle"
type="com.bea.console.handles.Handle"/> <form-property name="totalRx"
Example: How Struts Portlets Display Content
Understanding Administration Console Extensions 2-13 it initializes a Java bean of type
org.apache.struts.action.DynaActionForm with properties named
name, handle, and totalRx.
6. The Struts controller invokes the
com.bea.medrec.extension.MedRecMBeanFormAction class and passes to this class the DynaActionForm bean that it instantiated.
7. The MedRecMBeanFormAction class gathers data from an MBean in the MedRec application and populates the properties in the DynaActionForm bean with data from the MedRec MBean.
The MedRecMBeanFormAction class returns the populated DynaActionForm
bean.
8. The Struts controller serializes the DynaActionForm bean, sets it in an HTTP request, and then forwards to a JSP.
9. The JSP uses JSP tags to display data in the DynaActionForm bean.
3
Setting Up a Development Environment 3-1
3
Setting Up a Development Environment
Oracle provides all of the JSP tag libraries, schemas, and base Java classes that you need to develop a console extension. Because an Administration Console extension is a collection of XML files, Java classes, JSPs, and other standard Web-related resources, you can use any text editor or Integrated Development Environment to develop your extension.
The following sections describe setting up an environment for developing Administration Console extensions:
■ Section 3.1, "Set Up the Classpath (Optional)"
■ Section 3.2, "Import Tag Libraries Into IDEs (Optional)" ■ Section 3.3, "Create a Directory Tree for the Extension" ■ Section 3.4, "Configure Preferences to See UI Control Labels"
3.1 Set Up the Classpath (Optional)
If you are creating Apache Struts classes or Beehive Page Flow classes for your extension, you need a set of Apache classes in your classpath. If you are adding nodes to the NavTreePortlet, you need a set of Oracle classes.
To add these classes to your classpath, run the following script:
WL_HOME\server\bin\setWLSEnv.cmd
or
WL_HOME\server\bin\setWLSEnv.sh
where WL_HOME is the directory in which you installed WebLogic Server.
Instead of using Oracle's script, you can add to your environment's classpath all of the JAR files in the WL_HOME/server/lib/consoleapp/webapp/WEB-INF/lib
directory.
3.2 Import Tag Libraries Into IDEs (Optional)
If you are using Oracle's JSP templates to create JSPs in your extension, you must use JSP tags from the JSP Standard Tag Library (JSTL), the Oracle Administration Console Extension Tag Library, and the Apache Beehive Page Flows Tag Library.
Create a Directory Tree for the Extension
3.3 Create a Directory Tree for the Extension
An Administration Console extension is a portion of a Web application and its resources must be organized into a directory structure that satisfies the requirements for standard Java EE Web applications. In addition, the WebLogic Portal framework, Apache Struts, and Apache Beehive require configuration files to be in specific locations.
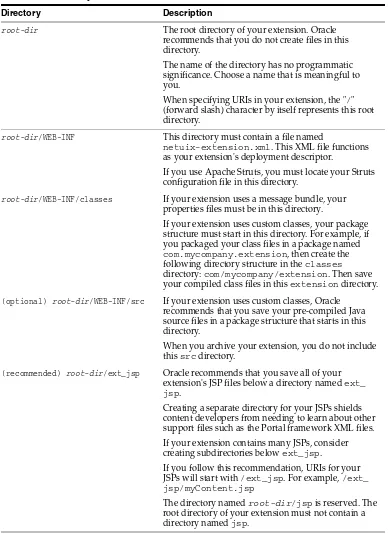
To start working on your Administration Console extension, create a directory tree that matches the skeletal structure in Table 3–1.
Table 3–1 Directory Tree for an Administration Console Extension
Directory Description
root-dir The root directory of your extension. Oracle recommends that you do not create files in this directory.
The name of the directory has no programmatic significance. Choose a name that is meaningful to you.
When specifying URIs in your extension, the "/" (forward slash) character by itself represents this root directory.
root-dir/WEB-INF This directory must contain a file named
netuix-extension.xml. This XML file functions as your extension's deployment descriptor.
If you use Apache Struts, you must locate your Struts configuration file in this directory.
root-dir/WEB-INF/classes If your extension uses a message bundle, your properties files must be in this directory.
If your extension uses custom classes, your package structure must start in this directory. For example, if you packaged your class files in a package named com.mycompany.extension, then create the following directory structure in the classes directory: com/mycompany/extension. Then save your compiled class files in this extension directory.
(optional) root-dir/WEB-INF/src If your extension uses custom classes, Oracle recommends that you save your pre-compiled Java source files in a package structure that starts in this directory.
When you archive your extension, you do not include this src directory.
(recommended) root-dir/ext_jsp Oracle recommends that you save all of your extension's JSP files below a directory named ext_ jsp.
Creating a separate directory for your JSPs shields content developers from needing to learn about other support files such as the Portal framework XML files. If your extension contains many JSPs, consider creating subdirectories below ext_jsp.
If you follow this recommendation, URIs for your JSPs will start with /ext_jsp. For example, /ext_ jsp/myContent.jsp
Configure Preferences to See UI Control Labels
Setting Up a Development Environment 3-3 If you are extending the Administration Console's Look and Feel, your root directory will contain additional subdirectories. See Chapter 5, "Rebranding the Administration Console."
3.4 Configure Preferences to See UI Control Labels
WebLogic Server provides a configuration option for displaying the labels of the Administration Console's extension points. You use these labels to specify where you want your extension to display. To display these labels:
1. In the Administration Console toolbar, click Preferences.
2. Select the Extensions tab.
3. Select Show Definition Labels.
4. Click Save.
A field is displayed over each labeled control on the page. The field displays the value of the control's definitionLabel, prefixed by Book: or Label: to indicate whether it is a book or a label. See Figure 3–1.
(recommended) root-dir/controls Oracle recommends that you save all of your extension's portal book files (.book) below a directory named controls.
If your extension contains many books or pages, consider creating subdirectories below controls. If you follow this recommendation, URIs for your books or pages will start with /controls. For example, /controls/myBook.book.
(recommended) root-dir/portlets Oracle recommends that you save all of your
extension's portlet files (.portlet) below a directory named portlets.
If your extension contains many portlets, consider creating subdirectories below portlets.
If you follow this recommendation, URIs for your portlets will start with /portlets. For example, /portlets/myContent.portlet.
Table 3–1 (Cont.) Directory Tree for an Administration Console Extension
Configure Preferences to See UI Control Labels
4
Creating a Message Bundle 4-1
4
Creating a Message Bundle
Oracle recommends that you define all of the text strings that your Administration Console extension displays in a message bundle. A message bundle is a collection of text files (properties files) that contain key-value pairs (properties). You create one properties file for each language or locale that you want to support. If you name the properties file per a set of file-naming conventions, the Administration Console displays strings from the properties file whose locale matches the Web browser's locale setting.
To create a message bundle:
1. Create a text file that contains name-value pairs for each string you want to display. Use the equal sign (=) as the delimiter between the name and value, and place each property on its own line.
For example:
myextension.myTab.introduction=This page provides monitoring data for my application.
myextension.myTab.TotalServletHits.label=Total hits for my servlet.
2. Save the file as root-dir/WEB-INF/classes/bundle.properties where
■ root-dir is the root directory of your extension
■ bundle is a unique value (do not use global, which is the name of a
WebLogic Server bundle). Consider using your company name as the value for bundle.
The bundle.properties file is the default file that the Administration Console uses if the Web browser or the JVM have not specified a locale. It is a required file.
3. Save each localized version of the properties file as
root-dir/WEB-INF/classes/bundle_locale.properties.
where locale is a locale code supported by java.util.Locale. See Locale in the J2SE API Specification, at
shttp://java.sun.com/j2se/1.5.0/docs/api/java/util/Locale.htm l.
For example, mycompany_ja.properties.
5
Rebranding the Administration Console 5-1
5
Rebranding the Administration Console
This section describes how to create a WebLogic Portal Look and Feel and deploy it as an Administration Console extension. A Look and Feel extension enables you to replace some or all of Oracle's logos, colors, and styles in the Administration Console.
5.1 Files Used to Create a Look and Feel
The following types of files are used to create the look and feel of a console extension:
■ Cascading stylesheets (CSS). Most of the changes (and the easiest changes) are
done by changing CSS.
■ Images. These may be referenced from CSS files or by the HTML generated by
skeleton JSPs or content JSPs. If you change an image but keep it the same size and use the same name, you do not have to change the CSS or JSPs that reference it.
■ Skeleton Java Server (JSP) files.
■ JavaScript files. Client side behaviors come from JavaScript files. Oracle
recommends that you do not change these files.
All of the Look and Feel files (CSS, skeleton, JavaScript and images) are subject to change with each release. Therefore, when you upgrade to a new release of WebLogic server, you may have to update your custom Look and Feel.
5.2 Overview of the Process
Expand the Look and Feel Template
Figure 5–1 Administration Console Extension Development Overview
5.3 Expand the Look and Feel Template
Your WebLogic Server installation includes a Look and Feel template that you can use as a starting point. Expand the template, and replace the images and styles with your own. There are two files:
■ build-new-laf.xml
This file is an ant script that creates the initial set of Look and Feel files for an extension. This script expands the Look and Feel files from laftemplate.zip
(see below) and renames directories to correspond to the name of your extension.
■ laftemplate.zip
Table 5–1 Rebrand the Administration Console: Tasks and Results
Step Description Result
1. Expand the Look and Feel Template
WebLogic Server includes a Look and Feel template that you can use as a starting point. Expand the template to access the files.
A set of Look and Feel files you can modify.
2. Modify or Replace Files
Replace images and styles with your own to create a custom Look and Feel for the console.
A Look and Feel that contains your logos and styles.
3. (Optional) Use a Message Bundle for Your Look and Feel
If you want to change the text messages displayed in the banner, login, and login error pages, create your own message bundle and modify the pages to use messages from your bundle.
Localized properties files that contain your messages.
4. Create a NetUI Extension File
The NetUI Extension file describes the locations of files and directories in your Look and Feel.
netuix-extension.xml
5. Archive and Deploy the Extension
Archive the Look and Feel extension in a WAR file and copy it to your domain's console-ext directory.
See Chapter 9, "Archiving and Deploying Console Extensions."
Modify or Replace Files
Rebranding the Administration Console 5-3 This template contains the initial set of Look and Feel files that
build-new-laf.xml expands.
To expand the template:
1. If you do not already have Apache Ant installed (or available in an IDE), install and configure it. See The Apache Ant Project at http://ant.apache.org/.
2. From a command prompt, change to the following directory:
WL_HOME/server/lib/console-ext/templates
where WL_HOME is the directory in which you installed WebLogic Server.
3. Run Ant on build-new-laf.xml using the following syntax:
ant -f build-new-laf.xml -Dname=ext-name -Ddir=root-dir
where ext-name is the name of your extension and root-dir is your console extension development directory, for example:
ant -f build-new-laf.xml -Dname=myLAF -Ddir=c:\src\laf-ext
The files from laftemplate.zip are extracted into root-dir.
5.4 Modify or Replace Files
Once the template is expanded, you can modify or replace the files to create your own Look and Feel. See the following:
■ Modify the Administration Console Banner ■ Modify the Login Page
■ Modify Colors, Fonts, Buttons, and Images
Making more complex changes to the WebLogic Server Look and Feel, such as changing the layout of portal components and navigation menus, requires a more advanced knowledge of WebLogic Portal Look and Feels. For more information, see "User Interface Development with Look & Feel Features" in Portal Development Guide for Oracle WebLogic Portal.
5.4.1 Modify the Administration Console Banner
To overwrite the sample Look and Feel's image files with your image files, do the following
1. To replace the logo in the Administration Console banner, save your own logo file
as root-dir/framework/skins/ext-name/images/Branding_
WeblogicConsole.gif.
To prevent the need to resize the banner frame, do not change the size of the image.
2. To change the background color of the banner, replace the following image file with one of the same size but that contains a different color:
root-dir/framework/skins/ext-name/images/titlebar_bg.png
3. To replace the ALT text for the logo, change the value of the login.wlsident
key in the global.properties file (and any bundle_locale.properties
Modify or Replace Files
To make more complex modifications, you can change the JSP and styles that render the banner. The root-dir/framework/skeletons/ext-name/header.jsp file determines the contents of the Administration Console banner. Within header.jsp, the style console-header-logo specifies the name and location of an image file that is used as the banner background. The style console-title specifies the name and location of the logo file. Both of these styles are defined in
root-dir/framework/skins/ext-name/css/console.css.
5.4.2 Modify the Login Page
The login page asks users to enter a user ID and password. Table 5–2 summarizes the files that determine the appearance of the login page.
5.4.3 Modify Colors, Fonts, Buttons, and Images
The Administration Console uses several cascading style sheets (CSS) to specify its fonts and colors, as well as other properties such as spacing. To change these styles, open the style sheet and change the style's definition.
5.4.3.1 Style Sheet Properties
Table 5–3 summarizes the Look and Feel styles defined in the style sheets. The styles themselves are not described in the table, because the style names in the style sheets are adequately descriptive, for example, background-color.
Note: You must precompile JSPs before deploying the extension.
Table 5–2 Files for the Login and Login Error Page Appearance
File Name and Path (Under root-dir/) Description
css/login.css Defines fonts and spacing for the
login page.
framework/skins/ext-name/images/Branding_Login_WeblogicConsole.gif framework/skins/ext-name/images/Login_GC_LoginPage_Bg.gif
framework/skins/ext-name/images/Loginarea_Background.png
Images for the login page. See
Table 5–4 for more information about Login_GC_LoginPage_ Bg.gif.and Loginarea_ Background.png.
login/LoginForm.jsp Render the login page.
Modify or Replace Files
Rebranding the Administration Console 5-5
Table 5–3 CSS Style Sheets Used for Look and Feel Extensions
File Name and Path (Under root-dir/) Styles
css/changemgt.css Styles for the Change Center ("Lock and Edit") panel.
css/content.css The following styles:
■ General console layout, such as margins.
■ The toolbar area. ■ Breadcrumbs.
■ Messages. ■ Data tables.
css/forms.css Styles for defining forms, such as configuration and monitoring page content areas.
css/jndinavtree.css Styles to define the navigation tree in the JNDI browser.
css/login.css Styles for the login page.
css/navtree.css Styles to define the navigation tree in the Domain Structure panel.
css/quicklinks.css Styles for the How Do I... panel.
css/systemstatus.css Styles for the System Status panel.
framework/skeletons/ext-name/css/layout.css Default styles for the grid on which the other user-interface items are arranged.
framework/skins/ext-name/css/console.css The following styles:
■ Console header and footer styles, including logo
image file name and location, background color, size, etc.
■ Structural elements, such as margins and widths.
■ Background colors for content areas. ■ Breadcrumb styles.
■ Styles to enhance screen reader support. framework/skins/ext-name/css/general.css The following styles:
■ The background color for the console, including the
Domain Structure, How do I..., and System Status panes on the left side, as well as the areas behind content areas.
■ Typography throughout the console, including font
family, font weight, font size, text color, text decoration, link styles, etc.
framework/skins/ext-name/css/menu.css.css Styles to define menu margins, padding, backgrounds, colors, etc.
framework/skins/ext-name/css/window.css The following styles:
■ Titlebar colors, borders, padding, alignment, image
rollover behavior, etc.
■ Windows styles, such as border style and color,
spacing, background image file name and location, etc.
Modify or Replace Files
5.4.3.2 Images Used In Conjunction with Style Sheets
Several images are used in conjunction with the style sheets to create effects such as rounded and shaded corners on tabs and buttons. These are summarized in Table 5–4
and Table 5–5. To change any of these effects, you can substitute your image for the default image, using the same file name; or you can reference a different image file from the style sheet.
Other images than the ones listed in the tables are also used in the console, and some are referenced in the style sheets. However, these tables only show those that are used to create formatting effects, as mentioned above. Browse
root-dir/framework/skins/ext-nameimages/ and root-dir/images/ to
see the other images.
Note: Two tables show the association of the style sheets and the images. Table 5–4 shows files relative to root-dir/ and Table 5–5
shows files relative to root-dir/framework/skins/ext-name. There is no special significance that the files are grouped this way except to improve the readability of the tables.
Table 5–4 Images Used With Style Sheets (Under root-dir/)
Effect CSS File Image file
The surface of a button.
See also use of this image with login.css.
css/forms.css images/button_bg_n.png
The surface of a button when the mouse pointer rolls over it.
See also use of this image with login.css.
css/forms.css images/button_bg_mo.png
The surface of a button when it is pressed down. See also use of this image with login.css.
css/forms.css images/button_bg_md.png
The background of the Welcome box that prompts for Username and Password when first starting WebLogic Server.
css/login.css framework/skins/ext-name/images/ Loginarea_Background.png
The surface of the Log In button in the Welcome box.
See also use of this image in forms.css, listed above.
css/login.css images/button_bg_n.png
The surface of a button when the mouse pointer rolls over it.
See also use of this image in forms.css, listed above.
css/login.css images/button_bg_mo.png
The surface of a button when it is pressed down. See also use of this image in forms.css, listed above.
css/login.css images/button_bg_md.png
Use a Message Bundle for Your Look and Feel
Rebranding the Administration Console 5-7
5.5 Use a Message Bundle for Your Look and Feel
In the banner and login pages, the Administration Console uses JSTL tags to load text messages from localized properties files. For example, to display the window title in
LoginForm.jsp:
1. The <fmt:setBundle basename="global" var="current_bundle" scope="page"/> tag in LoginForm.jsp sets the current message bundle to
global.
This JSP tag looks in WEB-INF/classes for files with the following name pattern:
bundle[_locale].properties.
The default properties file for this bundle is global.properties in WL_
HOME/server/lib/consoleapp/webapp/WEB-INF/classes/console.jar
. If the Web browser or operating system specifies a different locale, then the JSP tag would load global_locale.properties.
2. The <fmt:message key="window.title" bundle="${current_
bundle}" /> tag opens the global.properties file and renders the text that is identified by the window.title key:
window.title=Oracle WebLogic Server Administration Console
If you want to change these messages, you can create your own properties files and modify the JSP tags to use your bundle. See Chapter 4, "Creating a Message Bundle." Table 5–6 describes the text messages that the banner, login, and login error pages display.
Table 5–5 Images Used With Style Sheets (Under root-dir/framework/skins/ext-name/)
Effect CSS File Image file
Title bar at top of panels css/window.css images/titlebar_bg.png
Background for entire console. Visible at top of console behind logo.
css/console.css images/r_bg_global.png
The left edge of a tab. The top half of the image is used for unselected tabs and the bottom half is used for selected tabs.
css/menu.css images/tab_left.gif
The main surface of a tab. The top half of the image is used for unselected tabs and the bottom half is used for selected tabs.
css/console.css images/tab_right.gif
The corner of a shadow behind a panel. With default settings, it is at the top and bottom right corners.
css/window.css images/shadow-corners
The right side of a shadow behind a panel. css/window.css images/shadow-right.gif
Create a NetUI Extension File
5.6 Create a NetUI Extension File
A NetUI Extension file, named netuix-extension.xml, is the deployment descriptor for your Look and Feel. It contains the names and locations of the files in your Look and Feel, and it causes the Administration Console to replace its Look and Feel with yours. See Section 5–1, "netuix-extension.xml.". For more information about this file, see the NetUI Extensions Schema Reference.
Example 5–1 netuix-extension.xml
<title>My LAF</title> <version>1.0</version>
<description>My LAF.</description> <author>Me</author>
<support-url>My URL</support-url> </provider-info>
<portal-file>/console.portal</portal-file> <desktop-extension>
<look-and-feel-content title="myLAF" definitionLabel="myLAF"
1. Open the file in a validating XML editor (recommended) or a text editor.
2. In the <provider-info> element, change the information to describe your Look and Feel, developer contact and support URL.
Table 5–6 Messages in Banner and Login Pages
File (Under root-dir/) Message Key and Value
login/LoginForm.jsp window.title=Oracle WebLogic Server Administration Console login.wlsident=Oracle WebLogic Server Administration Console login.welcome2=Log in to work with the WebLogic Server domain
Archive and Deploy the Extension
Rebranding the Administration Console 5-9 The information in this element has no programmatic significance. It is intended to help your technical support team keep track of your software modifications.
3. In the <look-and-feel-content> element:
a. In the title, skin, and skeleton attributes, replace the myLAF value with the name of the directory you chose in step 3 in Section 5.3, "Expand the Look and Feel Template."
b. In the definitionLabel and markupName attributes, replace the myLAF
value with the name of the directory you chose in step 2 or use some other string. These attributes are required by the portal framework, but are not used in a Look and Feel extension.
5.7 Archive and Deploy the Extension
6
Adding Portlets and Navigation Controls 6-1
6
Adding Portlets and Navigation Controls
In the Administration Console, all content is contained within portlets, so even the most minimal extension must define a portlet (and content for the portlet). You can add your portlet directly to the desktop, but if you want the portlet to display as a tab or subtab in the ContentBook, you must define books or pages to contain it. Your extension can also add a node to the NavTreePortlet, which enables users to navigate to your portlet directly from the desktop.
This section describes how to add portlets, UI controls, and NavTreePortlet nodes to the Administration Console.
Figure 6–1 illustrates the process. The steps in the process, and the results of each are described in Table 6–1. Subsequent sections detail each step in the process.
Figure 6–1 Adding Portlets and Navigation Controls Development Overview
Table 6–1 Model MBean Development Tasks and Results
Step Description Result
1. Section 6.1, "Define a Portlet."
Create an XML file to define a portlet that the portal framework can instantiate. A portlet definition includes instructions on which type of data to load: JSPs, Struts Actions, or Beehive Page Flows. The portal's Look and Feel determines whether the portlet provides borders and minimize/maximize controls.
A .portlet XML file.
2. Section 6.2, "Define UI Controls (Optional)."
If you want your portlet to display in a tab, subtab, or in some other location within ContentBook, create an XML file that defines a page or book.
Define a Portlet
6.1 Define a Portlet
You define a portlet in an XML file. The portlet definition includes instructions on which type of data to load: JSPs, Struts Actions, or Beehive Page Flows. The following sections describe how to define a portlet:
■ Section 6.1.1, "Define a JSP Portlet" ■ Section 6.1.2, "Define a Struts Portlet" ■ Section 6.1.3, "Define a Page Flow Portlet" ■ Section 6.1.4, "Displaying a Title Bar for a Portlet"
For more information about portlet XML files, see the entry in Portal Support Schema Reference.
6.1.1 Define a JSP Portlet
To define a portlet that loads a JSP:
1. Copy the code from Example 6–1 and paste it into a new text file in
root-dir/portlets (see Section 3.3, "Create a Directory Tree for the Extension").
Consider using the following naming convention:
content-name.portlet
where content-name is the name of a JSP file that the portlet contains. For example, if the portlet contains a JSP file named monitorEJB.jsp, then name the portlet XML file monitorEJB.portlet.
2. Replace the values in Example 6–1 as follows:
■ Label. Provide a unique identifier that the portal framework uses to identify
this portlet.
■ (optional) Title. Provide a default title that this portlet displays if its title bar
is visible. See Section 6.1.4, "Displaying a Title Bar for a Portlet."
3. Section 6.3, "Specify a Location for Displaying Portlets or UI Controls."
Create an XML file that describes whether you want your portal to display next to a labeled UI control or to replace the control.
A
netuix-extension.xml file.
4. Section 6.4, "Add Nodes to the NavTreePortlet (Optional)."
You can create a link from the
NavTreePortlet to any book or page in your extension.
WebLogic Server provides default support for appending control names to the end of the existing navigation tree. If you want to insert nodes in specific locations, or if you want to create a node tree, you create your own Java classes that describe the node and node location.
Additional entries in the .book XML file.
Optionally, Java classes that give you more control over the node that you are adding.
5. Archive and deploy the extension.
See Chapter 9, "Archiving and Deploying Console Extensions."
A WAR file that contains your extension.
Table 6–1 (Cont.) Model MBean Development Tasks and Results
Define a Portlet
Adding Portlets and Navigation Controls 6-3
■ URI. Specifies the absolute path and file name of the JSP that the portlet
contains starting from the root of the extension.
For example:
/ext_jsp/monitorEJB.JSP
You must precompile JSPs before deploying your extension.
Example 6–1 Template for a Portlet XML File that Loads a JSP File
<?xml version="1.0" encoding="UTF-8"?> support/1.0.0 portal-support-1_0_0.xsd">
<netuix:portlet definitionLabel="Label" title="Title" > <netuix:content>
<netuix:jspContent contentUri="URI"/> </netuix:content>
</netuix:portlet> </portal:root>
6.1.2 Define a Struts Portlet
Instead of encapsulating your extension's business logic and navigation logic in JSP files, you can use the Apache Struts framework. See Section 7.3, "Create Struts Artifacts for Tables and Forms."
To create a portlet that loads (forwards to) a Struts Action:
1. Copy the code from Example 6–2 and paste it into a new text file in
root-dir/portlets (see Section 3.3, "Create a Directory Tree for the Extension").
Consider using the following naming convention:
action-name.portlet
where action-name is the name of the Struts Action to which the portlet forwards.
2. Replace the values in Example 6–2 as follows:
■ Label. Provide a unique identifier that the portal framework uses to identify
this portlet.
■ (optional) Title. Provide a default title that this portlet displays if its title bar
is visible. See Section 6.1.4, "Displaying a Title Bar for a Portlet."
■ Struts-module. Specifies the Struts module that defines a Struts Action.
You must create your own Struts module to define the Actions and
ActionForms that your Administration Console extension uses; the default Struts module is reserved for Oracle Actions and ActionForms. Each module includes its own, uniquely named configuration file. For information about Struts modules, see the Apache Struts User Guide at
Define a Portlet
For example, if you specify "myModule" for Struts-module, the Struts controller servlet looks in the following location for the action:
root-dir/WEB-INF/struts-auto-config-myModule.xml
■ action-path. Specifies the path to a Struts Action that is defined in your
Struts module.
■ refresh-action-path. Specifies the Action to invoke on subsequent
requests for this portlet (for example, the user agent refreshes the document).
Note that this .portlet does not specify the name of a JSP. Instead, typically the Struts Action mapping forwards to a specific JSP upon successful operation.
Example 6–2 Template for a Portlet XML File that Forwards to a Struts Action
<?xml version="1.0" encoding="UTF-8"?> support/1.0.0 portal-support-1_0_0.xsd">
<netuix:portlet definitionLabel="Label" title="Title" > <netuix:strutsContent module="Struts-module"
action="action-path"
refreshAction="refresh-action-path"/> </netuix:portlet>
</portal:root>
6.1.3 Define a Page Flow Portlet
To define a portlet that loads a Beehive Page Flow:
1. Copy the code from Example 6–3 and paste it into a new text file in
root-dir/portlets (see Section 3.3, "Create a Directory Tree for the Extension").
Consider using the following naming convention:
pageFlow-name.portlet
where pageFlow-name is the name of the Page Flow that the portlet loads (forwards to). For example, if the portlet forwards to a Page Flow named
myPageFlow.jpf, then name the portlet XML file myPageFlow.portlet.
2. Replace the values in Example 6–3 as follows:
■ Label. Provide a unique identifier that the portal framework uses to identify
this portlet.
■ (optional) Title. Provide a default title that this portlet displays if its title bar
is visible. See Section 6.1.4, "Displaying a Title Bar for a Portlet."
■ URI. Specifies the absolute path and file name of the JPF file that defines the
Page Flow. The URI must be absolute starting from the
root-dir/WEB-INF/classes directory.
For example, if your JPF file is
root-dir/WEB-INF/classes/com/mycompany/extension/pageflows
/myPageFlow.jpf, specify the following value