Dickon Ross
Editor-in-Chief, Electronics & Technology
Magazine
Cathleen Shamieh
Gordon McComb
Learn to:
•
Get to grips with electronics theory
•
Start working with electrical parts
and equipment
•
Read schematics and build simple
circuits
•
Create your own projects, from flashing
lights to infrared detectors
Start with
FREE
Cheat Sheets
Cheat Sheets include
•
Checklists
•
Charts
• Common Instructions
• And Other Good Stuff!
Get Smart at Dummies.com
Dummies.com makes your life easier with 1,000s
of answers on everything from removing wallpaper
to using the latest version of Windows.
Check out our
•
Videos
• Illustrated Articles
• Step-by-Step Instructions
Want a weekly dose of Dummies? Sign up for Newsletters on
• Digital Photography
• Microsoft Windows & Office
• Personal Finance & Investing
• Health & Wellness
• Computing, iPods & Mobile Phones
•
eBay
•
Internet
• Food, Home & Garden
Find out “HOW” at Dummies.com
Electronics
FOR
by Dickon Ross, Cathleen Shamieh,
and Gordon McComb
Electronics
FOR
DUMmIES
‰The Atrium
E-mail (for orders and customer service enquires): [email protected] Visit our Home Page on www.wiley.com
Copyright © 2010 John Wiley & Sons, Ltd, Chichester, West Sussex, England Published by John Wiley & Sons, Ltd, Chichester, West Sussex
All Rights Reserved. No part of this publication may be reproduced, stored in a retrieval system or transmit-ted in any form or by any means, electronic, mechanical, photocopying, recording, scanning or otherwise, except under the terms of the Copyright, Designs and Patents Act 1988 or under the terms of a licence issued by the Copyright Licensing Agency Ltd, Saffron House, 6-10 Kirby Street, London EC1N 8TS, UK, without the permission in writing of the Publisher. Requests to the Publisher for permission should be addressed to the Permissions Department, John Wiley & Sons, Ltd, The Atrium, Southern Gate, Chichester, West Sussex, PO19 8SQ, England, or emailed to [email protected], or faxed to (44) 1243 770620.
Trademarks: Wiley, the Wiley Publishing logo, For Dummies, the Dummies Man logo, A Reference for the Rest of Us!, The Dummies Way, Dummies Daily, The Fun and Easy Way, Dummies.com and related trade dress are trademarks or registered trademarks of John Wiley & Sons, Inc. and/or its affi liates in the United States and other countries, and may not be used without written permission. All other trademarks are the property of their respective owners. Wiley Publishing, Inc., is not associated with any product or vendor mentioned in this book.
LIMIT OF LIABILITY/DISCLAIMER OF WARRANTY: THE PUBLISHER, THE AUTHOR, AND ANYONE ELSE INVOLVED IN PREPARING THIS WORK MAKE NO REPRESENTATIONS OR WARRANTIES WITH RESPECT TO THE ACCURACY OR COMPLETENESS OF THE CONTENTS OF THIS WORK AND SPECIFICALLY DIS-CLAIM ALL WARRANTIES, INCLUDING WITHOUT LIMITATION WARRANTIES OF FITNESS FOR A PAR-TICULAR PURPOSE. NO WARRANTY MAY BE CREATED OR EXTENDED BY SALES OR PROMOTIONAL MATERIALS. THE ADVICE AND STRATEGIES CONTAINED HEREIN MAY NOT BE SUITABLE FOR EVERY SITUATION. THIS WORK IS SOLD WITH THE UNDERSTANDING THAT THE PUBLISHER IS NOT ENGAGED IN RENDERING LEGAL, ACCOUNTING, OR OTHER PROFESSIONAL SERVICES. IF PROFESSIONAL ASSIS-TANCE IS REQUIRED, THE SERVICES OF A COMPETENT PROFESSIONAL PERSON SHOULD BE SOUGHT. NEITHER THE PUBLISHER NOR THE AUTHOR SHALL BE LIABLE FOR DAMAGES ARISING HEREFROM. THE FACT THAT AN ORGANIZATION OR WEBSITE IS REFERRED TO IN THIS WORK AS A CITATION AND/OR A POTENTIAL SOURCE OF FURTHER INFORMATION DOES NOT MEAN THAT THE AUTHOR OR THE PUBLISHER ENDORSES THE INFORMATION THE ORGANIZATION OR WEBSITE MAY PROVIDE OR RECOMMENDATIONS IT MAY MAKE. FURTHER, READERS SHOULD BE AWARE THAT INTERNET WEBSITES LISTED IN THIS WORK MAY HAVE CHANGED OR DISAPPEARED BETWEEN WHEN THIS WORK WAS WRITTEN AND WHEN IT IS READ.
For general information on our other products and services, please contact our Customer Care Department within the U.S. at 877-762-2974, outside the U.S. at 317-572-3993, or fax 317-572-4002. For technical support, please visit www.wiley.com/techsupport.
Wiley also publishes its books in a variety of electronic formats. Some content that appears in print may not be available in electronic books.
British Library Cataloguing in Publication Data: A catalogue record for this book is available from the British Library
ISBN: 978-0-470-68178-7
Dickon Ross, adapting author of the UK edition, has been a science and technology journalist for 20 years, working on titles ranging from Electronics Times to Focus. Dickon is now Editor-in-Chief of Engineering & Technology magazine and Flipside – the magazine he launched for teenagers – for the Institution of Engineering and Technology.
Cathleen Shamieh is a writer with an engineering background who spe-cialises in creating communication materials focused on technology and its business benefi ts. She received an outstanding education in electrical engineering at Manhattan College and MIT, and enjoyed working as an engi-neer for several years in the medical electronics and telecommunications industries. Accepting a challenge from a respected colleague, she shifted her career into business consulting with a focus on technology implementa-tion, eventually migrating into marketing and communications consulting for high-tech companies. Cathleen enjoys leveraging her technical and business background to create white papers and other materials for not-so-technical audiences.
To my parents, Beth and Jim Corbett, who taught me that I can do anything I put my mind to; to Sister Eustelle, who made a writer out of me; to my wonderful husband, Bill, who’s always there to support me; and to my four fantastic sons, Kevin, Peter, Brendan, and Patrick, who make life a fun, loving adventure every single day.
C.S.
To my father, Wally McComb, who instilled in me a fascination with electronics; and to Forrest Mims, who taught me a thing or two about it.
G.M.
Authors’ Acknowledgements
Dickon Ross would like to thank his son Edmund for his help in building and testing the circuits in this book.
Cathleen Shamieh extends her thanks to the excellent editors at Wiley, espe-cially Katie Feltman and Christopher Morris, for their hard work, support, and gentle reminders, and to Kirk Kleinschmidt for his intense technical scru-tiny of the material. She is also grateful to Linda Hammer and Ken Donoghue, who kindly recommended her work to Wiley. Finally, Cathleen thanks her family and friends, whose support, assistance, and understanding helped make her goal of becoming a Dummies author a reality.
Some of the people who helped bring this book to market include the following:
Commissioning, Editorial, and Media Development
Project Editor: Steve Edwards
Content Editor: Jo Theedom
Commissioning Editor: Nicole Hermitage
Assistant Editor: Jennifer Prytherch
Development Editor: Andy Finch
Copy Editor: Anne O’Rorke
Technical Editor: Roger Dettmer
Proofreader: Kelly Cattermole
Production Manager: Daniel Mersey
Cover Photos: © Tombaky/Fotolia
Cartoons: Ed McLachlan
Composition Services
Project Coordinator: Lynsey Stanford
Layout and Graphics: Carrie A. Cesavice, Joyce Haughey, Melissa K. Jester, Mark Pinto, Christine Williams
Proofreaders: Melissa Cossell, Rebecca Denoncour
Indexer: Ty Koontz
Special Help
Introduction ... 1
Part I: Understanding the Fundamentals of Electronics ... 7
Chapter 1: What Is Electronics and What Can It Do for You? ... 9
Chapter 2: Manipulating Electricity to Make Something Happen ... 19
Chapter 3: Meeting Up with Resistance ... 37
Chapter 4: Getting a Charge Out of Capacitors ... 63
Chapter 5: Curling Up with Coils and Crystals ... 89
Chapter 6: The Wide World of Semiconductors ... 109
Chapter 7: Cramming Components into Chips ... 139
Chapter 8: Rounding Out Your Parts List ... 163
Part II: Getting Your Hands Dirty ... 187
Chapter 9: Setting Up Shop and Staying Safe ... 189
Chapter 10: Sussing out Schematics... 213
Chapter 11: Constructing Circuits ... 233
Chapter 12: Measuring and Analysing Circuits ... 255
Part III: Putting Theory into Practice ... 279
Chapter 13: Exploring Some Simple Circuits ... 281
Chapter 14: Great Projects You Can Build in 30 Minutes or Less... 305
Part IV: The Part of Tens ... 329
Chapter 15: Ten Exciting Electronics Extras ... 331
Chapter 16: Ten Great Sources for Electronics Parts ... 341
Appendix: Internet Resources ... 345
Introduction ... 1
Why Buy This Book? ... 1
Why Electronics? ... 2
Foolish Assumptions ... 3
Safety Is Number 1 ... 3
How This Book Is Organised ... 4
Part I: Understanding the Fundamentals of Electronics ... 4
Part II: Getting Your Hands Dirty ... 5
Part III: Putting Theory into Practice... 5
Part IV: The Part of Tens ... 5
Icons Used in This Book ... 6
Part I: Understanding the Fundamentals of Electronics ... 7
Chapter 1: What Is Electronics and What Can It Do for You? . . . .9
Just What Is Electronics? ... 9
Understanding Electric Current ... 10
Getting a charge out of electrons ... 10
Moving electrons in conductors ... 11
Harnessing Electricity to Do Work ... 12
Where Electrical Energy Comes From ... 12
Tapping into electrical energy ... 12
Giving electrons a nudge ... 13
Using conductors to make the circuit ... 13
Oh, the Things Electrons Can Do! ... 15
Creating good vibrations ... 15
Seeing is believing ... 15
Sensing and alarming ... 16
Controlling motion ... 16
Solving problems (aka computing) ... 16
Communicating with each other ... 16
Chapter 2: Manipulating Electricity to Make Something Happen . . .19
Supplying Electrical Energy ... 19
Getting direct current from a battery ... 20
Using alternating current from the power station ... 22
Understanding Directions: Real Electron Flow
versus Conventional Current Flow ... 24
Examining a Simple Light Bulb Circuit ... 25
Controlling Electrical Current with Basic Components ... 28
Ways to control current ... 29
Active versus passive components ... 30
Making Connections: Series and Parallel ... 30
Series connections ... 30
Parallel connections ... 31
Combination circuits ... 32
Creating Electronic Systems ... 33
Making sound appear out of thin air ... 33
Painting pictures with electrons ... 35
Chapter 3: Meeting Up with Resistance . . . .37
Resisting the Flow of Current ... 37
Resistors: Passive Yet Powerful ... 39
Discovering the usefulness of resistors ... 39
Choosing a type: fi xed or variable ... 40
Decoding fi xed resistors ... 42
Dialling with potentiometers ... 44
Rating resistors according to power ... 45
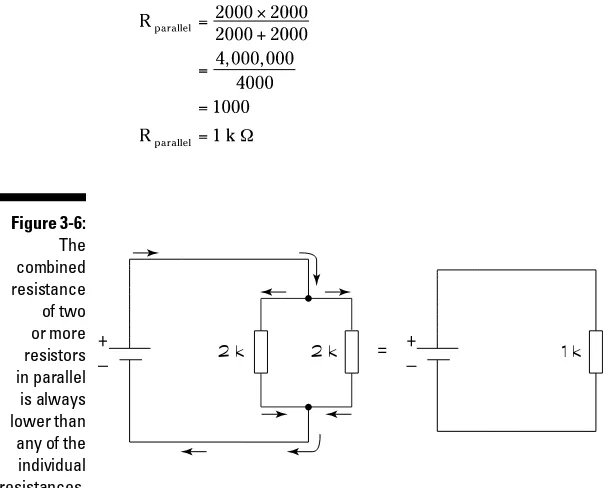
Combining Resistors ... 47
Using resistors in series ... 47
Employing resistors in parallel ... 48
Combining series and parallel resistors ... 50
Obeying Ohm’s Law ... 51
Driving current through a resistance ... 51
Understanding a relationship that’s constantly proportional! ... 52
Working with one law, three equations ... 53
Using Ohm’s Law to Analyse Circuits ... 54
Calculating current through a component ... 54
Working out voltage across a component ... 55
Determining an unknown resistance ... 56
What is Ohm’s Law Really Good For? ... 56
Analysing complex circuits ... 57
Designing and altering circuits ... 58
The Power of Joule’s Law ... 60
Using Joule’s Law to choose components ... 60
Going perfectly together: Joule and Ohm ... 60
Trying Your Hand at Circuits with Resistors ... 61
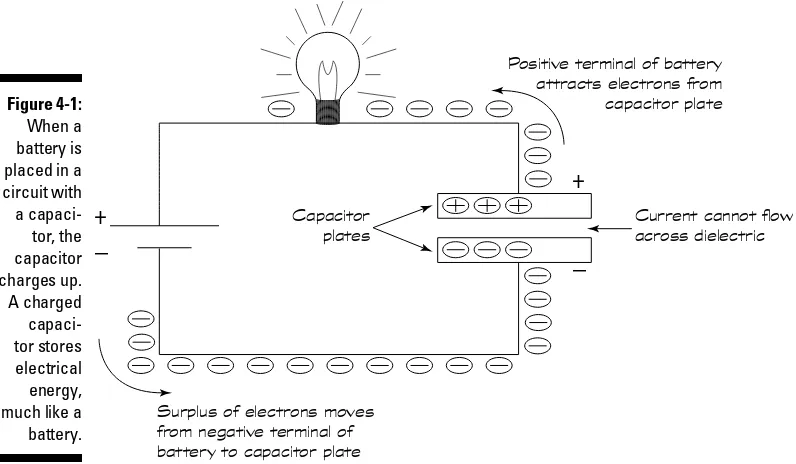
Chapter 4: Getting a Charge Out of Capacitors . . . .63
Reservoirs for Electrical Energy ... 63
Charging and discharging ... 64
Allowing alternating current ... 66
Shining a light on capacitors ... 67
Characterising Capacitors ... 67
Calculating the charge a capacitor can store ... 67
Reading capacitor values ... 68
Keeping an eye on the working voltage ... 71
Selecting dielectrics... 71
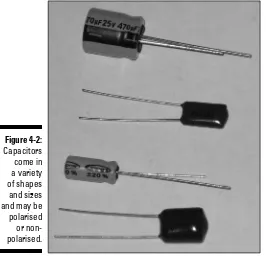
Sizing up capacitor packaging ... 72
Connecting with polarity ... 73
Varying capacitance ... 74
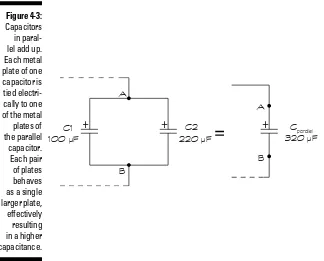
Combining Capacitors ... 74
Capacitors in parallel ... 74
Capacitors in series ... 76
Understanding Capacitive Reactance ... 77
Using Ohm’s Law for capacitive reactance ... 78
Understanding that behaviour depends on frequency ... 79
So What Have Capacitors Ever Done for Us? ... 80
Storing electrical energy ... 80
Blocking DC current ... 80
Smoothing out voltage ... 80
Creating timers ... 81
Tuning in (or out) frequencies ... 81
Teaming Up with Resistors ... 81
Timing is everything ... 81
Calculating RC time constants ... 83
Creating a timer... 84
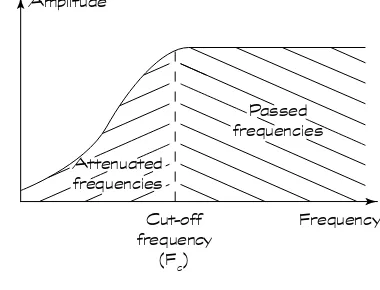
Selecting Frequencies with Simple RC Filters ... 85
Looking at low-pass fi lters ... 85
Encountering high-pass fi lters ... 86
Cutting off frequencies at the knees ... 87
Filtering frequency bands ... 88
Trying Out Simple Capacitive Circuits ... 88
Chapter 5: Curling Up with Coils and Crystals . . . .89
Working Both Ways: Magnetism and Electricity ... 90
Drawing the (fl ux) lines with magnets ... 90
Producing a magnetic fi eld with electricity ... 91
Inducing current with a magnet ... 92
Introducing the Inductor: A Coil with a Magnetic Personality ... 93
Measuring inductance ... 93
Opposing current changes ... 94
Alternating current gets nowhere fast ... 95
Understanding Inductive Reactance ... 96
Using Ohm’s Law for inductive reactance ... 97
Using Inductors in Circuits ... 98
Insulating and shielding inductors ... 98
Reading inductance values ... 98
Combining shielded inductors ... 99
Filtering signals with inductors... 99
Calculating the RL time constant ... 100
Now Introducing Impedance! ... 101
Tuning in to Radio Broadcasts ... 102
Resonating with RLC circuits ... 102
Ensuring crystal-clear resonance ... 104
Calling on the Coil Next Door: Transformers ... 105
Letting unshielded coils interact ... 105
Isolating circuits from a power source ... 106
Stepping up, stepping down voltages ... 106
Chapter 6: The Wide World of Semiconductors . . . .109
Are We Conducting, or Aren’t We? ... 109
Doping semiconductors ... 111
Combining n-types and p-types to create components ... 111
Forming a Junction Diode ... 113
Biasing the diode ... 114
Conducting current through a diode ... 115
Rating your diode ... 116
Discovering what’s in a name ... 116
Orientating yourself: Which way is up? ... 117
Using Diodes in Circuits ... 117
Rectifying AC ... 118
Regulating voltage with Zener diodes ... 119
Seeing the light with LEDs ... 120
Using diodes in other ways ... 122
Trillions of Transistors ... 123
Shrinking circuits ... 123
Examining the anatomy of a transistor ... 123
Operating a transistor ... 125
How Transistors Really Work ... 126
Emitting and collecting electrons ... 127
Gaining current ... 129
Saturating the transistor ... 130
Using a Model to Understand Transistors ... 131
Amplifying Signals with a Transistor ... 132
Turning it on ... 133
Turning it up ... 133
Turning it to your needs ... 134
Choosing Transistors ... 135
Tackling transistor ratings ... 136
Identifying transistors ... 136
Recognising transistors ... 137
Integrating Components ... 138
Chapter 7: Cramming Components into Chips. . . .139
Discovering Integrated Circuits ... 140
Linear, Digital or Both? ... 141
Making Decisions with Logic ... 141
Beginning with bits ... 142
Processing data with gates ... 144
Telling the truth ... 146
Understanding How to Use ICs ... 147
Identifying ICs with part numbers ... 147
Packaging is everything ... 147
Understanding IC pinouts ... 149
Relying on IC datasheets ... 150
Meeting Some Top Chips ... 151
Sounding out operational amplifi ers ... 151
Playing with the IC time machine: the 555 timer ... 153
Counting on the 4017 decade counter ... 159
Expanding Your IC Horizons ... 161
Chapter 8: Rounding Out Your Parts List . . . .163
Making Connections ... 163
Choosing wires wisely ... 164
Plugging in to connectors ... 166
Powering Up ... 168
Turning on the juice with batteries ... 168
Getting power from the sun ... 171
Working off your wall power (not recommended!) ... 172
Switching Electricity On and Off ... 173
Controlling the action of a switch... 173
Making the right contacts ... 174
Using Your Sensors ... 176
Seeing the light ... 176
Capturing sound with microphones ... 177
Feeling the heat ... 178
Trying other energising input transducers ... 180
Sensing Something’s Going On ... 181
Speaking of speakers ... 181
Sounding off with buzzers ... 183
Part II: Getting Your Hands Dirty ... 187
Chapter 9: Setting Up Shop and Staying Safe . . . .189
Picking a Place to Practise Electronics ... 190
Creating a great lab... 190
Choosing a workbench ... 191
Tooling Up ... 191
Shopping for soldering stuff ... 192
Measuring with a multimeter ... 193
Getting hands-on with hand tools... 195
Collecting cloths and cleaners ... 197
Oiling the wheels... 198
Sticking with it ... 198
Selecting other tools and supplies ... 199
Picking up Parts ... 200
Practising with solderless breadboards ... 200
Building a circuit-building starter kit ... 202
Adding up the extras ... 203
Organising all your parts ... 204
Protecting You and Your Electronics ... 204
Accepting that electricity can really hurt ... 205
Soldering safely ... 208
Avoiding static like the plague ... 209
Staying Safe: Safety Checklist ... 211
Chapter 10: Sussing out Schematics . . . .213
Approaching Schematics ... 213
Seeing the Big Picture ... 214
Following connections ... 215
Looking at a simple battery circuit ... 216
Recognising Symbols of Power ... 217
Showing where the power is ... 218
Marking your ground ... 220
Labelling Circuit Components ... 223
Analogue electronic components ... 224
Digital logic and IC components ... 226
Odds and ends ... 228
Exploring a Schematic ... 229
Alternative Schematic Drawing Styles ... 231
Chapter 11: Constructing Circuits . . . .233
Taking a Look at Solderless Breadboards ... 234
Exploring a solderless breadboard, inside and out ... 234
Building Circuits on Solderless Breadboards ... 237
Preparing your parts and tools ... 237
Saving time with pre-stripped wires ... 238
Laying out your circuit ... 239
Avoiding damaged circuits ... 241
Soldering On ... 242
Preparing to solder ... 243
Soldering for success ... 244
Inspecting the joint ... 245
Desoldering when necessary ... 246
Cooling down after soldering ... 247
Ensuring safe soldering ... 247
Committing to a Permanent Circuit ... 248
Moving your circuit to a solder breadboard ... 248
Prototyping with strip boards ... 249
Wrapping with wires ... 251
Making a custom circuit board ... 252
Chapter 12: Measuring and Analysing Circuits . . . .255
Multitasking with a Multimeter ... 255
It’s a voltmeter! ... 257
Now, it’s an ammeter! ... 257
Ohm my! It’s an ohmmeter, too! ... 258
Meeting Your First Multimeter ... 258
Unpacking your digital multimeter ... 260
Homing in on the range ... 261
Setting Up Your Multimeter ... 263
Operating Your Multimeter ... 264
Measuring voltage ... 265
Measuring current ... 266
Measuring resistance ... 268
Running other multimeter tests ... 273
Using a Multimeter to Check Your Circuits ... 274
Introducing Logic Probes and Oscilloscopes ... 275
Probing the depths of logic ... 275
Scoping out signals with an oscilloscope ... 276
Part III: Putting Theory into Practice ... 279
Chapter 13: Exploring Some Simple Circuits . . . .281
Getting Equipped ... 281
Seeing Is Believing: Ohm’s Law Really Works! ... 283
Analysing a series circuit ... 284
Dividing up voltage ... 287
Charging and Discharging a Capacitor ... 291
Watching your charges go up and down ... 291
Varying the RC time constant ... 293
Dropping Voltages across Diodes ... 294
Turning on an LED ... 294
Clipping voltages... 296
Gaining Experience with Transistors ... 298
Amplifying current ... 298
Measuring tiny currents ... 300
Creating light at your fi ngertip ... 300
Using Your Logic ... 301
Seeing the light with a logic gate ... 302
Turning three NAND gates into an OR gate ... 303
Chapter 14: Great Projects You Can Build in 30 Minutes or Less . . .305
What to Get and Where to Get It ... 305
Building Brilliant, Blinking, Bright Lights ... 306
Following the 555 fast fl asher ... 306
Gathering parts for the LED fl asher ... 310
Putting the Squeeze on with Piezoelectricity ... 310
Experimenting with piezoelectricity ... 311
Getting the parts for the piezoelectric circuit ... 313
Assembling the Amazing See-in-the-Dark Infrared Detector ... 313
Searching for infrared light ... 314
Tracking down parts for the infrared detector ... 315
Keeping People Away with a Siren! ... 315
Making your siren sound ... 316
Sorting the siren parts list ... 317
Lighting the Way with an Electronic Compass ... 317
Checking under the compass bonnet ... 317
Locating your electronic compass parts ... 319
Alarming Way to Sense the Light ... 320
Making your alarm work for you ... 320
Assembling a light alarm parts list ... 321
’Lil but Loud Amp ... 321
Making Music with a Melody Maker ... 322
Building the Pocket Water Tester ... 323
Understanding how the water tester works ... 323
Gathering water tester parts ... 324
Generating Cool Lighting Effects ... 325
Arranging the LEDs ... 325
Chasing down the parts ... 327
Part IV: The Part of Tens ... 329
Chapter 15: Ten Exciting Electronics Extras . . . .331
Trying Out Ready-Made Electronics Kits ... 331
Varying Your Voltage ... 332
Counting Up Those Megahertz ... 332
Generating All Kinds of Signals ... 334
Sweeping Frequencies Up and Down ... 334
Taking the Pulse ... 335
Analysing Your Logic ... 336
Simulating with Software ... 336
Buying Testing Tool Deals ... 338
Boxing Your Tricks – With Knobs On ... 339
Chapter 16: Ten Great Sources for Electronics Parts . . . .341
Buying British: Suppliers within the UK ... 341
Maplin ... 341
RS Components ... 342
Farnell ... 342
RSH Electronics ... 342
Bitsbox ... 343
ESR Electronic Components ... 343
Ordering from across the Pond ... 343
Digikey ... 343
All Electronics ... 344
B.G. Micro ... 344
Mouser Electronics ... 344
Appendix: Internet Resources ... 345
Finding Guides and Advice ... 345
Working Things Out with Calculators ... 346
Surfi ng for Circuits ... 346
Asking Questions in Discussion Forums ... 347
Getting Things Surplus ... 348
A
re you curious to know what makes your iPod tick? How about your mobile phone, laptop, stereo system, digital camera, plasma TV – or, well, just about every piece of electronics you use for work or play, in the office, at home or on the move?Perhaps you’ve even thought that you could design and build your own little electronic circuit or gadget to do something you want it to do?
If you’ve ever wondered how transistors, capacitors and other building blocks of electronics work, or if you’ve been tempted to try building your own electronic devices, you’ve come to the right place!
Electronics For Dummies is your entry into the electrifying world of modern electronics. No dry, boring or incomprehensible tome, this; what you hold in
your hands is the book that enables you to understand, create and
trouble-shoot your own electronic devices. We’re getting excited already!
Why Buy This Book?
All too often, electronics seems like a mystery, because it involves control-ling something you can’t see – electric current – which you’ve been warned repeatedly not to touch. That’s enough to scare most people away. But as you continue to experience the benefits of electronics on a daily basis, you may begin to wonder how so many incredible things can happen in such tight spaces.
This book is designed to explain electronics in ways you can relate to. It gives you a basic understanding of exactly what electronics is, provides down-to-earth explanations of how major electronic components work and gives you just what you need to build and test working electronic circuits and projects. Although this book doesn’t pretend to answer all your questions about elec-tronics, it does give you a good grounding in the essentials.
Why Electronics?
Electronics is everywhere. You find electronics in your phones, audio and video systems, and kitchen appliances. Electronic systems control traffic lights, Internet commerce, medical devices – even many toys. You can’t see most of them, but electronic systems also proliferate throughout your car. Try for just one minute to imagine your life without electronics; you may as well be living in the Dark Ages!
So what does all this mean to you as you peruse this book? After all, you don’t expect to be able to design satellite communication systems after a
sit-down session with this humble For Dummies book.
Remember though that even the most complicated electronics systems con-sist of no more than a handful of different electronic component types gov-erned by the same set of rules that make simple circuits work. So if you want to understand complex electronic systems, you start with the basics – just like the designers of those systems did when they started out.
More importantly, understanding the basics of electronics can enable you to create some really useful, albeit somewhat simple, electronic devices. You can build circuits that flash lights at just the right time, sound a buzzer upon sensing an intruder or even move an object around the room. And when you know how to use integrated circuit (IC) chips, which are populated with easy-to-use fully functioning circuits, you can create some rather clever designs for just a few well-spent pounds.
Technology development being what it is – lightning fast, smaller and
cheaper year after year – you can now hold the ingredients for very advanced electronic systems in the palm of your hand. With a little knowledge and a willingness to experiment, you can build a unique musical birthday card, fan-tastic flashing decorations or an alarm that senses someone trying to get into your bedroom or biscuit tin.
Also, you may have another hobby that can be enriched by electronics. If you’re into model railways, you can build your own automated switching points. If your hobby is racing radio-controlled cars, electronics know-how may enable you to improve the performance of your car and win the next championship. Knowing more about electronics can really enhance your hobbies.
Foolish Assumptions
This book assumes that you’re curious about electronics, but you really don’t know much, if anything, about its inner workings. You chose this book, rather than a book consisting exclusively of recipes for electronic circuits, and therefore we assume that you want to discover more about how parts such as resistors, capacitors and transistors actually work.
So we take the time (and more than half the book) to explain the basics to you, distilling fairly technical information down into easy-to-understand con-cepts. You don’t need to be well-versed in physics or mathematics to benefit from reading this book, although a little bit of school algebra is helpful (but we do our best to refresh that possibly painful memory).
We assume you may want to jump around this book a bit, diving deep into a topic or two that holds special interest for you, and possibly skimming through other topics. For this reason, we provide loads of chapter cross-references to point you to information that can fill in any gaps or refresh your memory on a topic. And although the first half of the book is devoted to how electronic circuits and individual parts work, we include cross-references to simple circuits and projects that appear later in the book. That way, as soon as you find out about a component, you can jump ahead, if you like, and build a circuit that uses that very component.
The table of contents at the front of the book provides an excellent resource that you can use to find quickly exactly what you’re looking for. Finally, the good people at Wiley have thoughtfully provided a thorough index at the back of the book to help you find what you want fast.
Safety Is Number 1
Reading about electronics is pretty safe. About the worst that can happen is that your eyes get tired from too many late nights with this book. But actually building electronic projects is another matter. Lurking behind the fun of your electronics hobby are high voltages that can electrocute you, soldering irons that can burn you and little bits of wire that can fly into your eyes when you snip them off with sharp cutters. Aaaagh!
Even if you’ve dabbled in electronics before, we still say you should read this bit as you may be surprised by some of the information. When you follow proper precautions, electronics is a very safe and sane hobby. Be sure to keep it that way!
Although we try to give you great advice about safety throughout, we can’t possibly give you every safety precaution in the world in one book. In addi-tion to reading our advice, use your own common sense, read manufacturer’s instructions for parts and tools that you work with and always stay alert.
How This Book Is Organised
Electronics For Dummies is organised so that you can quickly find, read and understand the information that you want. Also, if you have some experience with electronics, or want to deepen your knowledge of one particular topic, you can skip around and focus on the chapters that interest you.
The chapters in this book are divided into parts to help you zero in on the information that you’re looking for quickly and easily.
Part I: Understanding the Fundamentals
of Electronics
Turn to Part I if you want to get a thorough grounding in basic electronics theory. Chapter 1 gives you the big picture of exactly what electronics is and the amazing things it can do for you. You discover the fundamentals of elec-tronic circuits and get introduced to voltage, current and sources of electri-cal energy in Chapter 2.
In Chapters 3–6, you dive deep into the heart of all the major electronic com-ponents, including resistors, capacitors, inductors, transformers, diodes and transistors. You find out how each component works, how it handles electric current and what role it plays in electronic circuits.
Chapter 7 introduces you to integrated circuits (ICs) and explains a bit about digital logic and how three popular ICs function. Chapter 8 covers sensors, speakers, buzzers, switches, wires and connectors.
Part II: Getting Your Hands Dirty
Part II is all about tooling-up, constructing real circuits and probing around working (and non-working) circuits – without electrocuting yourself.
In Chapter 9, you find out how to set up an electronics workbench, what electronic components, tools and other supplies you need to build circuits, and how to protect yourself and your electronic components as you work on circuits. Chapter 10 explains how to interpret circuit diagrams (known as
schematics) so that you know how to connect components together when you build a circuit.
You discover various methods of wiring up temporary and permanent cir-cuits in Chapter 11, including how to solder. Finally, Chapter 12 explains how to use the most important testing tool in electronics – the multimeter – to explore and analyse your circuits. This chapter also introduces you very briefly to two other tools: the logic probe and oscilloscope.
Part III: Putting Theory into Practice
If you’re anxious to wire up some circuits and get your electronic juices flow-ing, Part III is the place to be.
Chapter 13 shows you some elementary circuits that you can build to dem-onstrate the principles of electronics and observe specific electronic compo-nents functioning as advertised. Turn to this chapter if you want to reinforce your theoretical knowledge of electronics or gain experience building simple circuits.
When you’re ready for more involved circuits, explore Chapter 14. Here, you find several projects that you can have fun building and exploring. You may even decide to put one or two of them to good use in your home or office.
Part IV: The Part of Tens
As you may expect, Part IV is where you can find further information laid out in top-ten list format.
When you’re ready to shop for all things electronic, turn to Chapter 16 for a list of the top electronics suppliers in the UK and abroad.
Icons Used in This Book
We can’t place dozens of Post-it notes in each and every copy of Electronics
For Dummies, so we use icons to draw your attention to critical information.
Tips alert you to information that can really save you time, headaches or money (or all three!). If you use our tips, your electronics experience is that much more enjoyable.
When you tinker with electronics, you’re bound to encounter situations that call for extreme caution. Enter the Warning icon: a not-so-gentle reminder to take extra precautions to avoid personal injury or prevent damage to your tools, components, circuits – or your bank balance.
This icon reminds you of important ideas or facts that you really need to keep in mind. Occasionally, we use this icon to note where in the book an important concept is originally introduced, so that you can flick back to more detailed information for a refresher, if you need one.
Understanding the
Fundamentals of
Electronics
D
o you ever wonder what makes electronic devices tick? Are you ever curious to know how speakers speak, motors move and computers compute? Well, then, you’ve come to the right place!What Is Electronics and
What Can It Do for You?
In This Chapter
▶ Seeing electric current for what it really is
▶ Recognising the power of electrons
▶ Using conductors to go with the flow (of electrons)
▶ Making the right connections with a circuit
▶ Controlling the destiny of electrons with electronic components
▶ Applying electrical energy to loads of things
I
f you’re like most people, you probably have some idea about whatelectronics is. You’ve been up close and personal with lots of so-called consumer electronics devices, such as iPods, stereo equipment, personal computers, digital cameras and televisions, but to you, they may seem like mysteriously magical boxes with buttons that respond to your every desire.
You know that underneath each sleek exterior nestles an amazing assortment of tiny components connected together in just the right way to make some-thing happen. And now you want to understand how.
In this chapter, you discover that electrons moving in harmony constitute electric current, which is shaped by electronics. You take a look at what you need to keep the juice flowing, and you also get an overview of some of the things you can do with electronics.
Just What Is Electronics?
When you turn on a light in your home, you’re connecting a source of elec-trical energy (usually supplied by your power company) to a light bulb in a
complete path, known as an electrical circuit. If you add a dimmer or a timer
Electrical systems, like the circuits in your house, use a standard electric
current to make things such as light bulbs work. Electronic systems take this
a step further: they control the electrical current, changing its fluctuations,
direction and timing in various ways in order to accomplish a variety of func-tions, from dimming a light bulb to communicating with satellites (take a look at Figure 1-1). This control is what distinguishes electronic systems from electrical systems.
Figure 1-1:
The dimmer electronics in this circuit control the flow of electric current to the light bulb.
Power source
Dimmer electronics
To understand how electronics controls electricity, you need to first under-stand what electricity is and how it powers things like light bulbs.
Understanding Electric Current
Electric current is the flow of electrical charges carried by unbelievably small
particles called electrons. So what on earth are electrical charges, where
exactly do you find electrons and how do they move around? You find the answers by taking a peek inside the atom.
Getting a charge out of electrons
Atoms are the natural building blocks of everything. They’re so tiny that you can find millions of them in a single speck of dust – so you can imagine how
many exist in your average sumo wrestler! Electronsare found in every single
atom in the universe, outside the atom’s centre, or nucleus. All electrons have
a negative electrical charge and are attracted to positively charged particles,
known as protons, which exist inside the nucleus. Electrical charge is a kind of
Under normal circumstances, an equal number of protons and electrons
reside in each atom, and the atom is said to be electrically neutral. The
attrac-tive force between the protons and electrons, known as an electromagnetic
force, acts like invisible glue, holding the atomic particles together, much
as the gravitational force of the earth keeps the moon within sight. The elec-trons closest to the nucleus are held to the atom with a stronger force than the electrons farther from the nucleus, and some atoms hold on to their outer electrons with a vengeance whereas others are a bit more lax.
Moving electrons in conductors
Materials such as air and plastic, in which the electrons are all tightly bound to atoms, are insulators – they don’t like to let their electrons move and so they don’t easily carry an electric current. However, other materials, like the metal copper, are conductors because they have ‘free’ electrons wandering between the atoms, normally moving around at random. When you give these free electrons a push, they all tend to move in one direction and, hey presto, you have an electric current. This flow appears to be instantaneous because all those free electrons, including those at the ends, move at the same time.
A coulomb is defined as the charge carried by 6.24 x 10¹⁸ (that’s 624 followed
by 16 zeros) electrons. If a coulomb of charge moves past a point within a second, we say that the strength of the electric current is one ampere, or one amp (abbreviated to 1 A). That’s a whole lot of electrons moving simultane-ously, and much more than is typically found in electronic systems. You’re more likely to see current measured in milliamps (mA). A milliamp is one one-thousandth of an amp.
Experiencing electricity
You can personally experience the flow ofelec-trons by shuffling your feet across a carpet on a dry day and touching a doorknob; that zap you feel (and the spark you may see) is the result of electrical charges jumping from your fingertip to the doorknob, a form of electricity known as
static electricity.
If you can get enough charges to move around and you can harness the energy they release, you can use that energy to power light bulbs and other things.
Lightning is another example of static electric-ity (but not one you want to experience person-ally), with electrical charges travelling from one cloud to another or from a cloud to the ground. When electrical charges move around, they release energy (hence the zaps and the sparks).
Harnessing Electricity to Do Work
Benjamin Franklin was one of the first people to observe and experiment with electricity, and he came up with many of the terms and concepts (for instance, current) that we know and love today. Contrary to popular belief, Franklin didn’t actually hold the key at the end of his kite during that storm in 1752. (If he had, he wouldn’t have been around for the American Revolution.) He may have performed that experiment, but not by holding the key.
Franklin knew that electricity was both dangerous and powerful, and his work got people wondering whether a way existed to use the power of elec-tricity for practical applications. Scientists such as Michael Faraday, Thomas Edison and others took Franklin’s work a bit further and figured out ways to harness electricity and put it to good use.
Where Electrical Energy Comes From
In this section, we explore where electrical energy comes from and how you can apply that energy to make things work.
Tapping into electrical energy
An electric current flowing in a conductor moves energy from its source, such as a battery, to a place where it can do something useful. That place could be a light bulb, motor or loudspeaker, for example. These useful objects convert the electrical energy into another form of energy, such as light, heat or mechanical energy. In this way, you make the filament glow, the motor shaft rotate or the speaker diaphragm vibrate.
Giving electrons a nudge
The force that gets the free electrons in a conductor moving is known as
volt-age, which is measured in units called volts (abbreviated to V). Think of voltage
as electric pressure. Much like water pressure pushes water through pipes and valves, voltage pushes electrons through wires and other circuit components. The higher the pressure, the stronger the push, and so the higher the voltage, the stronger the electric current that is pushed through a circuit.
You may also hear the terms potential difference, voltage potential, potential
drop or voltage drop used. Try not to let these different terms confuse you. We discuss this a bit more in Chapter 2.
Using conductors to make the circuit
Electric currents don’t just flow anywhere. (If they did, you’d be getting shocked all the time.) Electrons only keep flowing if you provide a closed
conductive path, or circuit, for them to move through and start that flow by
applying a source of electrical energy such as a battery. Copper and other conductors are commonly formed into wire to provide a path for the flow of free electrons, so that you can direct electrical energy to a light bulb or other part that can use it. Just as with pipes and water, the wider the wire, the more freely the electrons flow.
If a break exists in the path (an open circuit), the electrons get stuck in a dead
end. Picture water flowing through an open pipe. The water flows for a short time, but then stops when all the water exits the pipe. If you pump water through a closed pipe system, the water continues to flow as long as you keep forcing it to move.To keep the electric current flowing, you need
to connect everything together into one big happy electrical circuit. As shown
in Figure 1-2, every circuit needs at least three basic things to ensure that electrons get energised and deliver their energy to something that needs work done:
✓ A source of electricity (or electrical energy): The source provides the force that nudges the electrons in the chain reaction. You may also
hear the terms electrical source, power source, voltage source and energy
source used to describe a source of electricity. We discuss sources of electricity in Chapter 2.
✓ A load: The load is the thing that uses the energy in a circuit (for instance, a light bulb or a speaker). Think of the load as the destination for the electrical energy.
Figure 1-2:
An electric current starts with a push from the energy source and flows through the wire path to the load, where energy is released to make some-thing happen, for instance, emitting light.
Working electrons create power
Work is a measure of the energy that a device like a light bulb or a motor uses over a cer-tain amount of time when you apply a volt-age to it. The more electrons you push, and the harder you push them, the more electri-cal energy is available and the more work can be done. The total energy used in doing work over some period of time is known as
power and is measured in watts. Power is calculated by multiplying the force (voltage) by the strength of the electron flow (current):
Oh, the Things Electrons Can Do!
Imagine applying an electric current to a pair of speakers without using anything to control or shape the current. What would you hear? It certainly wouldn’t be music! By using the proper combination of electronics assem-bled in just the right way, you can control the way each speaker diaphragm vibrates, producing recognisable sounds, like speech or music (well, certain music anyway). And you can do so much more with electric current when you know how to control the flow of electrons.
Electronics is all about using specialised devices, known as electronic
compo-nents (for example, resistors, capacitors, inductors and transistors, which we discuss in Chapters 3, 4, 5 and 6 respectively) to control current (also known as the flow of electrons) in such a way that it performs a specific function.
Simple electronic devices use a few components to control current flow. The dimmer switch that controls current flowing into a light bulb is one such exam-ple. But most electronic systems are a lot more complicated than that; they con-nect lots of individual components together in one or more circuits to achieve their ultimate goal. The great thing is that when you understand how a few indi-vidual electronic components work and find out how to apply some basic prin-ciples, you can begin to understand and build interesting electronic circuits.
This section provides just a sampling of the sorts of things you can do by controlling electrons with electronic circuits.
Creating good vibrations
Electronic components in your iPod, car stereo and other audio systems convert electrical energy into sound energy. In each case, the system’s speak-ers are the load, or destination, for electrical energy, and the job of the elec-tronic components within the system is to shape the current flowing to the speakers so that the diaphragm within each speaker moves in such a way as to reproduce the original sound.
Seeing is believing
Cathode ray tube (CRT) TV sets (the sort we all used before flat-panel sets) are coated with phosphors that glow when struck by electron beams within the tube. The electronic circuits within the TV set control the direction and intensity of the electron beams, thus controlling the pattern painted across the TV screen, which is the image you see. Enlightening, isn’t it?
Sensing and alarming
Electronics can also be used to make something happen in response to a
specific level of light, heat, sound or motion. Electronic sensors generate or
change an electrical current in response to a stimulus. Microphones, motion detectors, temperature sensors and light sensors can be used to trigger other electronic components to perform some action, such as activating an auto-matic door opener or sounding an alarm.
Controlling motion
A common use of electronics is to control the on/off activity and speed of motors. By attaching various objects, from wheels to aeroplane flaps, to motors, you can use electronics to control their motion. Such electronics can be found in robotic systems, aircraft, spacecraft, elevators and lots of other places.
Solving problems (aka computing)
Much as the ancients (those living thousands of years ago, not your great-grandparents) used the abacus to perform arithmetic operations, so you use electronic calculators and computers to perform computations. With the abacus, beads were used to represent numbers and calculations were per-formed by manipulating those beads. In computing systems, different electri-cal signals are used to represent numbers, letters and other information, and computations are performed by manipulating those patterns using electronic components. Of course, the worker-bee electrons inside have no idea they’re crunching numbers!
Communicating with each other
and encode it for transmission), convert it into a radio signal and send it out through the air to a communication tower. Other electronic circuits in your handset detect incoming messages from the tower, decode the messages and convert an electrical pattern within the message into the sound of your friend’s voice (via a speaker).
Manipulating Electricity to
Make Something Happen
In This Chapter
▶ Finding a source of electrical force
▶ Being positive about the direction of current
▶ Shedding light on a circuit in action
▶ Taking control of electron flow
▶ Sending current this way and that
E
lectronics is all about controlling the flow of electrons throughconduc-tors in a complete path (circuit) in order to shape the electrical energy delivered to a load, such as a light bulb, motor or speaker, in just the right way. By manipulating the flow of electrons, electronic components enable you to do some amazing things with electrical energy, such as vary the sound produced by speakers, change the direction and speed of motors and control the intensity and timing of lights, among many other things. In other words, electronics doesn’t make electricity – it makes electricity better.
In this chapter, you discover how to get electrons flowing through a circuit and why conventional current can be thought of as electrons moving in reverse. You also explore the depths of a simple electronic circuit and look at different ways to connect electronic components so that you can begin to shape and direct current the way you see fit in your own circuits.
Supplying Electrical Energy
Think about the motion of water that’s just sitting in a closed pipe: the water may bounce up and down a bit, but it’s not going to go whooshing through the pipe on its own. You need to introduce a force in order to deliver the energy needed to get a current flowing through the pipe.
Just as a car needs petrol to get it going, a circuit needs a source of electri-cal energy to get the electrons moving. Batteries and solar cells are common sources. The energy available at your wall sockets comes from many differ-ent power plants. But how do you conjure up electrical energy?
All sources of electrical energy take another form of energy (for instance, mechanical, chemical, heat or light) and convert it. Exactly how electrical energy is generated by your favourite source turns out to be important,
because different sources produce different types of electric current: direct
current (known as DC) and alternating current (known as AC).
✓ Direct current is a steady flow of electrons in one direction, with very little variation in the strength of the current. Cells (commonly known as batteries) produce DC; most electronic circuits use DC.
✓ Alternating current is a fluctuating flow of electrons that keeps chang-ing direction back and forth. Power companies supply AC to your elec-trical sockets.
Getting direct current from a battery
A battery converts chemical energy into electrical energy through a process
called an electrochemical reaction. When two different metals are immersed
in a certain type of chemical, metal atoms react with chemical atoms to pro-duce charged particles. Negative charges build up on one of the metal plates, while positive charges build up on the other metal plate. The difference in
charge across the two metal terminals (a terminal is just a piece of metal to
which you can hook up wires) creates the force needed to push electrons
around a circuit. We give this electrical force the name voltage, and it’s a
measure of how strong a force the electrical energy source can supply.
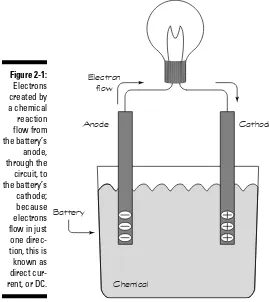
To use a battery in a circuit, you connect one side of your load, for instance,
a light bulb, to the negative terminal (known as the anode) and the other side
of your load to the positive terminal (known as the cathode). In this way you
Figure 2-1:
Electrons created by a chemical reaction flow from the battery’s anode, through the circuit, to the battery’s cathode; because electrons flow in just one direc-tion, this is
known as direct
cur-rent, or DC. Chemical Battery
Anode Cathode
Electron flow
Because the electrons move in only one direction (from the anode, through the circuit, to the cathode), the electric current generated by a battery is DC. A battery continues to generate current until all the chemicals inside it have been used up by the electrochemical process. The AAA-, AA-, C-, and D-size batteries that you can buy almost anywhere each generate about 1.5 volts – regardless of size. The difference in size amongst those batteries has to do with how much current can be drawn from them. The larger the battery, the more current can be drawn, and the longer it lasts. Larger batteries can handle heavier loads, which is just a way of saying that they can produce more power
(remember, power = voltage × current), so that they can do more work.
Technically speaking, real batteries are only formed from connected
sub-batteries called cells. When you connect several cells together, as you often
The symbol commonly used to represent a battery in a circuit diagram is shown below. The plus sign signifies the cathode and the minus sign signifies the anode. Usually the voltage is shown alongside the symbol.
+
−
Using alternating current
from the power station
When you plug a light into an electrical socket in your home, you’re using electrical energy that originates at a generating plant. Generating plants convert energy from resources like water, coal, oil, natural gas or uranium
into electrical energy. That’s why electrical energy is said to be a secondary
energy source: it’s generated through conversion of a primary energy source.
Many plants use the heat energy generated by nuclear reactions or the burn-ing of fossil fuels to transform water into steam. Then the steam exerts pres-sure on the fins of a turbine, causing it to turn. Hydroelectric power plants located at dams use water pressure and windmills use wind energy to rotate turbines. Power plant turbines are connected to electromechanical genera-tors, which convert mechanical energy (the motion of the turbine) into elec-trical energy. A generator contains a coil of wire inside a huge magnet. As the turbine rotates, it turns the coil of wire, and – hey presto! – electrical current is induced in the wire. That’s just a technical way of saying that something is causing electrons to flow, without any direct contact with the wire.
Electron flow can be induced by moving a wire near a magnet, or moving a
magnet near a wire. This technique is called electromagnetic induction, and it
works thanks to the close relationship between magnetism and electricity. We mention this relationship again in Chapter 5 when we discuss inductors.
As the coil rotates inside the magnet, the magnet first causes the electrons to flow in one direction, but when the coil has rotated 180 degrees, the magnet pulls the electrons in the other direction and they go right back again. This
rotation creates alternating current (AC).
rotation is called a cycle. The number of cycles per second in alternating
current is known as frequency and is measured in units called Hertz,
abbrevi-ated to Hz. The UK and most of Europe generate AC at 50 Hertz, whereas the United States and many other countries use 60 Hertz as a standard.
AC is stepped up, or transformed to higher voltages, for transmission across
long distances. When the current reaches its destination, it’s stepped down
to lower voltages (230 volts in the UK, for example) for distribution to homes and businesses. The symbol used in circuit diagrams for an AC voltage source is shown below:
∼
Making (sine) waves
AC is constantly changing, so you can’t describeits strength with a single number, as you can with DC. A common way to discuss its varia-tions is to look at a waveform, or the pattern of the voltage over time. The AC waveform shows how the changing voltage causes electrons to flow in one direction (the positive region of the graph below) and then the other (the negative area). The instantaneous current is the strength of the current at a single point in time, and peak current is the magnitude (absolute value) of the current at its highest and lowest point. Because you can use the mathematical sine function to calculate the current for a given time, AC waveforms are often referred to as sine waves. (If you think that you can smell trigonometry,
you’re right, but don’t worry – you don’t need to wipe the dust off your school maths books! We just want you to be aware of the term ‘sine’ as it’s used in electronics.)
The peak voltage (symbolised by Vp) is the mag-nitude of the highest voltage. You may hear the term peak-to-peak voltage (symbolised by Vpp), which is a measure of the difference between the highest and lowest voltage on the wave-form, or twice the peak value. Another term thrown around is rms voltage (symbolised by Vrms), which is short for root-mean-square volt-age and is used to work out how much power is in use in AC circuits. To get the rms voltage, you multiply the peak value by 0.7071.
Many electronic devices, such as laptop computers for instance, require a steady DC supply, so if you’re using AC to supply an electronic device or
cir-cuit, you need to convert AC to DC. Regulated power supplies, also known as
AC-to-DC adapters, or AC adapters, convert AC to DC and are commonly included with electronic devices when purchased. Think of your mobile phone charger; this little device essentially converts AC power into DC power that the battery in your phone uses to charge itself back up.
Transforming light into electricity
Solar cells, also known as photovoltaic cells, produce a small voltage when
you shine light on them. They’re made from semiconductors, which are
mate-rials that are somewhere between conductors and insulators in terms of their willingness to conduct electrons. (We discuss semiconductors in detail in Chapter 6.) The amount of voltage produced by a solar cell is fairly constant no matter how much light you shine on it, but the strength of the current you can draw depends on the intensity of the light: the brighter the light, the higher the available current.
Solar cells have wires attached to two terminals for conducting electrons through circuits, so that you can power your calculator or garden lights. You may notice panels of solar cells powering road signs or parking meters or see pictures of satellites with large solar cell arrays on each side. Solar panels are becoming increasingly popular for supplying electrical power to homes and businesses as a way to reduce utility costs. If you scour the Internet you can find lots of information on how to make your own solar panels for just a couple of hundred pounds – and a willingness to try. You can read more about this
subject in Solar Power Your Home For Dummies by Rik DeGunther (Wiley).
Understanding Directions: Real Electron
Flow versus Conventional Current Flow
Figure 2-2:
Conventional current is the flow of a positive charge from positive to nega-tive voltage and is just the reverse of real electron flow. All descriptions of electronic circuits use conventional current, so if you see an arrow depicting current flow in a circuit diagram, you know that it’s showing the direction
of conventional current flow. The symbol, I, is used to represent conventional current, which is measured in amperes (or amps, abbreviated to A). You’re more likely to encounter milliamps (mA) in circuits you build at home. A mil-liamp is one one-thousandth of an amp.
In AC circuits, current is constantly reversing direction. So how do you show current flow in a circuit diagram? Which way should the arrow point? The answer is that it doesn’t matter. You arbitrarily pick a direction for current flow (known as the reference direction), and you label that current I. The value of I fluctuates up and down as the current alternates. If the value of I is nega-tive, that just means that the (conventional) current is flowing in the opposite direction to the way the arrow is pointing.
Examining a Simple Light Bulb Circuit
The diagram in Figure 2-3 depicts a battery-operated circuit that lights a bulb, much like you find in a torch. What you see in the figure is a circuit diagram, or schematic, that shows all the components of the circuit and how they’re connected. We discuss schematics in detail in Chapter 10.
which current flows (conventional current, of course). The negative sign near the battery symbol indicates the negative terminal of the battery, to which the current flows when it makes its way around the circuit. The arrow in the circuit indicates the reference direction of current flow, and because it’s pointing away from the positive terminal of the battery in a DC circuit, you can expect the value of the current to be positive all the time.
Figure 2-3:
The lines in the circuit diagram show how the circuit components are con-nected, using wire or other connectors. (We discuss various kinds of wire and connectors in Chapter 8.) Switches and other circuit components are
usually made with leads, consisting of protruding wires connected to the
innards of the component that provide the means to connect the component to other circuit elements.
Next to the battery is a switch, which simply opens and closes the circuit, allowing current to flow out of the battery or stopping it dead in its tracks. If the switch is closed, current flows out of the battery through the light bulb, where electrical energy is dissipated as light and heat, and back into the negative terminal of the battery. If the switch is open, current doesn’t flow at
all through this open circuit.
The battery supplies electrical energy and the light bulb uses electrical
When you drop voltage across a light bulb or other component, the voltage where the current enters the component is higher (or more positive) than the voltage where the current exits the component. Voltage is a relative measurement, comparing one point in a circuit to another, which is why you
sometimes see voltage called voltage drop, potential difference, or potential drop.
The voltage at any point in a circuit is always relative to the voltage at some other point – usually the negative terminal of the battery.
An analogy that may help you understand: measuring voltage is much like measuring distance. If someone asks you, ‘What’s the distance?’, you prob-ably say, ‘Distance from what?’ Similarly, if you’re asked, ‘What’s the voltage at the point in the circuit where the current enters the light bulb?’ you should ask, ‘With respect to what point in the circuit?’ On the other hand, you may say, ‘I’m five miles from home’, stating your distance from a reference point (home). So if you say, ‘The voltage where the current enters the bulb is 1.5 volts with respect to ground’, that makes perfect sense. (See the sidebar ‘Standing your ground’ for more about the term ‘ground’.)
If you start at the negative terminal of the battery in our simple light bulb cir-cuit and travel all the way around the circir-cuit measuring voltages, you can see that the voltage at the positive terminal of the battery is 1.5 volts, and all that 1.5 volts is dropped across the light bulb. (In reality, the switch eats up a tiny bit of voltage, because even the best conductors use up some energy, but the amount is negligible compared to the voltage drop across the light bulb.)
The important thing to notice here is that as you travel around a DC circuit, you gain voltage going from the negative terminal of the battery to the positive
terminal (that’s known as a voltage rise), and you lose or drop voltage as you
continue in the same direction across circuit components. By the time you get back to the negative terminal of the battery, all the battery voltage has been dropped and you’re back to 0 volts. With all circuits (AC or DC), if you start at
any point in the circuit and add up the voltage rises and drops going around
the circuit, you end up back where you started. The net sum of the voltage rises and drops around a circuit is zero.
You can measure the voltage drop across the light bulb using a voltmeter
(which we discuss in detail in Chapter 12). And if you multiply the voltage
across the bulb (that’s a common way of saying voltage drop) by the strength of the current running through it, you get the power dissipated in the bulb
(power = voltage × current) in watts.
Controlling Electrical Current
with Basic Components
If you start to build the simple light bulb circuit discussed in the preceding section and you don’t have a 1.5-volt battery available, you may think that it’s okay to use the 9-volt battery you found in the kitchen drawer. After all, 9 volts is more than 1.5 volts, so the battery should provide enough energy to light the bulb. If you do use the 9-volt battery, however, your little circuit draws a lot more current – and you may overload your light bulb. If too many electrons are allowed to flow through a filament, the electrical energy dissi-pated in the filament creates so much heat that the bulb bursts.
Standing your ground
In electronics, the word ground can have twodifferent meanings. Earth ground means pretty much what it says: it’s a direct connection to the ground – real ground. The top pin in a three-pin plug is connected to earth ground. Behind each wall socket is a wire that runs through your house or office and eventually connects to a metal post that makes good contact with the ground. This provides extra protection for circuits that use large amounts of current, by providing a path to sink dangerous current directly into the earth. Benjamin Franklin’s light-ning rod provided a direct path for dangerous lightning to hit the ground – instead of a house or person (see Chapter 1). The term floating ground refers to a circuit that’s not connected to earth ground and may be dangerous. You’re wise to stay away from such a circuit until it’s safely earthed!