Windows® 7 Resource
Kit
Mitch Tulloch,
Tony Northrup,
and Jerry Honeycutt
To learn more about this book, visit Microsoft Learning at
http://www.microsoft.com/MSPress/books/
Table of Contents
Chapter 1 Overview of Windows 7 Architecture
Chapter 2 Security in Windows 7
Chapter 3 Deployment Platform
Chapter 4 Planning Deployment
Chapter 5 Testing Application Compatibility
Chapter 6 Developing Disk Images
Chapter 7 Migrating User State Data
Chapter 8 Deploying Applications
Chapter 9 Preparing Windows PE
Chapter 10 Configuring Windows Deployment Services
Chapter 11 Using Volume Activation
Chapter 12 Deploying with Microsoft Deployment Toolkit
Chapter 13 Overview of Management Tools
Chapter 14 Managing the Desktop Environment
Chapter 15 Managing Users and User Data
Chapter 16 Managing Disks and File Systems
Chapter 17 Managing Devices and Services
Chapter 19 Managing Printing
Chapter 20 Managing Search
Chapter 21 Managing Internet Explorer
Chapter 22 Maintaining Desktop Health
Chapter 23 Support Users with Remote Assistance
Chapter 24 Managing Software Updates
Chapter 25 Managing Client Protection
Chapter 26 Configuring Windows Networking
Chapter 27 Configuring Windows Firewall and IPsec
Chapter 28 Connecting Remote Users and Networks
Chapter 29 Deploying IPv6
Chapter 30 Configuring Startup and Troubleshooting Startup
Issues
Chapter 31 Troubleshooting Hardware, Driver, and Disk Issues
Chapter 32 Troubleshooting Network Issues
Chapter 33 Troubleshooting Stop Messages
C H A P T E R 2 3
Supporting Users Using
Remote Assistance
Remote Assistance in Windows Vista included improvements in connectivity, performance, usability, and security along with feature enhancements that make it even more useful than Remote Assistance in Windows XP. Windows 7 builds upon these earlier improvements with Easy Connect, a new feature of Remote Assistance in Windows 7 that makes it easier than ever for novice users to request help from expert users and for experts to offer help to novices. With increased Group Policy support, command-line scripting capabilities, session logging, bandwidth optimization, and more, Remote Assistance is now an essential tool for enabling enterprises to support users in Help Desk scenarios. This chapter examines how Remote Assistance works in Windows 7, how to use it to support end users, and how to manage it using Group Policy and scripts.
Understanding Remote Assistance
Supporting end users is an essential function of IT departments and the corporate Help Desk. Unfortunately, conventional technical support provided over the telephone or using chat tools is generally cumbersome and inefficient. As a result, supporting users is often both time-consuming and costly for large enterprises to implement. For example, end users often have difficulty describing the exact nature of the problem they are having. Because of their general inexperience and lack of technical knowledge, end users may try to describe their problem using nontechnical, inexact language. As a result, Help Desk personnel are generally reduced to asking a series of simple questions to try to isolate the problem the user is having. The methodical nature of these questions sometimes causes users to feel as if Help Desk personnel are being condescending, and such misunderstandings can reduce the
effectiveness of the support experience and can make users tend to avoid contacting support personnel when future problems arise.
Accessories can require several sentences or more, and this kind of communication can add time to support incidents, making them more costly to the company.
Remote Assistance (RA) solves these problems by enabling support personnel to view the user’s desktop in real time. The user seeking assistance can demonstrate the nature of the problem to the support person. This is a quicker and more efficient way to communicate a problem than using words or e-mail. If necessary, the user can also give the support person permission to assume shared interactive control of the user’s computer to show the user how to resolve the problem. The result of using Remote Assistance is faster problem resolution, an improved support experience, and a lower Total Cost of Ownership (TCO) for supporting end users in large, corporate environments.
Remote Assistance vs. Remote Desktop
Remote Assistance and Remote Desktop are different features of Windows 7 that have entirely different uses. Remote Desktop is based on Microsoft Terminal Services and is a tool for remotely logging on to remote computers. When you use Remote Desktop to connect to a remote computer, a new user session is established. Remote Desktop can also establish sessions with computers that have no interactive sessions running (no users logged on locally), such as headless servers. For more
information on Remote Desktop, see Chapter 28, ―Connecting Remote Users and Networks.‖
Remote Assistance, on the other hand, is a tool for interactively helping users troubleshoot problems with their computers. To use Remote Assistance, both the User (also called the Novice) and the Helper must be present on their computers. Unlike Remote Desktop, Remote Assistance does not create a new session. Instead, Remote Assistance allows the Helper to work in the existing session of the User. The
User’s desktop gets remoted to the Helper, who can then view the User’s desktop and, with the User’s consent, share control of the desktop.
Here is another way to summarize the difference between these two features: In Remote Assistance, both users involved are looking at the same desktop using the same logon credentials (those of the interactively logged-on User) and can share control of that desktop; in Remote Desktop, when the remote person logs on, the interactively logged-on user (if one exists) is logged out.
Improvements to Remote Assistance in Windows 7
Remote Assistance in Windows 7 builds upon the many enhancements introduced earlier for this feature in Windows Vista. These earlier enhancements improved upon the earlier Windows XP implementation of Remote Assistance and included: An improved user interface that is easier to launch and use
A standalone executable (Msra.exe) that accepts command-line arguments and can easily be scripted
Improved overall performance with a smaller footprint, quicker startup and connect times, and optimized bandwidth usage for screen updates
Enhanced security with mandatory password and integration with UAC
New Offer RA via IM scenario and an open API for integration with peer-to-peer applications
Additional Group Policy settings for improved manageability
In addition to these Windows Vista enhancements for Remote Assistance, Windows 7 adds the following new enhancements to Remote Assistance:
Easy Connect, a new method for soliciting RA that uses the peer-to-peer collaboration infrastructure to simplify RA user interactions.
An improved RA connection wizard that makes it easier than ever for users to solicit or offer help.
New command-line arguments for the RA executable (Msra.exe)
Remote Assistance in Windows 7 and Vista deprecate the following features that were available on Windows XP:
No more support for the MAILTO method of solicited Remote Assistance No more support for voice sessions
For information on interoperability between the Windows XP, Windows Vista and Windows 7 versions of Remote Assistance, see the section titled ―Interoperability with Remote
Assistance in Windows XP‖ later in this chapter.
How Remote Assistance Works
In Remote Assistance, the person needing help is referred to as the User (or Novice), and the support person providing assistance is called the Helper (or Expert). You launch RA from the Start menu by navigating to All Programs, clicking Maintenance, and then selecting Windows Remote Assistance. You can also launch RA from a command prompt by typing msra.exe.
Remote Assistance has two basic modes of operation:
Solicited RA In Solicited RA (also known as Escalated RA) the User requests assistance from the Helper by initiating the RA session using e-mail, instant messaging, or by providing the Helper with a saved copy of an invitation file (*.MsRcIncident). Each of these methods uses a different underlying mechanism: Solicited RA using e-mail This method requires that the e-mail clients being
Examples of SMAPI-compliant e-mail clients include Windows Mail, which was included in Windows Vista, and Microsoft Office Outlook 2007. Windows 7 does not have a built-in e-mail SMAPI-compliant client, but you can install Windows Live Mail, which is available for download as part of the Windows Live Essentials suite of applications (see http://get.live.com). Web-based email services such as Windows Live Hotmail are not SMAPI-compliant and cannot be used for soliciting or offering RA using e-mail. In this approach, the User launches the RA user interface to create an e-mail message that has an RA invitation file
(*.MsRcIncident) attached to the message. The User must specify a password for the RA session, which must be communicated to the Helper using an out-of-band (OOB) method such as calling the Helper on the telephone. When the Helper receives the User’s RA invitation, she opens the attached ticket, enters the password that was conveyed by the User, and the RA session starts. The Helper must respond to the invitation from the User within a specified time limit (the default is 6 hours), or the invitation will expire and a new one will need to be sent. In a domain environment, this ticket lifetime can also be configured using Group Policy. See the section titled ―Managing Remote Assistance Using Group Policy‖ later in this chapter.
Solicited RA using file transfer This method requires that both the User and Helper have access to a common folder (such as a network share on a file server), or that they use some other method for transferring the file (for example, by using a USB key to manually transfer the file or by uploading the file to an FTP site). The user creates an RA invitation file and saves it in the shared folder. The User must provide a password that must be communicated to the Helper using an out-of-band (OOB) method such as a telephone call. The Helper retrieves the ticket from the shared folder, opens it, enters the password, and the RA session starts. Again, the Helper must respond to the invitation within a specified time, or the invitation will expire and a new one will be needed. (The expiration time is configurable through Group Policy.)
Rendezvous API, see the Windows SDK on MSDN at
http://msdn2.microsoft.com/en-us/library/aa359213(vs.85).aspx.
Solicited RA using Easy Connect This method for soliciting assistance is new in Windows 7 and uses Peer Name Resolution Protocol (PNRP) to enable direct peer-to-peer transfer of the RA invitation using the cloud. To establish the initial RA session, the User only needs to communicate a password to the Helper using an OOB method such as by telephone. The Helper uses this password to obtain the RA invitation from the cloud and initiate the session. Once the initial RA
connection has been made, a trust relationship is established between the Helper and the User. This trust relationship is established through the exchange of contact and certificate information. Subsequent interactions are simplified since the contact information can be used to pick a Helper who is currently available. For more information on this method for soliciting assistance, see the section titled "Scenario 1: Soliciting Remote Assistance Using Easy Connect" later in this chapter. For information on how Easy Connect works, see the sidebar titled "Direct from the Source: How Easy Connect Works" later in this chapter. For information on how PNRP works, see the sidebar titled "How it Works: PNRP and Microsoft P2P Collaboration Services" later in this chapter.
How It Works: RA Invitation Files
Remote Assistance invitation files (.MsRcIncident) are XML-formatted file documents
that include information used by the Helper’s computer that will attempt to connect.
This ticket information is encrypted to prevent unauthorized users from accessing the information if e-mail or file transfer is used to send the invitation over an unsecured network.
If the e-mail method is used to send the invitation file to the Helper, the invitation file is sent as an e-mail attachment with a filename of RATicket.MsRcIncident. If the file transfer method is used instead, the invitation file is created by default on the desktop
of the User’s computer, and the filename of the invitation is Invitation.MsRcIncident.
Unsolicited RA In Unsolicited RA (also known as Offer RA), the Helper offers help to the User by initiating the RA session.
method also requires that the Helper either knows the name (the host name on a local subnet; the fully qualified name otherwise) or address (IPv4 or IPv6) of the User’s computer.
Offer RA using Instant Messaging This method for offering assistance requires that the instant messaging (IM) applications being used by both the User and the Helper support the Rendezvous API. In this approach, the Helper offers assistance to someone on her buddy list. If the buddy agrees, he must enter a password to be used by the Helper. The password must be relayed by an OOB mechanism to ensure that the remote person is really the User’s buddy (and not someone masquerading as the buddy). For more information on the Rendezvous API, see the Windows SDK on MSDN at
http://msdn2.microsoft.com/en-us/library/aa359213(vs.85).aspx.
How it Works: PNRP and Microsoft P2P Collaboration Services
The Microsoft P2P network and collaboration technologies are designed to enable the next generation of peer-to-peer scenarios, including shared workspaces, distributed computing, and even load balancing. These P2P technologies allow users to securely communicate and share information with each other without requiring a central server to be involved. Because P2P technologies are designed to work in networking environments with transient connectivity—such as an ad hoc wireless network established between several laptops at a coffee shop—they cannot rely on the server-based Domain Name System (DNS) to perform name resolution between peers. Instead, P2P name resolution is based on the Peer Name Resolution Protocol (PNRP), a mechanism for distributed, serverless name resolution of peers in a P2P network.
PNRP works by utilizing multiple groupings of computers called clouds. These clouds correspond to two different scopes of IPv6 addresses:
Global clouds Any given computer will be connected to a single Global cloud. For computers with IPv6 Internet connectivity, the Global cloud is Internet-wide. In networks where computers do not have IPv6 Internet connectivity, but still have Global IPv6 addresses (such as firewalled corporate environments), the Global cloud is network-wide.
Link-local clouds One or more clouds, each corresponding to nodes within the same subnet or network link (link-local addresses and the link-local address scope).
IPv6 address and port. Peer names are represented by identifiers (IDs) that are 32 bytes long and can be either unsecured (names that can be spoofed) or secured (names that cannot be spoofed because they are derived from a public/private key pair owned by the publisher).
The underlying name resolution functions on PNRP IDs within a cloud are stored in a
distributed fashion in a cache on each peer within the cloud, with each peer’s cache
containing only a portion of the names for all the peers in the cloud. When a peer (the issuing peer) wants to resolve the name of another peer (the targeted peer) to its published address and port number, it follows these steps:
1. The issuing peer first consults its own PNRP cache for this information. If it finds this information, it sends a PNRP Request message to the targeted peer and waits for a response. These Request messages serve the function of enabling peers to communicate to other peers their active involvement within the cloud.
2. If the issuing peer does not find this information, it sends the Request message to the peer whose ID most closely matches (is closest numerically to) that of the targeted peer. The peer that receives this message then consults its own cache. If it finds a closer match or the match itself, it returns this information to the
requesting peer. The requesting peer then goes to the returned peer and the process continues until the resolution succeeds or fails.
3. If the peer that receives this message does not find closer information in its cache, it returns the message to the issuing peer, indicating that it does not know the targeted peer. The issuing peer then repeats the previous step by sending a message to the peer whose ID next most closely matches that of the targeted peer. This process continues until the targeted peer is found (if present on the network) or not found (is no longer present within the cloud).
Looping is prevented by including in the Request message the list of peers that have already forwarded requests.
For more information on how PRNP and other Microsoft P2P technologies work, see
http://technet.microsoft.com/en-us/library/bb742623.aspx on Microsoft TechNet.
Remote Assistance Operational States
Remote Assistance has three operational states: Waiting For Connect This state occurs when either:
The User has sent the Helper an invitation but the Helper has not yet responded by opening the invitation, or the Helper has opened the invitation and the User has not yet agreed to allow the Helper to connect to his computer.
In the Waiting For Connect state, the Helper cannot view or control the screen of the User’s computer until an RA connection has been established and both computers have entered the Screen Sharing state. After the RA application has been started and is running in the Waiting For Connect state, the application should not be closed until the other party responds and establishes the connection. For example, if the User uses the Solicit RA Using E-mail method and sends an invitation file to a Helper, the RA application opens on the User’s computer and waits for the Helper to accept the invitation. If the User closes RA on her computer before the Helper accepts the invitation, the Helper will not be able to connect to the User’s computer and the User will need to send a new invitation.
Screen Sharing This state occurs when the User has consented to allow the Helper to connect to his computer—either after the User has sent the Helper an invitation or the Helper has offered RA to the User. In the Screen Sharing state, an RA session has been established and the Helper can view—but not control—the screen of the User’s computer.
When the User is prompted for consent to allow the Helper to connect to his computer, a warning message appears on the User’s computer saying that the Helper wants to connect to his computer. This warning message is customizable using Group Policy. See the section titled ―Managing Remote Assistance Using Group Policy‖ later in this chapter for more information.
Control Sharing This state occurs after the Screen Sharing state, when the Helper has requested control of the User’s computer and the User has consented to allow the Helper to have shared control of his computer. In the Control Sharing state, the Helper has the same level of access to the User’s computer that the User has, and the Helper can use his own mouse and keyboard to remotely perform actions on the User’s computer. Specifically:
If the User is a standard user on his computer, the Helper will be able to perform only those actions on the User’s computer that can be performed by a standard user on that computer.
If the User is a local administrator on his computer, the Helper will be able to perform any actions on the User’s computer that can be performed by a local administrator on that computer.
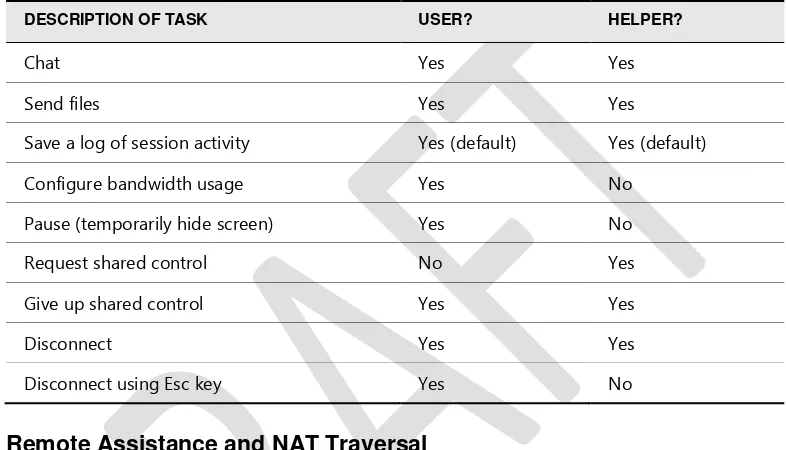
User vs. Helper Functionality
[image:13.531.69.462.125.350.2]After an RA connection has been established and both computers have entered the Screen Sharing state, the User and Helper are able to perform the tasks listed in Table 23-1.
Table 23-1 Tasks That Can Be Performed by User and Helper During an RA Session
DESCRIPTION OF TASK USER? HELPER?
Chat Yes Yes
Send files Yes Yes
Save a log of session activity Yes (default) Yes (default)
Configure bandwidth usage Yes No
Pause (temporarily hide screen) Yes No
Request shared control No Yes
Give up shared control Yes Yes
Disconnect Yes Yes
Disconnect using Esc key Yes No
Remote Assistance and NAT Traversal
Remote Assistance works by establishing a peer-to-peer connection between the User’s computer and the Helper’s computer. One challenge this poses is that it can be difficult to establish peer-to-peer connections if one or both of the computers involved are behind a gateway or router that uses Network Address Translation (NAT). NAT is an IP routing technology described by RFC 1631 that is used to translate IP addresses and TCP/UDP port numbers of packets being forwarded. NAT is typically used to map a set of private IP addresses to a single public IP address (or to multiple public addresses). Home networks using a wireless or wired router also use NAT technology.
To overcome this difficulty, Windows 7 and Windows Vista include built-in support for Teredo, an IPv6 transition technology described in RFC 4380 that provides address
enterprises that need to remotely support users who work from home, see the section titled ―Other Possible Remote Assistance Usage Scenarios‖ later in this chapter.
Note Offering RA using DCOM is not usually a Teredo scenario, because enterprise
users are behind a corporate firewall and are not separated from each other by NATs.
Remote Assistance will not connect in certain configurations. Specifically:
Teredo cannot traverse a symmetric NAT. Remote Assistance can connect only across restricted NATs and cone NATs. In most cases, this is not a significant limitation, because the large majority of deployed NATs are either the restricted or cone variety. For more information on NAT traversal support in Windows 7, see Chapter 29, ―DeployingIPv6.‖
RA will not work if the NAT-enabled router is configured to block the specific ports used by RA. See the section titled ―Remote Assistance and Windows Firewall‖ later in this chapter for more information.
Remote Assistance will not work if the user’s NAT-enabled router is configured to block all UDP traffic.
Note To determine the type of NAT a network is using, open an elevated command
prompt and type netsh interface teredo show state.
For more information on IPv6 support in Windows 7, including built-in client support for Teredo and other IPv6 transition technologies, see Chapter 29.
To verify whether your NAT supports Remote Assistance, you can use the Internet Connectivity Evaluation Tool at
http://www.microsoft.com/windows/using/tools/igd/default.mspx. If your NAT supports Universal Plug and Play (UPnP), then RA should be able to get a global IPv4 address that allows anyone to connect to you. If your NAT supports Teredo/IPv6 and you are running Windows 7 or Windows Vista, then an RA helper that is running Windows 7 or Windows Vista and is Teredo enabled should be able to connect to you.
Remote Assistance and IP Ports Used
The ports used by a Remote Assistance session depend on which version of Windows is running on the two computers involved in the session. Specifically:
Windows 7 to XP or Windows Vista to Windows XP Port 3389 TCP (local/remote) In addition, the Offer RA via DCOM scenario uses Port 135 (TCP).
Note If you are concerned about opening the DCOM port (TCP port 135) on your
corporate firewall and want to avoid doing this but still be able to offer RA to remote users, you can do so by using Authenticated IPsec Bypass as described in http://technet2.microsoft.com/windowsserver/en/library/0e79765c-beb2-4e5e-8a74-ea7d07598f821033.mspx?mfr=true.
Remote Assistance and Windows Firewall
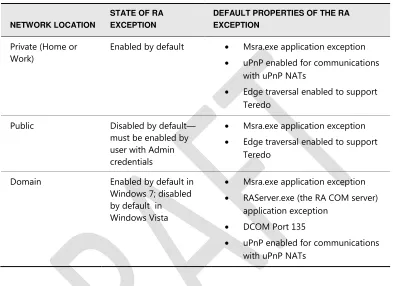
The Windows Firewall is configured with a group exception for Remote Assistance. This group exception has multiple properties that are grouped together as part of the RA exception. The RA exception properties will change depending on the network location of the computer (private, public, or domain). For example, the default RA exception when the computer is in a public location is stricter than when the computer is in a private location. In a public location (such as an airport), the RA exception is disabled by default and does not open ports for Universal Plug-and-Play (UPnP) and Simple Service Discovery Protocol (SSDP) traffic. In a private network (a home or work network, for example) the RA exception is enabled by default and uPnP and SSDP traffic is permitted. In a domain-based enterprise environment, the RA exception is typically managed using Group Policy and is enabled by default in Windows 7 (it was disabled by default in Windows Vista).
The default configuration of the Remote Assistance exception in Windows Firewall varies depending on the firewall profile. Specifically:
Private profile The RA exception in the Windows Firewall is enabled by default when the computer location is set to Private. It is configured for NAT traversal using Teredo by default so that users in a private networking environment (for example, the home environment) can solicit help from other users who may also be behind NATs. The private profile includes the appropriate exceptions needed to allow communication with uPnP NAT devices. If a uPnP NAT is in this environment, Remote Assistance will attempt to use the uPnP for NAT traversal. Offer RA via DCOM is not configured in this profile.
Public profile The RA exception is disabled by default and no inbound RA traffic is permitted. Windows Firewall is configured this way by default to better protect users in a public networking environment (such as a coffee shop or airport terminal). When the RA exception is enabled, NAT traversal using Teredo is enabled. However, traffic to uPnP devices is not enabled, and Offer RA via DCOM is not enabled.
Windows 7 and is typically managed via Group Policy. Teredo is not enabled in this profile because corporate networks typically have a corporate firewall that blocks Teredo UDP traffic. However, uPnP is enabled so that uPnP NATs can be
[image:16.531.69.445.148.558.2]communicated with.
Table 23-2 Default State of Remote Assistance Firewall Inbound Exception for Each Type of Network Location
NETWORK LOCATION
STATE OF RA EXCEPTION
DEFAULT PROPERTIES OF THE RA EXCEPTION
Private (Home or Work)
Enabled by default Msra.exe application exception uPnP enabled for communications
with uPnP NATs
Edge traversal enabled to support Teredo
Public Disabled by default—
must be enabled by user with Admin credentials
Msra.exe application exception Edge traversal enabled to support
Teredo
Domain Enabled by default in Windows 7; disabled by default in Windows Vista
Msra.exe application exception RAServer.exe (the RA COM server)
application exception DCOM Port 135
uPnP enabled for communications with uPnP NATs
Remote Assistance and the Secure Desktop
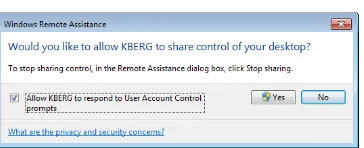
When a User consents to having a Helper share control of her computer during a Remote Assistance session, the User has the option of allowing the Helper to respond to UAC prompts (Figure 23-1). Typically, User Account Control (UAC) prompts appear on the Secure Desktop (which is not remoted), and consequently the Helper cannot see or respond to Secure Desktop prompts. The Secure Desktop mode is the same mode that a user sees when she logs on to her computer or presses the Secure Attention Sequence (SAS) keystroke
Figure 23-1 The User has the option of allowing the Helper to respond to UAC prompts when the RA session is in Control Sharing State.
It is important to understand that the Secure Desktop on the User’s computer is not remoted to the Helper’s computer. In other words, the Helper can only respond to UAC prompts on the User’s computer using the User’s own credentials. This means that if the User is a Standard user on her computer and the Helper is a local administrator on the User’s computer, the Helper can only have administrative privileges on the User’s computer if the User can first supply those credentials.
Enforcing this limitation is essential to ensure the security of Windows 7 desktops. The reason behind this design decision is that if RA was architected to allow the Helper to
remotely elevate the User’s privileges, the User would be able to terminate the RA session and thus steal local administrative credentials from the Helper.
Remote Assistance Logging
Remote Assistance can generate a session log of RA-associated activity. Session logging is enabled by default and consists of time stamped records that identify RA-related activities on each computer. Session logs only contain information about activities that specifically relate to RA functionality, such as who initiated the session, if consent was given to a request for shared control, and so on.
Session logs do not contain information on actual tasks that the User or Helper performed during a session. For example, if the Helper is given Shared Control privileges, starts an Admin command prompt, and performs steps to reconfigure the TCP/IP configuration on the User’s computer during an RA session, the session logs will not contain a record of this action.
Session logs do include any chat activity performed during an RA session. The log
generated during a session is also displayed within the chat window so that both the User and the Helper can see what is being logged during the session. Session logs also include any file transfer activity that occurs during the session, and they also record when the session has been paused.
PURPOSE OF RA SESSION LOGGING
in a banking environment, where a financial institution is required by law to maintain records of who accessed a computer and at what time.
Because the ACLs on these session logs grant the User full control over logs stored on her own computer, by default, session logs are generated on both the User’s computer and Helper’s computer so that the Helper can archive them and protect them from tampering. The logs created on each side of an RA session are similar but not identical. This is because session logs are generated from the perspective of the computer involved—whether the User’s computer orthe Helper’s computer—and therefore complement each other instead of being identical.
In an enterprise environment, Group Policy can be used to enable or disable session logging. If session logging is not configured using Group Policy, both the User and Helper are free to disable session logging on their own computers. For more information, see the section titled ―Managing Remote Assistance Using Group Policy‖ later in this chapter.
SESSION LOG PATH AND NAMING CONVENTION
Session logs are XML-formatted documents so that they can be easily integrated into other data sets—for example, by importing them into a database managed by Microsoft SQL Server 2005. All session logs are stored under each user’s Documents folder within the following path:
Users\user_name\Documents\Remote Assistance Logs
A unique session log file is created for each RA session on the computer. Log files stored within this folder are formatted using XML and are named using the convention
YYYYMMDDHHMMSS.xml, where the time format is 24-hour. For example, a session log created at 3:45:20 P.M. on August 13, 2006, would be named 20060813154520.xml.
The XML content of a typical session log looks like this:
<?xml version="1.0" ?> <SESSION>
<INVITATION_OPENED TIME="3:24 PM" DATE="Wednesday, May 07, 2008" EVENT="A Remote Assistance invitation has been opened." />
<INCOMING_IP_ADDRESS TIME="3:26 PM" DATE="Wednesday, May 07, 2008">fe80::2856:e5b0: fc18:143b%10</INCOMING_IP_ADDRESS>
<CONNECTION_ESTABLISHED TIME="3:26 PM" DATE="Wednesday, May 07, 2008" EVENT="A Remote Assistance connection has been established.">jdow</CONNECTION_ESTABLISHED>
<EXPERT_REQUEST_CONTROL TIME="3:27 PM" DATE="Wednesday, May 07, 2008" EVENT="jdow has requested to share control of the computer." />
<EXPERT_GRANTED_CONTROL TIME="3:27 PM" DATE="Wednesday, May 07, 2008" EVENT="jdow has been granted permission to share control of the computer." />
<EXPERT_CONTROL_STARTED TIME="3:27 PM" DATE="Wednesday, May 07, 2008" EVENT="jdow is sharing control of the computer." />
sharing control of the computer." />
<CHAT_MESSAGE TIME="3:30 PM" DATE="Wednesday, May 07, 2008">jdow: test</CHAT_MESSAGE> <CHAT_MESSAGE TIME="3:30 PM" DATE="Wednesday, May 07, 2008">jchen: ok</CHAT_MESSAGE> <CONNECTION_ENDED TIME="3:30 PM" DATE="Wednesday, May 07, 2008" EVENT="The Remote Assistance connection has ended." />
<INVITATION_CLOSED TIME="3:30 PM" DATE="Wednesday, May 07, 2008" EVENT="A Remote Assistance invitation has been closed." />
</SESSION>
Using Remote Assistance in the Enterprise
The main Remote Assistance scenario within a corporate networking environment is supporting desktop computers that are on the corporate network and joined to a domain. Users’ computers must be configured appropriately before they can be offered RA. This is done via Group Policy, as explained in the section titled ―Managing Remote Assistance Using Group Policy‖ later in this chapter. Additionally, the Remote Assistance exception in the Windows Firewall must be enabled. For more information, see the section titled ―Remote Assistance and Windows Firewall‖ earlier in this chapter.
Because most corporate networks have a perimeter firewall blocking access from outside the internal network, supporting remote users who are connecting from outside the corporate network can be more difficult. However, most enterprises now use virtual private network (VPN) technologies to allow remote users to connect to their corporate networks over the Internet, and this kind of scenario generally poses no problem to RA functionality.
Using Remote Assistance in the Corporate Help Desk Environment
The standard approach to using Remote Assistance in an enterprise environment is for Help Desk personnel to offer Remote Assistance to users who telephone in to request assistance. A typical scenario might be as follows:1. User Jane Dow (the User) is having problems configuring an application on her computer. She phones Help Desk, explains her problem briefly, and asks for help. 2. A Help Desk person named Jacky Chen (the Helper) asks Jane for the fully qualified
name or IP address of her computer. She responds with the information, which she can get from computer properties or by running ipconfig.
3. Jacky starts Remote Assistance on his computer and uses the Offer RA feature to offer help to Jane. This causes a dialog box to appear on Jane’s computer, asking her if she would like to allow Jacky to connect to her computer.
5. At this point, Jacky can see Jane’s screen, but he can’t control it. Jane then explains the problem she is having, either by using the Chat feature of Remote Assistance, or more likely over the telephone. Jacky asks Jane to perform a series of steps to correct the problem and watches her screen in his own Remote Assistance window as she does this.
6. If the instructions Jacky provides are too complex or if time is limited, Jacky can ask Jane if he can share control of her computer. If Jane agrees, Jacky clicks the Request Control button at the top of his Remote Assistance window. A dialog box appears on Jane’s desktop asking her if she wants to allow Jacky to share control of her desktop. Jane accepts the prompt and also selects the option to allow Jacky to respond to User Account Control (UAC) prompts on Jane’s computer.
7. Jacky is now connected to Jane’s computer using Jane’s credentials, and he can both view her screen and interact with it using his own mouse and keyboard. Jacky then proceeds to perform the steps needed to resolve the problem, either correcting the issue or demonstrating to Jane how to fix the problem if it occurs again in the future. If at any time Jane wants to force Jacky to relinquish control of her computer, she can click the Stop Sharing button or the Disconnect button, or she can press the Panic key (Esc).
Note Offer RA needs preconfiguration of the User’s computer via Group Policy. See the
section titled ―Managing Remote Assistance Using Group Policy‖ later in this chapter for
more information.
Other Possible Remote Assistance Usage Scenarios
Other types of Remote Assistance scenarios are also possible for businesses ranging from large enterprises to Small Office/Home Office (SOHO) environments. Examples of possible usage scenarios include:
A user who is having a problem with configuring an application on her computer can phone Help Desk for assistance. A support person can then use Offer RA to connect to the user’s computer, ask for control of her screen, and show the user how to configure her application. This scenario is the standard one for enterprise Help Desk environments and is described in more detail in the section titled ―Using Remote Assistance in the Corporate Help Desk Environment‖ later in this chapter.
A user is on the road and is connected to the internal corporate network using a VPN connection over the Internet. The user is having problems configuring Windows Mail on her computer, so she opens Windows Live Messenger and notices that someone she knows in Corporate Support is currently online. She sends an RA invitation to the support person using Windows Live Messenger, and that person responds to the invitation, asks for control, and shows the user how to configure Windows Mail.
A user who is having problems installing an application uses Easy Connect to request help from a support technician. Because this is the first time he has requested help from this particular support technician, the user must communicate the password for the session to the support technician using an out-of-band method such as making a telephone call. The next time the user needs help however, he won't have to provide a password because of the trust relationship that was established during the first RA session between them.
The preceding list is not intended to be complete—other corporate support scenarios using RA are possible. Generally speaking, however, corporate environments will use Offer RA to provide assistance to users who phone Help Desk when they have problems. Some enterprises may also allow users to submit RA invitations either via e-mail or by saving invitation files to network shares that are monitored by support personnel. Others may use instant messaging applications that support Remote Assistance within the corpnet.
Note Helpers can have multiple RA sessions open simultaneously—one session for
each User they are supporting. However, Users can have only one RA session in the Waiting For Connect state. The invitation that was created could be sent to multiple
recipients—any of whom may connect. All subsequent connect attempts will be
blocked until the first helper disconnects, after which another helper may connect. If the user disconnects the session, the RA application terminates and no further connections will be allowed.
Interoperability with Remote Assistance in Windows
Vista
Interoperability with Remote Assistance in Windows XP
Remote Assistance in Windows 7 is backward-compatible with Remote Assistance inWindows XP, with the following limitations:
Offer RA from Windows 7 to Windows XP is supported, but Offer RA from
Windows XP to Windows 7 is not supported. This means that enterprises who want to implement Offer RA as a support solution for their Help Desk departments should ensure that computers used by support personnel who will help users running Windows 7 are themselves running Windows 7 (and not Windows XP).
NAT traversal using Teredo and IPv6 is supported on Windows 7 to Windows 7 RA only, and not on Windows 7 to Windows XP.
Voice support for RA in Windows XP is not supported by RA in Windows 7, and any attempt by a User on an Windows XP computer to use this feature during an RA session with a Helper on a Windows 7 computer will cause a notification message regarding this limitation to appear.
The MAILTO method of soliciting assistance that is supported by RA in Windows XP is not supported by RA in Windows 7.
Windows Messenger (which shipped with Windows XP) does not ship with Windows 7. Users of RA with Windows Messenger in Windows XP will need to migrate to an IM application such as Windows Live Messenger that supports Windows 7 RA. Offer RA via Windows Live Messenger is a supported in Windows 7 but not in
Windows XP.
Windows XP does not support the new Easy Connect method for soliciting RA found in Windows 7. This means that a User on a Windows XP computer cannot use Easy Connect to solicit RA from a Helper on a Windows 7 computer, and a User on a Windows 7 computer cannot use Easy Connect solicit RA from a Helper on a Windows XP computer.
Implementing and Managing Remote Assistance
Remote Assistance is a powerful and flexible feature that can be used in many different ways to support users within large enterprises, medium-sized businesses, and SOHO environments. This section outlines how to initiate Remote Assistance sessions from both the UI and the command line. This section also demonstrates how to use Remote Assistance in an enterprise Help Desk environment involving two common scenarios:
Helper offers RA to User who has telephoned Help Desk with a problem.
For information on other scenarios for implementing Remote Assistance, including sending invitations with Windows Mail and Windows Messenger, search for the topic ―Remote Assistance‖ within Windows Help And Support.
Initiating Remote Assistance Sessions
Remote Assistance sessions can be initiated either from the user interface or the command line. A significant usability enhancement, from the perspective of support personnel, is that Offer RA is no longer buried within Help And Support as it is in Windows XP, but instead is easily accessible now from the GUI.
Initiating Remote Assistance from the GUI
Initiating Remote Assistance sessions from the GUI can be done using the following methods: From the Start menu, click Start, click All Programs, click Maintenance, and then click Windows Remote Assistance. This launches the Windows Remote Assistance screen. Click Start and type assist in the Start menu search box. When Windows Remote
Assistance appears in the search results under Programs, click it to launch the Windows Remote Assistance screen.
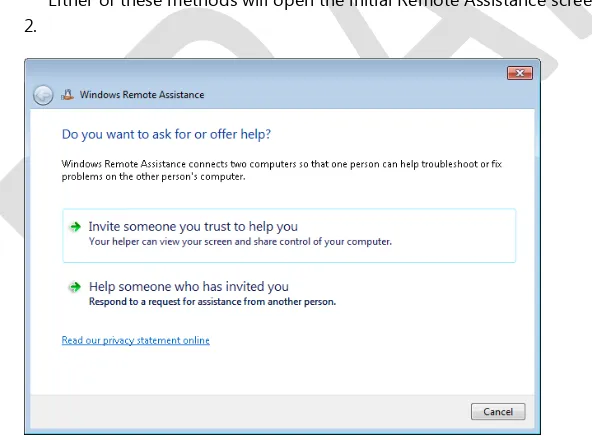
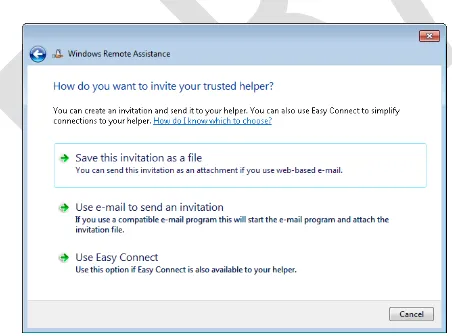
[image:24.531.74.370.307.527.2]Either of these methods will open the initial Remote Assistance screen, shown in Figure 23-2.
Figure 23-2 The initial screen of Windows Remote Assistance.
Once this initial screen appears, you can do either of the following:
option, which displays the How Do You Want To Invite Your Trusted Helper screen as shown in Figure 23-3.
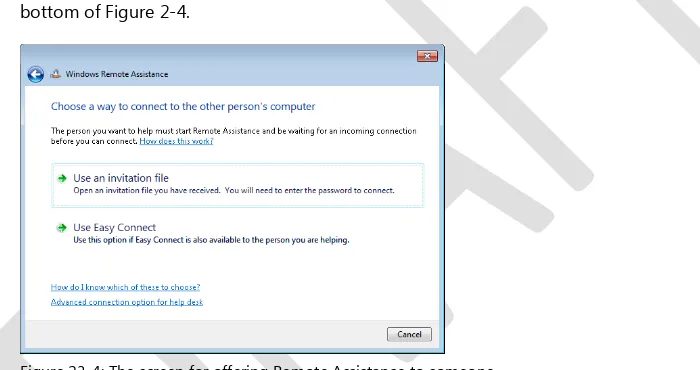
Accept an RA invitation from someone or offer RA to someone by clicking the Help Someone Who Has Invited You option, which displays the Choose A Way to Connect To The Other Person's Computer screen as shown in Figure 23-4.
The How Do You Want To Invite Your Trusted Helper screen (see Figure 23-3) lets you select from the following methods for soliciting RA:
Save This Invitation To A File Selecting this option lets you to save your RA invitation file to a folder on your computer or to an available shared folder on the network.
Use E-mail To Send An Invitation Selecting this option launches your e-mail client application, creates a new message, and attached the invitation file to the message. Note that if you do not have an SMAPI-compatible e-mail client application on your computer, this option will be unavailable.
Use Easy Connect Selecting this option creates and publishes your RA invitation file to the cloud using PNRP and displays a 12-character password which you must communicate out of band to your Helper in order for him to accept your invitation. If however you previously used Easy Connect to establish an RA session with the same Helper, the Helper can accept your invitation without any password being required.
Note If the computer has IPv6 disabled or is behind a NAT router that blocks
[image:25.531.61.287.361.529.2]Teredo traffic, the Easy Connection option will be unavailable for selection.
The Choose A Way to Connect To The Other Person's Computer screen ( see Figure 23-4) lets you accept an RA invitation from someone or offer RA to someone. The following options are available on this screen for accepting an RA invitation from someone:
Use An Invitation File Selecting this option lets you browse your local file system or network share for the RA invitation from someone who needs your help. You will need the password associated with the invitation, which must be provided OOB by the User who needs help.
Use Easy Connect Selecting this option lets you browse the PNRP cloud for the RA invitation from someone who needs your help. The first time you use Easy Connect to help this individual you will need the password associated with the invitation, which must be provided OOB by the User who needs help. For subsequent times you use Easy Connect to help this individual, the password is not required.
[image:26.531.76.426.231.416.2]To offer RA to someone, click the Advanced Connection Option For Help Desk link at the bottom of Figure 2-4.
Figure 23-4: The screen for offering Remote Assistance to someone.
Additional steps for soliciting and offering RA are described in the scenario sections later in this chapter.
Initiating Remote Assistance from the Command Line
Remote Assistance in Windows 7 and Windows Vista is implemented as a standalone executable called Msra.exe. You can initiate RA sessions directly from the command line or by using scripts. The syntax and usage for this command is explained in Table 23-3.
Table 23-2 Syntax and Usage for Command-Line Remote Assistance (Msra.exe)
/novice Windows 7 Windows Vista
Launches Remote Assistance as Novice (User) in Solicited RA mode and presents the user with the choice of either sending an RA ticket using a SMAPI-enabled e-mail application such as Windows Mail or by saving the invitation as a file. After this choice has been made, Windows Remote Assistance opens on the User’s computer in the Waiting For Connect state.
/expert Windows 7
Windows Vista
Launches Remote Assistance in the Helper mode and presents the user with the choice of either specifying the location of an RA ticket to open or specifying the User’s computer name or address (Offer RA). The computer name can be either a host name (if the User is on the local subnet) or a fully qualified name (DNS name), and the address can be either an IPv4 address or an IPv6 address. Unsolicited RA without an invitation requires preconfiguration of the remote computer being helped.
/offerRA
computer
Windows 7 Windows Vista
Launches Remote Assistance as Helper in Unsolicited (Offer) RA mode and uses DCOM to remotely open Remote Assistance on the User’s computer and then connect to the User’s computer to initiate an RA session. The User’s computer can be specified using either its computer name or address. The computer name can be either a host name (if the User is on the local subnet) or a fully qualified name (DNS name), and the address can be either an IPv4 address or an IPv6 address. This method is demonstrated in more detail in the section titled ―Scenario 1: Offering Remote Assistance Using DCOM‖ later in this chapter.
password
Windows 7 Windows Vista
the invitation file attached. The User must enter the e-mail address of the Helper in the To field to send the message to the Helper.
/saveasfile
path password
Windows 7 Windows Vista
Launches Remote Assistance as Novice (User) in Solicited RA mode and creates a password-protected RA ticket that is saved at the path specified. The path may be either a local folder or network share, and the User must have appropriate permissions on the destination folder to create the file. The path must include a filename for the ticket. (The .MsRcIncident file extension will be
automatically added to the filename.) The password must be six characters or more. Use of this method is demonstrated in more detail in the section titled ―Scenario 2: Soliciting Remote Assistance by Creating RA Tickets and Saving Them on Monitored Network Shares‖ later in this chapter.
/openfile path password
Windows 7 Windows Vista
Launches Remote Assistance as Expert (Helper) in Solicited RA mode and opens a previously created RA ticket that was saved within the path specified. The path may be either a local folder or network share, and the Helper must have appropriate permissions on the destination folder to open the file. The path must include the filename of a valid ticket that has the .MsRcIncident file extension. The password must be the same password that was used by the User to secure the ticket when it was created.
accept the invitation and initiate the RA session.
/offereasyhelp
address
Windows 7 only Launches Remote Assistance as Expert (Helper) in Offer RA mode and with the Easy Connection option already selected. The Helper is presented with a dialog box for entering the 12-character password that was communicated OOB to him by the Novice (User), which is needed by the Helper in order to accept the invitation and initiate the RA session.
/getcontacthel p address
Windows 7 only Launches Remote Assistance as Novice (User) in Solicited RA mode with the Easy Connection option already selected and with the RA history contact specified by address already selected. You can find
address for a contact in your RA history by opening the RAContacthistory.xml file located in the \users\username\appdata\local folder on your computer. The format for address is a 40-character hexadecimal string with .RAContact appended to it. /offercontacth
elp address
Windows 7 only Launches Remote Assistance as Expert (Helper) in Offer RA mode with the Easy Connection option already selected and with the RA history contact specified by address already selected. You can find
address for a contact in your RA history by opening the RAContacthistory.xml file located in the \users\username\appdata\local folder on your computer. The format for address is a 40-character hexadecimal string with .RAContact appended to it.
Note There is no support for Windows Managing Instrumentation (WMI) scripting
of Msra.exe.
Scenario 1: Soliciting RA using Easy Connect
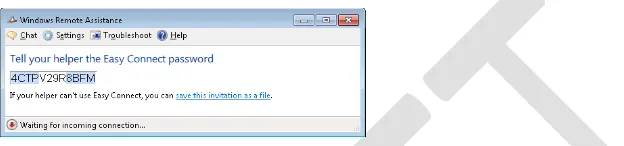
Easy Connect. (Easy Connect is not intended for enterprise environments as it requires global P2P connectivity in order to work.) In the following scenario, Tony Allen, a Novice user, requests help from Karen Berg, a friend who is an Expert user. Tony solicits Karen's help for the first time by launching Remote Assistance on his computer and selecting Invite Someone You Trust To Help You followed by Use Easy Connect. At this point Windows Remote Assistance displays a password as shown in Figure 23-5:
[image:30.531.86.398.136.209.2]
Figure 23-5: Tony's computer displays the password needed for Karen to connect using RA.
Tony telephones Karen, indicates he wants her to help him using Remote Assistance, and gives her the password. Karen now launches Remote Assistance on her own computer and selects Help Someone Who Has Invited You. Windows Remote Assistance opens and displays the dialog box shown in Figure 23-6:
Figure 23-6: Karen needs Tony's password to connect to his computer using RA
[image:30.531.87.397.278.373.2]Figure 23-7: Tony must allow the RA connection to occur.
Tony clicks Yes and the RA session begins. At this point, the desktop properties of Tony’s desktop may change (based on configurable settings) to optimize the network bandwidth used by RA for screen updates on Karen’s computer. Karen can now request control from Tony, send files to Tony or receive files from him, chat with Tony, or disconnect the session. Tony can send and receive files, chat, or pause or disconnect the session.
Tip If you are a User and a Helper has shared control of your computer, you can
immediately terminate shared control and return the session to Screen Sharing state by pressing the Panic key (Esc).
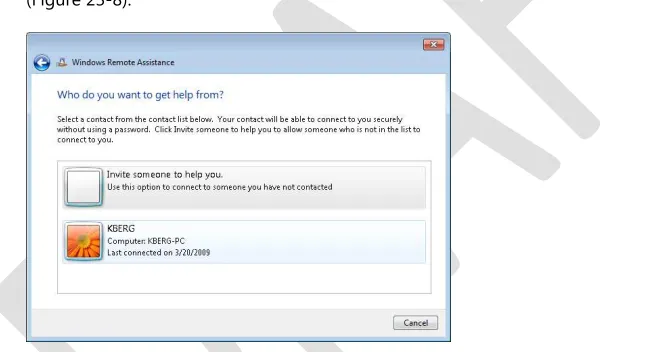
[image:31.531.59.389.257.433.2]If Tony needs help again from Karen on some future occasion, the steps involved are simpler. Tony launches Remote Assistance and selects Invite Someone You Trust To Help You. Remote Assistance displays the history list of recent contacts Tony has used before as Helpers (Figure 23-8):
Figure 23-8: Karen is listed as a contact in Tony's history list.
[image:31.531.75.300.502.564.2]Tony clicks on Karen's contact info in his history list, and this time instead of a password being displayed, a message is displayed indicating that Tony should tell Karen he needs her help (Figure 23-9):
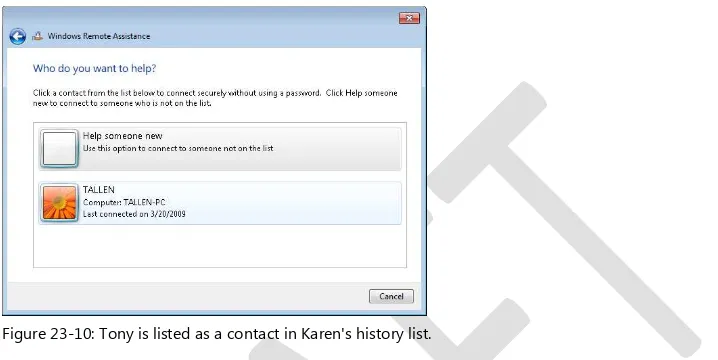
Tony telephones Karen and asks her to start Remote Assistance on her computer. Karen does this and selects Help Someone Who Has Invited You (Figure 23-10):
[image:32.531.85.444.85.265.2]
Figure 23-10: Tony is listed as a contact in Karen's history list.
Karen clicks on Tony's contact info in her history list. Karen's computer searches the PNRP cloud for Tony's RA invitation and displays Waiting For Acceptance in the Remote Assistance status bar when the invitation is found. Tony then clicks Yes and the new RA session begins.
You can also use the new command-line switches for Msra.exe in Windows 7 to simplify the Easy Connect experience even further. For example, if Tony frequently needs help from Karen, Karen (the Expert user) could create a shortcut on Tony's desktop that executes the following command:
msra.exe /getcontacthelp address
Here address is the value of the ADDRESS attribute in Karen's RA history contact information on Tony's computer, which is stored as an XML element in the
RAContacthistory.xml file located in the \users\TALLEN\appdata\local folder on Tony's computer. The contents of this file might look something like this:
<?xml version="1.0"?> <RAINVITATIONCOLL>
<RAINVITATIONITEM NAME="KBERG" COMPUTERNAME="KBERG-PC" AVATAR="Qk1QgA…[lots of
characters]…"
PUBLICKEY="BgIAAAC…"
ADDRESS="5823b8d7b47af2c1cd94f32535a79d8f0569e7d0.RAContact" TYPE="1"
TIME="20090320170235.779000"/> </RAINVITATIONCOLL>
msra.exe /getcontacthelp 5823b8d7b47af2c1cd94f32535a79d8f0569e7d0.RAContact
Karen can then create a similar shortcut on her own computer using the Tony's RA history contact information, which is stored as an XML element in the RAContacthistory.xml file located in the \users\KBERG\appdata\local folder on Karen's computer. Once this is done, Tony can request assistance by simply double-clicking on the shortcut on his desktop, and once he has informed Karen of this, Karen then double-clicks on the corresponding shortcut on her own computer, and when Tony agrees to allow the connection the session is started.
Scenario 2: Soliciting Remote Assistance by Creating
RA Tickets and Saving Them on Monitored Network
Shares
Another way that you can use Remote Assistance in an enterprise environment is by having users create invitation files and save them on a network share that is monitored by Help Desk personnel. This way, when Help Desk determines that a new ticket has been uploaded to the share, a support person can call the user on the telephone to obtain the password for the ticket and then use the ticket to establish an RA session with the user who needs help.
To make the procedure easier, administrators can first deploy a script on users’ desktops that uses command-line Remote Assistance (Msra.exe) to create the invitation file and save it on the network share. For example, let’s say that users’ invitation files should be uploaded to \\FILESRV3.contoso.com\Support\IncomingTickets, a folder in the Support share on the file server named FILESRV3. The following script, named SubmitTicket.vbs, could be deployed on each user’s desktop to accomplish this task:
dim strPassword dim strUser dim strTicketName
strPassword = InputBox("Enter a password for your ticket") Set WshShell = Wscript.CreateObject("Wscript.Shell") strUser = WshShell.ExpandEnvironmentStrings("%username%")
strTicketName = strUser & "-" & Year(Now) & "-" & Month(Now) & "-" & Day(Now) & _ "-" & Hour(Now) & "-" & Minute(Now) & "-" & Second(Now)
strRA = "msra.exe /saveasfile \\FILESRV3\Support\IncomingTickets\" & _ strTicketName & " " & strPassword
WshShell.Run strRA
obtained the ticket’s password using an OOB method such as a telephone call, the support person opens the ticket. After the User grants consent, the RA connection is established.
To monitor the IncomingTickets folder in the network share, Help Desk personnel can use the file-screening capabilities of file servers running Windows Server 2008. To do this, follow these steps to create a passive file screen that monitors the folder and sends an e-mail alert to a Help Desk alias whenever a new ticket is uploaded to the folder:
1. Install or upgrade the File Server role on the Windows Server 2008 computer where the Support folder is located.
2. Start the File Server Resource Manager console from Administrative Tools, right-click the root node, and select Configure Options.
3. Specify the DNS name of the IP address of an SMTP host that can be used to forward alert e-mails generated by the file screen you will create.
4. Click OK to close File Server Resource Manager Options and expand the console tree to select File Screens under File Screening Management.
5. Select the option Create File Screen in the Action pane.
6. Click Browse to select the Incoming folder for the File Screen Path.
7. Select the Define Custom File Screen Properties option and click Custom Properties. 8. Choose the option for Passive Screening so that uploaded tickets will only be
monitored and not blocked by the screen.
9. Click Create to create a new file group called RA Tickets and use the Add button to add files of type *MsRcIncident to the group.
11. Click the E-mail tab and specify a support alias (such as [email protected]) that will be notified whenever a new ticket is uploaded to the folder. Configure a suitable subject and body for the message.
12. Click Create to create the new file screen and then choose the option to save the screen without creating a template.
13. Test the new file screen by opening a command prompt on a user’s computer and then typing msra.exe /saveasfile path password, where path is the UNC path to the Incoming folder within the Support share on the file server, and password is any password of six or more characters that you specify.
For more information on how to implement file screening in Windows Server 2008, see the topic ―Screening Files‖ on the Microsoft Windows Server TechCenter at
http://technet2.microsoft.com/windowsserver2008/en/library/c16070f8-25f6-4d22-8040-5299b08d6eea1033.mspx?mfr=true.
Scenario 3: Offering Remote Assistance Using DCOM
Before you can offer Remote Assistance to other users, your user account must be authorized as a Helper on the User’s computer. You should use Group Policy to do this in an enterprise environment. (See the section titled ―Managing Remote Assistance Using Group Policy‖ later in this chapter for information on how to do this.)After a support person (or group of individuals) has been configured as a Helper for all Windows 7 computers in a domain or OU, the support person can offer RA to users of those computers when they need assistance. For this scenario, let’s say that Tony Allen
([email protected]), who asks Tony for the name or IP address of his computer. Tony provides Karen with his fully qualified computer name (TALLEN-PC.contoso.com) or IP address. Karen then offers assistance to Tony by launching Remote Assistance on her computer, selecting Help Someone Who Has Invited You, clicking Advanced Connection Option For Help Desk, and entering the name or IP address of Tony's computer (see Figure 23-11):
Figure 23-11 Karen offers help to Tony using unsolicited RA.
Tip Karen could also type msra /offerRA TALLEN-PC.contoso.com at a command
prompt to quickly offer assistance to Tony.
Figure 23-12: The history list makes it easy to start RA sessions with users that were helped before.
Tip Karen can also quickly display the screen in Figure 23-12 by typing msra
/offerRA at the command prompt.
Karen then clicks on Tony's computer in her history list and clicks Next, and once Tony accepts the offer the session begins.
Managing Remote Assistance Using Group Policy
In an enterprise environment, Remote Assistance can be managed using Group Policy. The policy settings for Remote Assistance are all machine settings and are found in the following policy location:Computer Configuration\Policies\Administrative Templates\System\Remote Assistance
When these policy settings are written to the registry on targeted computers, they are stored under the following registry key:
Remote Assistance policy settings are summarized in Table 23-4.
Table 23-4 Group Policy Settings for Remote Assistance
POLICY DESCRIPTION
Solicited Remote Assistance
Enabling this policy allows users of targeted computers to use Solicited RA to request assistance using e-mail, file transfer, or instant messaging. Disabling this policy prevents users from using Solicited RA. The default setting is Not Configured, which allows users to change their Remote Assistance settings using the Remote tab of the System CPL in Control Panel. If the policy is Enabled, you can further configure whether Helpers can be prevented from sharing control of the User’s computer, the maximum ticket lifetime, and the method used for sending invitations by e-mail. (Windows 7 does not support the MAILTO method—select SMAPI instead if the targeted computers are running Windows 7.) Ticket lifetime applies only to RA invitations sent by e-mail or file transfer. The default ticket lifetime when Group Policy is not being used is 6 hours.
If this policy is Enabled, you must also enable the Remote Assistance exception in Windows Firewall to allow Solicited RA to work.
In an unmanaged environment, this setting can also be configured using the Remote tab of the System CPL in Control Panel.
This policy is also supported on Windows XP Professional and Windows Server 2003.
Offer Remote Assistance
Enabling this policy allows designated Helpers to use Offer RA to offer assistance to users of targeted computers. Disabling this policy or leaving it Not Configured prevents Offer RA from being used to offer assistance to users of targeted computers.
If the policy is Enabled, you can further configure whether Helpers can view or control the Users’ computers, and you must specify a list of Helpers who are allowed to Offer RA to the users of the targeted computers. Helpers can be either users or groups and must be specified in the form
domain_name\username or domain_name\groupname.
If this policy is Enabled, you must also enable the Remote Assistance exception in Windows Firewall to allow Offer RA to work. (In Windows 7, the Remote Assistance exception is open by default for the domain firewall profile.)
Allow Only Vista Or Later Connections
The default Windows 7 invitation file includes a XP-specific node for backward-compatibility. This node is not encrypted and allows Windows XP computers to connect to the Windows 7 computer that created the ticket. Enabling this policy causes all RA invitations generated by users of targeted computers to not include the XP node, thereby providing an additional level of security and privacy. Disabling this policy or leaving it Not Configured leaves information such as IP address and port number unencrypted in RA invitations This policy setting applies only to RA invitations sent using e-mail or file transfer and has no effect on using instant messaging to solicit assistance or on using Offer RA to offer assistance.
In an unmanaged environment, this setting can also be configured by clicking Advanced from the Remote tab of the System Properties dialog box. This policy is supported only on Windows Vista and later platforms.
Customize Warning Messages
Enabling this policy causes a specified warning to be displayed on targeted computers when a Helper wants to enter Screen Sharing State or Control Sharing State during an RA session. Disabling this policy or leaving it Not Configured causes the default warning to be displayed in each instance. If the policy is Enabled, you can further specify the warning message to be displayed in each instance.
This policy is supported only on Windows Vista and later platforms. Turn On
Session Logging
Enabling this policy causes RA session activity to be logged on the targeted computers. For more information, see the section titled ―Remote Assistance Logging‖ earlier in this chapter. Disabling this policy causes RA auditing to be disabled on the targeted computers. The default setting is Not
Turn On Bandwidth Optimization
Enabling this policy causes the specified level of bandwidth optimization to be used to enhance the RA experience over low-bandwidth network connections. Disabling this policy or leaving it Not Configured allows the system defaults to be used.
If the policy is Enabled, you must specify the level of bandwidth optimization you want to use from the following options:
No Optimization No Full Window Drag Turn Off Background
Full Optimization (Use 8-Bit Color)
If No Optimization is selected, the User’s computer will use the Windows Basic theme with full background, and during a shared control session, the Helper will be able to drag full windows across the User’s screen. Additional optimization turns off effects to allow a more responsive experience for the Helper.
This policy is supported only on Windows Vista and later platforms.
Note In Windows XP, members of the Domain Admins group are implicitly granted
Helper privileges even if they are not added to the Helpers list of the Offer Remote Assistance policy setting. This is no longer the case in Windows 7 and Windows Vista, where the Domain Admins group must now be explicitly added to the Helpers list to grant them Helper privileges for Offer RA.
Configuring Remote Assistance in Unmanaged
Environments
Figure 23-13 Configuring RA from the Remote tab of System in Control Panel.
Note that settings changes made this way will affect all users on the system. Clicking Advanced lets you specify whether remote control of the computer will be allowed during a RA session, what the maximum lifetime of a RA invitation can be before it times out (the default is 6 hours), and whether invitations supported only by RA in Windows Vista or later will be created (see Figure 23-14):
Figure 23-14 Advanced configuration settings for RA.
In managed environments, when the following Group Policy setting is Enabled, the Control Panel settings for configuring Remote Assistance become unavailable (appear dimmed):
Computer Configuration\Policies\Administrative Templates\System\Remote Assistance\Solicited Remote Assistance
Note Group Policy settings always prevail over locally configured settings when
[image:41.531.68.357.299.433.2]Additional Registry Settings for Configuring Remote
Assistance
Additional behavior for Remote Assistance can be configured by modifying certain registry settings. Specifically, per-user registry settings for Remote Assistance are found under the following key:
HKCU\Sofware\Microsoft\Remote Assistance
These settings are changeable when in the Waiting To Connect mode or when in the connected mode from the Settings button.
Caution If Group Policy is used to manage Remote Assistance settings and any
configured policy settings overlap these registry settings, the policy settings prevail.
Direct from the Source: Troubleshooting Remote Assistance in Windows 7 and Windows Vista
When I attempt to create an invitation with e-mail or save-to-file, I see a warning message that says that the Windows Firewall is currently blocking Remote Assistance.
The Remote Assistance firewall exception will change depending on your network location (Private, Public, or Domain). If you are at home, your network location type should be set to Private, which enables the Remote Assistance firewall exception automatically. If your network location is set to Public, the Remote Assistance firewall exception is not enabled automatically for security purposes. It will need to be enabled by an administrator.
If you are connected to a managed network (for example, when you are within a corporate domain), the network location is categorized as Domain, and the Remote Assistance exception is not enabled automatically. It is expected to be configured by Group Policy by your system administrator.
I cannot use RA to connect from my home computer to a work computer.
RA uses Teredo (IPv6) to traverse NATs. However, Teredo cannot be used to traverse corporate edge firewalls that provide NAT for intranet clients and block dynamic ports or outbound UDP traffic. Because you do not have a globally
reachable IPv4 address within the corpnet, RA cannot make a connection to you from outside the corpnet.
In Windows 7 and Windows Vista, the Windows Firewall is IPv6-aware. The RA exception in the Windows Firewall enables Teredo for edge traversal. If the Windows Firewall is disabled, the ability to use Teredo for NAT traversal is also disabled. The Window