AMSTERDAM • BOSTON • HEIDELBERG • LONDON • NEW YORK OXFORD • PARIS • SAN DIEGO • SAN FRANCISCO • SINGAPORE
SYDNEY • TOKYO Focal Press is an imprint of Elsevier
MoCap for Artists
Workflow and Techniques for Motion Capture
Acquisitions Editor: Paul Temme
Cover Image: Eddie Smith and Patrick Dunnigan Focal Press is an imprint of Elsevier
30 Corporate Drive, Suite 400, Burlington, MA 01803, USA Linacre House, Jordan Hill, Oxford OX2 8DP, UK
Copyright © 2008, Midori Kitagawa and Brian Windsor. Published by Elsevier Inc. All rights reserved. No part of this publication may be reproduced, stored in a retrieval system,
or transmitted in any form or by any means, electronic, mechanical, photocopying, recording, or otherwise, without the prior written permission of the publisher. Permissions may be sought directly from Elsevier’s Science & Technology
Rights Department in Oxford, UK: phone: (⫹44) 1865 843830, fax: (⫹44) 1865 853333, E-mail: [email protected]. You may also complete your request on-line via the Elsevier homepage (http://elsevier.com), by selecting “Support & Contact” then “Copyright and Permission” and then “Obtaining Permissions.”
Library of Congress Cataloging-in-Publication Data
Kitagawa, Midori.
MoCap for artists : workflow and techniques for motion capture / by Midori Kitagawa and Brian Windsor. p. cm.
Includes index.
ISBN-13: 978-0-240-81000-3 (pbk. : alk. paper) 1. Computer animation. 2. Motion — Computer simulation. 3. Three-dimensional imaging. I. Windsor, Brian. II. Title.
TR897.7.K58 2008
006.6⬘96 — dc22 2008000453
British Library Cataloguing-in-Publication Data
A catalogue record for this book is available from the British Library. ISBN: 978-0-240-81000-3
08 09 10 11 12 5 4 3 2 1
Typeset by Charon Tec Ltd (A Macmillan Company), Chennai, India www.charontec.com
Printed in the United States of America
v
Contents
Acknowledgments xi
Introduction xiii
Chapter 1: An Overview and History of Motion Capture 1
1.1 About This Book 1
2.3.2.1 What are the system limitations? 18
2.3.2.2 What kind of motion will be captured? 19
Chapter 3: Pipeline 31
3.1 Setting up a Skeleton for a 3D Character 31
3.2 Calibrations 33
3.6 Applying Motions to a 3D Character 43
3.7 Rendering and Post-production 44
Chapter 4: Cleaning and Editing Data 47
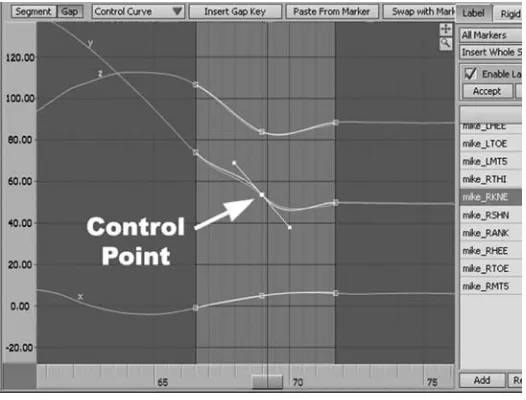
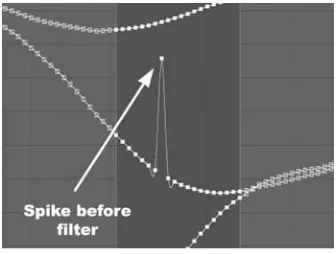
4.1 Cleaning Marker Data 47
4.1.1 Types of data 47
4.1.1.1 Optical marker data (translational data) 47
4.1.1.2 Translational and rotational data 47
4.1.1.3 Skeletal data 48
4.1.2 What to clean and what not? 48
4.1.2.1 What not to clean? 48
4.2 Applying Marker Data to the Skeleton 62
5.2 Blending Motions 79
5.2.1 Selecting a blending point 80
5.2.2 Matching positions 86
5.2.3 Dealing with less than ideal cases 86
5.3 Inverse Kinematics 88
5.6.2.1 Walking down the z-axis 94
5.6.2.2 Taking out the translation 95
5.7 Poses 98
5.7.1 Deciding what to use 98
5.7.2 Creating a pose 98
5.7.3 Key-framing a pose 100
Chapter 6: Data Application — Intro Level: Props 103
6.1 A Stick with Two Markers 103
6.1.1 When it fails: Occlusion 103
6.1.2 When it fails: Rotation 105
6.2 A Stick with Three Markers 105
6.2.1 Three markers with equal distances 105
6.2.2 Three markers on a single straight line 106
6.2.3 Placement of three markers that works 108
6.3 Flexible Objects 109
Chapter 7: Data Application — Intermediate Level: Decomposing and
Composing Motions 113
7.1 Mapping Multiple Motions 113
7.1.1 Decomposing and composing upper and lower body motions 113 7.1.2 Synchronizing upper and lower body motions 116
7.2 Balance 118
7.3 Breaking Motion Apart 119
7.3.1 When you don’t need all the motion 119
7.3.2 Re-use of motion data for non-motion purposes 122 Chapter 8: Data Application — Advanced Level: Integrating Data with
Character Rigs 125
8.1 Mocap as Forward Kinematics Animation 125
8.2 Key-frame Animation with Inverse Kinematics 127
8.2.1 Key-framing 128
8.2.2 IK 129
8.3 Integrating Mocap Animation and Key-frame Animation 130
8.3.1 Why do we want to do that? 131
8.3.2 Setting up a skeleton for FK and IK 131
8.3.3 Adding key-frame animation to mocap 134
Chapter 9: Hand Motion Capture 137
9.1 Anatomy of a Hand 137
9.2 Rig and Marker Set for the Hand 141
9.2.1 Rigid hand 141
9.2.2 Mitten 143
9.2.3 Mitten with an independent thumb 144
9.2.4 Mitten that stretches 146
10.3.1 Facial rig with discrete joints 155
10.3.2 Facial rig with muscles 156
Chapter 12: Mocap Data and Math 179
12.1 How Data Is Created 179
12.1.1 Optical systems 179
12.1.2 Magnetic systems 180
12.2 Data Types and Formats 181
12.2.1 C3D 181
12.2.2 ASF/AMC 181
12.2.3 BVH 182
12.2.4 FBX 183
12.3 Coordinates and Coordinate Systems 183
12.3.1 2D and 3D coordinate systems 184
12.3.2 Cartesian, spherical, and cylindrical coordinate systems 184
12.3.3 Right-handed and left-handed systems 185
12.3.4 Object space and world space 186
12.4 Order of Transformation 186
12.5 Euler Angle 188
12.6 Gimbal Lock 190
12.7 Quaternions 194
Bibliography 195
Appendix A: Shot List for Juggling Cow 197
Appendix B: Sample Mocap Production Pipeline and Data Flow Chart 199
Glossary 201
Index 207
xi
Acknowledgments
xiii
Introduction
If anyone asks us “Do you think motion capture will replace key-frame animation?” we will say “No.”
Motion capture (mocap) is a very fast and accurate way to bring human motion into a 3D com-puter animation, but it is not always the best way. Mocap technology exhibits its remarkable strengths for some projects while other methods, such as key-framing, work much better for some other projects. We all need to make sure that whichever the method we decide to use, that’s the most effective method for the project.
In this book, we try to give you a basic overview of motion capture based off of the most popular method which is currently (circa 2007) optical motion capture that tracks retro-reflective markers. We don’t even try to say that our way is the only way or always the best way, just that it works for us. You will find many different ways to tackle problems as you go along and find different ways to think about mocap data. Every person we know in the mocap industry has a different idea about how to do things and very good reasons for doing them that way. It’s a big pond and there’s room for lots of different ideas and methods. If you use motion capture you’ll create some of your own methods. Our goal is to help those who are involved in 3D computer animation and games have a better understanding of motion capture as a whole so that they can decide if they need it for a project, and if they do, how it can be used. One of the things we try to do in this book is to have a mix of showing you how to do things and telling you the theory behind it. Neither one of us was inter-ested in writing a “manual” nor a definite guide that tells you exactly what you need to do with specific mocap hardware and software. We wanted to make the information as broad as possible and applicable to as many situations as possible. So there will be times you need to rely on the user manuals from your hardware and software providers.
1
1
An Overview and History of
Motion Capture
1.1 About This Book
Motion capture (mocap) is sampling and recording motion of humans, animals, and inanimate objects as 3D data. The data can be used to study motion or to give an illusion of life to 3D com-puter models. Since most mocap applications today require special equipment there are still a lim-ited number of companies, schools, and organizations that are utilizing mocap technology. Outside the film industry, army, and medicine, there are not too many people who know what mocap is. However, most people, even small children, have seen the films, games, and TV commercials for which mocap technology is used. In that sense mocap is in our everyday life.
The main goal of this book is to help you understand steps and techniques that are essential in a workflow or pipeline for producing a 3D character animation using mocap technology. Capturing data using mocap equipment is, of course, the essential part of the pipeline, but equally important are the things we do before and after capturing data, that is preproduction (planning), data clean-ing and editclean-ing, and data applications. Without a well-thought-out preproduction for a project, the project is destined to fail or go through preventable difficulties. It cannot be emphasized enough that good preproduction is a key to the success of a project. After capture sessions, data needs to be cleaned, edited, and applied to a 3D model. Applications are getting better every year but they are tools, that is, technology does not create arts, you do. You are the creator and decision-maker. Another key to success is setting up a reliable pipeline that suits your needs and environment. We’ve heard about production companies deciding to use mocap for particular projects, believing that mocap would cut their production cost and time, and giving up on mocap quickly after finding that mocap was neither quick nor cheap. Mocap disaster stories are often caused by the lack of a reliable production pipeline. Mocap technology can be effectively used once a production pipeline is estab-lished. For the first project or two, you will be hammering kinks out of your production pipeline while the project is moving through the pipeline. Thus, greater productivity shouldn’t be expected immediately after introducing mocap technology into the production environment.
we show you simple cases of data applications. In Chapter 7’ we discuss mapping multiple motions and taking motions apart. In Chapter 8’ we explain how you can integrate data into rigs. Special issues about hand capture are discussed in Chapter 9, facial capture in Chapter 10, and puppetry capture in Chapter 11. Chapter 12 covers mocap data types and formats, and mathematical concepts that are useful to know when you are setting up or troubleshooting a production pipeline.
We suggest that you read through this book once before you start a mocap project, and read it again as you go through your project pipeline.
1.2 History of Mocap
The development of modern day mocap technology has been led by the medical science, army, and computer generated imagery (CGI) field where it is used for a wide variety of purposes. It seems that mocap technology could not exist without the computer. However, there were early successful attempts to capture motion long before the computer technology became available. The purpose of this section is to shed light on some of the pioneers in mocap in the 19th and 20th centuries: this is not our attempt to list all the achievements on which today’s mocap technology is built upon.
1.2.1 Early attempts
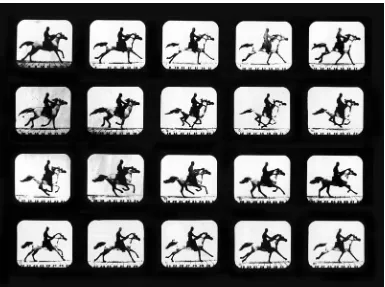
Eadweard Muybridge(1830 –1904) was born in England and became a popular landscape pho-tographer in San Francisco. It is said that in 1872 Leland Stanford (California governor, president of the Central Pacific Railroad, and founder of Stanford University) hired Muybridge to settle a $25,000 bet on whether all four feet of a horse leave the ground simultaneously or not. Six years later Muybridge proved that in fact all four feet of a trotting horse simultaneously get off the ground. He did so by capturing a horse’s movement in a sequence of photographs taken with a set of one dozen cameras triggered by the horse’s feet.
Muybridge invented the zoopraxiscope, which projects sequential images on disks in rapid suc-cession, in 1879. The zoopraxiscope is considered to be one of the earliest motion picture devices. Muybridge perfected his technology for sequential photographs and published his photographs of athletes, children, himself, and animals. His books, Animals in Motion(1899) and The Human Figures in Motion (1901), are still used by many artists, such as animators, cartoonists, illustrators, and painters, as valuable references. Muybridge, who had a colorful career and bitter personal life, is certainly a pioneer of mocap and motion pictures (Figure 1.1).
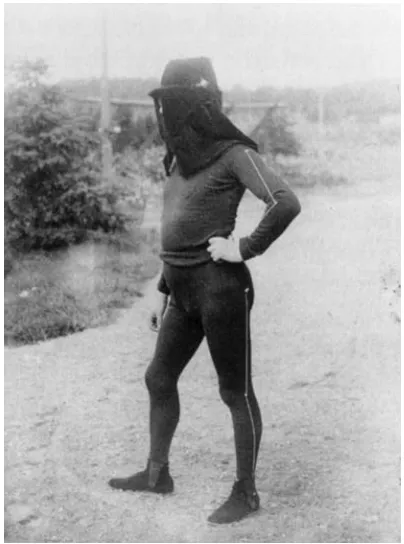
Born in France, in the same year as Muybridge, was Etienne-Jules Marey. Marey was a physiolo-gist and the inventor of a portable sphygmograph, an instrument that records the pulse and blood pressure graphically. Modified versions of his instrument are still used today.
initially captured images on glass plates but later he replaced glass plates with paper film, introduc-ing the use of film strips into motion picture. The photographs of Marey’s subject wearintroduc-ing his mocap suit show a striking resemblance to skeletal mocap data (Figures 1.2 and 1.3).
Marey’s research subjects included cardiology, experimental physiology, instruments in physiology, and locomotion of humans, animals, birds, and insects. To capture motion, Marey used one cam-era while Muybridge used multiple camcam-eras. Both men died in 1904, leaving their legacies in arts and sciences.
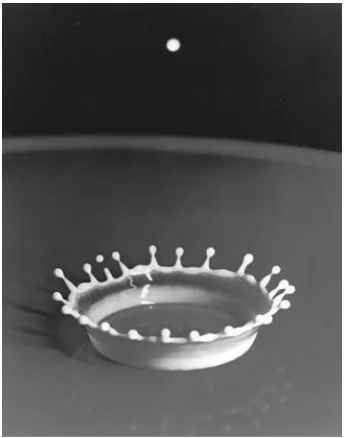
In the year after Muybridge and Marey passed away Harold Edgerton was born in Nebraska. Edgerton developed his photographic skills in the early 1920s while he was a student at University of Nebraska. In 1926 while working on his master’s degree in electrical engineering at the Massachusetts Institute of Technology (MIT), he realized that he could observe the rotating part of a motor as if the motor were turned off by matching the frequency of the strobe’s flashes to the speed of the motor’s rotation. In 1931 Edgerton developed the stroboscope to freeze fast moving objects and capture them on film. Edgerton became a pioneer in high-speed photography (Figures 1.4 and 1.5).
Edgerton designed the first successful underwater camera in 1937 and made many trips aboard the research vessel Calypsowith French oceanographer Jacques Cousteau. He designed and built deep Chapter 1: An Overview and History of Motion Capture 3
Figure 1.2 Etienne-Jules Marey’s mocap suit, 1884
Figure 1.3 Motion photographed by Etienne-Jules Marey, 1886
sea electronic flash equipment in 1954. Edgerton ended his long career as an educator and researcher at MIT when he passed away in 1990.
1.2.2 Rotoscoping
Chapter 1: An Overview and History of Motion Capture 5
Figure 1.4 Milk-Drop Coronet,Harold Edgerton, 1957
Figure 1.5 Shooting the Apple,Harold Edgerton, 1964
mixed and Fleischer himself interacted with the animation characters, Koko the Clown and Fitz the dog. In 1924, 4 years before Disney’s “Steamboat Willie,” Fleischer produced the first animation with a synchronized soundtrack. Fleischer Studio animated characters from the comics, such as Popeye the Sailor and Superman. Betty Boop first appeared in Fleischer’s animation and later became a comic strip character. Fleischer’s early 30s animations were filled with sexual humor, ethnic jokes, and gags. When the Hays Production Code (censorship) laws became effective in 1934 it affected Fleischer Studio more than other studios. As the result, Betty Boop lost her garters and sex appeal.
In 1937, after almost 4 years of production, Walt Disney(1901–1966) presented the first feature length animation, “Snow White and Seven Dwarfs.” “Snow White” was enormously successful. Paramount, the distributor of Fleischer’s animations, pressured Max and David Fleischer to pro-duce feature length animations. They borrowed money from Paramount and propro-duced two features, “Gulliver’s Travels” (1939) and “Mr. Bug Goes to Town” (1941). Neither film did well at the box office. After the failure of “Mr. Bug,” Paramount fired the Fleischer brothers and changed the studio’s name to Famous Studios. In the 1950s Max Fleischer sued Paramount over the distribution of his animations. Before his death in 1972, he signed a Betty Boop merchandising deal for King Features, a unit of the Hearst Corporation.
Rotoscoping was used in Disney animations, starting with “Snow White.” Later Disney animations characters were highly stylized and rotoscoping became a method for studying human and animal motions. Disney’s classic animations on DVDs, such as “Snow White” and “Bambi,” contain live action film footages from the Disney archive. Comparison between film footages and the correspond-ing scenes in the animations reveals skillful and selective use of rotoscopcorrespond-ing by Disney animators. They went above and beyond rotoscoping. The success of “Snow White” can be attributed to Walt Disney’s detailed attention to the plot, character development, and artistry. There are some beautiful scenes in the Fleischers’ feature length animations. However, they do not have plots that can sustain the audi-ence’s interests until the end of the movie nor characters that make the audience care about them. Both Max Fleischer and Walt Disney were highly innovative individuals; however, it is sadly true that “Disney’s memory belongs to the public; Max’s to those who remember him by choice” (Heraldson, 1975).
1.2.3 Beginning of digital mocap
computers weren’t powerful enough. (Ray-tracing and radiocity didn’t become widely available until the computing power improved.) CPUs, memories, storage devices, and applications were more expensive than today. Wavefront Technologies developed and marketed the first commercial off-the-shelf 3D computer animation software in 1985. Only a handful of computer animation production companies existed. Most of the animations that they produced were “flying logos” for TV commercials or TV programme’s opening sequences. These were often 15 to 30 seconds long per piece. The read-ers who saw “Brilliance” (also called “Sexy Robot”) in the 1980s probably still remember the astonish-ment of seeing a computer generated character, a shiny female robot, moving like a real human being.
“Brilliance” was produced by Robert Abel and Associates for the National Canned Food Information Council and was aired during the 1985 Super Bowl. They invented their own method for capturing motion for the project. They painted black dots on 18 joints of a female model and photographed her action on a swivel stool from multiple angles. The images were imported into Silicon Graphics workstations and a number of applications were employed to extract the infor-mation necessary to animate the CGI robot. They didn’t have enough computing power to render frames for the 30 second piece in house. So, in the final 2 weeks before the project deadline they borrowed VAX 11/750 computers around the country to render. The final product was a ground breaking piece and is regarded as a milestone in the history of CGI.
While “Brilliance” was the first successful application of mocap technology in CGI, “Total Recall”was the first failed attempt to use mocap in a feature film. Metrolight Studios was one of the production companies contracted to produce effects for the 1990 science fiction film starring Arnold Schwarzenegger and Sharon Stone. Metrolight decided to use mocap to create an anima-tion sequence of moving skeletons for the scene in which Schwarzenegger’s character goes through a large airport security X-ray machine, along with other people and a dog. (Still images from the scene popped up in news media after the 9/11 tragedy regarding security vs. privacy issues.) An operator of an optical mocap equipment company was sent to a location with a mocap system. A Metrolight team followed the operator’s instruction while capturing performances by Schwarzenegger and other performers. They went home believing that the capture session had gone well and the mocap company would deliver the captured data after processing and cleaning. However, Metrolight never received usable data and had to give up using mocap for the scene. It is not certain if the operator did not know his company’s equipment well and made critical mis-takes or the system was faulty. One of the lessons that we can learn from Metrolight’s unfortunate experience is that if you need to rely on an external expert in capture sessions, make sure that you hire a service provider with a good track record and references. Another is to check the data after captur-ing the range of motion and one or two shots. You don’t want your capture subjects to wait for a long time. Don’t process all the captured data during capture sessions, but check what kind of data quality you are getting, especially at a location site that you are not familiar with. If you need to recalibrate, recalibrate the system. Recalibrate after lunch or a long break and again before you wrap up sessions. Also be prepared to have a follow-up shoot in case the director, clients, you, or any other decision-makers make changes after the first shoot, or data from the first shoot has problems. Mocap wasn’t used as planned but “Total Recall” won an Academy Award (Special Achievement Award) for its spe-cial effects. Mocap technology had to wait for a few more years to come into the limelight.
Released in 1995, FX Fighteris the first real-time fighting game with 3D characters in 3D envi-ronments. It is also one of the first video games that used mocap technology to give realism to 3D characters’ movements. Game characters are animated in real time by the user input using a set of motion captured actions, for example, running, walking, and kicking. Pieces of actions are played in such a way that the player does not notice the transition from one action to another giving an impression that the player is fully in control of a game character’s movement. The game’s success encouraged other game companies to use mocap in their games.
Since these pioneering efforts in the 1980s and 1990s we have seen remarkable development and achievement in digital mocap. In recent years, in addition to medicine, military, and entertainment, mocap applications have been found in many other fields. Various sports use mocap to analyze and enhance athletes’ performances and prevent injuries. Designers use mocap to understand users’ movements, constraints, and interactions with environments and to design better products. Engineers use mocap to analyze human movements and design robots that walk like us. Art historians and educators use mocap to archive and study performances by dancers and actors. For instance, in 1991 an intricate performance by legendary French mime Marcel Marceau (1923 –2007) was cap-tured at the Ohio State University to preserve his arts for future generations.
1.3 Types of Mocap
Mocap systems commercially available today can be categorized into three main groups: optical systems, magnetic systems, and mechanical systems. Each type has strengths and weaknesses, which we will look at in this section. We will not look at ultrasonic and inertial systems because they are very infrequently used in the entertainment environment.
1.3.1 Optical mocap systems
Chapter 1: An Overview and History of Motion Capture 9
Figure 1.6 Vicon camera with LEDs
Cameras in an optical system capture the lights reflected or emitted by markers at speeds somewhere between 30 and 2000 samples per second. At least two cameras need to see a marker in order to deter-mine the 3D position of the marker, although three or more are preferred for accuracy. Sometimes a capture subject herself/himself, another capture subject, or a prop hides (occludes) some of the mark-ers on the subject. For instance, when a subject lies flat on the stomach, the markmark-ers on the subject’s front will be occluded. When markers are occluded, no camera sees them and it results in loss of data. There are data editing techniques and tools to make up for missing data but when too many markers are occluded or the duration of an occlusion is too long, it is impossible to fix the problem. Optical data generated by a state of the art system is very clean and accurate when it does not suffer from occlusion problems.
Marker configurations are flexible with optical systems. You can use the marker configurations that the system manufacturer provides you with or you can design your own that suits your needs. A relatively large number of markers can be tracked simultaneously, for example, up to 200 mark-ers with a 16 camera system. Since capturing multiple subjects at once tends to cause occlusion problems, capture one subject at a time if it is not crucial to capture multiple performers together. When performers interact with each other and the synchronization among them is important, cap-ture multiple subjects simultaneously. Capcap-ture subjects can move freely in a capcap-ture volume because no equipment or wires are connected to them.
Optical systems’ real-time visual feedback during capture is often limited to stick figures, although linking a mocap’s real-time output to a specific real-time application such as MotionBuilder will ren-der real-time results. Other systems such as the Giant Studios system readily renren-der real-time charac-ters directly in system. Recorded data is still processed to compute the trajectories of the markers in a rather extensive post-processing to get the best, most stable results. Rotational data can be computed in real time, but is usually computed from positional data in post-processing.
Advantages of optical systems:
● Optical data is accurate. ● Capture rate is high.
● Multiple subjects can be captured simultaneously. ● A large number of markers can be used.
● Marker configurations can be changed easily, depending on project goals. ● Optical systems’ capture subjects can move freely in a capture volume. ● Capture volume can be larger than most other systems.
● Skeletal data can be generated.
Disadvantages of optical systems:
● Extensive post-processing is required
● Rotational data needs to be computed from positional data in the post-processing. ● Markers can be occluded by capture subjects or props, resulting in loss of data. ● Lighting needs to be controlled for most optical systems, especially passive systems. ● Real-time visual feedback is limited to stick figures.
● Hardware is often more expensive than other types of mocap equipment.
1.3.2 Magnetic mocap systems
Magnetic (electromagnetic) mocap systems are sometimes called magnetic trackers. The systems were derived from the sensors placed on a military aircraft pilot’s helmet to track the pilot’s head position and orientation for the helmet-mounted display. With a magnetic mocap system, 12 to 20 tracking sensors are placed on a capture subject to measure spatial relationship to a magnetic transmitter. The tracking sensors output their translations and orientations. Hence, no post-processing is required to compute rotations. This fact allows magnetic systems to be used for real-time applications.
Tracking sensors are not occluded by capture subjects or props made of non-metallic materials, which is an advantage over optical systems. However, they are prone to magnetic and electrical interferences caused by metal objects and electronics in the environments. Interferences can result in distorted output. Building structures with high-conductivity metals are not suitable as capture spaces for magnetic systems. The wiring and batteries for tracking sensors may limit capture sub-jects’ movements. Moreover, tracking sensors’ batteries need to be recharged every few hours. Magnetic systems can be divided into two groups. One group uses direct current (DC) electro-magnetic fields and the other uses alternating current (AC) fields. AC systems (e.g., Liberty by Polhemus) are very sensitive to aluminum and copper. DC systems (e.g., Flock of Birds by Ascension) are sensitive to iron and steel.
simultaneously with multiple setups. Magnetic systems’ capture volumes are normally smaller than optical systems’. One of the biggest advantages of magnetic systems is their cost; magnetic systems are less expensive than optical systems.
Advantages of magnetic systems:
● Position and orientation are available without post-processing. ● Real-time feedback allows real-time applications.
● Tracking sensors are not occluded by non-metallic objects.
● Multiple performers can be captured simultaneously with multiple setups. ● Magnetic systems are less expensive than optical systems.
Disadvantages of magnetic systems:
● Tracking sensors are prone to magnetic and electrical interferences.
● Wiring and batteries for tracking sensors can limit capture subjects’ movements. ● Magnetic sensors have a lower sampling rate than most optical systems.
● Magnetic data tends to be noisy.
● Tracking sensors’ configurations are hard to change.
● Magnetic systems’ capture volumes are normally smaller than optical systems’.
1.3.3 Mechanical mocap systems
Mechanical (exo-skeletal) mocap systems directly measure joint angles of a capture subject who wears an articulated device that consists of straight rods and potentiometers. Straight rods are linked with potentiometers at the joints of the body, designed to measure joint angles as the capture sub-ject moves. The device looks like an exo-skeleton. Other types of mechanical systems include data gloves and digital armatures.
Mechanical systems are real time, relatively inexpensive, free of occlusion, free from magnetic or electrical interferences, and highly portable. Wireless mechanical systems provide large capture vol-umes. A notable disadvantage of mechanical systems is that they do not measure global translation very well. They measure it using accelerometers, but the data can still “slide” and “slip” a little. They do a poor job when the feet leave the floor. If a capture subject jumps up, the data will nor-mally not follow the jump and the data will stay on the floor. If a character walks up stairs, the data will never go up in the air but look as if it were walking in place. Magnetic sensors are often added to mechanical systems to correct this problem. The joints in articulated exo-skeletal systems are simple hinge joints, although we, humans, have other kinds of joints, such as ball and socket joints, gliding joints, saddle joints, and pivot joints. This means that articulated exo-skeletal systems restrict capture subjects’ movement at their joints. Also the device’s volume and breakability restrict subjects’ movement, for example, a capture subject wearing an articulated exo-skeletal system probably doesn’t want to roll around on a floor since it hurts and breaks the device. ShapeWrap, developed by Measurand, uses flexible fiber-optic tapes and is more durable than rigid exo-skeletal systems.
Advantages of magnetic systems:
● Real time
● Relatively inexpensive ● No occlusion
● No magnetic or electrical interferences ● Highly portable
● Large capture range
Disadvantages of magnetic systems:
● No global translations
● Restrictions on capture subject’s movement ● Breakable
● Fixed configuration of sensors ● Low sampling rate
13
2
Preproduction
Preproduction can be looked at as one of the most important steps in motion capture. This is the part of the process that allows us to break everything apart and prepare before either going into the motion capture space or before going into the space with a client. Preproduction can be broken down into pre-capture planning (Section 2.2), preparation for the capture (Section 2.3), and designing a production pipeline (Chapter 3).
2.1 Importance of Preproduction
Why do you want to spend time on preproduction? Because a good preproduction saves a lot of production cost and time, spares you from unnecessary pain, and results in a much better end-product. If you jump into production with little or no preproduction, we assure you that you will face problems at some point that will cause waste of motion capture time, difficulties during the capture, issues in processing, and other trouble. The majority of these can be avoided by taking the time to really go through the preproduction process meticulously. We can never stress enough how much planning and working through everything in advance is the difference between a motion capture nightmare and good motion capture experiences.
What preproduction gives you is a roadmap to how you’re going to organize and accomplish all of your goals. It should answer the questions, such as “Why are you capturing anything?,” “What are you capturing?,” “How will you capture it?,” and “What will you do with the data once it’s cap-tured?” Thinking through all of this and running a few small tests will make a huge difference in how easy or hard motion capture will be.
Many people have a preconceived notion that motion capture is not only simple but very quick and that it automatically works. This, unfortunately, is not the case. Getting good data out of a motion capture system takes patience and experience. The process will not be quick until you’ve done it several times and are used to how it works. Motion capture never works automatically. However, with enough planning, even the first time you work all the way through a motion capture project, you will have a clear idea about how you get from one end to the other.
2.2 Pre-capture Planning
word processors, and thumbnail sketches. We’ll now take a look at the areas that need to be fleshed out before you go into a shoot.
2.2.1 Script
The script is the narrative of the story that you’re trying to tell. This could be anything. It could be a screenplay, an idea for a short animation, or the shots needed for a video game. The script is one of the basic building blocks of any type of animation process.
The script allows you to bring all of your ideas together and gives a certain flow to the story that you want to tell. It not only serves as a roadmap for the client, but it also serves as a roadmap for the talent. The talent will need a script as early in the process as possible. This helps them not only prepare to be in character, but to understand what will be physically required of them.
When we refer to the client, we’re referring to whomever you are capturing the motion for. This can be for a class assignment, for yourself, for another group of students, for teachers who need some motion capture, or for paying clients in a studio. Always think of what you’re doing in this relationship and give your client the best motion capture experience pos-sible. Don’t cut corners or try to pass off bad data to anyone. It will hurt your reputation, and the motion capture world is a fairly small one.
Because I’ve worked in the private sector with motion capture, I’ll at times put emphasis on saving money and time, and these are important to think about no matter what situation you’re in. Even though saving money may not be relevant to a student who has access to a mocap system based on a course enrollment, still think about the impact that your decisions will have on the time it takes you to complete certain tasks.
Scriptwriters are professionals who specialize in writing scripts for films, TV programmes, anima-tions, video games, etc. It is common for a film script to be rewritten by multiple screenwriters while a project is going through the preproduction, production, and post-production phases. Typical scripts contain the following elements for each scene:
● Scene Heading: Short description of when and where a scene takes place. ● Action: Description of any moving elements in the scene.
● Dialog: Conversation between characters.
● Character Name: Character’s name that precedes his/her line in a dialog. ● Transition: Editing transition between shots or scenes (e.g., cut and dissolve). ● Shot: Name of a camera shot (e.g., close-up shot, long shot, and tracking shot).
where revisions can be maintained and multiple people can make comments or changes. The script is also used as the basis for the storyboard.
2.2.2 Storyboard
The storyboard is a 2D visual representation of the script. A script is turned into a set of drawings and short text that accompanies each drawing. They present essential elements of character performance, timing, staging, camera (shot size, camera move, camera angle, etc.), editing (transitions between shots, etc.), and sound (dialog, narrative, sound effect, etc.). Drawings for a storyboard are usually quick thumbnail sketches that are rough but pre-visualize the motions and emotions of the script. Storyboards have traditionally been one of the most important steps in preproductions of anima-tions, films, TV programmes, and games. They allow content creators, directors, performers, cin-ematographers, clients, and anyone else who is involved in the preproduction and/or production to get a clear picture of how the final product will look.
Most storyboard artists create storyboards in a format that allows them to make modifications eas-ily. Some pin thumbnail sketches to a cork board with pushpins; others draw on Post-it notes and stick them to a wall. Either way, they can add, delete, replace, and rearrange any parts of the sto-ryboard while they are trying to find the best way to tell the story.
How storyboards are made is not important. You can use pencils, markers, watercolors, pastels, computer applications, and anything else. No matter what you decide to use as a tool for story-boarding, keep in mind that you are making a storyboard to get your idea across. Storyboards do not have to look like art works because they are not. The main goal of storyboarding is to firm your ideas up and communicate with a team of artists and with decision makers, such as directors and clients. A good storyboard will result in a final product that reaches the audience’s heart.
2.2.3 Shot list
The shot list is a list of actions or motions that will be compiled together to create a scene. Breaking the story into shots will give you a very good idea about how complex each scene and shot will be and also about how many talent, props, and other things will be needed for each shot. This is one of the earliest and most important steps in organizing your project. It can tell you how many days a shoot will take, what types of talent will be needed on what days, if special rigging will be needed, etc.
If there is a lot of rough action and stunt work, you may want to have a longer shoot time. If it’s more dramatic with less dangerous action, you may want more acting talent. If there are special rig-ging shots, you’ll want to find a stunt coordinator who has experience in motion capture. Also try to figure out if your motion capture equipment is capable of capturing the desired motion. If there are a lot of physically demanding shots, it will take longer to capture these shots since the talent will tire quickly. Because of this, you will get fewer shots in during a day for this type of action, so take this into account when putting together your shot list.
As a term in cinematography a shot can be defined as a continuous view filmed by a single camera with no interruption, while a scene is a place or setting for an action to take place. A scene may consist of a series of shots (or a single shot) that depicts a continuous event. Thus, you may have several shots for a scene, instead of one continuous shot. You need to think about and decide what types of camera shots you want to use based on the storyboards as well as what types of editing are feasible, where editing includes both editing motion capture data to create motions that are humanly impossible or improbable and compositing in the post-production phase.
If you have one shot that’s 45 seconds of continuous running, you may not have enough physical area in your motion capture space to capture a full run for that long. The person may be through your space in a few seconds. In this case, you’d need to be able to loop smaller motions together several times to create 45 seconds of running. This is one of those types of problems you may encounter and will need to try to solve before you go into the mocap studio.
When thinking about the studio, always think about the amount of space it has as well as the capa-bilities. Are you going to be tracking facial, finger, and full body data all at once? If so, is this pos-sible throughout the entire space or is it just pospos-sible in a smaller area of the space that has more cameras? What are the physical limits as far as length, width, and height of the motion capture vol-ume? If you’re doing motions that are gymnastics related and possibly need a high bar, you’re going to want to make sure that this type of motion is flagged ahead of time for not fitting in the normal space as well as requiring special equipment. Use your shot list as a way to think about what you have to use for capture. We will look at shot lists in more detail in Section 2.3.4.
2.2.4 Animatic
The animatic is basically a storyboard in a time-based format that has visual elements (e.g., draw-ings, rough animation, camera moves, and preliminary special effects) and sound elements (e.g., dialog, sound effects, and music), where both elements are timed and edited together to fit each other. Animatics let us see how timing and cinematographic elements of the camera are working. That makes it easier for you to determine if your story is being told effectively or not. The pro-gression reel is similar to animatics but shots and scenes in a propro-gression reel are repeatedly replaced with animated scenes and elements that are closer to the final ones as the production proceeds.
Timing is essential, not only in telling a good story, but also in conserving money. If there are shots that can be reduced from 2 minutes down to 30 seconds, this is important and can usually be seen in an animatic. A common mistake is to try to capture really long motions or complex motions just because it’s possible and not because they add to the story. Don’t capture any scenes that do not contribute to the story telling. An animatic will help to see if your pacing is working and if all of your scenes are really adding to your overall story.
shots. This is a very helpful tool since the real-time rendering capability of video games allows for instant updating and changing without long render times that you’d have with a traditional ani-matic rendered by hand or with animation software. A good library of generic motions for this purpose is never a bad idea.
Students often animate camera positions in their 3D computer animation, not because a camera flying through a scene adds something important to story telling, but because it is easy and fun to move a virtual camera around. If you want to animate camera moves to create an effective dynamic shot, study popular types of camera moves that are possible with a real physical camera, such as dolly, crane, and boom.
Knowledge in cinematography is essential in making good films, videos, video games, and anima-tions, including mocap data driven ones. If you have never produced a narrative video piece, try it. Taking a video production course and a film history course is beneficial as well. There are a lot of good books on cinematography and film history too. Study and get familiar with common terms and concepts in cinematography that you need when you create storyboards and animatics. For those who are studying animation, we highly recommend Prepare to Board!: Creating Story and Characters for Animated Features and Shortsby Nancy Beiman, published by Focal Press, 2007. The author explains a number of concepts and techniques that are crucial in preproduction.
2.3 Preparation for Capture
Preproduction is one area where there are many things happening at once and if any one aspect is neglected it will have a negative impact on the overall process. There are too many times when a small oversight in this area has caused either bad data or people to dislike the process so much that they’ll never agree to use mocap again. We want the results to be good and the overall experience to be well thought out and enjoyable.
2.3.1 Talent
Make sure to use the proper talent. It can’t be stressed enough that if you want to motion capture dancing, then use dancers, not your friend who used to dance when she was 10 but hasn’t danced in years. The results are evident and the poise and confidence of the right talent come across in the data.
revealed the fact that she was not right for that particular role no matter how talented she was in her field. Remember that the final look and feel of motion capture has a lot to do with the talent, and you need to get the right talent for the right situation. The right talent will produce good motion capture.
There is also something to be said for capturing people that have distinguishable physical features. One of the stunt coordinators I enjoy working with has a few definable motion traits. One of those characteristics comes with the fact that he broke his arm close to the elbow and that arm never straightens all the way out. If we use his motion for a main character, that’s fine, but if we used his motion as the motion for several background characters, they all would have a slightly bent elbow. It would be fairly noticeable when half of the extras all have the same physical feature. I’ve heard people say “Well, you can edit that out. …” Yes, you can, but it takes much less time to mocap another person than trying to make the person look like someone else by massaging the data. When casting for facial animation, which may or may not be done separately, do not cast based on the voice alone. Cast for the look of the character and the voice. Some people are not good for facial capture. I personally am not a great candidate for facial capture. My brow goes far enough forward and my upper eyelids come up enough that I lose any markers on my upper eyelids. I also have what would be termed chubby cheeks that shake when I laugh. If the character is supposed to have a very lean face, you don’t want the motion capture data to possibly inject some secondary motion that’s not wanted in your character.
If you need to capture older people or kids, capture them. Do not capture people acting like older people or younger people unless there is an extremely good overriding reason to do so. Kids, adults, and seniors all move differently, so try to cast the right talent to the age as well.
2.3.2 Marker sets
The marker set defines how many markers will be attached to your actor, prop, and anything else that will be captured and where the markers will be placed. A few of the things to think about when attaching markers are: what the limitations of your system are, how close markers can get to each other, what type of motion you are capturing, and if the markers are in logical locations.
2.3.2.1 What are the system limitations?
2.3.2.2 What kind of motion will be captured?
The types of motion to be captured may cause you to move your markers away from the standard marker positions that you start with. For example, if your actor is constantly lying on the stomach, you may want to put more markers on the back and get rid of the ones on the front of the chest. Think if there are several markers that will be rarely or never seen because of a certain set of motions, other people, or props. If a number of markers will not be visible in a significant number of motions (maybe more than a quarter of your captures for a day), then you should make an alter-native marker set. If it’s only for one or two shots, it may not be worth interrupting the flow of the capture to create a different marker set. This is a judgment call you’ll have to make.
We normally have to apply different marker sets when using flying harnesses as well because the harnesses’ pick points and wires may interfere with markers. Since the pick points are normally on the sides of the hips the markers in those locations can be close enough to be sheared off by the wires. It’s best to work around this type of setup with an alternate marker set since you’ll get bad or unusable data almost every time if you use the normal marker set.
If you are doing a lot of work with physical rigging, physically demanding shots, or shots that require a lot of setup in between takes, you can always change marker sets during this time. Using your downtime to your advantage is an important area of motion capture. There always seems to be something to do, even if it’s just starting to create 3D data on a different computer while other people are changing a set. It’s important to maximize your time.
2.3.2.3 Know the anatomy
It’s very important to understand the anatomy of whatever you’re capturing. There are several anatomy books out there, but the really important issues are musculo-skeletal anatomy. We also like to refer to Anatomy of Movement by Blandine Calais-Germain, published by Eastland Press. When dealing with human motion, it gives a very clear view of how the body moves with a num-ber of illustrations and it’s thorough but not overly technical.
The importance of anatomy in regards to optical markers is that you are trying to represent the underlying human skeletal structure using a set of markers. You need an understanding of how bones relate to each other or what parts of the body move more than others. To decide where to attach a marker on a knee, it’s important to know how to find a good location for the marker as well as be able to replicate it on the other knee without just guessing. You want to avoid areas around the joints that move a lot, and try to find locations where the bone is near the surface. For markers in between the joints, you’ll have to compromise and use some locations that will move a lot. The leg is a good example where you need to place a marker on the upper leg, and the only place to put it in between the hip and knee is all muscle which will expand as the muscles are moved. You will have to put the marker someplace that will have a considerable amount of movement.
It also helps if you know how to find the bony landmarks that define the hips and other joints of the body. If you go too far below the landmarks for the hips, the motion of your marker will be heavily influenced by the upper leg; if you go too far above, it will be heavily influenced by the back and abdomen.
The markers are specifically located for a reason and it’s a good idea to know the reason. However, every system has its own way of placing markers, so we won’t cover a specific marker scheme here. Reference your motion capture manufacturer’s guides for their suggestion on where to place markers. They must have tested and retested different marker setups until they came up with an optimum setup. We suggest using their scheme to begin with and then changing it to work best for your situation. Anatomy is even more important when capturing very intricate data such as hand or facial data because a good understanding of anatomy will help you determine how many markers to use and where to put them. The face is extremely complicated, but the hands are as well, and getting good data from either requires both a lot of informed decision making and some trial and error. Never be afraid to try many different marker setups.
When we don’t know what we are really getting out of a capture (which is often true when exper-imenting), we usually put too many markers on. If there are too many markers you will see which ones are redundant and where one marker can be used, instead of two or three markers. The face is an area where we tend to place too many markers. Depending on the complexity of your facial rig and the requirements of your software application for it, you may need more or less markers. However, until you put some markers on a face, track them, label them, and then bring marker data into your 3D animation system; it’s not possible to know if your marker setup will give you what you’re looking for. It may take three tries to get experimentation to work reliably.
The first try is done with some guesswork on marker placement and we know in advance that we are not going to get perfect data, but it will give us a lot of useful information. We take all the information from the first try and apply it to the second try. This usually gets us 75% there. The third time we nar-row in on everything that we want: a marker setup that gives us clean useful data, how markers relate to the facial rig, and how we can get repeatable results (read Chapter 10 for more about facial capture). So what do you do if you’re not capturing a person but an animal? We usually try to take a human marker set and distort it to match whatever we’re capturing. A dog is a good example. Keep the back legs as in a human marker set, although you need to change them for the natural bend in a dog’s legs. Make the spine come forward out of the hips instead of going up. Rotate the upper arms down to the floor and shorten them. All the while make appropriate adjustments for the differences in dog and human anatomy. This method has a lot of flaws, but gives you a starting point. The biggest flaws are that a dog’s back curves differently than a human’s and that the shoulders are much more impor-tant in locomotion. Besides these are the obvious changes in bone lengths and positions.
Comparative anatomy is the study of the body structures of different species of animals. It helps us understand adaptive changes that body structures of vertebrates (that includes us, humans) have undergone in the process of evolving from common ancestors. At a glance, a horse’s knee and a human’s elbow seem to have evolved from the same joint of the common ancestor but a knee of a horse’s front leg is comparable to a human wrist and a human elbow is comparable to a horse’s joint that’s right below the rib cage.
than plants. Lions, tigers, and other carnivores don’t need long intestines and have flexible torsos that allow them to run fast to catch their prey. If you are capturing motions of a cat, you will need con-siderably more markers on its torso than when capturing a horse. You will be able to reduce your guesswork if you study the anatomy and movements of the animal that you will be capturing. There are a number of excellent books on comparative anatomy and biomechanics that can give you an idea how different things behave in motion. Just to name a few, Life’s Devicesby Steven Vogel, published by Princeton University Press, 1988, Exploring Biomechanics: Animals in Motionby R. McNeill Alexander, published by Scientific American Library, 1992, and Vertebrates: Comparative Anatomy, Function, Evolution
by Kenneth V. Kardong, Ph.D., published by McGraw Hill, 2002. Do some research.
2.3.3 Capture volume
The capture volume is the amount of 3D space that your motion capture system can “see.” When using an optical system, the capture volume never has a nice rectangular or square shape. It’s almost always more of a tent shape with higher points being in the middle. If you’re using a lot of cameras which are not pointing at the center of the space, then your capture volume can have a shape that is even more irregular. You’ll have to check the capture volume before every shoot. There are certainly a number of things to take into consideration when you are setting up your capture space for the first time. If you’re using an optical system, the number of cameras in your system is a major factor that deter-mines your capture volume’s size. You want a good mix of camera coverage over a floor. So, if you only have six or eight cameras (Figure 2.1), you’ll probably want your space to be as close to 10 feet by 10 feet as possible, although it could be closer to 8 feet by 8 feet.
Chapter 2: Preproduction 21
Figure 2.2 Cameras set up in a zone approach
If you have more cameras, you may want to create a type of overlapping “zone” approach in which the cameras are grouped and focused on quadrants, instead of all focusing on the center of your mocap space (Figure 2.2), but you should still try to get the center of the space in view of the cam-era if at all possible. This zoning approach may or may not allow every camcam-era to see the actual cen-ter of your capture space depending on the size of your capture volume and the number of cameras that you have. In certain types of capture spaces it is possible that only three or four of your cam-eras can see the center of the space and other camcam-eras have overlapping coverage areas with them. This type of setup is fine, but you need to check your manufacturer’s guidelines on setting up a volume.
camera and the center of your capture space does not have to be the exact distance that you figure out from the focal length.
The first step in roughing in a capture space is to place markers on the floor to outline the area that you’re interested in. Next, decide what the desirable height for the edges of your capture volume is and place markers at the height on tripods (poles, c-stands, or anything else that is tall enough). Then, place the tripods on the outline of the capture space where markers are placed in the previ-ous step.
The height of a capture volume depends on what will be captured. If your capture subject will be jumping up on a trampoline, you want to increase the height of your capture volume by reducing the capture space in terms of the square foot of floor area. The height for the edges of a capture space is normally somewhere between 6 and 7 feet.
Finally, adjust each camera’s aim so that the markers on the floor and the tripods are seen by as many cameras as possible. Markers in the capture space’s corners should be seen by at least two cameras, although three cameras would be more ideal. Adjusting camera aims is easier if you can do it with another person. While you are on a ladder to change a camera len’s aim, the other per-son can look at what the camera is looking at and tell you in which direction the camera aim should be moved. If you have to aim cameras by yourself, you may want to project what the camera is looking at onto a wall so that you can see it from the ladder you are on.
After setting up cameras, you need to test if your capture volume has any blind spots. To do this, walk around outside the capture space with an object with at least three markers on it. With three mark-ers you can track the object and see where the markmark-ers go in and out of the capture volume. Make sure to move it all over the space. Thus, you want to move it close to the floor and in the air to find out where markers disappear. Once you know where the blind spots are, adjust the cameras covering that part of the floor to eliminate the blind spot. You may need to calibrate your system first in order to have it compute the trajectories instead of just eyeballing when markers are in or out.
There are times that covering one blind spot opens up others. When this happens you either need to reposition your cameras and try to cover an overall smaller space, or you have to decide which blind spot you can live with. Either way, try to make the most out of what you have, but still remember that the better data you get, the better results you’ll have.
With a magnetic system, the size of a capture space is usually defined by the system. Hence, you can’t change it depending on specific needs for a shoot. A magnetic system needs to be calibrated for items in the room that may disturb the magnetic field. Calibration must be done in order to create a corrected magnetic field and let you know where the capture space’s boundary is. Outlining the capture space on the floor with tape helps you know when you step outside of it.
2.3.4 Shot list
preparations will be required, and how long each shot will take. A shot list should be the culmina-tion of your organizaculmina-tion regarding the shots that you are planning to capture moculmina-tions for. It is generated by breaking down a storyboard as we discussed in Section 2.2.3 (see an example shot list in Appendix A and on the CD).
Your shot list is for you as well as for your talent, client, and project staff. Your shot list should help you understand each shot’s requirement, organize people and props, and find the best order for cap-turing all shots that you need. Also the list should inform your talent of what’s expected of them and your client of what you’ll be doing.
No matter how great the talent is they will get tired especially if there are a lot of exhausting shots in a row. If your actor gets tired during a shoot, it will show up in captured motion data. You don’t want your 3D hero to look tired at some points and perfectly fine at others if the character is sup-posed to have the same silhouette or pose through all of the motions. If you can, spread strenuous shots throughout the day, but still try to bunch them together in small groups. For example, if you have several run motions, try to keep them together. If you also have several falling motions that are tiring for your talent as well, move the falling motions away from the run motions.
Use the shot list to help you know on what day which talent needs to be at the capture site. You do not want any talent to be sitting around all day long by needing them for the first shot in the morning and the last shot in the afternoon. It is your job to group the shots that require the same talent together as much as possible so that you can economize the amount of time that each talent is required to be there. That minimizes the amounts of your time and cost as well. Major set changes or stunt work also need to be figured into a shot list. For a shoot of 1 week or longer, you’ll normally have to write several drafts of a shot list until you get all the pieces fit together. Double and triple check your shot list before you distribute it.
Clients often want to sneak a few extra motions in on the capture day. Work it into your shot list in a logical manner and try to stay on track. If what they want will take too much time, let them know that it will impact the day’s shoot, but don’t refuse to do it. If they want to add another day’s worth of shooting, it would be best to let your producer or whoever handles your negotiations with your client talk with them about the time and financial ramifications of adding to the shot list.
2.3.5 Capture schedule
The capture schedule outlines logistics for a motion capture shoot, such as when and where cap-tures will happen, which talent will be involved, if audio is used, and if special props are needed. For the most part, the capture schedule is an expanded shot list. It lays out the schedule for each day of shooting and informs which talent is needed for which shots.
Be sure to have a lunch break. You can use the time to have your lunch, recalibrate the system, and make any adjustments that the actor’s mocap suit(s) needs. Mocap subjects cannot easily slip in/out of mocap suits, but they will eventually have to go to the bathroom. Lunch breaks are very con-venient times for that. When they take mocap suits off to go to the bathroom and put them back on, all the markers will shift and it will require you to recapture a T-pose, range of motion, scal-ing position, or whatever your system needs for trackscal-ing.
Some people become uncomfortably hot in mocap suits and may want to cool off by unzipping the suits and getting partially out of them. Try to make your talent as comfortable as possible. If you can’t have the mocap space air-conditioned enough, let your talent unzip the suit even if that means you will need to capture another T-pose. Have a positive attitude and consider recapturing a T-pose as an opportunity to improve the quality of your data, instead of an unscheduled task brought upon you. Always make enough room for any special setups in your capture schedule. If you need to bring in a trampoline or set up a flying rig for stunt work, you have to build setup time into your capture schedule so that everyone will know what needs to happen next and also setup time won’t cut into shoot time.
You want to follow your capture schedule as much as possible, but remember your capture sched-ule is a guide. Capture schedsched-ules are not set in stone and everyone appreciates a flexible approach, especially if they are new to motion capture. So, if you have to deviate from your schedule, try not be stressed out about it. Be flexible.
2.3.6 Rehearsals
Rehearsals are vitally important to the smooth running of a motion capture shoot. By rehearsals, we mean that the actor(s) will rehearse at an off-site location but not at the motion capture studio. There are many reasons to have off-site rehearsals, so let us go into just a few of them here. Time is money in a mocap studio. Each time you start using a mocap studio, someone has to pay for the electricity, the salaries of the staff who works there, and the wear and tear on the comput-ers, cameras, mocap suits, and markers to name just a few of the obvious costs. Your client does not want to waste any part of a day in a mocap studio. While a director or choreographer is figuring out how to approach a shot with talent, your client will be paying for the mocap staff who is not capturing anything. That will be a large waste of money on the client’s part. Rehearsing at an off-site location can certainly avoid such a situation.
Some clients may swear that they are prepared although they’re not. Talk to your client about hav-ing a rehearsal at an off-site location. If you can convince your client to have a rehearsal, it will ben-efit you as well. You will be able to flag difficult to capture motions and foreseeable problems. Your clients may never give you a shot list or will give you one that will change a lot when they start shooting. Rehearsing will help the clients to better understand what they are really looking for. It also lets the clients know if they want something that they have never thought of before until they see it acted out in front of them. Rehearsing will help your clients to create a better shot list.
You can’t force your clients to have a rehearsal. If you tell your clients that you want them to have a rehearsal because it will make your life easier it will be very unlikely that they take you seriously. They may tell you that they are not paying you to have an easy life. On the other hand, if you explain to your clients that a rehearsal can save their money and time, they will be more agreeable. If you are the client, then you can of course make the people whom you work with have a rehearsal and get ideas about how the mocap shoot will go, how much you can possibly capture in 1 day, etc. Planning ahead and thinking things through always make the whole mocap process easier. Many times clients will not know exactly what they want to do because they have not done motion capture before or a member of their production crew is not familiar with it. There is also a case where the clients have done it several times before and know what to expect, but they are not used to your way of doing things. You will encounter individuals who have seen mocap on YouTube and assume that they know how it’s done. It is your job to educate them about how motion cap-ture works and how your studio should run in a non-hostile, cooperative manner. Also be flexible enough to make them comfortable by relaxing your methodology and adding a little of theirs. You’ll find out you get much better results when everyone understands what other people are doing and why. You’ll also make your methodology better.
2.3.7 Props
One area that people tend to work on at the last minute is the props. There are a variety of good and bad reasons that props are added at the last second, but you normally have to accept it and try to incorporate them into what you’re doing. By props we mean “markered” props that will be cap-tured. They should be regarded as actors. The reason to think of them this way is that you will be capturing their motions and they will be moving in relationship to your actor(s).
Because props are usually moved in relationship to the actor(s), special consideration needs to be given to where to place markers and how many to place. You usually need at least three markers, but think about using more to help with occlusion problems. Occlusion will normally happen if the prop that you are using is picked up by an actor or handed from one actor to another. Unless you know for sure that the markers will always be seen by the cameras, it’s best to double up on the markers. More about props and markers will be covered in Chapter 6.
When you are deciding where to place markers, think about where the prop will be handled and what other markers on the actor will be in the same vicinity. If the prop is a rifle, the butt of the rifle will be up against the actor’s shoulder. In this case, you wouldn’t want to put a marker on the butt of the rifle (Figure 2.3), but a few inches up on the top side of the stock would work well (Figure 2.4).
Chapter 2: Preproduction 27
Figure 2.4 Better marker placement
Another consideration for props is their relationship to other props that are captured on the set. If you are capturing a sword, you will of course need to pay attention to the relationship between the sword and the actor’s hand that’s holding it. If the sword hits another sword, you will also need to pay attention to the relationship between the two swords. You do not want markers to get flung off when the swords collide.
Think about these relational issues when placing markers on your props. Test capture your mark-ered props to see if marker placements are working and also if props are reflective enough to cause an issue with your motion capture sensors. If a prop is too shiny, then ask the prop’s owner if it is OK to cover the prop up with gaffer’s tape or paper tape. Also, before you start attaching markers on a prop, talk to the prop’s owner about potential damages to the prop. Some tape or glue will take the finish off of a prop’s surface and damage the prop.
When you attach motions to a 3D character, a prop should not be treated as a natural rigid exten-sion of the character’s hand because it is not. When people use hammers, golf clubs, etc. the items will swing and move in their hands. Thus, a grip, or how an actor holds a prop in the hand, can change in the course of an action. That’s why props cannot be regarded as rigid extensions of hands. There are a few different types of grips, but let’s look at two of the most common ones. One is the grip that you use when you are pointing a prop at someone. It is more of a golfing grip where the thumb is open and the object lies diagonally across the palm. The other is the grip that you use when you are holding a prop upright. It is more of a hammer grip where the thumb is normally closed and the object lies along the palm parallel to the knuckles. There are obviously other ways to grip items, but these two can exemplify the point that an object moves within the hand and changes its orientation with respect to the hand. Do not simply parent a prop object to a hand of a 3D character. Spend time making sure that you properly track the props and the actors and then learn good editing techniques to take the above fact into account.