Exam Ref 70-483:
Programming in C#
Published with the authorization of Microsoft Corporation by: O’Reilly Media, Inc.
1005 Gravenstein Highway North Sebastopol, California 95472
Copyright © 2013 by O'Reilly Media, Inc.
All rights reserved. No part of the contents of this book may be reproduced or transmitted in any form or by any means without the written permission of the publisher.
ISBN: 978-0-7356-7682-4
1 2 3 4 5 6 7 8 9 QG 8 7 6 5 4 3
Printed and bound in the United States of America.
Microsoft Press books are available through booksellers and distributors worldwide. If you need support related to this book, email Microsoft Press Book Support at [email protected]. Please tell us what you think of this book at http://www.microsoft.com/learning/booksurvey.
Microsoft and the trademarks listed at http://www.microsoft.com/about/legal/en/us/IntellectualProperty/ Trademarks/EN-US.aspx are trademarks of the Microsoft group of companies. All other marks are property of their respective owners.
The example companies, organizations, products, domain names, email addresses, logos, people, places, and events depicted herein are fictitious. No association with any real company, organization, product, domain name, email address, logo, person, place, or event is intended or should be inferred.
This book expresses the author’s views and opinions. The information contained in this book is provided without any express, statutory, or implied warranties. Neither the authors, O’Reilly Media, Inc., Microsoft Corporation, nor its resellers, or distributors will be held liable for any damages caused or alleged to be caused either directly or indirectly by this book.
Acquisitions and Developmental Editor: Russell Jones Production Editor: Melanie Yarbrough
Editorial Production: Box Twelve Communications Technical Reviewer: Auri Rahimzadeh
Copyeditor: Ginny Munroe
Dedicated to my parents who encouraged me to start
programming when I was 7.
Contents at a glance
Introduction xv
Preparing for the exam
xxi
ChAPTER 1 Manage program flow 1
ChAPTER 2 Create and use types 89
ChAPTER 3 Debug applications and implement security 179
ChAPTER 4 Implement data access 253
What do you think of this book? We want to hear from you!
Microsoft is interested in hearing your feedback so we can continually improve our books and learning resources for you. To participate in a brief online survey, please visit:
Contents
Introduction xv
Microsoft certifications xv
Who should read this book xvi
Organization of this book xvi
System requirements xvii
Conventions and features in this book xvii
Preparing for the exam xxi
Chapter 1
Manage program flow
1
Objective 1.1: Implement multithreading and
asynchronous processing . . . 2
Understanding threads 2
Using Tasks 10
Using the Parallel class 16
Using async and await 17
Using Parallel Language Integrated Query (PLINQ) 21
Using concurrent collections 25
Objective summary 30
Objective review 30
Objective 1.2: Manage multithreading . . . 31
Synchronizing resources 31
Canceling tasks 37
Objective summary 40
Objective review 40
Objective 1.3: Implement program flow . . . 41
Working with Boolean expressions 41
Making decisions 44
Objective summary 55
Objective review 56
Objective 1.4: Create and implement events and callbacks . . . 57
Understanding delegates 57
Using lambda expressions 59
Using events 61
Objective summary 67
Objective review 68
Objective 1.5: Implement exception handling . . . 68
Handling exceptions 69
Throwing exceptions 75
Creating custom exceptions 79
Objective summary 81
Objective review 82
Chapter summary . . . 82
Answers . . . 83
Objective 1.1: Thought experiment 83
Objective 1.1: Review 83
Objective 1.2: Thought experiment 84
Objective 1.2: Review 84
Objective 1.3: Thought experiment 85
Objective 1.3: Review 86
Objective 1.4: Thought experiment 87
Objective 1.4: Review 87
Objective 1.5: Thought experiment 88
Objective 1.5: Review 88
Chapter 2 Create and use types
89
Objective 2.1: Create types . . . 89
Choosing a type to create 90
Giving your types some body 93
Designing classes 99
Using generic types 101
Objective summary 106
Objective review 106
Objective 2.2: Consume types . . . 107
Boxing and unboxing 107
Converting between different types 108
Using dynamic types 112
Objective summary 114
Objective review 115
Objective 2.3: Enforce encapsulation . . . 116
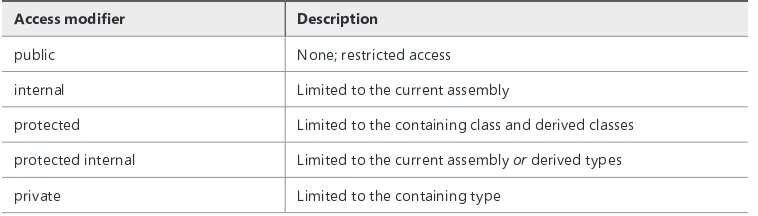
Using access modifiers 116
Using properties 120
Using explicit interface implementations 121
Objective summary 123
Objective review 124
Objective 2.4: Create and implement a class hierarchy . . . 124
Designing and implementing interfaces 125
Creating and using base classes 128
Implementing standard .NET Framework interfaces 133
Objective summary 138
Objective review 138
Objective 2.5: Find, execute, and create types at runtime by
using reflection . . . 139
Creating and using attributes 139
Using reflection 143
Using CodeDom and lambda expressions to generate code 145
Objective summary 149
Objective review 149
Objective 2.6: Manage the object life cycle . . . 150
Understanding garbage collection 150
Managing unmanaged resources 151
Objective summary 157
Objective 2.7: Manipulate strings . . . 158
Using strings in the .NET Framework 159
Manipulating strings 160
Searching for strings 162
Enumerating strings 163
Formatting strings 163
Objective summary 167
Objective review 167
Chapter summary . . . 168
Answers . . . 169
Objective 2.1: Thought experiment 169
Objective 2.1: Review 169
Objective 2.2: Thought experiment 170
Objective 2.2: Review 170
Objective 2.3: Thought experiment 171
Objective 2.3: Review 172
Objective 2.4: Thought experiment 173
Objective 2.4: Review 173
Objective 2.5: Thought experiment 174
Objective 2.5: Review 174
Objective 2.6: Thought experiment 175
Objective 2.6: Review 176
Objective 2.7: Thought experiment 177
Objective 2.7: Review 177
Chapter 3 Debug applications and implement security
179
Objective 3.1: Validate application input . . . 179
Why validating application input is important 180
Managing data integrity 180
Using Parse, TryParse, and Convert 185
Using regular expressions 188
Validating JSON and XML 189
Objective summary 192
Objective 3.2 Perform symmetric and asymmetric encryption . . . 193
Using symmetric and asymmetric encryption 194
Working with encryption in the .NET Framework 195
Using hashing 199
Managing and creating certificates 202
Using code access permissions 204
Securing string data 206
Objective summary 208
Objective review 209
Objective 3.3 Manage assemblies . . . 209
What is an assembly? 210
Signing assemblies using a strong name 211
Putting an assembly in the GAC 214
Versioning assemblies 214
Creating a WinMD assembly 217
Objective summary 219
Objective review 219
Objective 3.4 Debug an application . . . 220
Build configurations 220
Creating and managing compiler directives 222
Managing program database files and symbols 226
Objective summary 230
Objective review 230
Objective 3.5 Implement diagnostics in an application . . . 231
Logging and tracing 231
Profiling your application 238
Creating and monitoring performance counters 241
Objective summary 245
Objective review 245
Chapter summary . . . 246
Answers . . . 247
Objective 3.1: Thought experiment 247
Objective 3.1: Review 247
Objective 3.2: Review 248
Objective 3.3: Thought experiment 249
Objective 3.3: Review 249
Objective 3.4: Thought experiment 250
Objective 3.4: Review 250
Objective 3.5: Thought experiment 251
Objective 3.5: Review 251
Chapter 4 Implement data access
253
Objective 4.1: Perform I/O operations . . . 253
Working with files 254
Working with streams 260
The file system is not just for you 263
Communicating over the network 265
Implementing asynchronous I/O operations 266
Objective summary 269
Objective review 269
Objective 4.2: Consume data . . . 270
Working with a database 271
Using web services 281
Consuming XML 284
Consuming JSON 289
Objective summary 290
Objective review 291
Objective 4.3: Query and manipulate data and objects by using LINQ . 291
Language features that make LINQ possible 292
Using LINQ queries 296
How does LINQ work? 300
Objective summary 305
Objective review 306
Objective 4.4: Serialize and deserialize data . . . 307
Using serialization and deserialization 307
Using XmlSerializer 308
Using JSON serializer 315
Objective summary 316
Objective review 317
Objective 4.5: Store data in and retrieve data from collections . . . 317
Using arrays 318
Understanding generic versus nongeneric 319
Using List 319
Using Dictionary 321
Using sets 322
Using queues and stacks 323
Choosing a collection 324
Creating a custom collection 324
Objective summary 326
Objective review 326
Chapter summary . . . 327
Answers . . . 328
Objective 4.1: Thought experiment 328
Objective 4.1: Objective review 328
Objective 4.2: Thought experiment 329
Objective 4.2: Objective review 329
Objective 4.3: Thought experiment 330
Objective 4.3: Objective review 331
Objective 4.4: Thought experiment 332
Objective 4.4: Objective review 332
Objective 4.5: Thought experiment 333
Objective 4.5: Objective review 333
Index 335
What do you think of this book? We want to hear from you!
Microsoft is interested in hearing your feedback so we can continually improve our books and learning resources for you. To participate in a brief online survey, please visit:
Introduction
The Microsoft 70-483 exam focuses on a broad range of topics that you can use in your work as a C# developer. This book helps you understand both the basic and the more advanced areas of the C# language. It shows you how to use the C# language to create powerful software applications. This book also shows you how to use the new features that were added to the C# language, such as support for asynchronous code. This book is aimed at developers who have some experience with C# but want to deepen their knowledge and make sure they are ready for the exam. To use the examples in this book, you should be familiar with using Visual Studio to create a basic Console Application.
This book covers every exam objective, but it does not cover every exam question. Only the Microsoft exam team has access to the exam questions themselves and Microsoft regu-larly adds new questions to the exam, making it impossible to cover specific questions. You should consider this book a supplement to your relevant real-world experience and other study materials. If you encounter a topic in this book that you do not feel completely com-fortable with, use the links to find more information and take the time to research and study the topic. Great information is available on MSDN, TechNet, in blogs, and in forums.
Microsoft certifications
Microsoft certifications distinguish you by proving your command of a broad set of skills and experience with current Microsoft products and technologies. The exams and corresponding certifications are developed to validate your mastery of critical competencies as you design and develop, or implement and support, solutions with Microsoft products and technologies both on-premise and in the cloud. Certification brings a variety of benefits to the individual and to employers and organizations.
MORE INFO ALL MICROSOFT CERTIFICATIONS
Who should read this book
This book is intended for developers who want to achieve certification for the C# program-ming language. This book prepares you to take and pass the exam 70-483: Programprogram-ming in C#. Successfully passing the 70-483 exam also counts as credit toward the Microsoft Certified Solution Developer (MCSD): Windows Store Apps Using C#.
Developers reading this book should have a basic understanding of writing a simple C# program. You can create and run applications using Visual Studio.
Assumptions
You should have at least one or more years of experience programming the essential busi-ness/application logic for a variety of application types and hardware/software platforms us-ing C#. As you progress with your learnus-ing through this book and other study resources, you will become proficient at developing complex applications. You will be able to use all features that C# offers. This book is focused on helping those of you whose goal is to become certified as a C# developer.
You can find information about the audience for Exam 70-483 in the exam prepa-ration guide, available at http://www.microsoft.com/learning/en/us/exam-70-483. aspx#fbid=x2KPCL1L6z8.
Organization of this book
This book is divided into four chapters. Each chapter focuses on a different exam domain re-lated to Exam 70-483: Programming in C#. Each chapter is further broken down into specific exam objectives that have been published by Microsoft; they can found in the "Skills Being Measured" section of the Exam 70-483: Programming in C# website at http://www.microsoft. com/learning/en/us/exam-70-483.aspx#fbid=x2KPCL1L6z8.
System requirements
Where you are unfamiliar with a topic covered in this book, you should practice the concept on your study PC. You will need the following hardware and software to complete the prac-tice exercises in this book:
■ One study PC that can be installed with Visual Studio 2012 (see hardware specifications below) or a PC that allows the installation of Visual Studio 2012 within a virtualized environment. You can use Visual Studio 2012 Professional, Premium, or Ultimate if you own a license for one of these. If you don't have access to a licensed version, you can also use Visual Studio 2012 Express for Windows Desktop, which can be downloaded from http://www.microsoft.com/visualstudio/eng/downloads.
■ Visual Studio 2012 supports the following operating systems: Windows 7 SP1 (x86 and x64), Windows 8 (x86 and x64), Windows Server 2008 R2 SP1 (x64), Windows Server 2012 (x64).
■ Visual Studio 2012 requires the following minimum hardware requirements: 1.6 GHz or faster processor, 1 GB of RAM (1.5 GB if running on a virtual machine), 5 GB of avail-able hard disk space, 100 MB of availavail-able hard disk space (language pack), 5400 RPM hard disk drive, DirectX 9-capable video card running at 1024 x 768 or higher display resolution.
■ If you plan to install Visual Studio 2012 in a virtualized environment, you should consider using Hyper-V and ensure that the minimum hardware requirements are as follows: x64-based processor, which includes both hardware-assisted virtualiza-tion (AMD-V or Inter VT) and hardware data execuvirtualiza-tion protecvirtualiza-tion; 4 GB RAM (more is recommended); network card; video card; DVD-ROM drive; and at least 100 GB of available disk space available to allow for the storage of multiple virtual machines.
Conventions and features in this book
This book presents information using conventions designed to make the information readable and easy to follow:
■ Each exercise consists of a series of tasks, presented as numbered steps listing each action you must take to complete the exercise.
■ Boxed elements with labels such as "Note" provide additional information or alterna-tive methods for completing a step successfully.
■ Boxed elements with "Exam Tip" labels provide additional information that might offer helpful hints or additional information on what to expect on the exam.
■ A plus sign (+) between two key names means that you must press those keys at the same time. For example, "Press Alt+Tab" means that you hold down the Alt key while you press the Tab key.
■ A vertical bar between two or more menu items (for example, File | Close) means that you should select the first menu or menu item, then the next, and so on.
Acknowledgments
I’d like to thank the following people:
■ To Jeff Riley for providing me the opportunity to write this book.
■ To Ginny Munroe for helping me through the whole editing process. I learned a lot from your feedback and advice.
■ To Auri Rahimzadeh for your technical reviewing skills.
■ To my wife, Elise, for your support.
And to all the other people who played a rolein getting this book ready. Thanks for your hard work!
Errata & book support
We’ve made every effort to ensure the accuracy of this book and its companion content. Any errors that have been reported since this book was published are listed on our Microsoft Press site at oreilly.com:
http://aka.ms/ER70-483/errata
If you find an error that is not already listed, you can report it to us through the same page. If you need additional support, email Microsoft Press Book Support at [email protected].
We want to hear from you
At Microsoft Press, your satisfaction is our top priority, and your feedback our most valu-able asset. Please tell us what you think of this book at:
http://www.microsoft.com/learning/booksurvey
The survey is short, and we read every one of your comments and ideas. Thanks in ad-vance for your input!
Stay in touch
Preparing for the exam
Microsoft certification exams are a great way to build your resume and let the world know about your level of expertise. Certification exams validate your on-the-job experience and product knowledge. While there is no substitution for on-the-job experience, preparation through study and hands-on practice can help you prepare for the exam. We recommend that you round out your exam preparation plan by using a combination of available study materials and courses. For example, you might use this Exam Ref and another study guide for your "at home" preparation, and take a Microsoft Official Curriculum course for the classroom experience. Choose the combination that you think works best for you.
C h A P T E R 1
Manage program flow
If you could build only programs that execute all theirlogic from top to bottom, it would not be feasible to build complex applications. Fortunately, C# and the .NET Framework offer you a lot of options for creating complex programs that don’t have a fixed program flow.
This chapter starts with looking at how to create mul-tithreaded applications. Those applications can scale well and remain responsive to the user while doing their work. You will also look at the new language feature async/ await that was added to C# 5.
You will learn about the basic C# language constructs
to make decisions and execute a piece of code multiple times, depending on the circum-stances. These constructs form the basic language blocks of each application, and you will use them often.
After that, you will learn how to create applications that are loosely coupled by us-ing delegates and events. With events, you can build objects that can notify each other when something happens and that can respond to those notifications. Frameworks such as ASP.NET, Windows Presentation Foundation (WPF), and WinForms make heavy use of events; understanding events thoroughly will help you build great applications.
Unfortunately, your program flow can also be interrupted by errors. Such errors can hap-pen in areas that are out of your control but that you need to respond to. Sometimes you want to raise such an error yourself. You will learn how exceptions can help you implement a robust error-handling strategy in your applications.
Objectives in this chapter:
■ Objective 1.1: Implement multithreading and asynchronous processing
■ Objective 1.2: Manage multithreading
■ Objective 1.3: Implement program flow
■ Objective 1.4: Create and implement events and callbacks
■ Objective 1.5. Implement exception handling
i m p o r t a n t
Have you read
page xxi?
Objective 1.1: Implement multithreading and
asynchronous processing
Applications are becoming more and more complex as user expectations rise. To fully take advantage of multicore systems and stay responsive, you need to create applications that use multiple threads, often called parallelism.
The .NET Framework and the C# language offer a lot of options that you can use to create multithreaded applications.
This objective covers how to:
■ Understand threads.
■ Use the Task Parallel Library.
■ Use the Parallel class.
■ Use the new async and await keywords.
■ Use Parallel Language Integrated Query.
■ Use concurrent collections.
Understanding threads
Imagine that your computer has only one central processing unit (CPU) that is capable of executing only one operation at a time. Now, imagine what would happen if the CPU has to work hard to execute a task that takes a long time.
While this operation runs, all other operations would be paused. This means that the whole machine would freeze and appear unresponsive to the user. Things get even worse when that long-running operation contains a bug so it never ends. Because the rest of the machine is unusable, the only thing you can do is restart the machine.
To remedy this problem, the concept of a thread is used. In current versions of Windows, each application runs in its own process. A process isolates an application from other applica-tions by giving it its own virtual memory and by ensuring that different processes can’t influ-ence each other. Each process runs in its own thread. A thread is something like a virtualized CPU. If an application crashes or hits an infinite loop, only the application’s process is affected.
certain time period. After this period ends, the thread is paused and Windows switches to another thread. This is called context switching.
In practice, this means that Windows has to do some work to make it happen. The cur-rent thread is using a certain area of memory; it uses CPU registers and other state data, and Windows has to make sure that the whole context of the thread is saved and restored on each switch.
But although there are certain performance hits, using threads does ensure that each process gets its time to execute without having to wait until all other operations finish. This improves the responsiveness of the system and gives the illusion that one CPU can execute multiple tasks at a time. This way you can create an application that uses parallelism, meaning that it can execute multiple threads on different CPUs in parallel.
Almost any device that you buy today has a CPU with multiple cores, which is similar to having multiple CPUs. Some servers not only have multicore CPUs but they also have more than one CPU. To make use of all these cores, you need multiple threads. Windows ensures that those threads are distributed over your available cores. This way you can perform mul-tiple tasks at once and improve scalability.
Because of the associated overhead, you should carefully determine whether you need multithreading. But if you want to use threads for scalability or responsiveness, C# and .NET Framework offer you a lot of possibilities.
Using the
Thread
class
The Thread class can be found in the System.Threading namespace. This class enables you to create new treads, manage their priority, and get their status.
The Thread class isn’t something that you should use in your applications, except when you have special needs. However, when using the Thread class you have control over all configura-tion opconfigura-tions. You can, for example, specify the priority of your thread, tell Windows that your thread is long running, or configure other advanced options.
As you can see, both threads run and print their message to the console. The Thread.Join method is called on the main thread to let it wait until the other thread finishes.
Why the Thread.Sleep(0)? It is used to signal to Windows that this thread is finished. In -stead of waiting for the whole time-slice of the thread to finish, it will immediately switch to another thread.
Both your process and your thread have a priority. Assigning a low priority is useful for applications such as a screen saver. Such an application shouldn’t compete with other applica-tions for CPU time. A higher-priority thread should be used only when it’s absolutely neces-sary. A new thread is assigned a priority of Normal, which is okay for almost all scenarios.
Another thing that’s important to know about threads is the difference between fore-ground and background threads. Foreground threads can be used to keep an application alive. Only when all foreground threads end does the common language runtime (CLR) shut down your application. Background threads are then terminated.
Listing 1-2 shows this difference in action.
LISTING 1-2 Using a background thread
using System;
using System.Threading;
namespace Chapter1 {
public static class Program
{
public static void ThreadMethod() {
for (int i = 0; i < 10; i++) {
Console.WriteLine(“ThreadProc: {0}”, i); Thread.Sleep(1000);
} }
public static void Main() {
Thread t = new Thread(new ThreadStart(ThreadMethod)); t.IsBackground = true;
t.Start(); }
} }
The Thread constructor has another overload that takes an instance of a Parameter-izedThreadStart delegate. This overload can be used if you want to pass some data through the start method of your thread to your worker method, as Listing 1-3 shows.
LISTING 1-3 Using the ParameterizedThreadStart public static void ThreadMethod(object o) expected type to use it in your method.
To stop a thread, you can use the Thread.Abort method. However, because this method is executed by another thread, it can happen at any time. When it happens, a ThreadAbort-Exception is thrown on the target thread. This can potentially leave a corrupt state and make your application unusable.
A better way to stop a thread is by using a shared variable that both your target and your calling thread can access. Listing 1-4 shows an example.
LISTING 1-4 Stopping a thread
Thread t = new Thread(new ThreadStart(() =>
In this case, the thread is initialized with a lambda expression (which in turn is just a short-hand version of a delegate). The thread keeps running until stopped becomes true. After that, the t.Join method causes the console application to wait till the thread finishes execution.
A thread has its own call stack that stores all the methods that are executed. Local vari-ables are stored on the call stack and are private to the thread.
A thread can also have its own data that’s not a local variable. By marking a field with the ThreadStatic attribute, each thread gets its own copy of a field (see Listing 1-5).
for(int x = 0; x < 10; x++) {
_field++;
Console.WriteLine(“Thread B: {0}”, _field); }
}).Start();
Console.ReadKey(); }
} }
With the ThreadStaticAttribute applied, the maximum value of _field becomes 10. If you remove it, you can see that both threads access the same value and it becomes 20.
If you want to use local data in a thread and initialize it for each thread, you can use the ThreadLocal<T> class. This class takes a delegate to a method that initializes the value. Listing 1-6 shows an example.
LISTING 1-6 Using ThreadLocal<T> using System;
using System.Threading;
namespace Chapter1 {
public static class Program {
public static ThreadLocal<int> _field = new ThreadLocal<int>(() =>
{
return Thread.CurrentThread.ManagedThreadId;
});
public static void Main() {
new Thread(() =>
{
for(int x = 0; x < _field.Value; x++) {
Console.WriteLine(“Thread A: {0}”, x); }
}).Start(); new Thread(() => {
for (int x = 0; x < _field.Value; x++) {
}).Start();
Console.ReadKey(); }
} }
// Displays // Thread B: 0 // Thread B: 1 // Thread B: 2 // Thread B: 3 // Thread A: 0 // Thread A: 1 // Thread A: 2
Here you see another feature of the .NET Framework. You can use the Thread.Current-Thread class to ask for information about the thread that’s executing. This is called the thread’s execution context. This property gives you access to properties like the thread’s current culture (a CultureInfo associated with the current thread that is used to format dates, times, numbers, currency values, the sorting order of text, casing conventions, and string comparisons), principal (representing the current security context), priority (a value to indicate how the thread should be scheduled by the operating system), and other info.
When a thread is created, the runtime ensures that the initiating thread’s execution context is flowed to the new thread. This way the new thread has the same privileges as the parent thread.
This copying of data does cost some resources, however. If you don’t need this data, you can disable this behavior by using the ExecutionContext.SuppressFlow method.
Thread pools
When working directly with the Thread class, you create a new thread each time, and the thread dies when you’re finished with it. The creation of a thread, however, is something that costs some time and resources.
A thread pool is created to reuse those threads, similar to the way a database connection pooling works. Instead of letting a thread die, you send it back to the pool where it can be reused whenever a request comes in.
When you work with a thread pool from .NET, you queue a work item that is then picked up by an available thread from the pool. Listing 1-7 shows how this is done.
LISTING 1-7 Queuing some work to the thread pool
using System;
using System.Threading;
namespace Chapter1 {
public static void Main() {
ThreadPool.QueueUserWorkItem((s) => {
Console.WriteLine(“Working on a thread from threadpool”); });
Console.ReadLine(); }
} }
Because the thread pool limits the available number of threads, you do get a lesser degree of parallelism than using the regular Thread class. But the thread pool also has many advan-tages.
Take, for example, a web server that serves incoming requests. All those requests come in at an unknown time and frequency. The thread pool ensures that each request gets added to the queue and that when a thread becomes available, it is processed. This ensures that your server doesn’t crash under the amount of requests. If you span threads manually, you can easily bring down your server if you get a lot of requests. Each request has unique charac-teristics in the work they need to do. What the thread pool does is map this work onto the threads available in the system. Of course, you can still get so many requests that you run out of threads. Requests then start to queue up and this leads to your web server becoming unresponsive.
The thread pool automatically manages the amount of threads it needs to keep around. When it is first created, it starts out empty. As a request comes in, it creates additional threads to handle those requests. As long as it can finish an operation before a new one comes in, no new threads have to be created. If new threads are no longer in use after some time, the thread pool can kill those threads so they no longer use any resources.
MORE INFO ThREAD POOL
For more information on how the thread pool works and how you can configure it, see
http://msdn.microsoft.com/en-us/library/system.threading.threadpool.aspx.
One thing to be aware of is that because threads are being reused, they also reuse their local state. You may not rely on state that can potentially be shared between multiple operations.
Using
Task
s
This is why the .NET Framework introduces the concept of a Task, which is an object that represents some work that should be done. The Task can tell you if the work is completed and if the operation returns a result, the Task gives you the result.
A task scheduler is responsible for starting the Task and managing it. By default, the Task scheduler uses threads from the thread pool to execute the Task.
Tasks can be used to make your application more responsive. If the thread that manages the user interface offloads work to another thread from the thread pool, it can keep process-ing user events and ensure that the application can still be used. But it doesn’t help with scal-ability. If a thread receives a web request and it would start a new Task, it would just consume another thread from the thread pool while the original thread waits for results.
Executing a Task on another thread makes sense only if you want to keep the user in-terface thread free for other work or if you want to parallelize your work on to multiple processors.
Listing 1-8 shows how to start a new Task and wait until it’s finished.
LISTING 1-8 Starting a new Task using System;
using System.Threading.Tasks;
namespace Chapter1 {
public static class Program {
public static void Main()
{
Task t = Task.Run(() => {
for (int x = 0; x < 100; x++) {
Console.Write(‘*’); }
});
t.Wait();
} } }
Next to Task, the .NET Framework also has the Task<T> class that you can use if a Task should return a value. Listing 1-9 shows how this works.
LISTING 1-9 Using a Task that returns a value. using System;
using System.Threading.Tasks;
namespace Chapter1 {
public static class Program {
public static void Main() {
Task<int> t = Task.Run(() => {
return 42; });
Console.WriteLine(t.Result); // Displays 42 }
} }
Attempting to read the Result property on a Task will force the thread that’s trying to read the result to wait until the Task is finished before continuing. As long as the Task has not finished, it is impossible to give the result. If the Task is not finished, this call will block the current thread.
Because of the object-oriented nature of the Task object, one thing you can do is add a continuation task. This means that you want another operation to execute as soon as the Task finishes.
Listing 1-10 shows an example of creating such a continuation.
LISTING 1-10 Adding a continuation
Task<int> t = Task.Run(() => {
return 42; }).ContinueWith((i) => {
return i.Result * 2; });
Console.WriteLine(t.Result); // Displays 84
LISTING 1-11 Scheduling different continuation tasks
Next to continuation Tasks, a Task can also have several child Tasks. The parentTask fin-ishes when all the child tasks are ready. Listing 1-12 shows how this works.
LISTING 1-12 Attaching child tasks to a parent task
finalTask.Wait(); }
} }
The finalTask runs only after the parent Task is finished, and the parent Task finishes when all three children are finished. You can use this to create quite complex Task hierarchies that will go through all the steps you specified.
In the previous example, you had to create three Tasks all with the same options. To make the process easier, you can use a TaskFactory. A TaskFactory is created with a certain configu -ration and can then be used to create Tasks with that configuration. Listing 1-13 shows how you can simplify the previous example with a factory.
LISTING 1-13 Using a TaskFactory using System;
using System.Threading.Tasks;
namespace Chapter1 {
public static class Program {
public static void Main() {
Task<Int32[]> parent = Task.Run(() => {
var results = new Int32[3];
TaskFactory tf = new TaskFactory(TaskCreationOptions.AttachedToParent, TaskContinuationOptions.ExecuteSynchronously);
tf.StartNew(() => results[0] = 0); tf.StartNew(() => results[1] = 1); tf.StartNew(() => results[2] = 2); return results;
});
var finalTask = parent.ContinueWith( parentTask => {
foreach(int i in parentTask.Result) Console.WriteLine(i);
});
finalTask.Wait(); }
} }
LISTING 1-14 Using Task.WaitAll
In this case, all three Tasks are executed simultaneously, and the whole run takes approxi-mately 1000ms instead of 3000. Next to WaitAll, you also have a WhenAll method that you can use to schedule a continuation method after all Tasks have finished.
Instead of waiting until all tasks are finished, you can also wait until one of the tasks is finished. You use the WaitAny method for this. Listing 1-15 shows how this works.
tasks[0] = Task.Run(() => { Thread.Sleep(2000); return 1; }); tasks[1] = Task.Run(() => { Thread.Sleep(1000); return 2; }); tasks[2] = Task.Run(() => { Thread.Sleep(3000); return 3; });
while (tasks.Length > 0) {
int i = Task.WaitAny(tasks); Task<int> completedTask = tasks[i];
Console.WriteLine(completedTask.Result);
var temp = tasks.ToList(); temp.RemoveAt(i);
tasks = temp.ToArray();
} } } }
In this example, you process a completed Task as soon as it finishes. By keeping track of which Tasks are finished, you don’t have to wait until all Tasks have completed.
Using the
Parallel
class
The System.Threading.Tasks namespace also contains another class that can be used for paral-lel processing. The Parallel class has a couple of static methods—For, ForEach, and Invoke— that you can use to parallelize work.
Parallelism involves taking a certain task and splitting it into a set of related tasks that can be executed concurrently. This also means that you shouldn’t go through your code to re-place all your loops with parallel loops. You should use the Parallel class only when your code doesn’t have to be executed sequentially.
Increasing performance with parallel processing happens only when you have a lot of work to be done that can be executed in parallel. For smaller work sets or for work that has to synchronize access to resources, using the Parallel class can hurt performance.
The best way to know whether it will work in your situation is to measure the results.
Listing 1-16 shows an example of using Parallel.For and Parallel.ForEach.
LISTING 1-16 Using Parallel.For and Parallel.Foreach Parallel.For(0, 10, i =>
{
Thread.Sleep(1000); });
var numbers = Enumerable.Range(0, 10); Parallel.ForEach(numbers, i =>
{
You can cancel the loop by using the ParallelLoopState object. You have two options to do this: Break or Stop. Break ensures that all iterations that are currently running will be finished. Stop just terminates everything. Listing 1-17 shows an example.
LISTING 1-17 Using Parallel.Break
ParallelLoopResult result = Parallel.
For(0, 1000, (int i, ParallelLoopState loopState) => {
if (i == 500) {
Console.WriteLine(“Breaking loop”); loopState.Break();
}
return; });
When breaking the parallel loop, the result variable has an IsCompleted value of false and a LowestBreakIteration of 500. When you use the Stop method, the LowestBreakIteration is null.
Using
async
and
await
As you have seen, long-running CPU-bound tasks can be handed to another thread by using the Task object. But when doing work that’s input/output (I/O)–bound, things go a little differently.
When your application is executing an I/O operation on the primary application thread, Windows notices that your thread is waiting for the I/O operation to complete. Maybe you are accessing some file on disk or over the network, and this could take some time.
Because of this, Windows pauses your thread so that it doesn’t use any CPU resources. But while doing this, it still uses memory, and the thread can’t be used to serve other requests, which in turn will lead to new threads being created if requests come in.
Asynchronous code solves this problem. Instead of blocking your thread until the I/O op-eration finishes, you get back a Task object that represents the result of the asynchronous op-eration. By setting a continuation on this Task, you can continue when the I/O is done. In the meantime, your thread is available for other work. When the I/O operation finishes, Windows notifies the runtime and the continuation Task is scheduled on the thread pool.
But writing asynchronous code is not easy. You have to make sure that all edge cases are handled and that nothing can go wrong. Because of this predicament, C# 5 has added two new keywords to simplify writing asynchronous code. Those keywords are async and await.
A method marked with async just starts running synchronously on the current thread. What it does is enable the method to be split into multiple pieces. The boundaries of these pieces are marked with the await keyword.
When you use the await keyword, the compiler generates code that will see whether your asynchronous operation is already finished. If it is, your method just continues running syn -chronously. If it’s not yet completed, the state machine will hook up a continuation method that should run when the Task completes. Your method yields control to the calling thread, and this thread can be used to do other work.
Listing 1-18 shows a simple example of an asynchronous method.
LISTING 1-18 async and await using System;
using System.Net.Http; using System.Threading.Tasks;
namespace Chapter1.Threads {
public static class Program {
public static void Main() {
string result = DownloadContent().Result; Console.WriteLine(result);
}
public static async Task<string> DownloadContent() {
using(HttpClient client = new HttpClient()) {
string result = await client.GetStringAsync(“http://www.microsoft.com”); return result;
} } }
}
Because the entry method of an application can’t be marked as async, the example uses the Wait method in Main. This class uses both the async and await keywords in the Down-loadContent method.
The GetStringAsync uses asynchronous code internally and returns a Task<string> to the caller that will finish when the data is retrieved. In the meantime, your thread can do other work.
when debugging your code. The await keyword enables you to write code that looks synchro-nous but behaves in an asynchrosynchro-nous way. The Visual Studio debugger is even clever enough to help you in debugging asynchronous code as if it were synchronous.
So doing a CPU-bound task is different from an I/O-bound task. CPU-bound tasks always use some thread to execute their work. An asynchronous I/O-bound task doesn’t use a thread until the I/O is finished.
If you are building a client application that needs to stay responsive while background operations are running, you can use the await keyword to offload a long-running operation to another thread. Although this does not improve performance, it does improve responsive-ness. The await keyword also makes sure that the remainder of your method runs on the correct user interface thread so you can update the user interface.
Making a scalable application that uses fewer threads is another story. Making code scale better is about changing the actual implementation of the code. Listing 1-19 shows an ex-ample of this.
LISTING 1-19 Scalability versus responsiveness
public Task SleepAsyncA(int millisecondsTimeout) {
return Task.Run(() => Thread.Sleep(millisecondsTimeout)); }
public Task SleepAsyncB(int millisecondsTimeout) {
TaskCompletionSource<bool> tcs = null;
var t = new Timer(delegate { tcs.TrySetResult(true); }, null, -1, -1); tcs = new TaskCompletionSource<bool>(t);
t.Change(millisecondsTimeout, -1); return tcs.Task;
}
The SleepAsyncA method uses a thread from the thread pool while sleeping. The sec-ond method, however, which has a completely different implementation, does not occupy a thread while waiting for the timer to run. The second method gives you scalability.
When using the async and await keywords, you should keep this in mind. Just wrapping each and every operation in a task and awaiting them won’t make your application perform any bet-ter. It could, however, improve responsiveness, which is very important in client applications.
The FileStream class, for example, exposes asynchronous methods such as WriteAsync and ReadAsync. They use an implementation that makes use of actual asynchronous I/O. This way, they don’t use a thread while they are waiting on the hard drive of your system to read or write some data.
One other thing that’s important when working with asynchronous code is the concept of a SynchronizationContext, which connects its application model to its threading model. For example, a WPF application uses a single user interface thread and potentially multiple background threads to improve responsiveness and distribute work across multiple CPUs. An ASP.NET application, however, uses threads from the thread pool that are initialized with the correct data, such as current user and culture to serve incoming requests.
The SynchronizationContext abstracts the way these different applications work and makes sure that you end up on the right thread when you need to update something on the UI or process a web request.
The await keyword makes sure that the current SynchronizationContext is saved and restored when the task finishes. When using await inside a WPF application, this means that after your Task finishes, your program continues running on the user interface thread. In an ASP.NET application, the remaining code runs on a thread that has the client’s cultural, princi-pal, and other information set.
If you want, you can disable the flow of the SynchronizationContext. Maybe your continu-ation code can run on any thread because it doesn’t need to update the UI after it’s finished. By disabling the SynchronizationContext, your code performs better. Listing 1-20 shows an example of a button event handler in a WPF application that downloads a website and then puts the result in a label.
LISTING 1-20 Using ConfigureAwait
private async void Button_Click(object sender, RoutedEventArgs e) {
HttpClient httpClient = new HttpClient();
string content = await httpClient
.GetStringAsync(“http://www.microsoft.com”) .ConfigureAwait(false);
Output.Content = content; }
This example throws an exception; the Output.Content line is not executed on the UI thread because of the ConfigureAwait(false). If you do something else, such as writing the content to file, you don’t need to set the SynchronizationContext to be set (see Listing 1-21).
LISTING 1-21 Continuing on a thread pool instead of the UI thread
private async void Button_Click(object sender, RoutedEventArgs e) {
HttpClient httpClient = new HttpClient();
string content = await httpClient
using (FileStream sourceStream = new FileStream(“temp.html”, FileMode.Create, FileAccess.Write, FileShare.None, 4096, useAsync: true))
{
byte[] encodedText = Encoding.Unicode.GetBytes(content);
await sourceStream.WriteAsync(encodedText, 0, encodedText.Length) .ConfigureAwait(false);
}; }
Both awaits use the ConfigureAwait(false) method because if the first method is already finished before the awaiter checks, the code still runs on the UI thread.
When creating async methods, it’s important to choose a return type of Task or Task<T>. Avoid the void return type. A void returning async method is effectively a fire-and-forget method. You can never inspect the return type, and you can’t see whether any exceptions were thrown. You should use async void methods only when dealing with asynchronous events.
The use of the new async/await keywords makes it much easier to write asynchronous code. In today’s world with multiple cores and requirements for responsiveness and scal-ability, it’s important to look for opportunities to use these new keywords to improve your applications.
EXAM TIP
When using async and await keep in mind that you should never have a method marked async without any await statements. You should also avoid returning void from an async
method except when it’s an event handler.
Using Parallel Language Integrated Query (PLINQ)
Language-Integrated Query (LINQ) is a popular addition to the C# language. You can use it to perform queries over all kinds of data.
Parallel Language-Integrated Query (PLINQ) can be used on objects to potentially turn a sequential query into a parallel one.
Extension methods for using PLINQ are defined in the System.Linq.ParallelEnumerable class. Parallel versions of LINQ operators, such as Where, Select, SelectMany, GroupBy, Join, OrderBy, Skip, and Take, can be used.
LISTING 1-22 Using AsParallel
var numbers = Enumerable.Range(0, 100000000); var parallelResult = numbers.AsParallel() .Where(i => i % 2 == 0)
.ToArray();
The runtime determines whether it makes sense to turn your query into a parallel one. When doing this, it generates Task objects and starts executing them. If you want to force PLINQ into a parallel query, you can use the WithExecutionMode method and specify that it should always execute the query in parallel.
You can also limit the amount of parallelism that is used with the WithDegreeOfParallel-ism method. You pass that method an integer that represents the number of processors that you want to use. Normally, PLINQ uses all processors (up to 64), but you can limit it with this method if you want.
One thing to keep in mind is that parallel processing does not guarantee any particular order. Listing 1-23 shows what can happen.
LISTING 1-23 Unordered parallel query
using System; using System.Linq;
namespace Chapter1 {
public static class Program {
public static void Main() {
var numbers = Enumerable.Range(0, 10); var parallelResult = numbers.AsParallel() .Where(i => i % 2 == 0)
.ToArray();
foreach (int i in parallelResult) Console.WriteLine(i);
} } }
// Displays // 2 // 0 // 4 // 6 // 8
LISTING 1-24 Ordered parallel query
using System; using System.Linq;
namespace Chapter1 {
public static class Program {
public static void Main() {
var numbers = Enumerable.Range(0, 10);
var parallelResult = numbers.AsParallel().AsOrdered() .Where(i => i % 2 == 0)
.ToArray();
foreach (int i in parallelResult) Console.WriteLine(i);
} } }
// Displays // 0 // 2 // 4 // 6 // 8
If you have a complex query that can benefit from parallel processing but also has some parts that should be done sequentially, you can use the AsSequential to stop your query from being processed in parallel.
One scenario where this is required is to preserve the ordering of your query. Listing 1-25 shows how you can use the AsSequential operator to make sure that the Take method doesn’t mess up your order.
LISTING 1-25 Making a parallel query sequential
var numbers = Enumerable.Range(0, 20);
var parallelResult = numbers.AsParallel().AsOrdered() .Where(i => i % 2 == 0).AsSequential();
foreach (int i in parallelResult.Take(5)) Console.WriteLine(i);
When using PLINQ, you can use the ForAll operator to iterate over a collection when the iteration can also be done in a parallel way. Listing 1-26 shows how to do this.
LISTING 1-26 Using ForAll
var numbers = Enumerable.Range(0, 20);
var parallelResult = numbers.AsParallel() .Where(i => i % 2 == 0);
parallelResult.ForAll(e => Console.WriteLine(e));
In contrast to foreach, ForAll does not need all results before it starts executing. In this example, ForAll does, however, remove any sort order that is specified.
Of course, it can happen that some of the operations in your parallel query throw an exception. The .NET Framework handles this by aggregating all exceptions into one Aggrega-teException. This exception exposes a list of all exceptions that have happened during parallel execution. Listing 1-27 shows how you can handle this.
LISTING 1-27 Catching AggregateException using System;
using System.Linq;
namespace Chapter1 {
public static class Program {
public static void Main()
{
var numbers = Enumerable.Range(0, 20);
try {
var parallelResult = numbers.AsParallel() .Where(i => IsEven(i));
parallelResult.ForAll(e => Console.WriteLine(e)); }
catch (AggregateException e) {
Console.WriteLine(“There where {0} exceptions”, e.InnerExceptions.Count); }
}
public static bool IsEven(int i) {
if (i % 10 == 0) throw new ArgumentException(“i”);
} } }
// Displays // 4 // 6 // 8 // 2 // 12 // 14 // 16 // 18
// There where 2 exceptions
As you can see, two exceptions were thrown while processing the data. You can inspect those exceptions by looping through the InnerExceptions property.
Using concurrent collections
When working in a multithreaded environment, you need to make sure that you are not ma-nipulating shared data at the same time without synchronizing access.
The .NET Framework offers some collection classes that are created specifically for use in concurrent environments, which is what you have when you’re using multithreading. These collections are thread-safe, which means that they internally use synchronization to make sure that they can be accessed by multiple threads at the same time.
Those collections are the following:
■ BlockingCollection<T>
■ ConcurrentBag<T>
■ ConcurrentDictionary<TKey,T>
■ ConcurrentQueue<T>
■ ConcurrentStack<T>
BlockingCollection<T>
This collection is thread-safe for adding and removing data. Removing an item from the col-lection can be blocked until data becomes available. Adding data is fast, but you can set a maximum upper limit. If that limit is reached, adding an item blocks the calling thread until there is room.
BlockingCollection is in reality a wrapper around other collection types. If you don’t give it any specific instructions, it uses the ConcurrentQueue by default.
A regular collection blows up when being used in a multithreaded scenario because an item might be removed by one thread while the other thread is trying to read it.
LISTING 1-28 Using BlockingCollection<T>
The program terminates when the user doesn’t enter any data. Until that, every string entered is added by the write Task and removed by the read Task.
You can use the CompleteAdding method to signal to the BlockingCollection that no more items will be added. If other threads are waiting for new items, they won’t be blocked any-more.
You can even remove the while(true) statements from Listing 1-28. By using the GetCon-sumingEnumerable method, you get an IEnumerable that blocks until it finds a new item. That way, you can use a foreach with your BlockingCollection to enumerate it (see Listing 1-29).
LISTING 1-29 Using GetConsumingEnumerable on a BlockingCollection Task read = Task.Run(() =>
{
foreach (string v in col.GetConsumingEnumerable()) Console.WriteLine(v);
MORE INFO IENUMERABLE
For more information about using IEnumerable, see Chapter 2.
ConcurrentBag
A ConcurrentBag is just a bag of items. It enables duplicates and it has no particular order. Important methods are Add, TryTake, and TryPeek.
Listing 1-30 shows how to work with the ConcurrentBag.
LISTING 1-30 Using a ConcurrentBag
ConcurrentBag<int> bag = new ConcurrentBag<int>();
bag.Add(42); bag.Add(21);
int result;
if (bag.TryTake(out result)) Console.WriteLine(result);
if (bag.TryPeek(out result))
Console.WriteLine(“There is a next item: {0}”, result);
One thing to keep in mind is that the TryPeek method is not very useful in a multithreaded environment. It could be that another thread removes the item before you can access it.
ConcurrentBag also implements IEnumerable<T>, so you can iterate over it. This operation is made thread-safe by making a snapshot of the collection when you start iterating it, so items added to the collection after you started iterating it won’t be visible. Listing 1-31 shows this in practice.
LISTING 1-31 Enumerating a ConcurrentBag
ConcurrentBag<int> bag = new ConcurrentBag<int>(); Task.Run(() =>
{
bag.Add(42); Thread.Sleep(1000); bag.Add(21); });
Task.Run(() => {
foreach (int i in bag) Console.WriteLine(i); }).Wait();
// Displays // 42
ConcurrentStack
and
ConcurrentQueue
A stack is a last in, first out (LIFO) collection. A queue is a first in, first out (FIFO) collection. ConcurrentStack has two important methods: Push and TryPop. Push is used to add an item to the stack; TryPop tries to get an item off the stack. You can never be sure whether there are items on the stack because multiple threads might be accessing your collection at the same time.
You can also add and remove multiple items at once by using PushRange and TryPopRange. When you enumerate the collection, a snapshot is taken.
Listing 1-32 shows how these methods work.
LISTING 1-32 Using a ConcurrentStack
ConcurrentStack<int> stack = new ConcurrentStack<int>();
stack.Push(42);
int result;
if (stack.TryPop(out result))
Console.WriteLine(“Popped: {0}”, result);
stack.PushRange(new int[] { 1, 2, 3 });
int[] values = new int[2]; stack.TryPopRange(values);
foreach (int i in values) Console.WriteLine(i);
// Popped: 42 // 3
// 2
ConcurrentQueue offers the methods Enqueue and TryDequeue to add and remove items from the collection. It also has a TryPeek method and it implements IEnumerable by making a snapshot of the data. Listing 1-33 shows how to use a ConcurrentQueue.
LISTING 1-33 Using a ConcurrentQueue.
ConcurrentQueue<int> queue = new ConcurrentQueue<int>(); queue.Enqueue(42);
int result;
if (queue.TryDequeue(out result))
Console.WriteLine(“Dequeued: {0}”, result);
ConcurrentDictionary
A ConcurrentDictionary stores key and value pairs in a thread-safe manner. You can use meth-ods to add and remove items, and to update items in place if they exist.
Listing 1-34 shows the methods that you can use on a ConcurrentDictionary.
LISTING 1-34 Using a ConcurrentDictionary
var dict = new ConcurrentDictionary<string, int>(); if (dict.TryAdd(“k1”, 42))
{
Console.WriteLine(“Added”); }
if (dict.TryUpdate(“k1”, 21, 42)) {
Console.WriteLine(“42 updated to 21”); }
dict[“k1”] = 42; // Overwrite unconditionally
int r1 = dict.AddOrUpdate(“k1”, 3, (s, i) => i * 2); int r2 = dict.GetOrAdd(“k2”, 3);
When working with a ConcurrentDictionary you have methods that can atomically add, get, and update items. An atomic operation means that it will be started and finished as a single step without other threads interfering. TryUpdate checks to see whether the current value is equal to the existing value before updating it. AddOrUpdate makes sure an item is added if it’s not there, and updated to a new value if it is. GetOrAdd gets the current value of an item if it’s available; if not, it adds the new value by using a factory method.
Thought experiment
Implementing multithreading
In this thought experiment, apply what you’ve learned about this objective. You can find answers to these questions in the “Answers” section at the end of this chapter.
You need to build a new application, and you look into multithreading capabili-ties. Your application consists of a client application that communicates with a web server.
1. Explain how multithreading can help with your client application.
2. What is the difference between CPU and I/O bound operations?
3. Does using multithreading with the TPL offer the same advantages for your
Objective summary
■ A thread can be seen as a virtualized CPU.
■ Using multiple threads can improve responsiveness and enables you to make use of multiple processors.
■ The Thread class can be used if you want to create your own threads explicitly. Other-wise, you can use the ThreadPool to queue work and let the runtime handle things.
■ A Task object encapsulates a job that needs to be executed. Tasks are the recommend-ed way to create multithreadrecommend-ed code.
■ The Parallel class can be used to run code in parallel.
■ PLINQ is an extension to LINQ to run queries in parallel.
■ The new async and await operators can be used to write asynchronous code more easily.
■ Concurrent collections can be used to safely work with data in a multithreaded (con-current access) environment.
Objective review
Answer the following questions to test your knowledge of the information in this objective. You can find the answers to these questions and explanations of why each answer choice is correct or incorrect in the “Answers” section at the end of this chapter.
1. You have a lot of items that need to be processed. For each item, you need to perform a complex calculation. Which technique should you use?
A. You create a Task for each item and then wait until all tasks are finished.
B. You use Parallel.For to process all items concurrently.
C. You use async/await to process all items concurrently.
D. You add all items to a BlockingCollection and process them on a thread created by the Thread class.
2. You are creating a complex query that doesn’t require any particular order and you want to run it in parallel. Which method should you use?
A. AsParallel
B. AsSequential
C. AsOrdered