Oracle® Fusion Middleware
Template Editor Guide for Dynamic Converter
11g Release 1 (11.1.1)
E10635-01
Oracle Fusion Middleware Template Editor Guide for Dynamic Converter, 11g Release 1 (11.1.1) E10635-01
Copyright © 2010, Oracle and/or its affiliates. All rights reserved. Primary Author: Mike Manier
Contributor: Ron van de Crommert, Sean Cearley, Alec Han, Bill Hammond
This software and related documentation are provided under a license agreement containing restrictions on use and disclosure and are protected by intellectual property laws. Except as expressly permitted in your license agreement or allowed by law, you may not use, copy, reproduce, translate, broadcast, modify, license, transmit, distribute, exhibit, perform, publish, or display any part, in any form, or by any means. Reverse engineering, disassembly, or decompilation of this software, unless required by law for interoperability, is prohibited.
The information contained herein is subject to change without notice and is not warranted to be error-free. If you find any errors, please report them to us in writing.
If this software or related documentation is delivered to the U.S. Government or anyone licensing it on behalf of the U.S. Government, the following notice is applicable:
U.S. GOVERNMENT RIGHTS Programs, software, databases, and related documentation and technical data delivered to U.S. Government customers are "commercial computer software" or "commercial technical data" pursuant to the applicable Federal Acquisition Regulation and agency-specific supplemental regulations. As such, the use, duplication, disclosure, modification, and adaptation shall be subject to the restrictions and license terms set forth in the applicable Government contract, and, to the extent applicable by the terms of the Government contract, the additional rights set forth in FAR 52.227-19, Commercial Computer Software License (December 2007). Oracle USA, Inc., 500 Oracle Parkway, Redwood City, CA 94065.
This software is developed for general use in a variety of information management applications. It is not developed or intended for use in any inherently dangerous applications, including applications which may create a risk of personal injury. If you use this software in dangerous applications, then you shall be responsible to take all appropriate fail-safe, backup, redundancy, and other measures to ensure the safe use of this software. Oracle Corporation and its affiliates disclaim any liability for any damages caused by use of this software in dangerous applications.
Oracle is a registered trademark of Oracle Corporation and/or its affiliates. Other names may be trademarks of their respective owners.
Contents
Preface
... xiiiAudience... xiii
Documentation Accessibility ... xiii
Related Documents ... xiv
Conventions ... xiv
1
Introduction
1.1 About Templates... 1-1 1.2 About the Classic HTML Conversion Editor... 1-1 1.2.1 Template Editing Options ... 1-2 1.3 About the HTML Conversion Editor ... 1-2 1.3.1 Template Editing Options ... 1-3 1.4 Comparing the HTML Conversion Template Editor with the Classic ... 1-3
2
Element Setup
2.7.6 Metadata Options ... 2-38 2.7.7 Making a Metadata Element-Based ... 2-38 2.7.8 Using Custom Tags for New Metadata ... 2-39 2.7.9 Changing the Association Between a Metadata and an Element ... 2-40 2.7.10 Standard and Custom Metadata... 2-40 2.7.11 Changing the Properties of Metadata... 2-41 2.7.12 Metadata Tab Dialog ... 2-42 2.7.13 Ordering Metadata ... 2-42 2.7.14 Removing Metadata from a Template ... 2-43 2.8 Elements and HTML tags ... 2-43 2.8.1 About HTML Tags... 2-43 2.8.2 Changing the HTML Tag Assigned to an Element... 2-44 2.8.3 Adding Custom Tags Before and After an Element ... 2-44
3
Formatting
3.6.6 Stripping Non-List Items ... 3-22 3.7 Converting Graphics in Source Documents... 3-22 3.8 Associating HTML or Scripting Code With an Element ... 3-23 3.9 Text Effects ... 3-24 3.9.1 About Text Effects... 3-24 3.9.2 Changing Text Effects ... 3-24 3.9.3 Using the Color Dialog Box... 3-25 3.10 Visual Aids... 3-25 3.10.1 Setting the Order of Navigation and Visual Aids... 3-25 3.10.2 Inserting Icons ... 3-26 3.10.3 Inserting Rules... 3-27 3.10.4 Inserting Separators... 3-28 3.10.5 Setting a Background Image ... 3-28 3.10.6 Setting a Background Color ... 3-29 3.10.7 Associating Alternative Text With a Graphic From Source ... 3-30
4
Navigation
4.1 About Navigation ... 4-1 4.2 Link Properties ... 4-2 4.3 Navigating to Another Website ... 4-2 4.4 Link to Source Link... 4-2 4.4.1 Adding a Link to Source Link to a Page Button Bar... 4-3 4.4.2 Adding a Link to Source Link to an Element Button Bar ... 4-4 4.5 Navigation Bars... 4-5 4.5.1 Adding a Specific Page Link to a Page Button Bar ... 4-5 4.5.2 Adding a Specific Page Link to an Element Button Bar... 4-6 4.5.3 Formatting a Text Bar With CSS... 4-7 4.5.4 Navigating With a Page Button Bar ... 4-8 4.5.5 Navigating With a Page Text Bar ... 4-9 4.5.6 Navigating With an Element Button Bar... 4-9 4.5.7 Navigating With an Element Text Bar... 4-10 4.6 Graphics Gallery ... 4-11 4.6.1 Graphics Gallery ... 4-11 4.6.2 Graphics Sets ... 4-12 4.6.3 Templates and Associated Graphics Sets... 4-12 4.6.4 Changing the Properties of Graphics Sets... 4-13 4.6.4.1 Creating a New Graphics Set... 4-13 4.6.4.2 Editing a Graphics Set... 4-14 4.6.4.3 Formatting a Rule for a Graphics Set... 4-14 4.6.4.4 Renaming a Graphics Set... 4-14 4.6.4.5 Deleting a Graphics Set... 4-15 4.6.5 Changing the Properties of Groups of Graphics... 4-15 4.6.5.1 Creating a New Group of Graphics ... 4-15 4.6.5.2 Editing a Group of Graphics... 4-15
5
Globals
5.2 Adding Rules to a Web Page... 5-1 5.3 Adding Separators to a Web Page... 5-2 5.4 HTML and Scripting... 5-3 5.4.1 Including HTML or Scripting Code at the Top of an HTML File... 5-3 5.4.2 Handling an Event Within a Body Page... 5-3 5.4.3 Including HTML or Scripting Code in a Web Page... 5-4 5.4.4 Including HTML or Scripting Code in the Head of a Web Page ... 5-4 5.4.5 Including HTML or Scripting Code Inside the HTML Tag... 5-5 5.4.6 Including Scripting Variables in Output ... 5-6 5.4.7 Compliance With HTML 4.0 ... 5-6 5.4.8 Generating XML-Compliant Output ... 5-6 5.5 Suppressing Cross-References in a Web Page ... 5-7 5.6 Specifying a Target for External Hyperlinks ... 5-7 5.7 Graphical Elements... 5-8 5.7.1 Setting Colors for a Web Page ... 5-8 5.7.2 Selecting a Graphics Set for a Web Page ... 5-9 5.7.3 Selecting a Background Graphic for a Web Page... 5-9 5.8 Other Web Page Settings ... 5-10 5.8.1 Adding an Address to your Web Page... 5-10 5.8.2 Adding an E-Mail Address to Your Web Page ... 5-11 5.8.3 Adding Titles to a Web Page... 5-11 5.8.4 Displaying Headers and Footers in a Web Page... 5-12 5.8.5 Including Revision Information From Source Documents... 5-12 5.8.6 Setting the Order of Navigation and Visual Aids in a Web Page... 5-13 5.8.7 Skipping Single Hard Carriage Returns... 5-13 5.8.8 Suppressing Footnotes and Endnotes in a Web Page ... 5-14 5.8.9 Adding Options to a Web Page ... 5-14 5.8.10 Suppressing Tables in a Web Page... 5-15
6
Document Formatting
6.6.2 Setting Display Method ... 6-7 6.7 Formatting a Database File ... 6-8 6.7.1 Creating a Layout ... 6-8 6.7.2 Setting Pagination Options... 6-8
7
Document Properties
7.1 About Document Properties... 7-1 7.2 Defining Document Properties ... 7-1
8
Generated Content
8.1 About Generated Content... 8-1 8.2 Adding a Text Element ... 8-1 8.3 Adding a Navigation Element ... 8-2 8.3.1 Adding Document Navigation ... 8-2 8.3.2 Adding Page Navigation ... 8-3 8.3.3 Adding Section Navigation... 8-4
9
Output Pages
9.1 About Output Pages ... 9-1 9.2 Configuring HTML Settings... 9-1 9.3 Configuring Output Markup Items... 9-5 9.4 Configuring Output Text Formats ... 9-5 9.5 Setting Format Mapping Rules ... 9-7 9.6 Configuring Output Page Layouts... 9-8
A
Classic HTML Conversion Editor User Interface
A.7.6 Options Tab ... A-71 A.10 Change Associations Dialog... A-82 A.11 Gallery Dialog... A-83 A.11.1 Gallery Example Dialog... A-84 A.11.2 Gallery Groups Dialog ... A-84 A.11.3 Gallery Groups Example Dialog ... A-85 A.11.4 Gallery HTML Code... A-86 A.11.5 Gallery Set Dialog ... A-87
B
HTML Conversion Editor User Interface
B.3.6.3 Navigation Markup Tab ... B-30 B.4 Output Pages ... B-31 B.4.1 Output Pages ... B-32 B.4.2 Add Output Markup Items ... B-35 B.4.3 Output Markup Items ... B-35 B.4.4 Add Output Text Formats ... B-36 B.4.5 Output Text Formats ... B-37 B.4.5.1 Output Text Format - Markup Tab ... B-37 B.4.5.2 Output Text Format - Formatting Tab... B-39 B.4.6 Add Format Mapping Rules ... B-41 B.4.7 Format Mapping Rules ... B-42 B.4.8 Add Output Page Layouts ... B-44 B.4.9 Output Page Layouts ... B-45 B.4.10 Title Source ... B-46 B.4.11 Navigation Layout... B-47 B.4.12 Page Layout ... B-49 B.5 Previewing and Saving your Template ... B-52 B.5.1 Previewing the Template XML Structure ... B-52 B.5.2 Previewing a Converted Document... B-52 B.5.3 Saving your Template ... B-53
Glossary
Preface
Dynamic Converter is a Content Server component that provides on-demand
document conversion using customizable templates. There are two options for editing conversion templates in Dynamic Converter: the HTML Conversion Editor and the Classic HTML Conversion Editor.
Audience
This document is intended for experienced Content Server users.
Documentation Accessibility
Our goal is to make Oracle products, services, and supporting documentation accessible to all users, including users that are disabled. To that end, our
documentation includes features that make information available to users of assistive technology. This documentation is available in HTML format, and contains markup to facilitate access by the disabled community. Accessibility standards will continue to evolve over time, and Oracle is actively engaged with other market-leading
technology vendors to address technical obstacles so that our documentation can be accessible to all of our customers. For more information, visit the Oracle Accessibility Program Web site at http://www.oracle.com/accessibility/.
Accessibility of Code Examples in Documentation
Screen readers may not always correctly read the code examples in this document. The conventions for writing code require that closing braces should appear on an
otherwise empty line; however, some screen readers may not always read a line of text that consists solely of a bracket or brace.
Accessibility of Links to External Web Sites in Documentation
This documentation may contain links to Web sites of other companies or
organizations that Oracle does not own or control. Oracle neither evaluates nor makes any representations regarding the accessibility of these Web sites.
Access to Oracle Support
Oracle customers have access to electronic support through My Oracle Support. For information, visit http://www.oracle.com/support/contact.html or visit
Related Documents
For more information, see the Oracle® Fusion Middleware Dynamic Converter Administration Guide.
Conventions
The following text conventions are used in this document:
Convention Meaning
boldface Boldface type indicates graphical user interface elements associated with an action, or terms defined in text or the glossary.
italic Italic type indicates book titles, emphasis, or placeholder variables for which you supply particular values.
1
1
Introduction
The following topics are covered in this section:
■ "About Templates" on page 1-1
■ "About the Classic HTML Conversion Editor" on page 1-1
■ "About the HTML Conversion Editor" on page 1-2
1.1 About Templates
A template is a set of formatting instructions you can associate with a source document. When you check a document into Content Server, you either associate it with a default conversion template, or you can create a new customized template.
The following template options are available:
■ HTML Conversion templates: These are the newest template types, which can be
configured in a cross-platform editor.
■ Classic HTML Conversion templates: These were previously known as GUI
templates. There is no direct migration path from the GUI templates to the HTML Conversion templates. If you select a Classic HTML Conversion template, you may also select a Classic HTML Conversion layout.
■ Script templates: These run with default settings, and can be edited with a text
editor.
After you have chosen a template type to associate with your document, and named the template, you can edit the template. There are two template editing utilities for customizing the appearance of native documents converted to an HTML format. These template editors are used to control the look and feel of the web pages you create.
■ The HTML Conversion Editor is used to edit the HTML Conversion Templates.
■ The Classic HTML Conversion Editor is used to edit the Classic HTML
Conversion Templates and Classic HTML Conversion Layouts.
To turn a source document into a web page, you can use the default settings to perform a conversion. Alternatively, you can create a template, associate it with the document, and then edit the template, using one of the two template editor options.
1.2 About the Classic HTML Conversion Editor
About the HTML Conversion Editor
Template Selection Rules page. It is an ActiveX control that must be run on Microsoft Windows with Internet Explorer 4.0 or higher present.
1.2.1 Template Editing Options
You work with the template associated with a document to create a set of instructions that will determine how the source document will look when turned into a web page. Some instructions are applied to the template itself. Most are applied to the individual elements that reside in each template.
There are four options for editing templates:
■ Element Setup: This option allows you to manage elements. You can create new
elements, ranks, styles, or patterns; and create metadata to include information about your source documents in the Web pages you create and in the Head of your output HTML. You can change the relationships between elements and the ranks in your template (and any styles or patterns you may create). See Chapter 2, "Element Setup" for more information.
■ Formatting: This contains numerous options for formatting the text in your source
document. When you create Web pages, you’ll spend much of your time in the Character and Paragraph tab dialogs, in particular, formatting each element in the template. Additional formatting options are available in these two tab dialogs when Cascading Style Sheets (CSS) are turned on. See Chapter 3, "Formatting" for more information.
■ Navigation: This option is where you set links for the pages of your Web page,
either for Web pages (Page Button Bar and Page Text Bar tab dialogs) or individual elements (Element Button Bar and Element Text Bar tab dialogs). Optional navigation buttons include the ability to open the source document used to create a Web page in its native format. See Chapter 4, "Navigation" for more information.
■ Globals: These settings are generally for the Web page as a whole, and include
inserting an address to appear at the end of your Web page. Some settings in the Options tab dialog are template-based, for example, whether or not to allow CSS in your template. See Chapter 5, "Globals" for more information.
1.3 About the HTML Conversion Editor
The HTML Conversion Editor’s primary goal is setting options that allow you to produce faithful representations of source files using the HTML, GIF, JPEG, and PNG formats. You can use the HTML Conversion Editor to set various options that affect the content and structure of the output.
The HTML Conversion Editor is Java-based and can run in any browser instance where a JRE is present. It is downloaded onto the client machine when the Edit Template button is clicked on either the Edit Templates page or Template Selection Rules page. With some browsers, such as Firefox, you may be prompted for how to handle the file dc_hcmapedit.jnlp. The correct way to open this file is with Java(TM) Web Start Launcher (default).
Here are some of the advantages of the HTML Conversion Editor:
Comparing the HTML Conversion Template Editor with the Classic
■ When launching within Content Server, the parent browser window can navigate
away, yet the HTML Conversion Editor stays open, and can still save changes to the template.
■ HTML Conversion Templates are generated as XML files; the Tools menu option
provides a view of the Template XML being generated by the editor front end.
■ HTML Conversion Templates can have multiple layouts. One template can
provide different layout types for different document types.
■ Native doc metadata and optional custom properties can be placed in a converted
document's body or metatags.
■ The HTML Conversion Editor’s Navigation Elements are greatly improved over
the default navigation elements in the Classic HTML Conversion Editor. They allow navigation to be linked directly to particular styles.
■ The HTML Conversion Editor enables you to set an external CSS file.
1.3.1 Template Editing Options
The HTML Conversion Editor gives you broad control over how a template interprets a source document and converts it to HTML.
There are four main HTML Conversion Editor pages for editing templates:
■ Document Formatting: This page contains several tabs that allow you to
customize the formatting of your converted files according to file type. See
Chapter 6, "Document Formatting," for more information.
■ Document Properties: This section of the HTML Conversion Editor allows you to
specify predefined and custom document properties to be placed in the head or body of the document. See Chapter 7, "Document Properties," for more
information.
■ Generated Content: Generated content is made up of two kinds of elements: Text
Elements, which define special formatting in the output; and Navigation Elements, which help automatically generate navigation links. See Chapter 8, "Generated Content," for more information.
■ Output Pages: The Output Pages section contains options for defining HTML
Output, including markup items, and formatting of text, page layouts, and navigation layouts. See Chapter 9, "Output Pages," for more information.
1.4 Comparing the HTML Conversion Template Editor with the Classic
For those who were accustomed to working with the Classic HTML Conversion Template Editor, this section maps functions in the old editor to the new one.
2
2
Element Setup
The following Classic HTML Conversion Editor topics are covered in this section:
■ "About Element Setup" on page 2-1
■ "About Elements" on page 2-1
■ "Elements" on page 2-2
■ "Ranks" on page 2-11
■ "Styles" on page 2-20
■ "Patterns" on page 2-23
■ "Metadata" on page 2-35
■ "Elements and HTML tags" on page 2-43
2.1 About Element Setup
Element Setup is one of four property sheets in the Classic HTML Conversion Editor used to edit templates. In Element Setup you can review the elements generated for the ranks applied to your source document, create new ranks and elements, and control the treatment of content in the web pages you create.
You can open Element Setup at any time in Classic HTML Conversion Editor by clicking the Element Setup icon (Figure 2–1).
Figure 2–1 Element Setup Icon
2.2 About Elements
The Classic HTML Conversion Editor uses elements as "handles" to format the content of source documents and associate the ranks in those documents (as well as any styles or patterns you may have created) with the HTML tags that control the appearance of web pages. The Classic HTML Conversion Editor does this automatically, so you don’t need to worry about the HTML tags themselves.
Elements
You create the look of a particular Web page by editing the template that is associated with the source document. Some of the instructions apply to the template itself, but most apply to the individual elements in the template.
Elements lists throughout Classic HTML Conversion Editor can help you select the elements to edit. For example, an Elements list is always available in Formatting, no matter which tabbed dialog you’re working in, and the currently selected element is always highlighted on the list.
2.3 Elements
The following topics are covered in this section:
■ "Changing Element Assignments" on page 2-2
■ "Changing Element Properties" on page 2-3
■ "The Elements List" on page 2-3
■ "Changing the Name of an Element" on page 2-4
■ "Creating a New Element" on page 2-5
■ "Element Properties" on page 2-5
■ "Elements Tab Dialog" on page 2-6
■ "Handling an Event for an Element" on page 2-6
■ "Placing an Element in a Meta Tag" on page 2-7
■ "Placing an Element in your Web Pages" on page 2-7
■ "Removing an Element from a Template" on page 2-8
■ "Changing the Association Between a Rank, Style, or Pattern and an Element" on
page 2-9
■ "Special Elements" on page 2-9
■ "Splitting a Source Document Into Several Web Pages" on page 2-10
■ "Using Hard Page Breaks to Create Multiple Output Pages" on page 2-11
2.3.1 Changing Element Assignments
When you check a document into Content Server, Dynamic Converter applies a default set of ranks in the template to content: Lowest 1, Title, Lowest 2, Heading 1. These ranks are designed to identify content hierarchy in source documents so that top-level content, in particular, can be handled consistently. At the same time,
Dynamic Converter generates an element for each rank. The elements are saved in the template.
You can create additional ranks, as well as styles and pattern to provide greater control over content.
To change an element assignment:
1. Click the Element Setup icon (Figure 2–2), then click Elements to open that tab.
Elements
The green check marks and the red crosses in the In Body column indicate whether content associated with an element has been assigned to the body (Web) page.
2. Under Name, select the element you want to re-assign.
3. Right-click the green check mark or red cross that you want to change.
4. From the popup menu that appears, choose the cross or check mark you want to use instead. The popup menu closes and the association is now changed.
2.3.2 Changing Element Properties
Elements contain a number of properties you can change in Element Properties in Element Setup.
To change the property of an element:
1. Click the Element Setup icon (Figure 2–3), then click Elements to open that tab.
Figure 2–3 Element Setup Icon
2. From the Elements list, right-click the name of the element you want to change and choose Properties from the popup menu (or select the element and click the Properties button).
3. In the Element Properties property sheet, click the appropriate tab to open and make the changes you want.
4. Click OK.
2.3.3 The Elements List
When you view the Elements list in Formatting or elsewhere, you will see the following:
Elements
Figure 2–4 Elements list
It is important to understand the different kinds of elements and how they are listed throughout Template Editor. The elements in the above list are presented
alphabetically as follows:
For more on the system paragraph elements, see "Special Elements" on page 2-9.
2.3.4 Changing the Name of an Element
Elements contain a number of properties you can change in Element Properties in Element Setup.
To change the name of an element:
1. Click the Element Setup icon (Figure 2–5), then click Elements to open that tab.
Figure 2–5 Element Setup Icon
2. Right-click the element you want to change and choose Properties from the popup menu.
3. Click General to open that tab. Icon Description
Paragraph elements. These are derived from styles or patterns in the source document, or have been associated with ranks.
Character elements. These are derived from character styles or pattern matching on special formatting in the source document.
System paragraph elements. These are common to all templates and cannot be removed.
System character element. Default Character is the only such element.
Elements
4. In the Name text box, type the new name for the element.
5. Click OK.
2.3.5 Creating a New Element
When you check a document into Content Server, Dynamic Converter applies a default set of ranks in the template to content: Lowest 1, Title, Lowest 2, Heading 1. These ranks are designed to identify content hierarchy in source documents so that top-level content, in particular, can be handled consistently. At the same time,
Dynamic Converter generates an element for each rank. The elements are saved in the template.
You should:
■ Check that Dynamic Converter has successfully assigned the Title and Heading 1
ranks to the content. The best way is to open pass your cursor over the Preview window. A screentip displays the element associated with each portion of content.
■ Review content associated with Default Paragraph and decide how many new
ranks you should create in order to identify the different kinds of content in your source documents and maximize your formatting options.
You can create new elements, if you want. For example, you might want to create unique elements for the patterns in your source documents. This will increase your formatting options.
To create a new element:
1. Click the Element Setup icon (Figure 2–6), then click Elements to open that tab.
Figure 2–6 Element Setup Icon
2. Under Name, enter the name of the new element you want to create.
3. Change the default HTML tag <P>, if necessary.
4. Under Element Type, select Paragraph or Character.
5. Click OK to return to the Elements tab.
The new element appears grayed out at the bottom of the Elements list. Once you assign the element to a rank, style, or pattern, it becomes active and appears in regular type in the top portion of the list.
In most cases you will create a paragraph element. But you may need to create a character element for a character style or pattern, for example, if you want to search for a specific word or phrase in the document.
2.3.6 Element Properties
Elements contain a number of properties you can change in Element Properties in Element Setup.
■ The Split tab dialog is used to split a source document into a series of smaller body
pages to facilitate viewing and downloading. You can split a source document on any element.
■ In the HTML Tags tab dialog you can place custom HTML tags before and after
Elements
■ In the Meta Tag tab dialog you can give a name to the element when it is included
in a Meta tag in the Head of the HTML file. You can also specify custom tags. (This tab dialog is available only when you edit a body page template.)
■ In the Events tab dialog you can specify an event for the element, that is, HTML or
scripting code to be included in the tag for the element.
You can change element properties at any time (see "Changing Element Properties" on page 2-3).
2.3.7 Elements Tab Dialog
When you check a document into Content Server, Dynamic Converter creates a set of default ranks to apply to the content and generates an element for each rank. The elements are saved in the template.
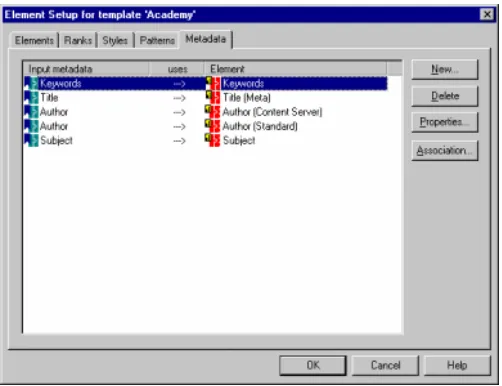
Element Setup contains four tab dialogs that let you view ranks as well as any styles or patterns you create, along with the elements assigned to them. (A fifth tab dialog summarizes any metadata in the template.)
In the Elements tab dialog, you can:
■ Control the placement of content in the web page you create
■ Select an element to split a source document into a series of smaller web pages for
ease of browsing and downloading, or split the document on hard page breaks in the source
2.3.8 Handling an Event for an Element
You can assign an event handler to an element that is triggered by an event in your browser. Such an event handler might be onClick or onMouseOver. You could also include HTML code or JavaScript.
To assign an event handler or include HTML or scripting code:
1. Click the Element Setup icon (Figure 2–7), then click Elements to open that tab.
Figure 2–7 Element Setup Icon
2. Select the element you want to assign an event handler to, and click Properties.
3. Click Include HTML or scripting code in the element’s tag, and then click either
Use the following or Use the contents of this file.
■ If you click Use the following, enter the code you want to use in the box
provided.
■ If you click Use the contents of this file, enter the path and file name in the
text box, or click Gallery to pick a file from the HTML Code folder in the Gallery.
4. Click OK.
Elements
2.3.9 Placing an Element in a Meta Tag
Any element can be placed in a Meta tag in the Head of your HTML files, to facilitate searches on your Web server. It can also be placed in your web pages (see "Placing an Element in your Web Pages" on page 2-7) to be visible to users.
Dynamic Converter automatically creates elements for ranks in each template, but it does not do so for metadata (or styles and patterns). The standard metadata Keywords was created specially for the templates that ship with Dynamic Converter. You must make a metadata element-based (see "Making a Metadata Element-Based" on page 2-38) in order to include it in your web pages.
To place an element in a Meta tag:
1. Click the Element Setup icon (Figure 2–8), then click Elements to open that tab.
Figure 2–8 Element Setup Icon
2. Select the element you want to include in the Head of your output HTML.
3. Click Properties to open the Element Properties dialog box.
4. In the General tab dialog, select Include in Head with Meta tag.
5. Click Meta Tag to open that tab dialog.
6. Select Use standard Meta tag and enter the name you want to appear within the Meta tag to describe this element. You may want to use the element name itself.
7. To use custom tags instead, click Use custom tags, select the appropriate check boxes, and enter the opening and closing tags in the text boxes. See "Using Custom Tags for New Metadata" on page 2-39.
8. Click OK, and OK again.
For a metadata to appear in a Meta tag, it must exist in the source document. As with the elements for styles, patterns, and ranks, the metadata you create will apply to all source documents associated with the template you edit.
The order in which metadata are listed in the Metadata tab dialog of Element Setup determines the order in which the metadata will appear in the Meta tags of your HTML output. You can use drag-and-drop to move an element up or down the list of metadata. See "Ordering Metadata" on page 2-42.
2.3.10 Placing an Element in your Web Pages
Any element can be placed in your web pages, to be visible to users. It can also be placed in a Meta tag (see "Placing an Element in a Meta Tag" on page 2-7) in the Head of your HTML files, to facilitate searches on your web server.
Dynamic Converter automatically creates elements for ranks in each template, but it does not do so for metadata (or for styles and patterns). The standard metadata Keywords was created specially for the templates that ship with Dynamic Converter. You must make a metadata element-based (see "Making a Metadata Element-Based"
on page 2-38) in order to include it in your web pages.
Elements
To place a metadata in your web pages:
1. Click the Element Setup icon (Figure 2–9), then click Elements to open that tab.
Figure 2–9 Element Setup Icon
2. Select the element associated with the metadata you want to include in your publication.
3. Click Properties to open the Element Properties dialog box. In the General tab dialog, by default, the element is already checked to appear in the Head of your HTML output files. You can also include the metadata in the body of your Web pages.
4. Select or clear the Include in Body check box, so that the appropriate metadata will display automatically in your Web page once you translate your publication.
5. Click OK, and OK again.
For a metadata to appear in your Web pages, it must exist in the source document (as standard or custom metadata). As with the elements for styles, patterns, and ranks, the metadata you create will apply to all source documents associated with the template you edit.
The order in which metadata are listed in the Metadata tab dialog of Element Setup determines the order in which the metadata will appear in the Meta tags of your HTML output. You can use drag-and-drop to move an element up or down the list of metadata. See "Ordering Metadata" on page 2-42.
2.3.11 Removing an Element from a Template
When you check a document into Content Server, Dynamic Converter applies a default set of ranks in the template to content: Lowest 1, Title, Lowest 2, Heading 1. These ranks are designed to identify content hierarchy in source documents so that top-level content, in particular, can be handled consistently. At the same time,
Dynamic Converter generates an element for each rank. The elements are saved in the template.
You can remove an element, if you want. You may want to do this if you create duplicate styles under different names. You can associate both styles with a single element and remove the element you don't need.
To remove an element from a template:
1. Click the Element Setup icon (Figure 2–10), then click Elements to open that tab.
Figure 2–10 Element Setup Icon
2. Select the element you want to remove and click Delete.
Elements
3. The rank, style, or pattern associated with the element is now associated with the Default Paragraph element. You can associate the rank, style, or pattern with another element, instead.
4. When you've finished removing elements, click OK.
2.3.12 Changing the Association Between a Rank, Style, or Pattern and an Element
You can change the association between a rank, style, or pattern and its element. You may want to do this if, say, you import two similar styles that you want to format the same way in a body page.To change the association between a rank, style, or pattern and an element:
1. Click the Element Setup icon (Figure 2–11), then click Ranks, Styles, or Patterns
to open the appropriate tab.
Figure 2–11 Element Setup Icon
2. Depending on which tab dialog you are in, select the rank, style, or pattern you want to associate with a different element, and click Association.
3. In the Change Associations dialog box, select the new element from the elements list.
4. Click OK.
The new element associated with the rank, style, or pattern can be seen in the element column opposite the rank, style, or pattern name.
2.3.13 Special Elements
Dynamic Converter automatically creates a set of four default ranks when you check a document into Content Server, and also an element for each rank, which are saved to the template. The template will also contain a number of predefined elements that are part of any template and cannot be removed. These special elements represent special source content.
In addition, the sample templates that ship with Dynamic Converter (Academy.ttp, etc.) contain some pre-set elements that can be useful in many instances and can be deleted, if you want. These, a metadata and three character patterns, are listed first in the following table.
Note: The Blank template, which is the default template used to create new templates, does not contain these four elements.
Icon Element Description
Keywords Used for keyword metadata in source documents, which by default is included in the Meta tags of output pages.
Elements
2.3.14 Splitting a Source Document Into Several Web Pages
Elements contain a number of properties you can change in Element Properties in Element Setup.
The Split property lets you split a long source document into a series of smaller Web pages to simplify navigation and facilitate downloading. Each Web page becomes a separate HTML file in the process.
To split a source document into several web pages:
1. Click the Element Setup icon (Figure 2–12), then click Elements to open that tab.
Figure 2–12 Element Setup Icon
2. From the Elements list, select the element you want to use to split the source document.
3. Right-click the red cross in the Split column opposite the element and choose the green tick mark from the popup menu that appears. (You can also click Properties
and in the Split tab dialog click the Split the source document into multiple output pages check box.)
When Dynamic Converter splits a source document, it starts the second Web page with the second instance of the element. It creates a new Web page for each instance of the element after that. To split a document beginning with the first instance of the element, clear the appropriate check box in the Options tab dialog of Globals.
In addition to or instead of splitting on an element, you can use hard page breaks to create multiple output pages (see "Using Hard Page Breaks to Create Multiple Output Pages" on page 2-11).
HTTP Used for links in source documents that use the HTTP protocol. Formatting includes necessary HTML code to make such links active in output pages.
Weblink Used specifically for links in source documents to the World Wide Web. Formatting includes necessary HTML code to make such links active in output pages.
Address (System) Used to format the address information entered on the Address tab of the Globals property sheet.
Default Paragraph Associated with any paragraph not matched by a style or pattern.
Email (System) Used to format the email information entered on the Address tab of the Globals property sheet.
Title (System) Used to format the title information entered on the Titles tab of the Globals property sheet.
Default Character Associated with any character style or pattern that is not associated with a character element.
Ranks
2.3.15 Using Hard Page Breaks to Create Multiple Output Pages
As an alternative to splitting a source document on an element (see "Splitting a Source Document Into Several Web Pages" on page 2-10), you can use the hard page breaks of your source document to create multiple output pages.
To create multiple output pages with hard page breaks:
1. Click the Element Setup icon (Figure 2–13), then click Elements to open that tab.
Figure 2–13 Element Setup Icon
2. Click Split the source document into multiple output pages at each hard page break.
3. Click OK.
When you translate your source document, Dynamic Converter will create a new Web page for each hard page break in each source document associated with the template.
2.4 Ranks
The following topics are covered in this section:
■ "About Ranks" on page 2-11
■ "Removing a Rank From a Template" on page 2-12
■ "Ranks Tab Dialog" on page 2-13
■ "Rank Rules" on page 2-13
■ "Rank Properties" on page 2-14
■ "Rank Order" on page 2-14
■ "Changing the Alignment Property of a Rank" on page 2-15
■ "Changing the Association Between a Rank and an Element" on page 2-15
■ "Changing the Font Property of a Rank" on page 2-16
■ "Changing the Color Property of a Rank" on page 2-16
■ "Changing the Properties of a Rank" on page 2-17
■ "Changing the Rank Rules" on page 2-18
■ "Creating a New Rank" on page 2-18
■ "Hierarchy and Frequency of Ranks" on page 2-20
2.4.1 About Ranks
When you check a document into Content Server, Dynamic Converter applies a default set of ranks in the template to content: Lowest 1, Title, Lowest 2, Heading 1. These ranks are designed to identify content hierarchy in source documents so that top-level content, in particular, can be handled consistently. At the same time,
Ranks
The following table shows a simple example of what would happen for two documents with the manually formatted styles shown:
With ranks, Dynamic Converter doesn’t recognize the complete variety of content your source documents might contain. But Dynamic Converter can recognize content that helps define the top-level hierarchy of your source documents and thus
successfully format the most important content in your source documents
Note how Dynamic Converter determines which portion of content should be designated. The order of Title, Heading 1, Lowest 1, or Lowest 2 is determined by Rank Rules. You can customize these. See "Rank Rules" on page 2-13.
2.4.2 Removing a Rank From a Template
When you check a document into Content Server, Dynamic Converter applies a default set of ranks in the template to content: Lowest 1, Title, Lowest 2, Heading 1. These ranks are designed to identify content hierarchy in source documents so that top-level content, in particular, can be handled consistently. At the same time,
Dynamic Converter generates an element for each rank. The elements are saved in the template.
You can create additional patterns (and ranks and styles), if you want.
After initial setup, you may create a number of additional ranks for a particular template only to discover later that one or more of the ranks is no longer needed. You can easily remove any rank from a template.
To remove a rank from a template:
1. Click the Element Setup icon (Figure 2–14), then click Ranks to open that tab.
Figure 2–14 Element Setup Icon
2. Under Rank, select the rank you want to delete, and click Delete.
3. Click Elements to switch to the Elements tab dialog. The element is now grayed out, below the line.
4. Select the element and click Delete.
The content associated with that rank is now associated with the Default Paragraph element.
When you remove a rank, Dynamic Converter re-evaluates content in terms of the remaining ranks the next time you translate. If you deleted Title, Dynamic Converter would assign Heading 1 to content it formerly assigned Title to. So you should be
Content Doc A Doc B Rank Element
Title Times 20 pt Bold Arial 16pt Bold Title Title
First level Heading
Times 14 pt Italic Arial 12 pt Bold Heading 1 Heading 1
Other Heading Times 12 pt Underscore
Lowest 2 Default Paragraph
Caption Times 9 pt Bold Lowest 2 Default Paragraph
Ranks
careful how you delete ranks. Also, the element associated with the rank remains. You can associate the element with another rank or remove the element, too, from the template.
2.4.3 Ranks Tab Dialog
When you check a document into Content Server, Dynamic Converter applies a default set of ranks in the template to content: Lowest 1, Title, Lowest 2, Heading 1.
These are listed in the Ranks tab dialog of Element Setup, where you can:
■ Control the relationship between ranks and the elements assigned to them
■ Add new ranks
■ Delete unwanted ranks
■ Change the properties of ranks
■ Change the rank rules
The order of ranks in the Ranks tab dialog is important. Generally, you should not change it. See "Rank Order" on page 2-14.
The hierarchy and frequency of each rank is summarized in the Properties box on the tab dialog.
2.4.4 Rank Rules
Rank rules dictate how content in your source documents will be treated when Dynamic Converter assigns ranks to identify content hierarchy. They consist of "effects," which represent all possible characteristics of text. For ranking purposes, each effect has the properties "significance" and "order." By changing these, you change the rank rules that govern how Dynamic Converter assigns ranks.
The default settings can be seen in the Rank Rules dialog box (click Advanced on the Advanced tab dialog of Element Setup).
Figure 2–15 Rank Rules Dialog
Ranks
The effects that matter are the "positive" ones, in order. By default, then, when Dynamic Converter applies ranks to source documents at translation, it places text with the largest font size at the highest hierarchical level.
Three effects can be especially important in Dynamic Converter: Color, Font, and Alignment. In addition to significance and order, you can change the properties of these effects in different ways. See "Changing the Color Property of a Rank" on page 2-16, "Changing the Font Property of a Rank" on page 2-16, and "Changing the Alignment Property of a Rank" on page 2-15.
2.4.5 Rank Properties
Ranks contain properties that can be changed in the Ranks Properties dialog box in Element Setup. You can change the name of a rank and also the element assigned to it. You can also change the hierarchical level of the rank plus the frequency with which the rank appears in the source document. These properties are especially important when creating new ranks to help identify unique content in source documents. You may have to experiment with hierarchy and frequency to successfully identify unique content.
2.4.6 Rank Order
When you check a document into Content Server, Dynamic Converter applies a default set of ranks in the template to content: Lowest 1, Title, Lowest 2, Heading 1. It places those elements in the template you associate with the document.
These ranks are designed to identify content hierarchy in source documents so that top-level content, in particular, can be handled consistently Dynamic Converter use the following rules:
Dynamic Converter always looks first for content defined as the "lowest" because, in most instances, this will be your body text. Also, if one of your source documents is a text file, all the text will be in the same font size, and you wouldn’t want the text designated Title. What Dynamic Converter identifies as body text will be determined by the rules used to create ranks. See "Rank Rules" on page 2-13 for more information.
This order is important because ranks are set by Dynamic Converter at conversion. So if you changed the order, with Lowest 1 second and Title first, say, you would find Title assigned to all the content in the case of a text file. Likewise, the order is
important when you create new ranks and add them to the list in the Ranks tab dialog. See "Creating a New Rank" on page 2-18.
To review the way Dynamic Converter has assigned the Title and Heading 1 ranks to a specific source document, pass your cursor slowly over the Preview window. A screentip will display the element for each portion of content.
Note: Rank rules work in conjunction with Rank Properties, in particular, Hierarchy and Frequency.
Rank Element Availability Number of Occurrences
Lowest 1 Default Paragraph Lowest Greater than 0
Title Title Highest Equals 1
Lowest 2 Default Paragraph Lowest Greater than 0
Ranks
Strictly speaking, Dynamic Converter identifies only a single instance of the highest level content. Even if manual line breaks have been used to spread the title of a source document over two or more lines, Dynamic Converter will treat this "block" of text as a single instance and successfully assign the Title rank to it.
2.4.7 Changing the Alignment Property of a Rank
Rank rules dictate how content in your source documents is treated when the Template Editor assigns ranks to identify hierarchy. They consist of "effects," which represent all possible characteristics of text.
You may want to change the rank rules, depending on the nature of the content of your source documents. If, say, you use specific alignments in your source documents to differentiate content and define hierarchy, you may want to change the default settings for the Alignment effect.
To change the properties of the Alignment effect:
1. Click the Element Setup icon (Figure 2–16), then click Ranks to open that tab.
Figure 2–16 Element Setup Icon
2. Click Advanced to open the Rank Rules dialog box.
3. Select the Alignment effect and click Properties.
4. Under Significance, be sure that Has Positive Effect is selected.
5. The Alignments box contains three possible alignments: Right, Center, and Left. To delete any alignment, select the alignment and click Delete. To change the order of the alignments, select any alignment and click Move Up or Move Down.
6. To add Justify to the selection of alignments, click Add to open the Add Alignment dialog box. Select Justify and click OK.
7. Click OK again, to return to the Ranks tab dialog.
If alignment is used consistently in your source documents and can be helpful in creating ranks for special content, you may also want to change the order of the Alignment effect in the Ranks Rules dialog box.
2.4.8 Changing the Association Between a Rank and an Element
You can change the association between a rank and its element. You may want to do this if you have created ranks for two distinct types of content that you now want to format the same way in a body page.
To change the association between a rank and an element:
1. Click the Element Setup icon (Figure 2–17), then click Ranks to open that tab.
Figure 2–17 Element Setup Icon
Ranks
3. In the Change Associations dialog box, select the new element from the elements list.
4. Click OK.
The new element associated with the rank can be seen in the element column opposite the rank name.
2.4.9 Changing the Font Property of a Rank
Rank rules dictate how content in your source documents is treated when Classic HTML Conversion Editor assigns ranks to identify hierarchy. They consist of "effects," which represent all possible characteristics of text.
You may want to change the rank rules, depending on the nature of the content of your source documents. If, say, you use specific fonts in your source documents to differentiate content and define hierarchy, you may want to change the default settings of the Font effect.
To change the properties of the Font effect:
1. Click the Element Setup icon (Figure 2–18), then click Ranks to open that tab.
Figure 2–18 Element Setup Icon
2. Click Advanced to open the Rank Rules dialog box.
3. Select the Font effect and click Properties.
4. Under Significance, be sure that Has Positive Effect is selected.
5. Click the Add button to open the Add Font dialog box. From the list, select the font that you want to become a property of the Font effect, and then click OK. The font name displays in the Font box. If the name of the font used in your source documents is not on the list, type it into the text box.
6. Click Add again if you want to add a second font property to the Font effect.
7. If you add two or more fonts to the Font effect, you can arrange the order of the fonts by selecting any font and clicking Move Up or Move Down.
8. Click OK to return to the Ranks Rules dialog box.
If fonts are used consistently in your source documents and can be helpful in creating ranks for special content, you may also want to change the order of the Font effect in the Ranks Rules dialog box.
2.4.10 Changing the Color Property of a Rank
Rank rules dictate how content in your source documents will be treated when Classic HTML Conversion Editor assigns ranks to identify hierarchy. They consist of "effects," which represent all possible characteristics of text.
You may want to change the rank rules, depending on the nature of the content of your source documents. If, say, you use color in your source documents to
differentiate content and define hierarchy, you may want to change the default settings of the Color effect.
Ranks
1. Click the Element Setup icon (Figure 2–19), then click Ranks to open that tab.
Figure 2–19 Element Setup Icon
2. Click Advanced to open the Rank Rules dialog box.
3. Select the Color effect and click Properties.
4. Under Significance, be sure that Has Positive Effect is selected.
5. Click the Add button to open the Color dialog box. Select the color you want to become a property of the Color effect, and then click OK. A color bar representing that color appears in the Color box. Click Add again if you want to add a second color property.
6. If you add two or more colors to the Color effect, you can arrange the order of the colors by selecting any color and clicking Move Up or Move Down.
7. Click OK to return to the Ranks Rules dialog box.
If color is used consistently in your source documents and can be helpful in creating ranks for special content, you may also want to change the order of the Color effect in the Ranks Rules dialog box.
2.4.11 Changing the Properties of a Rank
The properties of a rank consist of its name, the element it is associated with, and its hierarchical level and frequency.
When you create ranks to help identify unique content in source documents,
hierarchical level and frequency are important properties. Typically, with the Title and Heading 1 ranks successfully assigned, you will want to create additional ranks for additional headings levels and special content.
To change the properties of a rank:
1. Click the Element Setup icon (Figure 2–19), then click Ranks to open that tab.
Figure 2–20 Element Setup Icon
2. From the Ranks list, right-click the rank whose properties you want to change and choose Properties from the popup menu (or select the rank and click the
Properties button).
3. If you want to change the rank name, type a new name in the Name text box.
4. If you want to change the element associated with the rank, choose another element from the Elements list.
5. Under Hierarchy, select the appropriate radio button. Under Frequency, select the appropriate choice from the list and enter a value in the text box. See "Hierarchy and Frequency of Ranks" on page 2-20 for more information.
Ranks
2.4.12 Changing the Rank Rules
Rank rules dictate how content in your source documents will be treated when Classic HTML Conversion Editor assigns ranks to identify hierarchy. Rank rules consist of "effects," which represent all possible characteristics of text. For ranking purposes, each effect has the properties "significance" and "order." By changing these, you change the rank rules that govern how Dynamic Converter assigns ranks.
If you use ranks a great deal you may want to change the rank rules, depending on the nature of the content of your source documents. You can change the rules by changing the significance and/or order of each effect.
To change an effect:
1. Click the Element Setup icon (Figure 2–21), then click Ranks to open that tab.
Figure 2–21 Element Setup Icon
2. Click Advanced to open the Rank Rules dialog box.
3. xTo change the significance of an effect, select the effect and click Properties.
4. In the Rank Properties dialog box, change the significance by selecting the appropriate radio button.
■ Has negative effect means that Dynamic Converter will place ranks with this
effect at the bottom of its list when it is determining content hierarchy.
■ Has no effect means that the effect is not taken into account by Dynamic
Converter when Classic HTML Conversion Editor determines content hierarchy.
■ Has positive effect means that Dynamic Converter will use this effect to
ascertain the ranks for top-level content in source documents.
5. Click OK to return to the Rank Rules dialog box.
6. To change the order of the effect, select the effect and click Move Up or Move Down, as necessary, to position the effect in the desired order in the list of effects.
7. Select another effect and repeat steps 3 to 5.
8. Click OK to return to the Ranks tab dialog.
The effects Color, Font, and Alignment have additional properties that may be useful in ranking content if your source documents consistently use color, font, or alignment in special ways to define hierarchy. See "Changing the Color Property of a Rank" on page 2-16, "Changing the Font Property of a Rank" on page 2-16, and "Changing the Alignment Property of a Rank" on page 2-15.
2.4.13 Creating a New Rank
When you check a document into Content Server, Dynamic Converter applies a default set of ranks in the template to content: Lowest 1, Title, Lowest 2, Heading 1. These ranks are designed to identify content hierarchy in source documents so that top-level content, in particular, can be handled consistently. At the same time, it generates an element for each rank. The elements are saved in the template.
Ranks
■ Check that Dynamic Converter has successfully assigned the Title and Heading 1
ranks to the content. The best way is to and pass your cursor over the Preview window. A screen tip displays the element associated with each portion of content.
■ Review content associated with Default Paragraph and decide how many new
ranks you should create in order to identify the different kinds of content in your source documents and maximize your formatting options.
To create a new rank:
1. Click the Element Setup icon (Figure 2–22), then click Ranks to open that tab.
Figure 2–22 Element Setup Icon
2. Click the New button to open the New Rank dialog box.
3. In the Name text box, type the name you want to use for the new rank. You may care to use a descriptive name such as Intro (if your source document contained, say, introductory text in a specific style).
4. Under Associated Element, select an element from the list or click the New button
to open the New Element dialog box.
5. In the text box, enter the name you want to use for the new element. Typically, you will want to create a new element for each new rank, and to use the same name for the elements as the rank.
6. Click OK to return to the New Rank dialog box, and OK again to return to the Ranks tab dialog.
7. Select the new rank from the Ranks list and click Properties to open that dialog box. Having given the new rank a name and associated it with a new element, you must now specify its properties.
8. Under Hierarchy, select one of the options. Highest Available means Dynamic Converter will create the new rank by identifying content, based on the current rank rules, immediately below the Title and Heading 1 ranks.
9. Under Frequency, select the appropriate option from the list, and in the second text box enter a value. For example, if you were seeking to create a rank for a second-level heading, you would probably select the frequency Number of occurrences if greater than and enter the value 0.
10. Click OK to return to the Ranks tab dialog.
You can see how new ranks take effect in the preview window.
If you already know how many elements you will need, you can always create these first. If you do so, they will be available from the Associated Element list in the New Rank dialog. But they will be "below the line," grayed out, until you select each one and formally associate it with a rank.
Styles
2.4.14 Hierarchy and Frequency of Ranks
Hierarchy and frequency are two important properties of a rank. When Dynamic Converter creates ranks, it uses these properties, in conjunction with rank rules, to identify unique content in source documents.
Once you create a new rank and associate it with a new element, your next step is to review the rank’s properties. (Select the rank in the Ranks tab dialog and click Properties.) Your choice of Hierarchy and Frequency options, along with Rank Rules, will determine what content the new rank is associated with.
In the Rank Properties dialog box, you have three hierarchy options,
■ Number of occurrences equals: Use when you know the exact number of
occurrences of the content you’re trying to associate the rank with, and enter that number in the companion text box. This option, with the value 1, is used by Dynamic Converter to create the Title rank when you first add source documents to the content server.
■ Number of occurrences is fewer than: Use when you want to limit the instances
of specific content to the value entered in the companion text box.
■ Number of occurrences is greater than: Typically used with a value of 0 in the
text box. Three of the four default ranks created by Dynamic Converter have this property.
Remember: these options work in conjunction with the ranks rules.
The value for Number of occurrences equals should always be set to 1 in order to identify the title. Even if manual line breaks have been used to spread the title of a source document over two or more lines, Dynamic Converter will treat this "block" of text as a single instance and successfully assign the Title rank to it. (This value can be set to 1 for other ranks, too.)
2.5 Styles
The following topics are covered in this section:
■ "About Styles" on page 2-20
■ "Styles Tab Dialog" on page 2-21
■ "Style Properties" on page 2-21
■ "Removing a Style From a Template" on page 2-21
■ "Creating a New Style" on page 2-22
■ "Changing the Association Between a Style and an Element" on page 2-22
■ "Changing the Properties of a Style" on page 2-23
2.5.1 About Styles
"Styles" in Dynamic Converter refers to named styles typically found in word processing documents. A named style is a set of formatting characteristics that are saved and given a name so that they can be applied to any paragraph in a document.
When you check a document into Content Server, Dynamic Converter applies a default set of ranks in the template to content: Lowest 1, Title, Lowest 2, Heading 1. Ranks are designed to identify content hierarchy in source documents so that top-level content, in particular, can be handled consistently. At the same time, Dynamic
Styles
You can achieve greater control over your HTML output if you're source documents contain styles. You can create a style in Element Setup and a complementary element for each style in your source document. Classic HTML Conversion Editor will recognize these styles, and you will be able to format the elements associated with them and thus gain greater control, over the content associated with the styles.
2.5.2 Styles Tab Dialog
In addition to ranks, which Dynamic Converter creates and applies to content when you check a document into Content Server, you can create styles for any styles that are in your source document. You can then create elements to associate with those styles, which will be placed in the template you associate with the document.
Element Setup contains tab dialogs that let you view styles along with the elements assigned to them. In the Styles tab dialog, you can
■ Control the relationship between styles and the elements assigned to them
■ Add new styles
■ Delete unwanted styles
■ Change the properties of styles
2.5.3 Style Properties
Styles contain properties that can be changed in Styles Properties in Element Setup. On the General tab dialog, you can change the name of a style and also the element assigned to it. See"Changing the Properties of a Style" on page 2-23 and "Styles" on page 2-20.
2.5.4 Removing a Style From a Template
When you check a document into Content Server, Dynamic Converter applies a default set of ranks in the template to content: Lowest 1, Title, Lowest 2, Heading 1.
Ranks are designed to identify content hierarchy in source documents so that top-level content, in particular, can be handled consistently. At the same time, Dynamic
Converter generates an element for each rank; the elements are saved in the template. You can create additional patterns (and ranks and styles), if you want. For example, you may create a style that you know exists in a source document.
You can easily remove a style from a template at any time.
To remove a style from a template:
1. Click the Element Setup icon (Figure 2–23), then click Styles to open that tab.
Figure 2–23 Element Setup Icon
2. Under Input Style, select the style you want to delete, and click Delete.
3. Click OK.
Styles
2.5.5 Creating a New Style
Dynamic Converter applies a default set of ranks in the template to your source documents: Lowest 1, Title, Lowest 2, Heading 1. These ranks are designed to identify a content hierarchy in source documents so that top-level content, in particular, can be handled consistently. At the same time, it generates an element for each rank. The elements are saved in the template.
You should:
■ Check that Dynamic Converter has successfully assigned the Title and Heading 1
ranks to the content. The best way is to open pass your cursor over the Preview window. A screen tip displays the element associated with each portion of content.
■ Review content associated with Default Paragraph and decide how many new
ranks you should create in order to identify the different kinds of content in your source documents and maximize your formatting options.
One option is to create a new style, if you know that a particular style exists in your source document. You can create a new style with the same name as the one in the source document, and then a new element for the style at the same time. Just be sure to accurately name the new style you create.
To create a new style:
1. Click the Element Setup icon (Figure 2–24), then click Styles to open that tab.
Figure 2–24 Element Setup Icon
2. Click New.
3. In the New Style dialog box, type the name of the new style in the text box.
4. From the Associated Element list, select the element to you want to associate with the new style. If necessary, click New to create a new element.
5. Under Style Type, select Paragraph for a paragraph style or Character for a character style.
6. Click OK.
Typically, you will want to create a paragraph style, since character styles are used for the specialized treatment of text or data within a paragraph.
2.5.6 Changing the Association Between a Style and an Element
You can change the association between a style and its element. You may want to do this if, say, you import two similar styles that you want to format the same way in a body page.
To change the association between a style and an element:
1. Click the Element Setup icon (Figure 2–25), then click Styles to open the appropriate tab.