THE EXPERT’S VOICE
®IN JAVA
™TECHNOLOGY
Beginning
JSF
™
2
APIs
and
JBoss
®
Seam
Kent Ka Iok Tong
Beginning JSF
™
2 APIs
and JBoss
®
Seam
Beginning JSF™ 2 APIs and JBoss® Seam
Copyright © 2009 by Kent Ka Iok Tong
All rights reserved. No part of this work may be reproduced or transmitted in any form or by any means, electronic or mechanical, including photocopying, recording, or by any information storage or retrieval system, without the prior written permission of the copyright owner and the publisher.
ISBN-13 (pbk): 978-1-4302-1922-4
ISBN-13 (electronic): 978-1-4302-1923-1
Printed and bound in the United States of America 9 8 7 6 5 4 3 2 1
Trademarked names may appear in this book. Rather than use a trademark symbol with every occurrence of a trademarked name, we use the names only in an editorial fashion and to the benefit of the trademark owner, with no intention of infringement of the trademark.
Java™ and all Java-based marks are trademarks or registered trademarks of Sun Microsystems, Inc., in the US and other countries. Apress, Inc., is not affiliated with Sun Microsystems, Inc., and this book was written without endorsement from Sun Microsystems, Inc.
Lead Editors: Steve Anglin, Matt Moodie Technical Reviewer: Jim Farley
Editorial Board: Clay Andres, Steve Anglin, Mark Beckner, Ewan Buckingham, Tony Campbell, Gary Cornell, Jonathan Gennick, Michelle Lowman, Matthew Moodie, Jeffrey Pepper, Frank Pohlmann, Ben Renow-Clarke, Dominic Shakeshaft, Matt Wade, Tom Welsh
Project Manager: Sofia Marchant
Copy Editors: Kim Wimpsett and Heather Lang Associate Production Director: Kari Brooks-Copony Production Editor: Ellie Fountain
Compositor and Artist: Kinetic Publishing Services, LLC Proofreader: Patrick Vincent
Indexer: Toma Mulligan Cover Designer: Kurt Krames
Manufacturing Director: Tom Debolski
Distributed to the book trade worldwide by Springer-Verlag New York, Inc., 233 Spring Street, 6th Floor, New York, NY 10013. Phone 1-800-SPRINGER, fax 201-348-4505, e-mail [email protected], or visit http://www.springeronline.com.
For information on translations, please contact Apress directly at 2855 Telegraph Avenue, Suite 600, Berkeley, CA 94705. Phone 510-549-5930, fax 510-549-5939, e-mail [email protected], or visit http://www.apress.com. Apress and friends of ED books may be purchased in bulk for academic, corporate, or promotional use. eBook versions and licenses are also available for most titles. For more information, reference our Special Bulk Sales–eBook Licensing web page at http://www.apress.com/info/bulksales.
The information in this book is distributed on an “as is” basis, without warranty. Although every precaution has been taken in the preparation of this work, neither the author(s) nor Apress shall have any liability to any person or entity with respect to any loss or damage caused or alleged to be caused directly or indirectly by the information contained in this work.
iii
Contents at a Glance
About the Author
. . . .ixAbout the Technical Reviewer
. . . .xiCHAPTER 1
Getting Started with JSF
. . . . 1CHAPTER 2
Using Forms
. . . . 29CHAPTER 3
Validating Input
. . . . 67CHAPTER 4
Creating an E- shop
. . . . 101CHAPTER 5
Creating Custom Components
. . . . 151CHAPTER 6
Providing a Common Layout for Your Pages
. . . . 173CHAPTER 7
Building Interactive Pages with Ajax
. . . . 183CHAPTER 8
Using Conversations
. . . . 215CHAPTER 9
Supporting Other Languages
. . . . 231CHAPTER 10
Using JBoss Seam
. . . . 253v
Contents
About the Author
. . . .ixAbout the Technical Reviewer
. . . .xiCHAPTER 1
Getting Started with JSF
. . . . 1Introducing the “Hello world” Application
. . . . 1Installing Eclipse
. . . . 2Installing JBoss
. . . . 3Installing a JSF Implementation
. . . . 7Installing Web Beans
. . . . 8Creating the “Hello world!” Application with JSF
. . . . 9Generating Dynamic Content
. . . . 17Retrieving Data from Java Code
. . . . 20Exploring the Life Cycle of the Web Bean
. . . . 25Using an Easier Way to Output Text
. . . . 25Debugging a JSF Application
. . . . 25Summary
. . . . 27CHAPTER 2
Using Forms
. . . . 29Developing a Stock Quote Application
. . . . 29Getting the Stock Quote Symbol
. . . . 29Displaying the Result Page
. . . . 36Displaying the Stock Value
. . . . 38Marking Input As Required
. . . . 40Inputting a Date
. . . . 49Conversion Errors and Empty Input
. . . . 55Using a Combo Box
. . . . 60Using a Single b2 Bean
. . . . 62Hooking Up the Web Beans
. . . . 63nC O N T E N T S vi
CHAPTER 3
Validating Input
. . . . 67Developing a Postage Calculator
. . . . 67What If the Input Is Invalid?
. . . . 73Null Input and Validators
. . . . 78Validating the Patron Code
. . . . 80Creating a Custom Validator for the Patron Code
. . . . 82Displaying the Error Messages in Red
. . . . 86Displaying the Error Message Along with the Field
. . . . 87Validating a Combination of Multiple Input Values
. . . . 96Summary
. . . . 100CHAPTER 4
Creating an E- shop
. . . . 101Listing the Products
. . . . 102Making the Link to Show the Details
. . . . 106Displaying Headers in the Columns
. . . . 115Implementing a Shopping Cart
. . . . 116Displaying the Content of the Shopping Cart
. . . . 126The Checkout Function
. . . . 127Getting the Credit Card Number of the Current User
. . . . 131Forcing the User to Log In
. . . . 139Implementing Logout
. . . . 146Protecting the Password
. . . . 148Summary
. . . . 149CHAPTER 5
Creating Custom Components
. . . . 151Displaying a Copyright Notice on Multiple Pages
. . . . 151Allowing the Caller to Specify the Company Name
. . . . 157Creating a Product Editor
. . . . 159Passing a Method in a Parameter?
. . . . 162Creating a Box Component
. . . . 163Accepting Two Pieces of XHTML Code
. . . . 166Creating a Reusable Component Library
. . . . 168Creating a Component Library Without taglib .xml
. . . . 170vii nC O N T E N T S
CHAPTER 6
Providing a Common Layout for Your Pages
. . . . 173Using the Same Menu on Different Pages
. . . . 173Using Global Navigation Rules
. . . . 177Using Two Abstract Parts
. . . . 178Creating Page- Specific Navigation Cases
. . . . 180Summary
. . . . 182CHAPTER 7
Building Interactive Pages with Ajax
. . . . 183Displaying a FAQ
. . . . 183Refreshing the Answer Only
. . . . 185Hiding and Showing the Answer
. . . . 189Using Ajax to Hide or Show the Answer
. . . . 191Giving a Rating to a Question
. . . . 194Updating the Rating as the User Types
. . . . 199Using a Dialog Box to Get the Rating
. . . . 200Setting the Look and Feel with Skins
. . . . 204Displaying Multiple Questions
. . . . 206Summary
. . . . 212CHAPTER 8
Using Conversations
. . . . 215Creating a Wizard to Submit Support Tickets
. . . . 215Interference Between Browser Windows
. . . . 219URL Mismatched?
. . . . 225Summary
. . . . 229CHAPTER 9
Supporting Other Languages
. . . . 231Displaying the Current Date and Time
. . . . 231Supporting Chinese
. . . . 232Easier Way to Access Map Elements
. . . . 237Internationalizing the Date Display
. . . . 238Letting the User Change the Language Used
. . . . 238Localizing the Full Stop
. . . . 243Displaying a Logo
. . . . 246Making the Locale Change Persistent
. . . . 248Localizing Validation Messages
. . . . 250nC O N T E N T S viii
CHAPTER 10
Using JBoss Seam
. . . . 253Installing Seam
. . . . 253Re-creating the E-shop Project
. . . . 254Allowing the User to Add Products
. . . . 257Restricting Access to the Product-Editing Page
. . . . 265Creating a Shopping Cart
. . . . 267Turning the Shopping Cart into a Stateful Session Bean
. . . . 273Creating the Checkout Page
. . . . 277Using WebLogic, WebSphere, or GlassFish
. . . . 284Summary
. . . . 284ix
About the Author
xi
About the Technical Reviewer
1
C h A P T E R 1
Getting Started with JSF
I
n this chapter you’ll learn how to set up a development environment and create a “Hello world!” application with JSF.Introducing the “Hello world” Application
Suppose that you’d like to develop the application shown in Figure 1-1.
Figure 1-1. A simple “Hello world!” application with a single page
C h A P T E R 1 n G E T T I N G S T A R T E D W I T h J S F
2
JBoss JSF
App1 Eclipse
Web Beans Generates
App2
Figure 1-2. The software that you’ll need
Installing Eclipse
You need to make sure you have the Eclipse IDE for Java EE Developers, as shown in Figure 1-3 (note that the Eclipse IDE for Java Developers is not enough, because it doesn’t include tools for developing web applications). You can go to http://www.eclipse.org
to download it. For example, you’ll need the eclipse-jee-ganymede-SR1- win32.zip file if you use Windows. Unzip it into a convenient location, such as c:\eclipse. Then, create a shortcut to run c:\eclipse\eclipse -data c:\workspace. This way, it will store your proj-ects under the c:\workspace folder.
You need this one, NOT that one:
C h A P T E R 1 n G E T T I N G S T A R T E D W I T h J S F 3
To see whether it’s working, run it, and make sure you can switch to the Java EE per-spective (it should be the default; if not, choose Window ➤ Open Perspective ➤ Other), as shown in Figure 1-4.
Figure 1-4. The Java EE perspective
Installing JBoss
To install JBoss, go to http://www.jboss.org/jbossas/downloads to download a binary pack-age of JBoss Application Server 5.x (or newer), such as jboss- 5.0.1.GA.zip. Unzip it into a folder such as c:\jboss. To test whether it is working, you can try to launch JBoss in Eclipse. To do that, choose Windows ➤ Preferences in Eclipse, and then choose Server ➤
Installed Runtime Environments. You’ll see the window shown in Figure 1-5.
C h A P T E R 1 n G E T T I N G S T A R T E D W I T h J S F
4
Click Add, and choose JBoss ➤ JBoss v5.0 ( Figure 1-6).
Figure 1-6. The JBoss 5.0 runtime
Click Next. Specify c:\jboss as the application server directory ( Figure 1-7).
C h A P T E R 1 n G E T T I N G S T A R T E D W I T h J S F 5
Click Finish. Next, you need to create a JBoss instance. In the bottom part of the Eclipse window, you’ll see a Servers tab (you’ll see this tab only when you’re in the Java EE perspective); right- click anywhere on the tab, choose New ➤ Server, and choose the JBoss v5.0 server runtime environment ( Figure 1-8).
Figure 1-8. Choosing the JBoss runtime environment
C h A P T E R 1 n G E T T I N G S T A R T E D W I T h J S F
6
If you had web application projects in Eclipse, you would see them listed here.
You can add selected projects to that JBoss instance.
Figure 1-9. Adding web applications
For the moment, you’ll have none. Click Finish. Then you should see your JBoss instance on the Servers tab ( Figure 1-10).
To run it, click the green button here.
To stop it, click the red button here.
C h A P T E R 1 n G E T T I N G S T A R T E D W I T h J S F 7
Click the green icon as shown in Figure 1-10 to run JBoss. Then you will see some messages on the Console tab, as shown here:
...
14:47:06,820 INFO [TomcatDeployment] deploy, ctxPath=/
14:47:06,902 INFO [TomcatDeployment] deploy, ctxPath=/jmx- console
14:47:06,965 INFO [Http11Protocol] Starting Coyote HTTP/1.1 on http-127.0.0.1- 8080 14:47:06,992 INFO [AjpProtocol] Starting Coyote AJP/1.3 on ajp-127.0.0.1- 8009 14:47:07,001 INFO [ServerImpl] JBoss (Microcontainer) [5.0.1.GA (build:
SVNTag=JBoss_5_0_1_GA date=200902231221)] Started in 26s:587ms
n
Note
If your computer is not that fast, JBoss will take so long to start that Eclipse may think it has stopped responding . In that case, double- click the JBoss instance, click Timeouts, set the timeout for starting to a longer value such as 100 seconds, and then start JBoss again .To stop JBoss, click the red icon (as shown earlier in Figure 1-10).
Installing a JSF Implementation
JSF stands for JavaServer Faces and is an API (basically, it’s some Java interfaces). To use JSF, you need an implementation (which means you need Java classes that implement those interfaces). There are two main implementations: the reference implementation from Sun and MyFaces from Apache. In this book, you’ll use the former, but you could use MyFaces with no practical difference.
C h A P T E R 1 n G E T T I N G S T A R T E D W I T h J S F
8
Installing Web Beans
To install Web Beans, go to http://www.seamframework.org/WebBeans to download it. Make sure it is strictly newer than 1.0.0 ALPHA2; otherwise, get the nightly snapshot. The file is probably called something like webbeans-ri-distribution-1.0.0- SNAPSHOT.zip; unzip it into a folder such as c:\webbeans.
Next, you’ll need to install Web Beans into JBoss. To do that, you’ll need to run Ant 1.7.0 or newer. If you don’t have this tool, you can download it from http://ant.apache.org and unzip it into a folder such as c:\ant.
Next, modify the c:\webbeans\jboss- as\build.properties file to tell it where JBoss is, as shown in Listing 1-1. Make sure that there is no leading # character on that line!
Listing 1-1. Tell Web Beans Where JBoss Is
jboss.home=c:\jboss
java.opts=...
webbeans-ri-int.version=5.2.0-SNAPSHOT webbeans-ri.version=1.0.0-SNAPSHOT jboss-ejb3.version=1.0.0
Open a command prompt, make sure you’re connected to the Internet, and then issue the commands shown in Listing 1-2.
Listing 1-2. Issue These Commands at the Command Prompt
c:\>cd \webbeans\jboss- as c:\>set ANT_HOME=c:\ant c:\>ant update
This will output a lot of messages. If everything is fine, you should see a “BUILD SUC-CESSFUL” message at the end, as shown here:
...
[copy] Copying 2 files to
/home/kent/jboss-5.0.1.GA/server/default/deployers/webbeans.deployer/lib-int [copy] Copying 8 files to
/home/kent/jboss-5.0.1.GA/server/default/deployers/webbeans.deployer
update:
C h A P T E R 1 n G E T T I N G S T A R T E D W I T h J S F 9
Creating the “Hello world!” Application with JSF
To create the “Hello world!” application, right- click in Package Explorer, and choose New
➤ Dynamic Web Project ( Figure 1-11).
Figure 1-11. Creating a dynamic web project
Enter the information shown in Figure 1-12.
The name doesn't really matter.
Run this application in JBoss.
C h A P T E R 1 n G E T T I N G S T A R T E D W I T h J S F
10
Keep clicking Next until you finish. Finally, you should end up with the project struc-ture shown in Figure 1-13.
Figure 1-13. Project structure
To make JAR files from the JSF implementation available to your project, copy the JAR files into JBoss, as shown in Figure 1-14.
jsf
lib
?????.jar
?????.jar
jboss
server
default
deploy
jbossweb.sar
jsf-libs
C h A P T E R 1 n G E T T I N G S T A R T E D W I T h J S F 11
To see the Web Beans classes available to you at compile time, right- click the project, choose Build Path ➤ Configure Build Path, and add c:\jboss\server\default\deployers\ webbeans.deployer\jsr299-api to the build path.
Next, you’ll create the “Hello world!” page. To do that, right- click the WebContent
folder, and choose New ➤ HTML. Enter hello as the file name, as in Figure 1-15.
Figure 1-15. Creating the “Hello world!” page
C h A P T E R 1 n G E T T I N G S T A R T E D W I T h J S F
12
Figure 1-16. Using the XHTML strict template
Click Finish. This will give you a file named hello.html. This XHTML file will serve as the “Hello world!” page. However, JSF by default assumes that XHTML files use the .xhtml
C h A P T E R 1 n G E T T I N G S T A R T E D W I T h J S F 13
Figure 1-17. Renaming the file
Open the file, and input the content shown in Listing 1-3.
Listing 1-3. Content of hello.xhtml
<?xml version="1.0" encoding="UTF- 8" ?>
<!DOCTYPE html PUBLIC "- //W3C//DTD XHTML 1.0 Strict//EN" "http://www.w3.org/TR/xhtml1/DTD/xhtml1- strict.dtd"> <html xmlns="http://www.w3.org/1999/xhtml"
xmlns:h="http://java.sun.com/jsf/html"> <head>
<meta http-equiv="Content- Type" content="text/html; charset=UTF- 8" /> <title>Insert title here</title>
</head> <body>
Hello world!
</body> </html>
C h A P T E R 1 n G E T T I N G S T A R T E D W I T h J S F
14
This “servlet” is the JSF engine. You can give it any name
you'd like.
http://localhost:8080/hello/faces/???
You will access the application using a URL like this. This way, JBoss will send the request to the JSF engine for handling.
hello
<welcome-file>index.html</welcome-file>
<welcome-file>index.htm</welcome-file>
<welcome-file>index.jsp</welcome-file>
<welcome-file>default.html</welcome-file>
<welcome-file>default.htm</welcome-file>
<welcome-file>default.jsp</welcome-file>
</welcome-file-list>
This "servlet" is the JSF engine.
You can give it any name
you'd like.
...
C h A P T E R 1 n G E T T I N G S T A R T E D W I T h J S F 15
Next, create a file called faces- config.xml in the WebContent/WEB- INF folder. This is the configuration file for JSF, as shown in Listing 1-4. Without it, JSF will not initialize. Because you have no particular configuration to set, it contains only an empty <faces- config>
element.
Listing 1-4. faces-config.xml
<faces-config xmlns="http://java.sun.com/xml/ns/javaee" xmlns:xsi="http://www.w3.org/2001/XMLSchema- instance" xsi:schemaLocation="http://java.sun.com/xml/ns/javaee http://java.sun.com/xml/ns/javaee/web-facesconfig_2_0.xsd"
version="2.0">
</faces-config>
To register your application with JBoss, right- click the JBoss instance on the Servers tab, and choose Add and Remove Projects; then you’ll see Figure 1-19.
C h A P T E R 1 n G E T T I N G S T A R T E D W I T h J S F
16
Choose your Hello project to add to the JBoss instance.
Now, start JBoss, and try to access http://localhost:8080/Hello/hello.xhtml in a browser. Note that this URL does not include the /faces prefix and thus will not be han-dled by the JSF engine. Instead, JBoss will directly read the hello.xhtml page and return its content (see Figure 1-20). We’re doing this just to check whether the basic web applica-tion is working.
http://localhost:8080/hello/hello.xhtml
JBoss GET /hello/hello.xhtml
hello
WebContent
hello.xhtml Read and return the
content of this file hTTP Request
Browser
Figure 1-20. Directly accessing the content of hello.xhtml
If everything is working, the browser should either prompt you to save the file (Firefox) or display the “Hello world!” page (Internet Explorer).
To access it through the JSF engine, use http://localhost:8080/Hello/faces/hello.xhtml
C h A P T E R 1 n G E T T I N G S T A R T E D W I T h J S F 17
http://localhost:8080/hello/hello.xhtml Browser
JBoss GET /hello/faces/hello.xhtml
3: Treat /hello.xhtml as a relative path from WebContent to read the file. This path is called the “view ID” in JSF.
hTTP Request
JSF 2: Pass the path /hello.xhtml to JSF.
Page Object
4: Parse the .xhtml file and create an object to represent the page (the “Page Object”).
5: Generate hTML code.
1: Read this path.
hello
WebContent
hello.xhtml
Figure 1-21. Accessing the hello.xhtml file through JSF
You’ll see “Hello world!” displayed in the browser.
Generating Dynamic Content
C h A P T E R 1 n G E T T I N G S T A R T E D W I T h J S F
18
This is the JSF hTML namespace. This namespace contains tags like <outputText>:
Page Object (View Root)
UI Output
This tag will create a UI Output component.
Value:John “h” is a shorthand for the
JSF hTML namespace. It is called a “prefix.”
Such a hierarchical data structure is called the “JSF component tree” or the “JSF view.”
The page object is called the “component view root.”
<?xml version="1.0" encoding="UTF-8" ?>
<!DOCTYPE html PUBLIC "-//W3C//DTD XHTML 1.0 Strict//EN"
"http://www.w3.org/TR/xhtml1/DTD/xhtml1-strict.dtd">
<html xmlns="http://www.w3.org/1999/xhtml"
xmlns:h="http://java.sun.com/jsf/html"
>
<head>
<meta http-equiv="Content-Type" content="text/html; charset=UTF-8" />
<title>Insert title here</title>
</head>
<body>
Hello world
<h:outputText value="John"></h:outputText>
!
</body>
</html>
Figure 1-22. JSF component tree
C h A P T E R 1 n G E T T I N G S T A R T E D W I T h J S F 19
<?xml version="1.0" encoding="UTF-8" ?> <!DOCTYPE html ...>
<html ...> ...
<body>
Hello <h:outputText value="John"></h:outputText>! </body>
</html>
View Root
UI Output
Value: John Static Code Block 1
Static Code Block 2
View Root
UI Output
Value: John John
Static Code Block 1
Static Code Block 2 Static Code Block 1
Static Code Block 2
1: Output the static code unchanged.
2: Output the value.
3: Output the stuff unchanged.
Figure 1-23. JSF component tree generating HTML code
C h A P T E R 1 n G E T T I N G S T A R T E D W I T h J S F
20
Figure 1-24. Generated HTML code
Note that there is no space between “Hello” and “John.” This is because JSF ignores the spaces surrounding JSF tags. You can easily fix this problem, but let’s ignore it for now; we’ll fix it later in the chapter.
Retrieving Data from Java Code
Next, you’ll let the UI Output component retrieve the string from Java code. First, create the Java class GreetingService in the hello package. Input the content shown in Listing 1-5.
Listing 1-5. GreetingService.java
package hello;
public class GreetingService { public String getSubject() {
return "Paul"; }
}
So, how do you get the UI Output component to call the getSubject() method in the class? Figure 1-25 shows how it works. Basically, in each HTTP request, there is a table of objects, and each object has a name. (Each object is called a web bean.) If you set the
C h A P T E R 1 n G E T T I N G S T A R T E D W I T h J S F 21
View Root
Web Beans Manager
U Output
Object 1
Object 2 Name
foo
bar
... ...
Object
value: #{foo}
JSF Engine hTTP request
1: Give me an object named “foo.”
2: Give me an object named “foo.” 3: Look up a web bean named “foo.”
Figure 1-25. Accessing a web bean
C h A P T E R 1 n G E T T I N G S T A R T E D W I T h J S F
22
Listing 1-6. Accessing the subject Property of a GreetingService Object
<html ...> ... <body>
Hello <h:outputText value="#{foo.subject}"></h:outputText>! </body>
</html>
Now, let’s return to the question of how to put a GreetingService object into the web bean table. To do that, modify the GreetingService class as shown in Figure 1-26.
package hello;
import javax.annotation.Named; import javax.context.RequestScoped;
@Named("foo") @RequestScoped
public class GreetingService { public String getSubject() { return "Paul";
} }
Put the web bean into the table in the request.
The web beans-related annotations are defined in those packages.
The name of the web bean.
Figure 1-26. Declaring a web bean class
How does it work? When the Web Beans manager looks for a web bean named foo
C h A P T E R 1 n G E T T I N G S T A R T E D W I T h J S F 23
Web Beans Manager
Greeting Service
foo Name
... ... ...
... ... ... Object
hTTP request
1: Look up a web bean
named “foo.” Not found. 2: Look, there is a class with a
matching @Named annotation. 5: Add a new entry to
the table. 3: Create an
instance.
4: Where to store it? Look, store it into the request.
Name Object
@Named("foo")
@RequestScoped
public class GreetingService {
public String getSubject() {
return "Paul";
}
}
Figure 1-27. How the Web Beans manager creates the web bean
Note that in order for the Web Beans manager to create an instance of the class, it needs to have a no- argument constructor. For the JSF engine to get its subject property, it needs to have a corresponding getter, in other words, getSubject(). In summary, the class needs to be a Java bean.
When you need to use Web Beans, you must enable the Web Beans manager by creating a configuration file for it. So, create an empty file named beans.xml in the
WebContent/WEB- INF folder.
C h A P T E R 1 n G E T T I N G S T A R T E D W I T h J S F
24
Now run the application, and it will work as shown in Figure 1-28.
Figure 1-28. Successfully getting the value from a web bean
Now let’s fix that space issue we talked about earlier; just add a space to the value
attribute of the outputText tag, as shown in Figure 1-29.
<?xml version="1.0" encoding="UTF-8" ?> <!DOCTYPE html ...>
<html ...> ...
<body>
Hello <h:outputText value=" #{foo.subject}"></h:outputText>! </body>
</html> Add a space here. It is treated as static text and will be output as is. It is called a “literal expression.”
This part will be evaluated at runtime and is called an “eval expression.”
In general, you can have multiple literal expressions and multiple eval expressions in a single EL expression like:
<h:outputText value="... #{...}" ... #{...} ...>
Figure 1-29. Adding a space to the value attribute
C h A P T E R 1 n G E T T I N G S T A R T E D W I T h J S F 25
Exploring the Life Cycle of the Web Bean
Will the web bean stay there forever? No; the web bean table is stored in the HTTP request, so as HTML code is returned to the client (the browser), the HTTP request will be destroyed and so will the web bean table and the web beans in it.
n
Note
If you have worked with servlets and JSP before, you may wonder whether it’s possible to store web beans in the session instead of the request . The answer is yes; you’ll see this in action in the subse-quent chapters .Using an Easier Way to Output Text
You’ve seen how to use the <h:outputText> tag to output some text. In fact, there is an easier way to do that. For example, you could modify hello.xhtml as shown in Listing 1-7.
Listing 1-7. Using an EL Expression Directly in the Body Text
<?xml version="1.0" encoding="UTF- 8" ?> <!DOCTYPE html ...>
<html ...> ... <body>
Hello <h:outputText value=" #{foo.subject}"></h:outputText>!
Hello #{foo.subject}!
</body> </html>
Run the application, and it will continue to work.
Debugging a JSF Application
C h A P T E R 1 n G E T T I N G S T A R T E D W I T h J S F
26
Figure 1-30. Setting a breakpoint
Then click the Debug icon in the Server window ( Figure 1-31). Now go to the browser to load the page again. Eclipse will stop at the breakpoint ( Figure 1-32). Then you can step through the program and check the variables and whatever else. To stop the debug ses-sion, just stop or restart JBoss in normal mode.
This will start JBoss in debug mode. If it is already running, it will be restarted.
C h A P T E R 1 n G E T T I N G S T A R T E D W I T h J S F 27
Figure 1-32. Stopping at a breakpoint
Summary
In this chapter, you learned that you can run one or more web applications on top of JBoss. If a web application uses the JSF library, it is a JSF application. In a JSF application, a page is defined by an .xhtml file and is identified by its view ID, which is the relative path to it from the WebContent folder.
You also learned that an .xhtml file consists of tags. Each tag belongs to a certain namespace, which is identified by a URL. To use a tag in an .xhtml file, you need to intro-duce a shorthand (prefix) for the URL and then use the prefix to qualify the tag name. The JSF tags belong to the JSF HTML namespace.
To create a JSF component in the component tree, you use a JSF tag such as
<h:outputText> in the .xhtml file. The root of the component tree is the view root. The component tree will generate HTML code to return to the client. The process of gener-ating markup in JSF is called encoding.
C h A P T E R 1 n G E T T I N G S T A R T E D W I T h J S F
28
As an alternative to the <h:outputText> tag, you can directly put the EL expression into the body text.
In addition, this chapter also covered EL expressions, which typically look like #{foo.p1}. If you use an EL expression, the JSF engine will try to find an object named foo. It will in turn ask the Web Beans manager to do it, and the Web Beans manager will look up the web beans in the web bean table in the HTTP request or create it appropriately. Then the JSF engine will call getP1() on the web bean, and the result is the final value of the EL expression.
Finally, you learned that web beans are JavaBeans created and destroyed automatically by the Web Beans manager. To enable web beans, you need to have a META-INF/web- beans.xml
29
C h A P T E R 2
Using Forms
I
n this chapter, you’ll learn how to use forms to get input from users and store it in a web bean for processing.Developing a Stock Quote Application
Suppose that you’d like to develop the application shown in Figure 2-1. That is, if the user enters a stock symbol and clicks the button, then the application will display the stock value.
1: Input a stock symbol.
2: Clicking the button will display the result page.
Figure 2-1. A stock quote application
Getting the Stock Quote Symbol
C h A P T E R 2 n U S I N G F O R M S
30
Figure 2-2. Locate this configuration file.
Open the file, and modify it as shown in Listing 2-1. Eclipse “forgot” to update the project name there, so you need to do it yourself.
Listing 2-1. Update the Content with the New Project Name
<?xml version="1.0" encoding="UTF- 8"?>
<project-modules id="moduleCoreId" project- version="1.5.0"> <wb- module deploy- name="Stock">
<wb- resource deploy- path="/" source- path="/WebContent"/>
<wb- resource deploy-path="/WEB- INF/classes" source- path="/src"/> <property name="context- root" value="Stock"/>
<property name="java-output- path"/> </wb- module>
C h A P T E R 2 n U S I N G F O R M S 31
Save this file, and close the Navigator view. Then rename the hello.xhtml file as
getsymbol.xhtml. Modify the new getsymbol.xhtml file as shown in Figure 2-3.
<?xml version="1.0" encoding="UTF-8" ?>
<h:inputText></h:inputText>
<h:commandButton></h:commandButton> </h:form> Before the page is rendered, the <h:form>
tag will create a UI Form component.
It will create a UI Input component.
It will create a UI Command component.
Figure 2-3. getsymbol.xhtml
What do the components such as UI Form do? During rendering, these components will generate HTML elements, as shown in Figure 2-4.
UI View Root
UI Form
UI Input
UI Command
<form action="...">
<input type="text" value="???" /> <input type="submit" />
</form>
But what is the value initially displayed to the user? The UI Form will generate the action value so that this component tree will be invoked on form submission.
C h A P T E R 2 n U S I N G F O R M S
32
What is the initial symbol value displayed to the user? You can link a web bean to UI Input component (see Figure 2-5). That is, on rendering, the UI Input component will evaluate the EL expression and use the result as the initial value.
UI View Root
UI Form
UI Input
UI Command
<form ...>
<input type="text" value="???" /> <input type="submit" />
</form>
b1
value: #{b1.sym} sym: MSFT
1: Set the value to an EL expression. Here, it points to the "sym" property of a web bean "b1."
2: When it needs to get the initial value to display, it reads the "sym" property. Let's suppose that the value is "MSFT."
3: It puts the "MSFT" as the initial value.
MSFT
Figure 2-5. Linking a property of a web bean to a UI Input component
Note that after rendering the page, the HTTP request is gone and so is the b1 bean (see Figure 2-6).
http://localhost/...
Browser GET the Page
Request 1
...
...
HTML Code Response 1
b1
b1 is accessed and thus created on demand. Finally, when the response has been sent, b1 is destroyed.
C h A P T E R 2 n U S I N G F O R M S 33
Suppose that the user changes the value from “MSFT” to “IBM” and then submits the form. What will happen? Figure 2-7 shows the process. Note that this b1 bean is not the original; it is newly created and associated with the new request representing the form submission.
Browser GET the Page
Request 1
HTML Code Response 1
b1
IBM Request 2 1: The user changes it to
IBM and submits the form. IBM
b1
UI Input
value: #{b1.sym} sym: BM
2: It tries to store the value "IBM" back into the "sym" property of b1. This will create a new b1.
...
Figure 2-7. The form submission process
C h A P T E R 2 n U S I N G F O R M S
34
Browser GET the Page
Request 1
hTML Code Response 1
b1
IBM Request 2 1: The user changes it to
IBM and submits the form. IBM
b1
UI Input
value: #{b1.sym} sym: IBM
...
2: Store the value "IBM" back into b1. 3: During rendering, read the "sym" property again.
hTML Code
Response 2 4: Generate the response.
Figure 2-8. The rendering process after form submission
Now, to implement these ideas, modify getsymbol.xhtml as shown in Listing 2-2.
Listing 2-2. getsymbol.xhtml
<?xml version="1.0" encoding="UTF- 8" ?> <!DOCTYPE ...>
<html ...> ... <body> <h:form>
<h:inputText value="#{b1.sym}"></h:inputText>
<h:commandButton></h:commandButton> </h:form>
C h A P T E R 2 n U S I N G F O R M S 35
Of course, you need to define the b1 web bean. To do that, create a class called
QuoteRequest in a stock package (see Listing 2-3). Note that the sym property is initial-ized to MSFT, and some messages are printed in various methods to show the order of the events. You can also delete the hello package.
Listing 2-3. Defining the b1 Web Bean
package stock; ...
@Named("b1") @RequestScoped
public class QuoteRequest { private String sym = "MSFT";
public QuoteRequest() {
System.out.println("Creating b1"); }
public String getSym() {
System.out.println("getting sym"); return sym;
}
public void setSym(String sym) {
System.out.println("setting sym to: " + sym); this.sym = sym;
} }
Now, start JBoss, and access the page at http://localhost:8080/Stock/faces/getsymbol. xhtml. You should see the messages in the console that are shown in Listing 2-4.
Listing 2-4. Messages Showing the Rendering Process
Creating b1 getting sym
C h A P T E R 2 n U S I N G F O R M S
36
Listing 2-5. Messages Showing the Form Submission Process
Creating b1 getting sym
Creating b1 getting sym
setting sym to: IBM getting sym
Displaying the Result Page
For the moment, when handling the form submission, you’re simply letting JSF redisplay the current page containing the form. This is no good. You’d like to display a result page showing the stock price instead. To do that, create a stockvalue.xhtml file in the WebContent
folder. For the moment, the content is hard- coded (see Listing 2-6).
Listing 2-6. Result Page
<?xml version="1.0" encoding="UTF- 8" ?>
<!DOCTYPE html PUBLIC "- //W3C//DTD XHTML 1.0 Strict//EN" "http://www.w3.org/TR/xhtml1/DTD/xhtml1- strict.dtd"> <html xmlns="http://www.w3.org/1999/xhtml"
xmlns:h="http://java.sun.com/jsf/html"> <head>
<meta http-equiv="Content- Type" content="text/html; charset=UTF- 8" /> <title>Insert title here</title>
</head> <body>
Stock value is: 123.
</body> </html>
C h A P T E R 2 n U S I N G F O R M S 37
/getsymbol.xhtml
/stockvalue.xhtml If Outcome is OK
Some other view ID If Outcome is ...
The View ID of the Current Page
The View ID of the Next Page Each such branch is called a "navigation case."
The whole thing is called a "navigation rule."
The View ID of the Next Page
Figure 2-9. Navigation rule
To create the navigation rule, modify faces- config.xml as shown in Listing 2-7.
Listing 2-7. Navigation Rule in faces-config.xml
<faces-config ...> <navigation- rule>
<from-view-id>/getsymbol.xhtml</from-view- id> <navigation- case>
<from-outcome>ok</from- outcome>
<to-view-id>/stockvalue.xhtml</to-view- id> </navigation- case>
...
...You could have more <navigation- case> elements here... ...
</navigation- rule>
</faces-config>
C h A P T E R 2 n U S I N G F O R M S
38
Listing 2-8. Setting the action Attribute of UI Command Component
<?xml version="1.0" encoding="UTF- 8" ?> ...
<h:form>
<h:inputText value="#{b1.sym}"></h:inputText> <h:commandButton action="ok"></h:commandButton> </h:form>
</body> </html>
Then, the UI Command component reads its action attribute and uses the value to set the outcome, as shown in Figure 2-10.
IBM 2: Look into the request to see the button was
Figure 2-10. Using the action attribute to control the outcome
Now, run the application, and it should work.
Displaying the Stock Value
C h A P T E R 2 n U S I N G F O R M S 39
as the stock value. To do that, modify stockvalue.xhtml so that it gets the stock value from the b1 bean (see Listing 2-9).
Listing 2-9. Getting the Stock Value from a Web Bean
... <body>
Stock value is: #{b1.stockValue}. </body>
...
For this to work, define a getter in the b1 bean, as shown in Listing 2-10.
Listing 2-10. Providing the Stock Value from the b1 Bean
...
public class QuoteRequest { private String sym = "MSFT";
public QuoteRequest() {
System.out.println("Creating b1"); }
public String getSym() {
System.out.println("getting sym"); return sym;
}
public void setSym(String sym) {
System.out.println("setting sym to: " + sym); this.sym = sym;
}
public int getStockValue() {
return Math.abs(sym.hashCode()); }
}
C h A P T E R 2 n U S I N G F O R M S
40
Assuming that there is no error of any kind, JSF will enter the next phase in which all scheduled listeners will be executed. In this example, the listener scheduled by the UI Command component will execute to set the outcome. Then JSF will check the outcome and use the navigation rules to determine the next view ID of the next page. This phase is called the Invoke Application phase.
In the next phase, JSF uses the next view ID to load the page and let it render. This phase is called the Render Response phase.
Input Processing UI Input
...
UI Command HTTP request
1: Read the values, check them if they are provided, validate them.
Web bean
2: Store the values into web beans.
Invoke Application
Listener 3: Schedule a listener to be
executed.
ok Outcome
4: Set the outcome
Render Response
Figure 2-11. JSF handles a request in phases.
Marking Input As Required
C h A P T E R 2 n U S I N G F O R M S 41
UI Input
required: true symbol=
2: HTTP Request
3: The symbol has a non-empty value? No.
Symbol is required 4: Log an error message.
1: Mark it as required.
<h:inputText value="#{b1.sym}" required="true"></h:inputText>
Figure 2-12. Marking input as required
However, if the UI Command component still sets the outcome to ok, JSF will go ahead and display the stock result. This is obviously not what you want. You’d like to do the following:
1. Redisplay getsymbol.xhtml.
2. Have it display the error message.
C h A P T E R 2 n U S I N G F O R M S
42
Input Processing UI Input
...
UI Command HTTP Request
1: There is an error while reading the values and validating them.
Web Bean
2: Will not store any values into the web bean.
Invoke Application
Listener 3: Schedule a listener to be
executed.
null Outcome
Render Response
Figure 2-13. Skipping the Invoke Application phase if there is any error when processing input
C h A P T E R 2 n U S I N G F O R M S 43
Input Processing UI Input
...
UI Input HTTP Request
1: There is an error while reading the values and validating them.
Web Bean
3: Will not store any values into the web bean.
Invoke Application
Render Response 2: No error.
Web Bean
4: Will it store the value into the web bean?
Figure 2-14. What would happen if just one UI Input component failed?
C h A P T E R 2 n U S I N G F O R M S
44
Input Processing UI Input ...
UI Input HTTP Request
1: There is an error while reading the values and
validating them. Web Bean
Invoke Application
Render Response 2: No error.
Web Bean
Update Domain Values
3: Go directly to the Render Response phase if there is any error.
Normally (e.g., no error), go to the Update Domain Values phase.
Figure 2-15. Skipping the Update Domain Values phase if there is any error when processing input
C h A P T E R 2 n U S I N G F O R M S 45
<?xml version="1.0" encoding="UTF-8" ?> <!DOCTYPE ...>
<html ...> ...
<body>
<h:messages/>
<h:form>
<h:inputText ...></h:inputText>
<h:commandButton action="ok"></h:commandButton> </h:form>
</body> </html>
UI View Root
UI Messages 1: Before the page is rendered, the
<h:messages> tag will create a UI Messages component.
2: It will render the error messages as a list.
... <ul>
<li>error message 1</li> <li>error message 2</li> ...
</ul> ...
Figure 2-16. Displaying error messages
C h A P T E R 2 n U S I N G F O R M S
46
UI View Root
UI Form
UI Input
UI Command UI Messages
The ID of the UI Form
The ID of the UI Input The whole path is called the client ID of the UI Input
Figure 2-17. Error messages are displayed.
As you can see in Figure 2-17, the client ID of the UI Input component is the ID path from the form to the component concerned. In general, client IDs are mainly used as the values of the id or name attributes of the HTML elements generated. If you view the source of the HTML page, you’ll see how various client IDs are used (see Listing 2-11).
Listing 2-11. Client IDs Used As id or name Attributes
<?xml version="1.0" encoding="UTF- 8" ?> <!DOCTYPE html ...>
<html xmlns="http://www.w3.org/1999/xhtml"> <head>
C h A P T E R 2 n U S I N G F O R M S 47
<title>Insert title here</title> </head>
<body>
<form name="j_id3" id="j_id3" method="post" action="/Stock/faces/getsymbol.xhtml" enctype="application/x-www-form- urlencoded">
<input type="hidden" name="j_id3"></input>
<input type="text" name="j_id3:j_id4" value="MSFT"></input> ...
</form> </body> </html>
So, displaying the client ID is quite confusing to users. Instead, you should display a user- friendly description for the UI Input component. To do that, modify getsymbol. xhtml as shown in Listing 2-12.
Listing 2-12. Specifying the Label
... <body>
<h:messages /> <h:form>
<h:inputText value="#{b1.sym}" required="true" label="Stock symbol"></h:inputText>
<h:commandButton action="ok"></h:commandButton> </h:form>
</body> </html>
Run the code again, and it will display the label instead of the client ID (see Figure 2-18).
C h A P T E R 2 n U S I N G F O R M S
48
If you don’t like this error message, you can provide your own. To do that, create a text file named messages.properties in the stock package (the file name is not really sig-nificant as long as it has a .properties extension). Figure 2-19 shows the content to input.
javax.faces.component.UIInput.REQUIRED=You must input {0}!
This is called the "resource key."
JSF will fill in the label ("Stock symbol").
Figure 2-19. Specifying the error message for missing input
JSF will not load the file automatically; you must tell it to do so. Therefore, modify
faces- config.xml as shown in Figure 2-20.
<faces-config ...>
<application>
<message-bundle>stock.messages</message-bundle> </application>
<navigation-rule>
<from-view-id>/getsymbol.xhtml</from-view-id> <navigation-case>
<from-outcome>ok</from-outcome>
<to-view-id>/stockvalue.xhtml</to-view-id> </navigation-case>
</navigation-rule> </faces-config>
The Package
The Base Filename without the .properties Extension
Figure 2-20. Telling JSF to load a properties file
C h A P T E R 2 n U S I N G F O R M S 49
Figure 2-21. Custom error messages in effect
Note that this error message will apply to all UI Input components in your applica-tion. If you’d like this error message to apply only to a single UI Input component, you can do that by using the code in Listing 2-13. This will override the message provided by the UI Input component (either the default text or the text loaded from a .properties file). Note that you can’t use placeholders like {0} in this string.
Listing 2-13. Specifying the Error Message for a Single UI Input Component
<?xml version="1.0" encoding="UTF- 8" ?> <!DOCTYPE ...>
<html ...> ... <body> <h:messages/> <h:form>
<h:inputText value="#{b1.sym}" required="true" label="Stock symbol" requiredMessage="Input is missing!"></h:inputText>
<h:commandButton action="ok"></h:commandButton> </h:form>
</body> </html>
Run the application, and it will display the error message you specified.
Inputting a Date
C h A P T E R 2 n U S I N G F O R M S
50
Figure 2-22. Inputting a date
How does that differ from inputting a string? During rendering (the Render Response phase), the UI Input component now needs to convert a Date object into a string (see Figure 2-23).
UI Input
2: Convert the Date object into a string.
Web Bean
1: Read a Date object from a web bean.
<input type="text" value="9/25/2008"/> ...
y: 2008 m: 9 d: 25
Figure 2-23. Converting a Date object into a string in the Render Response phase
C h A P T E R 2 n U S I N G F O R M S 51
Input Processing UI Input d: "9/25/2008"
HTTP Request
1: Read the value (string) and convert it to a Date object.
Invoke Application
Render Response
Web Bean
Update Domain Values converted:
2: Store into a web bean.
y: 2008 m: 9 d: 25
Figure 2-24. Converting a string into the Date object in the Input Processing phase
The UI Input component knows about a few common types such as java.lang.Integer
and java.lang.Double and can convert between a value of such types and a string. Unfortu-nately, it doesn’t know how to convert between a java.util.Date and a string. To solve this problem, you need to tell it to use a Date converter, as shown in Figure 2-25.
UI Input
"9/25/2008" y:m: 92008
d: 25 Date Converter
"8/26/2008" y:m: 82008
d: 26
C h A P T E R 2 n U S I N G F O R M S
52
To implement this idea, modify getsymbol.xhtml as shown in Figure 2-26.
...
<html xmlns="http://www.w3.org/1999/xhtml" xmlns:h="http://java.sun.com/jsf/html" xmlns:f="http://java.sun.com/jsf/core"> ...
<h:form>
<h:inputText value="#{b1.sym}" required="true" label="Stock symbol" requiredMessage="Input is missing!"></h:inputText>
on
<h:inputText value="#{b1.quoteDate}" required="true" label="Quote date"> <f:convertDateTime/>
</h:inputText>
<h:commandButton action="ok"></h:commandButton> </h:form>
</body> </html>
1: Create a Date converter.
UI Input
Date converter 2: What is the JSF component
that you created? Oh, it's that UI Input.
3: Add the Date converter to it.
You'll add this property to the b1 bean later.
This is the JSF Core taglib. The converter is not related to HTML in any way so it belongs to the Core taglib.
Figure 2-26. Specifying a Date converter for a UI Input component
Add the quoteDate property to the b1 bean, as shown in Listing 2-14. You’ll simply append the Date to the symbol before getting the hash code so that the calculated stock price will depend on both the Date and the symbol.
Listing 2-14. Providing a quoteDate Property
@Named("b1") @RequestScoped
public class QuoteRequest { private String sym = "MSFT";
C h A P T E R 2 n U S I N G F O R M S 53
public QuoteRequest() {
System.out.println("Creating b1"); }
public String getSym() {
System.out.println("getting sym"); return sym;
}
public void setSym(String sym) {
System.out.println("setting sym to: " + sym); this.sym = sym;
}
public Date getQuoteDate() { return quoteDate; }
public void setQuoteDate(Date quoteDate) { this.quoteDate = quoteDate;
}
public int getStockValue() {
return Math.abs((sym+quoteDate.toString()).hashCode());
} }
Now run the application, and it should work (see Figure 2-27). Note that you’re creat-ing a new Date object and assigning it to the quoteDate property for each request, so the UI Input component will display the current date on render.
Figure 2-27. Quote date working
C h A P T E R 2 n U S I N G F O R M S
54
Table 2-1. How the Date Format Is Determined
Preferred Language Short Style Medium Style Long Style Full Style
U.S. English 10/26/2008 Oct 26, 2008 October 26, 2008 Sunday, October 26, 2008
U.K. English 26/10/2008 26 Oct, 2008 ... ...
If you don’t set the style, it will use the medium style. To tell the converter to use, say, the short style, you can use the code shown in Listing 2-15.
Listing 2-15. Specifying the Date Style
... <h:form>
<h:inputText value="#{b1.sym}" required="true" label="Stock symbol" requiredMessage="Input is missing!"></h:inputText>
on
<h:inputText value="#{b1.quoteDate}" required="true" label="Quote date">
<f:convertDateTime dateStyle="short"/>
</h:inputText>
<h:commandButton action="ok"></h:commandButton> </h:form>
Now, run the application, and it should look like Figure 2-28. Obviously, the user now has to input the date using this short style too.
Figure 2-28. Quote date displayed in short style
You can also change the preferred language in the browser. For example, in Firefox, you can set the preferred language by selecting Tools ➤ Options ➤ Content ➤ Languages
➤ Choose. For this to work, you still need to tell JSF that you support that language in
C h A P T E R 2 n U S I N G F O R M S 55
(fr), German (de), and Chinese (zh) are supported and that English is the default. What does
default mean here? If an unsupported language such as Italian is requested, English will be
used instead.
Listing 2-16. Configuring the Supported Languages in faces-config.xml
<faces-config ...> <application>
<message-bundle>stock.messages</message- bundle>
<locale- config>
<default-locale>en</default- locale> <supported-locale>fr</supported- locale> <supported-locale>de</supported- locale> <supported-locale>zh</supported- locale> </locale- config>
</application> <navigation- rule>
<from-view-id>/getsymbol.xhtml</from-view- id> <navigation- case>
<from-outcome>ok</from- outcome>
<to-view-id>/stockvalue.xhtml</to-view- id> </navigation- case>
</navigation- rule> </faces-config>
Now, change your preferred language to, say, French, and run the application again. It will display the date in French.
You may wonder what will happen if you don’t configure the supported languages in faces- config.xml at all. In that case, if your OS account (which runs JBoss) is set to use, say, Japanese, then JSF will assume that you support Japanese only.
Conversion Errors and Empty Input
Having to convert a string into a Date object introduces some new issues:
• Whatifthestringis,say,“abc”andthuscan’tbeconverted?
• Whatiftheuserdoesn’tinputanything(emptystring)andsubmitstheform?
C h A P T E R 2 n U S I N G F O R M S
56
Input Processing UI Input d: "abc"
HTTP Request
1: Read the value (string) but fails convert it to a Date object.
Invoke Application
Render Response
Web Bean
Update Domain Values abc is not a valid date
2: Log an error message
Figure 2-29. Conversion failure
C h A P T E R 2 n U S I N G F O R M S 57
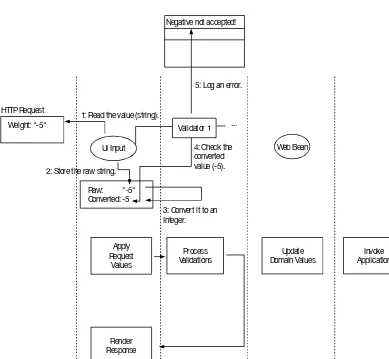
Process Validations UI Input
d: "abc"
HTTP Request 1: Read the value (string).
Invoke Application
Render Response
Web Bean
Update Domain Values abc is not a valid date
Apply Request
Values Raw: "abc" Converted: null
4: Log an error.
2: Store the raw string.
3: Try to convert it to a Date object but fails.
Figure 2-30. The Apply Request Values phase and the Process Validations phase
n
Note
I’ve made up the term Input Processing phase; in the official JSF specification, there is no such term . You’ll find only the phases shown in Figure 2-30 .C h A P T E R 2 n U S I N G F O R M S
58
Figure 2-31. “abc” can’t be converted, and it is redisplayed.
Again, if you don’t like the error message, you can override it in the messages.properties
file (see Figure 2-32).
javax.faces.component.UIInput.REQUIRED=You must input {0}!
javax.faces.converter.DateTimeConverter.DATE={0} is an invalid {2}. \ Try something like {1}
JSF will fill in the user input ("abc"). You may specify TIME here when you use the converter it to convert a time.
When the line is too long, you can use a backslash to tell Java to continue to the next line.
The Label ("quote date") An example string that
is valid such as "12/20/08"
Figure 2-32. Customizing error messages using a .properties file
C h A P T E R 2 n U S I N G F O R M S 59
Figure 2-33. Finding out what placeholders are supported
Using a .properties file will affect all UI Input components. If you’d like to set a .properties file just for this UI Input component, you can do so using the code shown in Listing 2-17.
Listing 2-17. Specifying the Conversion Error Message for a Single UI Input Component
... <h:form>
<h:inputText value="#{b1.sym}" required="true" label="Stock symbol" requiredMessage="Input is missing!"></h:inputText>
on
<h:inputText value="#{b1.quoteDate}" required="true" label="Quote date"
converterMessage="The quote date is invalid">
<f:convertDateTime dateStyle="short"/> </h:inputText>
<h:commandButton action="ok"></h:commandButton> </h:form>
</body> </html>
We’ve covered conversion errors, but what about empty input? Because an empty string can’t be converted to a Date, will it be treated as a conversion error? No. The UI Input component will assume all input is optional, and an empty string is treated as “no input.” In that case, it converts the empty string into null (if the property type is not a string) and stores it in the property of the web bean. As mentioned earlier, if the property type is a string, no conversion is needed, and it will store just an empty string in the property.
Again, if the input is not optional, you can simply set the required attribute to true
C h A P T E R 2 n U S I N G F O R M S
60
Using a Combo Box
Suppose that you’d like to change the application so that the user will choose from a combo box of stock symbols instead of typing one in (see Figure 2-34).
Figure 2-34. Using a combo box
To do that, modify getsymbol.xhtml as shown in Figure 2-35.
<h:form>
<h:inputText value "#{b1.sym}" required "true" label "Stock symbol" requiredMessage="Input is missing!">
</h:inputText>
<h:selectOneMenu value="#{b1.sym}" required="true" label="Stock symbol" requiredMessage="Input is missing!">
<f:selectItems value="#{b2.symbols}"/> </h:selectOneMenu>
on
<h:inputText value="#{b1.quoteDate}" .../> <h:commandButton action="ok"></h:commandButton> </h:form>
Create
UI Select One
UI Select Items Create
It provides the selected symbol.
It provides the list of available symbols. You'll create the b2 bean next.
It has got nothing to do with HTML, so it belongs to the Core taglib.
C h A P T E R 2 n U S I N G F O R M S 61
For it to work, create a new class to serve as the b2 bean. Let’s call it StockService (see Figure 2-36).
package stock;
import java.util.ArrayList; import java.util.List;
import javax.faces.model.SelectItem; import javax.annotation.Named;
import javax.context.ApplicationScoped;
@Named("b2") @RequestScoped
public class StockService {
private List<SelectItem> symbols;
public StockService() {
symbols = new ArrayList<SelectItem>(); symbols.add(new SelectItem("MSFT")); symbols.add(new SelectItem("IBM")); symbols.add(new SelectItem("RHAT")); }
public List<SelectItem> getSymbols() { return symbols;
} }
This class is provided by JSF. It represents an item for the user's selection.
This string will be displayed to the user.
It can return a List or an array.
Figure 2-36. StockService class
C h A P T E R 2 n U S I N G F O R M S
private List<SelectItem> symbols;
public StockService() {
symbols = new ArrayList<SelectItem>();
symbols.add(new SelectItem("MSFT", "Microsoft")); symbols.add(new SelectItem("IBM", "IBM"));
symbols.add(new SelectItem("RHAT", "Red Hat")); }
public List<SelectItem> getSymbols() { return symbols;
} }
b1
sym: ...
This string will be stored into the web bean.
This string will be displayed to the user.
Figure 2-37. Using a short ID and a long description
Using a Single b2 Bean
At the moment, you’re creating a new b2 bean for each request. However, because the list of symbols should be global, a single instance should be enough for all requests from all users. To do that, you need to know that in addition to the web bean table in each request, there is a web bean table for the whole application (see Figure 2-38).
hTTP Request 1
hTTP Request 2
Application Web Beans
1: Look up the web bean here (if you're handling request 1).