Oracle® Fusion Middleware
Configuration Guide for IBM WebSphere Application Server
11
g
Release 1 (11.1.1)
E17764-01
January 2011
Oracle Fusion Middleware Configuration Guide for IBM WebSphere Application Server, 11g Release 1 (11.1.1)
E17764-01
Copyright © 2011, Oracle and/or its affiliates. All rights reserved.
This software and related documentation are provided under a license agreement containing restrictions on use and disclosure and are protected by intellectual property laws. Except as expressly permitted in your license agreement or allowed by law, you may not use, copy, reproduce, translate, broadcast, modify, license, transmit, distribute, exhibit, perform, publish, or display any part, in any form, or by any means. Reverse engineering, disassembly, or decompilation of this software, unless required by law for interoperability, is prohibited.
The information contained herein is subject to change without notice and is not warranted to be error-free. If you find any errors, please report them to us in writing.
If this software or related documentation is delivered to the U.S. Government or anyone licensing it on behalf of the U.S. Government, the following notice is applicable:
U.S. GOVERNMENT RIGHTS Programs, software, databases, and related documentation and technical data delivered to U.S. Government customers are "commercial computer software" or "commercial technical data" pursuant to the applicable Federal Acquisition Regulation and agency-specific supplemental regulations. As such, the use, duplication, disclosure, modification, and adaptation shall be subject to the restrictions and license terms set forth in the applicable Government contract, and, to the extent applicable by the terms of the Government contract, the additional rights set forth in FAR 52.227-19, Commercial Computer Software License (December 2007). Oracle USA, Inc., 500 Oracle Parkway, Redwood City, CA 94065.
This software is developed for general use in a variety of information management applications. It is not developed or intended for use in any inherently dangerous applications, including applications which may create a risk of personal injury. If you use this software in dangerous applications, then you shall be responsible to take all appropriate fail-safe, backup, redundancy, and other measures to ensure the safe use of this software. Oracle Corporation and its affiliates disclaim any liability for any damages caused by use of this software in dangerous applications.
Oracle is a registered trademark of Oracle Corporation and/or its affiliates. Other names may be trademarks of their respective owners.
Contents
List of Examples List of Figures List of Tables
Preface
... xiAudience... xi
Document Organization ... xi
Documentation Accessibility ... xi
Related Documents ... xii
Conventions ... xii
1
Configuration Overview
1.1 Introduction to IBM WebSphere Cells ... 1-1 1.2 Overview of the Oracle Fusion Middleware Configuration Wizard ... 1-3 1.2.1 Oracle Fusion Middleware Product Templates ... 1-3 1.2.2 Template Information Specific to IBM WebSphere ... 1-4 1.2.3 Configuration Wizard Log Files ... 1-4 1.3 Cell Creation Process... 1-5 1.4 Federation Process ... 1-7 1.5 Creating Clusters and Cloning Application Servers ... 1-8
2
Using the Configuration Wizard
2.1 Before You Begin... 2-1 2.2 Starting the Configuration Wizard... 2-1 2.3 Creating a New Cell ... 2-2 2.3.1 Configuring Data Sources ... 2-4 2.3.2 Configuring Schemas ... 2-5 2.3.3 Optional Configuration... 2-6 2.4 Federating a Remote Machine to an Existing Cell ... 2-8 2.5 Updating an Existing Cell... 2-11 2.6 Postconfiguration Steps ... 2-13 2.7 Example Oracle Fusion Middleware Configuration... 2-14 2.8 Finding Profile Information... 2-18
3
Configuration Wizard Screens
3.3 Specify Cell, Profile and Node Name Information ... 3-3 3.4 Specify Administrator Information... 3-5 3.5 Specify Profile and Node Name Information ... 3-7 3.6 Cell Progress ... 3-8 3.7 Add Products to Cell ... 3-9 3.8 Configure the Application Server... 3-10 3.9 Configure JDBC Data Sources... 3-11 3.10 Configure RAC Data Sources... 3-12 3.11 Test JDBC Data Sources ... 3-13 3.12 Configure JDBC Component Schema ... 3-14 3.13 Configure RAC Data Source Component Schema... 3-16 3.14 Test Component Schema ... 3-17 3.15 Select Optional Configuration... 3-18 3.16 Configure Application Servers ... 3-19 3.17 Configure Clusters... 3-21 3.18 Configure Additional Cluster Members... 3-22 3.19 Configure End Points ... 3-23 3.20 Configure File Store Shared Directories ... 3-25 3.21 Target Deployments to Clusters or Servers ... 3-26 3.22 Target Services to Clusters or Servers... 3-27 3.23 Target Custom Services to Servers ... 3-29 3.24 Target Resource Adapters to Servers... 3-30 3.25 Target JDBC Data Sources to Clusters or Servers ... 3-31 3.26 Target JMS Resources to Clusters or Servers ... 3-32 3.27 Configuration Summary ... 3-33 3.28 Configuring Cell... 3-34
4
Using wsadmin to Configure Oracle Fusion Middleware
4.1 Prerequisite Environment Setup... 4-1 4.1.1 Environment Setup for IBM WebSphere ND ... 4-2 4.1.2 Environment Setup for IBM WebSphere AS... 4-3 4.1.3 Prerequisites for DB2 Databases... 4-3 4.2 Starting and Ending a Configuration Session... 4-4 4.3 Adding an Oracle Fusion Middleware Product to a Cell ... 4-5 4.4 Adding a New Server to a Cell ... 4-5 4.5 Configuring Host and Port Settings for End Points ... 4-6 4.6 Creating Servers, Clusters, and Cluster Members ... 4-8 4.7 Setting File Store Shared Directories for a Cluster... 4-9 4.8 Creating and Deleting a Data Source... 4-10 4.9 Changing a Data Source to an Oracle RAC Data Source ... 4-11 4.10 Changing an Oracle RAC Data Source to a Data Source ... 4-12 4.11 Configuring a Component Schema ... 4-12 4.12 Federating Remote Nodes to a Cell... 4-14
5
wsadmin Command Reference
5.2.4.6 getJdbcDriverClass... 5-27 5.2.4.7 validateJdbc ... 5-28 5.2.4.8 createDatasource... 5-28 5.2.4.9 deleteDatasource ... 5-29 5.2.4.10 setJdbcUsername ... 5-29 5.2.4.11 getJdbcUsername... 5-29 5.2.4.12 setJdbcPassword ... 5-30 5.2.4.13 setJdbcServerName ... 5-30 5.2.4.14 getJdbcServerName... 5-31 5.2.4.15 setJdbcPortNumber ... 5-31 5.2.4.16 getJdbcPortNumber ... 5-31 5.2.4.17 setJdbcDatabaseName ... 5-32 5.2.4.18 getJdbcDatabaseName... 5-32 5.2.4.19 setJdbcDriverVendor ... 5-32 5.2.4.20 getJdbcDriverVendor ... 5-33 5.2.4.21 setJdbcDriverXa ... 5-33 5.2.4.22 getJdbcDriverXa... 5-34 5.2.4.23 setJdbcIsOracleInstanceType ... 5-34 5.2.4.24 getJdbcIsOracleInstanceType... 5-34 5.2.5 JDBC Utility Functions for Oracle RAC ... 5-35 5.2.5.1 setJdbcRacHostsPorts... 5-35 5.2.5.2 setJdbcRacServiceName ... 5-35 5.2.5.3 getJdbcRacServiceName ... 5-36 5.2.5.4 convertJdbcNormalDatasourceToRAC ... 5-36 5.2.5.5 convertJdbcRACToNormalDatasource ... 5-37 5.2.6 File Store Utility Functions... 5-37 5.2.6.1 setFileStoreDirectory... 5-38 5.2.6.2 setLogDirectory ... 5-38 5.2.6.3 setPermanentStoreDirectory ... 5-39 5.2.6.4 setTemporaryStoreDirectory ... 5-39 5.2.6.5 getFileStoreDirectory ... 5-39 5.2.6.6 getLogDirectory ... 5-40 5.2.6.7 getPermanentStoreDirectory ... 5-40 5.2.6.8 getTemporaryStoreDirectory... 5-41
List of Examples
List of Figures
List of Tables
Preface
This document describes how to use the Oracle Fusion Middleware Configuration Wizard to configure Oracle Fusion Middleware products in IBM WebSphere cells on a UNIX or Windows operating system.
Audience
This document is intended for system administrators and application developers who are configuring one or more installed Oracle Fusion Middleware products in an IBM WebSphere environment.
Document Organization
This document is organized as follows:
■ Chapter 1, "Configuration Overview," provides an introduction to IBM
WebSphere cells and cell topology, as well as an overview of the Oracle Fusion Middleware Configuration Wizard. It also describes the general workflow for creating cells and federating remote machines to an existing cell. This chapter also describes what happens when you clone an existing server or add a new server to an existing cluster.
■ Chapter 2, "Using the Configuration Wizard," describes how to start the
Configuration Wizard. This chapter includes screen workflows for creating a new cell, federating a remote node to a cell, or modifying an existing cell. This chapter also includes an example configuration workflow for creating a clustered server environment on multiple nodes.
■ Chapter 3, "Configuration Wizard Screens," provides screen shots and detailed descriptions for each of the Oracle Fusion Middleware Configuration screens.
■ Chapter 4, "Using wsadmin to Configure Oracle Fusion Middleware," describes how to set up the environment on a machine prior to running wsadmin
commands. This chapter also provides examples of how to perform various cell configuration tasks using wsadmin commands or scripts.
■ Chapter 5, "wsadmin Command Reference," describes the OracleMWConfig and OracleMWConfigUtilities commands for wsadmin that are used to configure Oracle Fusion Middleware products in an IBM WebSphere environment.
Documentation Accessibility
documentation includes features that make information available to users of assistive technology. This documentation is available in HTML format, and contains markup to facilitate access by the disabled community. Accessibility standards will continue to evolve over time, and Oracle is actively engaged with other market-leading
technology vendors to address technical obstacles so that our documentation can be accessible to all of our customers. For more information, visit the Oracle Accessibility Program Web site at http://www.oracle.com/accessibility/.
Accessibility of Code Examples in Documentation
Screen readers may not always correctly read the code examples in this document. The conventions for writing code require that closing braces should appear on an
otherwise empty line; however, some screen readers may not always read a line of text that consists solely of a bracket or brace.
Accessibility of Links to External Web Sites in Documentation
This documentation may contain links to Web sites of other companies or
organizations that Oracle does not own or control. Oracle neither evaluates nor makes any representations regarding the accessibility of these Web sites.
Access to Oracle Support
Oracle customers have access to electronic support through My Oracle Support. For information, visit http://www.oracle.com/support/contact.html or visit
http://www.oracle.com/accessibility/support.html if you are hearing impaired.
Related Documents
For more information, see the following documents in the Oracle Fusion Middleware 11g Release 11.1.1.3 documentation set:
■ Oracle Fusion Middleware Third-Party Application Server Guide
■ Oracle Fusion Middleware Domain Template Reference
Conventions
The following text conventions are used in this document:
Convention Meaning
boldface Boldface type indicates graphical user interface elements associated with an action, or terms defined in text or the glossary.
italic Italic type indicates book titles, emphasis, or placeholder variables for which you supply particular values.
1
1
Configuration Overview
This chapter provides a basic overview of the Oracle Fusion Middleware
Configuration Wizard for IBM WebSphere and the IBM WebSphere cell environment. It contains the following sections:
■ Introduction to IBM WebSphere Cells
■ Overview of the Oracle Fusion Middleware Configuration Wizard
■ Cell Creation Process
■ Federation Process
■ Creating Clusters and Cloning Application Servers
1.1 Introduction to IBM WebSphere Cells
An IBM WebSphere Application Server (IBM WebSphere AS) cell contains one Application Server. An IBM WebSphere Application Server Network Deployment (IBM WebSphere ND) cell contains one or more Application Servers that can be clustered for high availability and scaled to meet performance needs.
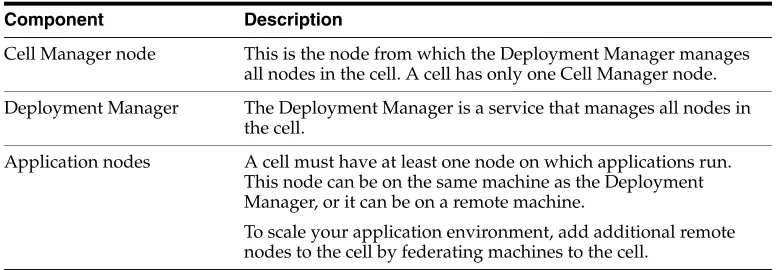
Table 1–1 briefly describes the components of a typical IBM WebSphere cell. Figure 1–1 illustrates the basic topology of an IBM WebSphere ND cell. For more detailed information about IBM WebSphere cells, see the IBM WebSphere documentation.
Note: In this document, IBM WebSphere is used to reference both IBM WebSphere AS and IBM WebSphere ND. The specific product names are used when appropriate.
Table 1–1 Components of a Cell
Component Description
Cell Manager node This is the node from which the Deployment Manager manages all nodes in the cell. A cell has only one Cell Manager node.
Deployment Manager The Deployment Manager is a service that manages all nodes in the cell.
Application nodes A cell must have at least one node on which applications run. This node can be on the same machine as the Deployment Manager, or it can be on a remote machine.
Introduction to IBM WebSphere Cells
Figure 1–1 IBM WebSphere ND Cell Topology
A typical Oracle Fusion Middleware product environment consists of a cell with Oracle Fusion Middleware Application Servers (including one Administration Server) residing on multiple nodes. The Cluster Member 1 and Cluster Member 2 Application Servers are clustered, with on server one Node 1 and the other server on Node 2, allowing for high availability and scalability. Server 1 and Server 2 are not clustered. To scale the environment, you add additional nodes to the cell by federating a machine to the cell, and then add new servers on those nodes.
Node Agent Each node has a Node Agent, which is a service that is used to communicate with the Deployment Manager.
Application Server A node can contain standalone Application Servers (servers that are not part of a cluster). The Administration Server is an Application Server on which the Administration Console application resides. Other applications can also be targeted to the Administration Server, although this is typically done only in a single-server IBM WebSphere AS environment.
Cluster A cluster typically contains Application Servers that span multiple nodes for high availability. You must create an
Application Server on one of your nodes before you can create a cluster.
Cluster members When creating a cluster, you add the initial cluster member (which must be an existing Application Server). After creating the cluster, you add additional cluster members to it. Each additional cluster member inherits the attributes of the first cluster member.
Table 1–1 (Cont.) Components of a Cell
Overview of the Oracle Fusion Middleware Configuration Wizard
1.2 Overview of the Oracle Fusion Middleware Configuration Wizard
Before you can use Oracle Fusion Middleware products in an IBM WebSphere environment, you must create and configure the cell in which the Oracle Fusion Middleware applications will run. The Oracle Fusion Middleware Configuration Wizard for IBM WebSphere simplifies the process of creating and expanding a cell for your Oracle Fusion Middleware environment. Using the wizard, you can:
■ Create new IBM WebSphere cells
■ Add Oracle Fusion Middleware products to the cell
■ Modify an existing cell
■ Add additional nodes to a cell
■ Add Application Servers and clusters to a cell
■ Configure the resources in a cell
The Configuration Wizard also provides the option to modify the basic configuration that is created by the product template. For example, you can add Application Servers and clusters, change JDBC data source settings, and change deployment targets.
1.2.1 Oracle Fusion Middleware Product Templates
The Configuration Wizard uses product templates to make it easy to add the necessary resources for an Oracle Fusion Middleware product to a cell, either when you are creating a new cell, modifying an existing cell, or federating a machine to a cell. These templates, which are Java archive (JAR) files that contain the files and scripts needed to add products to a cell, are automatically used when you select the Oracle Fusion Middleware products to include in the cell on the Add Products to Cell screen of the Configuration Wizard.
All cells that you create include the Oracle CIE Core template, which installs the Oracle CIE Custom Service and targets it to the Administration Server in the cell. The name of the Administration Server is defined as OracleAdminServer. This template is required in an IBM WebSphere environment.
When you select other products, the basic resources required by those products are also added to the cell. These may include:
■ Application Servers
■ Applications
■ Libraries
■ JDBC component schemas
Caution: Do not modify the template JAR file contents in any way. Doing so can potentially create issues in your Oracle Fusion
Middleware installation.
Note: wsadmin, which is a command line tool that you can use to configure a cell, uses the same templates as the Configuration Wizard. See Chapter 4, "Using wsadmin to Configure Oracle Fusion
Overview of the Oracle Fusion Middleware Configuration Wizard
■ JDBC data sources
■ JMS resources, such as connection factories, topics, and queues
■ Services
■ Custom services
■ Resource adapters
The product template for a particular product defines which resources are
automatically targeted to the Application Servers defined in the template, as well as the resources that are targeted to the Administration Server and Deployment Manager.
For more information about Oracle Fusion Middleware templates, see "Oracle Fusion Middleware Product Templates" in the Oracle Fusion Middleware Domain Template Reference, which describes the templates for WebLogic Server environments.
1.2.2 Template Information Specific to IBM WebSphere
Note the following differences between the IBM WebSphere environment and the WebLogic Server environment when you reference the Oracle Fusion Middleware Domain Template Reference:
■ The Oracle CIE Core template is unique to the IBM WebSphere environment, and is required for running Oracle Fusion Middleware applications in this
environment. Because this template is required, it is already selected on the Add Products to Cell screen, and cannot be deselected. It installs the Oracle CIE Custom Service and targets it to the Administration Server (OracleAdminServer) in the cell.
■ The JAR file names for the IBM WebSphere versions of the templates are identical to the file names for the WebLogic Server versions.
■ The template JAR files for IBM WebSphere are stored in the same path as the WebLogic Server template JAR files, except that the applications level of the directory path is was. For example, if the WebLogic Server JAR file is stored in
ORACLE_COMMON_HOME/common/templates/applications, the associated
JAR file for IBM WebSphere is stored in ORACLE_COMMON_ HOME/common/templates/was instead.
■ Some of the templates that are available for WebLogic Server are not available in an IBM WebSphere environment. To determine which templates are available for a particular product installation, see the product list on the Add Products to Cell screen of the Configuration Wizard. This list differs depending on the Oracle Fusion Middleware products that you installed.
■ The product name that is displayed on the Add Products to Cell screen of the Configuration Wizard may include "for IBM WebSphere."
■ In IBM WebSphere environments, the startscript.xml file is ignored.
1.2.3 Configuration Wizard Log Files
Each time that you run the Configuration Wizard, a log file is created for that session in the MW_HOME/logs directory. Log file names are in the format:
Cell Creation Process
1.3 Cell Creation Process
The Configuration Wizard guides you through the process of creating a cell for your Oracle Fusion Middleware environment by enabling you to select the product components to include in the cell. If necessary, you can also customize the cell to suit your environment by:
■ Customizing predefined JDBC and JMS resources
■ Adding Application Servers, clusters, and cluster members
■ Targeting application deployments and services to additional Application Servers or clusters
■ Targeting custom services to additional Application Servers
■ Targeting resource adapters to additional Application Servers
■ Targeting JDBC and JMS resources to additional Application Servers or clusters
■ Adding remote nodes to the cell (federating machines to a cell)
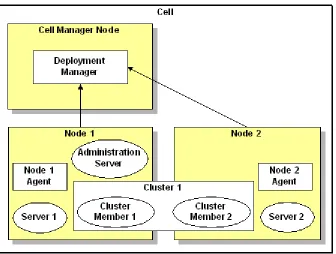
Figure 1–2 illustrates the workflow for creating a new cell. The steps indicated in boxes with dashed lines are relevant only when you create cells that contain specific
Cell Creation Process
Figure 1–2 Workflow for Creating a New IBM WebSphere ND Cell
When configuring a new cell for an Oracle Fusion Middleware product environment, you can either add products to the machine on which the Deployment Manager resides or add products only on your remote nodes.
In the first case, you add the products to the cell when creating the cell, and do not have to add them when federating remote nodes to the cell.
Federation Process
1.4 Federation Process
You can add remote nodes to an existing IBM WebSphere ND cell by using the federation process, which is initiated by selecting the Federate Machine and
Configure Cell option on the Select Configuration Option screen of the Configuration Wizard. After adding a remote node, you can add additional Application Servers to the cell or you can add cluster members on the node to expand an existing cluster.
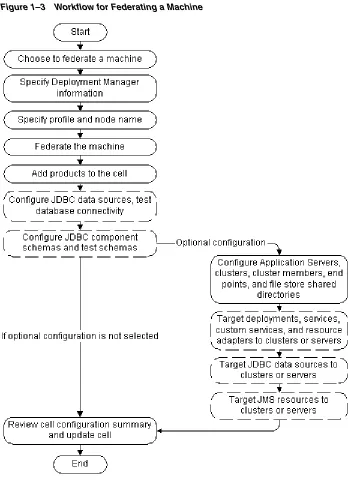
Figure 1–3 illustrates the workflow for federating a machine to an existing cell on the Deployment Manager node. The steps indicated in boxes with dashed lines are relevant only when you create cells that contain specific products, such as those that use JDBC data sources or JMS resources.
Creating Clusters and Cloning Application Servers
1.5 Creating Clusters and Cloning Application Servers
In an IBM WebSphere cell, you can create new Application Servers that inherit the attributes of an existing server by using one of the following processes:
■ Clone an existing standalone Application Server to create a second standalone Application Server, which inherits its attributes from the first server.
In this case, you clone the Application Servers by using the Clone function on the Configure Application Servers screen.
■ Create a new cluster by using an existing Application Server as the first cluster member, and then add a new cluster member to the cluster. The new cluster member inherits the attributes of the first cluster member.
In this case, you add the new cluster members by using the Add function on the Configure Additional Cluster Members screen. The new cluster member is a clone of the first cluster member.
When you create a standalone Application Server that is a clone of an existing Application Server, all applications and libraries that are targeted to the source server are also deployed to the clone. In addition, any of the following services that are targeted to the source server are automatically targeted to the clone:
■ connectionFactory
When you create a cluster, all applications and libraries that are targeted to the first cluster member are automatically moved from that server to the cluster. In addition, any of the following services that are targeted to the first cluster member are moved from the server to the cluster:
Creating Clusters and Cloning Application Servers
■ workManager
■ busMember
However, when you create a cluster, the following services are not moved from the first cluster member to the cluster. These services cannot be targeted to clusters, and can be targeted only to individual servers:
■ customService
2
2
Using the Configuration Wizard
This chapter describes how to use the Oracle Fusion Middleware Configuration Wizard to create and update cells. It includes the following sections:
■ Before You Begin
■ Starting the Configuration Wizard
■ Creating a New Cell
■ Federating a Remote Machine to an Existing Cell
■ Updating an Existing Cell
■ Postconfiguration Steps
■ Example Oracle Fusion Middleware Configuration
■ Finding Profile Information
2.1 Before You Begin
If you are using a DB2 database, prior to starting the Configuration Wizard for the first time to configure FMW products, set the DB_DRIVER_CLASSPATH environment variable to include the full path to both db2jcc4.jar and db2jcc_license_ cu.jar. If you do not do this, all DB2 connection tests will fail.
2.2 Starting the Configuration Wizard
The console for the machine on which the product installation resides must support Java-based graphical user interfaces (GUIs). All Windows-based consoles support Java-based GUIs; only a subset of UNIX-based consoles support Java-based GUIs.
You can start the Configuration Wizard in graphical mode from either the Windows
Start menu or from the command line.
■ To start the Configuration Wizard in graphical mode from a Windows command prompt or a UNIX command shell:
1. Log in to the system on which the product is installed.
Creating a New Cell
2. Open an MS-DOS command prompt window (on Windows) or a command shell (on UNIX).
3. Go to the following directory:
– Windows:ORACLE_HOME\common\bin
– UNIX:ORACLE_HOME/common/bin
Replace ORACLE_HOME with the directory in which you installed your Oracle Fusion Middleware products.
4. Execute the following command:
– Windows:was_config.cmd
– UNIX:./was_config.sh
2.3 Creating a New Cell
To create a new cell for your Oracle Fusion Middleware product installation by using the Configuration Wizard, start the Configuration Wizard as described in Section 2.2, "Starting the Configuration Wizard."
The Configuration Wizard displays a sequence of screens, in the order listed in Table 2–1. For more information about each screen, see the related section in Chapter 3, "Configuration Wizard Screens," or click the link in the Screen column.
Note: On some Windows operating systems, if you have User Account Control (UAC) enabled, you may have to start the command window using the Run as Administrator command. Otherwise, you may not be able to create a cell or federate a node.
Note: To create a log file of the Configuration Wizard session, include the -log=config.log -priority=debug parameter in the command. You can specify any file name for the log file, such as config_today.log. The log file is stored in the logs directory of the Oracle Middleware home directory.
Note: If you cannot run the Configuration Wizard in GUI mode, Oracle recommends that you use a wsadmin script to create or reconfigure a cell. For more information, see Chapter 4, "Using wsadmin to Configure Oracle Fusion Middleware," and Chapter 5, "wsadmin Command Reference."
Creating a New Cell
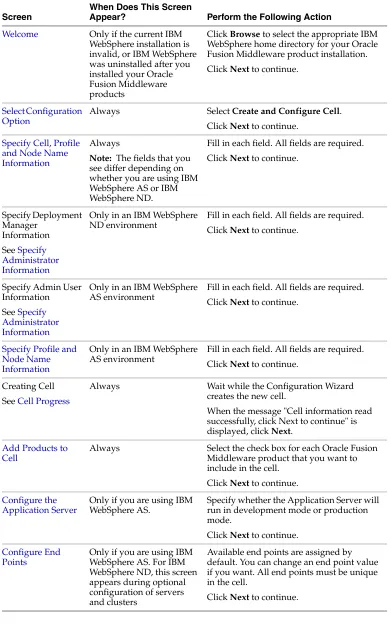
Table 2–1 Configuration Screens for Creating a New WebSphere Cell
Screen
When Does This Screen
Appear? Perform the Following Action
Welcome Only if the current IBM
WebSphere installation is invalid, or IBM WebSphere was uninstalled after you installed your Oracle Fusion Middleware products
Click Browse to select the appropriate IBM WebSphere home directory for your Oracle Fusion Middleware product installation. Click Next to continue.
Select Configuration Option
Always Select Create and Configure Cell. Click Next to continue.
Specify Cell, Profile and Node Name Information
Always
Note: The fields that you see differ depending on whether you are using IBM WebSphere AS or IBM WebSphere ND.
Fill in each field. All fields are required. Click Next to continue.
Specify Deployment
Only in an IBM WebSphere ND environment
Fill in each field. All fields are required. Click Next to continue.
Specify Admin User Information See Specify Administrator Information
Only in an IBM WebSphere AS environment
Fill in each field. All fields are required. Click Next to continue.
Specify Profile and Node Name Information
Only in an IBM WebSphere AS environment
Fill in each field. All fields are required. Click Next to continue.
Creating Cell See Cell Progress
Always Wait while the Configuration Wizard creates the new cell.
When the message "Cell information read successfully, click Next to continue" is displayed, click Next.
Add Products to Cell
Always Select the check box for each Oracle Fusion Middleware product that you want to include in the cell.
Click Next to continue.
Configure the Application Server
Only if you are using IBM WebSphere AS.
Specify whether the Application Server will run in development mode or production mode.
Click Next to continue.
Configure End Points
Only if you are using IBM WebSphere AS. For IBM WebSphere ND, this screen appears during optional configuration of servers and clusters
Available end points are assigned by default. You can change an end point value if you want. All end points must be unique in the cell.
Creating a New Cell
2.3.1 Configuring Data Sources
The screens described in this section are displayed in the Configuration Wizard only if the domain includes components that require JDBC data sources or Oracle RAC multi data sources. Table 2–2 lists the sequences of schema-related screens. For more
information about each screen, see the related section in Chapter 3, "Configuration Wizard Screens," or click the link in the Screen column.
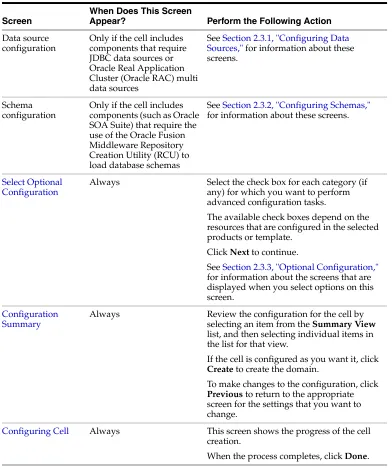
Data source configuration
Only if the cell includes components that require JDBC data sources or Oracle Real Application Cluster (Oracle RAC) multi data sources
See Section 2.3.1, "Configuring Data Sources," for information about these screens.
Schema configuration
Only if the cell includes components (such as Oracle SOA Suite) that require the use of the Oracle Fusion Middleware Repository Creation Utility (RCU) to load database schemas
See Section 2.3.2, "Configuring Schemas," for information about these screens.
Select Optional Configuration
Always Select the check box for each category (if any) for which you want to perform advanced configuration tasks.
The available check boxes depend on the resources that are configured in the selected products or template.
Click Next to continue.
See Section 2.3.3, "Optional Configuration," for information about the screens that are displayed when you select options on this screen.
Configuration Summary
Always Review the configuration for the cell by selecting an item from the Summary View list, and then selecting individual items in the list for that view.
If the cell is configured as you want it, click Create to create the domain.
To make changes to the configuration, click Previous to return to the appropriate screen for the settings that you want to change.
Configuring Cell Always This screen shows the progress of the cell
creation.
When the process completes, click Done.
Table 2–1 (Cont.) Configuration Screens for Creating a New WebSphere Cell
Screen
When Does This Screen
Creating a New Cell
2.3.2 Configuring Schemas
The screens described in this section are displayed in the Configuration Wizard only if an Oracle Fusion Middleware product that you selected includes components (such as Oracle SOA Suite) that require the use of the Oracle Fusion Middleware Repository Creation Utility (RCU) to load database schemas. Table 2–3 lists the sequences of schema-related screens. For more information about each screen, see the related section in Chapter 3, "Configuration Wizard Screens," or click the link in the Screen
column.
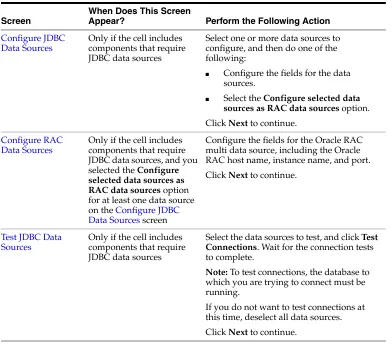
Table 2–2 Data Source Configuration Screens
Screen
When Does This Screen
Appear? Perform the Following Action
Configure JDBC Data Sources
Only if the cell includes components that require JDBC data sources
Select one or more data sources to configure, and then do one of the following:
■ Configure the fields for the data
sources.
■ Select the Configure selected data
sources as RAC data sources option. Click Next to continue.
Configure RAC Data Sources
Only if the cell includes components that require JDBC data sources, and you selected the Configure selected data sources as RAC data sources option for at least one data source on the Configure JDBC Data Sources screen
Configure the fields for the Oracle RAC multi data source, including the Oracle RAC host name, instance name, and port. Click Next to continue.
Test JDBC Data Sources
Only if the cell includes components that require JDBC data sources
Select the data sources to test, and click Test Connections. Wait for the connection tests to complete.
Note: To test connections, the database to which you are trying to connect must be running.
Creating a New Cell
2.3.3 Optional Configuration
When creating a new cell, updating an existing cell, or federating a machine to a cell, you can:
■ Add Application Servers, clusters, and cluster members to the cell
■ Target application deployments and services to additional Application Servers or clusters in the cell
■ Target custom services to additional Application Servers
■ Target JDBC and JMS resources to additional Application Servers or clusters
Table 2–4 lists the sequence of screens that is displayed in the Configuration Wizard when you select one or more configuration options on the Select Optional
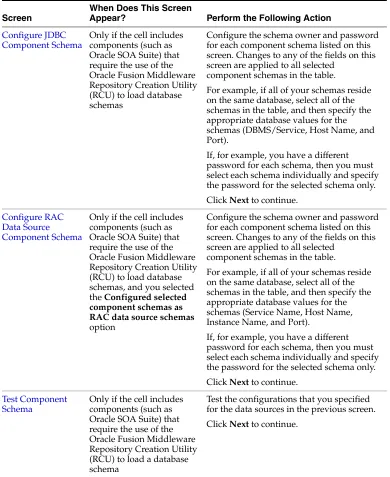
Table 2–3 Schema Configuration Screens
Screen
When Does This Screen
Appear? Perform the Following Action
Configure JDBC Component Schema
Only if the cell includes components (such as Oracle SOA Suite) that require the use of the Oracle Fusion Middleware Repository Creation Utility (RCU) to load database schemas
Configure the schema owner and password for each component schema listed on this screen. Changes to any of the fields on this screen are applied to all selected
component schemas in the table.
For example, if all of your schemas reside on the same database, select all of the schemas in the table, and then specify the appropriate database values for the schemas (DBMS/Service, Host Name, and Port).
If, for example, you have a different password for each schema, then you must select each schema individually and specify the password for the selected schema only. Click Next to continue.
Configure RAC Data Source Component Schema
Only if the cell includes components (such as Oracle SOA Suite) that require the use of the Oracle Fusion Middleware Repository Creation Utility (RCU) to load database schemas, and you selected the Configured selected component schemas as RAC data source schemas option
Configure the schema owner and password for each component schema listed on this screen. Changes to any of the fields on this screen are applied to all selected
component schemas in the table.
For example, if all of your schemas reside on the same database, select all of the schemas in the table, and then specify the appropriate database values for the schemas (Service Name, Host Name, Instance Name, and Port).
If, for example, you have a different password for each schema, then you must select each schema individually and specify the password for the selected schema only. Click Next to continue.
Test Component Schema
Only if the cell includes components (such as Oracle SOA Suite) that require the use of the Oracle Fusion Middleware Repository Creation Utility (RCU) to load a database schema
Creating a New Cell
Configuration screen. The screens that are displayed depend on the options that you selected.
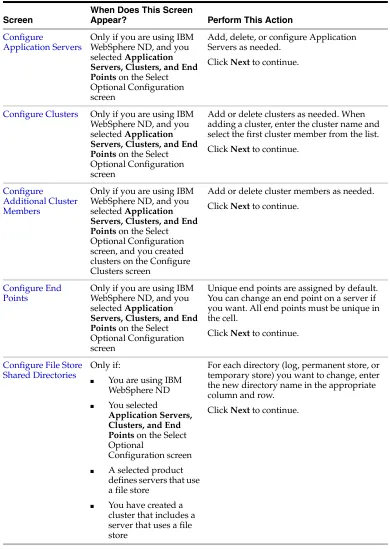
Table 2–4 Optional Configuration Screens
Screen
When Does This Screen
Appear? Perform This Action
Configure
Application Servers
Only if you are using IBM WebSphere ND, and you selected Application Servers, Clusters, and End Points on the Select Optional Configuration screen
Add, delete, or configure Application Servers as needed.
Click Next to continue.
Configure Clusters Only if you are using IBM WebSphere ND, and you selected Application Servers, Clusters, and End Points on the Select Optional Configuration screen
Add or delete clusters as needed. When adding a cluster, enter the cluster name and select the first cluster member from the list. Click Next to continue.
Configure
Additional Cluster Members
Only if you are using IBM WebSphere ND, and you selected Application Servers, Clusters, and End Points on the Select Optional Configuration screen, and you created clusters on the Configure Clusters screen
Add or delete cluster members as needed. Click Next to continue.
Configure End Points
Only if you are using IBM WebSphere ND, and you selected Application Servers, Clusters, and End Points on the Select Optional Configuration screen
Unique end points are assigned by default. You can change an end point on a server if you want. All end points must be unique in the cell.
Click Next to continue.
Configure File Store Shared Directories Clusters, and End Points on the Select Optional
Configuration screen
■ A selected product
defines servers that use a file store
■ You have created a
cluster that includes a server that uses a file store
For each directory (log, permanent store, or temporary store) you want to change, enter the new directory name in the appropriate column and row.
Federating a Remote Machine to an Existing Cell
2.4 Federating a Remote Machine to an Existing Cell
In an IBM WebSphere ND environment, you can create Application Server nodes on one or more remote machines, and associate those nodes with the Deployment Manager that will manage them. This process is called federating a machine. It is the process that you use to add new nodes to a cell that you previously created from the Deployment Manager node.
After adding remote nodes to an existing cell on the Deployment Manager host, you can:
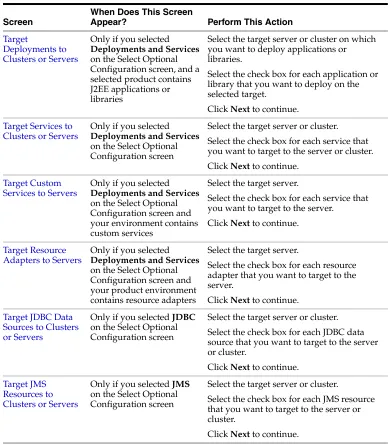
Target
Deployments to Clusters or Servers
Only if you selected Deployments and Services on the Select Optional Configuration screen, and a selected product contains J2EE applications or libraries
Select the target server or cluster on which you want to deploy applications or libraries.
Select the check box for each application or library that you want to deploy on the selected target.
Click Next to continue.
Target Services to Clusters or Servers
Only if you selected Deployments and Services on the Select Optional Configuration screen
Select the target server or cluster. Select the check box for each service that you want to target to the server or cluster. Click Next to continue.
Target Custom Services to Servers
Only if you selected Deployments and Services on the Select Optional Configuration screen and your environment contains custom services
Select the target server.
Select the check box for each service that you want to target to the server.
Click Next to continue.
Target Resource Adapters to Servers
Only if you selected Deployments and Services on the Select Optional Configuration screen and your product environment contains resource adapters
Select the target server.
Select the check box for each resource adapter that you want to target to the server.
Click Next to continue.
Target JDBC Data Sources to Clusters or Servers
Only if you selected JDBC on the Select Optional Configuration screen
Select the target server or cluster. Select the check box for each JDBC data source that you want to target to the server or cluster.
Click Next to continue.
Target JMS Resources to Clusters or Servers
Only if you selected JMS on the Select Optional Configuration screen
Select the target server or cluster.
Select the check box for each JMS resource that you want to target to the server or cluster.
Click Next to continue.
Note: Prior to federating a machine, you must install IBM
WebSphere ND and your Oracle Fusion Middleware products on that machine. The IBM WebSphere ND and Oracle Fusion Middleware product versions must be identical on all machines.
Table 2–4 (Cont.) Optional Configuration Screens
Screen
When Does This Screen
Federating a Remote Machine to an Existing Cell
■ Add standalone Application Servers on each node to the cell
■ Create clusters that include multiple Application Servers on each node, or that contain Application Servers on multiple nodes
■ Deploy applications on each Application Server or cluster
■ Target services to each Application Server or cluster
■ Target custom services to each Application Server
■ Target resource adapters to each Application Server
■ Target JDBC and JMS resources to each Application Server or cluster
To federate a remote machine to an existing cell on the Deployment Manager node:
1. If you have not already created the cell to which the new node will belong, follow the steps in Section 2.3, "Creating a New Cell," to create a new cell on the
Deployment Manager node.
The cell does not need to contain any products or be otherwise configured; you only need to create the Deployment Manager profile and an empty custom profile. Typically, you will want to run the Oracle Fusion Middleware applications on remote nodes and not run them on the Deployment Manager node. Therefore, you should add products during the federation process or by editing the cell
configuration later.
2. On the Deployment Manager node, start the Deployment Manager as follows:
If only one Deployment Manager is configured on the machine or if you are federating the remote node to a cell that is managed by the default Deployment Manager, execute the following commands, where WAS_HOME is the IBM WebSphere ND home directory:
■ UNIX:
cd WAS_HOME/bin
./startManager.sh
■ Windows:
cd WAS_HOME\bin
startManager.cmd
If multiple Deployment Managers are configured on the machine and you want to start a Deployment Manager other than the default, execute the following
commands, where WAS_HOME is the IBM WebSphere ND home directory, and
DepMgr is the name of the Deployment Manager that will manage the remote nodes (for example, Dmgr01):
■ UNIX:
cd WAS_HOME/profiles/DepMgr/bin
./startManager.sh
■ Windows:
cd WAS_HOME\profiles\DepMgr\bin
startManager.cmd
3. On the remote machine, start the Configuration Wizard as follows, where
Federating a Remote Machine to an Existing Cell
■ UNIX:
cd ORACLE_HOME/common/bin
./was_config.sh
■ Windows:
cd ORACLE_HOME\common\bin
was_config.cmd
4. See Table 2–5 for the sequence of screens that are displayed in the Configuration Wizard when you are federating a machine. For more information about each screen, see the related section in Chapter 3, "Configuration Wizard Screens," or click the link in the Screen column.
Table 2–5 Configuration Screens for Federating a Machine
Screen
When Does This Screen
Appear? Perform the Following Action
Welcome Only if the current IBM
WebSphere installation is invalid, or IBM
WebSphere was uninstalled after you installed your Oracle Fusion Middleware products
Click Browse to select the appropriate IBM WebSphere home directory.
Click Next to continue.
Select Configuration Option
Always Select Federate Machine and Configure Cell. Click Next to continue.
Specify Administrator Information
Always Specify the appropriate information for the Deployment Manager node.
Click Next to continue.
Specify Profile and Node Name Information
Always Specify the profile name and node for the Application Server node that you are creating.
Click Next to continue.
Federating Machine (see Cell Progress)
Always Displays the progress of the federation process.
When the message "Cell information read successfully, please click Next" is displayed, click Next to continue.
Add Products to Cell
Always Select the check box for each Oracle Fusion Middleware product that you want to add to this cell.
Click Next to continue.
Data source configuration
Only if the cell includes components that require JDBC data sources or Oracle RAC data sources
Updating an Existing Cell
2.5 Updating an Existing Cell
To update an existing cell for your Oracle Fusion Middleware product installation by using the Configuration Wizard, start the Configuration Wizard as described in Section 2.2, "Starting the Configuration Wizard." Oracle recommends that you run the Configuration Wizard from the Deployment Manager machine. If you run the
Configuration Wizard from a remote machine, ensure that the Deployment Manager is running.
The Configuration Wizard displays a sequence of screens, in the order listed in Table 2–6. For more information about each screen, see the related section in Chapter 3, "Configuration Wizard Screens," or click the link in the Screen column. Schema
configuration
Only if the cell includes components (such as Oracle SOA Suite) that require the use of the Oracle Fusion
Middleware Repository Creation Utility (RCU) to load database schemas
See Section 2.3.2, "Configuring Schemas," for information about these screens.
Select Optional Configuration
Always Select the check box for each category (if any) for which you want to perform advanced configuration tasks.
The available check boxes depend on the resources that are configured in the selected products or template.
Click Next to continue.
See Section 2.3.3, "Optional Configuration," for information about the screens that are displayed when you select options on this screen.
Configuration Summary
Always Review the configuration for the cell by selecting a Summary View, and then selecting individual items in the list for that view.
If the cell is configured as you want it, click Extend to add the remote node to the cell. To make changes to the configuration, click Previous to return to the appropriate screen for the settings you want to change.
Configuring Cell Always Shows the progress of the cell update.
When the process completes, click Done.
Table 2–5 (Cont.) Configuration Screens for Federating a Machine
Screen
When Does This Screen
Updating an Existing Cell
Table 2–6 Configuration Screens for Editing an Existing Cell
Screen
When Does This Screen
Appear? Perform the Following Action
Welcome Only if the current IBM
WebSphere installation is invalid, or IBM WebSphere was uninstalled after you installed your Oracle Fusion Middleware products.
Click Browse to select the appropriate IBM WebSphere home directory.
Click Next to continue.
Select Configuration Option
Always Select Select and Configure Existing Cell. From the list of cells displayed under this option, click the cell that you want to edit. The selected cell is highlighted.
Click Next to continue.
Loading Cell Information (see Cell Progress)
Always Wait while the Configuration Wizard loads the selected cell.
When the message "Cell information read successfully, please click Next" is
displayed, click Next to continue.
Add Products to Cell
Always Select the check box for each Oracle Fusion Middleware product that you want to add to this cell.
Click Next to continue.
Data source configuration
Only if the cell includes components that require JDBC data sources or Oracle RAC data sources
See Section 2.3.1, "Configuring Data Sources," for information about these screens.
Schema configuration
Only if the cell includes components (such as Oracle SOA Suite) that require the use of the Oracle Fusion Middleware Repository Creation Utility (RCU) to load database schemas
See Section 2.3.2, "Configuring Schemas," for information about these screens.
Select Optional Configuration
Always Select the check box for each category (if any) for which you want to perform advanced configuration tasks.
The available check boxes depend on the resources that are configured in the selected products or template. Click Next to continue.
Postconfiguration Steps
2.6 Postconfiguration Steps
After completing the cell configuration, perform the steps in the following sections to:
■ Start the Deployment Manager for the cell
■ Start the Node Agent for the Application node on the Deployment Manager machine
■ Start the Administration Server for the cell
■ Start the Application Servers in the cell
■ Start the Node Agent on each remote node in the cell
Deployment Manager Machine
Perform the following steps on the Deployment Manager machine to start the Deployment Manager, Node Agent, and Administration Server:
1. If the Deployment Manager is not already running, start the Deployment Manager as follows:
If only one Deployment Manager is configured on the machine or to start the default Deployment Manager, execute the following commands, where WAS_HOME
is the IBM WebSphere ND home directory:
■ UNIX:
cd WAS_HOME/bin
./startManager.sh
■ Windows:
cd WAS_HOME\bin
startManager.cmd
If multiple Deployment Managers are configured on the machine and you want to start a Deployment Manager other than the default, execute the following
commands, where WAS_HOME is the IBM WebSphere ND home directory, and
DepMgrProfile is the profile name of the Deployment Manager that you want to start (for example Dmgr02):
■ UNIX: Configuration Summary
Always Review the configuration for the cell by selecting a Summary View, and then selecting individual items in the list for that view.
If the cell is configured as you want it, click Extend to save the new cell configuration. To make changes to the configuration, click Previous to return to the appropriate screen for the settings that you want to change.
Configuring Cell Always This page shows the progress of the cell
configuration update.
When the process completes, click Done.
Table 2–6 (Cont.) Configuration Screens for Editing an Existing Cell
Screen
When Does This Screen
Example Oracle Fusion Middleware Configuration
cd WAS_HOME/profiles/DepMgrProfile/bin
./startManager.sh
■ Windows:
cd WAS_HOME\profiles\DepMgrProfile\bin
startManager.cmd
2. Enter the following commands to start the Node Agent, where Profile is the name of the Application Server profile on the Deployment Manager machine (for example, Custom01):
■ UNIX:
cd WAS_HOME/profiles/Profile/bin
./startNode.sh -profileName Profile
■ Windows:
cd WAS_HOME\profiles\Profile\bin
startNode.cmd -profileName Profile
3. Enter the following command to start the Administration Server:
■ UNIX:
./startServer.sh OracleAdminServer -profileName Profile
■ Windows:
startServer.cmd OracleAdminServer -profileName Profile
4. To start individual servers, enter the following command for each server:
■ UNIX:
./startServer.sh server_name -profileName Profile
■ Windows:
startServer.cmd server_name -profileName Profile
Remote Nodes
On each remote node, enter the following command to start the Node Agent on the node, where NodeProfile is the Application Server profile name that you configured on the node (for example, Custom04):
■ UNIX:
cd WAS_HOME/profiles/NodeProfile/bin
./startNode.sh -profileName NodeProfile
■ Windows:
cd WAS_HOME\profiles\NodeProfile\bin
startNode.cmd -profileName NodeProfile
2.7 Example Oracle Fusion Middleware Configuration
Example Oracle Fusion Middleware Configuration
installed IBM WebSphere ND and the Oracle SOA Suite on each machine that will be included in the configuration.
In this example:
■ A new cell is created on the Deployment Manager node.
■ The Administration Server is configured on the Deployment Manager machine.
■ The Oracle SOA Suite and Java Required Files (JRF) products are added to the cell. The Oracle SOA Suite product template automatically adds a soa_server_1
Application Server to the cell (it resides on the same machine as the Deployment Manager node).
■ A soa_cluster_1 cluster is created on the Application Server node, and the soa_ server_1 Application Server is added as the primary cluster member.
■ A remote node is added to the cell.
■ A soa_server_2 Application Server is added to the remote node as a secondary member of the soa_cluster_1 cluster.
Figure 2–1 shows the resulting topology of the cell.
Figure 2–1 Example Configuration
Creating the Cell
To create this cell configuration, first perform the following steps on the Deployment Manager machine.
1. Run the Configuration Wizard as described in Section 2.2, "Starting the Configuration Wizard."
Example Oracle Fusion Middleware Configuration
3. Specify the cell name (Machine1Cell01), Deployment Manager profile name (Dmgr01), Deployment Manager node name (Machine1CellManager01),
Application Server profile name (Custom01), and Application Server node name (Machine1Node01). Click Next.
4. Specify the Deployment Manager host name, and create the user name and password for the Administrator account. This is the user name and password that you will use to connect to the Deployment Manager from the remote node. When you are done, click Next.
5. Wait while the new cell is created, and then click Next to continue.
6. On the Add Products screen, the Oracle CIE Core product is required and is already selected. Select the Oracle SOA Suite for WebSphere ND product. The
Oracle Workflow Client Extension, Oracle WSM Policy Manager, and Oracle JRF for WebSphere products are then automatically selected, as they are required by SOA Suite. Click Next to continue.
7. On the Configure JDBC Component Schema screen, select one or more component schemas and configure them appropriately. When done, click Next.
8. On the Test Component Schema screen, wait for the schema tests to run. When a check mark appears to the left of each schema, click Next to continue.
9. On the Select Optional Configuration screen, select Application Servers, Clusters, and End Points. This allows you to create the soa_cluster_1 cluster and add soa_ server_1 to it. There is no need to select the Deployments and ServicesJDBC, or
JMS options, as all deployments, services, and other resources have already been targeted to the appropriate servers (OracleAdminServer or soa_server_1 or both). Click Next.
10. On the Configure Application Servers screen, you will see OracleAdminServer
and soa_server_1 in the list. Click Next to continue. For this example, there is no need to add additional application servers.
11. On the Configure Clusters screen, click Add to add a new cluster. Enter soa_ cluster_1 in the Name column, and select soa_server_1 from the list in the First cluster member column. When you are done, click Next.
Note: If you do not want to run Oracle Fusion Middleware
applications on the Deployment Manager host, install only the Oracle CIE Core product in this step. When you are configuring your first remote node, add Oracle SOA Suite and its supporting products to the cell.
Note: There are no JDBC data sources defined in configuration templates for the selected products, so the Configure JDBC Data Sources and Test JDBC Data Sources screens are not displayed.
Note: If you do not want to run Oracle Fusion Middleware
Example Oracle Fusion Middleware Configuration
12. On the Add Additional Cluster Members screen, click Next. For this example, there is no need to add additional cluster members at this time. You will add the soa_server_2 cluster member when you configure the remote node.
13. On the Configure End Points screen, click Next. For this example, there is no need to change the default port values. You may want to note the SOAP end point value, as this is the port you will use to connect to the Deployment Manager machine from a remote node.
14. On the Configure File Store Shared Directories screen, click Next. For this example, there is no need to change the defaults.
15. On the Configuration Summary screen, click Create to start the cell creation process.
16. On the Configuring Cell screen, wait for the cell to be created, and then click Done
to exit the Configuration Wizard.
17. In the command window, enter the following commands to start the Deployment Manager, where WAS_HOME is the IBM WebSphere ND home directory:
cd WAS_HOME/profiles/Dmgr01/bin/
■ UNIX:
cd WAS_HOME/profiles/Dmgr01/bin
./startManager.sh -profileName Dmgr01
■ Windows:
cd WAS_HOME\profiles\Dmgr01\bin
startManager.cmd -profileName Dmgr01
Continue to the next procedure to add the remote node.
Federating a Remote Machine to the Cell
After completing the steps on the Deployment Manager machine, perform the following steps on the remote machine:
1. Connect to the remote machine and start the Configuration Wizard as described in Section 2.2, "Starting the Configuration Wizard."
2. On the Select Configuration Option screen, select Federate Machine and Configure Cell and click Next.
3. Specify a unique profile name (Custom02) and node name (machine2_ nameNode01). Click Next.
4. On the Specify Deployment Manager Information screen:
■ Specify the host name of the Deployment Manager machine (Dmgr01).
■ Enter the SOAP port used to connect to the Deployment Manager (the default is 8880).
■ Enter the user name and password you specified in Step 4 of the previous procedure.
■ Click Next to continue.
5. Wait while the node is federated to the cell.
Finding Profile Information
WebSphere and products are already selected, as they were added to the cell when you created it. Click Next.
7. On the Configure JDBC Component Schema screen, click Next.
8. On the Test Component Schema screen, wait for the schema tests to run. When a check mark appears to the left of each schema, click Next to continue.
9. On the Select Optional Configuration screen, select Application Servers and Clusters. This allows you to add soa_server_2 to the soa_cluster1 cluster that you already created on the first node.
10. On the Configure Application Servers screen, you will see OracleAdminServer
and soa_server_1 in the list. Click Next to continue. For this example, there is no need to add additional Application Servers.
11. On the Configure Clusters screen, you will see soa_server_1 in the cluster list. There is no need to create another cluster. Click Next.
12. On the Add Additional Cluster Members screen, click Add to add soa_server_2 to soa_cluster_1.
13. Enter soa_server_2 in the Name column, select the current node from the Node
list, and select soa_cluster_1 from the Cluster list. The new cluster member inherits all attributes from the primary cluster member. When you are done, click
Next.
14. On the Configure End Points screen, click Next. For this example, there is no need to change the default port values. Unique end points are assigned to the new cluster member.
15. On the Configure File Store Shared Directories screen, click Next. For this example, there is no need to change the defaults.
16. On the Configuration Summary screen, click Create to start the cell creation process.
17. On the Configuring Cell screen, wait for the cell to be created, and then click Done
to exit the Configuration Wizard.
To scale the cluster to include additional Application Servers on other remote nodes, repeat the steps in this section using unique profile names and server names.
2.8 Finding Profile Information
Key information about the Deployment Manager profile and Application Server profiles can be found in the following file:
WAS_HOME/profiles/profile_name/logs/AboutThisProfile.txt
Deployment Manager profile information includes:
■ Disk space required for the profile
■ Whether or not the profile is the default profile
■ Cell Manager node name
■ Cell name
■ Host name
■ Administrative Console port
Finding Profile Information
■ Management bootstrap port
■ Management SOAP connector port
■ Whether or not the Deployment Manager is run as a service
Application Server profile information includes:
■ Whether or not the profile is the default profile
■ Application Server node name
3
3
Configuration Wizard Screens
This chapter contains screen descriptions for all of the Oracle Fusion Middleware Configuration Wizard for WebSphere.
■ Welcome
■ Select Configuration Option
■ Specify Cell, Profile and Node Name Information
■ Specify Administrator Information
■ Specify Profile and Node Name Information
■ Cell Progress
■ Add Products to Cell
■ Configure the Application Server
■ Configure JDBC Data Sources
■ Configure RAC Data Sources
■ Test JDBC Data Sources
■ Configure JDBC Component Schema
■ Configure RAC Data Source Component Schema
■ Test Component Schema
■ Select Optional Configuration
■ Configure Application Servers
■ Configure Clusters
■ Configure Additional Cluster Members
■ Configure End Points
■ Configure File Store Shared Directories
■ Target Deployments to Clusters or Servers
■ Target Services to Clusters or Servers
■ Target Custom Services to Servers
■ Target Resource Adapters to Servers
■ Target JDBC Data Sources to Clusters or Servers
Welcome
■ Configuration Summary
■ Configuring Cell
These screens contain the following standard buttons:
■ Exit: Exit the wizard without saving configuration changes.
■ Help: Display help for the current page. You can then navigate to other help topics if necessary.
■ Previous: Return to the previous screen.
■ Next: Continue to the next screen.
Some screens may also contain the following function buttons:
■ Discard Changes: Discard any changes you made on the current screen.
■ Delete: Delete the selected item or items.
■ Switch Display: Toggle between a table format (one row for each item) and a tabbed format (one tab for each item).
3.1 Welcome
Click Browse to navigate to the home directory for the IBM WebSphere installation for which you want to configure a new cell, update an existing cell, or federate a machine. After navigating to the directory, click Open.
Specify Cell, Profile and Node Name Information
3.2 Select Configuration Option
Select one of the following options. The options that you see depend on your current configuration.
■ Create and Configure Cell: Select this option to create a new cell. The Specify Cell, Profile and Node Name Information screen appears next.
■ Federate Machine and Configure Cell: (IBM WebSphere ND only) Select this option to add the current node to an existing cell. The Specify Profile and Node Name Information screen appears next. In this case, you must run the
Configuration Wizard on the node that you want to federate to the cell.
■ Select and Configure Existing Cell: This option is available only if you have already created a cell. To change the configuration of an existing cell, select this option. From the list, click on the cell that you want to configure (the selected cell will be highlighted). The Loading Cell Information screen appears next. See Section 3.6, "Cell Progress," for information about this screen.
3.3 Specify Cell, Profile and Node Name Information
This screen differs depending on whether you are running the Configuration Wizard in an IBM WebSphere ND environment or an IBM WebSphere AS environment.
In an IBM WebSphere AS environment:
■ There is no Deployment Manager profile or Deployment Manager node. Therefore, the Deployment Manager Profile Name and Deployment Manager Node Name fields are not available on this screen.
Specify Cell, Profile and Node Name Information
■ The Application Server Name field is available, allowing you to assign a name to the Application Server.
The following image shows the IBM WebSphere ND version of this screen.
Enter the appropriate values in the following fields. Each field is required. Use only alphanumeric characters in each field.
■ Cell Name: Enter a unique name for the new cell. This is the name of the directory in which the cell is created, under the following two directories:
– IBM WebSphere ND only: WAS_
HOME/profiles/DepMgrProfile/config/cells, where WAS_HOME is the IBM WebSphere ND installation directory and DepMgrProfile is the name of the Deployment Manager profile.
– Both IBM WebSphere AS and IBM WebSphere ND: WAS_
HOME/profiles/AppSrvrProfile/config/cells, where WAS_HOME is the IBM WebSphere installation directory and AppSrvrProfile is the name of the Application Server profile.
The default name is machine_nameCelln, where machine_name is the name of the current machine, and n is the next two-digit number in the sequence on that machine. For example, if the machine name is machine1 and Cell01 already exists, the default cell name is machine1Cell02.
■ Deployment Manager Profile Name: (IBM WebSphere ND only) Enter a unique Deployment Manager profile name for this cell. This is the name of the directory in which the Deployment Manager profile is created, under WAS_HOME/profiles.
The default name is Dmgrn, where n is the next two-digit number in the sequence. For example, if Deployment Manager profile Dmgr01 already exists, the default for this field is Dmgr02.