Praise for the First Edition
The closest thing I’ve seen to a class in a book. Contains tons of useful
exercises that instill PowerShell prowess by hands-on learning.
—Chuck Durfee
Sr. Software Engineer, Graebel Companies
From beginners to intermediate—this is THE only book you need.
Don Jones is a PowerShell superstar and in this book you will see why.
—David Moravec
SCCM Administrator, PowerShell.cz
The seminal guide to learning Powershell—highly recommended.
—Ray Booysen
Developer, BNP Paribas
The book I wish I’d had when I started PowerShell!
—Richard Siddaway
IT Architect and PowerShell MVP
This book not only teaches you PowerShell, it also teaches you to become
an expert in PowerShell.
Learn Windows PowerShell 3
in a Month of Lunches
S
ECOND
E
DITION
DON JONES
JEFFERY HICKS
M A N N I N G
www.manning.com. The publisher offers discounts on this book when ordered in quantity. For more information, please contact
Special Sales Department Manning Publications Co. 20 Baldwin Road
PO Box 261
Shelter Island, NY 11964 Email: [email protected]
©2013 by Manning Publications Co. All rights reserved.
No part of this publication may be reproduced, stored in a retrieval system, or transmitted, in any form or by means electronic, mechanical, photocopying, or otherwise, without prior written permission of the publisher.
Many of the designations used by manufacturers and sellers to distinguish their products are claimed as trademarks. Where those designations appear in the book, and Manning
Publications was aware of a trademark claim, the designations have been printed in initial caps or all caps.
Recognizing the importance of preserving what has been written, it is Manning’s policy to have the books we publish printed on acid-free paper, and we exert our best efforts to that end. Recognizing also our responsibility to conserve the resources of our planet, Manning books are printed on paper that is at least 15 percent recycled and processed without the use of elemental chlorine.
Manning Publications Co. Development editor: Cynthia Kane
20 Baldwin Road Technical Proofreaders: James Berkenbile, Trent Whiteley
PO Box 261 Copyeditor: Andy Carroll
Shelter Island, NY 11964 Proofreader: Maureen Spencer Typesetter: Dottie Marsico Cover designer: Marija Tudor
ISBN 9781617291081
Printed in the United States of America
v
brief contents
1 ■Before you begin 1
2 ■
Meet PowerShell 9
3 ■Using the help system 20
4 ■Running commands 36
5 ■Working with providers 49
6 ■
The pipeline: connecting commands 61
7 ■Adding commands 74
8 ■
Objects: data by another name 85
9 ■The pipeline, deeper 97
10 ■
Formatting—and why it’s done on the right 119
11 ■Filtering and comparisons 134
12 ■
A practical interlude 143
13 ■
Remote control: one to one, and one to many 151
14 ■Using Windows Management Instrumentation 169
15 ■Multitasking with background jobs 182
16 ■
Working with many objects, one at a time 196
17 ■Security alert! 211
19 ■
Input and output 238
20 ■
Sessions: remote control with less work 247
21 ■
You call this scripting? 257
22 ■
Improving your parameterized script 269
23 ■
Advanced remoting configuration 278
24 ■
Using regular expressions to parse text files 287
25 ■
Additional random tips, tricks, and techniques 294
26 ■
Using someone else’s script 308
27 ■
Never the end 316
vii
contents
preface xvii about this book xix author online xx about the authors xxii acknowledgments xxv
1
Before you begin 1
1.1
Why you can’t afford to ignore PowerShell 1
1.2
Is this book for you? 3
1.3
How to use this book 4
1.4
Setting up your lab environment 5
1.5
Installing Windows PowerShell 6
1.6
Online resources 7
1.7
Being immediately effective with PowerShell 8
2
Meet PowerShell 9
2.1
Choose your weapon 9
The console window 11 ■ The Integrated Scripting
Environment (ISE) 13
2.4
What version is this? 17
2.5
Lab 18
2.6
Further exploration 19
3
Using the help system 20
3.1
The help system: how you discover commands 20
3.2
Updatable help 22
3.3
Asking for help 23
3.4
Using help to find commands 24
3.5
Interpreting the help 26
Parameter sets and common parameters 26 ■ Optional and
mandatory parameters 27 ■ Positional parameters 28
Parameter values 30 ■ Finding command examples 32
3.6
Accessing “about” topics 32
3.7
Accessing online help 34
3.8
Lab 34
4
Running commands 36
4.1
Not scripting, but running commands 36
4.2
The anatomy of a command 37
4.3
The cmdlet naming convention 38
4.4
Aliases: nicknames for commands 39
4.5
Taking shortcuts 40
Truncating parameter names 40 ■ Parameter name aliases 41
Positional parameters 41
4.6
Cheating, a bit: Show-Command 42
4.7
Support for external commands 44
4.8
Dealing with errors 46
4.9
Common points of confusion 47
Typing cmdlet names 47 ■ Typing parameters 47
4.10
Lab 48
5
Working with providers 49
5.1
What are providers? 49
5.2
How the filesystem is organized 51
CONTENTS ix
5.4
Navigating the filesystem 54
5.5
Using wildcards and literal paths 55
5.6
Working with other providers 57
5.7
Lab 60
5.8
Further exploration 60
6
The pipeline: connecting commands 61
6.1
Connect one command to another: less work for you 61
6.2
Exporting to a CSV or an XML file 62
Exporting to CSV 63 ■ Exporting to XML 64
Comparing files 65
6.3
Piping to a file or a printer 67
6.4
Converting to HTML 68
6.5
Using cmdlets that modify the system: killing processes
and stopping services 69
6.6
Common points of confusion 70
6.7
Lab 72
7
Adding commands 74
7.1
How one shell can do everything 74
7.2
About product-specific “management shells” 75
7.3
Extensions: finding and adding snap-ins 76
7.4
Extensions: finding and adding modules 78
7.5
Command conflicts and removing extensions 80
7.6
Playing with a new module 81
7.7
Profile scripts: preloading extensions
when the shell starts 82
7.8
Common points of confusion 84
7.9
Lab 84
8
Objects: data by another name 85
8.1
What are objects? 85
8.6
Sorting objects 91
8.7
Selecting the properties you want 92
8.8
Objects until the end 93
8.9
Common points of confusion 94
8.10
Lab 95
9
The pipeline, deeper 97
9.1
The pipeline: enabling power with less typing 97
9.2
How PowerShell passes data down the pipeline 97
9.3
Plan A: pipeline input ByValue 98
9.4
Plan B: pipeline input ByPropertyName 102
9.5
When things don’t line up: custom properties 107
9.6
Parenthetical commands 110
9.7
Extracting the value from a single property 111
9.8
Lab 117
9.9
Further exploration 118
10
Formatting—and why it’s done on the right 119
10.1
Formatting: making what you see prettier 119
10.2
About the default formatting 120
10.3
Formatting tables 123
10.4
Formatting lists 124
10.5
Formatting wide 125
10.6
Custom columns and list entries 126
10.7
Going out: to a file, a printer, or the host 128
10.8
Another out: GridViews 129
10.9
Common points of confusion 130
Always format right 130 ■ One type of object at a time,
please 131
10.10
Lab 133
10.11
Further exploration 133
11
Filtering and comparisons 134
CONTENTS xi
11.3
Comparison operators 135
11.4
Filtering objects out of the pipeline 137
11.5
The iterative command-line model 139
11.6
Common points of confusion 140
Filter left, please 141 ■ When $_ is allowed 141
11.7
Lab 142
11.8
Further exploration 142
12
A practical interlude 143
12.1
Defining the task 143
12.2
Finding the commands 144
12.3
Learning to use the commands 146
12.4
Tips for teaching yourself 149
12.5
Lab 150
13
Remote control: one to one, and one to many 151
13.1
The idea behind remote PowerShell 152
13.2
WinRM overview 153
13.3
Using Enter-PSSession and Exit-PSSession
for one-to-one remoting 157
13.4
Using Invoke-Command for one-to-many remoting 159
13.5
Differences between remote and local commands 161
Invoke-Command versus -ComputerName 161 ■ Local versus
remote processing 162 ■ Deserialized objects 164
13.6
But wait, there’s more 165
13.7
Remote options 166
13.8
Common points of confusion 166
13.9
Lab 167
13.10
Further exploration 168
14
Using Windows Management Instrumentation 169
14.1
WMI essentials 170
14.2
The bad news about WMI 171
14.3
Exploring WMI 172
14.6
Using Get-CimInstance 179
14.7
WMI documentation 180
14.8
Common points of confusion 180
14.9
Lab 181
14.10
Further exploration 181
15
Multitasking with background jobs 182
15.1
Making PowerShell do multiple things
at the same time 182
15.2
Synchronous versus asynchronous 183
15.3
Creating a local job 184
15.4
WMI, as a job 185
15.5
Remoting, as a job 186
15.6
Getting job results 186
15.7
Working with child jobs 189
15.8
Commands for managing jobs 190
15.9
Scheduled jobs 193
15.10
Common points of confusion 194
15.11
Lab 195
16
Working with many objects, one at a time 196
16.1
Automation for mass management 196
16.2
The preferred way: “batch” cmdlets 197
16.3
The WMI way: invoking WMI methods 198
16.4
The backup plan: enumerating objects 202
16.5
Common points of confusion 206
Which way is the right way? 207 ■ WMI methods versus
cmdlets 208 ■ Method documentation 208 ■ ForEach-Object
confusion 209
16.6
Lab 210
17
Security alert! 211
17.1
Keeping the shell secure 211
17.2
Windows PowerShell security goals 212
17.3
Execution policy and code signing 213
CONTENTS xiii
17.4
Other security measures 218
17.5
Other security holes? 220
17.6
Security recommendations 220
17.7
Lab 221
18
Variables: a place to store your stuff 222
18.1
Introduction to variables 222
18.2
Storing values in variables 223
18.3
Using variables: fun tricks with quotes 225
18.4
Storing many objects in a variable 227
Working with single objects in a variable 228 ■ Working with
multiple objects in a variable 229 ■ Other ways to work with
multiple objects 230 ■ Unrolling Properties and Methods in
PowerShell v3 231
18.5
More tricks with double quotes 231
18.6
Declaring a variable’s type 233
18.7
Commands for working with variables 235
18.8
Variable best practices 236
18.9
Common points of confusion 236
18.10
Lab 236
18.11
Further exploration 237
19
Input and output 238
19.1
Prompting for, and displaying, information 238
19.2
Read-Host 239
19.3
Write-Host 241
19.4
Write-Output 243
19.5
Other ways to write 245
19.6
Lab 246
19.7
Further exploration 246
20
Sessions: remote control with less work 247
20.5
Implicit remoting: importing a session 252
20.6
Disconnected sessions 253
20.7
Lab 255
20.8
Further exploration 256
21
You call this scripting? 257
21.1
Not programming, more like batch files 257
21.2
Making commands repeatable 258
21.3
Parameterizing commands 259
21.4
Creating a parameterized script 261
21.5
Documenting your script 262
21.6
One script, one pipeline 264
21.7
A quick look at scope 267
21.8
Lab 268
22
Improving your parameterized script 269
22.1
Starting point 269
22.2
Getting PowerShell to do the hard work 270
22.3
Making parameters mandatory 271
22.4
Adding parameter aliases 273
22.5
Validating parameter input 274
22.6
Adding the warm and fuzzies with verbose output 275
22.7
Lab 277
23
Advanced remoting configuration 278
23.1
Using other endpoints 278
23.2
Creating custom endpoints 279
Creating the session configuration 280 ■ Registering the
session 281
23.3
Enabling multihop remoting 283
23.4
Digging deeper into remoting authentication 284
Defaults for mutual authentication 285 ■ Mutual authentication
via SSL 285 ■ Mutual authentication via TrustedHosts 285
CONTENTS xv
24
Using regular expressions to parse text files 287
24.1
The purpose of regular expressions 288
24.2
A regex syntax primer 288
24.3
Using regex with -Match 290
24.4
Using regex with Select-String 290
24.5
Lab 292
24.6
Further exploration 293
25
Additional random tips, tricks, and techniques 294
25.1
Profiles, prompts, and colors: customizing the shell 294
PowerShell profiles 294 ■ Customizing the prompt 296
Tweaking colors 297
25.2
Operators: -as, -is, -replace, -join, -split, -in, -contains 298
-as and -is 298 ■ -replace 299 ■ -join and -split 299
-contains and -in 300
25.3
String manipulation 301
25.4
Date manipulation 302
25.5
Dealing with WMI dates 304
25.6
Setting default parameter values 305
25.7
Playing with script blocks 306
25.8
More tips, tricks, and techniques 307
26
Using someone else’s script 308
26.1
The script 309
26.2
It’s a line-by-line examination 313
26.3
Lab 313
27
Never the end 316
27.1
Ideas for further exploration 316
27.2
“Now that I’ve read the book, where do I start?” 317
27.3
Other resources you’ll grow to love 318
28
PowerShell cheat sheet 319
28.3
Operators 323
28.4
Custom property and column syntax 323
28.5
Pipeline parameter input 324
28.6
When to use $_ 325
appendix
Review labs 326
xvii
preface
We’ve been teaching and writing about Windows PowerShell for a long time. When Don began contemplating the first edition of this book, he realized that most Power-Shell writers and teachers—including himself—were forcing our students to approach the shell as a kind of programming language. Most PowerShell books are into “script-ing” by the third or fourth chapter, yet more and more PowerShell students were backing away from that programming-oriented approach. Those students wanted to use the shell as a shell, at least at first, and we simply weren’t delivering a learning experience that matched that desire.
So he decided to take a swing at it. A blog post on WindowsITPro.com proposed a table of contents for this book, and ample feedback from the blog’s readers fine-tuned it into the book you’re about to read. He wanted to keep each chapter short, focused, and easy to cover in a short period of time—because we know administrators don’t have a lot of free time, and often have to learn on the fly. When PowerShell v3 came out, it was obviously a good time to update the book, and Don turned to long-time col-laborator Jeffery Hicks to help out.
will make it easier to modify those examples for other purposes, and eventually to con-struct your own commands and scripts from scratch.
We hope this book won’t be the only PowerShell education that you pursue. In fact, this book’s companion website, MoreLunches.com, is designed to help you con-tinue that education in small chunks. It offers free videos that correspond to this book’s chapters, letting you see and hear our demonstrations of key techniques. We’ve also co-authored Learn PowerShell Toolmaking in a Month of Lunches, which offers the same day-at-a-time approach to learning PowerShell’s scripting and tool-creation capa-bilities.
If you need any further help, we encourage you to log on to www.PowerShell.org. We both answer questions in several of the discussion forums there, and we’d be happy to try and get you out of whatever you’re stuck on. The site is also a great portal into the robust and active PowerShell community—you can learn about the annual Scripting Games, the in-person PowerShell Summit, and about all of the regional and local user groups and PowerShell-related events that happen throughout the year. Get involved—it’s a great way to make PowerShell a more powerful part of your career.
xix
about this book
Most of what you’ll need to know about this book is covered in chapter 1, but there are a few things that we should mention up front.
First of all, if you plan to follow along with our examples and complete the hands-on exercises, you’ll need a virtual machine or computer running Windows 8 or dows Server 2012. We cover that in more detail in chapter 1. You can get by with Win-dows 7, but you’ll miss out on a few of the hands-on labs.
Second, be prepared to read this book from start to finish, covering each chapter in order. Again, this is something we’ll explain in more detail in chapter 1, but the idea is that each chapter introduces a few new things that you will need in subsequent chapters. You really shouldn’t try to push through the whole book – stick with the one chapter per day approach. The human brain can only absorb so much information at once, and by taking on PowerShell in small chunks, you’ll actually learn it a lot faster and more thoroughly.
Third, this book contains a lot of code snippets. Most of them are quite short, so you should be able to type them quite easily. In fact, we recommend that you do type them, since doing so will help reinforce an essential PowerShell skill: accurate typing! Longer code snippets are given in listings and are available for download at http:// Morelunches.com (just click on this book’s cover image and look for the
“Down-loads” section), as well as from the publisher’s website at www.manning.com/
LearnWindowsPowerShell3inaMonthofLunchesSecondEdition.
That said, there are a few conventions that you should be aware of. Code will always appear in a special font, just like this example:
That example also illustrates the line-continuation character used in this book. It indi-cates that those two lines should actually be typed as a single line in PowerShell. In other words, don’t hit Enter or Return after Win32_OperatingSystem—keep right on typing. PowerShell allows for very long lines, but the pages of this book can only hold so much.
Sometimes, you’ll also see that code font within the text itself, such as when we write Get-Command. That just lets you know that you’re looking at a command, param-eter, or other element that you would actually type within the shell.
Fourth is a tricky topic that we’ll bring up again in several chapters: the backtick character (`). Here’s an example:
Invoke-Command –scriptblock { Dir } ` -computerName SERVER-R2,localhost
The character at the end of the first line isn’t a stray bit of ink—it’s a real character that you would type. On a U.S. keyboard, the backtick (or grave accent) is usually near the upper left, under the Escape key, on the same key as the tilde character (~). When you see the backtick in a code listing, type it exactly as is. Furthermore, when it appears at the end of a line—as in the preceding example—make sure that it’s the very last character on that line. If you allow any spaces or tabs to appear after it, the backtick won’t work correctly, and neither will the code example.
Finally, we’ll occasionally direct you to Internet resources. Where those URLs are particularly long and difficult to type, we’ve replaced them with Manning-based short-ened URLs that look like http://mng.bz/S085 (you’ll see that one in chapter 1).
Author Online
The purchase of Learn Windows PowerShell 3 in a Month of Lunches, Second Edition
includes access to a private forum run by Manning Publications where you can make comments about the book, ask technical questions, and receive help from the authors and other users. To access and subscribe to the forum, point your browser to
www.manning.com/LearnWindowsPowerShell3inaMonthofLunchesSecondEdition or to www.manning.com/jones3 and click the Author Online link. This page provides information on how to get on the forum once you are registered, what kind of help is available, and the rules of conduct in the forum.
xxi
about the authors
DON JONES is a multiple-year recipient of Microsoft’s prestigious Most Valuable
Profes-sional (MVP) Award for his work with Windows PowerShell. He writes the Windows
PowerShell column for Microsoft TechNet Magazine, blogs at PowerShell.org, and
authors the “Decision Maker” column and blog for Redmond Magazine. Don is a pro-lific technology author and has published more than a dozen print books since 2001. He is also is a Senior Partner and Principal Technologist for Concentrated Technol-ogy (ConcentratedTech.com), an IT education and strategic consulting firm. Don’s first Windows scripting language was KiXtart, going back all the way to the mid-1990s. He quickly graduated to VBScript in 1995 and was one of the first IT pros to start using early releases of a new Microsoft product code-named “Monad”—which later became Windows PowerShell. Don lives in Las Vegas and travels all over the world delivering IT training (especially in PowerShell) and speaking at IT conferences.
xxii
acknowledgments
Books simply don’t write, edit, and publish themselves. Don would like to thank every-one at Manning Publications who decided to take a chance on a very different kind of book for Windows PowerShell, and who worked so hard to make the first edition of this book happen. Jeff would like to thank Don for inviting him along for the ride, and all the PowerShell community for their enthusiasm and support. Don and Jeff are both grateful to Manning for allowing them to continue the “Month of Lunches” series with this second edition.
1
Before you begin
We’ve been teaching Windows PowerShell since version 1 was released in 2006. Back then, most of the folks using the shell were experienced VBScript users, and they were eager to apply their VBScript skills to learning PowerShell. As a result, we and the other folks who taught the shell, wrote books and articles, and so forth, all adopted a teaching style that takes advantage of prior programming or script-ing skills.
But since late 2009, a shift has occurred. More and more administrators who don’t have prior VBScript experience have started trying to learn the shell. All of a sudden, our old teaching patterns didn’t work as well, because we had focused on scripting and programming. That’s when we realized that PowerShell isn’t a script-ing language. It’s a command-line shell where you run command-line utilities. Like all good shells, it has scripting capabilities, but you don’t have to use them, and you certainly don’t have to start with them. We started changing our teaching patterns, beginning with the many conferences we speak at each year. Don also implemented these changes into his instructor-led training courseware.
This book is the result of that process, and it’s the best that we’ve yet devised to teach PowerShell to someone who might not have a scripting background (although it certainly doesn’t hurt if you do). But before we jump into the instruc-tion, let’s set the stage for you.
1.1
Why you can’t afford to ignore PowerShell
administrators. We think it’s valuable to understand why you should care about Power-Shell, because when you do, you’ll feel comfortable that the time you commit to learn-ing PowerShell will pay off. Let’s start by considerlearn-ing what life was like before PowerShell came along, and look at some of the advantages of using this shell.
LIFEWITHOUT POWERSHELL
Windows administrators have always been happy to click around in the graphical user interface (GUI) to accomplish their chores. After all, the GUI is largely the whole point of Windows—the operating system isn’t called “Text,” after all. GUIs are great because they enable you to discover what you can do. Don remembers the first time he opened Active Directory Users and Computers. He hovered over icons and read tooltips, pulled down menus, and right-clicked on things, all to see what was available. GUIs make learning a tool easier. Unfortunately, GUIs have zero return on that invest-ment. If it takes you five minutes to create a new user in Active Directory (and assum-ing you’re fillassum-ing in a lot of the fields, that’s a reasonable estimate), you’ll never get any faster than that. One hundred users will take five hundred minutes—there’s no way, short of learning to type and click faster, to make the process go any quicker.
Microsoft has tried to deal with that problem a bit haphazardly, and VBScript was probably its most successful attempt. It might have taken you an hour to write a VBScript that could import new users from a CSV file, but once you’d invested that hour, creating users in the future would take only a few seconds. The problem with VBScript is that Microsoft didn’t make a wholehearted effort in supporting it. Micro-soft had to remember to make things VBScript-accessible, and when developers forgot (or didn’t have time), you were stuck. Want to change the IP address of a network adapter using VBScript? OK, you can. Want to check its link speed? You can’t, because nobody remembered to hook that up in a way that VBScript could get to. Sorry. Jeffrey Snover, the architect of Windows PowerShell, calls this “the last mile.” You can do a lot with VBScript (and other, similar technologies), but it tends to let you down at some point, never getting you through that “last mile” to the finish line.
Windows PowerShell is an express attempt on Microsoft’s part to do a better job, and to get you through the last mile.
LIFEWITH POWERSHELL
Microsoft’s goal for Windows PowerShell is to build 100% of a product’s administra-tive functionality in the shell. Microsoft continues to build GUI consoles, but those consoles are executing PowerShell commands behind the scenes. That approach forces the company to make sure that every possible thing you can do with the prod-uct is accessible through the shell. If you need to automate a repetitive task or create a process that the GUI doesn’t enable well, you can drop into the shell and take full con-trol for yourself.
Win-3
Is this book for you?
dows Server, which is where PowerShell v3 was introduced, is almost completely
man-aged from PowerShell—or by a GUI sitting atop PowerShell. That’s why you can’t
afford to ignore PowerShell—over the next few years, it’ll become the basis for more and more administration.
Ask yourself this question: If you were in charge of a team of IT administrators (and perhaps you are), who would you want in your senior, higher-paying positions? Administrators who need several minutes to click their way through a GUI each time they need to perform a task, or ones who can perform tasks in a few seconds after automating them? We already know the answer from almost every other part of the IT world. Ask a Cisco administrator, or an AS/400 operator, or a Unix administrator. The answer is, “I’d rather have the person who can run things more efficiently from the command line.” Going forward, the Windows world will start to split into two groups: administrators who can use PowerShell, and those who can’t. As Don famously said at Microsoft’s TechEd 2010 conference, “your choice is ‘learn PowerShell,’ or ‘would you like fries with that?’”
We’re glad you’ve decided to learn PowerShell.
1.2
Is this book for you?
This book doesn’t try to be all things to all people. In fact, Microsoft’s PowerShell team loosely defines three audiences who use PowerShell:
Administrators who primarily run commands and consume tools written by
others
Administrators who combine commands and tools into more complex
pro-cesses, and perhaps package those as tools that less-experienced administrators can use
Administrators and developers who create reusable tools and applications This book is designed primarily for the first audience. We think it’s valuable for any-one, even a developer, to understand how the shell is used to run commands. After all, if you’re going to create your own tools and commands, you should know the patterns that the shell uses, as they allow you to make tools and commands that work as well as they can within the shell.
If you’re interested in creating scripts to automate complex processes, such as new user provisioning, then you’ll absolutely see how to do that by the end of this book. You’ll even see how to get started on creating your own commands that other adminis-trators can use. But this book won’t plumb the depths of everything that PowerShell can possibly do. Our goal is to get you using the shell and being effective with it in a production environment.
We’ll also show you a couple of ways to use PowerShell to connect to external
man-agement technologies—Windows Manman-agement Instrumentation (WMI) and regular
them. Those topics deserve their own books (and have them; we’ll provide recom-mendations when we get there); we’ll concentrate solely on the PowerShell side of things. We’ll provide suggestions for further exploration if you’d like to pursue those technologies further on your own.
1.3
How to use this book
The idea behind this book is that you’ll read one chapter each day. You don’t have to read it during lunch, but each chapter should take you only about 40 minutes to read, giving you an extra 20 minutes to gobble down the rest of your sandwich and practice what the chapter showed you.
THEMAINCHAPTERS
Of the chapters in this book, chapters 2 through 25 contain the main content, giving you 24 days’ worth of lunches to look forward to. This means you can expect to com-plete the main content of the book in about a month. Try to stick with that schedule as much as possible, and don’t feel the need to read extra chapters in a given day. It’s more important that you spend some time practicing what each chapter shows you, because using the shell will help cement what you’ve learned. Not every chapter will require a full hour, so sometimes you’ll be able to spend some additional time practic-ing (and eatpractic-ing lunch) before you have to get back to work.
HANDS-ONLABS
Most of the main content chapters include a short lab for you to complete. You’ll be given instructions, and perhaps a hint or two, but you won’t find any answers in the book. The answers are online, at MoreLunches.com, but try your best to complete each lab without looking at the online answers.
SUPPLEMENTARYMATERIALS
The MoreLunches.com website also contains additional supplementary content, including extra chapters, companion videos, and so forth. In fact, each chapter has at least one companion video, which means you can see what the chapter is trying to show you. Each video is only five minutes or so in length, which gives you time to watch them when you’re done reading the chapters. You’ll also find a collection of videos from this book’s previous edition, all of which still apply to PowerShell v3. And they’re all free.
FURTHEREXPLORATION
A few chapters in this book only skim the surface of some cool technologies, and we’ll end those chapters with suggestions for how you might explore those technologies on your own. We’ll point out additional resources, including free stuff that you can use to expand your skill set as the need arises.
ABOVEANDBEYOND
5
Setting up your lab environment
and how it works. We’ve included some of that tangential information throughout the book in sections labeled “Above and beyond.” None of those will take you more than a couple of minutes or so to read, but if you’re the type of person who likes to know why something works the way it does, they can provide some fun additional facts. If you feel those sections might distract you from the practical stuff, ignore them on your first read-through. You can always come back and explore them later when you’ve mastered the chapter’s main material.
1.4
Setting up your lab environment
You’re going to be doing a lot of practicing in Windows PowerShell throughout this book, and you’ll want to have a lab environment to work in—please don’t practice in your company’s production environment.
All you’ll need to run most of the examples in this book—and to complete all of the labs—is a copy of Windows that has PowerShell v3 installed. The copy can be Win-dows Vista, WinWin-dows 7, WinWin-dows Server 2008, WinWin-dows Server 2008 R2, WinWin-dows 8, or Windows Server 2012. Note that PowerShell might not exist on certain editions of Windows, such as “Starter” editions. If you’re going to play with PowerShell, you’ll have to invest in a version of Windows that has it. Also note that some of the labs rely on functionality that’s new in Windows 8 and Windows Server 2012. At the start of each lab, we’ll tell you what operating system you need in order to complete the lab. We do recommend having a Windows 8 or Windows Server 2012 computer to play with—even if it’s in a virtual machine.
Keep in mind that, throughout this book, we’re assuming you’ll be working on a 64-bit operating system, also referred to as an “x64” operating system. As such, it comes with two copies of Windows PowerShell and the graphically oriented Windows PowerShell ISE. In the Start menu (or, in Windows 8, the Start screen), the 64-bit ver-sions of these are listed as “Windows PowerShell” and “Windows PowerShell ISE.” The 32-bit versions are identified by an “(x86)” in the shortcut name, and you’ll also see “(x86)” in the window’s title bar when running those versions. If you’re on a 32-bit operating system, you’ll have only the 32-bit version of PowerShell, and it won’t specif-ically say “(x86).”
The examples in this book are based on the 64-bit versions of PowerShell and the ISE. If you’re not using those, you may sometimes get slightly different results than ours when running examples, and a few of the labs might not work properly. The 32-bit versions are primarily provided for backward compatibility. For example, some shell extensions are available only in bit flavors and can be loaded into only the 32-bit (or “x86”) shell. Unless you need to use such an extension, we recommend using the 64-bit shell when you’re on a 64-bit operating system. Microsoft’s investments going forward are primarily in 64-bit; if you’re stuck with a 32-bit operating system, unfortunately that’s going to hold you back.
you have two or three computers, all in the same domain, to play with. We’ve used CloudShare.com as an inexpensive way to spin up several virtual machines in the cloud—if such a scenario interests you, look into that service, or something like it. Note that CloudShare.com isn’t currently available in all countries.
1.5
Installing Windows PowerShell
Windows PowerShell v3 has been available for most versions of Windows since the release of Windows Server 2008, Windows Server 2008 R2, Windows 7, and later ver-sions. Windows Vista is not supported, but it can still run v2. The shell is preinstalled only on the most recent versions of Windows; it must be manually installed on older versions.
TIP You should check on your version of PowerShell: Open the PowerShell
console, type $PSVersionTable, and hit Enter. If you get an error, or if the output doesn’t say “PSVersion 3.0,” then you don’t have PowerShell v3.
PowerShell v3 can install “side by side” with v2, which means you won’t break anything that depends upon v2 being present. You don’t need to have v1, and installing v3 will replace it. No recent, updated Microsoft software depends solely on v1.
If you happen to be using an older version of PowerShell, visit http://download .microsoft.com and enter “powershell 3” into the search box. Locate the correct download for your version of Windows, and install it. You’re looking for the Windows Management Framework 3.0 package, with which PowerShell v3 is distributed. Again, be careful to select the right version: “x86” refers to 32-bit packages; “x64” refers to 64-bit packages. You won’t see a download for the most recent versions of Windows because PowerShell v3 comes preinstalled on those versions.
TIP PowerShell requires .NET Framework v4 at a minimum, and it prefers to have the latest and greatest version of the framework that you can get. We rec-ommend also installing at least .NET Framework v3.5 SP 1 and .NET Frame-work v4.0 to get the maximum functionality from the shell.
Installing PowerShell v3 also installs some companion technologies, including the Windows Remote Management (WinRM) service, which you’ll learn more about later in this book. PowerShell is installed as a hotfix, which means that once it’s installed, it can be a bit tricky to remove. Generally speaking, you won’t want to remove it. Power-Shell is officially a part of the core Windows operating system, and any bug fixes or updates will come down as additional hotfixes, or even in service packs, as with any other component of Windows.
7
Online resources
_ISE.exe). We use the text-based console most of the time, but you’re welcome to use the ISE if you prefer.
NOTE The PowerShell ISE isn’t preinstalled on server operating systems. If you want to use it, you’ll need to go in to Windows Features (using Server Manager) and manually add the ISE feature (you can also open the
Power-Shell console and run Add-WindowsFeature powershell-ise). The ISE isn’t
available at all on server installations that don’t have the full GUI (for exam-ple, Server Core).
Before you go any further, take a few minutes to customize the shell. If you’re using the text-based console host, we strongly recommend that you change the font it uses to the Lucida fixed-width font instead of the default console font. The default font makes it difficult to distinguish some of the special punctuation characters that Power-Shell uses. Follow these steps to customize the font:
1 Click the control box (that’s the PowerShell icon in the upper left of the
con-sole window) and select Properties from the menu.
2 In the dialog box that appears, browse through the various tabs to change the
font, window colors, window size and position, and so forth.
TIP We strongly recommend you make sure that both the Window Size and
Screen Buffer have the same Width values.
Your changes will apply to the default console, meaning they’ll stick around when you open new windows.
1.6
Online resources
We’ve mentioned the MoreLunches.com website a couple of times already, and we hope you’ll find time to visit. A number of supplementary resources for this book are available there:
Companion videos for each chapter
Example answers for each end-of-chapter lab
Downloadable code listings (so you don’t have to type them in from the book)
Additional articles and bonus chapters
Links to our Windows PowerShell blogs, which contain even more examples
and articles
Links to Don’s Windows PowerShell Frequently Asked Questions (FAQ)
Links to discussion forums, where you can ask questions or submit feedback
about this book
on MoreLunches.com. Don can be reached through his company’s website, http:// ITPro.ConcentratedTech.com, and on Twitter as @concentrateddon. Jeff can be found on his blog, http://jdhitsolutions.com/blog, and on Twitter as @jeffhicks.
1.7
Being immediately effective with PowerShell
“Immediately effective” is a phrase we’ve made our primary goal for this entire book. As much as possible, we’ll try to have each chapter focus on something that you could use in a real production environment, right away. That means we’ll sometimes gloss over some details in the beginning, but when necessary we promise to circle back and cover those details at the right time. In many cases, we had to choose between hitting you with 20 pages of theory first, or diving right in and accomplishing something with-out explaining all the nuances, caveats, and details. When those choices came along, we almost always chose to dive right in, with the goal of making you immediately effec-tive. But all of those important details and nuances will still be explained at a different time in the book (or, for the subtle details that don’t impact the book’s content, we may explain them in an online article on MoreLunches.com).
9
Meet PowerShell
This chapter is all about getting you situated and helping you to decide which PowerShell interface you’ll use (yes, you have a choice). If you’ve used PowerShell before, this material might seem redundant, so feel free to skim this chapter—you might still find some tidbits here and there that’ll help you out down the line.
2.1
Choose your weapon
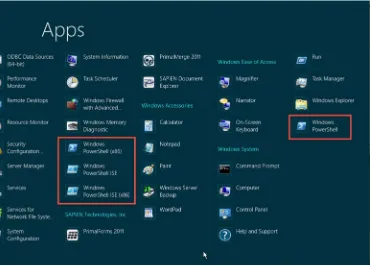
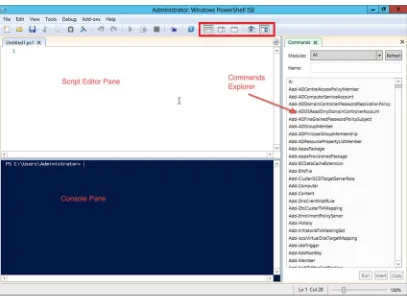
Microsoft provides you with two ways (four, if you’re being picky) to work with PowerShell. Figure 2.1 shows the Start screen’s All Apps page, with four PowerShell icons. We’ve highlighted them to help you spot them more easily.
TIP On older versions of Windows, these icons will be on your Start menu. You’ll point to All Programs > Accessories > Windows PowerShell to find the icons. You can also select Run from the Start menu, type PowerShell.exe, and hit Enter to open the PowerShell console application. On Windows 8 and Windows Server 2012, hold the Windows key on your keyboard and press R to get the Run dialog box. Or, press and release the Windows key, and start typing powershell to quickly get to the PowerShell icons.
On a 32-bit operating system, you’ll have only two (at most) PowerShell icons; on a 64-bit system, you’ll have up to four. These include
Windows PowerShell—64-bit console on a 64-bit system; 32-bit console on a 32-bit system
Windows PowerShell ISE—64-bit graphical console on a 64-bit system; 32-bit graphical console on a 32-bit system
Windows PowerShell ISE (x86)—32-bit graphical console on a 64-bit system In other words, 32-bit operating systems have only 32-bit PowerShell applications, whereas 64-bit operating systems have both 64-bit and 32-bit versions, and the 32-bit versions include “x86” in their icon names. You’d use the 32-bit versions only when you have a 32-bit shell extension for which a 64-bit version isn’t available. Microsoft’s fully invested in 64-bit these days, whereas it maintains the 32-bit versions mainly for backward compatibility.
TIP It’s incredibly easy to accidentally launch the wrong application when you’re on a 64-bit operating system. Get in the habit of looking at the applica-tion window’s title bar: if it says “x86,” you’re running a 32-bit applicaapplica-tion. The 64-bit extensions (and most new ones are 64-bit) won’t be available in a 32-bit application. Our recommendation is to pin a shortcut to your shell of choice to the Start menu.
11
Choose your weapon
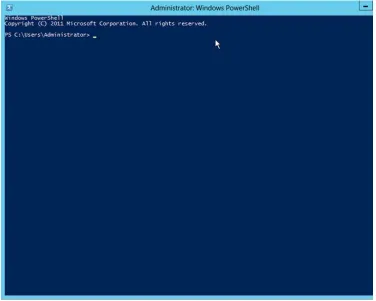
2.1.1 The console window
Figure 2.2 shows the console window, which is where most folks first meet PowerShell. We’ll start this section by making some arguments against using the PowerShell console application:
It doesn’t support double-byte character sets, which means many non-English
languages won’t display properly.
Clipboard operations (copy and paste) use nonstandard keystrokes that are
hard to get used to.
It provides little assistance when it comes to typing (compared to the ISE, which we’ll cover next).
That said, the PowerShell console application will be your only option when you’re running PowerShell on a server that doesn’t have a GUI shell installed (that’s any “Server Core” installation, or any Windows Server installation where the Server GUI Shell feature has been removed or not installed). On the plus side,
The console application is tiny. It loads fast and doesn’t use much memory.
It doesn’t require any more .NET Framework stuff than PowerShell itself needs.
You can set the colors to be green text on a black background and pretend
you’re working on a 1970s-era mainframe.
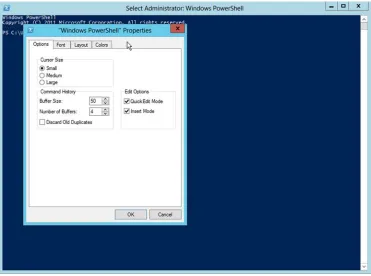
If you decide to use the console application, we have a few suggestions for configur-ing it. You can make all of these configurations by clickconfigur-ing on the window’s upper-left-corner control box and selecting Properties; you’ll see the dialog box shown in figure 2.3.
On the Options tab, you can increase the size of the Command History Buffer Size. This buffer is how the console remembers what commands you’ve typed, and how you recall them using the up and down arrows on your keyboard. You can also hit F7 for a pop-up list of commands.
On the Font tab, pick something a bit larger than the default 12 pt font. Please. We don’t care if you have 20/10 vision, jack up the font size a bit. PowerShell needs you to be able to quickly distinguish between a lot of similar-looking characters—such as ' (an apostrophe or a single quote) and ` (a backtick or a grave accent)—and a tiny font doesn’t help.
13
Choose your weapon
On the Layout tab, set both Width sizes to the same number, and make sure the resulting window fits on your screen. If you fail to do this, it can result in a horizontal scroll bar at the bottom of the window, which can lead to some PowerShell output appearing “wrapped” off the right side of the window, where you’ll never see it. We’ve had students spend half an hour running commands, thinking they were producing no output at all, when in fact the output was scrolled off to the right. Annoying.
Finally, on the Colors tab, don’t go nuts. Keep things high contrast and easy to read. Black on medium-gray is quite nice if you don’t like the default white on blue.
One thing to keep in mind: This console application isn’t PowerShell; it’s merely the means by which you interact with PowerShell. The console app itself dates to circa 1985. It’s primitive, and you shouldn’t expect to have a slick experience with it.
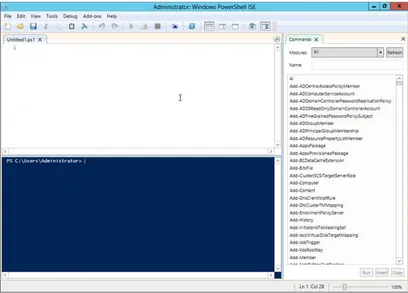
2.1.2 The Integrated Scripting Environment (ISE)
Figure 2.4 shows the PowerShell Integrated Scripting Environment, or ISE.
TIP If you accidentally open the normal console app, you can type ise and hit Enter to open the ISE.
We’ve got a lot of ground to cover with the ISE, and we’ll start with table 2.1, which lists its pros and cons.
Let’s start with some basic orientation. Figure 2.5 shows ISE’s three main areas with labels, and we’ve highlighted the area of the ISE toolbar that controls these main areas.
Table 2.1 ISE pros and cons
Pros Cons
ISE is nicer looking and supports double-byte character sets.
It requires Windows Presentation Foundation (WPF), which means it can’t run on a server that’s had the GUI uninstalled (although it can run in Minimal Server GUI mode, which supports WPF applications).
It does more to help you create PowerShell com-mands and scripts, as you’ll see later in this chapter.
It takes longer to get up and running, but usually only a couple of seconds longer.
It uses normal copy-and-paste keystrokes. It doesn’t support transcription.
15
It’s typing class all over again
In figure 2.5, the top area is the Script Editor Pane, which we won’t be using until the end of this book. In the upper-right corner of that pane, you’ll notice a little blue arrow; click it to hide the script editor and maximize the Console Pane, which is the area we’ll be using. On the right side is the Commands Explorer, which you can leave open or close by using the little “X” in its upper-right corner. You can also float the Commands Explorer by clicking the next-to-last button in the toolbar. If you close the Commands Explorer and want it back, the last button in the toolbar will bring it back. The first three buttons we’ve highlighted in the toolbar control the layout of the script editor and the Console Panes. You can set these panes one above the other, side by side, or as a full-screen Script Editor Pane.
In the lower-right corner of the ISE window, you’ll find a slider that changes the font size. On the Tools menu, you’ll find an Options item that lets you configure cus-tom color schemes and other appearance settings—feel free to play with those.
TRY IT NOW We’ll assume you’re using the ISE for the remainder of this book and not some other scripting editor. For now, hide the Script Editor Pane and (if you want to) the Commands pane. Set the font size to something you like. If the default color scheme isn’t to your liking, change it to something you prefer. If you decide to use the console window instead, you’ll be fine— most everything in the book will still work. For the few ISE-specific things we’ll show you, we’ll be sure to tell you that it works only in the ISE, to give you a chance to switch.
2.2
It’s typing class all over again
PowerShell is a command-line interface, and that means you’ll do a lot of typing. Typ-ing leaves room for errors—typos. Fortunately, both PowerShell applications provide ways to help minimize typos.
TRY IT NOW The following examples are impossible to illustrate in a book, but they’re cool to see in action. Consider following along in your own copy of the shell.
The console application supports tab completion in four areas:
Type Get-S and press Tab a few times, then try pressing Shift-Tab. PowerShell will cycle back and forth through all of the potential matches—continue to press those keys until you’ve hit the command you want.
Type Dir, then a space, then C:\, and then hit Tab. PowerShell will start cycling through available file and folder names from the current folder.
Type Set-Execu, and hit Tab. Then type a space and a dash (-). Start pressing Tab to see PowerShell cycle through the parameters for the command. You could also type part of a parameter name, like -E, and press Tab to start cycling through matching parameters. Hit Escape to clear the command line.
values for that parameter. This works only for parameters that have a pre-defined set of allowable values (the set is called an enumeration). Again, hit Escape to clear the command line—you don’t want to run that command yet. The PowerShell ISE offers something similar to, and better than, tab completion: IntelliSense. This feature operates in all four of the same situations that we showed you for tab completion, except that you get a cool little pop-up menu, like the one shown in figure 2.6. You can use your arrow keys to scroll up or down, find the item you want, hit Tab or Enter to select it, and then keep typing.
IntelliSense works in the ISE’s Console Pane and in the Script Editor Pane.
CAUTION It’s very, very, very, very, very important to be very, very, very, very
accu-rate when you’re typing in PowerShell. In some cases, a single misplaced space, quotation mark, or even carriage return can make everything fail. If you’re getting errors, double- and triple-check what you’ve typed.
2.3
Common points of confusion
Let’s quickly review some of the things that can muck up the works to make sure they don’t trip you up as well:
17
What version is this?
Horizontal scroll bars in the console app—We’ve learned from years of teaching classes—this trips up people every single time. Configure the console to not have a horizontal scroll bar across the bottom of the window. We explained how to do this earlier in this chapter.
The 32-bit versus 64-bit issue—You should be running a 64-bit version of Windows and using the 64-bit versions of PowerShell’s applications (the ones that don’t say “(x86)”). We know for some folks it can be a big deal to go buy a 64-bit com-puter and a 64-bit version of Windows. But that’s the investment you’ll have to make if you want to use PowerShell effectively. Most of what we cover in this book will work fine on 32-bit, but when you’re working in a production environ-ment, 64-bit makes all the difference.
Make sure the PowerShell application’s window title bar says “Administrator”—If it doesn’t, close the window, right-click the PowerShell icon again, and select Run As Administrator. In a production environment, you might not always do this, and later in the book we’ll show you how to specify credentials when you run commands. But for the moment, you need to be sure the shell window says “Administrator” or you’ll run into problems later.
2.4
What version is this?
It can be incredibly difficult to figure out which version of PowerShell you’re using, in no small part because every released version installs to a directory named “1.0” (which refers to the language engine of the shell, meaning every version has been made back-ward compatible to v1). With PowerShell v3, there’s an easy way to check your version: PS C:\> $PSVersionTable
Name Value ---- --- PSVersion 3.0 WSManStackVersion 3.0 SerializationVersion 1.1.0.1
CLRVersion 4.0.30319.17379 BuildVersion 6.2.8250.0 PSCompatibleVersions {1.0, 2.0, 3.0} PSRemotingProtocolVersion 2.2
Type $PSVersionTable and hit Enter. You’ll immediately see the version number for every PowerShell-related piece of technology, including PowerShell itself. If this doesn’t work, or if it doesn’t say “3.0” for “PSVersion,” you’re not using the right ver-sion of PowerShell for this book. Refer to chapter 1 for instructions on getting v3.
TRY IT NOW Don’t wait any longer to start using PowerShell. Start by
check-ing your version number to ensure it’s 3.0. If it isn’t, don’t go any further until you’ve installed v3.
isn’t v3 compatible (which is rare). PowerShell v3’s installer doesn’t install v2; you’ll be able to run only v2 if it was installed first. The installers for v2 and v3 will both overwrite v1 if it’s already installed; they can’t exist side by side. All current versions of Microsoft software (including the latest service packs of some older-generation soft-ware like Exchange Server 2007) will run with v2 installed.
TIP The newest versions of Windows install PowerShell v3 by default, but
include the PowerShell v2 engine. From PowerShell, run Add-WindowsFeature powershell-v2 to install the v2 engine if you need it.
2.5
Lab
Because this is the book’s first lab, we’ll take a moment and describe how these are supposed to work. For each lab, we’ll give you a few tasks that you can try and com-plete on your own. Sometimes we’ll provide a hint or two to get you going in the right direction. From there, you’re on your own.
We absolutely guarantee that everything you need to know to complete every lab is either in that same chapter or covered in a previous chapter (and the “previously cov-ered” information is the stuff for which we’re most likely to give you a hint). We’re not saying the answer will be in plain sight: most often, a chapter will have taught you how to discover something on your own, and you’ll have to go through that discovery pro-cess to find the answer. It might seem frustrating, but forcing yourself to do it will absolutely make you more successful with PowerShell in the long run. We promise.
Keep in mind that you can find sample answers at MoreLunches.com. Our answers might not exactly match yours, and that will become increasingly true as we move on to more complex material. In fact, you’ll often find that PowerShell offers a half dozen or more ways to accomplish almost anything. We’ll show you the way we use the most, but if you come up with something different, you’re not wrong. Any way that gets the job done is correct.
NOTE For this lab, you’ll need any computer running PowerShell v3.
We’ll start easy: we just want you to get both the console and the ISE set up to meet your needs. Follow these five steps:
1 Select fonts and colors that work for you.
2 Make sure the console application has no horizontal scroll bar at the bottom.
We’ve already mentioned this about three times in this chapter, so maybe it’s important.
3 In the ISE, get the Console Pane maximized; remove or leave the Commands
Explorer at your discretion.
4 In both applications, type a single quote, ', and a backtick, `, and make sure you
19
Further exploration
5 Also type (parentheses), [square brackets], <angle brackets>, and {curly
brack-ets} to make sure the font and size you’ve selected display well, so that all of these symbols are immediately distinguishable. If there’s some visual confusion about which is which, changes fonts or select a bigger font size.
We’ve already walked you through how to accomplish these steps, so you don’t have any answers to check for this lab, other than to be sure you’ve completed all five of the steps.
2.6
Further exploration
What Microsoft gives you isn’t the only way to use PowerShell; you’ll find other free and commercial editors and shell environments designed specifically for PowerShell, and you should try them out. Even the commercial ones come with a free trial period, so there’s no reason not to take them all for a spin.
PowerGUI—You’ll find a free edition from http://powergui.org and a profes-sional (commercial) edition from http://quest.com/powershell
SAPIEN PrimalScript and PrimalForms—Two commercial tools from http:// primaltools.com
PowerSE and PowerWF—A free editor and a commercial workflow solution from http://powerwf.com
Idera PowerShell Plus—An editor and console environment from http:// idera.com
You can likely find others, but these four are the big players and the ones with which we’re most familiar. We’re not associated with any of these companies (beyond appre-ciating their work). We’re often asked which of these we use the most, at which point we have to admit we use Microsoft’s ISE, mainly because we’re constantly rebuilding our virtual machines and we’re too lazy to keep reinstalling editors (and we haven’t gotten around to writing a PowerShell script to do it for us). That said, when we do find ourselves using a third-party tool, it’s usually PowerShell Plus, because we like the way it provides an enhanced console as well as a script editor, and we like the integra-tion between the two modes. But you should find an editor that meets your needs and budget.
In January 2012, Don did a write-up of various PowerShell environments. Provided you’re reading this book sometime before January 2014 (when the paper expires and will be updated based on available products at that time), you can get the paper at
20
Using the help system
In the first chapter of this book, we mentioned that discoverability is a key feature that makes graphical user interfaces (GUIs) easier to learn and use, and that command-line interfaces (CLIs) like PowerShell are often more difficult because they lack those discoverability features. In fact, PowerShell has fantastic discover-ability features—but they’re not that obvious. One of the main discoverdiscover-ability fea-tures is its help system.
3.1
The help system: how you discover commands
Bear with us for a minute as we climb up on a soapbox and preach to you.
We work in an industry that doesn’t place a lot of emphasis on reading, although we do have an acronym, RTFM, that we cleverly pass along to users when we wish they would “read the friendly manual.” Most administrators tend to dive right in, relying on things like tooltips, context menus, and so forth—those GUI dis-coverability tools—to figure out how to do something. That’s how we often work, and we imagine you do the same thing. But let’s be clear about one thing:
If you aren’t willing to read PowerShell’s help files, you won’t be effective with PowerShell. You won’t learn how to use it, you won’t learn how to administer products like Windows and Exchange with it, and you might as well stick with the GUI.
21
The help system: how you discover commands
furniture from the department store without reading the manual. Your experience will be frustrating, confusing, and ineffective. Why?
If you need to perform a task and don’t know what command to use, the help sys-tem is how you’ll find that command. Not Google or Bing, but the help syssys-tem.
If you run a command and get an error, the help system is what will show you how to properly run the command so you don’t get errors.
If you want to link multiple commands together to perform some complex task, the help system is where you’ll find out how each command is able to connect to others. You don’t need to search for examples on Google or Bing; you need to learn how to use the commands themselves, so that you can create your own examples and solutions.
We realize our preaching is a little heavy-handed, but 90 percent of the problems we see students struggling with in class, and on the job, could be solved if those folks would find a few minutes to sit back, take some deep breaths, and read the help. And then read this chapter, which is all about helping folks understand the help they’re reading.
From here on out, we’ll encourage you to read the help for several reasons:
Although we’ll be showing you many commands in our examples, we’ll almost
never expose the complete functionality, options, and capabilities of each com-mand. You should read the help for each and every command we show you, so that you’ll be familiar with the additional things each command can do.
In the labs, we may give you a hint about which command to use for a task, but we won’t give you hints about the syntax. You’ll need to use the help system to discover that syntax on your own in order to complete the labs.
We promise you that mastering the help system is the key to becoming a PowerShell expert. No, you won’t find every little detail in there, and a lot of super-advanced material isn’t documented in the help system, but in terms of being an effective day-to-day administrator, you need to master the help system. This book will make that sys-tem understandable, and it will teach you the concepts that the help skips over, but it’ll only do this in conjunction with the built-in help.
Stepping off the soapbox now.
Command vs. cmdlet
3.2
Updatable help
You may be surprised the first time you fire up help in PowerShell, because, well, there isn’t any. But wait, we can explain.
Microsoft included a new feature in PowerShell v3 called “updatable help.” Power-Shell v3 can download updated, corrected, and expanded help right from the inter-net. Unfortunately, in order to do that, Microsoft can’t ship any help “in the box.” When you ask for help on a command, you get an abbreviated, auto-generated version of help, along with a message on how to update the help files, which may look like the following:
PS C:\> help Get-Service
NAME
Get-Service
SYNTAX
Get-Service [[-Name] <string[]>] [-ComputerName <string[]>] [-DependentServices] [-RequiredServices] [-Include <string[]>] [-Exclude <string[]>] [<CommonParameters>]
Get-Service -DisplayName <string[]> [-ComputerName <string[]>] [-DependentServices] [-RequiredServices] [-Include <string[]>] [-Exclude <string[]>] [<CommonParameters>]
Get-Service [-ComputerName <string[]>] [-DependentServices] [-RequiredServices] [-Include <string[]>] [-Exclude <string[]>] [-InputObject <ServiceController[]>] [<CommonParameters>]
ALIASES gsv
REMARKS
Get-Help cannot find the Help files for this cmdlet on this computer. It is displaying only partial help.
-- To download and install Help files for the module that includes this cmdlet, use Update-Help.
-- To view the Help topic for this cmdlet online, type: "Get-Help Get-Service -Online" or
go to http://go.microsoft.com/fwlink/?LinkID=113332.
TIP It’s impossible to miss the fact that you don’t have local help installed– the first time you ask for help, PowerShell will prompt you to update the help content.
Updating PowerShell’s help should be your first task. These files are stored in the System32 directory, which means your shell must be running under elevated privi-leges. If it doesn’t say “Administrator” in the PowerShell title bar, you’ll likely get an error message:
PS C:\> update-help
Update-Help : Failed to update Help for the module(s)