11
g
Release 1 (11.1.1)
E16630-03Copyright © 2010, 2011, Oracle and/or its affiliates. All rights reserved.
Primary Author: Oracle Corporation
Contributors: Oracle Real-Time Decisions development, product management, and quality assurance teams.
This software and related documentation are provided under a license agreement containing restrictions on use and disclosure and are protected by intellectual property laws. Except as expressly permitted in your license agreement or allowed by law, you may not use, copy, reproduce, translate, broadcast, modify, license, transmit, distribute, exhibit, perform, publish, or display any part, in any form, or by any means. Reverse engineering, disassembly, or decompilation of this software, unless required by law for interoperability, is prohibited.
The information contained herein is subject to change without notice and is not warranted to be error-free. If you find any errors, please report them to us in writing.
If this software or related documentation is delivered to the U.S. Government or anyone licensing it on behalf of the U.S. Government, the following notice is applicable:
U.S. GOVERNMENT RIGHTS Programs, software, databases, and related documentation and technical data delivered to U.S. Government customers are "commercial computer software" or "commercial technical data" pursuant to the applicable Federal Acquisition Regulation and agency-specific supplemental regulations. As such, the use, duplication, disclosure, modification, and adaptation shall be subject to the restrictions and license terms set forth in the applicable Government contract, and, to the extent applicable by the terms of the Government contract, the additional rights set forth in FAR 52.227-19, Commercial Computer Software License (December 2007). Oracle USA, Inc., 500 Oracle Parkway, Redwood City, CA 94065.
This software is developed for general use in a variety of information management applications. It is not developed or intended for use in any inherently dangerous applications, including applications which may create a risk of personal injury. If you use this software in dangerous applications, then you shall be responsible to take all appropriate fail-safe, backup, redundancy, and other measures to ensure the safe use of this software. Oracle Corporation and its affiliates disclaim any liability for any damages caused by use of this software in dangerous applications.
Oracle is a registered trademark of Oracle Corporation and/or its affiliates. Other names may be trademarks of their respective owners.
Preface
... xiiiAudience... xiii
Documentation Accessibility ... xiii
Related Documents ... xiv
Conventions ... xiv
Part I
Getting Started
1
About Oracle Real-Time Decisions
1.1 Terminology... 1-1 1.2 About Decision Studio ... 1-2 1.2.1 Inline Service Explorer View... 1-3 1.2.2 Problems View ... 1-4 1.2.3 Test View... 1-4 1.2.4 Cheat Sheets View ... 1-4 1.2.5 Editor Area... 1-4 1.2.6 Arranging Views and Resizing Editors ... 1-4 1.3 About Decision Center ... 1-4 1.4 About the Inline Service Lifecycle ... 1-5
2
Creating an Inline Service
2.6.1 Creating an Informant... 2-10 2.6.2 Adding Testing Logic to the Informant... 2-10 2.7 Testing the Inline Service... 2-11 2.8 Adding Functionality ... 2-12 2.8.1 Creating a Call Entity ... 2-13 2.8.2 Creating the Call Begin Informant ... 2-13 2.8.3 Creating the Service Complete Informant ... 2-14 2.8.4 Creating the Call End Informant ... 2-15 2.8.5 Testing the Informants ... 2-16 2.9 Analyze Call Reasons ... 2-17 2.9.1 About Using Choices for Analysis ... 2-18 2.9.2 Adding a Choice Group... 2-18 2.9.3 Adding an Analytical Model ... 2-19 2.9.4 Adding Logic for Selecting Choices... 2-19 2.9.5 Testing It All Together ... 2-21
3
Simulating Load for Inline Services
3.1 Performance Under Load ... 3-1 3.1.1 Creating the Load Generator Script ... 3-2 3.1.2 Viewing Analysis Results in Decision Center ... 3-6 3.1.3 Excluding the Attribute ... 3-7 3.2 Resetting the Model Learnings ... 3-7 3.2.1 Summary of the Inline Service... 3-8
4
Enhancing the Call Center Inline Service
4.1 About Using Choice Groups and Scoring to Cross Sell ... 4-1 4.2 Creating an Offer Inventory Using Choice Groups ... 4-2 4.3 Configuring Performance Goals ... 4-3 4.4 Scoring the Choices... 4-3 4.5 About Advisors ... 4-5 4.6 Creating the Decisions... 4-5 4.7 Creating the Advisor ... 4-6 4.8 Viewing the Integration Map ... 4-7 4.9 Testing the Advisor ... 4-8
5
Closing the Feedback Loop
5.1.7 Updating the Load Generator Script ... 5-7 5.2 Using the Predictive Power of Models ... 5-11 5.2.1 Adding a Base Revenue Choice Attribute... 5-11 5.2.2 Adding a Second Performance Goal (Maximize Revenue) ... 5-12 5.2.3 Calculating Score Value for the Maximize Revenue Performance Goal ... 5-12 5.2.4 Updating the Select Offer Decision to Include the Second Performance Goal... 5-13 5.2.5 Adding a Choice Attribute to View Likelihood of Acceptance ... 5-14 5.2.6 Checking the Likelihood Value ... 5-14 5.2.7 Introducing Offer Acceptance Bias for Selected Customers ... 5-16 5.2.8 Running the Load Generator Script ... 5-17 5.2.9 Studying the Results... 5-18
Part II
Integration with Oracle RTD
6
About Integrating with Oracle RTD
6.1 Choosing the Best Means of Integration... 6-1 6.1.1 About the Java Smart Client... 6-2 6.1.2 About the .NET Smart Client ... 6-3 6.1.3 About the JSP Smart Client ... 6-3 6.1.4 About the PHP Client... 6-3 6.1.5 About Web Services... 6-3 6.2 About the CrossSell Inline Service ... 6-3 6.2.1 Using Decision Studio to Identify Object IDs... 6-4 6.2.2 Identifying Session Keys and Arguments... 6-5 6.2.3 Determining the Response of an Advisor ... 6-5 6.2.4 Identifying Event Responses to Oracle RTD ... 6-6 6.3 Oracle RTD Web Services and Web Service Security ... 6-6 6.4 System Requirements and Certification ... 6-6
7
Using the Java Smart Client
7.1 Before You Begin... 7-1 7.2 Integrating with an Inline Service Using the Java Smart Client ... 7-1 7.2.1 Preparing the Java Smart Client Example... 7-2 7.2.2 Creating the Java Smart Client Properties File ... 7-3 7.2.3 Creating the Java Smart Client... 7-4 7.2.4 Creating the Request ... 7-6 7.2.5 Examining the Response... 7-6 7.2.6 Closing the Loop ... 7-7 7.2.7 Closing the Client ... 7-8
8
Using Java Smart Client JSP Tags
9
PHP Client
9.1 Before You Begin... 9-1 9.2 Integrating with an Inline Service Using the Oracle RTD PHP Client... 9-2 9.2.1 Deploying the PHP Client Example... 9-2 9.2.2 Setting up the Oracle RTD PHP Client .ini File... 9-3 9.2.3 Editing the Nusoap Path Library Location ... 9-5 9.2.4 Creating the Oracle RTD PHP Client... 9-5 9.2.5 Creating the Request ... 9-6 9.2.6 Examining the Response... 9-6 9.2.7 Closing the Loop ... 9-7
10
Using the .NET Smart Client
10.1 Before You Begin... 10-1 10.2 Integrating with an Inline Service Using the .NET Smart Client... 10-2 10.3 .NET Integration Example ... 10-2
11
Web Service Client Example
11.1 Before You Begin... 11-1 11.2 Creating a New NetBeans Java Application Project ... 11-2 11.3 Adding the Provided Java Code and Testing the Client... 11-2
Part III
Decision Studio Reference
12
About Decision Studio
12.4 Inline Service Directory Structure ... 12-13 12.5 Inline Service Security ... 12-13
13
About Decision Studio Elements and APIs
13.14.4.5 Recording Choices for Choice Models ... 13-57 13.14.4.6 Obtaining Model Choice Likelihood ... 13-58 13.15 About Integration Points ... 13-58 13.15.1 About Informants ... 13-59 13.15.1.1 Adding a Session Key ... 13-60 13.15.1.2 Identifying the External System and Order... 13-60 13.15.1.3 Adding Request Data... 13-60 13.15.2 Adding Imported Java Classes and Changing the Decision Center Display... 13-60 13.15.3 Informant APIs... 13-60 13.15.4 Informant Logic... 13-61 13.15.4.1 Logic ... 13-61 13.15.4.2 Asynchronous Logic ... 13-61 13.15.4.3 Accessing Request Data From the Informant... 13-61 13.15.5 About Advisors ... 13-61 13.15.6 About the Advisor Decisioning Process... 13-62 13.15.7 Adding Imported Java Classes and Changing the Decision Center Display... 13-62 13.15.8 Adding a Session Key ... 13-62 13.15.9 Identifying the External System and Order ... 13-62 13.15.10 Adding Request Data ... 13-63 13.15.11 Adding Response Data ... 13-63 13.15.12 Logic in Advisors... 13-64 13.15.12.1 Logic ... 13-64 13.15.12.2 Asynchronous Logic ... 13-64 13.15.13 Accessing Request Data from the Advisor ... 13-64 13.15.14 Temporary Sessions for Integration Points Without Session Keys ... 13-64 13.16 About External Systems ... 13-65 13.17 About the Categories Object... 13-65 13.18 About Functions... 13-65 13.18.1 Functions to Use with Choice Event History Table... 13-66 13.18.2 About Maintenance Operations ... 13-66 13.18.3 Adding Imported Java Classes and Changing the Decision Center Display... 13-67 13.19 About Type Restrictions ... 13-67 13.19.1 Managing Type Restrictions ... 13-68 13.19.1.1 Creating and Editing "List of Values" Type Restrictions ... 13-68 13.19.1.2 Creating and Editing "List of Entities" Type Restrictions... 13-68 13.19.1.3 Creating and Editing Other Restrictions... 13-69 13.19.1.4 Associating Type Restrictions with Inline Service Objects... 13-70 13.19.1.5 Using Type Restrictions in Rules ... 13-70 13.19.1.6 Examples of Type Restrictions... 13-71 13.20 About Statistic Collectors... 13-73 13.20.1 Creating a Custom Statistics Collector ... 13-73
14
Deploying, Testing, and Debugging Inline Services
14.4.1 About the Problems View ... 14-5 14.4.2 Using the Test View... 14-5 14.4.2.1 Using logInfo() ... 14-5 14.4.2.2 Testing for Incoming Request Data ... 14-6 14.4.3 Using System Logs for Testing and Debugging Inline Services ... 14-6
15
About the Load Generator
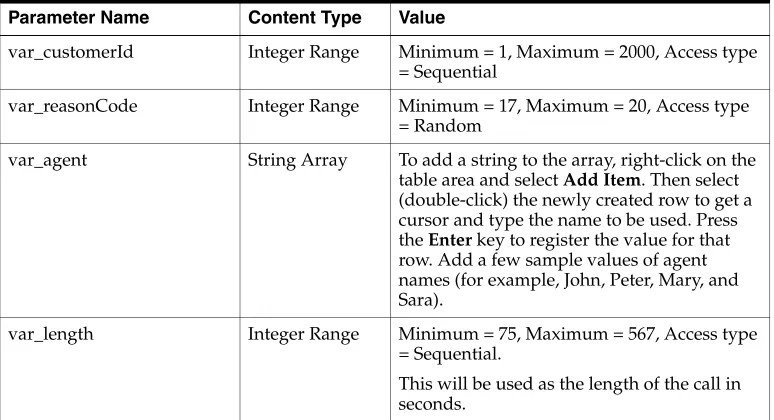
15.1 Using Load Generator for Testing... 15-1 15.2 Using Load Generator for Performance Characterization... 15-2 15.3 Running a Load Generator Session ... 15-2 15.3.1 Measuring the Server Load ... 15-2 15.4 Viewing Performance Graphs... 15-2 15.5 About the General Tab ... 15-3 15.5.1 Load Generator Section... 15-3 15.5.2 Details Section ... 15-3 15.5.3 Think Time Section ... 15-4 15.5.4 Scripts Section ... 15-4 15.5.5 Logging Section... 15-4 15.6 About Variables... 15-4 15.6.1 Using Variables ... 15-5 15.6.2 Variable Types... 15-5 15.7 About Actions... 15-5 15.7.1 Types of Actions ... 15-6 15.8 Load Generator CSV Log File Contents... 15-6 15.9 XLS File Contents... 15-7
Part IV
Miscellaneous Application Development
16
Oracle RTD Batch Framework
17.2.7.2 Defining the Inline Service Objects for the Rules... 17-47 17.2.7.3 Defining External Rules for Inline Service Objects... 17-47 17.2.8 Setting Up the External Interface and Embedded Rule Editor ... 17-49 17.2.8.1 Defining the Rule Editor Widget... 17-49 17.2.8.2 Changing the Rule Editor Context and Scope... 17-50 17.2.8.3 Defining the Callback Function ... 17-50 17.3 Example of End to End Development Using Dynamic Choices and External Rules... 17-51 17.3.1 Database Driven Dynamic Choices... 17-51 17.3.2 Evaluating External Rules ... 17-53 17.3.3 Embedding an External Rule Editor in a Third Party Interface... 17-53 17.3.4 DC_Demo External Rules Deployment Helper... 17-55 17.3.5 Pushing External Rules To a Production Environment ... 17-57 17.3.6 Viewing Reports for Dynamic Choices ... 17-57 17.4 Externalized Performance Goal Weighting... 17-58
A
Oracle RTD Model Features and Strategies
A.1 Model Concepts... A-2 A.2 From Models to Decisions ... A-2 A.3 Model Maturation ... A-3 A.3.1 Significance Threshold ... A-3 A.4 Model Randomized Likelihoods Computation... A-5 A.5 Model Likelihood Computation for Multiple Events... A-6 A.5.1 Requesting Specific Model Likelihoods ... A-6 A.6 Scoring Choices for Decisions ... A-7 A.6.1 Introduction of New Choices ... A-7 A.7 Model Quality... A-8 A.7.1 Model Quality Threshold and Model Usage ... A-9 A.8 Frequently Asked Questions ... A-9
B
Oracle RTD Web Services and Clients
B.1 Oracle RTD Web Services ... B-1 B.1.1 Overview of Oracle RTD Web Services... B-1 B.1.2 Administration Web Service ... B-4 B.2 Oracle RTD Clients ... B-6 B.3 Web Service Security ... B-8
C
Examples of Data Sources from Stored Procedures
Oracle Real-Time Decisions (Oracle RTD) enables you to develop adaptive enterprise software solutions. These adaptive solutions continuously learn from business process transactions while they execute and optimize each transaction, in real time, by way of rules and predictive models.
This document is divided into four parts:
■ Part I, "Getting Started" is a tutorial that provides information and examples to help you get started using Oracle RTD.
■ Part II, "Integration with Oracle RTD" provides information about integrating with Oracle RTD, including information about Oracle RTD Smart Clients, Web services, and directly messaging Real-Time Decision Server.
■ Part III, "Decision Studio Reference" identifies each of the elements used to configure Inline Services, including the properties of each Inline Service and the available APIs.
■ Part IV, "Miscellaneous Application Development" provides an in-depth look at the concepts, components, and processes involved in Oracle RTD application development that require special processing, such as batch framework and external editors that enable modification of Oracle RTD application objects.
Audience
Part I of this document is designed to help technical users of Oracle RTD get acquainted with the capabilities, terminology, tools, and methodologies used to configure Inline Services.
Part II of this document is intended for developers who will use the Java-based API, .NET component, or Web services to integrate enterprise applications with Oracle RTD Inline Services.
Part III of this document is designed for technical users configuring Inline Services using Decision Studio.
Part IV of this document is designed for technical users who will develop batch jobs or external editors that interface with Oracle RTD application objects.
Documentation Accessibility
Our goal is to make Oracle products, services, and supporting documentation accessible to all users, including users that are disabled. To that end, our
technology vendors to address technical obstacles so that our documentation can be accessible to all of our customers. For more information, visit the Oracle Accessibility Program Web site at http://www.oracle.com/accessibility/.
Accessibility of Code Examples in Documentation
Screen readers may not always correctly read the code examples in this document. The conventions for writing code require that closing braces should appear on an
otherwise empty line; however, some screen readers may not always read a line of text that consists solely of a bracket or brace.
Accessibility of Links to External Web Sites in Documentation
This documentation may contain links to Web sites of other companies or
organizations that Oracle does not own or control. Oracle neither evaluates nor makes any representations regarding the accessibility of these Web sites.
Access to Oracle Support
Oracle customers have access to electronic support through My Oracle Support. For information, visit http://www.oracle.com/support/contact.html or visit
http://www.oracle.com/accessibility/support.html if you are hearing impaired.
Related Documents
For more information, see the following documents in the Oracle Fusion Middleware 11g Release 1 (11.1.1) documentation set:
■ Oracle Fusion Middleware Release Notes for your platform
■ Oracle Fusion Middleware Administrator's Guide for Oracle Real-Time Decisions
■ Oracle Fusion Middleware Decision Center User's Guide for Oracle Real-Time Decisions
■ Oracle Fusion Middleware Installation Guide for Oracle Business Intelligence
■ Oracle Fusion Middleware Introducing Web Services
■ Oracle Fusion Middleware Security and Administrator's Guide for Web Services
Conventions
The following text conventions are used in this document:
Convention Meaning
boldface Boldface type indicates graphical user interface elements associated with an action, or terms defined in text or the glossary.
italic Italic type indicates book titles, emphasis, or placeholder variables for which you supply particular values.
Part I
Part I
Getting Started
The chapters in Part I are a tutorial that provide an introduction to using Oracle RTD. The examples in these chapters assume the reader has installed Oracle RTD on a Windows system.
Part I contains the following chapters:
■ Chapter 1, "About Oracle Real-Time Decisions"
■ Chapter 2, "Creating an Inline Service"
■ Chapter 3, "Simulating Load for Inline Services"
■ Chapter 4, "Enhancing the Call Center Inline Service"
1
1
About Oracle Real-Time Decisions
Oracle Real-Time Decisions (Oracle RTD) provides a new generation of enterprise analytics software solutions that enable companies to make better decisions in real time at key, high-value points in operational business processes.
Oracle RTD easily integrates with enterprise applications both on the front end (such as websites and CRM applications) and on the back end (such as enterprise data stores). Oracle RTD also includes other helpful load testing and debugging tools.
This chapter contains the following topics:
■ Section 1.1, "Terminology"
■ Section 1.2, "About Decision Studio"
■ Section 1.3, "About Decision Center"
■ Section 1.4, "About the Inline Service Lifecycle"
1.1 Terminology
Oracle RTD consists of five components:
■ Decision Studio
■ Real-Time Decision Server
■ Decision Center
■ Administration
■ Load Generator
Inline Service refers to the configured application that is deployed.
Inline Services are configured and deployed using Decision Studio and analyzed and updated using Decision Center. Inline Services run on Real-Time Decision Server.
An Inline Service consists of the metadata that describes how the Real-Time Decision Server should gather data and analyze characteristics of enterprise business processes on a real-time and continuous basis.
Elements are one of the following types of objects:
■ Application: The application object identifies application level settings including default model parameters, and any parameters needed for the Inline Service globally.
■ Choices: Choices represent the offers that will be presented through the Inline Service or the targets of study to be tracked by the self-learning models of Oracle RTD.
■ Rules: Rules are graphically configured rules used to target segments of population, decide whether a choice is eligible or score a particular choice.
■ Decisions: Decisions score and rank eligible choices based on the weighted scores for each associated performance goal.
■ Selection Functions: Selection Functions can be used by Decisions as a custom way to select which choice to send back through the Oracle RTD Advisors.
An Advisor is an Integration Point. For more information, see the topic Integration Points that follows in this list.
■ Entities: Entities represent the actors in the system. Entities are a logical representation of data used for Oracle RTD modeling and decisioning. The attributes of an entity can be populated via data sources, as incoming parameters from integration points, or derived in real time through custom logic.
■ Data sources: Data Sources retrieve data from tables or stored procedures.
■ Integration Points: Integration Points serve as the touchpoints with outside systems interacting with Oracle RTD. There are two classes of Integration Points:
Informants and Advisors. Informants receive data from outside systems, whereas Advisors receive data and also send recommendations back to outside systems.
■ Models: Self-learning, predictive models that can be used for optimizing decisions and providing real-time analysis for desired targets of study.
■ Statistics Collectors: Statistic Collectors are special models that track statistics about entities.
■ Categories: Categories are used to segment data for display in Decision Center.
1.2 About Decision Studio
Decision Studio is the development tool for configuring Inline Services, the services that are created to model business processes, gather statistics, and make recommendations.
Decision Studio is fully integrated with Eclipse, an open source Java IDE produced by the Eclipse Foundation. Decision Studio exists as a standard plug-in to the Eclipse environment. If you are using Eclipse, you have the advantage of using the environment for additional development and advanced features. If you are not
familiar with Eclipse, it is completely transparent to using Decision Studio. Eclipse and Decision Studio both have online help available through the Help menu.
Note: The following terms are referenced throughout the Oracle RTD documentation:
■ RTD_HOME: This is the directory into which the Oracle RTD client-side tools are installed.
■ RTD_RUNTIME_HOME: This is the application server specific directory in which the application server runs Oracle RTD.
Decision Studio allows you to work with an Inline Service from several perspectives. A perspective defines the initial set and layout of views and editors for the perspective. Each perspective provides a set of functionality aimed at accomplishing a specific type of task or works with specific types of resources. Perspectives control what appears in certain menus and toolbars.
To select or change to a different perspective (such as Inline Service, Java, Resource, and so on), click the Window menu in Decision Studio and choose Open Perspective, then choose from the list of available perspectives. The default perspective when starting Decision Studio for the first time is Inline Service. We will use this
perspective in this tutorial. In general, this will be the perspective you use to develop Inline Services.
The default Inline Service perspective contains four views and an editor area, as shown in Figure 1–1.
Figure 1–1 Inline Service Perspective in Decision Studio
This section contains the following topics:
■ Section 1.2.1, "Inline Service Explorer View"
■ Section 1.2.2, "Problems View"
■ Section 1.2.3, "Test View"
■ Section 1.2.4, "Cheat Sheets View"
■ Section 1.2.5, "Editor Area"
■ Section 1.2.6, "Arranging Views and Resizing Editors"
1.2.1 Inline Service Explorer View
1.2.2 Problems View
The Problems View shows validation (.sda files) and compilation errors (.java files) as you build and compile your Inline Service. If you double-click a validation error, Problems View opens the metadata/element-editor at the point of the error. If you double-click a compilation error, Problems View opens the generated source code (.java files) at the point of the error. You should not edit generated source code files directly; instead, fix related metadata/element problems, which will then regenerate and recompile the source code.
1.2.3 Test View
The Test View allows you to test your Inline Services directly from Studio after you deploy them to the server.
1.2.4 Cheat Sheets View
The Cheat Sheets View provides step-by-step instructions for common tasks. After installation, it is located on the right-hand side of the window.
1.2.5 Editor Area
The center area of the Inline Service Perspective is the editor area, and shows an editor that is specific to the node on the project tree you have selected. To change to a new editor, double-click the element you want to edit from the Inline Service Explorer View.
1.2.6 Arranging Views and Resizing Editors
Tabs on the editors indicate the names of resources that are currently open for editing. An asterisk (*) indicates that an editor has unsaved changes.
You can drag the views and editors of a perspective to any space on the screen. Views and editors will resize themselves to fit the area in which they are placed. Occasionally, portions of an editor (where you do your main work) or view will become covered by other views, or resized to an area that is not convenient to use. To resize the editor or view, either close other open views and the remaining will automatically resize, or maximize the editor or view by double-clicking the editor tab.
Both editors and views can be toggled between Maximize and Minimize by double-clicking the tab, or by using the right-click menu item.
To show additional views or open views that were closed, click the Window menu in Decision Studio and choose Show View, then choose from the list of available views.
1.3 About Decision Center
Decision Center is a Web-based application that allows the business analyst to monitor and optimize deployed Inline Services. From Decision Center, you can view statistics gathered from the models and fine-tune campaigns such as cross-selling, as well as adjust how decisions are made.
The Decision Center user interface displays Inline Services in two panes. The left pane shows the list of Inline Service elements, while the right pane displays detailed information related to the selected element.
Figure 1–2 Decision Center
1.4 About the Inline Service Lifecycle
Figure 1–3 Inline Service Lifecycle
The following steps outline the overall process by which Inline Services are created, deployed, and downloaded:
1. Create: Using Decision Studio, elements are configured to align with the business process into which Oracle RTD is to be integrated. Examples of elements are: Choice Groups, Performance Goals, Decisions, Informants, Advisors, Entities, and Data Sources.
Some elements allow the use of Java scriptlets in Logic and Asynchronous Logic attributes. For instance, an Informant element is shown in Figure 1–4. This element is named 'Call Begin.' In addition to the Description and the Advanced button, there are three tabs, each with a set of attributes for the Informant.
Figure 1–4 Call Begin Informant
Figure 1–5 Logic Tab of Call Begin Informant
As elements are created and saved, XML metadata is created in memory that describes the object.
2. Save: By saving the Inline Service in Decision Studio, the metadata is written to an Inline Service directory on the local file system, in XML files with the extension *.sda. The metadata that follows is an example of the content saved for the Informant 'Call Begin', in a file called CallBegin.sda.
<?xml version="1.0" encoding="UTF-8"?>
<sda:RTAPType xmlns:sda="http://www.sigmadynamics.com/schema/sda"
internalName="CallBegin" lastModifiedTime="1133228616435" name="Call Begin" schemaVersion="20050818" forcesSessionClose="false" order="1.0">
<sda:description>The Call Begin Informant starts the session after the customer's call enters the IVR system. Logic could be added here to pre-populate certain values (example: customer profile) that may be used later on.</sda:description>
<sda:system ref="Ivr"/>
<sda:sessionKey path="customer.customerId" relativeTo="session"/> <sda:requestMapper internalName="RequestMapper">
<sda:entity type="ApplicationSession" var="session"/> <sda:dataSource type="RequestDataSource" var="result">
<sda:arg>
<sda:path localVarName="session" path="request" relativeTo="local"/> </sda:arg>
</sda:dataSource> </sda:requestMapper>
<sda:requestData internalName="RequestDataSource"> <sda:param internalName="message" dataType="object" objectType="com.sigmadynamics.client.wp.SDRequest"/>
<sda:request> <sda:resultSet/> </sda:request> </sda:requestData> <sda:body>
<sda:java order="0">/* Trigger data retrieval */
session().getCustomer().fill(); </sda:java>
</sda:body>
<sda:postOutputBody/> </sda:RTAPType>
The attributes that were assigned to the element in Decision Studio, such as
As Inline Service elements are added, configured, and saved, Decision Studio automatically generates the necessary Java code and compiles them into Java class files. Two classes of Java code are generated. The first set is the base Java files used by the Inline Service; these files are named the element id preceded by GEN. For example, the CallBegin element will produce a file called GENCallBegin.java.
The second set of Java files is created to allow overriding of the generated code. These files are named the same as the element ID. For instance, the CallBegin element will produce a file named CallBegin.java. Note that by default, the Java class CallBegin simply extends the class GENCallBegin.
When the Inline Service is compiled, the generated code is used unless we specifically instruct that the override code be used. To do this, update and move the override Java file (for example, CallBegin.java) from the generated source files folder:
Inline_Service_project_root_folder\gensrc\com\sigmadynamics\sdo
to the override source files folder:
Inline_Service_project_root_folder\src\com\sigmadynamics\sdo
Decision Studio will now compile using the override Java file instead of the generated Java file.
3. Deploy: The Inline Service is deployed to Real-Time Decision Server using
Decision Studio. The Management Service on the server receives the metadata and compiled Inline Service files, stores the Inline Service in the database, and loads the Inline Service into memory. The Inline Service can now be utilized to process requests, view reports, and so on.
4. View and Update: Reports and learnings are viewed through the browser-based Decision Center interface. Selected elements and parameters of your Inline Service can be updated from Decision Center. Updated Inline Services are not available for run-time use until they are redeployed.
Tip: The XML for any Inline Service object can be viewed with Decision Studio's built-in Text Editor. Right-click an Inline Service object in the Inline Service Explorer View, then select Text Editor from the Open With menu. To switch back to normal editor format, select the option Inline Service Editor.
5. Redeploy: If updates are made to the Inline Service in Decision Center, the changes can be made available for use by redeploying the Inline Service in Decision Center. The Management Service will regenerate all necessary metadata and Java files, recompile the Inline Service, store the Inline Service in the database, and load it in memory.
2
2
Creating an Inline Service
This section is designed to demonstrate how to configure an Inline Service that monitors a specific process and its characteristics on a real-time and continuous basis. This type of Inline Service guides business users in the analysis of various business events and how drivers of those events change over time.
The Inline Service for this tutorial is based around a credit card company's call center. The Inline Service will collect data about the customer and the call center operational system and will analyze information about the call and its resolution.
The goal of this Inline Service is to analyze the patterns about calls, reasons for calling, and customers. In later sections, we will extend the capability of this Inline Service to provide recommendations to the CRM system on cross selling offers and then to add feedback to the service on the success of its recommendations.
This chapter contains the following topics:
■ Section 2.1, "About the Inline Service Tutorial"
■ Section 2.2, "About Deployment and Decision Center Security"
■ Section 2.3, "About Naming and Descriptions"
■ Section 2.4, "Accessing Data"
■ Section 2.5, "About the Session Entity"
■ Section 2.6, "Adding an Informant"
■ Section 2.7, "Testing the Inline Service"
■ Section 2.8, "Adding Functionality"
■ Section 2.9, "Analyze Call Reasons"
2.1 About the Inline Service Tutorial
An Inline Service is created using the Decision Studio development tool. In general, an Inline Service is created in the following fashion:
■ A project is started in Decision Studio.
■ Elements are added to that project and then configured to support the desired business process.
■ Logic is added in the form of Java scriptlets to certain elements that perform operations.
■ Reports generated from the use of the Inline Service are viewed through Decision Center.
In this tutorial the following elements are added and configured:
1. Application: The Application element establishes any application level settings that are needed, as well as defines security for the Inline Service. An Application element is automatically created for every Inline Service.
2. Performance Goals: Performance Goals represent organizational goals composed of metrics that are optimized using scoring. For instance, revenue and call
duration are performance metrics. An organizational goal would be to maximize revenue while minimizing call duration.
3. Data source: The data source element acts as a provider of data from an outside data source. The structure and format of data from data sources can vary. For example:
■ Rows and columns of a RDBMS table
■ Output values and result row sets from a stored procedure
A data source is a provider of data that you can map to Entity elements to supply the data for those elements.
For example, in this tutorial we add a data source that connects to a table in the database. This table contains customer data.
4. Entity: The Entity is a logical representation of data that can be built from one or more data sources. Entities serve the following purposes:
■ To organize the data into objects for organizational, analytical, and modeling purposes.
■ To allow relatively easy and intuitive access from Java code of data from various sources.
■ To hide the details by which the data is obtained so that those details can change without requiring the logic to change.
■ To hide the mechanisms by which the data is obtained to save the user of this data from needing to deal with the APIs that are used to obtain the data.
■ To support sharing of objects when objects need to be shared. For example, an object representing a service agent could be used in multiple sessions.
Attributes of an entity can be key values. The entity key is used to identify an instance of an entity.
For example, in this tutorial we create an entity to represent a customer. The attributes of that entity are mapped to the data source for values. The customer ID is chosen as the key for the customer entity.
Later we will also create an entity that represents a Call.
5. Session Entity: A session in Oracle RTD represents an interaction with the front end application that is unique to a single instance. For example, when a customer calls into a call center, the single customer's interaction with that agent could be a session. Likewise, a web visit by customer and that customers navigating through several pages on the visit would also be an example of a session.
Entities that have been defined can be associated with the session by being made attributes of the Session Entity. Only Entities that are Session attributes can have their keys marked as session keys.
For example, in this tutorial we add the Customer entity to the Session entity as an attribute, and then we choose the Customer key value, Customer ID, as a Session key.
6. Informant: An Informant is an Integration Point configured in the Inline Service. Informants allow a front end client to provide data to Oracle RTD about the business interactions as they occur, and can trigger business logic on the Decision Server. Informants represent one-way feeds that enable Oracle RTD to "watch" a process; they do not interact with it.
In this tutorial, we first create a testing Informant, and then create an Informant that gathers completion of service data from a CRM system.
Later in the tutorial, we create an Informant that provides feedback to the Inline Service on the success or failure of the predictions of the model.
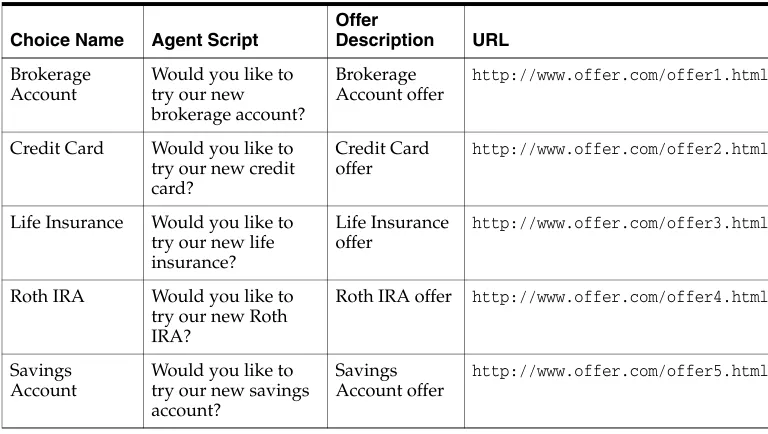
7. Choice Groups: Choice Groups are used to create a logical hierarchy for choices in the Inline Service. They provide a way to organize targets of study, such as offers, used for Oracle RTD modeling and decisions.
For example, in this tutorial we first create Choice Group that organizes the reason for calls. When we extend the Inline Service to include an Advisor, a Choice Group is used to organize cross sell offers that are recommended to the service center agent.
8. Models: Built-in analytical models allow self-learning and automatic analysis. Models can be used to simply analyze data, or to generate likelihood scores used in making recommendations to the business process.
In this tutorial, we create a model that analyzes the reasons for calls, and then later a model which helps to determine the most likely cross sell offer to be accepted by the customer.
9. Decision: A Decision is used by an Advisor to determine eligible Choices, score those Choices dynamically, weight the scoring according to segments of the population and its designated performance goals, and present the ranked list of choices back to the Advisor.
10. Advisors: An Advisor is an integration point that returns information back to the business process that calls it. Advisors call Decisions in the Inline Service that returns one or many ranked choices.
In this tutorial, we will create a Choice Group of offers that can be made to callers to the credit card service center. The Advisor calls on a Decision to determine the best offer for the caller based on information about the call and caller. The Advisor passes that cross sell recommendation to the front end application, so that the call center agent can make the offer.
2.2 About Deployment and Decision Center Security
To be able to deploy your Inline Service to Real-Time Decision Server, and to see the results from the Inline Service in Decision Center, you must have the necessary roles, which are provided through a user name and password.
If necessary, contact the administrator responsible for installing and setting up your Oracle RTD system. For more information, see the chapter "Security for Oracle Real-Time Decisions" in Oracle Fusion Middleware Administrator's Guide for Oracle Real-Time Decisions.
2.3 About Naming and Descriptions
Element names and descriptions are used extensively in Decision Center, the user interface for business users. Therefore, it is very important that as you create elements you take the time to name them intuitively and to write good descriptions for all elements.
Before you begin, ensure that Real-Time Decision Server is started. For more information, see the Section "Starting and Stopping Oracle Real-Time Decisions" in
Oracle Fusion Middleware Administrator's Guide for Oracle Real-Time Decisions.
To configure the Application element:
1. Open Decision Studio by running RTD_HOME\eclipse\eclipse.exe. After Decision Studio opens, choose File > New > Inline Service Project to begin a new project.
2. Enter the name for the project, Tutorial, and choose the Basic template. Click
Finish. If you are asked about upgrading the Inline Service, select Yes. The Inline Service project is created in the Inline Service Explorer. By default, the files for the project/Inline Service are stored in the Decision Studio workspace, in a folder with the same name as the project (for example, C:\Documents and
Settings\Windows_user\Oracle RTD Studio\Tutorial).
3. In Decision Studio, expand the Tutorial > Service Metadata folder. Double-click the Application element to bring up the element editor. In the element editor, type a description for the Tutorial Inline Service.
2.4 Accessing Data
In order to access organizational data, we will configure two elements:
■ Data source: The data source is the element that represents the structure of the data in the database.
■ Entity: The entity is a logical representation of data that can be populated by one or more data sources or contextual data retrieved by an Informant.
Figure 2–1 Data Source/Entity Mapping
This section contains the following topics:
■ Section 2.4.1, "Adding a Data Source"
■ Section 2.4.2, "Adding an Entity"
2.4.1 Adding a Data Source
Adding a data source involves creating the new data source, then importing the outputs for a data source.
This section contains the following topics:
■ Section 2.4.1.1, "Creating the New Data Source"
■ Section 2.4.1.2, "Importing the Outputs for a Data Source"
2.4.1.1 Creating the New Data Source
To create a data source:
1. In Decision Studio, select Data Sources in the Inline Service Explorer and right-click it. Select New SQL Data Source. For the Display Label, enter Customer Data Source, and click OK. The data source Editor appears.
2. Under Description, add the following description for the data source: Customer data from a database table.
Good descriptions are very important. These descriptions are used in Decision Center and are essential for business users to identify components of reports and analysis.
2.4.1.2 Importing the Outputs for a Data Source
The outputs of a data source are the columns that are retrieved from the database. Outputs do not have to include all the columns in the table.
To import the outputs for a data source:
1. Click Import. Import Database Table appears. You server should appear next to
Server. Click Next to connect to the server. Select Table or View appears.
2. For JDBC Data Source, select SDDS. Then, select CrossSellCustomers under
Tables and Views. This table is created when you run the InitAppDB script for the CrossSell Inline Service, as described in "Populating the CrossSell Example
Data" in Oracle Fusion Middleware Administrator's Guide for Oracle Real-Time Decisions.
3. Click Finish.
4. All of the columns of the table are imported into the Output columns table.
5. Set the input column for the data source. The input is the column on which you will be matching to retrieve the data record. In this case, we can select the column name Id from the Output columns table and click the right arrow to move Id to the Input columns table. The data type is Integer.
6. Set the output columns for the data source. In the Output columns table, select and use Remove to remove all except the columns listed in Table 2–1.
7. Save your work by choosing File > Save All. If there are errors in your work, you will receive notification in the Problems View.
2.4.2 Adding an Entity
Now that we have the data source defined, we can proceed to define a corresponding Entity. Entities are the objects that are used by the other elements in the configuration. Entities provide a level of abstraction from sources of data such as Data Sources or Informants. A single entity can have data coming from many data sources, or even computed values. For now, we will create a simple entity that maps directly to the structure of the data source.
This section contains the following topics:
■ Section 2.4.2.1, "Creating the New Entity"
■ Section 2.4.2.2, "About Additional Entity Properties"
■ Section 2.4.2.3, "Adding an Entity Key"
2.4.2.1 Creating the New Entity
To create the new entity:
1. In the Inline Service Explorer, right-click the Entities folder and select New Entity. For Display Label, enter the name Customer and click OK. The Entity Editor appears. Enter Customer entity for Description.
Table 2–1 Output Columns to Retain in CrossSellCustomers Table
Name Type
Age Integer
HasCreditProtection String
Language String
LastStatementBalance Double
MaritalStatus String
NumberOfChildren Integer
Occupation String
Good descriptions for entity attributes are very important. Make sure you add a good description for every entity.
2. Click Import to import the attributes names and data types from Customer Data Source. Leave the option Build data mappings for the selected data source
selected.
3. In the column Default Value of the Definition tab, click to get an insertion point and add a default value for each of the attributes listed in Table 2–2. Values for String data types will be automatically surrounded by double quotes.
2.4.2.2 About Additional Entity Properties
You can modify additional settings about the attributes of an entity. For example, in more complex Inline Services, you may want to define categories of attributes. To do this, create a category element and assign it using the Category on the attribute's
Properties. To view the properties of an attribute, select the attribute in the Definition
tab, then right-click and choose Properties from the menu.
You may also want to indicate that an attribute should not be used for learning. This is applicable when you want to use the attribute for custom logic in the Inline Service, but you do not want the attribute to be used directly as a model input. As a more specific example, if you have the phone number of the customer, it does not make sense to have analytics on the phone number. In all of these cases, you would deselect
Use for Analysis.
The Show in Decision Center option is used to control whether the attribute is visible in Decision Center. This is useful when an attribute has only technical meaning and no direct or interesting business meaning.
Note: Object IDs are automatically made to conform to Java naming conventions: variables are mixed case with a lowercase first letter; classes are mixed case with an uppercase first letter. If you have spaces in your label name, they will be removed when forming the object ID.
Use the Toggle icon on the Inline Explorer task bar to toggle between the label of the object and its object ID:
Table 2–2 Attributes for Default Value Column of Definition Tab
Name Type Default Value
Age Integer 35
HasCreditProtection String No
Language String English
LastStatementBalance Double 1000
MaritalStatus String Single
NumberOfChildren Integer 0
2.4.2.3 Adding an Entity Key
In order to fully map the entity object to the data source, we need an entity attribute to map to the key value of the data source and complete the mapping. To do this:
1. On the Definition tab of the Customer Entity, click Add Key to add a key attribute. Add Key appears. Enter customerId(exactly as shown - this entry is case-sensitive) for Display Label. Add a description for the key value, change the data type to Integer, and click OK.
2. Save your work using File > Save All. You may see several errors in the Problems View - this is expected because the mapping definition of the Customer entity attributes to its data source is incomplete. Proceed to the next section in order to complete the mapping definition.
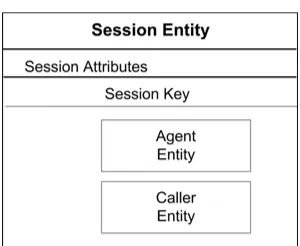
2.5 About the Session Entity
The Session is the root of run time data for a unit of a process. Data is kept in memory during the duration of the session. In order to track data about an Entity, we associate it with the Session entity that is part of the Oracle RTD framework. To associate the Entity to the session, make it an attribute of the Session entity. A key is chosen for the session. When a unique instance of that key is detected, the session begins.
As an example, consider a call center process being tracked by Oracle RTD. The Session contains entities that represent the Caller and the Agent. For the duration of the session (in other words, the call in this case) the data defined by those entities and the interaction between them is kept in memory and available for analysis and decision making.
This section contains the following topics:
■ Section 2.5.1, "Adding an Attribute to the Session Entity"
■ Section 2.5.2, "Creating a Session Key"
■ Section 2.5.3, "Mapping the Entity to the Data Source"
2.5.1 Adding an Attribute to the Session Entity
To add an attribute to the Session entity:
1. In the Inline Service Explorer, double-click Session under Entities.
2. From the Definition tab, click Add Attribute. For Display Label, enter an
attribute name, customer, then add a Description. Note that the initial data type is type String. We'll change this in the next step.
3. For Data type, select Other. A Type selection dialog appears. Under Entity Types, choose Customer. Click OK.
2.5.2 Creating a Session Key
To create a session key:
1. In Session Keys from Dependent Entities, click Select.
2. Expand the tree to see the keys of all entities associated with the Session. Expand
2.5.3 Mapping the Entity to the Data Source
We associate the Customer entity with the Customer Data Source through mappings defined in the Entity object editor. Our mapping of the Customer entity's attributes to the Customer Data Source output columns was automatically done when the attributes were imported from the Customer Data Source (see Section 2.4.2, "Adding an Entity" for more information). We need to now map the input column value for the Customer Data Source in the Customer entity.
To map the input column value for the Customer Data Source:
1. Open the Customer Entity and select the Mapping tab. Entity editors are identified by an E icon:
2. Because we used Import, the Customer Data Source attributes are already mapped to the Customer entity attributes. For attribute Age, the Source value should look like Customer Data Source / Age (or Customer Data Source.Age if the
Show Object ID icon is selected). If you had added additional attributes beyond the import, they are mapped by clicking the ellipsis under Source and locating the data source attribute.
3. We need to identify the input column values for each Data Source (in this case, Customer Data Source) in the Attributes table. The input columns for the data source are the identifier (the WHERE clause in a SQL select statement) by which records are retrieved. In the Customer Data Source, we had only one input column, Id, thus in the Mapping tab, we will see only one entry in the Data Source Input Values table, located below the Attributes table. In the Input Value
cell of this entry, click the ellipsis to open the Edit Value dialog.
4. For this Inline Service, we will select the Customer entity's key. Choose Attribute or Variable. Expand Customer, select customerId, then click OK.
Figure 2–2 Edit Value Dialog for Id Column
5. Save the Inline Service by choosing File > Save All.
2.6 Adding an Informant
Informants are a type of Integration Point that can send a message to Real-Time Decision Server containing information about a specific unit in a process.
To test the Inline Service at this stage, we will create a testing Informant that prints out the age of the customer. To view the actual printed statement, we will need to deploy the Inline Service to Real-Time Decision Server and then call the Informant.
If we get a number back, we will know that the entity, mappings, and data source have all been configured correctly.
This section contains the following topics:
■ Section 2.6.1, "Creating an Informant"
■ Section 2.6.2, "Adding Testing Logic to the Informant"
2.6.1 Creating an Informant
To create an informant:
1. In the Inline Service Explorer, go to Integration Points and then select Informants. Right-click and select New Informant from the menu. Enter an object name, Testing, then click OK.
2. In the Testing Editor, add a description under Description.
3. Click Advanced next to Description. Deselect Show in Decision Center. This will make this Informant invisible to the business users of Decision Center. Click OK.
2.6.2 Adding Testing Logic to the Informant
To add testing logic to the Informant:
1. On the Testing Informant Editor, select the Request tab. Informants are identified by an i icon:
2. To add a session key, click Select under Session Keys. Choose customerId from
Customer. Click OK.
3. Choose the Logic tab. Under Logic, add the following scriptlet:
logInfo("Customer age = " + session().getCustomer().getAge() );
The logInfo call allows us to output information to the Log subtab of the Test view and also the log file of the managed server where Oracle RTD is installed (which can be examined in Enterprise Manager). For more information, see "Searching and Viewing Server-Side Log Files" in Oracle Fusion Middleware Administrator's Guide for Oracle Real-Time Decisions. We will use the session to access the Customer object and get the contents of the age attribute.
4. Now we should be ready to deploy. Save the configuration by choosing File > Save All.
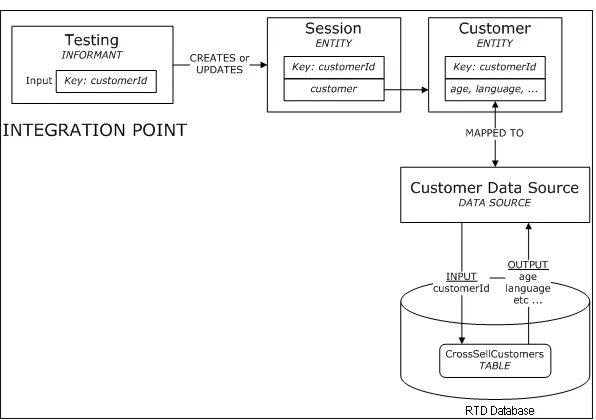
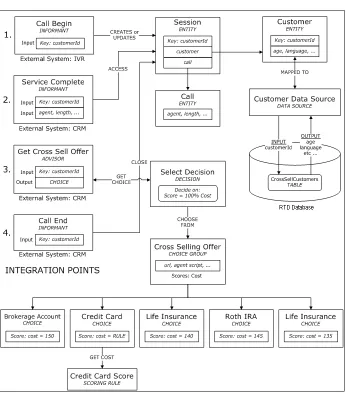
Figure 2–3 shows how the Testing Informant will access customer data when the Informant is called and a session created.
Figure 2–3 Tutorial Inline Service Objects
2.7 Testing the Inline Service
To test the Inline Service, we deploy it, call the Informant with test data, and use the Test View to observe the results. Because Informants do not return value to their callers, the results will be seen in the Log tab of Test View.
To deploy the Inline Service for testing:
1. Click the Deploy icon on the taskbar to deploy the Inline Service:
You can also use the menu item Project > Deploy to deploy your Inline Service.
2. Click Select to select the server where you want to deploy. Deploy to the location of your Real-Time Decision Server. This defaults to localhost, as does the default configuration of the installation. Enter the user name and password provided for you, as described in Section 2.2, "About Deployment and Decision Center Security." Use the drop-down list to select a deployment state,
Development. Select Terminate Active Sessions (used for testing). Click Deploy.
Deployment takes anywhere from about 10 seconds to a few minutes. A message 'Tutorial deployed successfully' will appear below the Inline Service Explorer when deployment is complete.
3. In the Test View at the bottom of the screen, select Testing as the Integration Point to test. Enter a value for customerId by typing 7 in the field. Click the Send icon:
4. Select the Log tab within Test View to see the results. Every printout coming from a logInfo command will be printed out with a timestamp.
Your results should look similar to the following:
Jun 18, 2010 3:59:09 PM Tutorial INFO: Customer age = 38
2.8 Adding Functionality
We will now create an entity to hold information specific to the call. This is contextual information about the nature of the interaction with the customer. The data in this entity will come from Informants or be computed, but it will not be retrieved from any database.
First we create an entity to represent a call, then an Informant that gathers data from calls.
Figure 2–4 Session Entity
Using this entity, we will explore the factors related to the reasons for calls, like the call lengths for each call reason, the most likely customer characteristics for these calls, and so on. In order to gather and analyze the call reasons gathered by the Informant, a self-learning analytical model will be added and reports will be displayed in Decision Center.
This section contains the following topics:
■ Section 2.8.1, "Creating a Call Entity"
■ Section 2.8.2, "Creating the Call Begin Informant"
Note: The RTD Decision Server by default protects against
Integration Point requests that originate from hosts other than the host that the RTD Decision Server is deployed to, as, for example, when you run Decision Studio on one host, and the RTD Decision Server is deployed on another host. This may result in an "Untrusted host" error when you execute the Informant.
■ Section 2.8.3, "Creating the Service Complete Informant"
■ Section 2.8.4, "Creating the Call End Informant"
■ Section 2.8.5, "Testing the Informants"
2.8.1 Creating a Call Entity
To create a call entity:
1. In the Inline Service Explorer, right-click the Entities folder and select New Entity. Enter the object name Call and click OK.
2. For each attribute listed in Table 2–3, do the following:
■ On the Definition tab of the Entity Editor, click Add Attribute. Add Attribute appears. Enter the values from the table and click OK.
■ Click in Type. Choose the proper data type for each attribute using the drop-down list.
3. In the Inline Service Explorer, double-click Session under Entities.
4. From the Definition tab, click Add Attribute. Enter an object name, call. Note that the default type is String. We will change the default type in the next step.
5. For Data type, select Other. In the Type dialog box, expand Entity types and select Call as the type, then click OK. Add a Description for 'call'. Click OK.
6. Save the changes to the Inline Service by choosing File > Save All.
2.8.2 Creating the Call Begin Informant
We will now create three Informants that will be called by the CRM application: Call Begin, Service Complete, and Call End. The first, Call Begin, will start the session. In this Informant, we could optionally preload and cache certain session attribute values so they can be accessed more quickly later. For example, we may want to preload the customer's profile if this information will be used later on and the loading of this information is expected to be slow due to database calls or other constraints.
Note that it is not necessary to preload session attribute values as they are
automatically loaded whenever they are needed. For example, when we want to print the customer's Age, as the Testing Informant did in the previous section, Real-Time Decision Server will automatically populate the entire session's Customer entity attribute and return the Age value. In this Tutorial Inline Service, our Call Begin Informant will simply start the session, but will not pre-populate any session attribute values.
To create the Call Begin Informant:
1. In the Inline Service Explorer, under Integration Points, right-click the External Systems folder and select New External System. Object Name appears. Name the system IVR and click OK. Give the element a description. Save this object.
Table 2–3 Attributes for Call Entity
Name Type
agent String
length Integer
2. In the Inline Service Explorer, under Integration Points, right-click the Informants
folder and select New Informant. Object Name appears. Name the Informant Call Begin and click OK.
3. Using the Informant Editor, enter a description for Call Begin.
4. To add a session key to the Call Begin Informant, click Select next to Session Keys
in the Request tab. Choose customerId. Click OK.
5. While still in the Request tab, choose IVR from the External System drop-down list and enter 1 in the Order box. Do not select Force session close. The External System and Order determine the display layout and order in Decision Center's Integration Map (see Section 4.8, "Viewing the Integration Map" for more
information). When we have finished defining the three Informants and deployed the Inline Service, the Integration Map in Decision Center will look like the one shown in Figure 2–5.
Figure 2–5 Decision Center Integration Map
***********************************************************************************************
6. In the Logic tab, add the following code:
/*
Prepopulate customer data during start of call even though the information may not be used until much later. This is not explicitly necessary since the server will automatically retrieve the information whenever logic in the Inline Service needs it.
*/
//session().getCustomer().fill();
int CustomerID = session().getCustomer().getCustomerId();
logInfo("Integration Point - CallBegin: Start Session for customerID = " + CustomerID);
7. Save the changes to the Inline Service by choosing File > Save All.
2.8.3 Creating the Service Complete Informant
customer's need, or in other words, when service is complete. The data that is gathered by the Informant will populate the Call entity.
To create the Service Complete Informant:
1. In the Inline Service Explorer, under Integration Points, right-click the External Systems folder and select New External System. Object Name appears. Name the system CRM and click OK. Give the element a description. Save this object.
2. In the Inline Service Explorer, under Integration Points, right-click the Informants
folder and select New Informant. Object Name appears. Name the Informant Service Complete and click OK.
3. Using the Informant Editor, enter a description for Service Complete.
4. To add a session key to the Service Complete Informant, click Select adjacent to
Session Keys in the Request tab. Select customerId and click OK.
5. While still in the Request tab, choose CRM from the External System drop-down list and enter 2 in the Order box. Do not select Force session close.
6. To add the additional pieces of data to the Informant, do the following for each incoming parameter listed in Table 2–4:
■ On the Request tab of the Informant Editor, click Add. Enter the name and then select the data type using the drop-down list. Click OK.
■ Under Session Attribute, click the ellipsis to use Assignment. Expand the Session folder, then expand call and then the select the call attribute that matches the incoming item.
7. In the Logic tab, add the following code:
logInfo("Integration Point - Service Complete");
logInfo(" Reason Code: " + session().getCall().getReasonCode()); logInfo(" Agent: " + session().getCall().getAgent());
logInfo(" Call Length: " + session().getCall().getLength());
8. Save the changes to the Inline Service by choosing File > Save All.
2.8.4 Creating the Call End Informant
The third Informant will close the session and could be the last Informant called by the CRM application. In this Tutorial Inline Service, we will only use this Informant to close the session, but in a real system, you might perform additional processing or trigger learning for a model.
To create the Call End Informant:
Table 2–4 Data Types and Session Attributes for Incoming Parameters
Incoming Parameter Name Type Session Attribute
agent String call / agent (or call.agent if the Show Object ID icon is selected)
length Integer call / length (or call.length if the Show Object ID icon is selected
1. In the Inline Service Explorer, under Integration Points, right-click the Informants
folder and select New Informant. Object Name appears. Name the Informant Call End and click OK.
2. Using the Informant Editor, enter a description for Call End.
3. To add a session key to the Call End Informant, click Select next to Session Keys
in the Request tab. Select customerId and click OK.
4. While still in the Request tab, choose CRM from the External System drop-down list and enter 5 in the Order box. We set the Order to 5 because we will add two more integration points (an Advisor and another Informant) later in this tutorial.
5. Make sure the option Force session close is selected. Choosing this option will explicitly close the session once the Informant has been called and its logic processed. Note that if we do not explicitly close a session, the session will
automatically close after some period of time - the default is 30 minutes and can be changed using the System MBean Browser for Oracle RTD.
6. In the Logic tab, add the following code:
logInfo("Integration Point - CallEnd"); logInfo("***************************");
7. Save the changes to the Inline Service by choosing File > Save All.
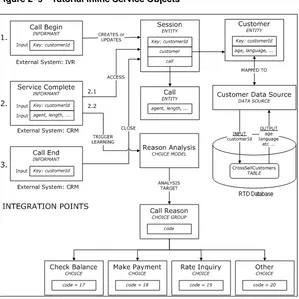
Figure 2–6 shows how the three Informants access and update the same session.
Figure 2–6 Tutorial Inline Service Objects: Integration Points
2.8.5 Testing the Informants
We will now test a simple scenario where three Informants you just created are called, corresponding to 1) start of a call, 2) service completion, and 3) end of the call. We will use the Test View to call the Informants and view the log messages we had placed in the logic portions of the Informants.
To test the Informants: