Add Audio and Video to Your
Site: The Mini Missing Manual
by Matthew MacDonald
Copyright © 2010 O’Reilly Media, Inc. All rights reserved. Published by O’Reilly Media, Inc., 1005 Gravenstein Highway North, Sebastopol, CA 95472.O’Reilly Media books may be purchased for educational, business, or sales promotional use. Online editions are also available for most titles: safari.oreilly.com. For more information, contact our corporate/institutional sales department: 800-998-9938 or [email protected].
January 2010: First Edition.
The Missing Manual is a registered trademark of O’Reilly Media, Inc. The Missing Manual logo, and “The book that should have been in the box” are trademarks of O’Reilly Media, Inc. Many of the designations used by manufacturers and sellers to distinguish their products are claimed as trademarks. Where those designations appear in this book, and O’Reilly Media is aware of a trademark claim, the designations are capitalized.
While every precaution has been taken in the preparation of this book, the publisher assumes no responsibility for errors or omissions, or for damages resulting from the use of the information contained in it.
ISBN: 9781449382506
Introduction
Nothing spices up a website like a cool sound effect (think ker-thunk as a visitor presses a button) or an embedded video. In this Mini Missing Manual, you’ll learn how to add several kinds of
media files to your site: background music, a MIDI player, sound
You’ll also find out where you can download free multimedia files to get you started, and learn how to prepare homegrown videos for quick, seamless playback. And if you don’t have the storagespace (or the desire) to host your own movies, you can embed them on your site but host them on YouTube.
Add Audio and Video to Your Site
In the early days of the Internet, websites were about as jazzy as an IRS form. You’d see pages filled with an assortment of plain text, links, and more plain text. Over time, the Web matured, and web pages started to change as designers embraced the joys of color, pictures, and tacky clip-art. But when that excitement started to wear off, it was time for a new trick—multimedia.
Multimediais a catchall term for a variety of technologies and file types, all of which have dramatically different PC requirements and pose different web-design challenges. Multimedia includes everything from the irritating jingle that plays in the background of your best friend’s homepage to the wildly popular movie clip of a cat playing the piano. (Depressing fact: with over 10 million views, it’s unlikely you’ll ever create web page that’s half as popular.)
Warning: Before you go any further, take a moment to consider the worst examples of multimedia abuse. These include flashing banner ads, irritating background music, time-wasting intro pages, and bandwidth-sucking commercials. Before you jump on the multimedia bandwagon, think about what you want to do. Are you planning to showcase your musical compositions or provide downloadable recordings of Junior’s first moments? If so, multimedia probably makes sense. But if you’re just looking for a way to dazzle visitors with an animated logo, think twice. It’s probably not worth the considerable effort to design something that will only aggravate most of your readers.
Understanding Multimedia
There comes a point when every new web designer wants more than mere text and pictures. Even spruced-up fonts and elegant page layouts don’t satisfy the design envy many newcomers feel when they spot a site loaded with sound and motion. That’s understandable: You, too, want to trick out your pages with audio and video. But before you can jazz up your site, you need to understand a few basics.
One of the key choices you make when you outfit your pages with multimedia is whether to link to or embed the files you’re adding.
Linking to multimedia content is the simplest but least glamorous approach. It lets you create a link that points toan audio or video file you’ve stored along with all your other XHTML pages and files. There’s really nothing to creating linked multimedia. You use the lowly anchor element andhrefattribute; here’s an example:
Would you like to hear <a
href="IndustrialNoiseBand.mp3">Industrial Noise</a>?
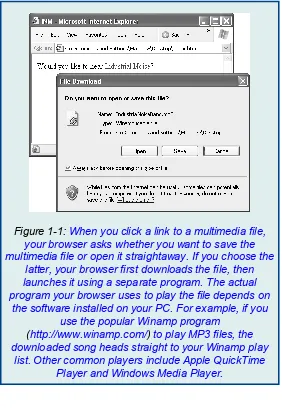
Figure 1-1 shows what happens when you click one of these
babies.
Figure 1-1:When you click a link to a multimedia file, your browser asks whether you want to save the multimedia file or open it straightaway. If you choose the
latter, your browser first downloads the file, then launches it using a separate program. The actual program your browser uses to play the file depends on
the software installed on your PC. For example, if you use the popular Winamp program
(http://www.winamp.com/)to play MP3 files, the downloaded song heads straight to your Winamp play
list. Other common players include Apple QuickTime Player and Windows Media Player.
result, you can create rich combinations of text, sound, and video.
But embedding multimedia can be a challenge. Multimedia files come in many different formats, as you’ll see in the next section. Some browsers support some of these formats, but few, if any, support all of them. Other browsers have no native multimedia compatibility at all. While visitors can add multimedia support with browser plug-ins (small programs that extend a browser’s capabilities), you have no way of knowing which plug-in your visitors have. The bottom line? There’s no guarantee that your visitors can see any particular type of multimedia content you embed on a page.
The Web offers a couple of solutions to embedded multimedia, neither of them ideal. One exists in the form of the slightly disreputable <embed> element, which you’ll learn to use in “Background Music”, below.
Note: The distinction between linking and
However, embedding audio and video takes you into less-well-charted waters.
But there’s one other option for managing multimedia. That solution is hosted multimedia—multimedia files stored on someone else’s server but displayed (or linked to) on your web page. The best-known example of hosted multimedia is YouTube, a ridiculously popular site that plays back more than 100 million video clips every day.
Types of Multimedia Files
Your decision to link or embed files depends, at least in part, on the type of multimedia content you want to showcase. Because XHTML has no multimedia standard of its own, other companies have innovated to fill the gap. Today, there’s a slightly bewildering field of choices.
Here are the types of multimedia files you can add to your pages:
▪ Synthesized music (MIDI). MIDI files store notes that your PC’s sound card generates on playback, rather than playing back a recording of a musical instrument. As a result, MIDI files are small but of questionable quality. Although the actual audio quality depends on your visitor’s sound card, the results most commonly resemble a cheesy Casio keyboard. But because MIDI files are lightweight, and since almost all browsers support them, they’re commonly used for web page background music. (MIDI stands for Musical Instrument Digital Interface.) ▪ Digital audio (WAV and MP3). These file
▪ Digital video (MPEG, AVI, MOV, and WMV).These file types are multimedia’s heavy hitters. They let you play back video that ranges in quality from thumbnail-sized windows with jerky playback to DVD-quality movies. Digital video files are a challenge for any web page creator because they’re ridiculously large. To have even a chance of making digital video perform acceptably, you need to compress, shrink, and reduce your clip’s size and quality using video editing software.
▪ Animated GIFs. Animated GIFs consist of a series of small, still images displayed one after the other in rapid succession, like a flipbook. If you see a website with dancing cartoon characters, spinning text, or a pulsing globe (don’t ask), you’re probably looking at an animated GIF. Most web-heads dismiss animated GIFs as not being “real” multimedia because they’re so simple. But they’re small, pretty easy to create, and widely supported. ▪ Flash. Flash is a versatile playback standard
so Flash experts can build lightweight but slick menus and embedded games that really enliven sites.
Despite these impressive pluses, Flash has three drawbacks: First, to create Flash content you need specialized software from Adobe, which runs into the hundreds of dollars. Second, even if you shell out the Flash cash, creating professional animations requires the skill of a talented Flash artiste. Finally, visitors won’t be able to see Flash movies unless they have a Flash plug-in installed. (That said, good estimates suggest that over 90 percent of Web-connected computers have the Flash plug-in.)
Figure 1-2:The news and current affairs site Salon (http://www.salon.com/)makes nonsubscribers sit through a short commercial before letting them read
certain articles. Though the commercial varies, it’s always a Flash animation—a fact you can confirm by
right-clicking it any time (Control-clicking on a Mac). Instead of seeing options that let you download a file (as
you would with a picture), you see a command for changing playback settings.
It’s difficult to digest all this information at once. If you’re still mulling over your choices, take a look at the scenarios in Table 1-1 to help you sort out the roles different multimedia types play.
If You Want To: Then Use: favorite pop tune in the background
MIDI files Embedded
Play a short loop of digital audio continuously in the background
Flash. (You can use the MP3 format instead, but not all browsers support it, and the looping is less precise.)
MP3 files (record your music using WAV files, then covert them to MP3 format to save space).
Linked
Let visitors see your favorite home movie
MPEG, AVI, WMV, or MOV files (but make sure you use video-editing star, or a dancing bean
Background Music
Most people like to browse the Web in peaceful silence. That means no trance-hypno-ambient background tracks, no strange disco beats, and no sudden cymbal crashes. This aversion to noise may be due to the fact that something like 98 percent of all Web browsing takes place on company time.
But if you like to startle and annoy people, or if you’re absolutely convinced that your Web audience really does want some funky beats, keep reading to bring on the background music.
The <embed> Element
Although the XHTML standard doesn’t support background music, almost all browsers support the <embed> element, first pioneered by Netscape in the early days of the Web. You can put the <embed> element anywhere on your page. Here’s a basic page that uses it to play background music:
<!DOCTYPE html PUBLIC “-//W3C//DTD XHTML
<body>
<h1>Automatic, Unsolicited Music</h1>
<p>The music now blaring from your speakers is
Scarlatti’s first sonata (K. 500).
I hope you didn’t tell your colleagues you were working!</p>
<embed src="soundfile.mid" />
</body>
</html>
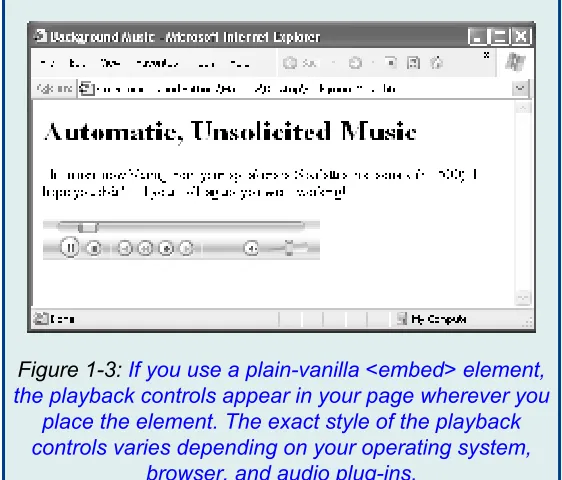
Figure 1-3:If you use a plain-vanilla <embed> element, the playback controls appear in your page wherever you
place the element. The exact style of the playback controls varies depending on your operating system,
browser, and audio plug-ins.
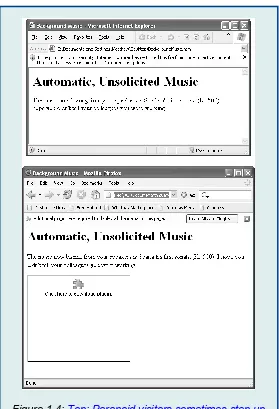
Bottom: Depending on what a web visitor has installed or uninstalled, a browser might not find the components
it needs to play your background music.
The <embed> element harbors an ugly secret—it’s not valid
XHTML. In fact, it’s not even a recognized part of the HTML language. Despite its poor pedigree, it works seamlessly in all modern browsers. But there’s still a price to pay. Once you put the <embed> element in your web page, you can no longer validate your page using an XHTML checker. If you’ve sworn to uphold the standards of XHTML, this may weigh heavily on your heart. Or perhaps not—many rogue web designers think nothing of using <embed> and retaining the XHTML doctype. It’s up to you whether you’re ready to violate the spirit of XHTML to get what you want.
Embedded audio options
Ordinarily, the <embed> element starts playing music as soon as your browser downloads the specified music file. Visitors can kill the sound with a quick click of the stop button (assuming you display the playback controls), but if they’re not expecting to hear a burst of music, it’s enough to frazzle some nerves.
A more polite way to handle background audio is to display the playback controls and let your visitors decide whether to click the play button. This design is easy—just use theautoplayattribute:
<p>If you’d like some soft music to browse by, click the play button.</p>
<embed src="soundfile.mid" autoplay="false"
/>
Turning off autoplay is considered good web etiquette. A much poorer idea is the hiddenattribute, which lets you hide the playback controls altogether. All too often, you’ll find web pages that use <embed> elements like this:
<embed src="soundfile.mid" hidden="true" />
Note:Unfortunately, autoplay and hidden playback controls are all too common on the Web. Some web designers become intoxicated with their newfound multimedia abilities, and decide it’s not enough to let visitors listen to music—they force them to. Resist the urge.
The <embed> element offers quite a few more frills. Table 1-2has the lowdown.
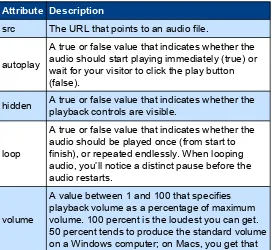
Table 1-2. Attributes for the <embed> element
Attribute Description
src The URL that points to an audio file.
autoplay
A true or false value that indicates whether the audio should start playing immediately (true) or wait for your visitor to click the play button (false).
hidden A true or false value that indicates whether the playback controls are visible.
loop
A true or false value that indicates whether the audio should be played once (from start to finish), or repeated endlessly. When looping audio, you’ll notice a distinct pause before the audio restarts.
volume
effect at 75 percent. If you set your volume to 100 percent, you can be sure you won’t get any repeat visitors. When you use the volume attribute, supply a number only (leave out the % sign).
border, width, and height
These attributes let you set the dimensions of the playback controls and the border around them, in pixels.
GEM IN THE ROUGH
Finding MIDI Files
Although MIDI files usually sound cheesy, you can’t complain about the number of tunes available online. With a simple Google search, you can usually dig up MIDI files for your favorite band, movie, computer game, or classical composer.
Technically, it’s against copyright rules to use a MIDI file of another artist’s work on your website. However, there’s a fairly large gray area. First of all, fans or amateur musicians usually sequence (transcribe onto the computer) MIDI files. So not only do they lack real instruments and vocals, they may also contain outright errors. In that respect, putting a cheap MIDI file on your Web site is a little bit like listening to a Led Zeppelin cover band—it’s a tribute to the original, not a competitive threat. That’s why music companies haven’t made any effort to crack down on MIDI files.
which means you’re free to draw from a huge catalog of classical pieces. To download your favorites, try the
Classical MIDI Archives
(http://www.classicalarchives.com/).
Other audio formats
As you learned earlier, MIDI files are remarkably small because they store digitally generated notes. Because of that, they don’t usually sound that great, and they don’t sound the same on everyone’s computer. MIDI files are fun, but they often make a site seem
amateurish.
What if you want something a little more upmarket? You could use a WAV file, which are audio files recorded in an uncompressed digital file format first introduced by Microsoft but now supported everywhere. Most computers have software for recording WAV files—for example, on Windows PCs you can usually find a program called Sound Recorder lurking in the Programs?Accessories ?Entertainment section of the Start
menu (in Windows XP) or All
Programs?Accessories?Sound Record (in Windows Vista). Mac fans may want to use the free program Audacity (http://audacity.sourceforge.net/), which is also
available in a Windows version.
<embed src="soundfile.wav" autoplay="false" />
The problem with WAV files is that they’re really,really big. In fact, they’re enormous. Think of the file size of an MP3 file, and then multiply it by 10. As a result, it rarely makes sense to use WAV files on web pages. With a typical mid-speed Internet connection, your visitor will wait a long time before the complete music file trickles down and starts playing.
Note: A typical MIDI file is even smaller than a typical image. A 100 kilobyte (KB) MIDI file could handle the first movement of a detailed symphony.
Alternatively, you can use MP3 files. This approach works great in modern browsers, but older ones may ignore your playback attempt or they may launch an MP3 player (like Windows Media Player) to play the file:
<embed src="soundfile.mp3" autoplay="false" />
Sadly, the <embed> element won’t help you create those nifty looping soundtracks you may have heard on some websites. Even though <embed> supports a loop attribute, the results aren’t good because it doesn’t loop cleanly. It pauses each time it reaches the end of your audio file. If you want a slick looping soundtrack, you need to use Flash, as described in the “Flash MP3 Players”section below.
Sound Effects
Ever wanted to create one of those web pages where every mouse movement unleashes a sound? Maybe you want a whoosh sound when visitors move over a button or you want them to hear an audible click when they select a link. Sadly, there’s no perfect solution that works with every browser, but there are two compromises:
▪ Use Flash, which lets you create pages that run rampant with sound effects. (To enjoy your creativity, your visitors need the Flash browser plug-in, but fortunately that’s the case for 90 percent of browsers.)
▪ Use the <bgsound> element (short for “background sound’) along with a JavaScript technique you’ll learn about next. The key limitation with this trick is that it works only with Internet Explorer 5 and later—most other browsers and older versions of IE ignore the background effects altogether. And like <embed>, XHTML doesn’t officially welcome the <bgsound> element.
To use JavaScript-powered sounds, start by adding a <bgsound> element in the <head> section of your web page. The <bgsound> element is an IE-specific version of the <embed> element:
<bgsound src="" id="ch01.xhtml_SoundEffect" autostart="true" loop="1" />
The trick in this example is that you don’t supply any source file at first. Instead, you set thesrcattribute when something actually happens on the page, at which point the sound begins playing.
Notice that you assign the name SoundEffect to the <bgsound> element. (The id attribute uniquely identifies an element in your document.) The last two attributes in the element instruct it to play audio files immediately (autostart=“true”) and play them exactly once (loop=“1”).
The next step is to add the script that includes the PlaySound() function to the <head> portion of your page. The PlaySound() function has one role—to point the <bgsound> element to the audio file you want to play:
<script type="text/javascript">
function PlaySound(soundfile) {
if (document.all &&
document.getElementById)
document.getElementById("SoundEffect").src
In other words, to play a sound, you need to call the PlaySound() function. PlaySound() finds the <bgsound> element, and then sets its src attribute to point to the audio file. This change causes the <bgsound> element to play the sound immediately.
Remember, functions just hang around idly until you call them. Your web page won’t make a peep until a visitor triggers a Java-Script event that calls the PlaySound() function.
Here’s how you use the PlaySound() function to play a file named soundeffect.wav when a visitor moves her mouse pointer over a link:
<a href=http://www.somesite.com
onmouseover="PlaySound('ding.wav')">Click Me</a>
The only problem here is that if you want to add sound effects like this to several links, you need to add every single linkseparately, even if they all use the same audio file. But don’t despair. There’s a solution courtesy of
http://www.dynamicdrive.com/. There, you can download
you add a sound effect to all the elements of a certain type in a certain container.
For example, if you want to add a sound effect to a group of links, pop them into a <div> element, like this:
<div>
Notice that in the first argument, it’s important to leave out the angle brackets (for example, you use “a” to apply the function to every <a> anchor element). For the third argument, you can always use the keyword this, which refers to the current element (in this case, that’s the <div> container). The end result of this is that you link every anchor in the <div> section to theding.wavaudio file.
You can use this trick to put sounds on your entire page—just add the onmouseover attribute to the <body> element that contains the page.
Flash MP3 Players
As you already learned, Flash is a browser plug-in that lets you add videos, animations, and even whole miniature programs, like games, to a web page. Although it takes a fair amount of work (and some pricey software) to create a Flash program from scratch, it’s not nearly as difficult to add a Flash-based music player to your page. That’s because plenty of people have already done the work for you. The web is awash in free Flash music players.
Note: You can download the Flash plug-in at
http://get.adobe.com/flashplayer/.
Search on Google for “flash mp3 player” to find a few free players. Most of them are surprisingly polished, with scrolling song lists, slick playback buttons, and even tiny animations that play in sync to your music.
The E-Phonic Player
One more-than-decent choice is E-Phonic (available at
http://www.e-phonic.com/mp3player/). It’s easy to use,
playback or switch songs when certain JavaScript events take place, like when a visitor mouses over a picture.
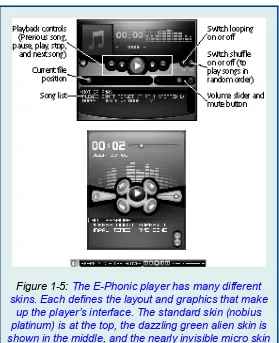
Figure 1-5:The E-Phonic player has many different skins. Each defines the layout and graphics that make
up the player’s interface. The standard skin (nobius platinum) is at the top, the dazzling green alien skin is shown in the middle, and the nearly invisible micro skin
To get E-Phonic, click the Download link on their website. You’ll get a compressed ZIP file with a whole package of sample designs, including the three shown in Figure 1-5.
To use E-Phonic on your website, you need the following ingredients:
▪ The Flash file ep_player.swf. This miniature Flash program runs in your web page. It’s the heart of the E-Phonic player.
▪ The JavaScript files ep_player.js and swfobject.js.These files set up the Flash player and give you the ability to interact with it using JavaScript. Although you won’t learn how to do that in this book, you can get all the details at (http://www.e-phonic.com/mp3player/
documentation/).
▪ Your skin folder.AsFigure 1-5shows, you can deck out the E-Phonic player with a thousand faces (“skins”). Once you choose a skin, copy it to your website. For example, to use the luminous green alien skin, add the alien_green folder and all its contents to your site. (Skin folders consist of one XML file, which defines the player’s layout, and a whole bunch of images, one for each of the player’s buttons and components.)
▪ The playlist file playlist.xml. This lists all the files you want to load into the player, in order. You’ll see how to edit this file shortly.
▪ The XHTML page that includes the player. You can add the player to any page on your site. All you need to do is add the right markup. The easiest way to get it is to copy it from one of the example files included with the E-Phonic download. You’ll find one example file for each skin.
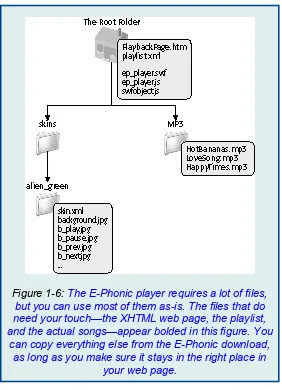
Figure 1-6shows how these files are arranged.
The following sections show you how to get the E-Phonic player up and running in one of your pages.
Create a playlist
The playlist tells the E-Phonic player what songs to load. To create a track list with your garage band’s best tunes, for example, copy your MP3 files into a subfolder named MP3 (seeFigure 1-6). Then create a playlist and tweak it to play your songs. To make a playlist, start with the following skeleton:
<playlist version="1"
xmlns="http://xspf.org/ns/0/">
<trackList>
</trackList>
Figure 1-6:The E-Phonic player requires a lot of files, but you can use most of them as-is. The files that do need your touch—the XHTML web page, the playlist, and the actual songs—appear bolded in this figure. You
can copy everything else from the E-Phonic download, as long as you make sure it stays in the right place in
your web page.
exists solely to provide information to the E-Phonics player.
In the <trackList> element, add one <track> element for each song in your playlist. You need to add two other elements inside the <track> element—a <location> element, which indicates the song’s file name, and a <title> element, which identifies the song title that the player will display during playback:
<track>
<location>MP3/HotBananas.mp3</location>
<title>Hot Bananas</title>
</track>
Notice that the <location> element uses the relative link system. That means the link is always relative to the location of the XHTML page that displays the player. In the example above, the location points to a file named HotBananas.mp3in a folder namedMP3.
You can add two optional elements to the <track> element (not shown in the example above)—a <creator> element and an
Here’s the complete playlist with all three songs:
<playlist version="1"
xmlns="http://xspf.org/ns/0/">
<trackList>
<track>
<location>MP3/HotBananas.mp3</location>
<title>Hot Bananas</title>
</track>
<track>
<location>MP3/LoveSong.mp3</location>
<title>Please Don’t Forget (That I Stopped Loving You)</title>
</track>
<track>
<location>MP3/HappyTimes.mp3</location>
<title>Happy Times Have Gone Away</title>
</track>
</trackList>
</playlist>
Adding the player to a web page
the skin you want. For the alien skin, open example_alien.html.
To use the E-Phonic player, your page needs three ingredients. First, you need a <script> block in the <head> section of your page that references the E-Phonics JavaScript file:
<script type="text/javascript"
src="swfobject.js"> </script>
This gives your web page access to the JavaScript code you used to create the player.
Next, you need a <div> element with the id=“flashcontent” attribute. The E-Phonics player will appear on your page at the location of the <div> element:
<div id="ch01.xhtml_flashcontent"></div>
You don’t actually need to put anything in the <div> element, because the magic of JavaScript will create the player for you. But it’s a good idea to supply some alternate content. The browser displays this alternate content if it can’t create the E-Phonics player, which usually means that your reader’s browser doesn’t have the required version of Flash:
<div id="ch01.xhtml_flashcontent">
you must have Flash Player 9 or better installed. Download it (for free)
<a href="http://www.adobe.com/go/
getflashplayer/"> here</a>.
</div>
Lastly, after the <div> element, you need to add a <script> block with the code that actually creates the player. This script also configures the player using several JavaScript variables. The variables shown here are the ones included with the samples in the E-Phonic download. To keep life simple, you can copy this whole <script> section from the E-Phonic sample web page (likeexample_alien.html) into your own web pages:
<script type="text/javascript">
var so = new SWFObject("ep_player.swf", "ep_player", "220", "265", "9",
</script>
You can tweak these variables to change the player’s behavior. For example, to change song lists, point the playlist variable to a different file. You can make the player start the moment a browser creates it by changing the autoplay value from false to true. You can modify similar values to turn song shuffle and automatic repeat on or off.
Whatever you do, don’t touch the skin setting. If you want to change skins, find the matching XHTML sample page and copy the <script> block from it. That’s because the very first line of code in the skin script sets the size of the player, and the player size has to match the skin graphics or it won’t work properly.
Here’s a complete sample page that uses the alien skin and the playlist you developed:
<!DOCTYPE html PUBLIC "-//W3C//DTD XHTML 1.0 Transitional //EN"
"http://www.w3.org/TR/xhtml1/DTD/ xhtml1-transitional.dtd">
<html xmlns="http://www.w3.org/1999/xhtml">
<head>
<title>Page with a Player </title>
<script type="text/javascript" src="swfobject.js">
</script>
<body>
<h1>You’ll Love E-Phonic</h1>
<p>This page has its own MP3 player built in. It’s right here:</p>
<div id="ch01.xhtml_flashcontent">
To view the E-Phonic Player, you need to have Javascript turned on and you must have
Flash Player 9 or better installed.
Download it (for free)
<a href="http://www.adobe.com/go/
getflashplayer/">here</a>.
</div>
<script type="text/javascript">
var so = new SWFObject("ep_player.swf", "ep_player", "220", "265", "9","#000000");
so.addVariable("skin", "skins/alien_green/
<p>(And this text is under the player.)</p>
</body>
Flashtrak Loops
The E-Phonic player is a great option if you want a full-featured MP3 player in your web page. But sometimes, you’re after a simpler goal. Rather than give your visitors the ability to shuffle through a collection of songs, you might just want to keep them happy with endlessly looping background music.
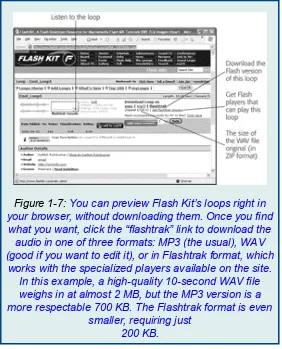
Although many websites sell audio loops, you can download free ones at Flash Kit,http://www.flashkit.com/ loops/ (see Figure 1-7). Flash Kit offers a large and
excellent catalogue of nearly 10,000 loops ranging in style from ambient to urban.
Note: Loops are the audio equivalent of a
Figure 1-7:You can preview Flash Kit’s loops right in your browser, without downloading them. Once you find
what you want, click the “flashtrak” link to download the audio in one of three formats: MP3 (the usual), WAV (good if you want to edit it), or in Flashtrak format, which
works with the specialized players available on the site. In this example, a high-quality 10-second WAV file weighs in at almost 2 MB, but the MP3 version is a more respectable 700 KB. The Flashtrak format is even
smaller, requiring just 200 KB.
visitors never have to wait to experience your site’s ambience. They require a Flashtrak player, which you can also download at the Flash Kit web site. (The Flashtrak player is a Flash program, just like E-Phonic is, but it doesn’t support MP3 files.)
To download the Flashtrak player, look for the “flashtrak players” link on the web page (see Figure 1-7). You can choose from more than a dozen player styles. Most have snazzy effects as they play music, like pulsing lines or expanding circles.
Note: When you download the Flashtrak player,
you may end up with more files than you actually need. For example, you don’t need any files that end with “.fla” (these are Flash source files that you can only edit in the Flash software). You can delete these files. Also, when you download a player, you’ll probably find yourself with a pile of extra song files. Delete the ones you don’t want, or your player will cycle through all of them.
Once you download a player, you’re ready to embed it in your web page. You can take care of that with a simple <embed> element that points to the player file:
<embed
Figure 1-8 shows you what you’ll see when you run the page that contains this element.
Flash content is notoriously difficult to patch into a page without breaking XHTML validation rules. The following markup provides a nice, clean solution that works in most browsers without requiring the pesky <embed> element:
<object
data="StarPlayerMultiTrackWithAutoStart.swf"
type="application/x-shockwave-flash">
<param name="movie"
value="StarPlayerMultiTrackWithAutoStart.swf" />
</object>
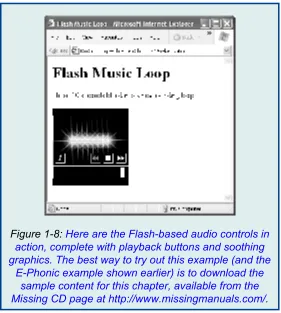
Figure 1-8:Here are the Flash-based audio controls in action, complete with playback buttons and soothing graphics. The best way to try out this example (and the
Video Clips
Now that you’ve conquered the challenges of audio and learned to put everything from sound effects to looping background music into your web pages, it’s time to move on to one more challenge—video content.
Although browsers use many of the same tools to play video as they do to play audio (plug-ins like Windows Media Player, QuickTime, and Flash), there are some hefty differences. Most importantly, video files are big. Even the smallest of them is many times the size of an audio recording of a full-length Mahler symphony. Handling this data without trying your visitors’ patience is a true test. In the following sections, you’ll learn how to prepare your video content for the Web, and consider two ways to let visitors view it.
POWER USERS’ CLINIC
Unlocking the Power of Flash
Flash files are utterly unlike ordinary multimedia content.
Second, Flash uses programming code. That means you can program all kinds of devious logic into a Flash program, like making shapes move and sounds play when a web visitor moves his mouse or clicks a portion of an animation. This ability brings all the tricks of a self-contained program together with all the tools of graphic design to make really slick animations. Best of all, your web server doesn’t need any special software to perform these tricks because the Flash browser plug-in does it all.
If you’re an ambitious sort, the Flash music players you learn about in this chapter just might have you dreaming big about building your own Flash animations or programs. You can certainly do that, but it’s a major undertaking. Before you start, you need to plunk down about $700 for the premier design tool Adobe Flash CS5 Professional. Then, you face a steep learning curve. And once you have the right software and you’ve fought your way through all the new concepts, you’ll find it takes more than a modicum of artistic skill to create a professional Flash animation.
To dip your toe into the fascinating world of Flash, check out the basic online tutorials at
http://www.w3schools.com/flash/, or read a dedicated book on the subject, like Flash CS5: The Missing Manual. To get a sense of what’s possible with Flash, check out the gorgeous graphics in the free Flash games at http://www.ferryhalim.com/orisinal/, or take on the detailed negotiation simulations at
Preparing Video
Putting personal video on a website is a task meant for ambitious multimedia mavens. The key stumbling block is the sheer size of digital video. Consider the popular MiniDV camcorder. It stores an hour of video on a single tape. You can download that video to your computer—but only if you have a spare 13 GB of drive space handy. The ugly truth is that every second of raw, high-quality video chews through a sizeable 3.5 MB of storage. Not only is this enough to take a bite out of any web master’s server and bandwidth allocations, it’s too big for even the speediest browser to download.
What can you do to make a web video both look good and perform well? You can always use someone else’s Web-ready video (or pay a video editing company lots of money to trim yours down to web proportions). Assuming that’s not what you want, you have two choices.
▪ Lower the quality afterward. More commonly, you’ll need to start with your high-quality video and go through a long process ofre-encoding it to convert it to a size suitable for the Web. To do this, you need a video-editing program. Video cameras generally include some sort of tool to help you out,
although you may want to pony up for more powerful software. Two popular choices are iMovie for the Mac (included with OS X) and Windows Movie Maker, included with Windows XP, Windows Vista, and Windows 7. In addition, some video editing programs have a feature that automatically picks suitably scaled-down quality settings for videos you want to upload to a website.
Note: For full details on how to operate Windows Movie Maker, check out Windows 7: The Missing Manual. If you’re using iMovie, take a look at iMovie ‘09: The Missing Manual.
Here are the steps to follow to get your video ready for the Web:
1. First, film your movie.
movements smooth and gradual, and don’t film complex patterns. Your compressed video will be smaller and look better.
2. Fire up the video capture program included with your video camera. Use it to download your movie to your computer’s hard drive.
Typically, this step involves connecting your camera to your computer using a FireWirecable. Although USB cables aren’t fast enough to keep up with huge chunks of raw video data, you might use one if you transfer video from less powerful devices, like a camera or cellphone that records short video clips.
3. Now you need to use a video-editing program to snip out just the video segment you want to post to your site.
Some programs let you add music or special effects at this point, too.
4. Next, re-encode that piece of video in a highly compressed format. If all the format information in your program sounds like gobbledy-gook, look for an option that clearly says “Web video” when you save your clip.
Note: There is a range of competing web video formats, but the most common is MPEG-4. Just to make life more interesting, MPEG-4 has all kinds of quality settings, so you can use it to create DVD-quality movies or web-friendly video clips. If in doubt, double-check the final file size of your movie. If 60 seconds of video take up 1 MB on your hard drive, you’re doing well.
Linking to and Embedding Video
Surprisingly, you can pop a video into your web page using the same techniques you used with digital audio (seeFigure 1-1). That means you can link to a video that opens up in another browser window:
Click to download or open my home movie
<a href="ouch.mpg">Ouch, That Hurts</a>.
Or you can use the <embed> element to put a video window right inside your web page.
<embed src="ouch.mpg" autoplay="false" />
If you use the <embed> element, make sure you turn off autoplay. Otherwise, visitors with feeble dial-up connections will see their web pages slow to a crawl while your video downloads.
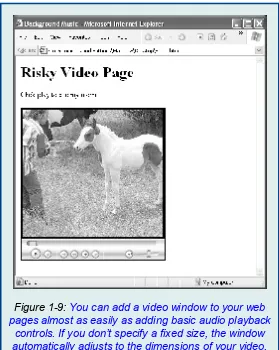
Figure 1-9:You can add a video window to your web pages almost as easily as adding basic audio playback
controls. If you don’t specify a fixed size, the window automatically adjusts to the dimensions of your video.
visitors may be forced to download the entire movie before they can start watching it. And if their browsers don’t have the right plug-in or it’s incorrectly installed, your video might not play at all.
Uploading Your Videos to YouTube
Before YouTube hit the scene, video clips hadn’t really taken off on the Web. Movie clips were all-around inconvenient. They were slow to download, and playback was often jerky and sporadic. But in a mere 5 years, the landscape has shifted. Web connections are faster and browser plug-ins that support movie playback (like Flash and Microsoft’s Flash competitor, Silverlight) are more common. Ordinary people own all sorts of digital video gadgets that can shoot short movies, from true video cameras to digital cameras, cellphones, and webcams. Popular clips rocket around the world, going from unknown to Internet sensation in a matter of hours. Family members, adventurers, and wannabe political commentators all regularly use video to keep in touch, show their skills, and dish the dirt.
YouTube (http://www.YouTube.com/) is at the forefront
If you’re still considering options for putting your video content online, there are two great reasons to use YouTube:
▪ It performs well.YouTube uses Flash to ensure that virtually all browsers can play back its videos. In addition, its videos support progressive downloading, which means you can watch the beginning of a video as your browser downloads the rest of it, rather than waiting for the whole enchilada.
▪ YouTube extends the reach of your website. YouTube is one of the most popular sites on the Web. Videos that get lucky can increase their audience size from a few people to millions of eager clip-watchers. By putting your movies on YouTube, you increase the odds that someone will discover it and possibly visit your site afterward. For example, many of the most popular clip-makers capitalize on their YouTube popularity by selling themed merchandise on their sites.
One disadvantage of YouTube is that you lose control over video quality. YouTube is notorious for applying a heavy dose of compression to shrink video size, making some clips look terrible.
In the following sections, you’ll see how to upload your first YouTube video, and even learn how to embed it in a window on one of your own pages.
Anyone can browse and view YouTube’s full catalog of videos (six million clips at the time of this writing). But to upload your own, you need a YouTube account. Here’s how to create one:
1. Go tohttp://www.YouTube.com/. Click the Sign Up
link (you can find it in the top right-hand corner of the page).
2. Fill in your account information.
You need to supply the usual information, including your email address, password, location, and date of birth. Unlike some websites, which identify you solely by your email address, YouTube requires auser name, which is a string of letters and numbers like JoeTheMovieMaker403. Given the site’s popularity, it may take a few tries to find an available name. To find out if a potential name is taken, click the Check Availability link after you type it in.
Tip: If you already have a Google account, you can use that with YouTube. Scroll down to the bottom-left of the sign-up page, and then click the “Sign in with your Google Account” link. You’ll still need to pick a YouTube user name and supply your address, but you’ll be able to log in to all the Google services you use with the same email and password combination.
YouTube sends a confirmation message to your email address. When you get this email, click the link inside it to confirm your account.
Preparing a video
Now you’re ready to post a video. But before you do, it’s time to double-check your video format to make sure YouTube supports it.
YouTube helps out quite a bit in this regard. You can upload a video in just about any popular video format, including AVI, MOV, WMV, MPG, DivX, FLV, OGG, and 3GP. Best of all, YouTube automatically re-encodes your video with the right quality settings so web visitors can download it without teeth-gnashing delays. This doesn’t mean you can upload a video straight out of your camcorder, however. YouTube limits uploads to files that are less than 1 GB (1,000 MB) in size, and even a movie file that’s half that size is still too large for many people to upload in a reasonable amount of time. Best-case scenario, it takes hours. Worst-case, your browser conks out halfway through the process.
With that in mind, you need to use the re-encoding process described in “Video Clips” above. Although it may take a bit of trial and error to get the best settings for your video, here are some guidelines:
choose. If you record video in standard size, use a resolution of 480×360 pixels. For slightly lower-quality content with standard video, you can use the original YouTube playback window size, which is 320×240. Either way, YouTube uses a widescreen video window to play back your standard video content, which means you’ll see a black bar of empty space on the sides of your video. For widescreen video, use a resolution of 640×360 pixels for best results. ▪ Although YouTube supports a kitchen sink of
video formats, it recommends you use the MPEG-4 or H.263 codecs when preparing your video.
▪ Ordinarily, you should encode your videos at 30 frames per second. However, you can sometimes cut this down to 15 frames per second to save space, and still get good results. ▪ The longer your video, the more compression
you’ll need to get the file size down to manageable proportions.
▪ Aim to create a file that’s less than 100 MB in size. You may need to fiddle with your settings and re-encode your video several times to get the right balance of size and quality.
UP TO SPEED
Understanding Bit Rates
much raw information each frame of your movie includes. For example, a mid-range bit rate of 400 kbps means there are 400 KB of data in every second of video. If your movie is about 4 minutes long, it will total about 96 MB in size.
Life isn’t quite that simple however, because many encoding programs use variable bit-rate encoding. That means they use a higher bit rate to encode more complex sections (like fast-moving action), and a lower bit rate to save space during simpler scenes. No matter what encoding rate you use, you’ll always run into the same trade-off. Bigger files have the potential for better quality video after YouTube converts them. But the smaller the file, the faster you can upload it.
Because every encoding program works a bit differently, you need to experiment (and sit through a few YouTube uploads to find out how fast your Internet connectionreally is). You might also want to try scouring the Web for tips on using your video editor to prepare YouTube videos. You can even hunt down one of the free programs that are designed to streamline YouTube uploads.
Uploading a video
Once your video’s ready, it’s time to put it online. The process is refreshingly straightforward:
1. Head back to YouTube and sign in.
for you to check out, and lets you subscribe to specific video groups. But right now, ignore these features and concentrate on adding your own video creation to the mix.
2. Click the yellow Upload button at the top right-hand side of the page.
Figure 1-10:YouTube uses just a single page to collect all the necessary information about your video and lets you configure options like comment support. (Click the
“choose options” links to expand these sections.)
3. Fill in the information for your video.
need to specify a category for your video, and add one or more tags. When other people search YouTube using keywords that match your tags, there’s a better chance that your video will turn up in the search results.
Along with this required information, YouTube offers several sections of optional settings. You can click the “choose options” link in any of these sections to change your options.
Use Broadcast Options to switch your video from public to private. Public videos turn up in YouTube search results, while you share private videos only with YouTubers you explicitly identify.
Use Date and Map Options to identify when and where you recorded your video.
Use Sharing Options to control how other people can offer feedback or use your video. For example, you can ban people from commenting on your video, or allow only comments that you approve. You can also specify whether people can rate your videos, post a video response (a video linked to yours), and play your video on their own web page. YouTube allows all these options automatically, giving the site a somewhat raucous community atmosphere.
Note: You can prevent other people from
this, however, it not only stops other people from showcasing your video, it prevents you from embedding your own video on your web pages.
Don’t worry if you can’t decide on all your options right now. You can change them (along with the descriptive video information) any time.
4. Click the “Upload a video” button.
This is the simplest way to submit your video. However, YouTube offers other options.
Click the Use Quick Capture button to record and upload your video on the spot. You need to have a webcam connected to your PC.
Click the “Use multi-video uploader” button on the right side of the page to use a special uploading interface. The multi-video uploader makes it easy to upload several files at once. This way, if you have a bunch of videos you want to put online, you can queue them all up and walk away from your computer for the day. The multi-video uploader also lets you upload files larger than 100 MB, up to the 1,000 MB maximum. If you click this button, YouTube prompts you to install the free Google Gears web browser extension (http://gears.google.com/), which YouTube requires to
make the multi-video uploader work.
Finally, click Upload Video to start the transfer process.
As YouTube uploads your video, it displays a status message that counts the number of bytes copied and displays the percent of the entire process it’s completed.
YouTube says it typically takes 1 to 5 minutes to upload each megabyte of video if you have a high-speed connection, so this is a good time to get a second cup of coffee.
6. When YouTube finishes the upload, it displays a confirmation message.
The process isn’t really finished yet, however. YouTube still needs to convert your video to the streamlined Flash format, and that process could take minutes or hours, depending on the number of requests ahead of yours.
Figure 1-11:Even though your video isn’t ready yet, you can already copy the markup needed to display it on a
Web page. At the moment, that markup won’t have much effect—it’ll just create a blank YouTube window. But once your video goes live on YouTube, you’ll see it
in your page.
Once your video is ready, you can watch it in several ways:
▪ You can search for it on YouTube.
▪ You can browse through the videos in your account. Log into YouTube, click the Account link (at the top right-hand side of the page), scroll down to the My Videos section, and then click the Uploaded Videos link.
Tip: You can handle other management tasks in the Uploaded Videos page as well. For example, click Delete to remove a video, Edit to change the video information and options you specified when you uploaded your video, and Insight to get some fascinating statistics on the people who’ve seen your video.
▪ You can play it back in a YouTube window on one of your web pages. To do so, copy the markup shown inFigure 1-11 into your page. If you neglected to copy this markup when you uploaded your video, go to the YouTube page for your video, where you’ll find these details (seeFigure 1-12).
Figure 1-12:Top: You can watch your video at its YouTube home. The page provides two useful text boxes (circled here): a URL box with the address you
markup you need to embed this video window in another web page.
Bottom: Embedding lets you watch your video in a page of your own
devising.
Here’s the complete markup that creates the page from Figure 1-12:
<!DOCTYPE html PUBLIC "-//W3C//DTD XHTML 1.0 Transitional //EN"
"http://www.w3.org/TR/xhtml1/DTD/ xhtml1-transitional.dtd">
<html xmlns="http://www.w3.org/1999/xhtml">
<head>
<title>A Taste of YouTube</title>
</head>
<body>
<h1>A Taste of YouTube</h1>
<p>The following video window is brought to you by the fine people
type="application/x-shockwave-flash" allowfullscreen="true"
width="425" height="344">
</embed>
</object>
<p>Click it to start playing.</p>
</body>
</html>
Keen eyes will notice that this video window consists of an <embed> element wrapped in an <object> element. This messy markup is great for browser compatibility, because browsers that support the <object> element will ignore the content inside, and browsers that don’t recognize the <object> element will use the <embed> element instead. However, like all uses of the <embed> element, it has the unhappy side effect of breaking the rules of XHTML. This simply goes to show that making a page work perfectly still trumps any standard—at least for the Web’s hottest video-sharing site.
Colophon
Peter McKie was the editor for Add Audio and Video to Your Site: The Mini Missing Manual. Nellie McKesson was the production editor.
Nellie McKesson designed the interior layout, based on a series design by Phil Simpson. The text font for the PDF version of this book is Myriad Pro; and the heading and note font is Adobe Formata.
For best printing results of the PDF version of this book, use the following settings in the Adobe Reader Print dialog box: A: Pages: ii–[last page number]; B: Page Scaling: Mulitple pages per sheet;