Getting Started with Metro Apps
Ben Dewey
Getting Started with Metro Apps by Ben Dewey
Revision History for the :
2012-04-12 Early release revision 1
See http://oreilly.com/catalog/errata.csp?isbn=9781449320553 for release details.
Table of Contents
Preface . . . v
1. Windows 8: A Quick Tour . . . 1
A User Interface for Touch 1
Start Screen 2
Start Bar 3
Windows Programming Reimagined 5
A New Native API, the Windows Runtime 5
Language Support 5
Hosted Application Model 7
Single File Deployment 7
Windows Store 7
Inside Metro-style Apps 8
Application Bar 8
Semantic Zoom 9
Animation 9
Outside Your App 10
Tiles 11
Pickers 11
Charms 11
Sensors and Devices 12
Summary 12
2. Getting Started . . . 13
Where is the Hello World app? 13
Bing Search API 13
Getting Started: The BingSimpleSearch App 15
Bing ImageSearchResponse Model 18
Calling the Bing Search API 19
Handling the Response 19
Wrapping up the UI 20
Running the Bing Simple Search app 21
Summary 21
3. Application Architecture . . . 23
How Will the Bing Image Search App Change Going Forward? 23Goals 23
Usability 23
Non-functional 24
Development Process Goals 25
Design of the User Interface 26
Application Diagram 28
Model-View-ViewModel (MVVM) 29
Who Comes First the View or the ViewModel (the ViewModelLocator) 29
Commands 30
Inversion of Control (IoC) Container 31
Navigation 33
NavigationService 34
MessageHub 35
Sending a Message 36
Alternatives to the MessageHub 37
Application Storage and Tombstoning 37
Settings 39
Error Handling 40
Preface
The personal computer (PC), which first hit the market over thirty years ago, has un-dergone tectonic changes that, in turn, launched the PC era. PCs were primarily used in the workplace where software was simple and optimized for use with the keyboard; touching a screen was unheard of until recently. Slowly computers began creeping into the home and many users didn’t know what to do with them; they were glorified type-writers.
When PCs started connecting to the Internet, possibilities reached a new level, which had a snowball effect. It allowed academia to share research; it spawned new means of communication from email and online chat to social networking, captivating the minds of people young and old. Soon consumers started using laptops and unplugging from the conventional desktop setting.
This shift had little impact on applications, but helped define a new wave of form factors in phones, tablets, and slates. Eventually, users started demanding more and we ush-ered in a new era, the modern consumer era. We are all modern consumers, not only consumers of goods, but consumers of information. We are constantly connected through the use of mobile devices as well as more traditional computers. Whatever type of device, be it static or mobile, content is synchronized and up-to-date. These new devices are used as gaming machines and personal entertainment centers, and they are replacing books and magazines for many avid readers.
Today, consumers expect developers to create apps where touch, mobility, and good battery life are a must. Tablets and slates leverage touch as a primary form of interaction while playing a critical role in the adoption of sensors and cameras in everyday com-puting. They are small and lightweight, making them extremely portable. Devices boot almost instantly so users can get to their content and put them right back in their bag without missing a step. Despite their youth, these devices are being embraced by work-forces and consumers worldwide and they appear to be on a relentless progression. With all this excitement, it’s hard to believe we’ve only begun to scratch the surface. We need a platform built from the ground up with these objectives in mind. This next version of Windows, codenamed Windows 8, ships with a new application model for building user experiences tailored to the next generation of devices.
The Windows Runtime
The underpinning for that new user experience is the Windows Runtime. For years Windows desktop applications interacted with the Win32APIs in some fashion, whether they were opening file dialogs, rendering graphics, or communicating over the network. Instead of replacing this, Windows 8 continues its support for the Win32APIs allowing existing Windows 7 apps to run seamlessly. What they built instead is a brand new API from the ground up called the Windows Runtime (WinRT). WinRT consists of an application execution environment and a collection of new APIs, which enables a new line of immersive full screen apps called Metro-style apps.
Windows desktop applications are still available and continue to be relevant for many situations. In fact, desktop applications can leverage the power of the Windows Run-time API—for example communicating with sensors.
Metro-style apps are designed to communicate with WinRT via a language-independ-ent projection layer, which enables apps to be written in statically typed languages like C++, C# and Visual Basic, while also feeling natural to dynamic languages like Java-Script. WinRT introduces a new trust model for users, called base trust. Unlike full trust, this model isolates each application while funneling high level action through the runtime broker to ensure users are aware when apps attempt to access protected re-sources. Even though Metro-style apps promote a model where the user is in charge, you will find their ability to connect with other apps is far superior than its predecessor. Metro-style apps can communicate with other apps using generic contracts and send or receive content in various formats - like text and photos. Contracts can also be defined to access core operating system components, like Search, to highlight your app even though it may seem irrelevant. (We’ll discuss contracts and search later in (to come))
Once a revolutionary technology, like mobile computing, has been un-leashed it’s hard not to push its potential. You can already see signs that manufacturers and researchers are innovating well beyond what is on the streets today. Microsoft is committed to contributing to the future of technology in a big way and Windows 8 is just the start. For more insight and the impending possibilities into what’s next for Microsoft, a video of their vision for the future can be found online at http://www .youtube.com/playlist?list=PL2B8C6AB94E8259C6
Disclaimer
Who This Book Is For
This book is written for existing .NET developers who are interested in the changes introduced with the release of Windows 8.
This book is intended to be a guide to developing complete Metro-style apps. If you have an idea or you are just curious about the platform, this is the place to start. For a reference on all things related to Windows 8 development I recommend the Windows Dev Center at http://dev.windows.com and the Windows Dev Forum at http://forums
.dev.windows.com.
The samples in this book are in C# and XAML. All of the samples in this book are available for download on this book’s website at http://bendewey.com/getting-started
-with-metro-apps and at https://github.com/bendewey/GettingStartedWithMetroApps.
How This Book Is Organized
This book focuses on helping you become familiar with the new Windows 8 landscape, WinRT, and writing your first Metro-style apps, from creating your first HelloWorld app to writing a touch enabled app that responds to native sensors. This book will go through the steps taken to create a full application using the Bing Image Search API and publishing it to the Windows Store. It has been broken up into five chapters:
Chapter 1: Windows 8: A Quick Tour
This chapter focuses on a high level overview of the Windows 8 features that power Metro-style apps. From the new OS features, like the new Start Screen, to the in app features such as the Application Bar. Many of these features will be covered in more depth in future chapters.
Chapter 2: Getting Started
Before building the full Bing Image Search applidation I will walk you through creating a simple version of the application that communicates with the Bing Search API and binds the results to a simple UI. If you choose to follow along you will need to create your own Bing Search API AppId.
Chapter 3: Application Architecture
Once you’ve seen how to create a simple application using the Bing Search API, I’ll show you what it takes to complete an application that leverages the full power of the Windows 8 platform. Chapter 3 will also focus on the goals, techniques, and designs used throughout the app.
Chapter 4: Interacting with the Operating System
Developers can create impressive apps of all shapes and sizes. At some point you will need to access some external resource. Whether you’re communicating with web services or responding to events from one of the many native sensors, this
chapter shows you how the Bing Image Search application takes advantage of these various features and how to implement them in a maintainable fashion.
Chapter 5: Going to Market
Windows 8 ships with a Windows Store that developers can leverage for marketing and distribution of their app without having to focus on the nuances of building installers and accepting payments. As you would experience with other app stores, the Windows Store has a certification process. This chapter focuses on navigating that process and the details around app distribution in this new environment.
Conventions Used in This Book
The following typographical conventions are used in this book:
Italic
Indicates new terms, URLs, email addresses, filenames, and file extensions. Constant width
Used for program listings, as well as within paragraphs to refer to program elements such as variable or function names, databases, data types, environment variables, statements, and keywords.
Constant width bold
Shows commands or other text that should be typed literally by the user. Constant width italic
Shows text that should be replaced with user-supplied values or by values deter-mined by context.
This icon signifies a tip, suggestion, or general note.
This icon indicates a warning or caution.
What You Need to Use This Book
To run the samples from this book, you will need to have a version of Windows 8 Beta. I recommend installing to a virtual hard drive (VHD) using the steps laid out by Scott Hanselman at http://www.hanselman.com/blog/GuideToInstallingAndBootingWind ows8DeveloperPreviewOffAVHDVirtualHardDisk.aspx
Creating a Bing Search API AppId
This book uses the publicly available Bing Image Search API. This API is a available for anyone to use as long as you register an account. In order to use the examples in this book on your own you will need to create a Bing Developer account and register for an AppId. This can be setup online by going to http://www.bing.com/toolbox/bingdevel
oper/ and clicking on the Create your AppId link in the How To Get Started section.
Using Code Examples
This book is here to help you get your job done. In general, you may use the code in this book in your programs and documentation. You do not need to contact us for permission unless you’re reproducing a significant portion of the code. For example, writing a program that uses several chunks of code from this book does not require permission. Selling or distributing a CD-ROM of examples from O’Reilly books does require permission. Answering a question by citing this book and quoting example code does not require permission. Incorporating a significant amount of example code from this book into your product’s documentation does require permission.
We appreciate, but do not require, attribution. An attribution usually includes the title, author, publisher, and ISBN. For example: “Book Title by Some Author (O’Reilly). Copyright 2011 Some Copyright Holder, 978-0-596-xxxx-x.”
If you feel your use of code examples falls outside fair use or the permission given above, feel free to contact us at [email protected].
Safari® Books Online
Safari Books Online is an on-demand digital library that lets you easily search over 7,500 technology and creative reference books and videos to find the answers you need quickly.
With a subscription, you can read any page and watch any video from our library online. Read books on your cell phone and mobile devices. Access new titles before they are available for print, and get exclusive access to manuscripts in development and post feedback for the authors. Copy and paste code samples, organize your favorites, down-load chapters, bookmark key sections, create notes, print out pages, and benefit from tons of other time-saving features.
O’Reilly Media has uploaded this book to the Safari Books Online service. To have full digital access to this book and others on similar topics from O’Reilly and other pub-lishers, sign up for free at http://my.safaribooksonline.com.
How to Contact Us
Please address comments and questions concerning this book to the publisher: O’Reilly Media, Inc.
1005 Gravenstein Highway North Sebastopol, CA 95472
800-998-9938 (in the United States or Canada) 707-829-0515 (international or local)
707-829-0104 (fax)
We have a web page for this book, where we list errata, examples, and any additional information. You can access this page at:
http://www.oreilly.com/catalog/<catalog page>
To comment or ask technical questions about this book, send email to:
For more information about our books, courses, conferences, and news, see our website at http://www.oreilly.com.
Find us on Facebook: http://facebook.com/oreilly
Follow us on Twitter: http://twitter.com/oreillymedia
Watch us on YouTube: http://www.youtube.com/oreillymedia
How to Contact the Author
CHAPTER 1
Windows 8: A Quick Tour
When the Metro design language was first announced at MIX 2010, I knew Microsoft was on to something. I really enjoyed the simple use of typography and a focus on content. At the Build conference in September 2011 Microsoft announced their plans to expand the Metro design language to other products, including their flagship product Microsoft Windows. This release marks a convergence of the latest versions of Win-dows, Windows Phone, and Xbox where all three use Metro and promote the concept with a trifecta of opportunities that will hopefully complement each other, and grow consumer awareness about the collective suite of offerings.
Metro-style apps are designed primarily for touch interaction, and Windows 8 has been written with this in mind. Microsoft is calling this the reimagining of Windows. Every-thing from the Desktop to the Start Menu has been redesigned and optimized for touch. The Windows Runtime (WinRT), a new application model for running Metro-style apps, provides access to the new features of the Operating System (OS) and the native hardware capabilities that are available on modern computers, tablets, and slates. This chapter focuses on what it means to reimagine Windows and what’s available to help developers reimagine their apps as well.
A User Interface for Touch
In line with other Metro-focused technologies like the Windows Phone and Xbox, the main interface for Windows is a vibrant Start Screen where tiles are used to launch apps. They are big and easily activated on touch devices while providing content that is up-to-date and visible even when flicked across the screen. Metro-style apps don’t have borders or windows like desktop apps which are difficult to interact with using touch. Instead they are all full screen enabling an immersive experience where your apps contain only relevant content. In Windows 8, when an app launches you use specific gestures—swiping in from the bezel on the right or bottom—to activate new touch-based menus. The system menu, or Start Bar, in conjunction with the Windows Runtime provides a new model for connecting apps. Once an app is running you can
change settings, search, and share content with other apps without having to leave the full screen experience.
Start Screen
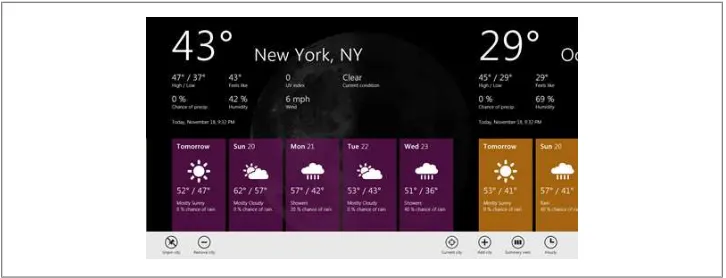
The new Windows 8 start screen, shown in Figure 1-1, is active providing a fast and fluid way to interact with all your important content. From checking email or the latest news, glancing at the weather or your stocks, checking in with your friends on various social networks, or just listening to music, the start screen keeps you up to date with your life. This means no bouncing between apps and the home screen just to check statuses.
Tiles make up the start screen with their bright colors and clean text. They can be organized into groups and personalized for each user. Simply tapping a tile launches the app in a full screen view. Apps can have either small or wide tiles in a number of different styles, providing clean and exciting animation. In addition to the primary application tile, apps can define additional tiles. For example, the weather app might show its tile with information from your hometown of New York. Before going on vacation you can add a secondary tile for your destination of London. The secondary tile can provide live information about the weather in London and when the user taps the tile the weather app will launch directly into a detailed view of London’s weather. By default, start screen settings are stored in the cloud, which allows the layout of their tiles to be consistent across all devices. Using the pinch gesture for zooming out, you can get a broad glance at your start screen and see a list of all the application groups. With this new user interface (UI) come lots of new features and ways to interact with Windows. In conjunction with the new Start screen comes a brand new Start Bar, which allows users to get back home to the start screen or communicate with other compo-nents of Windows or the other apps installed on the system.
Start Bar
The Start button has been a keystone of Windows for many releases. In that time it has undergone numerous changes, but this one is by far the most drastic. Microsoft has replaced the Start button with a Start Bar which is the hub of inter-app connectivity. In addition to the typical Windows logo, which will return you to the Start Screen, the Start Bar contains charms. Using these charms, regardless of which app is running you can access common features like searching and modifying settings. You can also use the Share and Devices charms to quickly send content to other apps and hardware like your printer. To display the Start Bar simply swipe your finger in from the right side of the screen and it will slide into place.
With the Start Bar visible you will see an overlay with system status information on the lower left side. It displays notifications, network and battery monitors, and the current date and time (See Figure 1-2). The Start Bar, on the right side, contains the Windows logo and four charms.
When using a mouse, Windows is all about the corners. To access the Start Bar move your mouse to the top right corner and it will appear. Others may find the keyboard shortcuts more convenient, in this case Windows key + C will show the Start Bar.
Each of these Charms are as follows:
Search
Windows has merged the All Programs list and the File System search into a common UI for searching everything on your computer (See Figure 1-3). The same interface for displaying apps is also used to provide search throughout the Windows experience. Figure 1-2. New Windows Start Bar slides in from the right side
You can search for apps, files, settings, and any information provided by your installed apps.
When using a keyboard, you can just start typing on the Start screen to search for an app. If you are in an app you can click the Windows key and then start typing.
Share
Share provides a way to send data to other applications without having to leave the app. Early samples treat this as an alternative to traditional copy and paste methods and examples include posting to Facebook, Twitter, or sending email, but the possi-bilities are endless.
Devices
Devices allows apps to communicate with the computer’s hardware. The initial exam-ples include printing, projecting, and sending content to your Xbox, other device, and/ or USB hard drives. Device manufacturers can communicate with apps in ways which are relevant to their device. Screens for this section will typically be developed by device manufacturers. For example, your printer will have specific screens for its use.
Settings
Settings is split into two sections; system settings and app settings. System settings contain quick access to networking, volume, brightness, notifications, power, and lan-guages. App settings depend on the app and developers should determine what settings are relevant to their apps.
Windows Programming Reimagined
The Win32 APIs have been a core component to native Windows programming for over 15 years. In addition to all the changes to Windows, Microsoft is reimaging the way in which programs, or apps as they are called, are written. Metro style apps can be written in the following ways:
• Javascript and HTML5/CSS3 • C# and XAML
• VB.NET and XAML • C++ and XAML • C++ with DirectX • Hybrid
All of the langauges above are designed to be first class citizens. This means that no matter what language you choose you will have equivalent capabilities. At this point the decision on which language to choose is going to be strongly guided by the prefer-ences of the team. Regardless of the choice you make all Metro-style apps communicate with the new Native Application Programming Interface (API) called the Windows Runtime, or just WinRT for short.
A New Native API, the Windows Runtime
Metro-style apps are all based on a new application model that has been completely rewritten from the ground up. While the Win32 APIs were written for C, WinRT APIs written in C++ and designed to be object oriented. This gives the APIs the flexibility to be used by multiple languages. Everything that is needed to host an application and communicate with the operating system has been updated or rewritten in native C++ and is exposed out via an API Metadata format (.winmd file).
This consistent framework allows the API to be optimized for performance. File access can be centralized and made consistent across all languages. User interface components can be hardware accelerated and common animations can become easily accessible. Resource management is handled at a higher level and currently running applications can be confident that they will be given additional resources if the system experiences pressure. In total, this gives users a better experience.
Language Support
In between the the different languages and the new WinRT APIs is a layer called the projection layer. This layer maintains the proxies and handles the activation of WinRT objects. For C# developers this means no more P/Invoke. The C# code you write just like regular code. While WinRT is designed for use with JavaScript, C#, Visual Basic,
and C++. This book will focus on C#, but the techniques are often the same and the syntax is suprisingly similar considering they are different languages.
JavaScript
Metro-style apps leverage the Internet Explorer WebHost, to render HTML5/CSS3, and the Chakra JavaScript engine to execute native web apps. These apps are as flexible as existing web apps, but they can perform tasks previously available only to desktop applications—tasks like using the camera to take a picture, accessing the accelerometer to determine the tilt of a device during game play, or reading and writing to a file on the local file system. In addition, JavaScript apps can communicate with other apps on the OS, as a source or a target of information, and provide interactive tiles and secon-dary tiles.
C# and Visual Basic
Existing WPF or Silverlight developers might wonder why the name changed to C# or Visual Basic and XAML and the answer comes from the addition of C++ and XAML. If you wanted to expose all of XAML to C++ as a UI technology it wouldn’t make much sense to spin up the CLR just to parse and render some XAML only to revert back to C++ for the remainder of your code execution. The only logical answer is to push XAML down further in the stack and expose it out through the same projection layer that is used for other Windows Runtime objects. This means that the XAML consumed from these Metro style apps is now written in C++. Many of the XAML controls and binding techniques remain, although there my slight differences, it is a complete rewrite in a completely new language after all.
For developers who are familiar with .NET, you’ll find many of the APIs and libraries will still be available. Microsoft has created a new profile, called the .NET Profile for Windows Metro style apps. Like the .NET Client profile, this is a subset of the full .NET Framework that is specific to Metro Style apps. In the process, they’ve removed dupli-cate and legacy code; optimized APIs for multiple core machines and asynchronous development; and hardware accelerated the UI layer. There may be new APIs to learn on the WinRT side, but .NET developers should find the developer experience ex-tremely familiar.
I often tell people that you can think of this change as if Microsoft took Silverlight or WPF and cut it in half. The XAML UI and application hosting controls were moved into the Windows Runtime with many brand new native Windows features. The re-mainder of the .NET components have been moved to this new .NET Profile for Win-dows Metro Style Apps.
C++
there were similar challenges, but unlike the managed C++, developers need a way to transition between native and managed C++. Windows 8 comes with a new C++ com-piler switch (/cx) that enables the C++ Comcom-piler Extensions. This exposes typical managed concepts, such as reference objects, partial classes, and generics, but allows easy portability between their native counterparts.
The WinRT libraries themselves are written through the same C++ ex-tensions made available to C++ developers. Objects that are projected out to other languages use a managed wrapper object, which points to the same memory as the native objects.
Hosted Application Model
Each Metro-style app is loaded into a new application host. The most important re-sponsibility is resource management. The way Windows ensures that the current app has the necessary resources available is by closing down other apps when needed. The two main resources that apps typically consume are CPU cycles and memory. These shutdowns are handled separately. First to be taken care of are the CPU cycles, shortly after an app has left the foreground it receives an event signaling itself to deac-tivate. This is the last chance to save state or consume the CPU, and this must be handled in a timely fashion. This is called tombstoning and from here the app is in a suspended state. The second step occurs when your system is low on memory. In this case, Windows will terminate the app without notification and free up memory. De-velopers can gain some startup performance if they realize that their app is not always terminated and they retain items in a cache. More information on tombstoning can be found in Chapter 3.
Single File Deployment
In the process of reimagining Windows, the application model, and the application programming interfaces (APIs), Microsoft overhauled the deployment process. This is the first time that Microsoft has allowed native apps to be installed from a single file. This file, or deployment package, is an .appx (pronounced App-X) file.
This new deployment process includes incremental updates. They support side-by-side installs of different versions for multiple users. Each application package is digitally signed with a certificate and hashes are created and verified for each app before exe-cution. More information about .appx packages can be found in (to come).
Windows Store
Getting your app to market and in front of Windows' large install base is simple with the integrated Windows Store. In order to have your apps published in the Windows
Store, developers will have to submit their apps for certification. Certification will verify code for a number of different conditions, such as invalid access to protected APIs, the use of proper capabilities, and proper handling of exceptions. More information about the Windows Store can be found in (to come).
Inside Metro-style Apps
The Windows Runtime provides a simple model for building apps of any type or design. However, in order to make a cohesive experience for all users, Microsoft is promoting a few design concepts that you should follow when building apps. These concepts include designing with typography, placing the back button in a consistent location, using the Application Bar, and providing elegant animation. Metro-style apps come with built-in support libraries and controls for these, so implementation is simplified.
Application Bar
With full screen apps and the lack of chrome on the windows, interfaces lose menu bars. These are the links you typically see at the top that say File, Tools, Help, etc. Metro-style apps have included a new Application Bar that is meant to provide appli-cation-specific buttons. When the user swipes their finger up from the bottom bezel it slides into place just like the Start Bar but from the bottom instead (See Figure 1-4).
To activate the application bar with a mouse just right-click or click Windows key + Z on the keyboard.
Application Bars are optional and completely customizable. Many apps are built so their Application Bar varies based on the context of the current page. The checklist for designing Application Bars available at http://msdn.microsoft.com/en-us/library/win
dows/apps/hh465302(v=VS.85).aspx, recommends right-aligning commands that vary in the app bar and left-aligning all the buttons that are consistent throughout the ap-plication.
Application settings do not belong on the Application Bar and should leverage the settings charm on the Start Bar. More information about the settings charm will be described later in Chapter 3.
Semantic Zoom
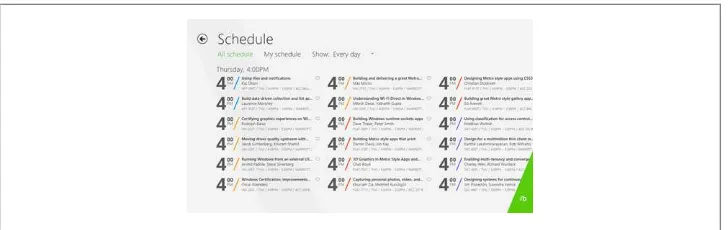
Anyone who has used a touch device is familiar with the pinch and stretch gestures used for zooming. This gesture has typically been used for zooming images, maps, or applications that have a functional requirement for zooming. Microsoft is trying to prove that almost every app can benefit from this semantic zoom. For example, if you have a list with hundreds of items, you can pinch your fingers on the screen, change the icon size, and get a view that provides more items than a standard list. Semantic zoom must be something that you decide to incorporate into your app, since it does not work by default. The sample app from the Build conference provides a great ex-ample: by simply pinching on the schedule of sessions you can change the list from a full view to a high level glance of all days (See Figure 1-5 and Figure 1-6).
The Windows Runtime provides built-in controls for SemanticZoom. This control has two zoom levels a ZoomedInView and a ZoomedOutView. To implement the control you provide a custom GridView or ListView for each view.
Animation
In order to build rich user experiences in your Metro-style apps, you need to consider the proper use of animation. Regardless of the language used, traditional forms of ani-mation are still available, such as DOM manipulation in JavaScript, or storyboards in XAML. In addition, Metro-style apps come with support for some common animations and transition.
Figure 1-5. Sample app from the Build conference in full view
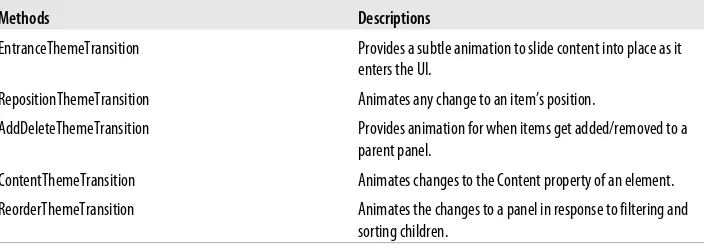
In XAML-based applications you can use ThemeTransistions. These are provided by the Windows Runtime and as with any XAML control, you can create your own tran-sitions or use one of the built in ones listed in Table 1-1.
Table 1-1. A list of WinRT XAML animations from Windows.UI.Xaml.Media.Animation
Methods Descriptions
EntranceThemeTransition Provides a subtle animation to slide content into place as it enters the UI.
RepositionThemeTransition Animates any change to an item’s position.
AddDeleteThemeTransition Provides animation for when items get added/removed to a parent panel.
ContentThemeTransition Animates changes to the Content property of an element.
ReorderThemeTransition Animates the changes to a panel in response to filtering and sorting children.
For a full list of XAML animations see http://msdn.microsoft.com/en-us/library/win
dows/apps/br243232.aspx.
Animations will not be covered in depth in this book. For more information about animation using XAML you can find separate documentation at http://msdn.microsoft
.com/en-us/library/windows/apps/hh452703.aspx.
Outside Your App
The tiles on the new Start Screen can be updated periodically to provide important details regarding your app. Apps can send and receive information from various open contracts allowing them to get content from a web of other apps on the users system that are unknown to developers at design time. Implementing these features appropri-ately adds to the users' experience when they use your app, and creates a better web of collective apps for the users.
Tiles
Every metro style app comes with a primary tile. Developers must provide an image for every application, to be used as the default tile. This tile is displayed until the application is launched and an update is sent. The default tile has to be a static image (150x150 for square tiles, and 310x150 for wide tiles). Once an update is sent the tile becomes a Live Tile. Depending on the app it may highlight an upcoming appointment, the weather in the neighborhood, or the latest sports scores for a favorite team. These apps are providing information even when they are not active.
In addition to a primary tile, you can create multiple secondary tiles for your app. The difference is that secondary tiles can link to a specific page or section in your app, a process called "deep linking."
Pickers
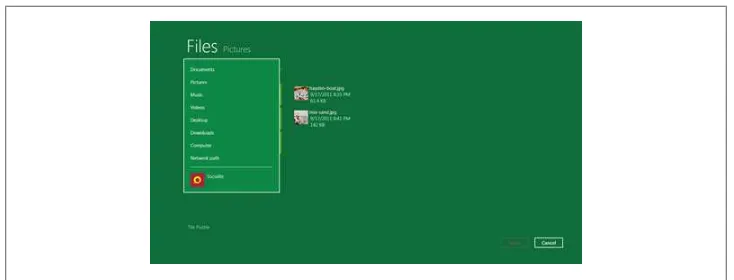
Due to the multitude of viruses, malicious software and the like in the wild, Microsoft has taken to thwart these attempts and disabled raw access to the file system. WinRT provides a feature called Pickers. Pickers come in a variety of forms, such as FilePickers, FolderPickers, and ContactPickers. They provide the functionality of a typical file di-alog box, except that they also can expose content from third party apps. If your app has data relevant to these pickers you can provide a contract that allows your app to provide data to any other app that uses the same file picker. Figure 1-7 shows a file picker of images. Notice the Socialite app (Socialite is a Facebook demo) listed in the menu. This allows you to pick images from your photos that were previously uploaded to Facebook.
Charms
A big challenge in current Windows development is sharing content between applica-tions. Pickers do a lot to help this, but let’s say you wanted to share a link from a news article with all of your Twitter followers. In Windows 7 this was possible, but it caused an abrupt context switch. You would copy the link into their clipboard, start the Twitter client, switch applications, paste the link, share the content, and then you could switch back to your previous task. In Windows 8, you can simply activate the start bar, choose the Share charm, select a Twitter client, and click share without ever having to leave the application.
Apps can define capabilities that allow them to be both sources and targets for charms. More information on charms can be found in (to come).
Sensors and Devices
Windows 8 is packaged with support for more sensors and devices because of new devices like tablets and mobile computing. The sample tablet from the Build conference has an forward and rear facing camera, an accelerometer, a GPS, and even a near field communication card. As a developer, you have access to use them for any application. The Windows Runtime includes APIs for communicating with all kinds of hardware. Some of these devices may only be relevant to tablets. Regardless, these APIs make communication with these devices easier than ever before. They provide consistency and access to raw, native features so complex algorithms and streaming servers are not required.
More information about sensors and devices can be found in (to come).
Summary
You have been given a glimpse of what is in store for you as you begin to develop for Windows 8. This is one of the biggest releases for Microsoft in some time, with en-hancements to ensure a safe and optimal experience for the user. I hope this book will show you how writing Metro-style apps can be a pleasurable experience for developers as well. Maybe your app will be the next featured app on the Windows Store, with downloads beyond your expectations.
CHAPTER 2
Getting Started
Where is the Hello World app?
Rather than show you a simple Hello World app, which is good at teaching syntax, but not much else, I wanted to build a practical app that can be used throughout the book. This allows me to progressively build on the examples and use the native features of Windows 8 in a complete system.
All kidding aside, if you want a Hello World app see the Getting Started Guide on the Windows Developer Center at http://msdn.microsoft.com/ library/windows/apps/br211386
Microsoft’s search engine Bing, like many popular search engines, provides a web ser-vice for retrieving their content. This is perfect for showing what Windows 8 apps can do because it allows me to communicate with a free online service and demonstrate how to search, share, update tiles, and much more with a vast collection of images. I’ll create a simple version first that is a single-page application with a textbox and a button to execute the search. When the user clicks on the search button the app will load the results from the web service, attach them to a listbox, and display the results (see Figure 2-1).
Before you start building the app, let me take a moment to describe the Bing image search API so you can become familiar with the results format.
Bing Search API
In order to retrieve an XML file containing a list of images related to the word trains
you would use the following URL:
http://api.search.live.net/xml.aspx?AppId=<APP_ID>&Market=en-US&Query=trains&Sources=image
Assuming you have your AppId already, you can replace the part in the URL that says <APP_ID> with your actual AppId and enter the URL directly into your browser. Fig-ure 2-2 shows a screenshot of what you should see when you do this. If you don’t have an AppId you can create one by going to the Bing Developer page at http://www.bing
.com/toolbox/bingdeveloper/.
This is just a basic query; in addition to XML, the web service offers other file formats, like a Javascript Object Notation (JSON) format. To use the JSON format, change the URL from xml.aspx to json.aspx. There are also numerous other query parameters that Figure 2-1. Bing Search App
can be added to your query, for a full list of options visit http://www.bing.com/toolbox/
bingdeveloper/. The completed app will use various parameters based on user settings
which will be accessible from the settings charm within Windows 8.
Getting Started: The BingSimpleSearch App
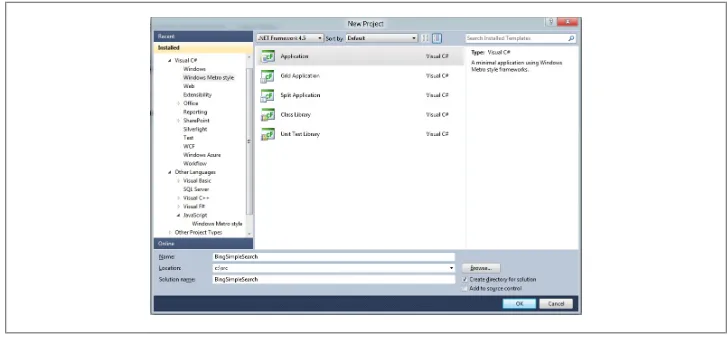
If you’ve ever created a new project in Visual Studio you already know how to get started creating Metro-style apps. To begin, open Visual Studio 11, on a Windows 8 machine, and choose File → New → Project. Figure 2-3 shows the full list of templates available for Metro-style apps. Each language contains a similar list of templates for creating Metro-style apps. Select Application under the Visual C# → Metro-style applications folder and enter the name BingSimpleSearch and click OK.
Now that you have created a new project, open Solution Explorer (View→Solution Explorer) you should see the files from Figure 2-4.
The empty application template for Metro-style apps contains two XAML files. Both of these files contain an associated code-behind file (i.e., a file with the same name with the addition of a .cs)
App.xaml
App.xaml is the appliation entry point for your project. In this simple application it just loads the MainPage. As an application evolves this file can be used for ini-tializing your application depedencies (eg. an inversion of control container), han-dling tombstoning and saving of settings, and providing activation triggers.
MainPage.xaml
MainPage.xaml is primary view for the application and it contains no content by default. As an application evolves this file would likely contain a Frame control
(http://link-to-frame) which allows your app to provide navigation between
mul-Figure 2-3. New Project Dialog
tiple pages. It will also be used as the primary shell of UI for your apps global items like settings.
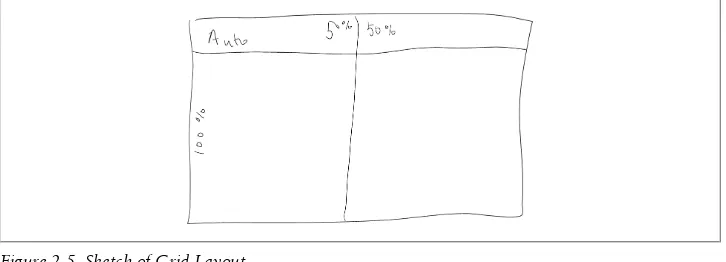
Open up the MainPage.xaml file and you will see the initial XAML content provided by the template. This is where you will be adding the TextBox and the Button to perform your searching. Scroll down to the root grid (it says x:Name="LayoutRoot"). Before you add the textbox and the button you are going to layout the grid’s columns and rows as in Figure 2-5.
To do this you need two rows and two columns. The two columns will be evenly spaced at 50% and 50%. The two rows, on the other hand, will be setup to provide only the minimum amount of space required for the textbox and the remain space will be allo-Figure 2-4. Solution Explorer for New Project
cated to the ListBox (as seen in Figure 2-5). The XAML for the grid layout definition would look like Example 2-1.
Example 2-1. Definition of Grid Layout
<Grid.RowDefinitions>
<RowDefinition Height="Auto" /> <RowDefinition />
</Grid.RowDefinitions> <Grid.ColumnDefinitions> <ColumnDefinition /> <ColumnDefinition /> </Grid.ColumnDefinitions>
Immediately following the row and column definitions add a TextBox and a Button like Example 2-2
Example 2-2. TextBox and Button for use with search app
<TextBox x:Name="SearchQuery" />
<Button Content="Search" Grid.Column="1" Click="Search_Click" />
Notice that you are providing a name to the textbox so that it can be accessed from the code-behind later. In addition, you only need to supply the row and column assign-ments if they are not equal to 0. The textbox is defaulted to Grid.Row="0" and Grid.Col umn="0". On the button there is a Click event assignment to Search_Click, this maps to a method called Search_Click on the code-behind where the Bing search code will be written, see Example 2-3.
Example 2-3. Search event on the code-behind for handling the Bing web service call
private async void Search_Click(object sender, RoutedEventArgs e) {
// Put webservice code here }
async and await keywords
Communicating with a web service may take longer than 50ms. Because of that, WinRT enforces asynchronous, in .NET you can use the new async/await keywords. These new keywords allow you to write your asynchronous code as if it were synchronous and the compiler handles the transfering of data between different threads. You will notice later in Example 2-5, the await keyword is used to unwrap the Task<T> object from an async method. For example, if you have an asynchronous method that returns a Task<string>, calling that method with an await keyword will result in just a string. Despite the fact that the code in the example reads as a synchronous call, and debugs like one, under the covers it’s actually triggering a continuation in which case the method gets split into two, the code before the await and the code after the await. For more information about the new async and await key-words see http://link-to-async.
Bing ImageSearchResponse Model
Before writing the code to search you need to create a model of the types being returned. If you were to take the results found in Figure 2-2 and map them to a C# object it would look something like Example 2-4. Once you download the content from the web you can map it to these types and use them to bind to your UI.
Example 2-4. Object model to map to the Bing image search web service response
public class BingResponse
{
public SearchResponse SearchResponse { get; set; } }
public class SearchResponse
{
public string Version { get; set; }
public ImageSearchResponse Image { get; set; } }
public class ImageSearchResponse
{
public ImageDetailsResultsList Results { get; set; } }
public class ImageDetailsResultsList : List<ImageDetail> {
}
public class ImageDetail
{
public int Width { get; set; } public int Height { get; set; } public int FileSize { get; set; } public string ContentType { get; set; } public Thumbnail Thumbnail { get; set; } }
public class Thumbnail
{
public string Url { get; set; } public string ContentType { get; set; } public int Width { get; set; }
public int Height { get; set; } public int FileSize { get; set; } }
Calling the Bing Search API
In the past, .NET has had numerous ways of communicating over HTTP to retrieve results of this kind. The new .NET Profile for Metro-style apps has one recommended aynchronous way and that is the HttpClient. Microsoft has simplified the API, so per-forming an HTTP GET or POST is easy. The more robust part of the API comes from how you read the response; you can read the response as a stream, a byte array, or as a string. In addition you can check for headers and status codes, or call EnsureSuccess StatusCode() to verify that the request was successful. In order to get results for the URL you simply call the HttpClient's GetAsync method with the uri.
Example 2-5. Web service code for contacting Bing image web service.
const string uriFormat = "http://api.search.live.net/json.aspx?AppId={0}&Market=en-US&Query={1}&Sources=image&Image.Count=20&Image.Offset=0";
string apikey = "<API_KEY>";
string uri = string.Format(uriFormat, apikey, this.SearchQuery.Text);
using (var client = new System.Net.Http.HttpClient()) {
var response = await client.GetAsync(uri);
var stream = response.EnsureSuccessStatusCode().Content.ContentReadStream; // handle the response stream
}
Handling the Response
You may have noticed in Example 2-5 that we used json.aspx in the URL. The JSON results are smaller in download size than the XML counterpart, choosing options that limit the use of your user’s bandwidth is always preferred. (Although, it can be argued that this sample app uses far more bandwidth for downloading images than compared to the web service call). At this point serializing the response is easy, create a new DataContractJsonSeralizer, pass it the model type, and then call ReadObject with the
response stream. Don’t forget to add a using statement for System.Runtime.Serializa tion.Json.
Example 2-6. Serialization code to map the web service response to the object model
var serializer = new DataContractJsonSerializer(typeof(BingResponse)); var results = serializer.ReadObject(stream) as BingResponse;
ImagesList.ItemsSource = results.SearchResponse.Image.Results;
Wrapping up the UI
The final piece is to bind a visual element to the model that was just populated. For this I am going to use a ListBox. On the list box you will need to specify a DataTem plate for how to visually represent the model of the search result. Example 2-7 shows the ListBox definition and should be placed in the MainPage.xaml file directly under the search button.
Example 2-7. ListBox with a DataTemplate for an image result
<ListBox x:Name="ImagesList" Margin="40" Grid.Row="1"> <ListBox.ItemTemplate>
<DataTemplate>
<StackPanel Orientation="Horizontal">
<Image Source="{Binding Thumbnail.Url}" Width="100" /> <TextBlock Text="{Binding Title}" />
</StackPanel> </DataTemplate> </ListBox.ItemTemplate> </ListBox>
As an extra touch we are going to add two images mapped to the thumbnail and the full size image on the right-hand column. This will give you the typical effect you may see where an image is pixelated while loading, but becomes sharper once the download of the full-size image completes. For this effect we stack the images on top of each other and, since they are the same aspect ratio, it shows the thumbnail and then covers it up with the full-size image (see Example 2-8).
Example 2-8. Large screen image to map to selected item
<Grid Grid.Row="1" Grid.Column="1">
<Image Source="{Binding SelectedItem.Thumbnail.Url, ElementName=ImagesList}" /> <Image Source="{Binding SelectedItem.MediaUrl, ElementName=ImagesList}" /> </Grid>
Running the Bing Simple Search app
At this point your patience will be rewarded. You can click Run (the play button) in Visual Studio and your app will build, deploy (install on your Metro start screen), and launch. Now you can enter whatever search term you desire and the listbox will ulate with the thumbnails. If you select one of the images, the full-size image will pop-ulate on the right-hand side of the screen as in Figure 2-6.
Summary
This is a simple example, one where we created a few controls, used C# to access a web service, parsed the results, and then displayed that data to the user using a List Box control. With the exception of the XAML controls, all of the code was written from the .NET Profile for Windows Metro-style Apps. That means none of the C# code actually communicated with the Windows Runtime APIs. In the next two chapters I will show how to start communicating with WinRT.
Figure 2-6. Bing SimpleSearch in action
CHAPTER 3
Application Architecture
How Will the Bing Image Search App Change Going Forward?
In order to have a fully functioning app and eventually publish it to the Windows Store you will need to properly handle application state, be considerate of the user’s band-width, disk space, and other system resources. I’ve simplified this to what I would call being a developer good citizen of the platform. This means providing users with an optimal experience regardless of the device or the presence of network connectivity. Whether you value user experience or not, Microsoft has a set of guidelines outlining, in general, the user experience, that need to be followed for certification to the Windows Store. These guidelines do value user experience and if you plan to release your app through the Windows Store you should consider these guidelines from the start. For more information on what’s required by the Windows Store see (to come).This chapter describes core components of the application. These concepts will be used throughout the book, and I will reference various aspects of the application through the use of these techniques. If you are familiar with previous XAML-based technologies you will likely be familiar with these concepts. As a reminder all the code for the book’s full application are available online at https://github.com/bendewey/GettingStartedWith
MetroApps.
Goals
Before I get to deep into the code, let’s step back and review the goals of the Bing Image Search app.
Usability
Usability goals determine the way users interact with the app from how quickly they can use it to how satisfied they are with the experience. In my case usability, function-ality, and interface design goals are all synonymous.
Allow users to search, browse, save, and share images
The Bing Image Search app will use the Bing Search engine to retrieve a list of search results and display them in a number of different user-friendly views.
Make use of the charms where applicable (search, share, settings)
The Windows 8 Charms provide a nice way to perform many tasks that are com-mon to all applications. A goal of this app is to use these where ever applicable. This does not mean that you should rely on the charms for all your user interaction, in contrast, I encourage you to provide app bar buttons that trigger the charm panes and provide users with an alternative to opening the charms to discover critical pieces of your app, like Search.
Expose the content to other apps via the file Pickers
Windows 8 provides new and improved file Pickers that can load images from numerous locations, not only the local file system. The Bing Image Search app should allow users from other apps to select images for use within their app.
Should support multiple layouts
In addition to multple screen resolutions, you will need to consider how your ap-plication will respond to changes in orientation (portait and landscape) and how it will look in the new Snapped mode. The Windows 8 Samples, available from the Windows Developer Center (http://code.msdn.microsoft.com/windowsapps/), use an IViewStateAware interface to provide pages with updates to their state. The Bing Image Search application shell will use the same technique to notify its pages of any changes.
Use gestures and sensors to provide users with unique ways to interact with the app
While a button to load more results is sufficient, it’s becoming common for tablets and slates to support a shake gesture for reloading content. In order to be on the cutting edge, the Bing Image Search app should support these gestures.
Non-functional
Non-functional goals describe what the app should be, this is in contrast to what the app should do in the previous section. This also includes features that may not be encountered during typical application use, but would ultimately effect the user expe-rience.
Be a good citizen on the platform
To be a good citizen means to do all you can to ensure a good user experience. This means your app should be responsive and clean. A good experience in the app is not the only concern, being a good citizen also includes sparing use of network bandwidth and isolated storage so that your app does not hog system resources.
Should gracefully respond to the user when network access is disabled
the ability to provide valid data to the user when offline, then I encourage you to consider this goal for yourself. In this case simply informing the users that the app is not available when the user is offline will suffice.
Should support a loading progress bar and downloading indicators
Because all the data for the Bing Image Search app comes from online sources, the network traffic can be quite heavy. For this reason, it’s imperative to provide pro-gress bars and status information to the user so they know when the app is busy. The main Shell of the application exposes status update functionality through an IStatusService interface.
Should gracefully handle exception messages
The Bing Image Search app should never return sensitive information regarding exceptions to users. To handle this the ExceptionService class can be used through-out the app or as unhandled exceptions are encountered it can provide users with friendly error messages.
Should perform all actions asynchronously
WinRT does not provide any way to perform actions that take longer then 50ms without using an asynchrous pattern. The Bing Image Search app maintains this requirement and performs all long-running tasks asynchronously so the user ex-perience is never jeopardized.
Development Process Goals
While the previous two goals relate to the overall user experience, Development Process goals impact developers and the overall code maintainability throughout the lifetime of the application.
Bing Image Search should have highly testable code.
The Bing Image Search uses the Model-View-ViewModel (MVVM) pattern to pro-vide testable application logic. View models are propro-vided to their respective views via the ViewModelLocator. All of the view models and services are instantiated via a central Inversion of Control (IoC) container and dependencies are provided to their objects via Dependency Injection (DI). This allows the unit tests to provide mock implementations when testing functionality.
Bing Image Search wants to be able to adapt to the application to work with any new capabilities of future versions.
The Bing Image Search app has an ApplicationSettings class which is a strongly-typed wrapper over application storage. The underlying implementation remains flexible to change. In the event that alternative storage needs arise, the object ex-posed to the consuming classes remains unchanged.
Bing Image Search wants to handle all events in a centralized location, be it Windows events or local app events.
The Bing Image Search app uses a MessageHub to handle messages. Messages are used to signal the occurence of an event in a loosely coupled fashion. Messages are made up of two parts an IMessage which is the payload and an IHandler which is responsible for handling the message when it is sent. There is also an IMessage Pump which are responsible for listening to events like a search action or a share data request for Windows, at which point its only job is to Send a message.
The WinRT platform is new, so expect it to change and design your application so that you can easily modify it to use new features.
These goals allow me to set a standard for quality and functionality that can be used when testing the app. The remainder of the chapter will focus on the actual application from designing the interface, structuring the pages, and core functionality within the application.
Design of the User Interface
In order to accomplish the goals laid out in this Chapter the Bing Image Search app needs to be small and easy to navigate. With that in mind the app is broken up into three pages:
• SearchHistoryPage • SearchResultsPage • DetailsPage
The primary page that the user sees is the SearchHistoryPage, this outlines the user’s searching history and is the home screen for the application. Once a user has performed a search they are navigated to a SearchResultsPage. The SearchResultsPage uses a SemanticZoom control with a thumbnail view and full image view. There are buttons on the bottom in the app bar that allow users to switch between views. Once an image is selected, the user has the ability to load a DetailsPage and from there they can perform a number of Windows 8 tasks. Figure 3-1 shows a detailed diagram of the navigation events in the Bing Image Search app.
Table 3-1. Application Entry Points
Entry Point Override in App.xaml Description Bing Image Search app behavior OnLaunching Occurs when the user clicks on the Tile
from the Start Screen or Apps list
Entry Point Override in App.xaml Description Bing Image Search app behavior OnSearchActivated Occurs when the user clicks the app icon
from within the Windows SearchPane when the app is not currently in the foreground. (i.e., From within another app or from the Start Screen)
Loads the main Shell and immediately sends a SearchQueryRequested Message to the MessageHub, which in turn navigates to the SearchResults-Page.
OnFileOpenPickerActivated Occurs when the user launches the Fil eOpenPicker from another applica-tion, clicks the Files button, and selects the Bing Image Search app.
Loads the custom FileOpenPicker shell with navigation disabled.
In addition to the overall design of the application, Figure 3-1 also shows the different entry points into the app. All of these entry points, described in Table 3-1, occur in the App.xaml.cs file. This App.xaml file contains the resource, or style, definitions for use throughout the application. The associated App.xaml.cs file contains the App class, which, like WPF and Silverlight, hosts the application startup and shutdown event or overrides. This App class, or application class, creates a new Shell control, assigns it to the current window, and activates that window, as seen in Example 3-1. This main application Shell is responsible for the navigation, title, back button and the Preferences page. In the case of the OnFileOpenPickerActivated entry point, the full application UI won’t work, that is why it loads a custom shell, specifically the FilePickerShell, to run the application. The file picker will be described in more detail in (to come).
Figure 3-1. Navigation Diagram of Bing Image Search App
Example 3-1. Activating the Application Shell
Window.Current.Content = new Shell();
Window.Current.Activate();
Application Diagram
The Bing Image Search app is made of models, views, view models, application services, and Windows serices. Figure 3-2 describes the structure of the Bing Image Search ap-plication. This diagram is simplified in a number of ways, but the core components in the application services layer remain. You will also notice that the view models don’t talk to the Windows services directly. The application services act as a proxy to the Windows Services, which maintains code testability.
The application services are broken up into five categories and I’ll review them in the order in which they occur when the application activates.
• MVVM & the ViewModelLocator • IoC
• MessagingHub • ApplicationSettings
Model-View-ViewModel (MVVM)
Model-View-ViewModel (MVVM) is a common practice in XAML and C# that was made popular by WPF and Silverlight and makes extensive use of the databinding capabilities in XAML. The ViewModel exposes properties on the Model objects to the View, which uses databinding to display that information to the user. In addition to binding data from the ViewModel to the View, events from the View are routed to the ViewModel via commands.
MVVM as a design pattern is a broad topic that I will not be able to cover in this short guide. This section will focus on what’s relevant for this apps, if you are new to MVVM then you may want to take a look at WPF Apps With The Model-View-ViewModel Design Pattern an article by Josh Smith in MSDN Magazine (http://msdn.microsoft.com/en-us/ magazine/dd419663.aspx).
Who Comes First the View or the ViewModel (the ViewModelLocator)
There are many schools of thought regarding which object should be created first, the View or the ViewModel. While there are merits in both, I find that using a ViewModel Locator for small task-oriented projects, like those typically found in apps for phones and tablets, is easy to manage. This approach may not be appropriate for larger appli-cations because the statically-typed nature of the properties may become difficult to manage.The ViewModelLocator is created as an application resource (See Example 3-2) and is used, in this case, with an Inversion of Control (IoC) container to provide object acti-vation for almost everything in the system. Within the ViewModelLocator you will find properties for each of the views. Example 3-3 shows the property for the SearchHistor yViewModel. This property retrieves an instance of the ViewModel from the container, which in the case of the Bing Image Search app returns a new instance of the ViewModel every time. This allows the ViewModel to load any information required for the page at the time the page is created. Example 3-4 shows the final piece of the puzzle. When a new page, a.k.a. the new view, loads it sets its DataContext, in XAML, to the property on the ViewModelLocator, which in turn creates the ViewModel for that page.
The View first style of MVVM works well with the page navigation model in XAML, because it decrease the concerns prior to navigating to a page. All you need to do is store the current user state and tell the application to navigate to a new page. Con-versely, you would have to create the ViewModel and populate it with information before navigating to a new page, which can negatively effect maintainability as calling
pages need to know specific details about any related pages. In addition, by storing all of the navigation state change information in application storage you get the added benefit of saving your user’s place in the application as they navigate around, which makes tombstoning easier.
Example 3-2. ViewModelLocator creation
<App.Resources>
<core:ViewModelLocator x:Key="ViewModelLocator" /> <!-- Other styles and resources --->
</App.Resources>
Example 3-3. SearchHistoryViewModel Property in the ViewModelLocator
public SearchHistoryViewModel SearchHistoryViewModel
{
get { return Container.Resolve<SearchHistoryViewModel>(); } }
Example 3-4. SearchHistoryPage DataContext Binding to ViewModel
<Page x:Class="BingImageSearch.SearchHistoryPage"
xmlns="http://schemas.microsoft.com/winfx/2006/xaml/presentation"
xmlns:x="http://schemas.microsoft.com/winfx/2006/xaml"
DataContext="{Binding SearchHistoryViewModel, Source={StaticResource ViewModelLocator}}"> <!-- code removed for clarity -->
</Page>
Commands
Instead of handling events in the code-behind, which is difficult to test, the MVVM pattern leverages commands to respond to user interactivity. A command is nothing more than a generic interface in WinRT. The way I’ve choosen to implement them uses a DelegateCommand which can be found in numerous places including the Prism Frame-work for WPF and Silverlight. Once you’ve included the DelegateCommand, wiring them up to execute methods is as simple as supplying a delegate to the constructor as seen in Example 3-5. In general, I try to ensure that the ViewModels have minimal respon-sibilities, except for coordinating with the view. For this reason many command han-dlers have a simple action which sends the required message to the MessageHub for processing.
Example 3-5. Defining a Command
public SearchHistoryViewModel(/* insert depedencies here */) {
SearchCommand = new DelegateCommand(Search); }
public void Search() {
// Send a message to the MessageHub. }
Inversion of Control (IoC) Container
Numerous Inversion of Control (IoC) containers have been created by the .NET com-munity and make the process of configuring types for your application quite easy. When leveraging the Depedency Inversion principle (or Depedency Injection) your services will likely have nested dependencies, which lead to quite a bit of set up. The IoC con-tainer solves this by handling the setup of your application type mappings in a cen-tralized location. In addition the IoC container is responsible for maintaining the life-time of each object in your application. If you want more info about IoC containers there is plenty of information online, my favorite resource is still the DNR TV video
James Kovacs' roll-your-own IoC container at http://www.dnrtv.com/default.aspx?show
Num=126.
You should consider carefully which objects you should reuse and which objects you should instantiate on demand, also known as Single tonLifetime and TransientLifetime respectively. Reusing objects can improve the application’s performance at the expense of memory uti-lization.
Since the .NET Windows Tailored Profile is new, the options for containers are limited. I’d imagine that many more containers will become available with time. For now, there is a nice container that is available from codeplex called MetroIoC (http://metroioc .codeplex.com/).
The ViewModelLocator maintains a reference to the application’s only IoC container and uses it to create all the ViewModels. Example 3-6 shows how the Container is created in the ViewModelLocator it uses a Lazy<T> object which builds the container the first time it’s requested. The constructor for the lazy object takes a delegate to create an object of the requested type. In the case of Example 3-6, the lazy construction is off-loaded to the IoC.BuildContainer method which can be seen in Example 3-7.
Example 3-6. Container declaration
private Lazy<IContainer> _container;
public IContainer Container
{
get { return _container.Value; } }
public ViewModelLocator() {
_container = new Lazy<IContainer>(IoC.BuildContainer); }
Example 3-7. BuildContainer method (IoC.cs)
public class IoC
{
public static IContainer BuildContainer() {
var container =