VB 2008
Beginning
VB 2008
From Novice to Professional
Beginning VB 2008
From Novice to Professional
■ ■ ■
All rights reserved. No part of this work may be reproduced or transmitted in any form or by any means, electronic or mechanical, including photocopying, recording, or by any information storage or retrieval system, without the prior written permission of the copyright owner and the publisher.
ISBN-13 (pbk): 978-1-59059-938-9
ISBN-10 (pbk): 1-59059-938-1
ISBN-13 (electronic): 978-1-4302-0542-5
ISBN-10 (electronic): 1-4302-0542-3
Printed and bound in the United States of America 9 8 7 6 5 4 3 2 1
Trademarked names may appear in this book. Rather than use a trademark symbol with every occurrence of a trademarked name, we use the names only in an editorial fashion and to the benefit of the trademark owner, with no intention of infringement of the trademark.
Lead Editor: Matthew Moodie Technical Reviewer: Andy Olsen
Editorial Board: Clay Andres, Steve Anglin, Ewan Buckingham, Tony Campbell, Gary Cornell,
Jonathan Gennick, Kevin Goff, Matthew Moodie, Joseph Ottinger, Jeffrey Pepper, Frank Pohlmann, Ben Renow-Clarke, Dominic Shakeshaft, Matt Wade, Tom Welsh
Project Manager: Sofia Marchant Copy Editor: Marilyn Smith
Associate Production Director: Kari Brooks-Copony Production Editor: Laura Esterman
Compositor: Susan Glinert Stevens Proofreader: Nancy Riddiough
Indexer: Broccoli Information Management Artist: Kinetic Publishing Services, LLC Cover Designer: Kurt Krames
Manufacturing Director: Tom Debolski
Distributed to the book trade worldwide by Springer-Verlag New York, Inc., 233 Spring Street, 6th Floor, New York, NY 10013. Phone 1-800-SPRINGER, fax 201-348-4505, e-mail [email protected], or visit http://www.springeronline.com.
For information on translations, please contact Apress directly at 2855 Telegraph Avenue, Suite 600, Berkeley, CA 94705. Phone 510-549-5930, fax 510-549-5939, e-mail [email protected], or visit http:// www.apress.com.
Apress and friends of ED books may be purchased in bulk for academic, corporate, or promotional use. eBook versions and licenses are also available for most titles. For more information, reference our Special Bulk Sales–eBook Licensing web page at http://www.apress.com/info/bulksales.
The information in this book is distributed on an “as is” basis, without warranty. Although every precaution has been taken in the preparation of this work, neither the author(s) nor Apress shall have any liability to any person or entity with respect to any loss or damage caused or alleged to be caused directly or indirectly by the information contained in this work.
“A common mistake that people make when trying to design something completely foolproof is to underestimate the ingenuity of complete fools.”
“The major difference between a thing that might go wrong and a thing that cannot possibly go wrong is that when a thing that cannot possibly go wrong
goes wrong it usually turns out to be impossible to get at or repair.”
v
Contents at a Glance
About the Author
. . . xvAbout the Technical Reviewer
. . . xviiIntroduction
. . . xix■
CHAPTER 1
Ready, Steady, Go!
. . . 1■
CHAPTER 2
Learning About .NET Number and Value Types
. . . 25■
CHAPTER 3
Learning About String Manipulations
. . . 51■
CHAPTER 4
Learning About Data Structures, Decisions, and Loops
. . . 77■
CHAPTER 5
Learning About Visual Basic Exception Handling
. . . 115■
CHAPTER 6
Learning the Basics of Object-Oriented Programming
. . . 135■
CHAPTER 7
Learning About Components and Class Hierarchies
. . . 163■
CHAPTER 8
Learning About Component-Oriented Architecture
. . . 197■
CHAPTER 9
Learning About Lists, Delegates, and Lambda Expressions
. . . 229■
CHAPTER 10
Learning About Persistence
. . . 249■
CHAPTER 11
Learning About .NET Generics
. . . 285■
CHAPTER 12
Learning About Application Configuration and
Dynamic Loading
. . . 313■
CHAPTER 13
Learning About Multithreading
. . . 341■
CHAPTER 14
Learning About Relational Database Data
. . . 371■
CHAPTER 15
Learning About LINQ
. . . 395■
CHAPTER 16
Learning About Other Visual Basic Techniques
. . . 417vii
Contents
About the Author
. . . xvAbout the Technical Reviewer
. . . xviiIntroduction
. . . xix■
CHAPTER 1
Ready, Steady, Go!
. . . 1Downloading and Installing the Tools
. . . 1Downloading Visual Basic Express
. . . 2Installing Visual Basic Express
. . . 3Choosing the Application Type
. . . 3Creating Projects and Solutions
. . . 4Creating the Windows Application
. . . 4Viewing the Source Code
. . . 5Saving the Project
. . . 6Running the Windows Application
. . . 7Making the Windows Application Say Hello
. . . 8Adding Comments to the Application
. . . 11Navigating the User Controls of the Solution
. . . 12Creating the Console Application
. . . 12Adding a Console Application Project to the Solution
. . . 12Making the Console Application Say Hello
. . . 13Setting the Startup Project
. . . 13Running the Console Project
. . . 13Creating the Class Library
. . . 14Adding a Class Library Project to the Solution
. . . 14Moving Functionality
. . . 15Defining References
. . . 15Calling Class Library Functionality
. . . 16Using Variables and Constants
. . . 17Understanding How the .NET Framework Works
. . . 19The Important Stuff to Remember
. . . 21■
CHAPTER 2
Learning About .NET Number and Value Types
. . . 25Focusing and Organizing Your Development
. . . 25Organizing the Calculator
. . . 26Focusing the Calculator
. . . 27Implementing the Class Library
. . . 30Writing the Add() Method
. . . 33Writing Code to Test the Add() Method
. . . 35Understanding Problems with Numeric Numbers
. . . 40Understanding Numeric and Value Data Types
. . . 42Understanding Value and Reference Types
. . . 42Understanding the CLR Numeric Types
. . . 43Finishing the Calculator
. . . 47The Important Stuff to Remember
. . . 48Some Things for You to Do
. . . 48■
CHAPTER 3
Learning About String Manipulations
. . . 51Organizing the Translation Application
. . . 51Building the Translator Application
. . . 52Creating the Translator Class
. . . 52Translating Hello
. . . 53Creating the Test Application
. . . 53Answering the Question of Responsibility
. . . 55Investigating the String Type
. . . 55Solving the Extra Whitespace Problem
. . . 60Quoting Strings
. . . 65Character Mapping
. . . 67Dealing with Languages and Cultures
. . . 68Setting Culture and Language in Windows
. . . 68Parsing and Processing Numbers
. . . 69Working with Cultures
. . . 72The Important Stuff to Remember
. . . 74Some Things for You to Do
. . . 75■
CHAPTER 4
Learning About Data Structures, Decisions,
and Loops
. . . 77Understanding the Depth-First Search Algorithm
. . . 77Implementing User-Defined Types
. . . 81Declaring Structures and Classes
. . . 81Organizing the Search Algorithm
. . . 87Writing the Depth-First Search Code
. . . 89Defining and Implementing the Data Structure
. . . 89Defining the Algorithm Test
. . . 98Implementing the Depth-First Search Algorithm
. . . 102Running the Depth-First Search Algorithm
. . . 110The Important Stuff to Remember
. . . 111Some Things for You to Do
. . . 112■
CHAPTER 5
Learning About Visual Basic Exception Handling
. . . 115Understanding Errors, Exceptions, and Exception Handling
. . . 115Running the Debugger
. . . 116Handling Exceptions
. . . 117Catching Exceptions
. . . 118Implementing Exception Handlers
. . . 120Safeguarding Against Stack Unwinding
. . . 123Filtering Exceptions
. . . 126Writing Exception-Safe Code
. . . 129Writing Defensive Code
. . . 129Using Default State
. . . 131Processing Errors That Are Warnings
. . . 133The Important Stuff to Remember
. . . 133Some Things for You to Do
. . . 134■
CHAPTER 6
Learning the Basics of
Object-Oriented Programming
. . . 135Understanding Currency Spreads
. . . 136Organizing the Currency Exchange Application
. . . 137Writing Tests for the Currency Exchange Application
. . . 137Getting Started with Structural Code
. . . 138Understanding Base Classes
. . . 138Understanding Inheritance
. . . 139Using Visual Basic Properties
. . . 141Understanding Inheritance and Scope Modifiers
. . . 144Handling Verification
. . . 148Finishing the Base Class
. . . 151Writing the Active Trader and Hotel Trader Currency Converters
. . . 152Implementing ActiveCurrencyTrader
. . . 152Learning More About Preprocessor Directives, Properties, and the
MustOverride Keyword
. . . 157More Preprocessor Directive Details
. . . 157More Property Scope Details
. . . 159The MustOverride Keyword
. . . 159The Important Stuff to Remember
. . . 161Some Things for You to Do
. . . 162■
CHAPTER 7
Learning About Components and Class Hierarchies
. . . . 163Understanding Some Basic Tax Concepts
. . . 163Organizing the Tax Application
. . . 164Programming Using Ideas
. . . 165Representing Ideas Using Visual Basic Interfaces
. . . 166Understanding How Inheritance and Components Work
. . . 168Implementing a Tax Engine
. . . 173Defining the Interfaces
. . . 173Implementing a Base Class Tax Engine
. . . 174Using Default Implementations
. . . 178Implementing a Base Tax Account
. . . 180Using the Base Functionality of the Tax Engine to Calculate Taxes
. . . 182Implementing a Tax Engine and Tax Account
. . . 182Using the Tax Engine
. . . 187Learning More About Inheritance and Type Casting
. . . 188More Inheritance Details
. . . 188More Type-Casting Details
. . . 194The Important Stuff to Remember
. . . 195Some Things for You to Do
. . . 195■
CHAPTER 8
Learning About Component-Oriented Architecture
. . . 197Understanding Kernels
. . . 197Organizing the Lighting Application
. . . 198Building the Kernel
. . . 199Defining the Interfaces
. . . 199Implementing the Kernel
. . . 203Defining the Kernel As an Interface Instead of a Class
. . . 220Building a Complete Application
. . . 222Defining Some Rooms
. . . 222Learning More About Private Classes and Object Initialization
. . . 225Private Classes
. . . 225Object Initialization with Nested Data Types
. . . 226The Important Stuff to Remember
. . . 227Some Things for You to Do
. . . 228■
CHAPTER 9
Learning About Lists, Delegates, and
Lambda Expressions
. . . 229Managing Collections
. . . 229Managing a Collection Before Visual Basic 2005
. . . 229Managing a Collection After Visual Basic 2005
. . . 234Adding Numbers and Finding Maximum Values
. . . 235Using Delegates
. . . 239Declaring the Delegate
. . . 240Implementing Methods That Match the Delegate
. . . 241Understanding Lambda Expressions
. . . 243Learning More About Collection Types
. . . 245Using a Plain-Vanilla List
. . . 245Using a Key/Value Pair List
. . . 246Using a Stack
. . . 246Using a Queue
. . . 247The Important Stuff to Remember
. . . 247Some Things for You to Do
. . . 248■
CHAPTER 10
Learning About Persistence
. . . 249Organizing the Lottery-Prediction System
. . . 249Piping Data Using a Console
. . . 250Reading Data from the Console
. . . 250Building a Shell
. . . 252Implementing the TextProcessor Application
. . . 260Piping Binary Data
. . . 268Defining the Interfaces and Implementing the Shell
. . . 270Defining the Type
. . . 272Converting a Text Stream into a Binary Stream
. . . 274Converting a Binary Stream into a Text Stream
. . . 275Tweaking Serialization
. . . 277Performing Custom Serialization
. . . 277Declaring a Data Member As Nonserializable
. . . 278Completing Custom Types
. . . 279Implementing GetHashCode()
. . . 279Implementing Equals()
. . . 282The Important Stuff to Remember
. . . 283Some Things for You to Do
. . . 284■
CHAPTER 11
Learning About .NET Generics
. . . 285Why Use .NET Generics?
. . . 285The Theory of a Server-Side Spreadsheet
. . . 288Architecting a Server-Side Spreadsheet
. . . 291Designing the Architecture
. . . 292Defining the Server Spreadsheet Interfaces
. . . 292Implementing the Server Spreadsheet
. . . 302Using Lambda Expressions in the Spreadsheet
. . . 302Assigning State Without Knowing the Type
. . . 304Overriding the ToString() Functionality
. . . 307Using the Spreadsheet
. . . 308Calculating an Average
. . . 308Understanding Why the Calculation Worked
. . . 310The Important Stuff to Remember
. . . 311Some Things for You to Do
. . . 312■
CHAPTER 12
Learning About Application Configuration
and Dynamic Loading
. . . 313Convention over Configuration
. . . 313Decoupling Using a Configuration Architecture
. . . 315Decoupling Using a Convention Architecture
. . . 315Setting Up the Dynamic Loading Projects
. . . 316Signing an Assembly
. . . 317Setting the Output Path
. . . 318Defining and Processing a Configuration File
. . . 319Creating an XML-Based Configuration File
. . . 319Adding the Dynamic Loading Configuration Items
. . . 321Reading a Configuration File
. . . 321Dynamically Loading an Assembly
. . . 322Dynamically Instantiating a Type
. . . 322Enhancing the Configuration File
. . . 326Loading a Strongly Named Assembly
. . . 331Implementing a Shared Typed Convention-Based Architecture
. . . 337Dynamically Loading Base Class or Interface Types
. . . 339The Important Stuff to Remember
. . . 339Some Things for You to Do
. . . 340■
CHAPTER 13
Learning About Multithreading
. . . 341Understanding Multitasking
. . . 341Preemptive Multitasking
. . . 342Time Slicing
. . . 342Using Threads
. . . 344Creating a New Thread
. . . 345Waiting for the Thread to End
. . . 346Creating a Thread with State
. . . 347Synchronizing Between Threads
. . . 349How Not to Deadlock Your Code (Mostly)
. . . 355Implementing a Reader/Writer Threaded Architecture
. . . 359Implementing a Producer/Consumer Architecture
. . . 363Using a Hidden Producer/Consumer Implementation
. . . 363Implementing a Generic Producer/Consumer Architecture
. . . 364Using an Asynchronous Approach
. . . 367The Important Stuff to Remember
. . . 368Some Things for You to Do
. . . 369■
CHAPTER 14
Learning About Relational Database Data
. . . 371Understanding Relational Databases
. . . 371Relational Database Tables
. . . 371Database Relations
. . . 373Accessing Relational Databases
. . . 375Designing a Database Using Visual Basic Express
. . . 377Configuring the Data Source
. . . 377Adding the Tables
. . . 378Accessing the Database Using ADO.NET
. . . 382Connecting to a Database
. . . 382Closing a Database Connection
. . . 382Adding Table Data
. . . 382Selecting Data from a Table
. . . 385Deleting Data from the Database
. . . 386Using the Dataset Designer
. . . 387Building Relations Between Tables
. . . 387Using the Generated Code
. . . 391The Important Stuff to Remember
. . . 392Some Things for You to Do
. . . 393■
CHAPTER 15
Learning About LINQ
. . . 395Finding the Frequency of Winning Numbers
. . . 395Extending the Lottery-Prediction System
. . . 396Implementing a Frequency Solution
. . . 400Learning More LINQ Tricks
. . . 405Selecting and Altering Data
. . . 408Selecting with Anonymous Types
. . . 409Processing Multiple Streams
. . . 410Sorting the Results
. . . 411Performing Set Operations
. . . 412Using LINQ in Other Contexts
. . . 413The Important Stuff to Remember
. . . 415Some Things for You to Do
. . . 416■
CHAPTER 16
Learning About Other Visual Basic Techniques
. . . 417Operators
. . . 417Using Arithmetic Operators
. . . 417Overloading Operators
. . . 420The GoTo Statement
. . . 422.NET Generics Constraints
. . . 423Using the Type Constraint
. . . 423Using the New Constraint
. . . 425Using the Class Constraint
. . . 425Nullable Types
. . . 426Partial Classes and Methods
. . . 427The Important Stuff to Remember
. . . 430Some Things for You to Do
. . . 431xv
About the Author
Many people say that by looking at a person’s dog, you can tell what the person is like. Well, the picture is of my dog Louys, an English bulldog. And yes, my English bulldog and I have many common characteristics. But what about the biography of the author, CHRISTIAN GROSS? It’s pretty simple: I’m a guy who has spent oodles of time strapped to a chair debugging and taking apart code. In fact, I really enjoy this business we call software development. I have loved it ever since I learned how to peek and poke my first bytes. I have written various books, including Ajax and REST Recipes: A Problem-Solution Approach, Foundations of Object-Oriented Programming Using .NET 2.0 Patterns, A Programmer's Introduction to Windows DNA, and
Beginning C#: From Novice to Professional, all available from Apress.
xvii
About the Technical Reviewer
■ANDY OLSEN is a freelance developer and consultant based in the UK. Andy has been working with .NET since beta 1 days, and has coauthored and reviewed several books for Apress, covering C#, Visual Basic, ASP.NET, and other topics.
xix
Introduction
T
he first computer programming book I read was titled Programming Windows 3.0 by Charles Petzold. This was around the time when Microsoft Windows 3.0 (circa 1992) once and for all showed the industry that Microsoft was a company with a future. Writing code for Windows back then was complicated by many things: lack of documentation, 16-bit architecture, and the necessity of buying a compiler separate from the software development kit (SDK). Charles’s book tied everything together and solved the problem of how to write a program for Windows.Now the problems are quite the opposite: we have too much documentation, we have 64-bit architectures, and everything including the kitchen sink is thrown into a development environ-ment. Now we need to figure out what we actually need. We have too many options—too many ways to solve the same problem. What I am trying to do with this book is the same thing that Charles did for me when I first started out, and that was to help me figure out what I needed to write code.
This book is about explaining the Visual Basic programming language in the context of solving problems. Visual Basic has become a sophisticated programming language that can achieve many goals, but you are left wondering what techniques to use when. This book is here to answer your questions.
This book is not a reference to all of the features of the Visual Basic programming language. I don’t explain the esoteric Visual Basic features. I stick to the Visual Basic programming features that you will use day in and day out. That does not mean that you will be missing certain Visual Basic programming language constructs, because I have covered all of the major features.
To get the full benefit of this book, I suggest that you do the exercises at the end of the chapters. The answers are available on the Apress web site (http://www.apress.com), and you can cheat and not do the exercises, but I advise against that.
If you are a beginning programmer who has no clue about Visual Basic, and you read this book and do the exercises, I believe that you will be a solid and knowledgeable Visual Basic programmer by the end of the book. If that sounds like a big promise, well, yes it is. The chapter text is intended to get you acquainted with the Visual Basic programming language and how to apply its features. The exercises are intended to make sure you actually understand the Visual Basic programming language and its features.
The chapter exercises are challenging. They cannot be solved within a few minutes. In fact, when I did all of the exercises, it took me five working-hour days to do all of them!
If you have any questions, such as, “So what was he trying to get at with that exercise?” I am available on Skype with the user ID christianhgross. Please don’t just ring me. First chat using text, and if necessary, we can have a voice conversation. Also, you can send e-mail to me at
1
■ ■ ■
Ready, Steady, Go!
T
his book is about the Visual Basic programming language first and foremost. It is about becoming a proficient Visual Basic programmer. Reading this book from cover to cover will not make you a superstar, but it will make you a programmer who understands what needs to be done when writing robust, stable, and maintainable Visual Basic applications.In this chapter, you’ll get started by acquiring the tools you need to develop Visual Basic applications and taking those tools for a test spin. Along the way, you’ll create a couple Visual Basic applications.
Downloading and Installing the Tools
Getting started with Visual Basic 2008, you’re probably really excited about writing some code that does something. It’s like getting your driver’s license and wanting to drive a car without even thinking about where you want to go. You just want to drive. The great part of .NET is that you can start writing some code after you have installed either the .NET software development kit (.NET SDK) or a Visual Studio integrated development environment (IDE). Downloading and installing the right environment is critical to taking your first step toward an enjoyable coding experience.
■
Note
Software version numbers, product descriptions, and technologies can be confusing. Having used Microsoft technologies for over a decade, I can say that naming a technology or product has never been Microsoft’s strong point. The technologies have been great (for the most part), but product classification and identification have not been so great. Thus, this book covers the Visual Basic 2008 programming language that is used to write applications for the .NET Framework. With Visual Basic 2008, the .NET 3.0 and 3.5 Frameworks are used. .NET 3.0 gives you all of the essentials, and .NET 3.5 gives you the extras.Microsoft also offers full versions of the Visual Studio IDE, such as the Standard, Professional, and Team editions. Each of these editions has different features and different price tags. See the Microsoft Visual Studio web site (http://msdn2.microsoft.com/en-us/vstudio/default.aspx) for more information. If you already have Visual Studio 2008 Professional, you can use that for the examples in this book. That edition can do everything that Visual Basic 2008 Express can do, and in fact, has many more options.
■
Note
I personally use Visual Studio Standard or Professional in combination with other tools such as X-develop and JustCode! from Omnicore (http://www.omnicore.com), TestDriven.NET (http:// www.testdriven.net/), and NUnit (http://www.nunit.org). The Visual Studio products are very good, but others are available. Being a good developer means knowing which tools work best for you.Installing and downloading Visual Basic Express from the Microsoft web site involves the transfer of large files. If you do not have a broadband connection, I suggest that you install the IDE from a CD instead.
Downloading Visual Basic Express
The following is the procedure for downloading Visual Basic Express from the Microsoft web site. By the time you are reading this book, the procedure may be a bit different, but it will be similar enough that you’ll be able to find and download the IDE package.
1. Go to http://www.microsoft.com/express/.
2. Select the Download Now! link.
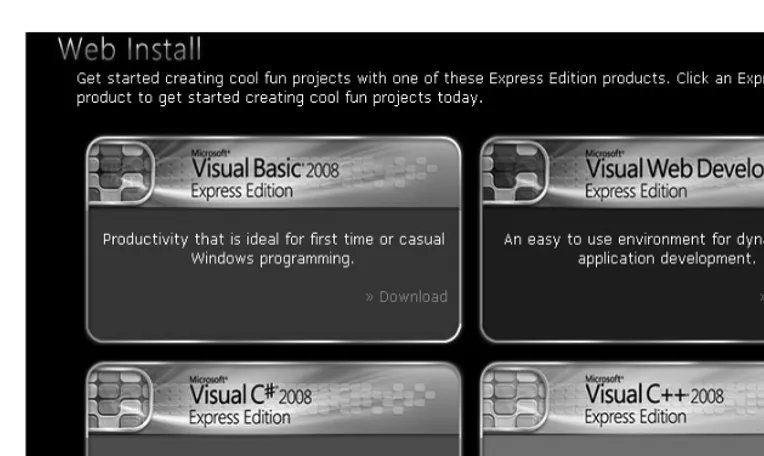
3. Scroll down to the Visual Basic 2008 Express Edition section, as shown in Figure 1-1.
4. Click the Download link.
5. A dialog box appears, asking where you want to store the downloaded file. The file that you are downloading is a small bootstrap file, which you’ll use to begin the actual installation of the Visual Basic Express IDE. Choose to save the file on the desktop.
Figure 1-1. Selecting Visual Basic 2008 Express Edition
Installing Visual Basic Express
After you’ve downloaded the setup file, you can start the Visual Basic Express installation. During this process, all the pieces of the IDE—about 300MB—are downloaded and installed. Follow these steps:
1. On your desktop, double-click the vbsetup.exe file. Wait while the setup program loads all the required components.
2. Click Next on the initial setup screen.
3. A series of dialog boxes will appear. Select the defaults and click Next to continue through the setup program. In the final dialog box, click Install.
4. After all the elements have been downloaded and installed, you may need to restart your computer.
After Visual Basic Express is installed, you can start it by selecting it from the Start menu.
Choosing the Application Type
• A console application is designed to run at the command line with no graphical user interface (GUI).
• A Windows application is designed to run on a user’s desktop and has a GUI.
• A class library holds reusable functionality that can be used by console and Windows applications. It cannot be run by itself.
So that you know what each type of program is about, in this chapter, you will code all three. They are all variations of the Hello, World example, which displays the text “hello, world” on the screen. Hello, World programs have been used for decades to demonstrate program-ming languages.
Creating Projects and Solutions
Regardless of which program type you are going to code, when using the Visual Studio line of products, you will create projects and solutions:
• A project is a classification used to describe a type of .NET application.
• A solution is a classification used to describe multiple .NET applications that most likely relate to each other.
Imagine building a car. A project could be the steering wheel, engine, or car body. Putting all of the car projects together creates a complete solution called the car.
A solution contains projects. For the examples in this chapter, our solution will contain three projects representing each of the three different program types.
When using Visual Basic Express, creating a project implies creating a solution, because creating an empty solution without a project does not make sense. It’s like building a car with no parts. When I say “project” or “application” in this book, from a workspace organization perspective, it means the same thing. Solution is an explicit reference to one or more projects or applications.
Our plan of action in terms of projects and solutions in this chapter is as follows:
• Create the .NET solution by creating a Windows application called WindowsApplication
(creating this application also creates a solution).
• Add to the created solution a console application called ConsoleApplication.
• Add to the created solution a class library project called ClassLibrary.
Creating the Windows Application
We’ll dive right in and start with the Windows application. With Visual Basic Express running, follow these steps to create the Windows application:
1. Select File ➤ New Project from the menu.
3. Change the default name to WindowsApplication.
4. Click OK.
These steps create a new project and solution at the same time: Visual Basic Express will display only the complete project, as shown in Figure 1-2.
Figure 1-2. The Visual Basic Express IDE with the new WindowsApplication project
Viewing the Source Code
When you create a new application, Visual Basic Express automatically generates some source code for it. Right-click the Form1.vb item in the Solution Explorer and select View Code from the context menu. The following source code will appear in the area to the left of the Solution Explorer.
■
Note
To shift between the user interface and generated code, right-click Form1.vb in the Solution Explorer. A submenu appears with the options View Code (to see the code) or View Designer (to see the user interface).Public Class Form1
End Class
getting in your way. This legacy is both good and bad. Figure 1-2 shows a simple project with a single file, but another file exists at the hard disk level, as shown in Figure 1-3 (you can see this file by clicking the Show All Files icon in the Solution Explorer and expanding the Form1.vb node).
Figure 1-3. All files that make up the WindowsApplication project
In previous versions, the Form1.Designer.vb file used to be a binary file that you could not edit. Now it is a text file that you can edit, but you should not make any changes to this file because it is maintained by the IDE. Contained within the Form1.Designer.vb file are the details of how to construct Form1, as is shown in Figure 1-2. At this point, Form1 does not contain anything note-worthy, and neither does the text file. However, if you were to add a button or text box to the form, those details would be added to the text file Form1.Designer.vb.
Visual Basic is a complete programming language that still adheres to the RAD model. For example, the following code creates a user-defined type (which you’ll learn about throughout the rest of the book).
Public Class Example Public Sub Empty() End Sub
End Class
The main elements to note are as follows:
Class: An organizational unit that groups related code together. This grouping is much more specific than a solution or a project. To use the car analogy again, if a project is a car engine, then a class can be the carburetor. In other words, projects are made up of multiple classes.
Sub: A set of instructions that carry out a task. Also called a method, a sub is analogous to a function in many other languages. The Empty() method can be called by another piece of code to carry out some type of action.
Saving the Project
1. Highlight the project name in the Solution Explorer.
2. Select File ➤ Save WindowsApplication.
3. Notice that Visual Basic Express wants to save the solution using the WindowsApplication
name, which isn’t ideal. (We’re using three projects in this solution, of which one is a Windows Forms application.) To save the solution with a new name, you need to change the WindowsApplication solution name to ThreeExamples (make sure you leave the
WindowsApplication project name as it is). Note the path of where Visual Basic Express saves your projects, as you will need to know it from time to time.
4. Click the Save button.
When the solution and project are successfully saved, you’ll see the message “Item(s) Saved” in the status bar in the lower-left corner of the window.
In the future, whenever you want to save the solution and project, you can use the keyboard shortcut: Ctrl+S.
■
Note
If you have not saved your changes and choose to exit Visual Basic Express, you will be asked if you want to save or discard the solution and project.To open a solution you have previously saved, you can choose File ➤ Open Project at any time and navigate to the solution file. You can also select the solution from the Recent Projects window when you first start Visual Basic Express. The Recent Projects window is always avail-able on the Start Page tab of the main Visual Basic Express window as well (and the File menu contains a list, too).
Running the Windows Application
The source code generated by Visual Basic Express is a basic application that contains an empty window with no functionality. The source code gives you a starting point where you can add more source code, debug the source code, and run the application.
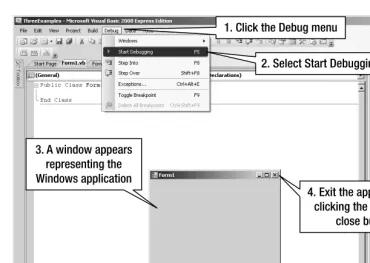
To run the application, select Debug ➤ Start Debugging. Alternatively, use the keyboard shortcut F5. You’ll see a window representing the WindowsApplication application. You can exit the application by clicking the window’s close button. Figure 1-4 illustrates the process. (Debugging is covered in Chapter 5.)
Figure 1-4. Running an application
You have not written a single line of code, yet you have created an application and some-thing actually happened, and all because Visual Basic Express generates some boilerplate Visual Basic code that works straight out of the box.
You have created an application, seen its source code, and run it. You did all of this in the context of a comfortable, do-it-all-for-you development environment called Visual Basic Express. Visual Basic Express is both a good thing and a bad thing. Visual Basic Express is good because it hides the messy details, but it is bad because the messy details are hidden. Imagine being a car mechanic. It is good that car manufacturers produce dashboards that have little lights that go on when something is wrong. But it would be bad if the mechanic had to rely on the little lights to fix problems in a car.
Making the Windows Application Say Hello
The Windows application does nothing other than appear with a blank window that you can close. To make the application do something, you need to add user interface elements or add some code. Adding code without adding user interface elements will make the program do something, but it’s not as exciting. So, we’ll add a button that, when clicked, will display “hello, world” in a text box.
like). Click Button, and then click the form to place the button on the form. These steps are illustrated in Figure 1-5.
Figure 1-5. Adding a button to the form
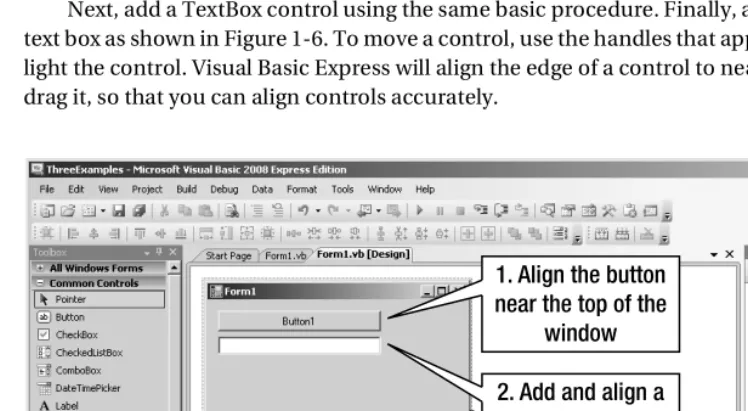
Next, add a TextBox control using the same basic procedure. Finally, align the button and text box as shown in Figure 1-6. To move a control, use the handles that appear when you high-light the control. Visual Basic Express will align the edge of a control to nearby edges as you drag it, so that you can align controls accurately.
If you now executed WindowsApplication by pressing Ctrl+F5 (Ctrl+F5 starts the applica-tion without debugging), you would see a window with a button and a text box. You can click the button and add or delete text from the text box. But whatever you do has no effect, because neither control has been associated with any code.
To make the application do something, you need to think in terms of events. For example, if you have a garage with an automatic door opener, you would expect that pressing the remote control button would open the garage door when it’s closed and close the door when it’s open. The automatic garage door manufacturer associated the event of pushing the remote control button with the action of either opening or closing the garage door. In WindowsApplication, we’ll associate the clicking of the button with the action of showing text in the text box.
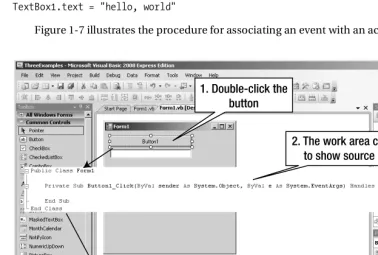
Select the button on the form in Visual Basic Express and double-click it. The work area changes to source code, with the cursor in the Button1_Click() function. Add this source code to the function:
TextBox1.text = "hello, world"
Figure 1-7 illustrates the procedure for associating an event with an action.
Figure 1-7. Associating the button click event with the action of adding text to the text box
Note that TextBox1 is the name of the text box you added to the form. This name is gener-ated by Visual Basic Express, just as it genergener-ated a default name for the button. You can change the default names (through each control’s Properties window), but we’ve left the default for this example.
simple. Visual Basic Express makes the assumption that when you double-click a control, you want to modify the default event of the control, and as such, automatically generates the code in step 3 of Figure 1-7. In the case of a button, the default event is the click event; that is, the event that corresponds to a user clicking the button. The assumption of the click event being the default event for a button is logical. Other controls have different default events. For example, double-clicking a TextBox control will generate the code for the text-changed event.
Run the application by pressing Ctrl+F5, and then click the button. The text box fills with the text “hello, world.” Congratulations, you’ve just finished your first Visual Basic application. You have associated an event with an action: the button click with the text display. Associ-ating events with actions is the basis of all Windows applications.
Adding Comments to the Application
Now that you have a working program, it would be good to document what it does, right there in the source code. Then if you come back to the application in the future, you won’t be puzzled by your previous work. In fact, you may not even be the person who maintains your code, so leaving comments in the code to help explain it is definitely good practice. Even if you know you will be maintaining the code forever, treat your future self as a stranger. You may be surprised how long it takes to decipher code you have written when revisited months or years later.
To add a single-line comment, use the following syntax:
' A single-line comment
Anything after the ' on the same line is ignored by the compiler and is not included in the final application. Let’s document our Windows application:
' When the user clicks the button, we display text in the text box
Private Sub Button1_Click(ByVal sender As System.Object, ByVal e As System.EventArgs) Handles Button1.Click
TextBox1.Text = "hello, world" End Sub
The Visual Basic language is a single-line language. This means that a statement must be part of a single line. Let’s look at a single statement:
TextBox1.Text = "hello, world"
This line of code is a single statement because it is considered an assignment of one variable by another piece of source code. You could not write the statement as follows:
TextBox1.Text = "hello, world"
When the statement is broken into two lines of source code, the Visual Basic compiler sees it as two statements. Since those two statements are not complete, a compilation error will result. If you need to break a single statement over two lines, you must let the compiler know by adding the line-continuation character—an underscore (_)—at the end of the continued code, as follows:
Navigating the User Controls of the Solution
When you are writing your code, your most important form of navigation is the Solution Explorer. The Solution Explorer is the tree control that contains the references to your solutions and projects. Consider the Solution Explorer as your developer dashboard, which you can use to fine-tune how your .NET application is assembled and executed.
I suggest that you take a moment to click around the Solution Explorer. Try some right-clicks on various elements. The context-sensitive click is a fast way of fine-tuning particular aspects of your solution and project. However, when clicking, please do not click OK in any dialog box; for now, click Cancel so that any changes you may have made are not saved.
To the right of the Solution Explorer is your work area. The work area is where you write your code or edit your user interface. The work area will display only a single piece of informa-tion, which could be some code, a user interface, or a project. As you saw earlier, when you double-click Form1.vb in the Solution Explorer, the work area displays the form related to the
Form1.vb file.
Now that you have an idea of how the IDE works, let’s continue with our examples. Next up is the console application.
Creating the Console Application
A console application is a text-based application. This means that rather than displaying a GUI, it uses a command-line interface.
The console has a very long history because the console was the first way to interact with a computer. Consoles are not very user-friendly and become very tedious for any complex oper-ations, yet some people claim that a console is all you need. (See http://en.wikipedia.org/ wiki/Command_line_interface for more information about the console.)
Writing to the console works only if the currently running application has a console. To open the console in Windows, select Start ➤ Run and type cmd in the dialog box. When you test a console application, Visual Basic Express opens a console for you.
Visual Basic Express can create, build, and manage console applications.
Adding a Console Application Project to the Solution
We will now create an application that outputs the text “hello, world” to the console. Follow these steps to add the new project to the ThreeExamples solution:
1. Choose File ➤ Add ➤ New Project.
2. Make sure the location is the same as that of WindowsApplication.
3. Select Console Application and change the name to ConsoleApplication.
The Solution Explorer changes to show the additional project and now also shows the solution. The work area displays the source code.
Making the Console Application Say Hello
To make the console application do something, you need to add some source code to the
Main() method, as follows:
Module Module1
Sub Main()
Console.WriteLine("hello, world")
Console.ReadKey() End Sub
End Module
The bolded line writes the text “hello, world” to the console.
If you tried to run the console application by pressing Ctrl+F5, you would instead cause the Windows application, WindowsApplication, to run. Let’s change that next.
Setting the Startup Project
To execute the console application, you need to set the console application as the startup project. Did you notice how the WindowsApplication project is in bold in the Solution Explorer? That means WindowsApplication is the startup project. Whenever you run or debug an application, the startup project is executed or debugged.
To switch the startup project to ConsoleApplication, right-click the ConsoleApplication
project and select Set As StartUp Project. ConsoleApplication will now be in bold, meaning it is the startup project of the ThreeExamples solution.
Running the Console Project
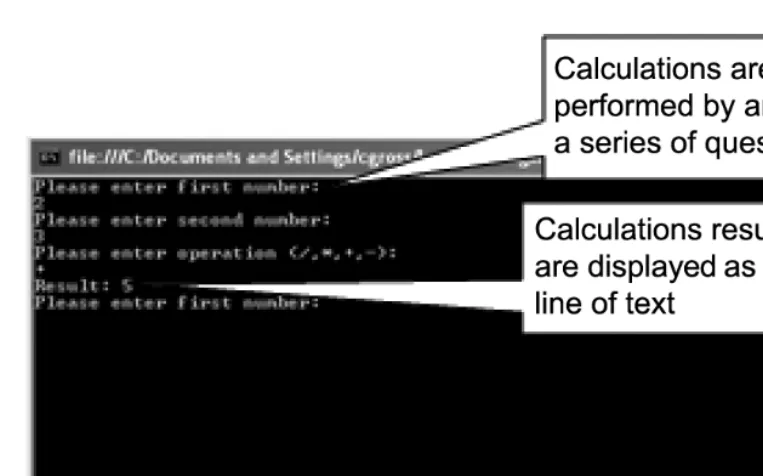
With ConsoleApplication set as the startup project, you can now press Ctrl+F5 to run the console application. The output is as follows:
hello, world
Executing the console application does not generate a window, as you saw with the Windows application. Instead, a command prompt is started with ConsoleApplication as the application to execute. Executing that application generates the text “hello, world.” You will also see that you can press any key to close the command prompt window. Visual Basic Express automati-cally generated the code to show this output and execute this action.
Creating the Class Library
The third example in this chapter is not a .NET application; rather, it is a shareable piece of functionality, typically called a class library. Windows applications and console applications are programs that you can execute from a command prompt or Windows Explorer. A class library cannot be executed by the user, but needs to be accessed by a Windows application or console application. It is a convenient place to put code that can be used by more than one application.
Adding a Class Library Project to the Solution
We will now create a class library for the Windows application and console application to share. Follow these steps to add the new project to the ThreeExamples solution:
1. Right-click the solution name, ThreeExamples, in the Solution Explorer.
2. Select Add ➤ New Project.
3. Select Class Library and change the name to ClassLibrary.
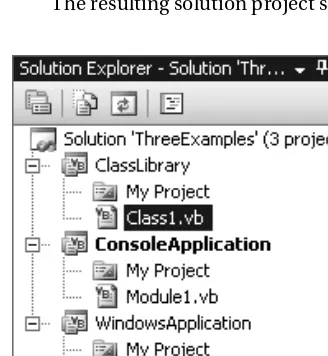
The resulting solution project should look like Figure 1-8.
Figure 1-8. Updated solution structure that contains three projects
Moving Functionality
Now we will move the code used to say “hello, world” from ConsoleApplication to
ClassLibrary. Add the code to Class1.vb as follows (the bolded code):
Public Class Class1
Public Shared Sub HelloWorld() Console.WriteLine("hello, world") End Sub
End Class
The modified code contains a method called HelloWorld(). When called, this method will output the text “hello, world.” As mentioned earlier in the chapter, a method is a set of instruc-tions that carry out a task. Methods are discussed in more detail in Chapter 2.
In order for applications to actually share the code that’s in a class library, you must make the projects aware of each other’s existence. You do that through references.
Defining References
To make one project aware of definitions in another project, you need to define a reference. The idea behind a reference is to indicate that a project knows about another piece of functionality.
■
Note
The project only knows about the functionality that has been declared as being public. Public function-ality, or what Visual Basic programmers call public scope, is when you declare a type with the Public keyword. You will learn about public and other scopes throughout this book.To make ConsoleApplication aware of the functionality in the ClassLibrary project, you need to set a physical reference, as follows:
1. In the Solution Explorer, click ConsoleApplication.
2. Right-click and select Add Reference.
3. Click the Projects tab.
4. Select ClassLibrary, and then click OK. ClassLibrary will be added to
ConsoleApplication’s references.
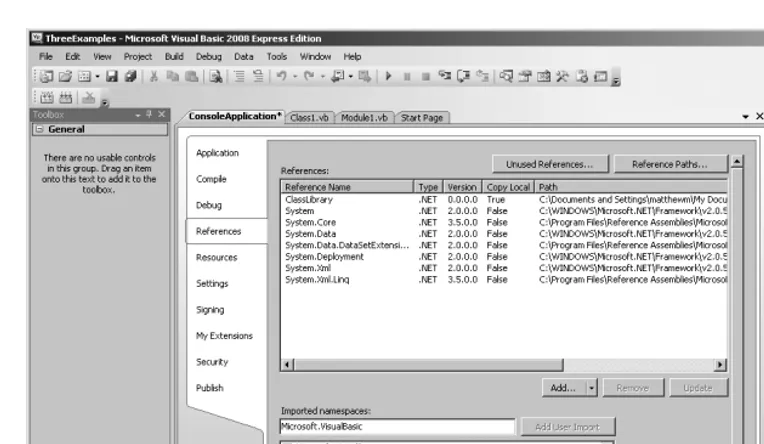
Once the reference has been assigned, ConsoleApplication can call the functionality in
ClassLibrary.
Figure 1-9. References used by the Visual Basic project
Calling Class Library Functionality
Now we need to change ConsoleApplication so that it calls the function in ClassLibrary. Modify the Module1.vb file in ConsoleApplication as follows:
Module Module1
Sub Main()
Console.WriteLine("hello, world")
ClassLibrary.Class1.HelloWorld()
Console.ReadKey() End Sub
End Module
Run ConsoleApplication by pressing Ctrl+F5. A command prompt window should appear and generate the “hello, world” text twice. The first “hello, world” is generated by the code
Console.WriteLine(). Calling the function ClassLibrary.Class1.HelloWorld() generates the second “hello, world.”
USING REFERENCE SHORTHAND
ClassLibrary.Class1.HelloWorld() is the longhand way to use a reference. If we were to use long-hand for the Console.WriteLine() call, we would write System.Console.WriteLine(), because the
To use shorthand for the ClassLibrary call, we would include an Imports line at the beginning of
Module1.vb in ConsoleApplication and change the call to Class1’s HelloWorld() method:
Imports ClassLibrary Module Module1
Sub Main()
Console.WriteLine("hello, world") Class1.HelloWorld()
Console.ReadKey() End Sub
End Module
But shorthand like this has a downside. What if we had many references, each containing a class called
Class1? In this case, Visual Basic Express wouldn’t know which Class1 to use without the help of longhand. Granted, you are not likely to name multiple classes Class1, but even sensible names can be duplicated in a collection of references. And if you are using someone else’s code as a reference, the possibility of duplicate names becomes higher. Therefore, you’re better off using longhand in this case.
Using Variables and Constants
One of the core concepts in a Visual Basic program is to use variables. Think of a variable as a block of memory where you can store data for later use. This allows you to pass data around within your program very easily.
In our ClassLibrary project, it would make life easier if we could define the message to display at the beginning of the method. That way, if we decide to change the message, we can get at it much more easily. As it stands, if we were to add more code before the Console.WriteLine() call, we would need to scroll through the text to find the message to change. A variable is perfect for this, as we can define some data (the message to print), and then use it later in our program.
Public Class Class1
Public Shared Sub HelloWorld()
Dim message As String = "hello, world" Console.WriteLine(message)
End Sub End Class
Here, we’ve defined a variable called message of type String (a String is a length of text). We can then refer to the message variable later when we want to place its contents into the code. In the example, we place its contents into the Console.WriteLine() call, which works as before. This time, however, we have set the message to display in a separate statement.
This is very useful for us, but there is more to variables. They have something that is called
Public Shared Sub HelloWorld()
Dim message As String = "hello, world" Console.WriteLine(message)
End Sub
Public Shared Sub DisplayeMessageText() Console.WriteLine("hello, world") Console.WriteLine(message) End Sub
The DisplayMessageText() method prints two lines of text to tell us what the message text should be. However, this doesn’t compile, because the compiler knows that the variable message is not available to the DisplayMessageText() method because of its method-level scope.
To fix this, we need to give message class-level scope by moving it to the beginning of the class definition (as it is used by methods marked Shared, it must also be Shared):
Public Class Class1
Shared Dim message As String = "hello, world" Public Shared Sub HelloWorld()
Console.WriteLine(message) End Sub
Public Shared Sub DisplayeMessageText() Console.WriteLine("hello, world") Console.WriteLine(message) End Sub
End Class
Now the variable message is shared by all the methods of Class1. You’ll learn much more about method-level and class-level scopes, as well as the Public and Shared keywords, throughout this book.
Sharing a variable among methods of a class can be useful, but it’s sometimes not wise to do this. That’s because methods can change variables as they carry out their tasks, which can produce unpredictable results further down the line. We can lock the value by using a constant
instead of a variable. The Const keyword denotes the constant:
Public Class Class1
Const MESSAGE As String = "hello, world" Public Shared Sub HelloWorld()
Console.WriteLine(MESSAGE) End Sub
Public Shared Sub DisplayeMessageText() Console.WriteLine("hello, world") Console.WriteLine(MESSAGE) End Sub
Constant names are usually all uppercase. The contents of a constant cannot be changed at any point. The following would not compile, for instance.
Public Class Class1
Const MESSAGE As String = "hello, world"
Public Shared Sub DisplayeMessageText()
MESSAGE = "another text that cannot be assigned" Console.WriteLine(MESSAGE)
End Sub End Class
Now that you’ve worked through this chapter’s examples, let’s talk a bit about how your Visual Basic code in Visual Basic Express actually turns into a program that can run on an oper-ating system like Windows.
Understanding How the .NET Framework Works
When you write Visual Basic source code, you are creating instructions for the program to follow. The instructions are defined using the Visual Basic programming language, which is useful for you, but not useful for the computer. The computer does not understand pieces of text; it understands ones and zeros. To feed instructions to the computer, developers have created a higher-level instruction mechanism that converts your instructions into something that the computer can understand. The conversion utility is called a compiler.
The twist with .NET, in contrast to traditional programming languages such as C++ and C, is that the compiler generates a binary-based intermediate language called Common Interme-diate Language (CIL). The .NET Framework then converts the CIL into the binary instructions required by the computer’s processor.
You might think converting the source code into an intermediate language is inefficient, but it is a good approach. Let’s use an analogy. There are dogs that learn quickly and those that take a while to learn. For example, German shepherds tend to learn quickly and don’t require much repetition of lessons. On the other hand, bullmastiffs need quite a bit of patience, as they tend to be stubborn. Now imagine being a trainer who has created instructions on how to teach things specifically geared toward the bullmastiff. If those same instructions are used on the German shepherd, you end up boring the German shepherd and possibly failing to teach that dog what you wanted him to learn.
The problem with the instructions is that they are specifically tuned for a single dog. If you want to teach both dogs, you need two sets of instructions. To solve this problem, the instruc-tions should be general, with added interpretation notes saying things like, “If dog is stubborn, repeat.”
is to create a set of instructions that are general, but have associated interpretation notes. The .NET Framework then applies these instructions using the interpretation notes.
The .NET Framework compiles to instructions (CIL) that are then converted into processor-specific instructions using notes embedded in the .NET Framework. The .NET architecture is illustrated in Figure 1-10.
Figure 1-10. .NET architecture
In Figure 1-10, Visual Basic Express is responsible for converting the Visual Basic source code into a CIL package. The converted CIL package is a binary file that, when executed, requires a common language runtime (CLR). Without a CLR installed on your computer, you cannot run the CIL package. When you installed Visual Basic Express, you installed the CLR in the back-ground as a separate package. Visual Basic Express is an application that allows you to develop for the CLR, but it also uses the CLR.
When using the .NET Framework, you are writing for the CLR, and everything you do must be understood by the CLR. Generally speaking, this is not a problem if you are writing code in Visual Basic. The following are some advantages of writing code targeted to the CLR:
Memory and garbage collection: Programs use resources such as memory, files, and so on. In traditional programming languages, such as C and C++, you are expected to open and close a file, and allocate and free memory. With .NET, you don’t need to worry about closing files or freeing memory. The CLR knows when a file or memory is not in use and will auto-matically close the file or free the memory.
■
Note
Some programmers may think that the CLR promotes sloppy programming behavior, as you don’t need to clean up after yourself. However, practice has shown that for any complex application, you will waste time and resources figuring out where memory has not been freed.Custom optimization: Some programs need to process large amounts of data, such as that from a database, or display a complex user interface. The performance focus for each is on a different piece of code. The CLR has the ability to optimize the CIL package and decide how to run it as quickly and efficiently as possible.
Common Type System (CTS): A string in Visual Basic is a string in C#. This ensures that when a CIL package generated by Visual Basic talks to a CIL package generated by C#, there will be no data type misrepresentations.
Safe code: When writing programs that interact with files or memory, there is a possibility that a program error can cause security problems. Hackers will make use of that security error to run their own programs and potentially cause financial disaster. The CLR cannot stop application-defined errors, but it can stop and rein in a program that generates an error due to incorrect file or memory access.
The benefit of the CLR is allowing developers to focus on application-related problems, because they do not need to worry about infrastructure-related problems. With the CLR, you focus on the application code that reads and processes the content of a file. Without the CLR, you would need to also come up with the code that uses the content in the file and the code that is responsible for opening, reading, and closing the file.
The Important Stuff to Remember
This chapter got you started working with Visual Basic in an IDE. Here are the key points to remember:
• There are three major types of Visual Basic programs: Windows applications, console applications, and class libraries.
• A console application is simpler than a Windows application and has no events. It is used to process data. Console applications generate and accept data from the command line.
• You will want to use an IDE to manage your development cycle of coding, debugging, and application execution.
• Among other things, IDEs manage the organization of your source code using projects and solutions.
• In an IDE, keyboard shortcuts make it easier for you to perform operations that you will do repeatedly. For example, in Visual Basic Express, use Ctrl+S to save your work and Ctrl+F5 to run your application without debugging.
• Visual Basic Express projects contain plain-vanilla files and specialized groupings. When dealing with specialized groupings, make sure that you understand how the groupings function and modify only those files that you are meant to modify.
Some Things for You to Do
The following are some questions related to what you’ve learned in this chapter. Answering them will help you to get started developing your projects in the IDE.
■
Note
The answers/solutions to the questions/exercises included at the end of each chapter are available with this book’s downloadable code, found in the Source Code/Download section of the Apress web site (http:// www.apress.com). Additionally, you can send me an e-mail message at [email protected].1. In an IDE, solutions and projects are used to classify related pieces of functionality. The analogy I used talked about cars and car pieces. Would you ever create a solution that contained unrelated pieces of functionality? For example, would you create an airplane solution that contained car pieces?
2. Projects are based on templates created by Microsoft. Can you think of a situation where you would create your own template and add it to Visual Basic Express?
3. In the Solution Explorer, each item in the tree control represents a single item (such as a file, user interface control, and so on). If you were to double-click a .vb file, you would be manipulating a Visual Basic file that would contain Visual Basic code. Should a single Visual Basic file reference a single Visual Basic class or namespace? And if not, how would you organize your Visual Basic code with respect to Visual Basic files?
5. You are not happy with the naming of the element TextBox1, and want to rename it to
TxtOutput. How do you go about renaming TextBox1?
25
■ ■ ■
Learning About .NET Number
and Value Types
I
n the previous chapter, you learned how to use Visual Basic Express, and what .NET is in terms of the CIL and CLR. In this chapter, we are going to roll up our sleeves and begin writing real Visual Basic code—specifically, a calculator.A calculator is an ideal example to start with, because it allows you to focus on the applica-tion without having to deal with all the nasty details that are normally associated with programs. In a programming language like Visual Basic, adding two numbers is trivial. What is not trivial is how to put the operation of adding two numbers into a program.
This chapter focuses on the mechanics of writing a program in Visual Basic—taking an idea and converting it into a Visual Basic program that can execute your intentions. You’ll learn how to organize your development and implement a Visual Basic class library, as well as how the .NET CLR manages number types.
Focusing and Organizing Your Development
When you develop software, you will split your work into two main tasks: organizing and imple-menting. Organizing your development involves figuring out what features and libraries you are going to define, how many people are going to be developing the features, and so on.
Organizing your development is one of the most important tasks when writing code, and it is also typically the most confusing for new developers. Professional developers seem to organize their work instinctively, but it only appears that way because they have done it so many times that the process has become automatic.
When defining the features, two major steps are involved:
• Gain an understanding of the features. You can’t implement something that you don’t understand. To be able to write the source code for a feature, you need to know the whys and whats of a feature.
• Describe the features using structured design methods. Simply organizing your thoughts may be enough if you are the only person working on a program; however, more often than not, you will be part of a team. You need to use a structured design method so that you and your team members can communicate the thoughts related to program development.
One common structured design method is the Unified Modeling Language (UML). UML is used to organize the features into units that correspond to programming language constructs, such as classes. Think of UML as software developer-specific lingo used to describe the various aspects of a programming environment at a higher level of abstraction. UML allows you to get an overall understanding of the architecture without having to read the source code. Think of UML as the structured doodle on the napkin of software programming.
Along with UML, there are other ways of structuring your development process. For example, another technique is called agile software development. The idea with agile software develop-ment is to use a whiteboard and develop your own structured communication mechanism.
The choice of UML, agile software development, or another structured design method is up to you and your team members. But you will need to organize your thoughts and have a structured communication technique. If you don’t, your software will be late, buggy, too expensive, or incomplete. It is not an understatement to say that organization is half the battle.
In this chapter, I am going to give you a taste of a simplified structured development tech-nique, so that you at least have an idea of how structured development works.
Organizing the Calculator
To begin this chapter’s example, get a piece of paper and a pen or pencil, or you can use a tablet PC for writing, if you have one. Next, in the center of the paper (or virtual paper), draw a circle and in it write the word Calculator. Now stop and think about what a calculator means with respect to the software that you will be writing. Write those ideas on the paper surrounding the circle. My thoughts are shown in Figure 2-1.
Your thoughts and my thoughts may or may not be the same, but what our results will have in common is a hodgepodge of ideas everywhere. Figure 2-1 illustrates that one of the biggest problems software developers face is lack of focus and organization. It is not that developers can’t focus or organize, but that developers are bombarded by information, and it is a Herculean task to keep track of, let alone organize, all of that information. But software projects that are successful must remain focused and organized. Therefore, the next step is to focus and organize your thoughts, which results in something like Figure 2-2.
Figure 2-1. Brainstorming what the calculator application represents
Figure 2-2. Focused and organized brainstorming
Focusing the Calculator
To implement a feature, you need source code, which means a file, project, and other program-ming techniques. The following two levels of organization are defined in Visual Basic:
• File level: At the file level, you are organizing what kinds of projects and solutions you will be creating.