Final Cut Express 4
Editing Workshop
Tom Wolsky
AMSTERDAM • BOSTON • HEIDELBERG • LONDON • NEW YORK • OXFORD PARIS • SAN DIEGO • SAN FRANCISCO • SINGAPORE • SYDNEY • TOKYO
Project Manager: Mónica González de Mendoza Assistant Editor: Chris Simpson
Marketing Manager: Amanda Guest Cover Design: Alisa Andreola Cover Image: iStock
Focal Press is an imprint of Elsevier
30 Corporate Drive, Suite 400, Burlington, MA 01803, USA Linacre House, Jordan Hill, Oxford OX2 8DP, UK
©
2008 Tom Wolsky. Published by Elsevier. All rights reserved.No part of this publication may be reproduced, stored in a retrieval system, or transmitted in any form or by any means, electronic, mechanical, photocopying, recording, or otherwise, without the prior written permission of the publisher. Permissions may be sought directly from Elsevier’s Science & Technology Rights Department in Oxford, UK: phone: (⫹44) 1865 843830, fax: (⫹44) 1865 853333, E-mail: [email protected]. You may also complete your request online via the Elsevier homepage (http://elsevier.com), by selecting “Support & Contact” then “Copyright and Permission” and then “Obtaining Permissions.”
Recognizing the importance of preserving what has been written, Elsevier prints its books on acid-free paper whenever possible.
Library of Congress Cataloging-in-Publication Data Wolsky, Tom.
Final Cut Express 4 editing workshop / Tom Wolsky. p. cm.
Includes index.
ISBN 978-0-240-81077-5 (pbk. : alk. paper) 1. Digital video—Editing— Data processing. 2. Motion pictures—Editing—Data Processing. 3. Final cut (Electronic resource) I. Title.
TR899.W659673 2008 006.6⬘96—dc22
2008007677 British Library Cataloguing-in-Publication Data
A catalogue record for this book is available from the British Library. ISBN: 978-0-240-81077-5
For information on all Focal Press publications visit our website at www.books.elsevier.com 08 09 10 11 12 5 4 3 2 1
Typeset by Charon Tec Ltd (A Macmillan Company), Chennai, India www.charontec.com
vii
WHAT’S ON THE DVD? ... xi
INTRODUCTION ... xiii
What Is Editing? ... xiii
Why Do I Get to Write This Book? ... xv
Who Should Read This Book? ... xvi
What’s on the DVD? ... xvi
ACKNOWLEDGMENTS ... xvii
LESSON 1 Installing Final Cut Express ... 1
What You Really Need ... 2
Firing Up the Application ... 10
Understanding the Interface ...13
Summary ... 16
LESSON 2 The Final Cut Express Interface ...17
Loading the Lesson ...17
Reconnecting the Media ... 18
The Browser ... 20
The Viewer ...29
Playing Clips ... 33
Exploring the Canvas and Timeline ...35
Summary ... 40
LESSON 3 Setting Up Your Application Preferences ... 41
Setting Up a New Project ... 41
User Preferences ...42
viii
General Preferences ...42
System Settings ... 49
Easy Setup ...55
Summary ...58
LESSON 4 Getting Material into Final Cut Express ...59
Capture ...59
Strategies for Capturing ...62
Log and Transfer ...69
Importing Files ... 73
Importing Music ... 74
Summary ...76
LESSON 5 Cutting Up Those Shots ... 77
Loading the Lesson ... 77
Marking In and Out Points ...78
DV Start/Stop Detect ...79
Using Markers ... 81
Slicing Your Clips... 84
Organizing the Clips ...93
Look Before You Cut ...96
Summary ...97
LESSON 6 Editing Basics: Placing Your Shots ...99
Loading the Lesson ...99
Working with the Clips ... 101
Summary ...113
LESSON 7 Editing Basics: Building Your Sequence ...115
Loading the Lesson ...115
Making the Sequence ...115
Rearranging the Sequence ... 118
The Trim Tools ...125
Summary ...131
LESSON 8 Adding Transitions ... 133
Loading the Lesson ...134
Applying Transitions ...134
Rendering ... 140
ix
Using Transitions ...148
Summary ... 153
LESSON 9 Advanced Editing: Trim Edit and Splitting Edits ... 155
Setting Up the Project ... 155
The Trim Edit Window ...156
The Split Edit ... 160
Summary ...165
LESSON 10 Advanced Editing: Using Sound ... 167
Setting Up the Project ... 167
Controlling Levels ... 167
Normalization ... 177
Finishing Up ... 178
Voice Over ...182
Summary ...185
LESSON 11 Adding Titles ...187
Setting Up the Project ...187
Text Generator...188
Basic Animation ... 197
Summary ...198
LESSON 12 Boris Calligraphy and Advanced Titling ...199
Setting Up the Project ...199
Title 3D ...199
Title Crawl ...208
Nesting ...209
Still Images ...214
Summary ...218
LESSON 13 Animating Images ...219
Setting Up the Project ...219
Keyframing ...220
Straight Motion ... 222
Curved Motion ... 224
Other Motion Controls... 227
Summary ... 232
CONTENTS
x
LESSON 14 Animation Effects ... 233
Setting Up the Project ... 233
Motion Control ... 233
Split Screen ... 238
Brady Bunch Open ... 239
Summary ...249
LESSON 15 Adding Special Effects Filters ... 251
Setting Up the Project ... 251
Effect Availability ... 252
Applying a Filter...254
Some Useful Filters ... 255
Summary ...264
LESSON 16 Color Correction, Keys, and Mattes ... 265
Color Correction ... 265
Image Control ... 270
Keying ... 272
Matte ... 275
Summary ...280
LESSON 17 Compositing ...281
Setting Up the Project ...281
Generators ...282
Compositing Modes ... 283
Summary ...291
LESSON 18 Travel Mattes ... 293
Setting Up the Project ... 293
Travel Mattes ... 293
Summary ... 307
LESSON 19 Outputting from Final Cut Express ...309
Record to Tape ...309
Print to Video ...310
Export ... 312
Archiving ...319
Summary ...320
xi The companion DVD for Final Cut Express 4 Editing Workshop includes
uned-ited, raw footage and tutorial projects with sequences that guide you through the material. You will fi nd the following on the disk:
■ Almost 16 minutes of audio and video media fi les ■ 27 graphics fi les
■ 15 FCE4 tutorial project fi les ■ Folder of AVCHD media ■ XML fi les of the project
■ QuickTime preview movies of all FCE transitions ■ Extras folder with:
■ Demo fi lters from CGM ■ Timecode Calculator ■ Two custom button bars
■ Lens fl are effect in DV and HD, both 1080i and 720p
xiii
WHAT IS EDITING?
The fi rst movies were single, static shots of everyday events. The Lumière broth-ers’ screening in Paris of a train pulling into the La Ciotat train station caused a sensation. Shot in black and white, and silent, it nevertheless conveyed a gripping reality for the audience. People leaped from their seats to avoid the approaching steam locomotive. The brothers followed this with a staged comic scene. Georges Méliès expanded on this by staging complex tableaux that told a story. It wasn’t until Edwin H. Porter and D. W. Griffi th in the United States dis-covered the process of editing one shot next to another that movies were really born. Porter also invented the close-up, which was used to emphasize climac-tic moments. Wide shots were used to establish location and context. Griffi th introduced such innovations as the fl ashback, the fi rst real use of fi lm to manip-ulate time. Parallel action was introduced, and other story devices were born, but the real discovery was that the shot was the fundamental building block of fi lm and that the fi lm is built one shot at a time, one after the other. It soon became apparent that the impact of storytelling lies in the order of the shots.
Films and videos are made in the moments when one shot changes into another, when one image is replaced by the next, when one point of view becomes someone else’s point of view. Without the image changing, all you have are moving pictures. The idea of changing from one angle to another or from one scene to another quickly leads to the concept of juxtaposing one idea against another. The story is not in each shot but in the consecutive relation-ship of the shots. The story isn’t told in the frames themselves so much as in the moment of the edit, the moment when one shot, one image, one idea, is replaced with another. The edit happens not on a frame but between the frames, in the interstices between the frames of the shots that are assembled.
xiv
Editing is a poor word for the fi lm or video production process that takes place after the images are recorded or created. It is not only the art and process of selecting and trimming the material and arranging it in a specifi c order but is very much an extension of script writing, whether the script was written before the project was recorded or constructed after the material was gathered and screened. The arrangement and timing of the scenes, and then the selection, timing and arrangement of the picture elements within each scene, are most analogous to what a writer does. The only difference is that the writer crafts his script from a known language and his raw imagination, whereas the editor crafts her fi lm from the images, the catalogue of words, as it were—the dic-tionary of a new language—that have been assembled during the production. The editor’s assembly creates a text that, although a new, never before seen or heard language, is based on a grammatical traditional—one that goes back to Porter and Griffi th—that audiences have come to accept as a means for convey-ing information or tellconvey-ing a story.
Unlike the written language, a novel, or an essay that can be started and stopped at the reader’s whim, video or fi lm production is based on the concept oftime, usually linear time of a fi xed length. Nowadays, of course, many forms of video delivery—the Web, computer or portable player, or DVD player—can be stopped and started according to the viewer’s desires. Nonetheless, most pro-ductions are designed to be viewed in a single sitting for a specifi ed duration.
Film and video are designed to accommodate the temporal rigidity of the the-ater but with the spatial fl uidity and freedom of a novel. Whether it is 10 min-utes, 30 minmin-utes, one hour, two hours, or more, the fi lm is seen as a single, continuous event of fi xed duration. On the other hand, time within the fi lm is infi nitely malleable. Events can happen quickly: We fl y from one side of the world to another, from one era to a different century, in the blink of an eye. Or every detail and every angle can be slowed down to add up to a far greater amount than the true expanse of time or seen again and again.
xv This process of writing with pictures that we call editing has three components:
1. Selection, choosing the words, deciding which shot to use
2. Arrangement, the grammar of our writing, determining where that shot should be placed in relation to other shots, the order in which the shots will appear
3. Timing, the rhythm and pace of our assembled material, deciding how long each shot should be on the screen
Timing is dictated by rhythm—sometimes by an internal rhythm the visuals present, sometimes by a musical track, and often by the rhythm of spoken language. All language, whether dialog or narration, has a rhythm, a cadence or pattern, that is dictated by the words and based on grammar. Grammar marks language with punctuation: Commas indicate short pauses, semico-lons are slightly longer pauses, and periods mark the end of a statement. The new sentence begins a new idea, a new thought, and it is natural that as the new thought begins, a new image is introduced to illustrate that idea. The shot comes not at the end of the sentence, not in the pause, but at the beginning of the new thought. This is the natural place to cut, and this rhythm of lan-guage often drives the rhythm of fi lm and video. Editing creates the visual and aural juxtaposition between shots. That’s what this book is about: how to put together those pieces of picture and sound.
WHY DO I GET TO WRITE THIS BOOK?
I have been working in fi lm and video production for longer than I like to admit (okay, about 40 years). I worked at ABC News for many years as an oper-ations manager and producer, fi rst in London and then in New York. I went on to teach video production at a small high school in rural northern California. I also have written curriculum for Apple’s Video Journalism program and taught training sessions for them, and during the summer, I have had the pleasure of teaching Final Cut at the Digital Media Academy on the beautiful Stanford University campus.
The structure of this book follows that of my Final Cut Pro Editing Workshop books. It is organized as a series of tutorials and lessons that I hope have been written logically to guide the reader from one topic to a more advanced topic. The nature of your work with Final Cut Express, however, may require the information in Lesson 10, for example, right away. You can read that lesson by itself. There may, however, be elements in Lesson 10 that presuppose that you know something about using the Viewer in conjunction with the Canvas.
xvi
WHO SHOULD READ THIS BOOK?
This editing workshop is intended for all FCE users. So the broader question should really be “Whom is FCE intended for?” It appeals, I think, to serious hobbyists, the so-called prosumer market, event producers, and even small companies with video production requirements. I also think it’s a great video application for education—fully featured, able to go beyond the limitations that frustrate many students who use iMovie, but without the professional fea-tures of its older sibling, Final Cut Pro. Institutional education pricing makes it affordable for schools even in these penny-pinching times. Final Cut Express is not a simple application to use; it’s not plug-and-play. It requires learning your way around the interface, its tools, and its enormous capabilities.
WHAT’S ON THE DVD?
xvii
Acknowledgments
First, as always, my gratitude to all of the people at Focal Press who make this bookwriting process relatively painless, particularly Paul Temme, Acquisitions Editor, for his thoughtful advice and guidance, and for bringing this project to life. My thanks also to Mónica González de Mendoza, Project Manager, and Chris Simpson, Assistant Editor, for their help and ready answers to my ques-tions and for shepherding the project through the production process. Many thanks are due to Deborah Prato for her stylish copyediting and to Macmillian Publishing Solutions for their work on the layout. My thanks to Alisa Andreola for her wonderful work on the covers, Janet Cocker for proofreading, and Keith Shostak for carefully indexing the book. Any errors in text or substance remain mine alone.
So many people helped make this book possible and deserve thanks: Sidney Kramer for his expert advice; Dion Scoppettuolo, FCE product manager, for his assistance; Rich Corwin and Anita Lupattelli Corwin for their gracious coopera-tion; and Toby Malina for her kind help. Thanks also to Klaus Eiperle for let-ting me put demo versions of his wonderful CGM effects on the DVD.
TheCGM DVE Complete XXL contains 186 fi lters, transitions, and generators for use in Final Cut Pro and Final Cut Express. In addition to the professional plug-ins, the package also includes a series of Final Cut workshops and 68 soft-wipe patterns.
All CGM transitions and fi lters are written in Final Cut’s “native language” so they function seamlessly while fully supporting YUV rendering and multipro-cessing in OSX. Additionally, they are designed to render at the subpixel level, which ensures smooth movement within the rendered clip.
Another advantage is that the 2D and 3D effects are “true” FCP transitions rather than After Effects fi lters (which may require cutting and pasting and often suffer from luminance shifts since they do not render in YUV space). All plugins support progressive video and the Intel Processor and RTExtreme HD architecture of FCP and FCE. Of course, rendering is optimized for maximum speed on all available Apple computers.
We can offer you four single volumes of plugins OR the complete package of all four volumes, the CGM DVE Complete XXL.
Available Packages (all prices in US Dollars):
– CGM DVE Complete XXL: $ 369.00 – CGM DVE Vol. 1: $ 99.00
– CGM DVE Vol. 2: $ 179.00 – CGM DVE Vol. 3: $ 179.00 – CGM DVE Vol. 4: $ 179.00
Online Store: http://www.cgm-online.com
We accept Mastercard, Visa, American Express, Diners Club and Paypal.
1 Welcome to Final Cut Express, version 4—the newest version of Apple’s video
editing software for DV and HDV users, and now the newest high-defi nition, consumer format for AVCHD users. This version is based on its older cousin, Final Cut Pro 6. It is a universal binary application, which means it will run on either older PowerPC Macs or Apple’s Intel-based computers. If you are working with AVCHD material, you will need to have one of Apple’s Intel computers, a MacPro, iMac, MacBook, MacBook Pro, or MacBook Air.
Final Cut Express (FCE) has a unique niche in video editing applications; nothing else of its caliber is available in its price range. FCE occupies the space between Apple’s free iMovie editing application and its high-end, resolution-independent suite of applications called Final Cut Studio. With the introduc-tion of the latest version of iMovie 08, many of its users have been frustrated with what appears to be a dumbing down of the application. It is now very sig-nifi cantly an amateur consumer product and not enough for the serious hobby-ist or even the small business professional. Though iMovie 06 is still available, it’s clearly been dead-ended by Apple. For the serious hobbyist or professional who is working in DV, HDV, or AVCHD, Final Cut Express is a good choice for those who don’t want or need to pay the price of Final Cut Studio. iMovie and FCE are similar in some ways, but they differ not only on the surface but in the applications’ underlying architecture. We will examine these differences in workfl ow as they come up in the book.
Installing Final Cut Express
LESSON 1
LESSON 1
In This Lesson
What You Really Need ...2 Firing Up the
2 I’m sure you want to dive right into it, but FCE 4 fi rst must be installed cor-rectly on a properly functioning system. Video editing software is not simple shareware but a complex, system-integrated piece of software that requires your system to be running in optimal condition. This means all of the correct system software must be installed on hardware, computer, and hard drives that can support digital video. Your hard drives must be fast, clean, and running properly, ready for moving large amounts of data at high speed.
WHAT YOU REALLY NEED
Final Cut Express 4 works only with Apple’s OS X 10.4.10 or higher. It runs well on Leopard, OS 10.5 and on a G4 or G5 Mac that is 1.25 GHz or higher. This also applies to dual processor machines. Each processor has to be 1.25 GHz or faster. FCE will, of course, run best on the Intel dual-core (Core Duo) computer. The computer must have an AGP or PCI Express graphics card or the Intel GMA integrated processor in the MacBook. All of these machines should come with the necessary graphics card as standard. Though the appli-cation will run with the MacBook integrated graphics process, it will not run some of new the FxPlug fi lters that come with FCE 4. I would no longer rec-ommend used a MacBook with this application, and though it will also run on a Mac mini, it is not approved as a system by Apple, and I would not advise
NOTE
New Operating System:
If you have to
upgrade your operating system to run your new software, or if you want to upgrade to Leopard, the new Mac OS 10.5, most professionals
recommend that you do a clean erase and install of the new operating system, rather than simply archiving and installing it. Professional applications,
especially video applications, call on many system functions to operate, and making a minor change or failing to correctly place or update a minor Library fi le will make the application function incorrectly. If you must upgrade, the best way is to
make a clone of your existing system, using Carbon Copy Cloner or Super-Duper! Erase your main drive, which you can do from the system installation discs, and then
install a clean, new operating system. Install your software, and then from the cloned drive, transfer your users and other fi les you want to keep. If you’re
really careful, you can even move over and install many simple applications this way, but you cannot do that with video
3 it. The application will run on a G4 PowerBook, MacBook Pro, or iMac, and,
of course, it will run beautifully on a top-of-the-line 8-core MacPro tower. As just noted, if you’re working in the AVCHD format, you must have an Intel-based computer, not a G4 or G5.
Memory: How Much and What Kind?
Applications have to deal with two distinct types of memory: RAM and stor-age. They perform quite distinct functions. RAM (random access memory) is the chips that hold the system and applications while they are running. FCE is stored in RAM while it’s open, as is the operating system. To do this, you will need at least 1 G of RAM, but I recommend that you have at least 2 G of RAM and even more if you can. You’ll also need 500 MB of storage space available for installation applications, Final Cut Express, and LiveType, together with their ancillary application support media.
NOTE
Do Not Upgrade LiveType: If you are upgrading from an older version of FCE, do not upgrade
LiveType. There is nothing new in it, and the new version that comes with the latest version of FCE has had a signifi cant amount of the LiveType content removed. Keep your old LiveType, and for safety, rename it so the FCE installation doesn’t accidentally erase it. Also, if you have Soundtrack from an older version of FCE,
this application will still work with the new Final Cut Express, though it has been removed from the FCE package. It is unclear how much longer Soundtrack will work with
FCE and the current versions of the operating system, but if you have it, you can use it. If you want a purely music creation tool, you’re probably better off
working with Garage Band than with the old Soundtrack.
Your fi nances almost invariably dictate which computer you purchase for edit-ing video. It’s a good idea to get the biggest, fastest, and most powerful com-puter you can afford. If you have budget constraints, start with an iMac. If you need to be on the road a lot, get a MacBook Pro. If you have a larger budget, go for it: an 8-core Mac Pro loaded with lots of RAM.
Multiple Drives
Storage is an essential part of any video system. DV consumes about 3.6 MB per second of storage space. That translates to 216 MB per minute, approximately
4
1 GB for fi ve minutes, and almost 13 GB for an hour. Fortunately, cheap hard drives are available in ever-increasing sizes, with platter speeds, seek times, and caches ample for working with DV-quality material. HDV material has the same amount of storage space as DV when recorded, but it gets converted to a high-resolution format when ingested into FCE. AVCHD uses even less storage space when recorded, and an hour or more can be fi tted onto a single 4 G mem-ory card. However, when this material, HDV and AVCHD, is ingested, it is trans-coded into the Apple Intermediate Codec, which is approximately 12 MB per second, about 40 G per hour of footage, ten times larger than AVCHD natively.
Because a digital video editing system needs to move large amounts of data at high speeds, you should use separate drives purely for storing video data. You should have one internal hard drive dedicated to your operating system and applications, such as Final Cut Express, LiveType, Photoshop or Photoshop Elements, iTunes, your iLife applications, iDVD, iWeb, Garage Band, and so on, and everything else from Internet-access software to word processing and spreadsheets. All of these should be on one drive—your system drive—and all the applications should be in the system’s Applications folder.
You should also have at least one other hard drive that’s both large and fast. This drive should carry only your media. A separate drive is much more effi cient at moving large amounts of data at high speed. The media drive needs to get that data off the drive very quickly and play it back. In addition, it needs to play back multiple tracks of audio from various places on the drive simultaneously. That’s quite enough work for any one drive to be doing at any one time! Expecting it to access both the application and the operat-ing system can be the straw that breaks the camel’s back. You are much less likely to have video playback or capture failure through dropped frames and other issues if you have the media on a separate, dedicated hard drive. This drive should run at 7,200 rpm and have at least an 8 MB cache. For MacBook, MacBook Pro, or iMac users, external FireWire drives are a good solu-tion, such as are those from Seagate, WiebeTech, or boxes from Granite Digital in which you can put a number of different fast, bare drives. With a G5 or a MacPro, the best solution is to put a second, large drive inside your computer.
Optimizing Your Computer for FCE
5
operations while it’s running. You should set Software Update to not check for updates automatically. That way, it won’t take off and try to run while you’re working in FCE.
For the Desktop, most professionals recommend switching off screen savers and working in a neutral, usually medium-gray desktop, because it is more
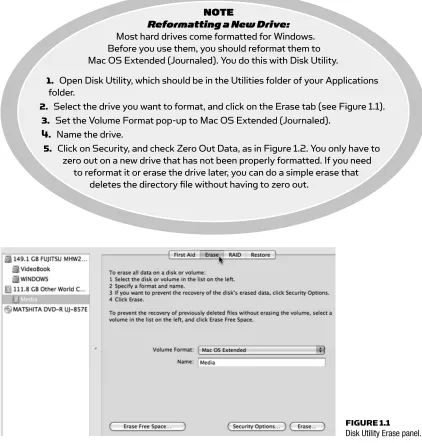
FIGURE 1.1 Disk Utility Erase panel.
NOTE
Reformatting a New Drive:
Most hard drives come formatted for Windows. Before you use them, you should reformat them to Mac OS Extended (Journaled). You do this with Disk Utility.
1. Open Disk Utility, which should be in the Utilities folder of your Applications folder.
2. Select the drive you want to format, and click on the Erase tab (see Figure 1.1).
3. Set the Volume Format pop-up to Mac OS Extended (Journaled).
4. Name the drive.
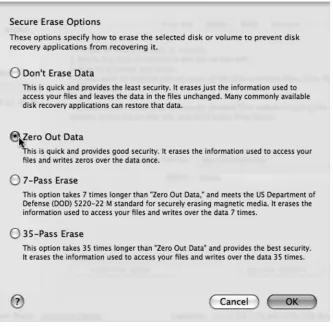
5. Click on Security, and check Zero Out Data, as in Figure 1.2. You only have to zero out on a new drive that has not been properly formatted. If you need
to reformat it or erase the drive later, you can do a simple erase that deletes the directory fi le without having to zero out.
6
restful for the eyes and does not affect the color rendition of your eyes. (You’ll see this tonal display in the application—mostly gray shades.)
The Displays should be set so that your computer monitor is running in
Millions of Colors and at the resolution settings the system recommends for your display, which should be a minimum of 1,024 ⫻ 768. The application will not run properly at lower resolutions.
TheEnergy Saver should be set so that the system never goes to sleep. It’s less critical, however, that the monitor doesn’t go to sleep. I usually set it around ten minutes, but the system and the hard drive should never shut down, which would wreak havoc with slow renders.
I also recommend that you switch off AppleTalk and networking. This is done easily by going to Network Preferences and creating a new location called
None. Set up your None location without any active connections—no internal FIGURE 1.2
7 modem, no Airport, no
Ethernet—every-thing unavailable and shut off. To reconnect to the network, simply change back to a location from the Apple This feature also allows you to call up
your Dashboard widgets, separate your windows
to see them all, and create separate rooms or spaces for doing different types of work. For example, I have one space for e-mail, another for Internet brows-ing, a third for writing tasks, and a fourth for video and media work. Exposé and Spaces is, unfortunately, a little problematical for FCE users. The default shortcuts for Exposé’s functions are F9, F10, and F11, which are critical to work-ing effi ciently in FCE. I recommend that you change the default Exposé key-board shortcuts to Option-F9, Option-F10, and Option-F11. You can do this in your System Preferences in the Exposé and Spaces panel, as shown in Figure 1.3. Hold down the Option key before selecting the item in the pop-up. You should change the default Dashboard shortcut as well. I like to use F1, because it doesn’t do anything in FCE.
Monitors
In addition to your computer display, you should also have a video monitor. These monitors, like television sets, reproduce images very differently from com-puter monitors, which have much greater color depth, resolution, and contrast range. In addition, video monitors have an interlaced scan line display, which computer monitors do not. These attributes are all critical to how your video will fi nally look. One reason this is so important is because your material is being made into a video format. Whether you shot it with a DV, HDV, or AVCHD camera, because FCE is resolution specifi c, it always generates video in one of these formats, which are usually interlaced video formats designed for display on a television. If you work in DV and your project is intended to be seen on a television set, you must edit with a video monitor that shows true color and
NOTE
No Spin: The Energy Saver controls do not affect secondary and external drives like FireWire drives, but this can be a problem for FireWire drives. If you fi nd your secondary or media drive spinning down or going to sleep (for example, if you take
a break), get a simple shareware utility like No Spin (http:// software.electriceelprod.com) to keep the drive awake while
you work. It sends a polling ping to the drive every 60 seconds or so to keep it from dosing off and
going to sleep.
8
interlacing output. The high-defi nition format that FCE uses cannot be displayed directly on a video monitor while you work.
Even if you intend the fi nal product to be seen only on the Internet, the appli-cation still makes it into one of these video formats, so you should
monitor on an interlaced display to properly assess your mate-rial’s output. Another way to monitor your material more
closely is to view it in FCE at full 100 percent resolution. (We’ll see how to do that later.)
You may also want a second computer display for the large number of windows that video editing applications need. This is helpful for long-form video production, but it is by no means as essential as a video monitor or, at the very least, a television display.
FIGURE 1.3 Exposé and Spaces system preferences.
TIP
Monitoring HD: You can best monitor HD by using the Digital Cinema Desktop display function while you work. This lets you view the video
full screen on your computer monitor, and it’s easy to toggle in and out of it with a
keyboard shortcut. We’ll see how to set this up in a later
To get the video out of your computer and onto the video monitor or TV, you need to use some kind of digital-to-analog conversion device. The simplest one for most people is a camcorder. The video and audio come out of the com-puter’s FireWire port, which gets connected to the camcorder, DV deck, or DV converter box, such as the DataVideo DAC-100. The output of the camcorder in turn is connected to the video monitor. That’s the best place to watch your movie while you work. The audio from the camera or the video monitor is fed into speakers. Figure 1.4 shows a typical DV connection layout. The camera is the hub that passes the digital signal to and from the computer and sends the analog signal to the video monitor and speakers.
If you are using an external FireWire hard drive, in most cases the system works best by daisy-chaining the FireWire connection. A six-pin to six-pin FireWire cable connects the computer to the hard drive, and a six-pin to four-pin cable connects the hard drive to the camcorder, a six-pin to six-pin cable connects to a converter box, and standard video cables connect the camcorder or converter to your TV or video monitor. Avoid using USB drives for video work. Although they are fast, they transfer data in bursts, which doesn’t work well for video and is not supported by Apple for use with video applications.
Speakers
Good-quality speakers are very important. They should be connected to the same source as the video you’re monitoring. The rule of thumb here is that audio
What You Really Need
FIGURE 1.4 Typical DV connection layout.
10
NOTE
Canon Cameras: Generally, Canon cameras do not support daisy-chaining and require a separate FireWire bus to work correctly with an external FireWire drive. Unfortunately, all Apple computers, although they may have multiple FireWire ports, have only one FireWire bus controlling them. For tower computers and laptops with PCMCIA cardbus or Express Card slots, third-party hardware can be added that will add a second bus and allow you to
use external drives with these cameras. This is a real problem for iMac users, who don’t have these options. Generally, with these setups, it’s best to capture
your material in the internal drive and then move it to the external drive for editing.
follows video, so if you are looking at your video on a television monitor, you should listen to your audio from the same source. If you have a deck or a DV camera that is feeding the signal from your computer to your TV monitor, that device should also be feeding your audio speakers. Switchable speakers would be ideal, with two inputs to monitor either the video source or the computer output.
NOTE
Updates: After installing the software, it’s probably
a good idea to check the Apple Final Cut Express web page (http://www. apple.com/fi nalcutexpress) to see if there have been any updates to the application. Applications are constantly being refi ned and updated to fi x problems or to accommodate
developments in hardware or the operating system. You can also do this by choosing
Software Update in the System Preferences or directly from under the Apple menu. Also, don’t forget to register your
new software.
FIGURE 1.5 Final Cut Express icon.
FIRING UP THE APPLICATION
Now it’s time to launch that program. Double-click on the icon in the Applications folder or, better yet, make an alias in the Dock and click on that (see Figure 1.5). After you start up the application, the fi rst window asks you to reg-ister your application. Once you’ve done this, the screen will not appear again.
11 new pop-ups that let you limit your selection choices to
make it easier to choose the correct setting. The Format pop-up (see Figure 1.7) lets you pick the format you want to work with—HD, NTSC, or PAL—or the codec you want to work in—Apple Intermediate Codec or DV/Panasonic DVCPRO. If you’re using HD, select that and the Use pop-up will be limited to the three available HDV Apple Intermediate Codec presets, as shown in Figure 1.8. The Rate pop-up lets you
select the frame rate you’re working in. If you change it to 25 fps, as in Figure 1.9, the default setup will immediately change to DV PAL, as 25 fps is the basic PAL frame rate.
If you are working in DV with audio recorded using 12-bit audio, also called 32 kHz audio, more choices will appear, such as in Figure 1.10. For now, choose
DV-NTSC. That’s the format in which we’ll be working.
The pop-up at the bottom makes you choose your primary scratch disk. The pop-up defaults to your system partition, setting the scratch disk inside the user’s Documentsfolder. It also offers you the choice of any hard drives attached to your system. You should set this to your dedicated media drive whenever pos-sible, as shown in Figure 1.11.
If you do not have a camcorder or DV deck connected to your computer, you will get the warning dialog shown in Figure 1.12. If you
will be working consistently without a deck or camera
FIGURE 1.6
Choose Setup Dialog box.
FIGURE 1.7 Format pop-up.
Firing Up the Application
FIGURE 1.9
Choose Frame Rate Dialog box. FIGURE 1.8
HD options.
NOTE
Registering: If you don’t register your software, every fi fth time you launch the application the registration screen will appear. There
12
FIGURE 1.10 DV options.
NOTE
Codec:Codec stands for
“compression-decompression.” FCE works using QuickTime, which is a
multimedia architecture that handles video, audio, still images, and other data. Any video that’s brought into Final Cut Express should be in QuickTime and compressed into one of the three codecs that FCE uses: DV/Panasonic DVCPRO in either NTSC (the North American and Japanese standard) or PAL (the standard used
by the rest of the world). The third codec is the Apple Intermediate Codec, which is a high-resolution codec used for HD material, either HDV or the new AVCHD
format. FCE does not work with other formats or codecs like MPEG-2 or MPEG-4. That material must be converted to QuickTime using
one of the three FCE compatible codecs.
NOTE
Sample Rates: Audio is recorded digitally by cutting up the sound into samples. The more samples per second into which the audio is divided, the more accurately it will represent the original sound. DV has two sample rate options: 32 kHz (kiloHertz) and 48 kHz, which means sampling the audio either 32,000 times per second, or 48,000 times per
second. The camera manufacturers designate these sample rates as 12-bit for 32 kHz and 16-bit for 48 kHz. You should always set
your camera to record at 16-bit or 48 kHz. If you haven’t and you recorded at 32 kHz, then you should use one
of the 32 kHz presets.
FIGURE 1.11 Setting the scratch disk.
13 connected, notice the little check box in the lower left that allows you to switch
off this warning. You can turn it back on in User Preferences under the Final Cut Express menu.
UNDERSTANDING THE INTERFACE
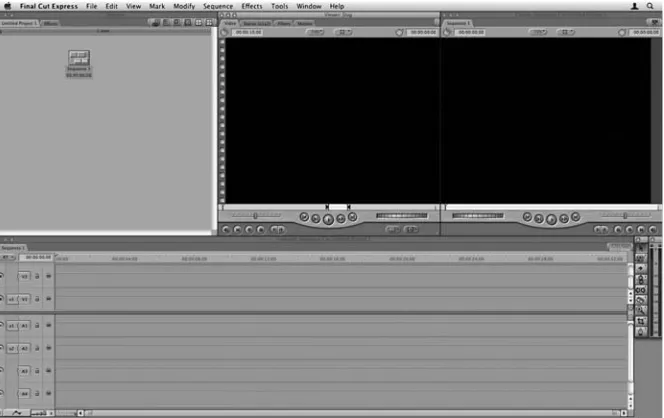
Launching a new application for the fi rst time is always an adventure, especially when it’s as complex as Final Cut Express. Some software can be intimidating, and some can be downright confusing. When FCE launches, it fi lls your screen with lots of windows, buttons, and tools to explore. Figure 1.13 shows you the default arrangement called Standard.
The Primary Windows
The screen is divided into four primary windows, with two large, empty screens as your principal monitors:
1. The Browser is the fi rst window at the top left of the screen, which is empty except for one sequence. The Browser is the equivalent of the Clips pane in iMovie HD or the Event pane in iMovie 08.
2. The Viewer, the empty black window in the middle of the screen, allows you to look at individual video clips. You can open clips either from the Browser or from the Timeline window.
3. The Canvas, the empty monitor on the right, displays the output of your material as you edit it. The Canvas is linked directly to the Timeline.
Understanding the Interface
14
4. The Timeline for your video is the window with the horizontal sections in the bottom half of the screen. This is where you lay out your video and audio material in the order you want them. The Timeline that’s open in the interface is the item called Sequence 1 in the Browser.
The materials that you’re working with in the project, such as video clips, audio fi les, and imported graphics, are all listed in the Browser. Think of the Browser as a giant folder. You can nest folders within folders, just as you can on the Desktop. You can make folders in FCE and keep them in your Browser to organize your material. The Browser is not where your clips are stored; it is only a list. Your clips are physically stored on your media hard drives.
You’ll also notice small vertical bars to the right of the Timeline that contain the Tools and Audio Meters. Some of the tools are hidden, nested inside the Tools palette. Figure 1.14 shows all the tools displayed. There is a Selection tool, which is the arrow at the top. There are Edit and Range Selection tools; Track Selection tools; editing tools such as Roll, Ripple, Slip, and Slide; Blade tools; Zoom and Hand tools; Crop and Distort tools; and various Pen tools for creat-ing and editcreat-ing keyframes.
Window Arrangements
Many people like to work with multiple monitors or large Cinema displays or to attach a second monitor when working on a PowerBook. With multiple monitors you can move the Browser onto a separate screen and leave just the Viewer, Canvas, Timeline, and Tools on the main monitor. In FCE, you can cre-ate new window arrangements by moving the screens into new positions, such as in Figure 1.15, with a long, tall Browser on the left. You can save this, or any other window arrangement, by holding down the Option key and select-ing from the Window menu, Arrange⬎Set Custom Layout (see Figure 1.16). In this menu some other presets are available to you.
Once the arrangement has been set, it can be called up at any time from the
Window⬎Arrange menu or by using the listed keyboard shortcut. You can always return to the Standard window arrangement from the Window menu or use the keyboard shortcut, Control-U.
In FCE, you can resize windows dynamically by grabbing the edges where the cursor changes to a Resizing tool (see Figure 1.17). When you pull with the FIGURE 1.14
15
Resizing tool, the windows will move propor-tionately, expanding and contracting as needed to fi ll the available space.
Tabbed Palettes
You have probably also noticed that most of these windows have tabs with other windows behind them. Let’s take a quick look at what’s back there. Tabbed in the
Browser is the Effects window. Video and audio effects,
transi-tions, and generators are stored here, including any favorites you want to access frequently.
FIGURE 1.15 Long Browser arrangement.
FIGURE 1.16
Window⬎Arrange⬎Set Custom arrangement.
Understanding the Interface
FIGURE 1.17 Resizing tool for window arrangements.
TIP
Open Sequence: Should your project ever open and you don’t see a Canvas or Timeline, it means that no sequence is open. There needs to be at least one sequence in a project.
Double-click the sequence icon in the Browser, and it will open the Timeline with its
16
TheViewer has tabs behind it as well:
■ Stereo (ala2) or Mono (al) and Mono (a2), which hold the two
chan-nels of audio associated with a video clip. This is where you can see a video clip’s audio waveform and manipulate the sound by raising and lowering the levels or panning the tracks from left to right.
■ Filters is where you control the effects that are applied to clips.
■ Motion lets you view and change settings for properties such as Scale,
Rotation, Center, Crop, and others.
Most of the Motion properties can be animated. You can also change the image’s opacity, making it more transparent. At zero opacity it will be invisible. You can add a Drop Shadow that will appear on any underlying layers, and you can add Motion Blur, which simulates the amount of smearing, created by a fast movement across the screen. We will look at these Motion tools in more detail in Lessons 13 and 14. The Canvas and the Timeline window can also have tabs. If you have more than one sequence open at a time, they will appear as tabs in the Timeline window and in the Canvas.
SUMMARY
17 Now that you’ve set up your system, let’s look more closely at each of the
com-ponents of Final Cut Express’s interface and each of its windows. To do so, we must open a project that has something in it, and to do that, we need to load the material from the DVD that accompanies this book onto your computer.
LOADING THE LESSON
Let’s begin by loading the book’s DVD into your DVD drive. To simplify the pro-cess for you, the materials you need for the projects are combined into a single folder on the disc. On the DVD you will see a folder called FCE_Media&Projects. Drag the entire folder onto your computer. Though the media for the projects is included in this folder, most computers’ internal drives should be fast enough to play these short DV clips, unless the drive is overly full.
Ideally you would place the project fi les in the Projects folder on your system drive and the clips inside the Media folder on your dedicated media drive. The sound and video clips included in the Media folder will play much more easily from your computer’s high-speed media drive than your internal drive. If you want to do this, use the following steps:
1. From the FCE_Media&Projects folder, drag the folder called Media onto your media drive.
2. Next, drag the Projects folder onto your internal system drive. It’s not very large, so probably the best place to put it is inside your home Documents folder.
The Final Cut Express
Interface
LESSON 2
LESSON 2
In This Lesson
3. Before you do anything else, eject the DVD.
4. Open the Projects folder on your hard drive, and double-click the project fi le Lesson 2 to open the project. There is no project for Lesson 1, so for convenience there’s no project named Lesson 1.
NOTE
Right-Clicking: If you do not have
a three-button mouse, either an Apple Mighty Mouse or a third-party mouse, you really should get one. Any inexpensive USB
three-button mouse with a scroll wheel will do. The application uses right-clicking to bring up shortcut menus, and the scroll wheel will move sliders as well as window
displays. Until you get the three-button mouse, whenever I say “right-click,” you should hold down the Control key while clicking to
bring up the shortcut menu.
RECONNECTING THE MEDIA
Before the project fi nishes loading, you may see the dialog box in Figure 2.1. This will happen if the projects and the media are in separate locations. Because the media is in a new location from where it was previously, you will have to reconnect the fi les:
1. Click on the Reconnect button in the Offl ine Files dialog box. Do not clickContinue.
2. In the next window that comes up, check the Search Single Location
box, and specify the drive where your media is located (see Figure 2.2).
3. Click the Search button.
4. FCE will fi nd one of the items. If it’s the correct item, make sure it’s selected and click the Open button in the dialog box (see Figure 2.3). If it doesn’t fi nd it, use the
Locate button in Figure 2.2 to fi nd it manually. It should fi nd the rest of the fi les as well.
5. All of the fi les should then have moved to the bottom of the Reconnect Files dialog box. Click the Connect button to reconnect the fi les (see Figure 2.4).
You must do this for each of the projects from this book that you open.
19 FIGURE 2.2
Reconnect Files dialog box.
Reconnecting the Media
FIGURE 2.3 Reconnect dialog box.
20
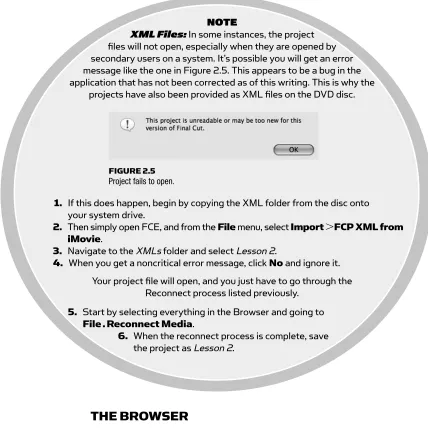
NOTE
XML Files: In some instances, the project fi les will not open, especially when they are opened by secondary users on a system. It’s possible you will get an error message like the one in Figure 2.5. This appears to be a bug in the application that has not been corrected as of this writing. This is why the
projects have also been provided as XML fi les on the DVD disc.
FIGURE 2.5 Project fails to open.
1. If this does happen, begin by copying the XML folder from the disc onto your system drive.
2. Then simply open FCE, and from the File menu, select Import ⬎FCP XML from iMovie.
3. Navigate to the XMLs folder and select Lesson 2.
4. When you get a noncritical error message, click No and ignore it.
Your project fi le will open, and you just have to go through the Reconnect process listed previously.
5. Start by selecting everything in the Browser and going to
File . Reconnect Media.
6. When the reconnect process is complete, save the project as Lesson 2.
THE BROWSER
21
Renaming Items
You can rename items in the Browser, clips, or sequences, just as you would any fi le in the Finder. Click twice on the name to highlight it. (Don’t quickly double-click, as this will open the item.) With the name selected, type in a new name. You can also select the item and press the Enter key on the keyboard to select the name for editing. (See the note on Clip Name Changes.)
You can have as many sequences as you want in a project, and you can place sequences within sequences, which is called nesting sequences. We’ll look at nesting in Lesson 12. FCE allows you to have more than one project open at a time, which is very useful because it allows you to easily move elements from one project to another. However, you may get confused about which window belongs to which project, so try not to have more than one project open at a time unless it’s really necessary.
To close the open projects, click the little round button in the upper left cor-ner of the Browser. This is the Close button that is red in the Mac operating system’s windows. This closes the Browser, and all the projects close with it. You can also close the project by right-clicking on the tab and selecting
Close, or by simply pressing Control-W when the Browser is the active window. You can identify the active window by the window title bar at the top, which is highlighted and brighter than the other window title bars in the application.
The Browser
22
FIGURE 2.7 Browser buttons.
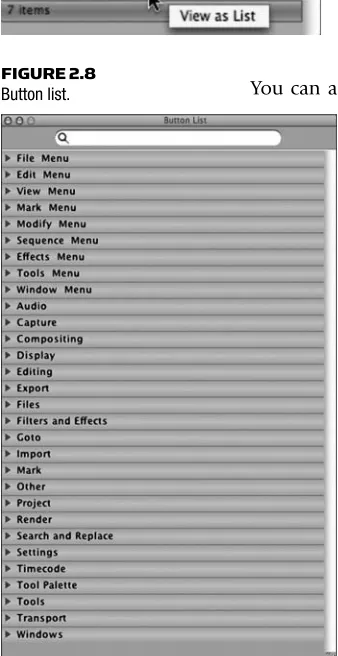
FIGURE 2.8 Button list.
NOTE
Clip Name Changes: Selecting a clip and pressing the
Enter key is the only instance in the application in which the Enter key and the Return key have different functions. Although the Enter key will let you rename
an item, the Return key will open the item, a clip into the Viewer, and a sequence into the Timeline window.
Browser Views and Buttons
You can change the Browser view by clicking one of the tiny buttons in the upper right corner of the window (see Figure 2.7). These buttons let you choose List view or three different icon views—Small, Medium, and Large—as well as buttons for arranging by Name or by Duration. Small icon view is pretty useless, and the large icons take up a lot of screen space.
You can also change views by selecting View⬎Browser Items. Finally, as in much else in FCE, you can use a keyboard short-cut. Shift-H will cycle through the four Browser view options.
FCE has the ability to create buttons that you can place in the various windows of the interface. To create a new but-ton, open the Button List from the Tools menu (or use the keyboard shortcut Option-J). This calls up the Button List shown in Figure 2.8. To fi nd the function for which you want to create a button, start typing in the search fi eld at the top of the list, and all the functions that have that word will appear in the list.
23 FIGURE 2.9
Button holder shortcut menu.
The Browser
NOTE
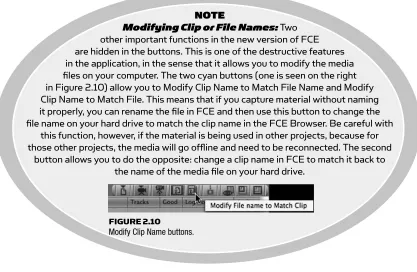
Modifying Clip or File Names: Two other important functions in the new version of FCE are hidden in the buttons. This is one of the destructive features in the application, in the sense that it allows you to modify the media fi les on your computer. The two cyan buttons (one is seen on the right in Figure 2.10) allow you to Modify Clip Name to Match File Name and Modify Clip Name to Match File. This means that if you capture material without naming it properly, you can rename the fi le in FCE and then use this button to change the fi le name on your hard drive to match the clip name in the FCE Browser. Be careful with
this function, however, if the material is being used in other projects, because for those other projects, the media will go offl ine and need to be reconnected. The second
button allows you to do the opposite: change a clip name in FCE to match it back to the name of the media fi le on your hard drive.
FIGURE 2.10 Modify Clip Name buttons.
button confi gurations for all of your windows (see Figure 2.9). To remove a button, drag it out of the bean. It will disappear, like an item from the Dock, in a puff of smoke.
In the Extras folder on the DVD that came with this book is a Button List calledEditing Workshop Button Bars. By right-clicking in the button folder and using the Load All Button Bars function and navigating to that fi le on the DVD, you can load a group of very useful buttons. There aren’t many of them because I’m not a great advocate of mousing around the desktop and clicking buttons, but you can add your own favorites to any of the button holders.
Let’s change the Browser to List view. Right-click in the empty Browser space, and select View as List. To see the contents of the bins, (1) click the twirly dis-closure triangle to expand the folder view, or (2) double-click on the folder icon.
24
TIP
Tabbed Bins: You can open a bin tabbed into the project window by holding down the Option key as you double-click to open it. To close a tab,
right-click on the tab, and select Close Tab, or use the keyboard shortcut,
Control-W.
TIP
Default Buttons: Final Cut does not
provide an easy way to get back to the default button bar set.
The only way to easily revert to the default set is to actually save the button bar set when it is in its default state. To do that, right-click on each button bar to restore the default, and then right-click on one, and from the shortcut menu select
Save All Buttons Bars. Now if you’ve added or deleted any buttons and you want to go back to the default state, simply select in the same shortcut menu
Load All Button Bars and navigate to your saved buttons, which is normally in your Final Cut Express User Data folder in your Preferences folder. A Default
Button Bars is already saved for you in the Extras folder of the DVD, along with the EditingWorkshop Button Bars.
The Browser contains two sequences: Sequence 1 andTitle.psd. When opened, a sequence appears in the Timeline window. Here you lay out your video, audio, and graphics clips. A sequence can have multiple tracks of video and audio. You can also place sequences within sequences, as we shall see later. Whenever you create a new project, FCE always creates a default empty sequence called Sequence 1. The Title.psd also has a sequence icon because FCE imports Photoshop fi les as layered sequences, with each of the layers in the PSD fi le appearing as a separate video layer in the Final Cut sequence, one stacked on top of the other. The other Photoshop fi le, View.psd, is a single-layer fi le and imports as a single-single-layer graphic and has a different icon. We’ll look at working with graphics in Lesson 12.
Browser Details
25 NOTE
Sequence Settings: The Sequence 1 that appears in the Browser is in the format and specifi cation you selected when you launched the application. In this case, the sequence is in DV NTSC format. If you change the easy setup, as we’ll see in the
next chapter, this does not affect the sequence that has already been created. Only any new sequences you create will be in that format.
The Browser
FIGURE 2.11 Browser List view.
The Browser shows the duration of clips and the In and Out points, which are probably marked Not Set at this stage. You also see track types (whether video and/or audio) and how many audio tracks are present. Note that the Photoshop sequences tell you how many layers are in the sequence. Also notice thatSequence 1 by default has two video tracks and four audio tracks.
The Master Clip column has some items that are checked. We’ll look at this more closely on page 78. In Figure 2.12, the clips in the bin called Courtyard have torn edges on the left and right. These are subclips, which we will discuss in more detail in Lesson 5.
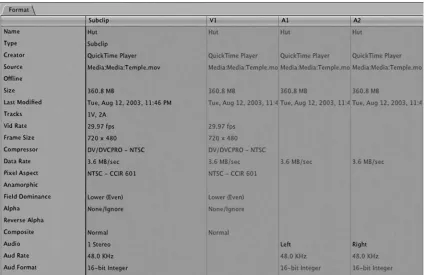
The Browser also shows the type of audio, frame size, and frame rate (in the case of these clips, 29.97 frames per second, the standard frame rate for all NTSC and HD video in North America and Japan); the type of video compres-sion used; the data rate; the audio sampling rate; and much, much more infor-mation than you will probably ever need!
26
If your cursor is over the column headers in the Browser and you right-click your mouse, you get a shortcut menu. Figure 2.13 shows the list of the available cat-egories, except for Name and Duration, that are active columns in the Browser.
One of the important items you can call up here is Source, which tells you the fi le path to a clip’s location on your hard drive. Another way to locate a fi le on your hard drive and what it’s called is to right-click on the clip and select
Reveal in Finder (see Figure 2.14). If you right-click on the clip Hut and go to the media in the Finder, you will see the media fi le is called Temple.mov. Renaming a clip in the Browser does not rename the media fi le on the hard drive and vice versa (see “The Browser Façade”).
Another item that is hidden in the Browser columns is Show Thumbnail. This cool feature brings up a thumbnail that shows the fi rst frame of the video. Grab the thumbnail and drag the mouse. This is called scrubbing, and you’re dragging through the video clip itself so you can see what’s in it. Viewing media in the Browser can save time. You can quickly scan through a shot to see if it’s the one you’re looking for. You can also change the Poster frame— the frame that appears in the thumbnail. The default is the fi rst frame of the video (or the In point), but if you scrub through the video and fi nd a new frame you would like to set as the thumbnail, press the Control key and release the mouse. A new Poster frame has FIGURE 2.13
List of available Browser
items. FIGURE 2.14Clip Shortcut menu.
TIP
Ordering: You can arrange the order in which clips are shown in List view by selecting the column header. By clicking the little triangle that appears in the header, you can change the order from descending to ascending. Also, if you Shift-click on the header of other columns, another triangle will appear and will be added as secondary ordering lists. Secondary sorting allows you to
organize and arrange your material to suit your workfl ow. To clear secondary sort orders, choose a new primary sort, and click on an unsorted
column header without the Shift key.
You can move any of the columns by grabbing the header at the top of the column and pulling it to wherever you want the column to appear. Only
27
The Browser
THE BROWSER FACADE
The FCE Browser is a facade. In other words, whatever you’re bringing into the FCE project—the media you are importing into your Browser—is equivalent to the aliases of your media (see Figure 2.15). While you are working with these aliases, you are using them to pass instructions to the computer about which pieces of video and audio to play when and what to do with them. The conveniences created for you in the application are an elaborate way of telling the computer what to do with the media on your hard drives and how to play it back. All of the clips in the project, whether in the Browser, the Viewer, or the Timeline, are simply pointers to the media on the hard drive. This is a nondestructive, completely nonlinear, random-access artifi ce. This means that your media is not modifi ed by anything you do in the application but that you can arrange the clips and work on any portion of your project at any time. It also means you can access any piece of media from anywhere on your hard drive at any time. The clips are not brought into the Browser or placed in the Timeline. They never leave their place on the hard drives. They are never in the project at all except as a list. You can change the names in the list to anything more convenient, and it has no effect at all on the data stored on your hard drive. All you are doing is changing how you give instructions to the data, not the data itself. On the other hand, if you change the names of the clips on your hard drive, that willconfuse FCE, and you will have to reconnect each clip to establish the links between the two.
FIGURE 2.15 Media and FCE workfl ow.
been set. If you change the Poster frame for a clip here or in any other Browser window, the poster will change for each instance of that clip anywhere in the Browser and will also display as the poster when the Browser is set to Icon view.
28
palette (see Figure 2.16). Or, if you hold down Control-Shift, the cursor will change to the Scrub tool, which is the Hand tool with forward and reverse arrows that will let you scrub the icons.
As everywhere in the application, right-clicking in the Browser will call up several useful items (see Figure 2.17), allowing you to make new bins and sequences, as well as importing and arranging material. The clips them-selves hold a shortcut menu that can do a variety of useful things, as we’ve already seen.
Another very useful option in the clip’s shortcut menu is Item Properties. Item Properties, which can also be called up by using the keyboard short-cut Command-9, calls up an information window that tells you every-thing about a clip (see Figure 2.18). You can rename a clip here, as well as see technical information about the clip and its specifi cations.
One of the most important functions of the Browser is that it allows you to organize and catalog material. This is especially important for long projects or projects with a great deal of media. The Browser allows you to add descriptions FIGURE 2.18
Item Properties format panel.
29 and other information about your clip. The descriptive information and
comments can be entered in the Browser columns (see Figure 2.19). To get from one comment fi eld to the next, press the Tab key, and the cursor will move to the next editable window.
Notice that two of the column headers have been renamed Camera and Sound to add information about the technical quality of the material. You can change the names of any of the comments columns by right-clicking in the column header and choosing Edit Heading from the shortcut menu (see Figure 2.20). There are Comments A and B as well as Master Comments 1 to 4.
THE VIEWER
Much of the editing in Final Cut Express takes place in the Viewer. This is where you manipulate individual clips, mark where you want them to start and
FIGURE 2.19 Browser comments.
The Viewer
FIGURE 2.20 Editing a column heading.
TIP
Shortcut Menus: Using shortcut menus in List view lets you change items for multiple clips with a few clicks of the mouse. For instance, to add a comment to the
Log Note, I select a number of clips and then use the shortcut menu in the Log Note column. This will bring up a list with all of my recent notes in that column. I select the one I want, and all of the selected
clips will have their log notes changed (see Figure 2.21).
30
end, and prepare them for your timeline. To load a clip into the Viewer, double-click on it, or select it and press the Return key. You can also drag it into the Viewer, or right-click on it and select Open in Viewer. Start by double-clicking on the clip Temple to open it into the Viewer (see Figure 2.22).
Viewer Buttons
Figure 2.23 shows the buttons clus-tered around the bottom of the Viewer. The Shuttle tab lets you shuttle the clip forward and back-ward. Grab it with the mouse and move right and left. The farther from the default center position you go, the faster the video will play. The Jog wheel lets you roll back and forth through the frames slowly. The central button in the middle is the Play button. Starting from the left in the group around the Play button, the fi rst button is Go to Previous Edit (Up arrow). The next button is quite useful; it lets you play from your In point to your Out point. The key-board shortcut is Shift-\. The next button to the right of the central Play but-ton is Play Around Current Point (\). The default is for playback to start fi ve seconds before where the playhead is and play for two seconds past where the
31 playhead is. We’ll look at how to use these functions in later lessons. The
play-head shows you where you are in the clip and is designated by a little yellow triangle with a line hanging off it. There are many playheads in the application; the three we see in the Viewer, the Canvas, and the Timeline just happen to be visible. The last button is Go to Next Edit (Down arrow).
Another cluster of smaller buttons sits at the bottom left of the Viewer. From the left, the fi rst button is Match Frame (F), which although very useful, will not work for you yet. If you open a clip that’s in a timeline, it allows you to match back to the same frame in the Canvas. The next button is Mark Clip (X), which selects the In and Out points the entire length of the clip. The diamond-shaped button adds a keyframe, which you need when creating animation, although the Viewer is not the best place to do this. The next button adds a marker to the clip (M). Markers are very useful; they let you set visible marks on clips that appear in the Timeline window. You can mark the beat of a piece of music, where a phrase appears in dialog, or where a pan or zoom starts or ends. Practically anything you can imagine noting about a clip can be made to appear on the screen. Think of them as onscreen Post-it® notes for a video editor. Next to the Marker button is a group of two buttons: Mark In (I) and Mark Out (O). These allow you to designate where you want a clip to start and end before you place it in the Timeline. Two more buttons appear at the bottom right of the Viewer. The one with the Clip icon lets you load recently opened clips. The
The Viewer
NOTE
Match Frame Variations: A match frame button, which is also activated by the F key, appears on the Canvas. When the Canvas or the Timeline is the active window, Match Frame has a different function from match frame in the Viewer. Here, the button or shortcut will match frame back to the same clip and frame of video in the Browser from which the Timeline clip was taken.
Another useful Match Frame tool to remember is Command-Option-F, which is a variation of Match Frame that takes you back to the same frame from a new clip of the original piece of media called up directly
from your hard drive. Another useful shortcut is Shift-F, which doesn’t open the clip into the Viewer but fi nds it and selects it in the
Browser. This can be very handy if you have lots of bins or even bins within bins. It lets you locate a clip
32
button with the large A opens a menu that accesses the Generators, such as Bars and Tone, Render Gradients, Color Mattes, Slug, Text, Title 3D, and the Title Crawl tool. We’ll delve into this button in later lessons.
Put your cursor in the white bar directly below the video image. As you mouse down, the playhead will jump to where you are. This is the scrubber bar. If you drag the playhead left or right it lets you scrub through the video that’s loaded in the Viewer.
Top of the Viewer
Let’s look at the top portion of the Viewer for a moment (see Figure 2.24). In the center are two buttons, actually pop-up menus. The one on the left, the
Zoom pop-up menu (see Figure 2.25), adjusts the size of the image displayed in the Viewer. You can set it to Fit to Window (Shift-Z), or to a percentage from very small to so large that you can see all of the pixels at their blocky best.
FIGURE 2.24 Top of the Viewer.
FIGURE 2.25 Zoom pop-up menu.
FIGURE 2.26 View pop-up menu.
The other button, the View pop-up menu, changes the view from Image mode to Image⫹ Wireframe (see Figure 2.26). You need this mode espe-cially for compositing in the Canvas when you’re combining and animat-ing multiple layers of video. The pop-up also lets you turn on overlays, including the Title Safe overlay.
Viewer Time Displays
At the top of the Viewer are two sets of numbers. The time display on the left is the duration of the clip from its marked In point to its marked Out point. If the In and Out are not set, it will show the duration of the media from start to fi nish. This clip is 1 minute, 39 seconds, and 24 frames long. See “What Is Timecode?” for an explanation of video frame counting.