M crosoft Press
A D v s on of M crosoft Corporat on One M crosoft Way
Redmond, Wash ngton 98052-6399 Copyr ght © 2011 by M crosoft Corporat on
A r ghts reserved No part of the contents of th s book may be reproduced or transm tted n any form or by any means w thout the wr tten perm ss on of the pub sher
L brary of Congress Contro Number 2001012345 ISBN 978-0-7356-5157-9
Pr nted and bound n the Un ted States of Amer ca
M crosoft Press books are ava ab e through bookse ers and d str butors wor dw de For further nfor mat on about nternat ona ed t ons, contact your oca M crosoft Corporat on off ce or contact M crosoft Press Internat ona d rect y at fax (425) 936-7329 V s t our Web s te at www m crosoft com/mspress Send comments to msp nput@m crosoft com
M crosoft and the trademarks sted at http //www m crosoft com/about/ ega /en/us/Inte ectua Property/ Trademarks/EN-US aspx are trademarks of the M crosoft group of compan es A other marks are property of the r respect ve owners
The examp e compan es, organ zat ons, products, doma n names, e-ma addresses, ogos, peop e, p aces, and events dep cted here n are fict t ous No assoc at on w th any rea company, organ zat on, product, doma n name, e-ma address, ogo, person, p ace, or event s ntended or shou d be nferred
Th s book expresses the author’s v ews and op n ons The nformat on conta ned n th s book s prov ded w thout any express, statutory, or mp ed warrant es Ne ther the authors, M crosoft Corporat on, nor ts rese ers, or d str butors w be he d ab e for any damages caused or a eged to be caused e ther d rect y or nd rect y by th s book
Acquisitions Editor: Devon Musgrave
Developmental Editor: Devon Musgrave
Project Editor: Va er e Woo ey
Editorial and Production: Waypo nt Press
Technical Reviewers: N ck Grave yn, Kurt Meyer; Techn ca Rev ew serv ces prov ded by Content Master, a member of CM Group, Ltd
Cover: G rv n
Table of Contents
Acknowledgments . . . xvii
Introduction . . . .xix
Who This Book Is For . . . .xix
System Requirements. . . xx
Code Samples . . . xx
Errata and Book Support . . . xx
We Want to Hear from You. . . .xxi
Stay in Touch . . . .xxi
Part I
Getting Started
1
Computers, C#, XNA, and You . . . 3
Introduction. . . 3
Learning to Program . . . 3
Becoming a Great Programmer . . . 4
How the Book Works . . . 4
C# and XNA . . . 5
Getting Started . . . 6
Installing the Development Environment and the XNA Framework . . . 6
Setting Up a PC to Run XNA Games . . . 7
Setting Up an Xbox 360 to Run XNA Games . . . 7
Setting up a Windows Phone to run XNA games . . . 10
Writing Your First Program . . . 12
Creating Your First Project. . . 12
Running Your First Program . . . 14
Stopping a Program . . . 16
Microsoft is interested in hearing your feedback so we can continually improve our books and learning resources for you. To participate in a brief online survey, please visit:
Program Bugs . . . 61
Conclusion . . . 63
Chapter Review Questions. . . 64
Part II
Images, Sound, and Text
4
Displaying Images. . . 67
Introduction. . . 67
Resources and Content . . . 68
Getting Some Pictures . . . 68
Content Management Using XNA . . . 69
Working with Content Using XNA Game Studio . . . 70
XNA Game Studio Solutions and Projects . . . 70
Adding Content to a Project . . . 72
Using Resources in a Game . . . 75
Loading XNA Textures . . . 75
Positioning Your Game Sprite on the Screen . . . 79
Sprite Drawing with SpriteBatch . . . . 81
Filling the Screen. . . 83
Conclusion . . . 86
Chapter Review Questions. . . 86
5
Writing Text . . . 87
Introduction. . . 87
Text and Computers . . . 87
Text as a Resource. . . 88
Creating the XNA Clock Project . . . 88
Adding a Font Resource. . . 88
Loading a Font. . . 91
Drawing with a Font . . . 92
Changing the Font Properties. . . 94
Getting the Date and Time . . . 95
Making a Prettier Clock with 3-D Text . . . 97
Drawing Multiple Text Strings . . . 97
Repeating Statements with a for Loop . . . 99
Other Loop Constructions . . . 101
Creating Fake 3-D . . . 103
Creating Shadows Using Transparent Colors . . . 104
Drawing Images with Transparency. . . 105
Conclusion . . . 106
Chapter Review Questions. . . 106
6
Creating a Multi-Player Game. . . 107
Introduction. . . 107
Creating the Button-Bash Game . . . 107
Level and Edge Detectors . . . 111
Constructing the Complete Game . . . 111
Adding Test Code . . . 114
Conclusion . . . 116
Chapter Review Questions. . . 116
7
Playing Sounds . . . 117
Adding Sound . . . 117
Creating the Drum Pad Project. . . 117
Capturing Sounds with Audacity . . . 117
Storing Sounds in Your Project. . . 119
Using Sounds in an XNA Program . . . 121
Playing Background Music . . . 123
Creating a RayGun . . . 123
Conclusion . . . 129
Chapter Review Questions. . . 130
8
Creating a Timer . . . 131
Making Another Game. . . 131
Reaction Timer Bug . . . 134
Finding Winners Using Arrays. . . 136
Creating an Array . . . 136
Using Data in an Array . . . 137
Scanning an Array . . . 138
Using an Array as a Lookup Table . . . 140
Displaying the Winner . . . 141
Conclusion . . . 143
9
Reading Text Input . . . 145
Using the Keyboard in XNA . . . 145
Creating the Message Board Project . . . 145
Registering Key Presses . . . 146
The Keys Type . . . 147
Enumerated Types. . . 148
Working with Arrays, Objects, and References . . . 148
Values and References . . . 149
Arrays as Offices . . . 149
Say Hello to the Garbage Collector . . . 151
Using References and Values . . . 151
Why Do We Have References and Values? . . . 153
References and GetPressedKeys . . . . 153
Displaying Keys . . . 153
Detecting Key Presses . . . 155
Decoding Key Characters. . . 159
Using the Shift Keys . . . 160
Editing the Text . . . 161
Conclusion . . . 163
Chapter Review Questions. . . 163
Part III
Writing Proper Games
10
Using C# Methods to Solve Problems . . . 167
Introduction. . . 167
Playing with Images . . . 167
Zooming In on an Image . . . 167
Creating a Zoom-Out . . . 169
Updating the Drawing Rectangle. . . 170
Creating a Method to Calculate Percentages. . . 173
Returning Nothing Using void . . . . 175
Debugging C# Programs . . . 179
Hitting a Breakpoint. . . 180
Using Floating-Point Numbers in C#. . . 183
The Compiler and C# Types. . . 184
Compilers and Casting . . . 185
Stopping the Zoom. . . 188
Zooming from the Center . . . 188
Conclusion . . . 191
Chapter Review Questions. . . 192
11
A Game as a C# Program. . . 193
Introduction. . . 193
Creating Game Graphics . . . 194
Projects, Resources, and Classes. . . 195
XNA Game Studio Solutions and Projects . . . 195
The Program.cs File. . . 198
Renaming the Game1 Class. . . 203
Creating Game Objects . . . 205
Sprites in Games . . . 205
Managing the Size of Game Sprites. . . 206
Moving Sprites. . . 209
Bouncing the Cheese . . . 210
Dealing with Display Overscan . . . 211
Conclusion . . . 213
Chapter Review Questions. . . 214
12
Games, Objects, and State. . . 215
Introduction. . . 215
Adding Bread to Your Game . . . 215
Using a Structure to Hold Sprite Information . . . 216
Using the Gamepad Thumbsticks to Control Movement . . . 218
Improving Programs Using Methods . . . 219
Handling Collisions . . . 222
Making the Cheese Bounce off the Bat. . . 222
Strange Bounce Behavior. . . 223
Strange Edge Behavior . . . 224
Adding Tomato Targets . . . 227
Tomato Collisions . . . 229
Conclusion . . . 232
13
Making a Complete Game. . . 233
Introduction. . . 233
Making a Finished Game . . . 233
Adding Scores to a Game . . . 233
Adding Survival . . . 235
Adding Progression . . . 236
Improving Code Design . . . 239
Refactoring by Creating Methods from Code . . . 240
Refactoring by Changing Identifiers . . . 241
Creating Code Regions. . . 244
Creating Useful Comments . . . 245
Adding a Background. . . 246
Adding a Title Screen . . . 247
Games and State . . . 247
Using the State Values . . . 248
Building a State Machine. . . 249
Conclusion . . . 252
Chapter Review Questions. . . 252
14
Classes, Objects, and Games . . . 253
Introduction. . . 253
Design with Objects . . . 253
An Object Refresher Course . . . 254
Cohesion and Objects. . . 254
Coupling Between Objects . . . 257
Designing Object Interactions . . . 260
Container Objects . . . 261
Background and Title Screen Objects . . . 263
Classes and Structures . . . 264
Creating and Using a Structure. . . 264
Creating and Using an Instance of a Class . . . 265
References . . . 267
Multiple References to an Instance . . . 267
No References to an Instance . . . 268
Why Bother with References? . . . 268
Value and Reference Types . . . 269
Creating a Sprite Class Hierarchy . . . 271
The BaseSprite Class . . . 271
Extending the BaseSprite to Produce a TitleSprite . . . . 272
Building a Class Hierarchy . . . 273
Adding a Deadly Pepper . . . 274
Creating a DeadlySprite Class . . . 275
Conclusion . . . 279
Chapter Review Questions. . . 280
15
Creating Game Components. . . 281
Introduction. . . 281
Objects and Abstraction . . . 281
Creating an Abstract Class in C#. . . 282
Extending an Abstract Class . . . 282
Designing with Abstract Classes. . . 284
References to Abstract Parent Classes. . . 284
Constructing Class Instances. . . 285
Constructors in Structures. . . 287
Constructors in Class Hierarchies . . . 287
Adding 100 Killer Tangerines . . . 289
Creating a KillerSprite Class. . . 290
Positioning the KillerSprites Using Random Numbers . . . 290
Using Lists of References . . . 293
Adding Artificial Intelligence . . . 297
Chasing the Bread Bat . . . 297
Adding Game Sounds. . . 302
From Objects to Components. . . 304
C# Interfaces . . . 305
Creating an Interface . . . 306
Implementing an Interface . . . 307
References to Interfaces . . . 307
Linking Bread, Cheese, and Tomatoes. . . 308
Designing with Interfaces . . . 308
Conclusion . . . 309
16
Creating Multi-Player Networked Games . . . 311
Introduction. . . 311
Networks and Computers . . . 311
Starting with the Signal . . . 311
Building Up to Packets. . . 312
Addressing Messages . . . 312
Routing . . . 313
Calls and Datagrams. . . 314
Networks and Protocols . . . 314
Xbox Live . . . 315
Gamertags and Xbox Live . . . 315
System Link and XNA . . . 316
Bread and Cheese Pong . . . 316
Managing Gamer Profiles in XNA . . . 317
Ensuring a Gamer Is Signed In for Network Play. . . 321
Creating a Game Lobby . . . 322
Network Games and State. . . 322
Playing the Game . . . 329
The Completed Game. . . 334
Conclusion . . . 334
Chapter Review Questions. . . 335
Part IV
Making Mobile Games for Windows Phone 7
with XNA
17
Motion-Sensitive Games . . . 339
Introduction. . . 339
The Accelerometer . . . 339
What Does the Accelerometer Actually Do? . . . 339
Acceleration and Physics . . . 340
Making Sense of Accelerometer Readings . . . 341
Creating a “Cheese Lander” Tipping Game . . . 343
Game World Objects in “Cheese Lander” . . . 343
Getting Access to the Accelerometer Class from XNA . . . 344
Using the Accelerometer in an XNA Game. . . 346
Using Accelerometer Values in a Game. . . 349
Using Vectors to Express Movement. . . 352
Adding Friction . . . 353
Detecting Shaking. . . 354
A Quick Digression About Threads and Synchronization . . . 355
Conclusion . . . 357
Chapter Review Questions. . . 357
18
Exploring Touch Input . . . 359
Introduction. . . 359
The Windows Phone Touch Screen . . . 359
Getting Touch Input . . . 359
Creating a Panic Button . . . 360
Reading Touch Events . . . 361
Touch Location Types . . . 361
Using the Location of a Touch . . . 363
Creating a Touch Drumpad . . . 364
Creating a soundPad Class for Each Drum Sound . . . 364
Storing soundPad Values in the Game. . . 365
Drawing the Soundpads. . . 366
Updating the Soundpads. . . 367
Making the Soundpads Flash . . . 368
Creating a Shuffleboard Game . . . 370
The PuckSprite Class . . . 370
Conclusion . . . 377
Chapter Review Questions. . . 377
19
Mobile Game Development . . . 379
Introduction. . . 379
The Windows Phone. . . 379
The Windows Phone Marketplace . . . 379
Maximizing the Phone Battery Life in XNA Games. . . 380
Setting the Update Rate of a Game . . . 380
Selecting Orientations in an XNA Game . . . 381
Getting Messages When the Orientation Changes. . . 382
Using a Specific Display Size for Windows Phone Games . . . 383
Hiding the Windows Phone Status Bar . . . 384
Stopping the Screen Timeout from Turning Off Your Game. . . 384
Creating a Phone State Machine . . . 385
Games and States . . . 385
Handing Incoming Phone Calls . . . 390
Detecting Phone Calls . . . 392
A Game as a Windows Phone Application . . . 393
The Windows Phone Back and Start Buttons. . . 393
Starting New Programs with the Start Button. . . 396
Using Isolated Storage to Store Game State . . . 397
Getting Your Games into the Marketplace. . . 403
The Windows Phone Marketplace . . . 403
Registering for the App Hub. . . 404
Using a Windows Phone Device . . . 404
Creating Games for Sale. . . 405
Conclusion . . . 405
Chapter Review Questions. . . 405
Answers to the Chapter Review Questions . . . 407
Index . . . 427
Microsoft is interested in hearing your feedback so we can continually improve our books and learning resources for you. To participate in a brief online survey, please visit:
Acknowledgments
Introduction
With Microsoft XNA, Microsoft is doing something really special. It is providing an accessible means for people to create programs for the Windows PC, Xbox 360, and Windows Phone. Now pretty much anyone can take a game idea, run it on a genuine console, and even send it to market in Xbox Live or the Windows Phone Marketplace.
This book shows you how to make game programs and run them on an Xbox 360, a Microsoft Windows PC, or a Windows Phone device. It also gives you an insight into how software is created and what being a programmer is really like.
Who This Book Is For
If you have always fancied writing software but have no idea how to start, then this book is for you. If you have ever played a computer game and thought, “I wonder how they do that?” or, better yet, “I want to make something like that,” then this book will get you started with some very silly games that you and all your friends can have a go at playing and modifying. Along the way, you’ll also get a decent understanding of C#, which is a massively popular programming language used by many thousands of software developers all over the world. The C# skills that you pick up in this book can also be used as the basis of a career in pro-gramming, should you find that you really enjoy writing programs. And because the design of the C# language is very similar to C, C++, and Java, you will find that your skills can be used with them too.
The book is structured into 19 chapters, starting with the simplest possible XNA program and moving on to show you how to use the Xbox gamepad, the keyboard, sounds, graphics, and network in your games. In the course of learning how to use C# and XNA, you create some very silly games, including Color Nerve, Mind Reader, Gamepad Racer, Bread and Cheese, and Button Bash. You can even download the full versions of these games from http://www.verysillygames.com and use them at your next party. The final section shows you how to take your programming skills and use them to create games for the Windows Phone device.
System Requirements
You need the following hardware and software to build and run the code samples for this book. Chapter 1, “Computers, C#, XNA, and You,” explains how to set up your environment.
■ A Windows PC with 3-D graphics acceleration if you want to run your XNA games on
your PC.
■ Microsoft Windows Vista or Windows 7.
■ Microsoft Visual Studio 2010 C# Express Edition for Windows Phone, Visual Studio 2010
Standard Edition, Visual Studio 2010 Professional Edition, or Visual Studio 2010 Team Suite.
■ To test your games on a console, you need an Xbox 360 fitted with a hard disk. Your
Xbox 360 must be connected to Xbox Live, and you need to join the App Hub. You will find out how to do this in Chapter 1.
■ If you have a Windows Phone you can run XNA games on that as well. Any Windows
Phone device can be connected to your PC so you can load your XNA games into it.
Code Samples
All the code samples discussed in this book can be downloaded from the book’s detail page, located at:
http://oreilly.com/catalog/9780735651579
Display the detail page in your Web browser, and follow the instructions for downloading the files.
There are also code samples and games at http://www.verysillygames.com.
Errata and Book Support
We’ve made every effort to ensure the accuracy of this book and its companion content. If you do find an error, please report it on our Microsoft Press site at Oreilly.com:
1. Go to http://microsoftpress.oreilly.com.
2. In the Search box, enter the book’s ISBN or title.
3. Select your book from the search results.
4. On your book’s catalog page, under the cover image, you’ll see a list of links.
You’ll find additional information and services for your book on its catalog page. If you need additional support, please e-mail Microsoft Press Book Support at [email protected].
Please note that product support for Microsoft software is not offered through the addresses above.
We Want to Hear from You
At Microsoft Press, your satisfaction is our top priority, and your feedback our most valuable asset. Please tell us what you think of this book at:
http://www.microsoft.com/learning/booksurvey.
The survey is short, and we read every one of your comments and ideas. Thanks in advance for your input!
Stay in Touch
Microsoft XNA Game Studio 4.0: Learn Programming Now!
Part I
Getting Started
In this part:
Chapter 1
Computers, C#, XNA, and You
In this chapter, you will■ Discover what makes a good programmer and what makes a great one.
■ See what computers are all about.
■ Find out why C# is a language you can love and Microsoft XNA is a framework you can
adore.
■ Get your system set up so that you can write code.
■ Run your first XNA program.
Introduction
Welcome to the wonderful world of Rob Miles—a world of bad jokes, puns, and
programming. In this book, I’m going to give you an introduction to the C# programming language and show you how to use C# to create XNA games. If you have programmed before, I’d be grateful if you’d still read all the text. It’s worth it just for the jokes, and you may actually learn something as you’re laughing.
Learning to Program
If you haven’t programmed before, don’t worry. Programming is not rocket science. It is, well, programming, and there are many more people in the world who have learned programming than rocket science. The bad news about learning to program is that you have lots of different things to learn when you start, and this can be confusing. But the keys to learning programming are simple:
■ Practice Do a lot of programming and force yourself to think about things from a problem-solving point of view.
■ Persistence Writing programs is hard work. And you have to work hard at it. The main reason most folks don’t make it as programmers is that they give up, not because they are stupid. However, don t get too persistent. If you haven’t solved a programming problem in 30 minutes, you should call a timeout and seek help or, at least, walk away from the problem and come back to it. Staying up all night trying to sort out a problem is not a good plan. It just makes you irritable in the morning. If you go to bed, have a nice sleep, and then go back to the problem in the morning, you will be amazed how often you can fix it in just a few minutes. (Later in this book, we’ll cover what else you can do if a problem is being stubborn.)
Becoming a Great Programmer
You might think that great programmers can type a thousand words a second, have a mega-sized brain, and are fitted with a socket that lets them connect directly to a computer. This is not true. Especially the socket bit. In my experience, the best programmers are the ones who are the most fun to be with. The ones who you enjoy talking to. The ones who don’t get upset when you find a mistake in their programs and who sometimes agree that your solution is better than the one that they invented. I’d much rather work with someone like that than someone who can write a hundred lines of code a minute but who refuses to speak to me if I dare to suggest that one of those lines might be wrong.
Great programmers take care to find out that what they are doing is the right thing. If they are working for a customer, they make sure that the customer gets what the customer wants. They do not assume that they know the best way to do it and just do it their way. They make sure that what they produce is tested and comes with helpful documentation. They work in the team, make coffee when it is their turn, and do whatever it takes to make sure that the project has a happy ending. Of course, they might also fill your office with beach balls, superglue your keyboard to the desk, or cover your chair with aluminum foil, but these are all done in a friendly spirit.
I have secured the services of a great programmer who will be adding Programmer’s Points to our text. These are truly words of wisdom, so make sure to take note when you see them.
How the Book Works
As you go through the text, you should never be more than a page or so away from making something happen with a program, so it helps if you have a computer and an Xbox 360 or Windows Phone nearby so that you can try things out. However, you don’t have to have ready access to hardware when you read the text because all the programs in the book are laid out and explained in detail.
Don’t be afraid to experiment and try things out yourself. At certain points in the text, I suggest ideas you might find fun to explore. Remember that learning by doing is one of the best ways to pick things up, so feel free to try stuff. One of the great things about creating game programs is that even the code that you get a bit wrong can produce cool-looking results. You might even end up creating an entirely new type of game by mistake!
Remember that the great scientists did not always find it easy to understand immediately what was going on inside their experiments, and the same is true about programming. Some of the things that you do when you write programs do not seem to make much sense at first, so be prepared to have to work to understand what is going on inside the program.
Note Throughout the chapters, words appear ng n italics are exp a ned more fu y n the G ossary at the end of th s book
C# and XNA
Before you go any farther, it is important that you consider exactly what this book is for. You are going to learn about the programming language C# and the XNA Software Development Kit. Understanding the difference between the two is key. You are familiar with the idea of a computer program. At the moment, I’m using a word processor to create this text. I started the word processing program, and it is telling my computer to take the text that I type and add it to the document I am writing. The program is the set of instructions that tells the computer what to do with the information it receives from the keyboard.
The C# programming language is a way of expressing that set of instructions. When you create your games, you write lines of C# to tell the computer how to make each game work. You can use C# to create programs that do many other tasks; you can even use it to create your own word processor.
other SDKs. A particular SDK has an overall architecture that contains all the features that the SDK provides. This is often called a framework.
Getting Started
You are going to create programs on the PC and then either run them on the PC or send them into an Xbox 360 or Windows Phone for execution. Either way, you need to install some tools on your PC.
Installing the Development Environment
and the XNA Framework
When developers wanted to write a program on the very first computers, they had to take the back off and actually change the wires in the machine. Fortunately, things have moved on, and now you can use an Integrated Development Environment (IDE) to create your code. An IDE gets its name because it provides a single place where you can perform the entire creative process of code development. In an IDE, you can write a program by using the built-in text editor, you can run the program and see what it does, and you can also de-bug the program, which means you stop it and try to find out why it is not doing what you want it to. The IDE you will use is Microsoft Visual Studio 2010 Express Edition for Windows Phone, which also includes Xbox 360 support. This is a version of the hugely powerful Visual Studio product, which is used by professional developers all over the world. At this point, I’m assuming that you have already installed Visual Studio and have it running on your machine. You can download Express editions of Microsoft software for free from
http://www.microsoft.com/Express/. The setup procedure is quite straightforward, and at the end of the process you are asked to register your copy. Registration does not cost you any money and actually gives you access to even more free resources. There are a number of other Express products that you can install. You can use these in addition to Visual Studio, but they are not required to create XNA games.
Note If you have other vers ons of V sua Stud o on your mach ne, you can a so use these to wr te XNA games so ong as they nc ude the C# deve opment env ronment However, you must make sure that your vers on of V sua Stud o has the atest vers on of the serv ce packs nsta ed The App Hub Web s te, http://create.msdn.com, has up-to-date nformat on on serv ce packs and V sua Stud o vers ons
Setting Up a PC to Run XNA Games
Once you have installed XNA on your PC, you can use this to create and run games. If you just want to write games on the PC and run them on an Xbox 360 or Windows Phone, you don’t need a very powerful machine. So long as it supports the minimum requirements for Visual Studio, you can create game software. The games you are going to create in this book do not require particularly advanced hardware but you will need a machine with reasonable graphical ability to run some of the more advanced examples. You can find the detailed hardware and driver requirements for XNA at http://msdn.microsoft.com/en-us/ library/bb203925.aspx.
If you want to create Windows Phone games you can run an emulator program on your PC that lets you see how the games would look on a phone. Because the Windows Phone has powerful graphics acceleration built in, your PC will need at least DirectX version 10 to run the emulator.
XNA games can be controlled by the PC keyboard. If you have a wired Xbox gamepad, you can plug it into a Universal Serial Bus (USB) port on your computer and after the New Hardware Wizard runs, it just works. Windows 7 and Windows Vista have the drivers for the gamepad already loaded. You can also obtain a special adapter that lets your PC communicate with wireless Xbox gamepads.
Setting Up an Xbox 360 to Run XNA Games
If you want the full game developer experience, there is no substitute for actually using a genuine console. In this section, you’re going find out how to set up an Xbox 360 and make it ready to receive the games that you are going to write.
To deploy games on your Xbox 360, it must be fitted with a hard disk. This is where the XNA Game Studio Connect application and the programs that you create are stored. Your console must also be connected to the Internet and you must be signed up for a Silver Xbox Live subscription or better. You must also be a Registered or Trial-level member of the App Hub.
App Hub
If you want to deploy games to your Xbox 360 you must be a member of the App Hub. There are a number of different membership levels:
■ Trial A trial member of the App Hub can download the development tools and educational content. He can also deploy XNA games to an Xbox 360. Trial members can also develop Windows Phone applications and publish them in the Windows Phone Marketplace. Trial membership is available from a variety of sources includ-ing MSDN Academic Alliance (http://msdn.microsoft.com/academic/default.aspx), Microsoft Faculty Connection (http://www. microsoft.com/education/FacultyConnection), Microsoft DreamSpark (http://www.dreamspark.com), and the Dream-Build-Play contest (http://www. dreambuildplay.com). If you are a student on a course of study, ask at your institution to see if it has signed up for any of these initiatives.
■ Registered A registered member of the App Hub has all of the abilities of a trial member. Registered members can submit their games for distribution on Xbox Live Indie Games and can also review Community Games submitted by other members. Membership presently costs $99. Registered members of the App Hub can register up to three Windows Phone devices for development
App Hub membership is linked to your Windows Live ID and Xbox Live Gamer Tag. You can find membership details at http://create.msdn.com.
XNA Game Studio Connect
The XNA Game Studio Connect program provides the link between your Xbox 360 and the XNA Game Studio application that you use to write games on your Windows PC. When you want to send a program from your Windows PC to the Xbox 360 you must run this program on the Xbox 360. You download the program from Xbox Live and it is stored in your games library on your Xbox. You’ll need to start it before each game development session in which you want to test your game on the Xbox.
You don’t need this program to run XNA programs that have been downloaded onto your Xbox, these are placed in your game library on your Xbox and you can just run them as you would any other locally stored game.
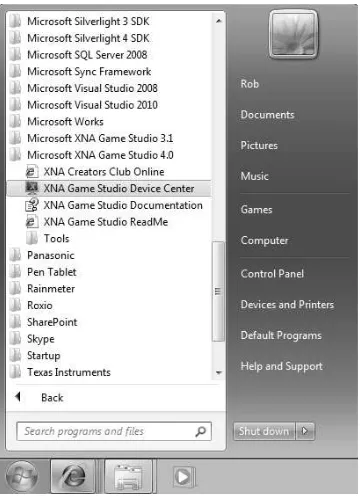
XNA Game Studio Device Center
FIGURE 1-1 Start ng the XNA Game Stud o Dev ce Center app cat on.
I am presently developing programs for my Xbox 360. My XNA Game Studio Device Center is shown in Figure 1-2. You can add an Xbox by clicking Add Device. You will need to add a device so that you can send programs to it.
You need to use the XNA Game Studio Connect application on your Xbox and the XNA Game Studio Device Center on your Windows PC together the first time you create a connection between your Xbox and your Windows PC. You can get detailed help with the procedure for connecting your Xbox to your PC by clicking the small blue question mark on the right side of the XNA Game Studio Device Center application.
FIGURE 1-2 My XNA Game Stud o Dev ce Center.
Setting up a Windows Phone to run XNA games
A Windows Phone device is a very good platform to run XNA games. You can create games for the phone and even sell them from the Windows Phone Marketplace. You can test your games on the Windows Phone emulator which is supplied with Visual Studio 2010. The way that XNA programs work on the phone is exactly the same as how games written for the Windows PC or the Xbox work. However, there are some differences in the way that games are played and used on a mobile device. We will take a detailed look at game development for Windows Phone in the three chapters at the very end of this book.
Note The Zune dev ce s not compat b e w th Vers on 4 0 of XNA, wh ch s be ng used as the bas s for the content n th s book If you w sh to create games for a Zune you w need to nsta V sua Stud o 2008 and XNA 3 1 These can be used on the same mach ne a ongs de V sua Stud o 2010 and XNA 4 0 There s no emu ator for Zune deve opment and Zune programs cannot be d str buted v a the Marketp ace
Selling Your Windows Phone Games in the Marketplace
Connecting a Windows Phone to a Windows PC
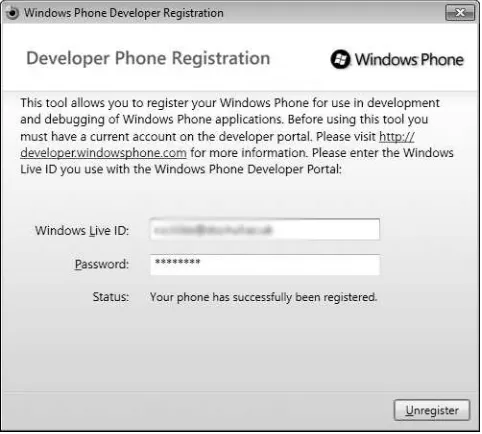
Developers can also register their Windows Phone devices so that they can download their own programs into them for testing on a real device. Figure 1-3 shows the registration program in action.
FIGURE 1-3 Reg ster ng a W ndows Phone for Deve opment.
The Windows Phone device connects to Visual Studio 2010 via the Zune software that is used to transfer media and other content to the device. It does not use the XNA Game Studio Connect program. When you connect the Windows Phone to your PC you should find that the Zune software will run automatically.
When writing a game for a Windows Phone you can use an emulator to show you what it will look like on the device. You can also debug your programs to find out what they are doing, even when they are running inside a phone device.
Writing Your First Program
You are now going to start from scratch with your first program. It won’t actually do much— you won’t be writing your own version of Halo just yet—but it does give you an insight into what XNA does and how you can write your own C# bits to produce a cool mood light.
Creating Your First Project
A computer game is not just a program—it is also lots of other bits and pieces that make playing the game fun and interesting. Just about every game has graphics, sounds, 3-D models of game objects, and all sorts of other items that must be created along with the code. This means that when you make a game, you have to manage all these other resources, too. The good news is that the XNA designers have thought of this, and they provide a comprehensive content management solution that looks after all these resources. You can just give your game resources to the Content Manager, and it makes sure that they are available to the programs that you write. Later on in the book, I’ll show you how to add some content of your own so that you can use a picture of your mom or your dog as a game character.
The content management is part of the project mechanism provided by XNA Game Studio. What this means right now is that to create your first game program, you actually have to create an XNA Game Studio project.
To create a project, first start XNA Game Studio if it is not already running. Do this by selecting Microsoft Visual Studio 2010 for Windows Phone from the Start menu.
Note Th s menu entry s created when XNA Game Stud o s nsta ed and conta ns a nk to the vers on of V sua Stud o 2010 nsta ed on your W ndows PC If you are us ng a d fferent vers on of V sua Stud o 2010 (perhaps you nsta ed XNA Game Stud o on top of your nsta at on of V sua Stud o 2010 Profess ona Ed t on) you m ght need to ook n the V sua Stud o 2010 fo der n your Program F es
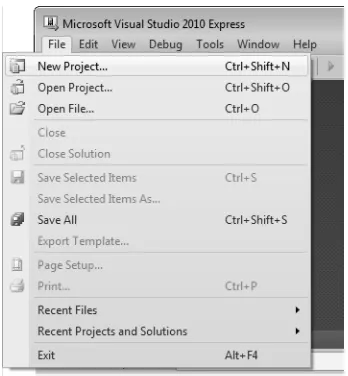
In XNA Game Studio, select New Project from the File menu, as shown in Figure 1-4. This automatically creates the entire project and the file into which you are going to put your code.
XNA Game Studio can make a whole range of different projects depending on what you actually want to build. The skeletons for each of these types of program are contained in project templates and Starter Kits. You can download and install other Starter Kits from the App Hub Web site. Right now, you are going to use a template to create an empty XNA project.
FIGURE 1-4Open ng the New Project d a og box.
Note Make sure that you create a “Game” and NOT a “Game L brary”; otherw se, you w not be ab e to make your program run
Later in this chapter, I’ll show you how you can create a workspace containing multiple projects, one for each target device. For now, you should just choose the one that you want to use; the way that the program works is identical for all. Call the project “MoodLight” because that is what we are building first. You can use the Browse button to select an appropriate destination for the project. You should ensure that the Create Directory For Solution check box is selected so that all the files for this game are held in one place. Once you have done this, click OK to get XNA Game Studio to build the project for you.
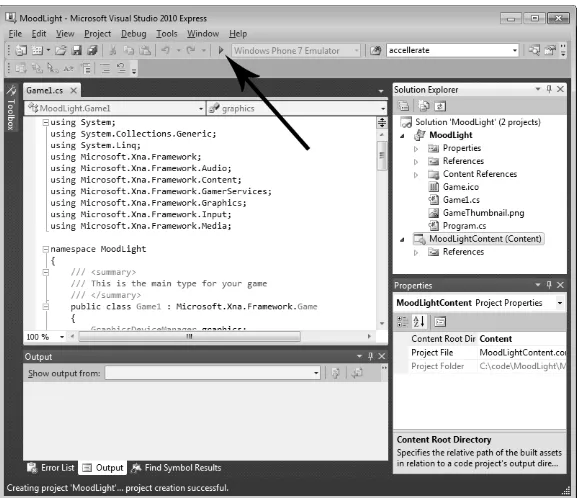
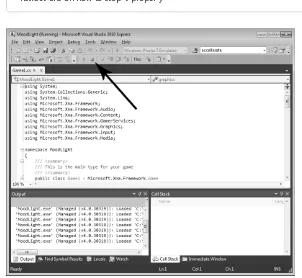
When the project has been created, you should see a screen that looks like the one in Figure 1-6. Yours might not look quite the same (it certainly won’t have the big arrow pointing at the Start Debugging button), but it should look similar. There are a lot of controls that you can play with. At the moment quite a few are disabled and can’t be used, but it still looks confusing the first time that you see it. The key here is not to panic. You are going to use only a few of the buttons to start with, and I’ll explain the others as you need them.
Running Your First Program
If you are running your program on a PC, you can just click the Start Debugging button ( indicated by the arrow in Figure 1-6), and the program runs. If you are sending your program to an Xbox 360, you must make sure that the XNA Game Studio Connect application is running on your Xbox 360 and that the Xbox has been connected to your Windows PC.
When you click the button to run the program, a number of things happen in quick succession:
1. XNA Game Studio compiles the source code files. The source code of the program is all
the lines of C# code that you and XNA Game Studio create that actually describe what you want the computer to do. A compiler is a program that takes source code and creates a set of machine instructions that can be loaded into the computer’s processor to control what the computer does. The C# language has a particular specification, and the compiler knows all about the rules in the specification. The compiler rejects any program that it thinks is not correct and tells you about the compilation errors. You are going to have to live with the fact that you will see a lot of these errors if you decide to become a computer programmer.
2. Your project might contain a large number of different source files; each of them must
be compiled. If all the program source files compile correctly, they are then combined with any resources (for example, images and sounds) that are part of the project.
3. If you are using an external device, either Xbox 360 or Windows Phone, the compiled
files are now transferred into it.
4. Finally, XNA Game Studio starts the program running. If you are using a Windows PC,
the program runs in a window on the desktop. If you are using an external device, the program takes it over completely. At this point, the window or target device is under the control of your program statements.
When XNA Game Studio produces an empty project, it actually creates a program that will compile and run, so you can just click the Start Debugging button (if you haven’t already) and turn the program loose.
When you run the program, the screen turns blue. That’s it—nothing else. All that work to turn the screen blue? You could have done that with a can of paint in 30 seconds. The “ empty” project from XNA just turns the screen blue, but in Chapter 2, “Programs, Data, and Pretty Colors,” you’re going to add some code to make it do much cooler things. You’re going to make a light that can display millions of possible colors, an ever-changing mood lamp, and finally, the world’s first-ever color-changing game.
Stopping a Program
Before you do anything else, you need to stop the program. There are two ways to do this. You can press the Back button on an Xbox 360 gamepad or Windows Phone to instruct the program to finish. If the program is running on a remote device, XNA Game Studio displays a message indicating that the remote connection to the device has been lost. Simply click OK on the message to dismiss it. Alternatively, you can stop the program from within XNA Game Studio by clicking the Stop button indicated by the arrow in Figure 1-7.
If you are using a PC and don’t have an Xbox gamepad, you have to stop the program from XNA Game Studio.
Note You shou d not norma y stop your program by us ng XNA Game Stud o Th s s ke turn ng off your Xbox 360 rather than qu tt ng a game correct y It stops the program, but because the program s nterrupted, t m ght not save a the game data proper y before t stops When you make your own game, you shou d make sure that you prov de the p ayer w th nstruct ons on how to stop t proper y
Storing Games on the Xbox 360 or Windows Phone
Once you’ve created a game and deployed it to an Xbox 360 or Windows Phone, the game itself remains stored inside the machine for you to load and play later, without the need for a PC to be attached. You can find the games you have created by selecting your Game Library on the Xbox 360 or entering the Xbox Live Games menu on the Windows Phone.
Running the Same XNA Game on Different Devices
You can use a single XNA workspace to hold multiple projects, one for each device you want to target. You will find out more about projects and workspaces in the section “XNA Game Studio Solutions and Projects” in Chapter 4. The following example shows how a Windows PC project can be copied to produce an Xbox 360 project.
Creating a Copy of an XNA Project for Another Device
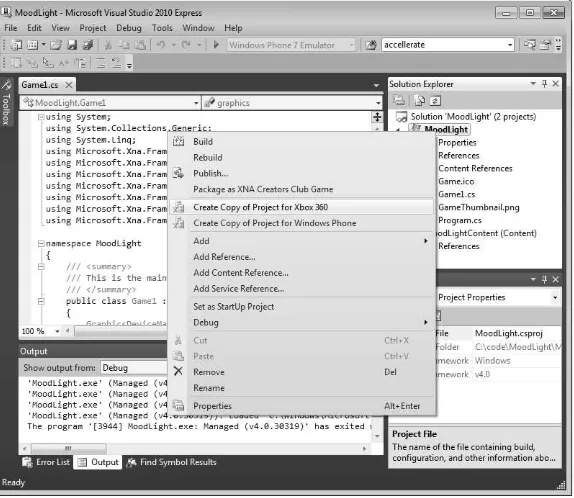
Start by clicking the MoodLight project in the Solution Explorer of XNA Game Studio so that it is selected. Then choose Create Copy Of Project For Xbox 360 from the Project menu, as shown in Figure 1-8.
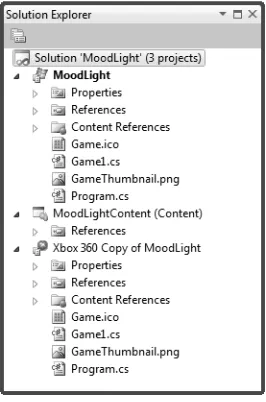
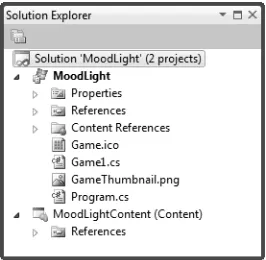
XNA Game Studio now copies the project and adds the copy to the workspace. This means that there are now two projects in the workspace, as shown in Figure 1-9.
Note It ooks as f there are now two cop es of everyth ng concerned w th the project Th s s not actua y the case The copy uses nks to the fi es n the or g na Th s means that changes to the content of one project are reflected n the other
You can select which of the projects to start by setting one of the projects as the StartUp Project. If you look carefully at Figure 1-9, you see that the Windows version of MoodLight has the name of the project displayed in bold type. This means that it is the project that runs on the Windows machine. To set a project as the StartUp project, you right-click the project and choose Set as StartUp Project from the menu that appears, as shown in Figure 1-10.
FIGURE 1-9Mu t p e projects.
When you click Start Debugging, the project that is selected as the StartUp project is the one that gets to run.
FIGURE 1-10Se ect ng the StartUp Project.
Choosing Between Windows Phone and Emulator
If you have created a game that is aimed at the Windows Phone device you can select whether the game runs on the Windows Phone itself or the emulator as shown in Figure 1-11.
FIGURE 1-11Choos ng between W ndows Phone Emu ator and W ndows Phone dev ce.
To deploy to the device it must have been registered as a development device. The phone must be connected to the computer via USB and the Zune software must be running. The phone should not be displaying its lock screen when you try to deploy the program to it.
Conclusion
Chapter Review Questions
Every chapter in this book has a set of questions at the end, just to test you a little. There are no prizes, but you might find it useful to check that you know the answers to the questions in one chapter before you go on to the next. All the answers are either true or false, and you can find them by reviewing the chapter and looking in the Glossary. The list of answers for all the book’s review questions are at the back of the book in Appendix A. No peeking now.
1. The most important thing about being a great programmer is having a big brain.
2. You must have an Xbox 360 to create games with C# and XNA.
3. XNA is a programming language.
4. XNA Game Studio is an IDE.
5. The C# compiler produces an XNA output file.
6. C# is a framework.
7. You need an App Hub membership to run your XNA programs on your Xbox 360.
8. You need an App Hub membership to run your XNA programs on your Windows
Phone.
9. The XNA Game Studio Device Center runs your programs on your Xbox 360.
10. The compiler runs your program.
11. The empty project created by XNA Game Studio draws a red screen.
12. It is not possible to use an Xbox 360 gamepad on a PC.
13. To write an XNA game for a Windows Phone, you use a special version of XNA
called XNA Phone Home Edition.
14. All the items that make up a game are held together by Visual Studio in a
Chapter 2
Programs, Data, and Pretty Colors
In this chapter, you will■ Explore how games actually work.
■ See how data is stored in a program.
■ Discover how colors are managed on computers.
■ Find out about classes and methods.
■ Write some code that controls color.
■ Write some code that makes decisions.
■ Create a funky color-changing mood light.
Introduction
You now know how to create a Microsoft XNA program and run it. Your program only turns the screen blue, but you could call it a start. Next, you are going to figure out how game programs are constructed. Then you’ll play with colors and find out how XNA stores color information and how C# stores data.
Program Project: A Mood Light
Your first project is going to be a program that turns a display (the bigger the better) into a mood light. These are the things that they have on spaceships, where a chandelier actually would not work very well. Instead, the spaceship will have a panel on the wall that can be set to glow in different colors and brightness levels or per-haps even change color over time. This is probably not a very efficient way of light-ing a buildlight-ing—you are uslight-ing one of the most powerful game consoles ever made to replace a lamp—but it is a fun exercise and may even lead to a game idea or two along the way. You can use the same program to convert your Windows Phone into a multicolored flashlight.
Data Data Computer
Program
FIGURE 2-1An Xbox game as a computer program.
Later versions of games might have other inputs and outputs, too; for example, if you are playing on Xbox Live, your console is receiving information about other players in your networked game. For now, start by considering only the output from your game. In Chapter 3, “Getting Player Input,” you’ll take a look at where the input values come from.
Making a Game Program
To see how a game program can produce a display, you need to look inside one of the C# programs that XNA built. At the end of Chapter 1, “Computers, C#, XNA, and You,” you used XNA Game Studio to create a game program. Now you are going to look at this program and discover how it works.
The file that contains the game behavior is called Game1.cs. The name Game1 was generated automatically when the project was created; the .cs part is the file extension for C# programs. If you want to look inside this file, start XNA Game Studio and open the file from Solution Explorer. You can find Solution Explorer, shown in Figure 2-2, in the top right corner of the XNA Game Studio screen. If you double-click the name of the file that you want to work with, the file opens in the editing window.
If you look at the content of Game1.cs, which drew that impressive blue screen, you can see how the program works. The program code that XNA Game Studio created when you made an empty game contains the following method:
protected override void Draw(GameTime gameTime) {
GraphicsDevice.Clear(Color.CornflowerBlue);
// TODO: Add your drawing code here
FIGURE 2-2So ut on Exp orer.
A method is a named part of a program. In this case, the method has the name Draw (you can
ignore the protected override void part for now). All you need to know at the moment
is that when XNA wants to draw the screen, it uses this method. You can change what gets drawn by altering the content of this method. At the moment, we just get a blue screen; if you look at the second line of the preceding code, you can see where the blue screen comes from.
Statements in the Draw Method
The Draw method contains a block of statements. C# programs are expressed as a series of
statements that are separated by a semicolon (;). Each statement describes a single action that your program needs to do. There are a number of different kinds of statements; you discover new ones as you learn more about programming. The statements are organized into a single block. A block is a way to lump statements together. The start of a block is marked with an open curly bracket character ({) and the end of the block is marked with a closing curly bracket (}). These curly kinds of brackets are sometimes called braces. The C# compiler, which is trying to convert the program text into something that can actually run, notices and complains if you use the wrong kind of bracket.
In the preceding code, there is also a comment. Comments are ignored by the compiler; they let you put text into your program to describe the program or to remind you to do things.
In the preceding code, the comment is a “TODO,” which tells programmers that they need to
do something. In this case, a programmer must add drawing statements at that position in the program file. The compiler can tell that the text is a comment because it starts with the character sequence //. For instance, look at the following example:
// This is a comment. It can be any text.
The Great Programmer Speaks: Comments Are Cool Our Great Programmer kes comments She says that a we -wr tten program s ke a story n the way that the purpose of each part s descr bed She says that she w be ook ng at our code and mak ng sure that we put the r ght k nd of comments n
From the point of view of changing the color of your screen, the statement that is most interesting is this one:
GraphicsDevice.Clear(Color.CornflowerBlue);
Clear is a method that is part of XNA. You will see precisely how it fits into the framework
later; for now, all you need to know is that the Clear method is given something that
describes a color, and the method clears the screen to that color. At the moment, you are
sending the Clear method the color CornflowerBlue, and it is clearing the screen to be that
color. If you want a different color, you just have to send a different value into Clear:
GraphicsDevice.Clear(Color.Red);
If you change the color as shown in the preceding line and run the program, you should see that the screen is now set to red.
Sample Code: Red Screen of Anger A the samp e projects can be obta ned from the Web resources for th s text, wh ch can be found at http://oreilly.com/catalog/9780735651579. The samp e project n the d rectory “01 MoodL ght Red Screen” n the resources for th s chapter draws a red screen for you You cou d run th s when you fe t part cu ar y angry You can change the co or that you want to d sp ay by chang ng the co ors used n the Draw method; there are some comments n the code to he p you w th th s
You can set the background color to a range of preset ones, but you can also design colors of your own, which brings us to our first project.
Working with Colors
You have seen that XNA has a set of colors built in, including one with the strange name of
Teal (it is actually a rather boring blue/green). However, you want to make your own colors
and use these in your program.
Storing Color Values
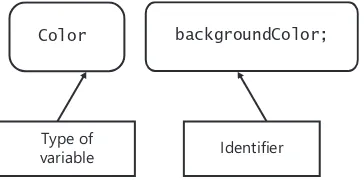
create your own colors, and you need somewhere to store the color values you create. In programming terms, this is called declaring a variable. Figure 2-3 shows the anatomy of the statement that declares a variable to hold a value that represents a color.
Color
Type of
variable Identifier
backgroundColor;
FIGURE 2-3Dec ar ng a Color var ab e ca ed backgroundColor.
The type of the variable is set as Color. This determines what you can put in your variable.
Having seen this declaration, the C# compiler knows that you want to create a location with
the name backgroundColor in memory, which can hold color information. In programming
terms, the name of a variable is called an identifier. The word backgroundColor is an
identifier that I’ve invented. When you create something to use in a C# program, you have to think up an identifier for it. An identifier is made up of numbers and letters and must start with a letter. The identifier should describe what you are going to use the thing for; in this program, you are storing the color that is going to be used for the background, so it can be
given the identifier backgroundColor.
Note The C# comp er uses the type of a var ab e to make sure that a program never tr es to do someth ng that wou d be stup d The va ue Color.Red s recogn zed by the comp er as be ng of type Color, and can therefore be p aced n a var ab e of type Color If the programmer wrote some code that tr ed to put someth ng e se n the var ab e backgroundColor, such as a p ayer name, then the program wou d fa to comp e Th s s rather ke rea fe, where an attempt to put an e ephant n a camera case wou d be s m ar y unsuccessfu
The Great Programmer Speaks: Pick Useful Identifiers Our Great Programmer says that there shou d be a spec a p ace n he reserved for programmers who create dent fiers ke X24, or secretMagicCode, or clunk She says that these te a reader of the program code noth ng about what the var ab e s be ng used for She rea y kes dent fiers ke CarSpeed, backgroundColor, and accountBalance
Setting a Color Value
You now have a variable that can hold the color of your background. At the moment, it is not set to anything useful. So next, you have to write a statement that causes the game program
particular amount of red, blue, and green. Figure 2-4 shows the anatomy of an assignment
that makes a new Color value and then places it in the variable.
=
FIGURE 2-4Ass gn ng a new Color va ue to backgroundColor.
The thing that is going to be assigned is on the right side of the equals sign. In this case, you
are making a new Color value. Don’t get this confused with a double-equals that might be
used to compare two things. You should regard the equals sign in Figure 2-4 as being what I call a “gozzinta” operator. The value on the right of the equals sign “goes into” the variable on the left. You will investigate how to compare things later in this chapter, in the section “Making a Proper Mood Light.” Now that you have your variable, you can use it in the game program:
GraphicsDevice.Clear(backgroundColor);
The preceding statement calls the Clear method and feeds it the value of backgroundColor.
This causes the screen to be cleared to the new color you created. If you put these
statements together, you get a game program that contains a backgroundColor variable
that is used by the Draw method, which sets it to a value and then clears the screen using it:
protected override void Draw(GameTime gameTime)
If you want to find out what color you get if you make one with no red, no green, and no
blue, you can run a program that uses this Draw method. But I don’t think I’m giving too
much away when I tell you that this would produce a black screen. The actual color values are given in the order red, green, and blue, and each must be in the range 0 to 255 (you
shall learn the reason for this later). By using different values when you set the Color, you
can experiment with different displays. The color combinations obey all the rules of color combinations (for light, rather than for paint) that you would expect:
backgroundColor = new Color(255, 255, 0);
The preceding statement sets backgroundColor to a color value that has the red and green
Sample Code: Yellow Screen of Peril The samp e project “02 MoodL ght Ye ow
Background” creates a ye ow background co or and fi s the screen w th t You can change the numbers n the Draw method to make any co or you ke
Controlling Color
At this point, you can see that we can add C# statements to the Draw method to change what
is drawn on the screen. You also know that XNA uses a Color structure to lump together
information that describes a particular color and that you can create your own Color variables
in the game that contain a specific amount of red, green, and blue. Finally, you have managed to make a program that uses a color variable to set the screen to any color that you like.
Next, you want the light to change color over time, to get a nice soothing mood light effect. This sounds like hard work (and like every great programmer, I really hate hard work), but actually it turns out to be quite easy. To discover how to do this, you have to find how XNA is connected to the game programs that you write. The way this works uses C# classes.
Games and Classes
The game program is actually a class called Game1. A class is a collection of abilities ( methods) and data (variables) that forms part of a program. You can put as much stuff as you like inside a single class. A class is usually constructed to look after one particular part of a system. Later in this book, in Chapter 14, “Classes Objects and Games,” you’ll use classes called things like GameSprite. In the commercial world, you might find classes called “Receipt,” “Invoice,”
and “StockItem.”
When it created our project, XNA Game Studio gave the game class the name Game1.
However, you can rename this if you wish; you will see how to do this later in the book in a section in Chapter 11 named, “Renaming the Game1 Class.”
Classes and Behaviors
A behavior is something that a class can be asked to do. A particular method performs a
particular behavior. You have already used the Clear behavior of the GraphicsDevice class.
When you use Clear, this causes the code in the Clear method to be obeyed to clear the
screen. You don’t need to know how Clear works; you just need to know that you can feed it
with information to tell it what color you want to use.
Drawing and Updating in Games
In the programs you have written up to now, you have done all the work in the Draw method.
However, this is not really how games should work. The Draw method should do nothing
other than draw the display, and the game should be updated by using the Update method.
You might be wondering why we have this split between Draw and Update. Why can’t Update
do everything, including the drawing part?
The answer to this question has to do with the way that games work. It is very important that
the game world is updated at constant speed. If Update is called less frequently than it should
be, players would find that time in the game goes into “slow motion,” which would be very frustrating for them because the game would not respond properly to their inputs to the
gamepad. However, a game can usually get away with calling the Draw method less often—
all that happens is that the display becomes more jerky as it is redrawn less frequently.
I’ve played a few games that do this, usually when there are a large number of objects on the screen at the same time. What is happening is that the display is running more slowly, but behind the scenes, the game is being updated properly, so gameplay itself is not affected. If the update and draw behaviors were not separated, it would not be possible to run them at different rates.
Sharing Game World Data Between Draw and Update
When you create a game, you must create the variables that hold the state of the game itself. In a driving game, this state would include the speed of the car the player is driving, the car position on the track, and the position and speed of the other cars. This could be called the game world data. The game world data that you are going to use in the mood light is the
amount of red, green, and blue that defines the color of the light. The present version of Draw
is entirely self-contained. It has a local variable that is set with the color that is to be drawn:
protected override void Draw(GameTime gameTime) {
Color backgroundColor;
backgroundColor = new Color(255,255,0); GraphicsDevice.Clear(backgroundColor); base.Draw(gameTime);
}
Local variables are used when you just want to manipulate some data for a very short time.
In this case, the program makes a color value that can be fed into the Clear method. At
the moment, the value of backgroundColor is constructed from the values 255, 255, and 0,
which give the amount of red, green, and blue in the color. We want to construct the color
value from game data values that are set up by the Update method. To make your light work
the way that XNA does, the program must store this game data in a place where both the
Draw and Update methods can use it. In other words, you need to set up some game world
data. Figure 2-5 shows how the Update and the Draw methods are part of the Game1 class,
XNA
FIGURE 2-5The Game1 c ass and XNA.
The job of the Update method is to update the game world data in the game (that is, adjust
the intensity values). The job of the Draw method is to use the game world data to draw the
display (that is, create a color from these values and clear the screen with it).
The XNA system calls Draw and Update at regular intervals when the game is running. You
have already used methods provided by other classes; you know that the Clear method can
be called to clear the display to a particular color. We are going to make the Update method
set the value of the color to be used, and the Draw method will just draw using that color.
Values that are shared among methods in a class are called members of the class.
Classes as Offices
You can think of Update and Draw as two people sitting in an office called Game1. Each of
them has his or her own telephone and pad of paper for taking notes (local storage). In the middle of the office is a desk (the description of the game world) with bits of paper on it. Every now and then, Mr. Draw’s phone rings, and a voice on the other end of the line tells him that a sixtieth of a second has gone by. Mr. Draw then jumps up, gets the value of the background intensities from the Game World data on the desk in the office, creates a color
value on his notepad, and then uses his phone to call Ms. Clear in the GraphicsDevice office
down the hall and asks her to clear the screen to that color. She has a set of paint cans and can fill the screen with any color that she is asked to use.
At a similar interval, the Update phone in the Game1 office rings, and a voice tells Mrs. Update that a sixtieth of a second has gone by. She jumps up, goes to the table in the office, and updates the Game World information on the bits of paper. You can see how this would look in Figure 2-6.
The people/methods in our office/classes perform actions for each other, and data is the information that the class stores within itself. When a class wants to use a method, it calls it. In our first version of the Game1 class, the information on the table is the color that Mr. Draw uses to color the graphics display. You change what happens when the screen is drawn by changing
what Mr. Draw does (the content of the Draw method). You change what happens when the game
redIntensity
greenIntensity
blueIntensity Desk
Mr. Draw Mrs. Update Draw Update
Game1 office GraphicsDevice office
Desk
Red Green Blue Clear Screen
Ms. Clear
FIGURE 2-6The Game1 and GraphicsDevice c asses as offices.
Note that no method has to know exactly how the other methods work. Mr. Draw has no idea about cans of paint and displays, but he does know that if he asks Ms. Clear to clear with yellow paint, this results in a yellow screen being drawn. A call of a method is equivalent to calling up someone in an office and asking her or him to perform a task.
Game World Data
The Game World data must be held as part of the class so that the Draw and Update
methods can make use of it. For the MoodLight game the data will be the brightness of the red, green, and blue components of the color of the light to be produced.
class Game1 {
// The Game World - our color values byte redIntensity ;
byte greenIntensity ; byte blueIntensity ;
// TODO: Draw method goes here
// TODO: Update method goes here
}
The preceding code declares three variables inside the Game1 class. These are part of the
class; they are often called members of the class and can be used by any methods that are
also members of the class. They have the identifiers redIntensity, greenIntensity, and