Oracle® Fusion Middleware
Quick Installation Guide for Oracle Enterprise Content
Management Suite
11
g
Release 1 (11.1.1)
E14538-04Oracle Fusion Middleware Quick Installation Guide for Oracle Enterprise Content Management Suite, 11g Release 1 (11.1.1)
E14538-04
Copyright © 1994, 2011, Oracle and/or its affiliates. All rights reserved.
Primary Author: Bonnie Vaughan
Contributing Authors: Sean Cearley, Sarah Howland, Kevin Hwang, Karen Johnson, Bruce Silver, Jean Wilson, Martin Wykes
Contributors: Satheesh Amilineni, Pete Chapman, Sandra Christiansen, Eric Cloney, Rupesh Das, Carl Foster, Sudhanshu Garg, Marsha Hancock, MaryJo Hoepner, Mei Hong, David Jones, Vasant Kumar, Peter LaQuerre, Rene Madsen, Liju Nair, John Neely, Toby O'Sullivan, Alejandro Paredes, Ty Paywa, Andy Peet, Sancho Pinto, Phillip Ratliff, Indira Smith, Gene Sutay, Vani Srivastava, Matt Wall, Venkatesh Yadalam, Lisa Zitek-Jones
This software and related documentation are provided under a license agreement containing restrictions on use and disclosure and are protected by intellectual property laws. Except as expressly permitted in your license agreement or allowed by law, you may not use, copy, reproduce, translate, broadcast, modify, license, transmit, distribute, exhibit, perform, publish, or display any part, in any form, or by any means. Reverse engineering, disassembly, or decompilation of this software, unless required by law for interoperability, is prohibited.
The information contained herein is subject to change without notice and is not warranted to be error-free. If you find any errors, please report them to us in writing.
If this software or related documentation is delivered to the U.S. Government or anyone licensing it on behalf of the U.S. Government, the following notice is applicable:
U.S. GOVERNMENT RIGHTS Programs, software, databases, and related documentation and technical data delivered to U.S. Government customers are "commercial computer software" or "commercial technical data" pursuant to the applicable Federal Acquisition Regulation and agency-specific supplemental regulations. As such, the use, duplication, disclosure, modification, and adaptation shall be subject to the restrictions and license terms set forth in the applicable Government contract, and, to the extent applicable by the terms of the Government contract, the additional rights set forth in FAR 52.227-19, Commercial Computer Software License (December 2007). Oracle USA, Inc., 500 Oracle Parkway, Redwood City, CA 94065.
This software is developed for general use in a variety of information management applications. It is not developed or intended for use in any inherently dangerous applications, including applications which may create a risk of personal injury. If you use this software in dangerous applications, then you shall be responsible to take all appropriate fail-safe, backup, redundancy, and other measures to ensure the safe use of this software. Oracle Corporation and its affiliates disclaim any liability for any damages caused by use of this software in dangerous applications.
Oracle is a registered trademark of Oracle Corporation and/or its affiliates. Other names may be trademarks of their respective owners.
Contents
Preface
... vAudience... v
Documentation Accessibility ... v
Related Documents ... vi
Conventions ... vi
1
Installing and Configuring Oracle Enterprise Content Management Suite
1.1 Installation Overview ... 1-2 1.2 Meeting System Requirements and Certification... 1-4 1.3 Preparing to Install ... 1-4 1.3.1 Installing a Database ... 1-4 1.3.2 Creating Schemas for Oracle Enterprise Content Management Suite Applications . 1-5 1.3.3 Installing Oracle WebLogic Server in a Middleware Home ... 1-5 1.3.4 Installing and Configuring Java Access Bridge (Windows Operating System
Only) ... 1-8 1.3.5 Configuring a DHCP Host ... 1-8 1.3.5.1 Configuring a DHCP Host on a UNIX Operating System ... 1-8 1.3.5.2 Configuring a DHCP Host on a Windows Operating System... 1-8 1.3.5.3 Installing a Loopback Adapter on a Windows Operating System... 1-9 1.3.5.4 Removing a Loopback Adapter from a Windows Operating System ... 1-10 1.3.6 Installing on a Non-Networked Computer ... 1-10 1.3.7 Installing on a Multihomed Computer... 1-10 1.4 Creating Oracle Enterprise Content Management Suite Schemas ... 1-11 1.5 Installing Oracle Enterprise Content Management Suite in a Middleware Home ... 1-14 1.5.1 Starting the Installer ... 1-15 1.5.2 Providing the Location of an Inventory Directory on a UNIX System... 1-15 1.5.3 Installing Oracle Enterprise Content Management Suite ... 1-16 1.5.4 Applying Patch 12369706 for Oracle Information Rights Management... 1-17 1.6 Configuring Oracle Enterprise Content Management Suite ... 1-18 1.6.1 Creating an Oracle WebLogic Server Domain ... 1-19 1.6.2 Increasing the Java VM Heap Size for Managed Servers ... 1-22 1.6.2.1 Setting Startup Parameters for Managed Servers with the Administration
Console... 1-22 1.6.2.2 Setting the USER_MEM_ARGS Environment Variable in the Startup Script
1.6.3 Setting Up Fonts on a UNIX System ... 1-24 1.6.3.1 Setting Up TrueType Fonts on a UNIX System ... 1-24 1.6.3.2 Installing Fonts for National Language Support on a UNIX System ... 1-25 1.6.4 Installing Libraries and Setting Environment Variables for Outside In
Technology ... 1-25 1.6.4.1 Installing Libraries for Outside In Technology on UNIX Platforms... 1-25 1.6.4.2 Setting Library Paths in Environment Variables on UNIX Platforms ... 1-28 1.6.4.3 Downloading Visual C++ Libraries for a Windows Operating System... 1-28 1.7 Performing Postinstallation Configuration... 1-29 1.8 Starting the Administration Server ... 1-29 1.9 Completing the Oracle UCM Configuration... 1-30 1.10 Completing the Oracle IBR Configuration... 1-32 1.11 Completing the Oracle I/PM Configuration ... 1-33 1.11.1 Starting the Oracle I/PM Managed Server and Accessing the Web Client ... 1-34 1.11.2 Connecting to the Oracle UCM Repository ... 1-35 1.11.3 Configuring the GDFontPath MBean for a UNIX Operating System... 1-36 1.11.4 Allowing IMPORT Definitions ... 1-37 1.12 Completing the Oracle IRM Configuration ... 1-38 1.12.1 Setting the Server URL Configuration Parameter for Oracle IRM ... 1-38 1.12.2 Configuring a Key Store for Oracle IRM ... 1-39 1.12.2.1 Creating a Key Store ... 1-39 1.12.2.2 Setting the Key Store Location... 1-40 1.12.2.3 Adding Key Store Passwords to the Credential Store ... 1-42 1.12.3 Configuring SSL for a Development Environment ... 1-43 1.12.3.1 Configuring One-Way SSL with a Server Certificate ... 1-43 1.12.3.2 Configuring Client Machines Running Oracle IRM Desktop to Accept a
Preface
This quick installation guide provides instructions for installing and configuring Oracle Enterprise Content Management Suite on a single host, using default values for most of the configuration. It also provides instructions for deinstalling the suite.
Audience
This guide is intended for users who are installing Oracle Enterprise Content Management Suite for the first time in development mode for a test or demo system.
Documentation Accessibility
Our goal is to make Oracle products, services, and supporting documentation accessible to all users, including users that are disabled. To that end, our
documentation includes features that make information available to users of assistive technology. This documentation is available in HTML format, and contains markup to facilitate access by the disabled community. Accessibility standards will continue to evolve over time, and Oracle is actively engaged with other market-leading
technology vendors to address technical obstacles so that our documentation can be accessible to all of our customers. For more information, visit the Oracle Accessibility Program Web site at http://www.oracle.com/accessibility/.
Accessibility of Code Examples in Documentation
Screen readers may not always correctly read the code examples in this document. The conventions for writing code require that closing braces should appear on an
otherwise empty line; however, some screen readers may not always read a line of text that consists solely of a bracket or brace.
Accessibility of Links to External Web Sites in Documentation
This documentation may contain links to Web sites of other companies or
organizations that Oracle does not own or control. Oracle neither evaluates nor makes any representations regarding the accessibility of these Web sites.
Access to Oracle Support
Related Documents
For additional information, see the following documents:
■ Oracle Fusion Middleware Administrator's Guide
■ Oracle Fusion Middleware Administrator's Guide for Conversion
■ Oracle Fusion Middleware Administrator's Guide for Oracle Application Adapters for Oracle Enterprise Content Management.
■ Oracle Fusion Middleware Concepts
■ Oracle Fusion Middleware Enterprise Deployment Guide for Oracle Enterprise Content Management Suite
■ Oracle Fusion Middleware High Availability Guide
■ Oracle Fusion Middleware Installation Guide for Oracle Enterprise Content Management Suite
■ Oracle Fusion Middleware Installation Guide for Oracle WebLogic Server
■ Oracle Fusion Middleware Installation Planning Guide
■ Oracle Fusion Middleware Node Manager Administrator's Guide for Oracle WebLogic Server
■ Oracle Fusion Middleware Patching Guide
■ Oracle Fusion Middleware Repository Creation Utility User's Guide
■ Oracle Fusion Middleware Setup Guide for Universal Records Management
■ Oracle Fusion Middleware System Administrator's Guide for Oracle Content Server
Conventions
In this document, the term or UNIX operating system or UNIX system refers to a category of operating systems that includes Linux operating systems. Most UNIX command examples in this document are for use with the Bourne shell. You should use the equivalent commands for the shell you are using.
The following table describes the text conventions that this document uses.
Convention Meaning
boldface Boldface type indicates a graphical user interface element associated with an action or a term defined in the text or glossary.
italic Italic type indicates a book title, emphasis, or a placeholder variable for which you can supply a value.
1
1
Installing and Configuring Oracle Enterprise
Content Management Suite
This quick installation guide describes how to install and configure Oracle Enterprise Content Management Suite for a demo, test, or proof of concept (POC) system. Most of the configuration uses default values.
This guide covers these topics:
■ Installation Overview
■ Meeting System Requirements and Certification
■ Preparing to Install
■ Creating Oracle Enterprise Content Management Suite Schemas
■ Installing Oracle Enterprise Content Management Suite in a Middleware Home
■ Configuring Oracle Enterprise Content Management Suite
■ Performing Postinstallation Configuration
■ Starting the Administration Server
■ Completing the Oracle UCM Configuration
■ Completing the Oracle IBR Configuration
■ Completing the Oracle I/PM Configuration
■ Completing the Oracle IRM Configuration
■ Completing the Oracle URM Configuration
■ Starting Managed Servers
■ Starting Node Manager
■ Verifying the Installation and Configuration
■ Deinstalling Oracle Enterprise Content Management Suite
Installation Overview
1.1 Installation Overview
This guide contains instructions for installing and configuring the following Oracle Enterprise Content Management Suite products on a single host:
■ Oracle Universal Content Management (Oracle UCM)
■ Oracle Inbound Refinery (Oracle IBR)
■ Oracle Imaging and Process Management (Oracle I/PM)
■ Oracle Information Rights Management (Oracle IRM)
■ Oracle Universal Records Management (Oracle URM)
Oracle Enterprise Content Management Suite requires a Middleware home with Oracle WebLogic Server on your system. If your system does not already have Oracle WebLogic Server, you can install it in a new Middleware home directory, as described in Section 1.3.3, "Installing Oracle WebLogic Server in a Middleware Home."
A Middleware home is a container for the Oracle WebLogic Server home, and,
optionally, one Oracle Common home and one or more Oracle homes, with a directory structure like this:
/middleware_home coherence_3.6 jdk160_21
jrockit_160_20_D1.1.0-2119 logs
modules wlserver_10.3 oracle_common utils
ECM_ORACLE_HOME user_projects
The installation of Oracle Enterprise Content Management Suite is a two-step process:
1. You run the installer to perform a base installation of the suite’s products.
2. You run Fusion Middleware Configuration Wizard to deploy one or more of the suite’s products as applications to an Oracle WebLogic Server domain.
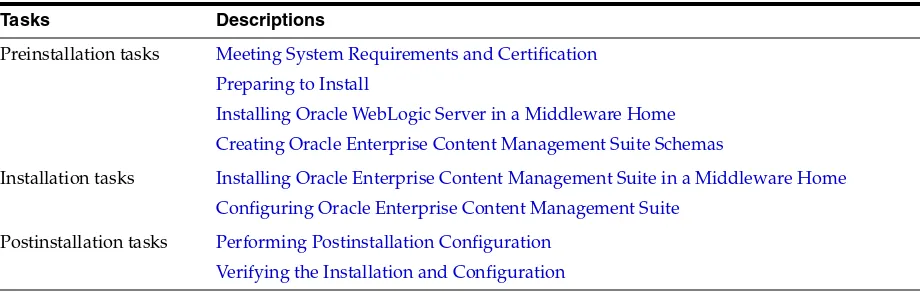
Table 1–1 lists the sections in the guide that provide information about the preinstallation, installation, and postinstallation tasks.
Table 1–1 Installation Roadmap
Tasks Descriptions
Preinstallation tasks Meeting System Requirements and Certification Preparing to Install
Installing Oracle WebLogic Server in a Middleware Home Creating Oracle Enterprise Content Management Suite Schemas
Installation tasks Installing Oracle Enterprise Content Management Suite in a Middleware Home Configuring Oracle Enterprise Content Management Suite
Installation Overview
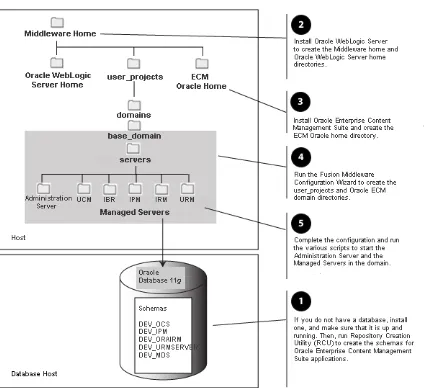
Figure 1–1 illustrates the topology that installation and configuration of these products will create on your system. Numbers in the figure show the order in which to perform certain tasks.
Figure 1–1 Installation Topology and Order of Tasks
This guide is for users who are installing Oracle Enterprise Content Management Suite for the first time to become familiar with the products in the suite, show what they can do, perform basic testing, or prepare a POC. For information about installing a
production system, see Oracle Fusion Middleware Installation Guide for Oracle Enterprise Content Management Suite.
For an example of an enterprise deployment based on Oracle best practices, high-availability configurations, and security technologies, see Oracle Fusion
Middleware Enterprise Deployment Guide for Oracle Enterprise Content Management Suite.
Meeting System Requirements and Certification
1.2 Meeting System Requirements and Certification
For system requirements and certification information, refer to the following documents, available on Oracle Technology Network (OTN):
■ "Oracle Fusion Middleware System Requirements and Specifications" contains information related to hardware and software requirements, minimum disk space and memory requirements, and required system libraries, packages, or patches. This document is at
http://www.oracle.com/technology/software/products/ias/files/ fusion_requirements.htm
■ "Oracle Fusion Middleware Supported System Configurations" contains
information related to supported installation types, platforms, operating systems, databases, JDKs, and third-party products. This document is at
http://www.oracle.com/technology/software/products/ias/files/ fusion_certification.html
1.3 Preparing to Install
The following tasks need to be done on your system before you install and configure Oracle Enterprise Content Management Suite. Some of the tasks are required only on a Windows operating system or on a Dynamic Host Configuration Protocol (DHCP) host.
■ Installing a Database
■ Creating Schemas for Oracle Enterprise Content Management Suite Applications
■ Installing Oracle WebLogic Server in a Middleware Home
■ Installing and Configuring Java Access Bridge (Windows Operating System Only)
■ Configuring a DHCP Host
■ Installing on a Non-Networked Computer
■ Installing on a Multihomed Computer
1.3.1 Installing a Database
The configuration of Oracle Enterprise Content Management Suite requires the availability of a supported database. The database must be up, and a database instance must be running before you create schemas for the suite’s applications with Repository Creation Utility (RCU) and before you configure any of the applications. The database does not have to be on the same machine where you are installing the suite.
The database must be compatible with RCU. This guide describes using RCU with Oracle Database. For more information, see Section 1.4, "Creating Oracle Enterprise
Notes:
■ For the 32-bit version of the product, the system on which you are installing must be a supported 32-bit system. Installing a 32-bit version of the product on a 64-bit system is not supported.
Preparing to Install
Content Management Suite Schemas." For information about using Microsoft SQL Server or IBM DB2 with RCU, see Oracle Fusion Middleware Installation Guide for Oracle Enterprise Content Management Suite.
The overall performance of an Oracle UCM system is dependent on the speed at which files that are checked into the server can be stored and retrieved. Using a database to store the files that are stored in the server requires that the database can execute both read and write commands at speeds similar to a file system. Oracle Secure Files meets this standard. For databases other than Oracle Database, consult your database provider to ensure that the database can achieve your storage and retrieval requirements.
For the latest information about supported databases, see the "Oracle Fusion Middleware Supported System Configurations" document on Oracle Technology Network at
http://www.oracle.com/technology/software/products/ias/files/fus ion_certification.html
For more information about Oracle Database, see the Oracle Documentation page on Oracle Technology Network at
http://www.oracle.com/technetwork/indexes/documentation/index.ht ml#database
1.3.2 Creating Schemas for Oracle Enterprise Content Management Suite Applications
Before you can configure an Oracle Enterprise Content Management Suite application, you need to use RCU to create a schema for it in the database. You can create the schema before or after you install Oracle WebLogic Server or Oracle Enterprise Content Management Suite. For information about how to create schemas for applications, see Section 1.4, "Creating Oracle Enterprise Content Management Suite Schemas."1.3.3 Installing Oracle WebLogic Server in a Middleware Home
Oracle Enterprise Content Management Suite requires a Middleware home directory in which Oracle WebLogic Server is installed on your system. If your system does not already have Oracle WebLogic Server, you can install it in a new Middleware home directory, before or after installation of the database and creation of the schemas.
To install Oracle WebLogic Server in a Middleware home:
1. Insert the Oracle WebLogic Server DVD, or download Oracle WebLogic Server 11gR1 (10.3.4) for your platform from either of these web sites:
■ Oracle E-Delivery at
http://edelivery.oracle.com/
■ Oracle WebLogic Server Downloads page on Oracle Technology Network (OTN) at
http://www.oracle.com/technetwork/middleware/weblogic/down Note: RCU is available only on a Linux or Windows operating
Preparing to Install
The 32-bit executable files from which you can install Oracle Weblogic Server are bundled with the appropriate JDK version. If you use the 64-bit installer, you will need to invoke the installer with a supported JDK for your platform. This JDK must be installed on your system before you install Oracle WebLogic Server. The JDK must be installed in a directory without spaces in the directory path (not underneath the \Program Files directory in a Windows operating system). For a list of supported JDKs for your operating system, see the "Oracle Fusion
Middleware Supported System Configurations" document, described in Section 1.2, "Meeting System Requirements and Certification."
2. Either run your installer file directly from the DVD, or copy the file to your local system and run it locally, after considering these notes:
■ Before running the installer on a UNIX operating system that is running XWindows, you need to set your system’s DISPLAY environment variable to a valid X Server to redirect the display to a system with suitable graphic
capabilities.
■ If you installed a JDK for your system, set the JAVA_HOME environment variable to the installation location.
■ If you are installing Oracle WebLogic Server on a 64-bit system and using a 32/64-bit hybrid JDK (such as the HP JDK for HP-UX or SUN JDK for Solaris SPARC), you need to use the -d64 flag when you run the installer.
To validate that your JAVA_HOME environment variable refers to a 64-bit JDK when you use a 32/64-bit hybrid JDK, execute either of the following
commands, in which JAVA_HOME is the value of the environment variable:
JAVA_HOME/bin/java -version
JAVA_HOME/bin/java -d64 -version
To run the installer on a 32-bit Linux operating system, use this command:
./wls1034_linux32.bin
To run the installer on a 32-bit Windows operating system, use this command:
wls1034_win32.exe
To run the installer on a 64-bit UNIX operating system, use either of these commands:
JAVA_HOME/bin/java -jar wls1034_generic.jar
JAVA_HOME/bin/java -d64 -jar wls1034_generic.jar
To run the installer on a 64-bit Windows operating system, use this command:
JAVA_HOME\bin\java -jar wls1034_generic.jar
3. Welcome screen
Click Next.
4. Choose Middleware Home Directory screen
Select Create a new Middleware Home.
Specify a location for your new Middleware home directory, which MW_HOME
Preparing to Install
The default Oracle Middleware home is /Oracle/Middleware on a UNIX operating system or \Oracle\Middleware on a Windows operating system. For more information, see "Middleware Home and WebLogic Home Directories" in Oracle Fusion Middleware Installation Planning Guide.
Click Next.
5. Register for Security Updates screen
Select whether or not to receive the latest product and security updates. If you choose not to receive anything, you need to verify your selection.
Click Next.
6. Choose Install Type screen
Select Typical, and click Next.
If you are prompted for a JDK location on a 64-bit system, specify a JDK:
a. Browse to the JDK location.
b. Select the directory that contains the bin directory.
c. Click Next.
7. Choose Product Installation Directories screen
Specify a location for your Oracle WebLogic Server home directory, which
WL_HOME represents in path names in this document. The default location for
WL_HOME follows:
■ UNIX path:MW_HOME/wlserver_10.3
■ Windows path: MW_HOME\wlserver_10.3
For more information about home directories, see "Middleware Home and WebLogic Home Directories" in the Oracle Fusion Middleware Installation Planning Guide.
You can also specify a JDK. To specify a JDK for a 64-bit operating system, you must select Custom and the installed 64-bit JDK.
Click Next.
8. Choose Shortcut Location (Windows operating system only)
If you are installing on a Windows operating system, you need to specify a location for creating a shortcut to Oracle products.
Click Next.
9. Installation Summary screen
Verify the information on this screen. If you want to change anything, click
Previous to go back.
Click Next to install Oracle WebLogic Server.
Preparing to Install
10. Installation Progress screen
No action is required on this screen.
11. Installation Complete screen
Deselect Run Quickstart.
Click Done.
For more information about installing Oracle WebLogic Server, see Oracle Fusion Middleware Installation Guide for Oracle WebLogic Server.
1.3.4 Installing and Configuring Java Access Bridge (Windows Operating System Only)
If you are installing on a Windows operating system, you can install and configure Java Access Bridge for Section 508 Accessibility:1. Download Java Access Bridge from the Java SE Desktop Accessibility page of the Sun Developer Network at
http://www.oracle.com/technetwork/java/javase/tech/index-jsp-136191.html
2. Install Java Access Bridge.
3. Copy the access-bridge.jar and jaccess-1_4.jar files from your installation location to the jre\lib\ext directory.
4. Copy the WindowsAccessBridge.dll, JavaAccessBridge.dll, and
JAWTAccessBridge.dll files from your installation location to the jre\bin
directory.
5. Copy the accessibility.properties file to the jre\lib directory.
For more information about accessibility, see "Using Oracle Fusion Middleware Accessibility Options" in Oracle Fusion Middleware Administrator's Guide.
1.3.5 Configuring a DHCP Host
If you are installing Oracle Enterprise Content Management Suite on a DHCP host, you must follow the configuration steps in this section for your operating system.
1.3.5.1 Configuring a DHCP Host on a UNIX Operating System
Configure the host to resolve host names to the loopback IP address by modifying the
/etc/hosts file on a UNIX operating system to contain the following entries:
127.0.0.1 hostname.domainname hostname 127.0.0.1 localhost.localdomain localhost
To check that the host name resolves to the loopback IP address, use this command:
/bin/ping hostname.domainname
1.3.5.2 Configuring a DHCP Host on a Windows Operating System
On a Windows operating system, install a loopback adapter on the DHCP server (see Section 1.3.5.3, "Installing a Loopback Adapter on a Windows Operating System"). This assigns a local IP address to your computer.
After installing the adapter, add a line immediately after the localhost line in the
Preparing to Install
Replace IP_address with the local IP address of the loopback adapter, hostname
with the name of the host, and domainname with the name of the domain.
1.3.5.3 Installing a Loopback Adapter on a Windows Operating System
On a Windows operating system, you can install a loopback adapter on the DHCP server to assign a local IP address to your computer.
To install a loopback adapter on a Windows operating system: 1. Open Control Panel.
2. Select Add Hardware.
3. In the "Welcome" window, click Next.
4. On the "Is the hardware connected?" window, select Yes, I have already connected the hardware, then click Next.
5. In the "The following hardware is already installed on your computer" window, in the list of installed hardware, select Add a new hardware device, then click Next.
6. In the "The wizard can help you install other hardware" window, select Install the hardware that I manually select from a list, then click Next.
7. In the "From the list of hardware types, select the type of hardware you are installing" window, select Network adapters, then click Next.
8. In the "Select Network Adapter" window, make the following selections:
■ Manufacturer: Microsoft
■ Network Adapter: Microsoft Loopback Adapter
9. Click Next.
10. In the "The wizard is ready to install your hardware" window, click Next.
11. In the "Completing the Add Hardware Wizard" window, click Finish.
12. Restart your computer.
13. Right-click My Network Places on the desktop and choose Properties. This displays the Network Connections control panel.
14. Right-click the connection that was just created. This is usually named Local Area Connection 2. Choose Properties.
15. On the General tab, select Internet Protocol (TCP/IP), then click Properties.
16. In the Internet Protocol (TCP/IP) Properties dialog box, click Use the following IP address, and then do the following steps:
a. IP Address: Enter a nonroutable IP for the loopback adapter, such as one of the following nonroutable addresses:
192.168.x.x (x is any value between 1 and 255) 10.10.10.10
b. Subnet mask: Enter 255.255.255.0.
c. Record the values you entered because you will need them later in this procedure.
Preparing to Install
17. In the Local Area Connection 2 Properties dialog box, click OK.
18. Close the Network Connections control panel.
19. Restart your computer.
1.3.5.4 Removing a Loopback Adapter from a Windows Operating System
You can remove a loopback adapter through Control Panel.
To remove a loopback adapter from a Windows operating system: 1. Start the System control panel.
2. On the Hardware tab, click Device Manager.
3. In the Device Manager window, expand Network adapters. You should see
Microsoft Loopback Adapter.
4. Right-click Microsoft Loopback Adapter and select Uninstall.
5. Click OK.
1.3.6 Installing on a Non-Networked Computer
You can install Oracle Enterprise Content Management Suite on a non-networked computer, such as a laptop. Because a non-networked computer has no access to other computers, you have to install all the components that you need on the computer.
In addition, you must follow the instructions in Section 1.3.5, "Configuring a DHCP Host" to install a loopback adapter and modify the hosts file on your system.
1.3.7 Installing on a Multihomed Computer
You can install Oracle Enterprise Content Management Suite on a multihomed computer. A multihomed computer is associated with multiple IP addresses. This is typically achieved by having multiple network cards on the computer. Each IP address is associated with a host name; additionally, you can set up aliases for each host name.
The installer picks up the fully qualified domain name from the first entry in the
hosts file:
■ UNIX path:/etc/hosts
■ Windows path:%SYSTEMROOT%\system32\drivers\etc\hosts
For example, the installer would pick up myhost1.example.com for configuration if your file contains the following entries:
127.0.0.1 localhost.localdomain localhost 10.148.56.76 myhost1.example.com myhost1 10.148.56.77 devhost2.example.com devhost2
Creating Oracle Enterprise Content Management Suite Schemas
1.4 Creating Oracle Enterprise Content Management Suite Schemas
Oracle Enterprise Content Management Suite requires that an application schema exists in the database before configuration of the application. You must run the
Repository Creation Utility (RCU) to create application schemas in the database, which must be up and running before you start RCU. You can create application schemas before or after you install Oracle WebLogic Server or Oracle Enterprise Content Management Suite.
To create Oracle Enterprise Content Management Suite Schemas:
1. Insert a DVD or unzip a ZIP containing the Repository Creation Utility, and then start RCU with the bin/rcu or BIN\rcu.bat file:
■ UNIX path:RCU_HOME/bin/rcu
■ Windows path:RCU_HOME\BIN\rcu.bat
You can download a ZIP file containing the Repository Creation Utility from either of these web sites:
■ Oracle E-Delivery at
http://edelivery.oracle.com/
■ Oracle Fusion Middleware 11g Software Downloads page on Oracle Technology Network (OTN) at
http://www.oracle.com/technology/software/products/middlew are
After downloading the ZIP file, extract the contents to a directory of your choice, and then start RCU as the preceding text describes.
2. Welcome screen
Click Next.
3. Create Repository screen
Select Create.
Click Next.
4. Database Connection Details screen
Database Type: You can keep the default, Oracle Database, selected.
For information about using Microsoft SQL Server or IBM DB2 with RCU, see Oracle Fusion Middleware Installation Guide for Oracle Enterprise Content Management Suite.
For connecting to an Oracle Database instance, provide the following information:
■ Host Name: Specify the name of the machine on which your database resides, in the format host.example.com.
For Oracle Real Application Cluster (RAC) databases, specify the Virtual IP name or one of the node names.
Creating Oracle Enterprise Content Management Suite Schemas
■ Port: Specify the database listen port number. The default port number for an Oracle Database instance is 1521.
■ Service Name: Specify the service name for the database. Typically, the service name is the same as the global database name.
If you do not know the service name for your database, you can obtain it from the SERVICE_NAMES parameter in the database's initialization parameter file. If this file does not contain the SERVICE_NAMES parameter, then the service name is the same as the global database name, which is specified in the DB_ NAME and DB_DOMAIN parameters. Another way to find the service name is to log in to the database as SYS and run the following command:
show parameter service_name
For Oracle RAC databases, specify the service name of one of the nodes in this field; for example, sales.example.com.
■ Username: Specify the user name of the database administrator.
Specify the name of an Oracle Database user with DBA or SYSDBA privileges. The default user name with SYSDBA privileges is SYS.
■ Password: Specify the password for your database user.
■ Role: Select a database user role from the list. SYS requires the SYSDBA role. Click Next. The Checking Global Prerequisites dialog box appears. If you have any prerequisite errors, the Database Connection Details screen displays details about the errors. Fix any errors, then click Next again.
After the checking is complete with no errors, click OK to dismiss the dialog box and go to the next screen.
5. Select Components screen
Near the top of the screen, select Create a New Prefix, and specify a prefix, or leave the default prefix, DEV.
For Oracle Database, the prefix can contain from 1 to 12 alphanumeric characters (0-9, a-z, or A-Z).
Expand Enterprise Content Management in the Components list, and then select one or more of the following applications:
■ Oracle Information Rights Management
■ Oracle Content Server 11g - Complete
■ Oracle Content Server 11g - Search Only
■ Oracle Universal Records Management 11g
■ Oracle Imaging and Process Management
To create a schema for Oracle UCM, select Oracle Content Server 11g - Complete.
If you select Oracle Imaging and Process Management, you should also select
Oracle Content Server 11g - Complete to use Oracle UCM as the Oracle I/PM repository.
Also, for Oracle Web Services Manager (WSM) Policy Manager, expand AS Common Schemas, and then select Metadata Services.
Creating Oracle Enterprise Content Management Suite Schemas
Click Next. The Checking Component Prerequisites dialog box appears.
If you have any prerequisite errors, the Select Components screen displays details about the errors. Fix any errors, then click Next again.
After the checking is complete with no errors, click OK to dismiss the dialog box and go to the next screen.
6. Schema Passwords screen
For a development system, you can select Use same passwords for all schemas, near the top of the screen. Enter your password two times, in the Password and
Confirm Password field.
Or you can enter a different password for each application listed in the
Component column. Enter the password for each application twice, in the Schema Password and Confirm Password columns.
Click Next.
7. Map Tablespaces screen
Click Next. The Validating and Creating Tablespaces dialog box appears.
If you have any validation errors, the Map Tablespaces screen displays details about the errors. You can track errors in log files, such as irm.log and rcu.log. This screen displays the log locations. Fix any errors, then click Next again.
After the tablespaces are created with no errors, click OK to dismiss the dialog box.
8. Summary screen
Click Create. The CREATE dialog box opens.
If you have any schema creation errors, the Summary screen displays details about the errors. Fix any errors, then click Next again.
After RCU creates the schema or schemas with no errors, click OK to dismiss the dialog box.
9. Completion Summary screen
Click Close.
Note: Record each schema owner name from this screen because you will need it later, in the format schemaprefix_schemasuffix, to configure the corresponding application.
For example, if you used the default prefix, DEV_, you would supply the following owner name for the Oracle URM schema in Oracle Database:
DEV_URMSERVER
Installing Oracle Enterprise Content Management Suite in a Middleware Home
For more information about RCU, see Oracle Fusion Middleware Repository Creation Utility User's Guide.
1.5 Installing Oracle Enterprise Content Management Suite in a
Middleware Home
Oracle Enterprise Content Management Suite requires a Middleware home with Oracle WebLogic Server on your system. If your system does not already have Oracle WebLogic Server, you can install it in a new Middleware home directory, as described in Section 1.3.3, "Installing Oracle WebLogic Server in a Middleware Home." For more information about the structure and contents of a Middleware home, see
"Understanding Oracle Fusion Middleware Concepts" in Oracle Fusion Middleware Administrator's Guide.
The ECM Oracle home contains the binary and library files necessary for Oracle Enterprise Content Management Suite. ECM_ORACLE_HOME represents the ECM Oracle home in path names.
When you install Oracle Enterprise Content Management Suite, you perform a base installation of the following products in an ECM Oracle home directory (represented by ECM_ORACLE_HOME in path names) under the Middleware home directory on your system:
■ Oracle Universal Content Management (Oracle UCM)
■ Oracle Inbound Refinery (Oracle IBR)
■ Oracle Imaging and Process Management (Oracle I/PM)
■ Oracle Information Rights Management (Oracle IRM)
■ Oracle Universal Records Management (Oracle URM)
You can install Oracle Enterprise Content Management Suite before or after you create schemas for the suite’s applications, as described in Section 1.3.2, "Creating Schemas for Oracle Enterprise Content Management Suite Applications." After installation and schema creation, you can deploy one or more of these products to an Oracle WebLogic Server domain, as applications.
Note: The user account created for a schema has a default expiration date of six months after creation. The database administrator should change the expiration of the user account to a later date. To view the expiration date for an account, use the SQL statement SELECT * FROM all_users or SELECT * FROM dba_users.
Installing Oracle Enterprise Content Management Suite in a Middleware Home
1.5.1 Starting the Installer
You can start the Oracle Enterprise Content Management Suite installer from Disk 1 of the suite’s media, as follows:
■ UNIX command:
ecm_media_loc/Disk1/runInstaller -jreLoc jre_location
If you do not specify the JRE location, you will be prompted for it.
■ Windows command:
ecm_installer_loc/Disk1/setup.exe -jreLoc jre_location
If you double-click setup.exe, you will be prompted for the JRE location. After you enter the path, click Enter to start the Oracle ECM installation.
The installer requires the location of a Java Runtime Environment (JRE) on your system. A JRE was installed with Oracle Fusion Middleware. Table 1–2 shows the default JRE locations.
You can either use the -jreLoc option or allow the installer to prompt for the directory containing the bin/java directory.
1.5.2 Providing the Location of an Inventory Directory on a UNIX System
If you are installing on a UNIX operating system, and if this is the first time any Oracle product is being installed on your system with the Oracle Universal Installer, you will be asked to provide the location of an inventory directory. This is where the installer will set up subdirectories and maintain inventory data for each Oracle product that is installed on the machine.
Note: For document conversions on a Solaris SPARC platform, Oracle I/PM requires the GNU Compiler Collection (GCC) package 3.4.2 or later in the /usr/local/packages directory.
Install this package on the Solaris operating system that will run Oracle I/PM. You can download GCC from the Sunfreeware web site at
http://www.sunfreeware.com
You also need to set the LD_LIBRARY_PATH environment variable to
/usr/local/packages/gcc-3.4.2/lib before starting the Oracle I/PM Managed Server. If you are using a later version of GCC, set that version instead of 3.4.2.
Table 1–2 Default JRE Locations
Operating
System Production Environment Development Environment
UNIX MW_HOME/jrockit_160_20string/jre MW_HOME/jdk160_21/jre
Windows MW_HOME\jrockit_160_20_string\jre MW_HOME\jdk160_21\jre
Installing Oracle Enterprise Content Management Suite in a Middleware Home
To provide the location of an inventory directory on a UNIX system:
1. On the Specify Inventory Directory screen, specify the location of the inventory directory.
This screen appears only on a UNIX operating system, for the first installation by Oracle Universal Installer. The installer will use the inventory directory to keep track of all Oracle products installed on the machine.
2. Take the action requested in the Inventory Location Confirmation dialog box.
This dialog box asks you to run the following script as the root user:
inventory_directory/createCentralInventory.sh
If you do not have root access on the machine but want to continue with the installation, select Continue installation with local inventory.
1.5.3 Installing Oracle Enterprise Content Management Suite
You install Oracle Enterprise Content Management Suite in an ECM Oracle home directory in a Middleware home.
To install Oracle Enterprise Content Management Suite: 1. Welcome screen
Click Next.
2. Install Software Updates screen
Specify any software updates to install before you install Oracle Enterprise Content Management Suite.
To get updates from My Oracle Support, you can select Search My Oracle Support for Updates, specify a user name and password, and then click Search for
Updates. Before you search, you can click Proxy Settings to change the settings for the proxy server and Test Connection to test the credentials.
To get updates that you have saved to your computer, you can select Search Local Directory for Updates, specify a directory, and then click Search for Updates.
If you do not want to update any software, select Skip Software Updates, and then click Next to continue the installation.
3. Prerequisite Checks screen
After the prerequisite checking is complete with no errors, click Next.
4. Specify Installation Location screen
Oracle Middleware Home: Select the Middleware home directory (MW_HOME).
The default Oracle Middleware home is /Oracle/Middleware on a UNIX operating system or \Oracle\Middleware on a Windows operating system.
Oracle Home Directory: Specify the directory where you want to install Oracle Enterprise Content Management Suite, inside the Middleware home directory:
■ If you specify a directory that already exists, it must be empty.
■ If you specify a new directory, the installer creates it.
Installing Oracle Enterprise Content Management Suite in a Middleware Home
Oracle home is MW_HOME/Oracle_ECM1 on a UNIX operating system or MW_ HOME\Oracle_ECM1 on a Windows operating system.
Click Next.
5. Installation Summary screen
Click Save to save the response file, and then click Install to start the installation.
6. Installation Progress screen
Monitor the progress of your installation.
After the progress reaches 100%, click Next to go to the last screen.
7. Installation Completed screen
Click Save to save the installation configuration, and then click Finish.
1.5.4 Applying Patch 12369706 for Oracle Information Rights Management
The 11.1.1.5.0 Oracle IRM Server Management Console has an issue that requires a patch to be applied to the installed or updated system. When rights are being selected for a context, the Properties, Edit, and Remove buttons are always disabled and cannot be used. Selecting one or more rights will not enable the buttons. Patch 12369706 fixes this issue.
This patch can be downloaded from My Oracle Support (formerly
OracleMetaLink
)at https://support.oracle.com.
To apply Patch 12369706 for Oracle IRM: 1. Log in to https://support.oracle.com.
2. Click the Patches & Updates tab.
3. Enter the patch number, 12369706, in the Patch Name or Number field, under
Patch Search.
4. Click Search.
5. Follow the installation instructions provided with the patch.
For general information about patching, see the Oracle Fusion Middleware Patching Guide.
Configuring Oracle Enterprise Content Management Suite
1.6 Configuring Oracle Enterprise Content Management Suite
After you have successfully run the installer and created application schemas, you can deploy and configure the following Oracle Enterprise Content Management Suite products as applications:
■ Oracle Universal Content Management (Oracle UCM)
■ Oracle Inbound Refinery (Oracle IBR)
■ Oracle Imaging and Process Management (Oracle I/PM)
■ Oracle Information Rights Management (Oracle IRM)
■ Oracle Universal Records Management (Oracle URM)
To configure one or more of these applications, you can create an Oracle WebLogic Server domain, which includes a Managed Server for each deployed application and one Administration Server. Each of these servers is an Oracle WebLogic Server instance.
Before you start the Administration Server or a Managed Server, you need to perform some additional configuration and post-installation configuration tasks. This section includes descriptions of the following configuration tasks.
■ Creating an Oracle WebLogic Server Domain
■ Increasing the Java VM Heap Size for Managed Servers
■ Setting Up Fonts on a UNIX System
■ Installing Libraries and Setting Environment Variables for Outside In Technology
For information about postinstallation configuration tasks, including the configuration of Oracle UCM, Oracle IBR, Oracle I/PM, Oracle IRM, or Oracle URM, see Section 1.7, "Performing Postinstallation Configuration."
Notes:
■ Before you configure Oracle IRM, you need to apply a patch. For information about the Oracle IRM patch, see Section 1.5.4, "Applying Patch 12369706 for Oracle Information Rights Management."
■ The Oracle I/PM product deployment provides for up to 10 GB of disk space to be used to stage simultaneous document uploads through the user interface. This limit exists to provide an upper limit to thwart malicious server attacks.
Note: Each of these applications needs to run in its own Managed Server or its own cluster of Managed Servers. You cannot deploy Oracle UCM, Oracle IBR, Oracle I/PM, Oracle IRM, or Oracle URM to a Managed Server or cluster that already has another Oracle ECM application deployed.
Configuring Oracle Enterprise Content Management Suite
1.6.1 Creating an Oracle WebLogic Server Domain
You can create a domain to include a Managed Server for one or more applications (one Managed Server each) and then extend the domain with Managed Servers for one or more other applications. For Oracle I/PM to take advantage of Business Process Management (BPM) and Oracle BPEL Process Manager within an existing domain, the domain must be extended with Oracle BPM Suite - 11.1.1.0.
The following procedure is for creating an Oracle WebLogic Server domain. For information about extending a domain, see "Extending an Existing Domain" in Oracle Fusion Middleware Installation Guide for Oracle Enterprise Content Management Suite.
To create an Oracle WebLogic Server domain:
1. Start Fusion Middleware Configuration wizard with the config script:
■ UNIX path:ECM_ORACLE_HOME/common/bin/config.sh
■ Windows path:ECM_ORACLE_HOME\common\bin\config.cmd
ECM_ORACLE_HOME represents the ECM Oracle home directory, where Oracle Enterprise Content Management Suite is installed. The default ECM Oracle home is MW_HOME/Oracle_ECM1 on a UNIX operating system or MW_HOME\Oracle_ ECM1 on a Windows operating system.
2. Welcome screen
Select Create a new WebLogic domain.
3. Select Domain Source screen
Select Generate a domain configured automatically to support the following products, and then select one or more of these products:
■ Oracle Universal Records Management Server
■ Oracle Information Rights Management
■ Oracle Universal Content Management - Inbound Refinery
■ Oracle Universal Content Management - Content Server
■ Oracle Imaging and Process Management
When you select Oracle Imaging and Process Management, you should also select Oracle Universal Content Management - Content Server.
When you select any Oracle ECM application on the Select Domain Source screen,
Oracle Enterprise Manager and Oracle JRF are automatically selected. If you deselect any of these items that are automatically selected, the Oracle ECM application will also be deselected.
Click Next.
4. Specify Domain Name and Location screen
Enter the name of the domain you want to create in the Domain name field. The default location for the domain follows (MW_HOME represents the Middleware home directory):
■ UNIX path:MW_HOME/user_projects/domains
Configuring Oracle Enterprise Content Management Suite
In the Application location field, you can specify a location for any applications you are deploying. The default location follows:
■ UNIX path:MW_HOME/user_projects/applications
■ Windows path:MW_HOME\user_projects\applications Click Next.
5. Configure Administrator User Name and Password screen
The User name field has the default administrator user name, weblogic, which you can change to another administrator user name.
In the User password field, enter the password for the administrator user.
Click Next.
6. Configure Server Start Mode and JDK screen
Under WebLogic Domain Startup Mode, leave Development Mode selected.
Under JDK Selection, leave Available JDKs and the default JDK selected, which is
Sun SDK 1.6.0_21 for development mode or, on a 64-bit system, the JDK you installed.
Click Next.
7. Configure JDBC Component Schemas screen
Configure each component schema by selecting a schema checkbox and then completing the following fields:
■ Component Schema: Select a component schema row.
■ Vendor: Leave Oracle selected.
■ Driver: Leave the default driver selected.
■ Schema Owner: Enter the user name of the application schema owner, specified during schema creation with Repository Creation Utility (RCU).
■ Schema Password: Enter the schema password.
■ DBMS/Service: Enter the name of the database instance if Oracle's
Driver (Thin) for Instance connections is selected in the Driver
field, or enter the service name (global database name) if Oracle's Driver (Thin) for Service connections is selected in the Driver field.
Specify the database that contains the application schema or schemas.
For Oracle RAC databases, specify the service name of one of the nodes in this field. For example: sales.example.com.
Note: Record the domain name and location from this screen because you will need them later to start the Administration Server.
Configuring Oracle Enterprise Content Management Suite
■ Host Name: Specify the name of the machine on which your database resides, in the format host.example.com.
For Oracle RAC databases, specify the Virtual IP name or one of the node names as the host name.
■ Listen Port: Leave the default number, which is 1521 for Oracle Database, or specify the listen port for your database if it is different.
Click Next.
8. Test Component Schema screen
Verify that the connections to your data sources are successful, and click Next.
9. Select Optional Configuration screen
Select Administration Server if you want to configure SSL for the Administration Server.
For information about the other optional configuration screens, see "Configuring Oracle Enterprise Content Management Suite" in Oracle Fusion Middleware Installation Guide for Oracle Enterprise Content Management Suite.
Click Next.
10. Configure the Administration Server screen
If you want to change the configuration of SSL for the Administration Server, you can select SSL enabled When you select SSL enabled, the SSL port is set to 7002 by default in the SSL Listen Port field. If SSL enabled is selected, you can change the SSL listen port value.
For information about configuring SSL for a production environment, see "SSL Configuration in Oracle Fusion Middleware" in Oracle Fusion Middleware Administrator's Guide.
For information about configuring SSL for Oracle IRM in a development environment, see Section 1.12.3, "Configuring SSL for a Development Environment."
Click Next.
11. Configuration Summary screen
Check your configuration and make any corrections or updates by following the instructions on the screen. When the configuration is satisfactory, click Create.
12. Creating Domain screen
Note: If SSL is enabled, before you use Oracle WebLogic Scripting tool (WLST) to connect to the Administration Server, you must either append the following parameters to the JVM_ARGS section of the
wlst.sh file or set them in the CONFIG_JVM_ARGS environment variable:
-Dweblogic.security.SSL.ignoreHostnameVerification=true -Dweblogic.security.TrustKeyStore=KeyStoreName
KeyStoreName is the name of the keystore in use (DemoTrust for the built-in demonstration certificate). The wlst.sh file is in the bin
Configuring Oracle Enterprise Content Management Suite
The following operations should have completed successfully:
■ Creation of an Oracle WebLogic Server domain, with an Administration Server
■ Creation of a Managed Server for each application that you selected on the Select Domain Source screen
■ Deployment of each application to its Managed Server
An application is not active until its Managed Server is started. For more information, see Section 1.14, "Starting Managed Servers."
1.6.2 Increasing the Java VM Heap Size for Managed Servers
You need to increase the size of the heap allocated for the Java Virtual Machine (VM) on which each Managed Server runs to at least 1 gigabyte, or to 512 MB for the Sun JDK. If you do not increase the Java VM heap size, then Oracle support and development will not accept any escalation of runtime issues, especially out-of-memory issues.
For a Managed Server using the Sun JDK on a Windows operating system, you need to set the size of the heap allocated for the Java VM to 512 MB rather than 1 GB so that programs configured to use all available space will not fail at initialization. Address space must be reserved for the permanent generation, and the MaxPermSize setting for each Managed Server reduces the space available for the rest of the heap.
There are two common ways to adjust the runtime memory parameters for a Managed Server:
■ Setting Startup Parameters for Managed Servers with the Administration Console
This method is required if the Managed Server process will be run from Node Manager. For more information about running Managed Servers from Node Manager, see Section 1.16, "Starting Node Manager."
■ Setting the USER_MEM_ARGS Environment Variable in the Startup Script for a Managed Server
This method is required if the managed server process will be run directly from the command line. For more information about running Managed Servers from the command line, see Section 1.14, "Starting Managed Servers."
1.6.2.1 Setting Startup Parameters for Managed Servers with the Administration
Console
You can set server startup parameters with the Oracle WebLogic Server
Configuring Oracle Enterprise Content Management Suite
To set server startup parameters for Managed Servers with the Administration Console:
1. Log in to the Oracle WebLogic Server Administration Console at this URL:
http://adminServerHost:adminServerPort/console
For adminServerHost, specify the name of the computer that hosts the
Administration Server for your domain. For adminServerPort, specify the listen port number for the Administration Server. The default number is 7001. For example:
http://myhost.example.com:7001/console
To log in, supply the user name and password that were specified on the Configure Administrator User Name and Password screen in the configuration wizard.
2. Click Environment under Domain Structure, on the left.
3. Click Servers on the Summary of Environment page.
4. Set the memory parameters for each Managed Server:
a. Click the name of a Managed Server in the Servers table.
b. On the Configuration tab, in the second row of tabs, click Server Start.
c. In the Arguments box, paste a string that specifies the memory parameters.
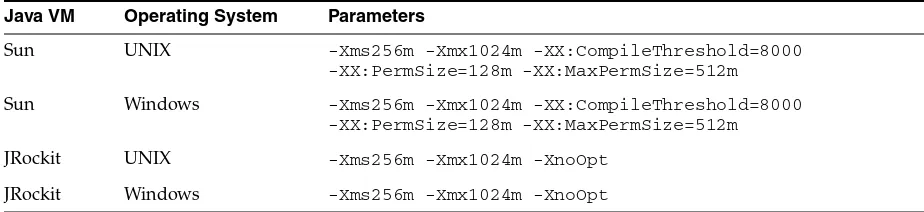
Table 1–3 shows parameters to specify for Sun and JRockit Java VMs on UNIX and Windows operating systems. Other Java VMs may have different values.
d. Save the configuration changes.
5. Restart any running Managed Servers, as described in Section 1.15, "Restarting a Managed Server."
1.6.2.2 Setting the USER_MEM_ARGS Environment Variable in the Startup Script
for a Managed Server
You can set server startup parameter for a Managed Server by setting the USER_ MEM_ARGS environment variable in its startup script. To increase the Java VM heap size, you set the value of the -Xmx parameter.
To set the USER_MEM_ARGS Environment Variable in the Startup Script for a Managed Server:
■ UNIX shell script (.sh)
Table 1–3 Java VM Memory Parameters
Java VM Operating System Parameters
Sun UNIX -Xms256m -Xmx1024m -XX:CompileThreshold=8000
-XX:PermSize=128m -XX:MaxPermSize=512m
Sun Windows -Xms256m -Xmx1024m -XX:CompileThreshold=8000 -XX:PermSize=128m -XX:MaxPermSize=512m
JRockit UNIX -Xms256m -Xmx1024m -XnoOpt
Configuring Oracle Enterprise Content Management Suite
■ UNIX C shell script (.csh)
setenv USER_MEM_ARGS "-Xms256m -Xmx1024m -XX:CompileThreshold=8000 -XX:PermSize=128m -XX:MaxPermSize=512m"
■ Windows command script (.cmd)
set USER_MEM_ARGS="-Xms256m -Xmx1024m -XX:CompileThreshold=8000 -XX:PermSize=128m -XX:MaxPermSize=512m"
1.6.3 Setting Up Fonts on a UNIX System
On a UNIX operating system, you need to make sure TrueType fonts are set up for Oracle I/PM, Oracle IBR, and Oracle UCM Dynamic Converter. If you are using a language other than English, you also need to set up fonts for national language support.
1.6.3.1 Setting Up TrueType Fonts on a UNIX System
For Oracle I/PM, Oracle IBR, and Oracle UCM Dynamic Converter to work correctly on a UNIX operating system, you need to set up TrueType fonts on the machine where Oracle I/PM, Oracle IBR, or the Dynamic Converter is running. If these fonts are not available on your system, you need to install them. Then you can configure Oracle IBR with the path to the font directory, as follows. For information about configuring the path to the font directory for Oracle I/PM once the fonts are installed, see
Section 1.11.3, "Configuring the GDFontPath MBean for a UNIX Operating System."
Some standard font locations on different UNIX platforms follow:
■ Solaris SPARC: /usr/openwin/lib/X11/fonts/TrueType
■ AIX: /usr/lpp/X11/lib/X11/fonts/TrueType
■ HP-UX Itanium: /usr/lib/X11/fonts/TrueType
Note: Table 1–3 shows parameters to specify for Sun and JRockit Java VMs on UNIX and Windows operating systems. Other Java VMs may have different values.
Note: For document conversions on a Solaris SPARC platform, Oracle I/PM requires the GNU Compiler Collection (GCC) package 3.4.2 or later in the /usr/local/packages directory.
Install this package on the Solaris operating system that will run Oracle I/PM. You can download GCC from the Sunfreeware web site at
http://www.sunfreeware.com
You also need to set the LD_LIBRARY_PATH environment variable to
Configuring Oracle Enterprise Content Management Suite
To set the path to the font directory in Oracle IBR: 1. Log in to Oracle IBR.
2. Select Conversion Settings, then Third-Party Application Settings, and then
General OutsideIn Filter Options.
3. Click Options.
4. Enter the path to the TrueType fonts in the Path to fonts field.
For example:
/usr/share/x11/fonts/FTP
5. Click Update.
1.6.3.2 Installing Fonts for National Language Support on a UNIX System
For languages other than English, the following installation steps need to be done on a UNIX operating system before you start a Managed Server:
■ Copy MW_HOME/oracle_common/jdk/jre/lib/fonts to the
jre/lib/fonts directory in the Sun JDK installation directory for the Middleware home.
■ Copy MW_HOME/oracle_common/jdk/jre/lib/fonts to the
jre/lib/fonts directory in the Oracle JRockit JDK directory for the Middleware home.
1.6.4 Installing Libraries and Setting Environment Variables for Outside In Technology
Oracle UCM, Oracle IBR, Oracle I/PM, and the Oracle I/PM Advanced Viewer for clients use Outside In Technology (OIT), which requires certain libraries that are not part of Oracle ECM. Before an Oracle UCM, Oracle IBR, or Oracle I/PM Managed Server is started, you need to install the libraries for your platform. For a UNIX platform, you also need to set an environment variable to reference the libraries in the library path for the user who will start the Managed Server.1.6.4.1 Installing Libraries for Outside In Technology on UNIX Platforms
Before you start an Oracle UCM, Oracle IBR, or Oracle I/PM Managed Server, the libraries required for your platform need to be available on your system.
Many of the required libraries are normally installed on the machine, including the C, math, X11, dynamic loader, and pthreads libraries, among others. The libgcc_s and
libstdc++ libraries are part of the GNU Compiler Collection (GCC) package.
OIT requires the following libraries for the specified UNIX platform. The libraries in bold are part of the GCC package 3.4.2 or later.
Solaris Sparc 32-bit requires GCC package 3.4.2 or later, which you can download from the Sunfreeware web site at
http://www.sunfreeware.com
HPUX Itanium requires GCC package 3.3.6, which you can download from the following web site:
http://hpacxx.external.hp.com/gcc
Configuring Oracle Enterprise Content Management Suite
HPUX ia64 system, on the machine where Oracle I/PM or Oracle UCM will run. If you are using a later version of GCC, specify that version instead of 3.4.2 or 3.3.6.
OIT requires the following libraries for the specified UNIX platform. The libraries in
bold are part of the GCC package.
■ Solaris Sparc 32-bit
Configuring Oracle Enterprise Content Management Suite
/usr/lib/libcrypt.a(shr.o) /usr/lib/libgaimisc.a(shr.o) /usr/lib/libgair4.a(shr.o) /usr/lib/libi18n.a(shr.o) /usr/lib/libiconv.a(shr4.o) /usr/lib/libodm.a(shr.o) /usr/lib/libpthreads.a(shr.o) /usr/lib/libpthreads.a(shr_comm.o) /usr/lib/libpthreads.a(shr_xpg5.o) /usr/lib/libpthreads_compat.a(shr.o)
■ HPUX PA/RISC 32-bit
/lib/libCsup.2 /lib/libCsup_v2.2 /lib/libX11.3 /lib/libXm.4 /lib/libXt.3 /lib/libc.2 /lib/libcl.2 /lib/libm.2 /lib/libstd.2 /lib/libstd_v2.2 /lib/libstream.2 /usr/lib/libCsup.2 /usr/lib/libCsup_v2.2 /usr/lib/libX11.3 /usr/lib/libXm.4 /usr/lib/libXt.3 /usr/lib/libc.2 /usr/lib/libcl.2 /usr/lib/libdld.2 /usr/lib/libisamstub.1 /usr/lib/libm.2 /usr/lib/libstd.2 /usr/lib/libstd_v2.2 /usr/lib/libstream.2
/view/x_r6hp700_1111/vobs/swdev/pvt/r6hp700_1111/X11R6/lib/libICE.2 /view/x_r6hp700_1111/vobs/swdev/pvt/r6hp700_1111/X11R6/lib/libSM.2 /view/x_r6hp700_1111/vobs/swdev/pvt/r6hp700_1111/X11R6/lib/libX11.3 /view/x_r6hp700_1111/vobs/swdev/pvt/r6hp700_1111/X11R6/lib/libXext.3 /view/x_r6hp700_1111/vobs/swdev/pvt/r6hp700_1111/X11R6/lib/libXp.2 /view/x_r6hp700_1111/vobs/swdev/pvt/r6hp700_1111/X11R6/lib/libXt.3
■ SUSE Linux
For an SUSE Linux operating system, the file /usr/lib/libstdc++.so.5 is required. You can find this file in the compat-libstdc++ or libstdc++33
Configuring Oracle Enterprise Content Management Suite
1.6.4.2 Setting Library Paths in Environment Variables on UNIX Platforms
Before Oracle Inbound Refinery or the Oracle UCM Dynamic Converter uses Outside In Technology for document and image conversions, the following environment variables must be set in the or Oracle I/PM or Oracle UCM Managed Server on the specified UNIX platforms:
■ Environment variables for library paths for Oracle I/PM
– Solaris Sparc:
LD_LIBRARY_PATH=/usr/local/packages/gcc-3.4.2/lib
If you are using a later version of GCC, specify that version instead of 3.4.2.
– AIX:
LIBPATH=DomainHome/oracle/imaging/imaging-server
– HP-UX Itanium:
LD_PRELOAD=/usr/lib/hpux64/libpthread.so.1
LD_LIBRARY_PATH=DomainHome/oracle/imaging/imaging-server
■ Environment variables for library paths for Oracle UCM with Dynamic Converter and Oracle IBR
– Solaris Sparc:
LD_LIBRARY_PATH=/usr/local/packages/gcc-3.4.2/lib
If you are using a later version of GCC, specify that version instead of 3.4.2.
Add the following line to the Oracle IBR intradoc.cfg file at
DomainHome/ucm/ibr/bin:
ContentAccessExtraLibDir=/usr/local/packages/gcc-3.4.2/lib
Then restart Oracle IBR, as described in Section 1.15, "Restarting a Managed Server."
– HP-UX Itanium:
export LD_LIBRARY_
PATH=/opt/hp-gcc/3.3.6/lib/:/opt/hp-gcc/3.3.6/lib/hpux64:$LD_LIBRARY_PATH
The Dynamic Converter on HP-UX Itanium needs the 3.3.6 version of the GCC libraries installed before the Oracle UCM server is started.
■ DISPLAY environment variable
On a UNIX operating system running XWindows, when redirecting the display to a system with suitable graphic capabilities, export DISPLAY to a valid X Server before starting the Oracle I/PM or Oracle IBR Managed Server or the Oracle UCM Dynamic Converter.
1.6.4.3 Downloading Visual C++ Libraries for a Windows Operating System
OutsideIn Technology requires the Visual C++ libraries included in the Visual C++ Redistributable Package for a Windows operating system. Three versions of this package (x86, x64, and IA64) are available from the Microsoft Download Center at