Like other map services, Google Maps provided driving directions, maps of cities and towns, and local business searches. The big change came in June 2005, when Google officially introduced the Google Maps API, which forms the basis for this book.
The Birth of the Google Maps Mania Blog
You can see why the Google Maps API holds the key to the next great apps on the web. Many important web technologies and patterns have emerged in parallel with the Google Maps API.
KML: Your First Map
To view this on Google Maps, paste that URL into the Google Maps search field. But once you get to Chapter 3, you'll start seeing things you can only do when you harness the full power of the Google Maps API.
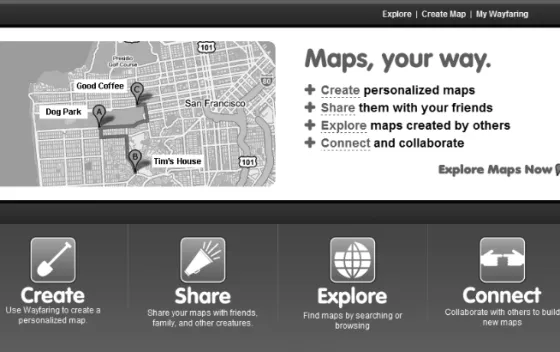
Wayfaring: Your Second Map
In fact, most of the examples you'll work through in Chapter 2 just replicate the functionality that Google provides here out of the box. Before we go any further, however, we'll take a look at another way to get a card online quickly.
Adding the First Point
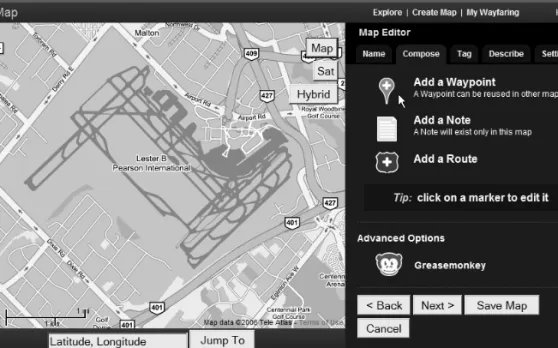
As an example, we'll walk you through a quick map of an imaginary trip to the Googleplex, in Mountain View, California. We'll call ours "Lester B Pearson International Airport." However, as we type, we find that Wayfaring suggests this exact name.
Adding the Flight Route
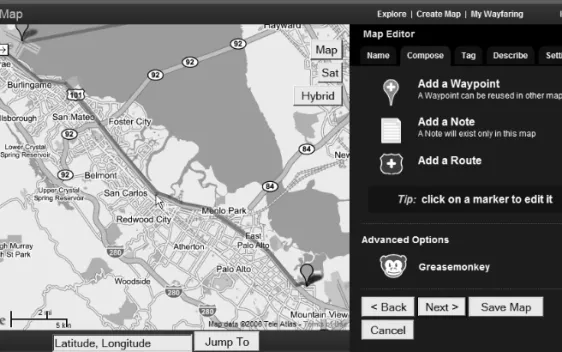
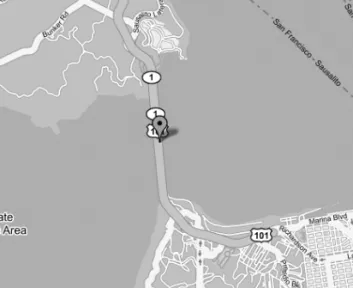
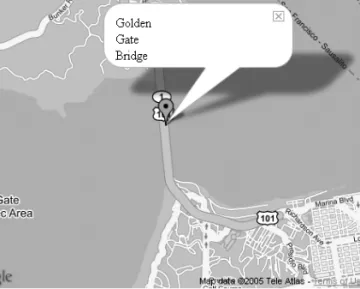
As you can see in Figure 1-4, another white dot appears on the airport and a blue line connects the two points. You can see how far your flight was on the right side of the screen, below the route label.
Adding the Destination Point
If you made a mistake and accidentally clicked a few extra times during the process of arriving in San Francisco, you can use the Undo Last option.
Adding a Driving Route
Of course, since this is a programming book, you're probably eager to dig into the code and make something truly unique. In the context of this book, mashup refers to mixing data from one source with maps from Google.
What’s Next?
You create a map, add some custom pins, and geocode a series of data using freely available services. In this chapter, you'll learn how to create your first Google map project, plot some markers, and add a little interactivity.
The First Map
Because JavaScript plays such a central role in managing the cards, you'll also start to pick up a few essentials about that language along the way.
Keying Up
We'll start by dissecting and working with this startup code so you can get a basic understanding of what's going on. If you start using Google's example, your key is already embedded in the JavaScript.
Examining the Sample Map
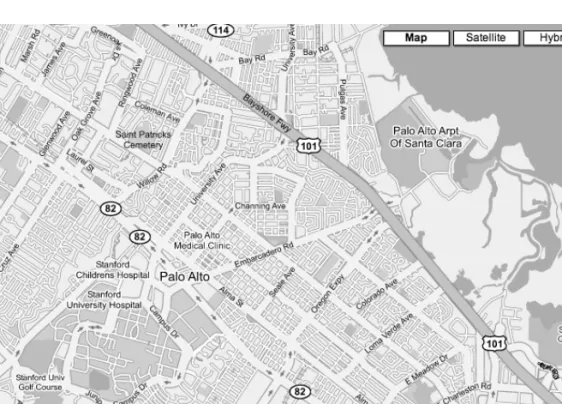
The GMap2 object is asked to join the map div and then assigned to a variable called map. For example, the very next line calls the setCenter() method to center and zoom the map on Palo Alto, California.
Specifying a New Location
The value contains the latitude and longitude of the center of the map in question. You can now extract the latitude and longitude values from the URL and use them to re-center your own map at the new location.
Separating Code from Content
JavaScript initialization has been moved out of the XHTML body and into map_functions.jsfile. Instead of embedding JavaScript in the body of XHTML, you can attach a function to window.onloadevent.
Cleaning Up
When you add parentheses after the function name, it means "execute it". Without the parentheses, it means "give me a reference to it". Otherwise, all you've assigned to the handler is the function's return value, possibly null.
Basic Interaction
Using Map Control Widgets
Creating Markers
Be careful to setCenter() your GMap2 object before adding any overlay to it, even if it's just at a hard-coded dummy location that you intend to change back immediately. We assigned the new GLatLngobject to a variable and were then able to use it twice: first to center the map and then a second time to create the marker.
WHITHER THOU, GICON?
Note Attempting to add overlays to a map before setting the center will cause the API to return unpredictable results.
Opening Info Windows
Finally, you'll wrap all the code to generate the pin, event, and info window into a single function called addMarker() in Listing 2-6. Now you're all set to draw a bunch of markers on your map.
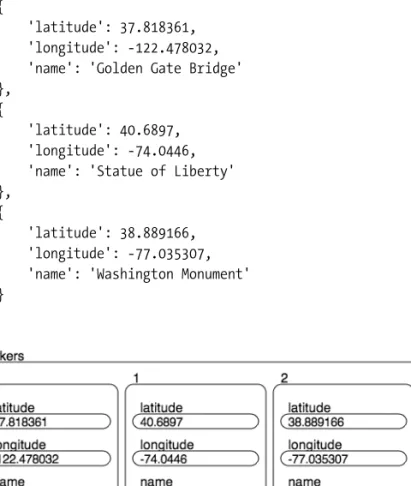
A List of Points
It's a pretty clean function that does everything you need to draw a pen with a clickable info bubble.
Using Arrays and Objects
As you'll see in the next section, JavaScript provides some great methods for working with data in this type of format. We will still use a lot of JSON-like structures to communicate data from the server to the browser.
Iterating
Summary
Now that you've created your first map (in Chapter 2) and had a chance to run some initial experiments with the Google Maps API, it's time to make your map a bit more useful and dynamic. In this chapter, we'll look at a few examples of how you can provide interactivity in your map using the Google Maps API, and you'll see how you can use the API to store and retrieve information from your server.
Going on a Treasure Hunt
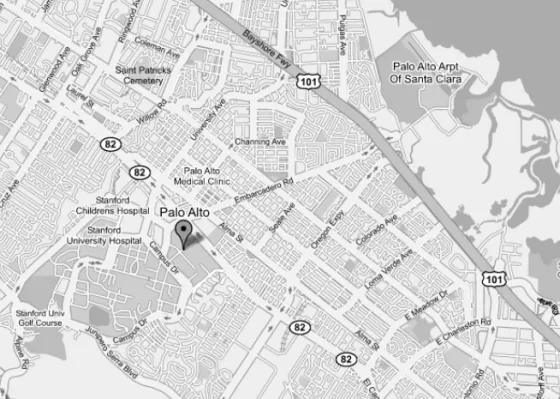
After uploading, recreate the map by inserting new markers from the server-side list, each of which has an info window to display its information. In this chapter, we will not discuss the design of the map and its content in CSS.
Creating the Map and Marking Points
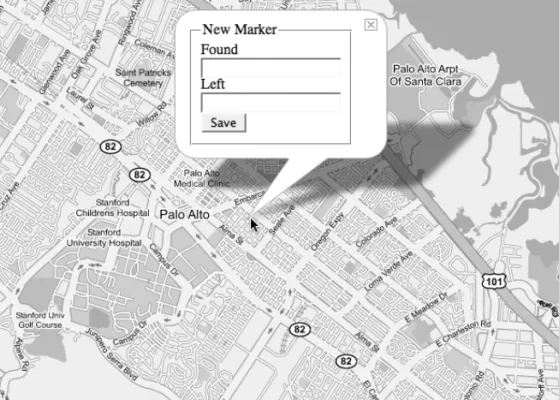
Create a map and add a JavaScript event trigger using the GEvent.addListener() method to respond to user clicks so that people visiting the map can mark their finds on the map . Retrieve the existing tags and their additional information from the server using Ajax and PHP.
Starting the Map
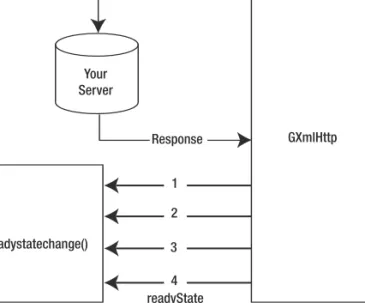
Ask users for additional information about their findings using an info window and an embedded HTML form. Store latitude, longitude and additional information in the form on your server using the GXmlHttpAsynchronous JavaScript and XML (Ajax) object on the client side and PHP on the server.
Listening to User Events
However, all bookmarks will disappear as soon as the user leaves the page and will never be seen again. To persist tags, you need to gather some information and send it back to the storage server with GXmlHttpobject or GDownloadUrlobject, which we'll discuss in the section “Using the Google Ajax Object” later in this chapter.

RETRIEVING THE LATITUDE AND LONGITUDE FROM A MAP CLICK
Asking for More Information with an Info Window
Note When we introduce the XmlHttp object in the "Using Google's Ajax object" section later in this chapter, we explain how to store the contents of the info window on your server.
Creating an Info Window on the Map
The last parameter, GInfoWindowOptions, is optional unless you want to change the default window settings. Now, when you click on the map, you'll see an info popup, the base of which points to the position you just clicked, with the content "You clicked here!" (Figure 3-5).
Embedding a Form into the Info Window
If you click again elsewhere on the map, you'll also notice that your info window disappears and reappears at the location of the new click. Previously, when you created the info window containing the "Clicked Here!" the same thing happened.
Avoiding an Ambiguous State
Each marker had the same content ("You clicked here!"), so it looked like the information window was simply moving. Here we decided to use the openInfoWindow() method so that you can see how the DOM structure and clicks work in the info window.
INFO WINDOWS THAT ZOOM
Controlling the Info Window Size
HOW TO CHANGE THE STYLE OF THE INFO WINDOW
Using Google’s Ajax Object
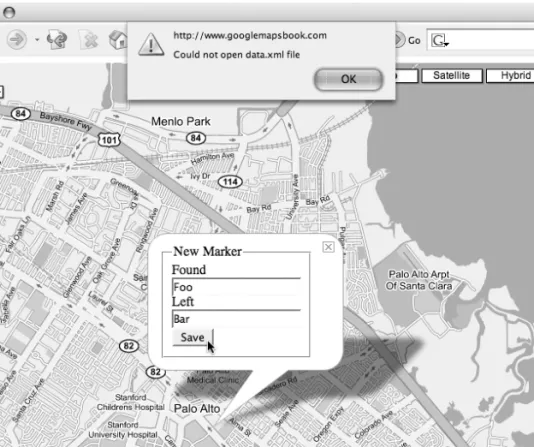
To achieve this, let's send the information back to the server and store it in a flat XML file. Then, upon the response that everything is fine, we create a new marker on the map with the new information to confirm to the user that the data was successfully saved.
Saving Data with GXmlHttp
Tip To further enhance your web application, you can use the different states of the request object to add loading, completed, and error states. Note, however, that this approach doesn't give you as much control over the different states of the request.
Parsing the XML Document Using DOM Methods
When the web browser receives the XML from your request object, it will be in the responseXML property. In the event of an error in Listing 3-5, all you need to do is call a JavaScript alert() with the contents of the
Retrieving Markers from the Server
For example, to retrieve the markers when the page loads, call the retrieveMarkers() function from the init() function after you create the map. When the retrieveMarkers() function executes, the server-side PHP script, retrieveMarkers.php(Listing 3-7), will return an XML file containing the latitude and longitude of each marker you previously saved.
Adding Some Flair
The XML also contains the additional information you requested for each marker, so you can include it in the info window. Additionally, when you create the new GIconobject in the storeMarker() and retrieveMarkers() functions, retrieve the icon from the XML and pass the icon image to the createMarker call.
Creating an XML File with the Address Data
With permission, we have taken the addresses of all the Ron Jon properties from the website and converted them into the sample XML data file for this chapter. Listing 4-1 shows the ronjons.xml file that you will use as you follow the examples in this chapter.
Using Geocoding Web Services
Note There are also sources of raw information that you can use to build your own geocoding solutions. So if you can't find a service that fits your needs and you have somewhere to get some raw street data, see Chapter 11 for the basics of creating your own geocoding service.
Requirements for Consuming Geocoding Services
CURL
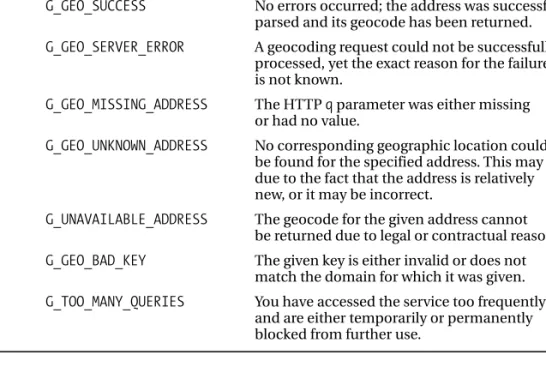
The Google Maps API Geocoder
THE ORIGIN OF REST
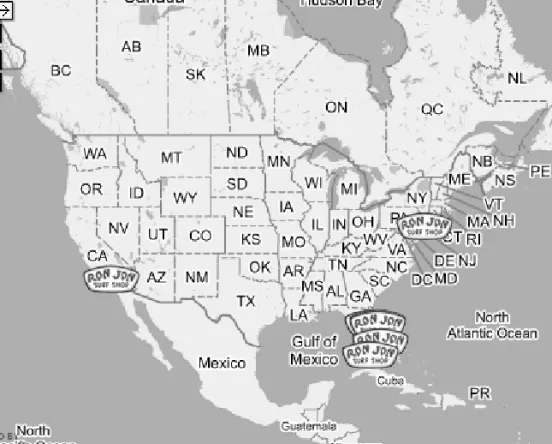
34;The Original" Ron Jon Surf Shop: "The Original" shop listed Long Beach Island as the city. This means you can calculate all the addresses for your shops on the server side and then cache the client side with the data.
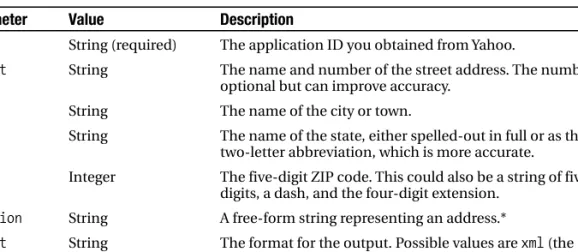
The Yahoo Geocoding API
As with Google and Yahoo services, there are limitations to the Geocoder.us service. The first is that the Geocoder.ca service prefers that you separate the street number from the street name.
Services for Geocoding Addresses Outside Google’s Coverage
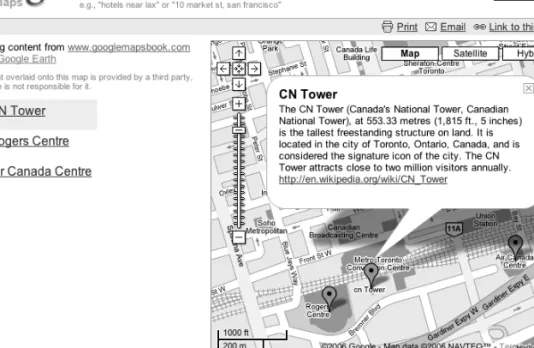
When you compare this answer to what Google gives you by clicking on the map, as in Chapter 3, you can see that Geocoder.ca has done an excellent job of finding the correct coordinates for the CN Tower based on its street address. Data quality varies (by provider, price, and country), so we suggest you do your research before hiring one to geocode your points.
Caching Lookups
Your modified script now creates a new file on the file system, as shown in Listing 4-14. You could just as easily have written the file on top of the existing ronjons.xml file, but if the conversion failed, you could lose all your existing data.
Building a Store Location Map
In the next part, we will move on to working with third-party data sets that have hundreds of thousands of points. We will use a single example (the FCC Antenna Structures dataset) in this and the next two chapters to demonstrate data manipulation.
Using Downloadable Text Files
In this chapter, we'll cover two of the most popular ways to get third-party data to use on your map: downloadable character-separated text files and screen scraping. The scripts in this chapter should give you a great toolbox for harvesting almost any data source, and the ideas in the next two chapters will help you create a great map no matter how much data there is.
Downloading the Database
Note The Entity Name column of the EN.dat file often contains an equals sign. As you can see, we are not concerned with most of the data available in this database.
Parsing CSV Data
Note In Listing 5-1, we limited our script to output only the first 50 lines to prevent abuse and save you time.
Optimizing the Import
After creating the tables, run Listing 5-3 from a browser or command line to import the data.
Using Your New Database Schema
IN just takes a list of things (in this case, integers) and selects all the rows where one of the values in the list is in the unique_si column. In Chapter 6 you'll be working on the user interface for the map, so now you're just going to plot all the points.
KEEPING YOUR DATABASE CURRENT
You'll be making a lot of use of PHP's exec() function, which simply runs an external program. You must enter the following two lines in the file that opens when you type crontab -e.
Screen Scraping
The three star symbols are wildcards that tell cron to run every day of the month (1 to 31), every month of the year (1 to 12), every day of the week (0 to 6, where Sunday is 0). . The second half of the line simply tells cron what you want it to do on your behalf.
COPYRIGHT AND LEGAL ISSUES
A Scraping Example
We're lucky that the data we care about is entirely surrounded by HTML and that PHP has a handy function to strip it: strip_tags(). We make no guarantees as to the accuracy of the information (in fact, there is one intentional error) or its suitability for any purpose.
Screen Scraping Considerations
We'll show you how to do some neat stuff with CSS and DOM manipulation. In this chapter, use the FCC ASR data you collected in Chapter 5 and create a mashup that really shines.
CSS: A Touch of Style
This chapter picks up where the middle of Chapter 5 left off, but if you start here it's easy to catch up. Listing 6-2 shows the style.cssfile you need to create and save in the same directory as everything else.
Maximizing Your Map
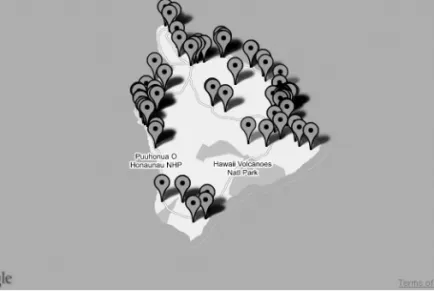
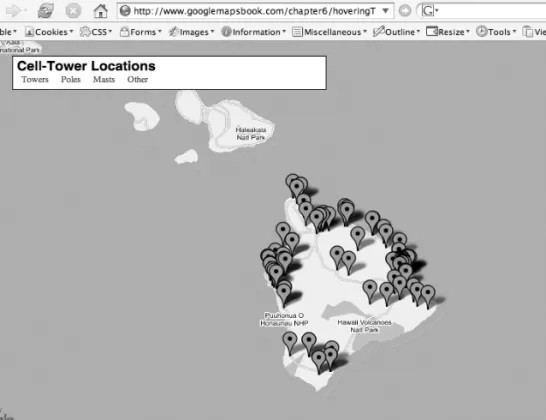
As you can see in Figure 6-1, the map is now fully scalable and fills any browser screen size. Tip When you zoom in on the map, you may notice how Internet Explorer 6 likes to display a disabled vertical scrollbar on our fully customized page.
Adding Hovering Toolbars
For the map, this means that you can make content of various types hover over the map that the API generates. And now, some CSS magic to take that note and drag the toolbar up on top of the map.
WHAT ABOUT A FULL-WIDTH TOOLBAR?
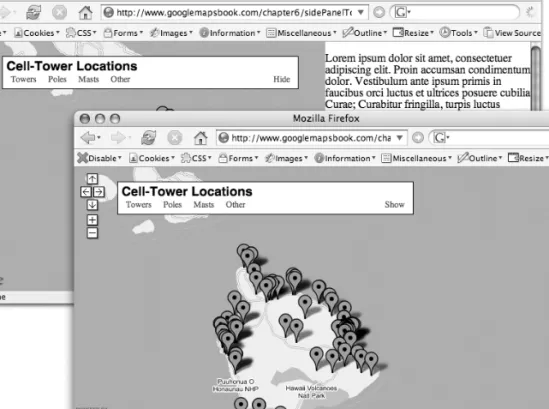
Creating Collapsible Side Panels
If you fill the sidebar with more content, you can see how the overflow statement makes it scroll. In Figure 6-3, we used the Firefox DOM Inspector to change the body element's class attribute, and suddenly the side panel disappeared.
Scripted Style
It may seem insignificant now that it's only the two styles that change, but imagine a future where you make more significant UI changes depending on the presence or absence of the sidebar.
Switching Up the Body Classes
The show/hide buttons behave as one, toggling the visibility of each other and the sidebar. Without JavaScript enabled in their browser, users won't care if they can hide the sidebar or not.
Resizing with the Power of JavaScript
Finding the correct height for the map and side panel is simply a matter of subtracting from the total height of the client window and then also removing the 30px of padding that appears in the three 10px gaps between the top, toolbar, content area, and bottom. You can see the full CSS changes that accompany Listing 6-11 on this book's website, but it's not a dramatic departure from the styles in Listing 6-7.
Populating the Side Panel
Let's arbitrarily select a handful of fields from fcc_towersview and add them to the output, as shown in Listing 6-13. There are several different schools of thought as to how to actually add these items to the sidebar list.
Getting Side Panel Feedback
So even though the initializePoint() function has long finished by the time focusPoint runs, each instance of focusPoint has access to the particular listItemobject that existed at that time. Even if there is only one of them at any given time, whichever exists maintains access to the listItemobject that the focusPoint function that spawned it carried.
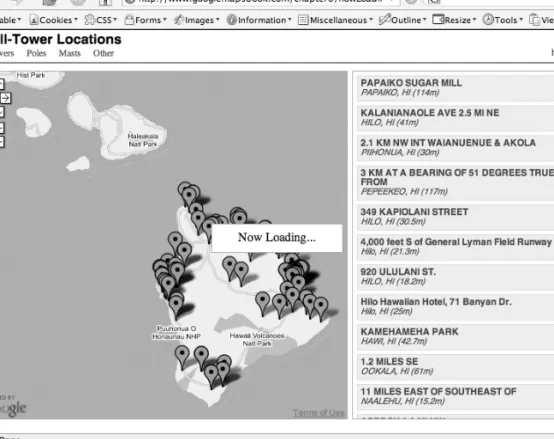
Warning, Now Loading
You'll need some similar CSS extensions to pull this message in front of the map and centered on it, as shown in Listing 6-17. For example, if the user interacts with the map in such a way that it needs to download another large block of data, it becomes trivial to show that message again and let the user know that you are working on it.
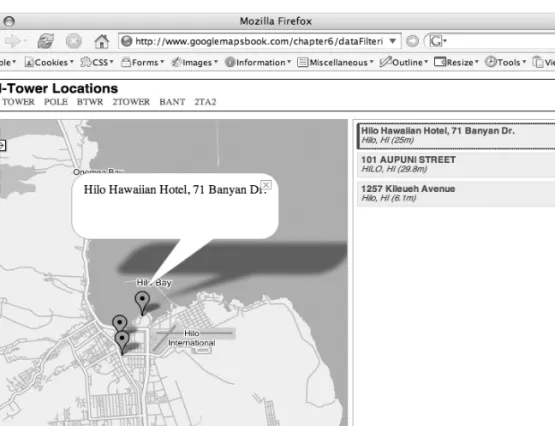
Data Point Filtering
Showing and Hiding Points
Discovering Groupings
For each element of the marker array, initializePoint() is called, and then the point's type value is assigned as the key to the allTypes object. From there, you can simply loop through that object and create a button and handler for each of the detected types.
Creating Filter Buttons
In previous chapters, you experimented with the US FCC's Antenna Structure Registration (ASR) database. As you may have noticed, FCC tower information is a fairly large dataset, containing more than 115,000 points across the United States.
Understanding the Limitations
In addition to the API overlays, the map can also contain custom overlays that you have created. One of the methods you'll explore in this chapter even uses a custom overlay to display detailed information using a transparent GIF.
Streamlining Server-Client Communications
Loading markers and moving them around with JavaScript is an expensive operation, so for better performance and reliability, try to keep the number to around 50 to 75 GMarkerobjects on the map at a time - even fewer if you combine them with GPolylineobjects. As you've probably figured out by now, Ajax doesn't really need to speak XML.
Optimizing Server-Side Processing
Server-Side Boundary Method
Tip The limit method is usually used in combination with one of the other solutions. The map is displayed using the Mercator projection, where the Earth's meridian is on the left and right edges.
Server-Side Common Point Method
Some maps we've seen use "closer to center" of the map to filter points. The latitude and longitude of the clicked point are sent to the server as the known point.
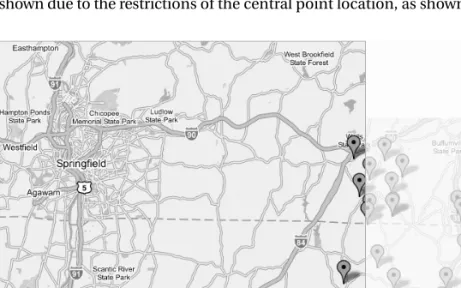
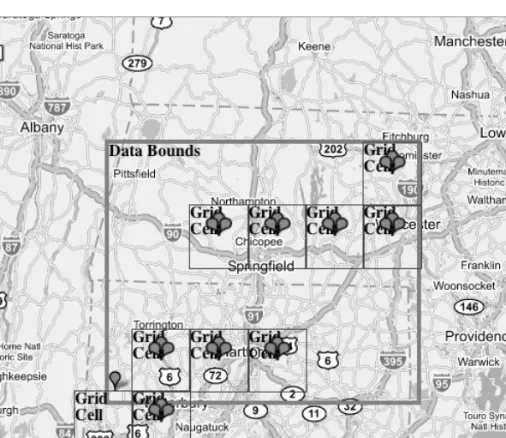
Server-Side Clustering
By increasing the size of the cell, you can achieve the best resolution of data for the number of points available. Listing 7-6 and 7-7 (http://googlemapsbook.com/chapter7/ServerCluster/) are modified versions of the server-side boundary method.
Custom Detail Overlay Method
Here, we present the possibility of including a detailed overlay for a specific area of the map. Detail.prototype.loadBackground = function() { //retrieve bounds of detail area var southWest = this.bounds_.getSouthWest();.