Creating the RTS Game World
Real-time strategy (RTS) games combine fast-paced tactical combat, resource management, and economy building within a defined game world.
A typical RTS game consists of a map of a world with different units, buildings, and terrain, as well as an interface to control and manipulate these elements. The player uses the interface to handle tasks such as gathering resources, constructing buildings, and creating an army, and then manages the army to achieve a set of goals defined for each level.
Although these games have an extensive history, the RTS genre was largely popularized by the games released by Westwood Studios and Blizzard Entertainment in the 1990s. Westwood’s Dune II and Command & Conquer series are considered classics that helped define the genre. With its engaging story line and addictive multiplayer, Blizzard’s Starcraft went on to elevate RTS gaming to an e-sport with professional competitive tournaments held around the world.
HTML5 now makes it possible to bring this genre to the browser in a way that wasn’t possible earlier. In fact, one of my better known game programming–related achievements in the last year was single-handedly re-creating the original Command & Conquer entirely in HTML5. While generating a lot of buzz on the Web, this project proved beyond a doubt that HTML5 is ready for the next generation of games.
Over the next few chapters, we will use what we learned in previous chapters and build upon it to create our own RTS game. We will define a game world with buildings, units, and an overarching story line to create an engaging single-player campaign. We will then use HTML5 websockets to add real-time multiplayer support to our game.
Most of the artwork for this game has been provided by Daniel Cook (www.lostgarden.com), who originally designed this art for an unreleased RTS title called Hard Vacuum. We will be reusing the artwork that he has graciously shared but will create our own game concept. Our game, Last Colony, will be about a small band of survivors on a planet that has just been attacked. We will explore the story and gameplay in more detail over the next few chapters.
While developing this game, we will keep the code as generic and customizable as possible so that you can later reuse this code to build your own ideas.
So, let’s get started.
Basic HTML Layout
Like the previous game, our RTS game will consist of several layers. The following are the first few layers that we will define:
• Splash screen and main menu: Shown when the game loads and allows the player to select campaign or multiplayer mode
• Loading screen: Shown whenever the game is loading assets
• Mission screen: Shown before a mission starts, with instructions for the mission
• Game interface screen: The main game screen that includes the map area and a dashboard for controlling the game
CHAPTER 5 ■ CREATing THE RTS gAmE WoRld
We will define more screens as needed in later chapters. We will be organizing all of the artwork inside an images folder. Unlike the previous game, we will break the JavaScript code into several files (such as buildings.js, vehicles.
js, levels.js, and common.js) inside the js folder so as to make the code easier to maintain.
Creating the Splash Screen and Main Menu
We will start by creating an HTML file and adding the markup for our containers, as shown in Listing 5-1.
Listing 5-1. Basic Skeleton (index.html) with Layers Added
<!DOCTYPE html>
<html>
<head>
<meta http-equiv="Content-type" content="text/html; charset=utf-8">
<title>Last Colony</title>
<script src="js/common.js" type="text/javascript" charset="utf-8"></script>
<script src="js/jquery.min.js" type="text/javascript" charset="utf-8"></script>
<script src="js/game.js" type="text/javascript" charset="utf-8"></script>
<script src="js/mouse.js" type="text/javascript" charset="utf-8"></script>
<script src="js/singleplayer.js" type="text/javascript" charset="utf-8"></script>
<script src="js/maps.js" type="text/javascript" charset="utf-8"></script>
<link rel="stylesheet" href="styles.css" type="text/css" media="screen" charset="utf-8">
</head>
<body>
<div id="gamecontainer">
<div id="gamestartscreen" class="gamelayer">
<span id="singleplayer" onclick = "singleplayer.start();">Campaign</span><br>
<span id="multiplayer" onclick = "multiplayer.start();">Multiplayer</span><br>
</div>
<div id="loadingscreen" class="gamelayer">
<div id="loadingmessage"></div>
</div>
</div>
</body>
</html>
The code first refers to the external JavaScript and CSS files we will be using. We will be creating and implementing all these JavaScript files (other than the jQuery code) over the course of this game. We also define a gamecontainer div that contains our first two game layers: gamestartscreen and loadingscreen.
The next thing we will do is define the initial style for the game container inside styles.css, as shown in Listing 5-2.
Listing 5-2. Initial Style Sheet (styles.css) for Game Container and Layer
#gamecontainer { width:640px;
height:480px;
background: url(images/splashscreen.png);
border: 1px solid black;
}
.gamelayer { width:640px;
height:480px;
position:absolute;
display:none;
}
In this code, we set the width and height for the game container and layers and assign a background splash screen, just like we did in our previous game.
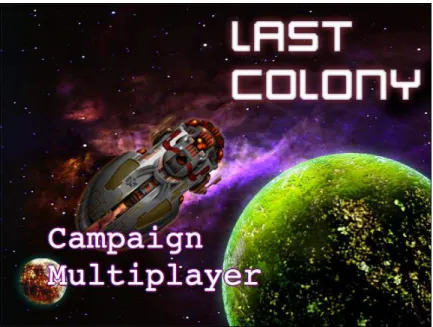
When we load index.html in the browser, we should now see our new splash screen, as shown in Figure 5-1.
Figure 5-1. The initial game splash screen
Now that the splash screen is in place, we can implement the main menu screen and the game loading screen.
We will start by setting up requestAnimationFrame and the asset loader using the same code as we did in our previous game. We will place this code inside a separate file called common.js, as shown in Listing 5-3.
Listing 5-3. Setting Up requestAnimationFrame and Image Loader (common.js)
// Setup requestAnimationFrame and cancelAnimationFrame for use in the game code (function() {
var lastTime = 0;
var vendors = ['ms', ';', 'webkit', 'o'];
for(var x = 0; x < vendors.length && !window.requestAnimationFrame; ++x) { window.requestAnimationFrame = window[vendors[x]+'RequestAnimationFrame'];
window.cancelAnimationFrame =
window[vendors[x]+'CancelAnimationFrame'] || window[vendors[x]+'CancelRequestAnimationFrame'];
}
CHAPTER 5 ■ CREATing THE RTS gAmE WoRld if (!window.requestAnimationFrame)
window.requestAnimationFrame = function(callback, element) { var currTime = new Date().getTime();
var timeToCall = Math.max(0, 16 - (currTime - lastTime));
var id = window.setTimeout(function() { callback(currTime + timeToCall); }, timeToCall);
lastTime = currTime + timeToCall;
return id;
};
if (!window.cancelAnimationFrame)
window.cancelAnimationFrame = function(id) { clearTimeout(id);
};
}());
var loader = { loaded:true,
loadedCount:0, // Assets that have been loaded so far
totalCount:0, // Total number of assets that need to be loaded
init:function(){
// check for sound support var mp3Support,oggSupport;
var audio = document.createElement('audio');
if (audio.canPlayType) {
// Currently canPlayType() returns: "", "maybe" or "probably"
mp3Support = "" != audio.canPlayType('audio/mpeg');
oggSupport = "" != audio.canPlayType('audio/ogg; codecs="vorbis"');
} else {
//The audio tag is not supported mp3Support = false;
oggSupport = false;
}
// Check for ogg, then mp3, and finally set soundFileExtn to undefined loader.soundFileExtn = oggSupport?".ogg":mp3Support?".mp3":undefined;
},
loadImage:function(url){
this.totalCount++;
this.loaded = false;
$('#loadingscreen').show();
var image = new Image();
image.src = url;
image.onload = loader.itemLoaded;
return image;
},
soundFileExtn:".ogg", loadSound:function(url){
this.totalCount++;
this.loaded = false;
$('#loadingscreen').show();
var audio = new Audio();
audio.src = url+loader.soundFileExtn;
audio.addEventListener("canplaythrough", loader.itemLoaded, false);
return audio;
},
itemLoaded:function(){
loader.loadedCount++;
$('#loadingmessage').html('Loaded '+loader.loadedCount+' of '+loader.totalCount);
if (loader.loadedCount === loader.totalCount){
loader.loaded = true;
$('#loadingscreen').hide();
if(loader.onload){
loader.onload();
loader.onload = undefined;
} } } }
Next, we will define our game object inside game.js, as shown in Listing 5-4.
Listing 5-4. Defining the Game Object init() Method (game.js)
$(window).load(function() { game.init();
});
var game = {
// Start preloading assets init: function(){
loader.init();
$('.gamelayer').hide();
$('#gamestartscreen').show();
}, }
In this code, we create a game object with an init() method that first initializes our asset loader and then uses jQuery to display the game start screen. We also use the window load handler to call game.init() once the window has loaded completely.
Finally, we need to append the CSS for the game starting screen and loading screen in styles.css, as shown in Listing 5-5.
Listing 5-5. Style for the Game Starting Screen and Loading Screen (styles.css) /* Game Starting Menu Screen */
#gamestartscreen { padding-top:320px;
text-align:left;
padding-left:50px;
width:590px;
height:160px;
}
CHAPTER 5 ■ CREATing THE RTS gAmE WoRld #gamestartscreen span {
margin:20px;
font-family: 'Courier New', Courier, monospace;
font-size: 48px;
cursor:pointer;
color:white ;
text-shadow: -2px 0 purple, 0 2px purple, 2px 0 purple, 0 -2px purple;
}
#gamestartscreen span:hover { color:yellow;
}
/* Loading Screen */
#loadingscreen {
background:rgba(100,100,100,0.7);
z-index:10;
}
#loadingmessage { margin-top:400px;
text-align:center;
height:48px;
color:white;
background:url(images/loader.gif) no-repeat center;
font:12px Arial;
}
When we open the game in the browser, we should see the starting screen with the main menu, as shown in Figure 5-2.
107 The menu currently offers options for campaign, which is our story-based single-player mode, and multiplayer, which is our player-versus-player mode. You may have noticed in Listing 5-1 that the onclick handler for these two options call the singleplayer.start() and multiplayer.start() methods, respectively. Right now, clicking the Campaign option won’t do anything since we haven’t yet implemented the singleplayer object. Before we can do this, however, we need to create our first level.
Creating Our First Level
There are many viable approaches to defining maps or levels, for our game. One approach is to store all the
information about the map terrain as metadata and then draw the map by assembling all the necessary images for the terrain on the browser at runtime.
The other approach, which is slightly simpler, is to store the basic map as a large image with the terrain drawn out using our own level-designing tool. We then need to store only the location of the map image along with metadata such as game entities and mission objectives. This is the approach that we will be using for our game.
Map images can be designed very quickly by using general-purpose tile map–editing software such as Tiled (www.mapeditor.org). Tiled is an excellent free tool that is available for several operating systems including Windows, Mac, and Linux. Once you start the application, you can load the sprite sheet for the terrain as a tile set and then use it to draw the map as if you were using a painting application (see Figure 5-3).
Figure 5-2. The starting screen with the main menu
CHAPTER 5 ■ CREATing THE RTS gAmE WoRld
Once you draw the map, you can export it to several different file formats such as PNG images or JSON metadata. You won’t need to use this the tool to follow along with this book since all the maps we will need have already been generated.
However, if you are considering developing your own game, I strongly recommend exploring the tool’s features.
Note
■ The Tiled editor’s JSon format contains references to the sprite sheet and offsets for all the tiles it uses. This means you can use the JSon files to create maps that are assembled at runtime (instead of the preassembled ones we are creating).
Once we have our first map image designed, we will need to create the basic metadata describing the level. We will do this inside maps.js, as shown in Listing 5-6.
Listing 5-6. Defining the Basic Level Metadata (maps.js) var maps = {
"singleplayer":[
{
"name":"Introduction",
"briefing": "In this level you will learn how to pan across the map.\n\nDon't worry! We will be implementing more features soon.",
/* Map Details */
"mapImage":"images/maps/level-one-debug-grid.png", "startX":4,
"startY":4,
}, ] };
Figure 5-3. Drawing a map using Tiled
We define a maps object that contains a singleplayer array. This array currently contains details for only one map. This array will eventually contain all our single-player campaign maps in chronological order. When the single- player campaign is started, the singleplayer object will load the first map in this array and then proceed down the list as the player completes each level.
The details that we store for the level include the level name and a mission briefing that we will display before we start the level. We then store the map image and the starting map coordinates (startX, startY).
The map image is broken down into a grid of squares 20 pixels wide by 20 pixels high (based on the size of the tiles we are using). For now, we are using a “debug” version of the level that has this grid drawn on the map. This will make it easier for us to position elements inside the level while we are building the game.
The starting map coordinates let us decide where to position the screen on the map when we start the level using the grid coordinates.
Now that we have a simple map defined, we will set up the singleplayer object and display the mission briefing screen.
Loading the Mission Briefing Screen
The first thing we will do is add the HTML code for the mission screen into the body of our HTML file (index.html).
The body of the HTML will now look like Listing 5-7.
Listing 5-7. Adding the Mission Screen
<body>
<div id="gamecontainer">
<div id="gamestartscreen" class="gamelayer">
<span id="singleplayer" onclick = "singleplayer.start();">Campaign</span><br>
<span id="multiplayer" onclick = "multiplayer.start();">Multiplayer</span><br>
</div>
<div id="missionscreen" class="gamelayer">
<input type="button" id="entermission" onclick = "singleplayer.play();">
<input type="button" id="exitmission" onclick = "singleplayer.exit();">
<div id="missonbriefing"></div>
</div>
<div id="loadingscreen" class="gamelayer">
<div id="loadingmessage"></div>
</div>
</div>
</body>
The missionscreen div contains two buttons; they are for entering the mission and exiting the mission screen. It also contains a missionbriefing div that we will use to display the briefing message.
Now that we have the HTML markup in place, we need to add the CSS styles for the mission screen into styles.
css, as shown in Listing 5-8.
Listing 5-8. CSS Style for Mission Screen /* Mission Briefing Screen */
#missionscreen {
background: url(images/missionscreen.png) no-repeat;
}
CHAPTER 5 ■ CREATing THE RTS gAmE WoRld
#missionscreen #entermission { position:absolute;
top:79px;
left:6px;
width:246px;
height:68px;
border-width:0px;
background-image: url(images/buttons.png);
background-position: 0px 0px;
}
#missionscreen #entermission:disabled, #missionscreen #entermission:active { background-image: url(images/buttons.png);
background-position: -251px 0px;
}
#missionscreen #exitmission { position:absolute;
top:79px;
left:380px;
width:98px;
height:68px;
border-width:0px;
background-image: url(images/buttons.png);
background-position: 0px -76px;
}
#missionscreen #exitmission:disabled,#missionscreen #exitmission:active{
background-image: url(images/buttons.png);
background-position: -103px -76px;
}
#missionscreen #missonbriefing { position:absolute;
padding:10px;
top:160px;
left:20px;
width:410px;
height:300px;
color:rgb(130,150,162);
font-size: 13px;
font-family: 'Courier New', Courier, monospace;
}
We define a new background for the mission briefing screen that looks like a futuristic console. We then position the button and div elements to fit into the background. We keep different images for the enabled and disabled states of the buttons but store all of these sprites in a single image file (buttons.png).
Now that the mission briefing layer is in place, we will implement the singleplayer object with the start() and exit() methods inside singleplayer.js, as shown in Listing 5-9.
Listing 5-9. Implementing the Basic Singleplayer Object (singleplayer.js) var singleplayer = {
// Begin single player campaign start:function(){
// Hide the starting menu layer $('.gamelayer').hide();
// Begin with the first level singleplayer.currentLevel = 0;
game.type = "singleplayer";
game.team = "blue";
// Finally start the level singleplayer.startCurrentLevel();
},
exit:function(){
// Show the starting menu layer $('.gamelayer').hide();
$('#gamestartscreen').show();
},
currentLevel:0,
startCurrentLevel:function(){
// Load all the items for the level
var level = maps.singleplayer[singleplayer.currentLevel];
// Don't allow player to enter mission until all assets for the level are loaded $("#entermission").attr("disabled", true);
// Load all the assets for the level
game.currentMapImage = loader.loadImage(level.mapImage);
game.currentLevel = level;
// Enable the enter mission button once all assets are loaded if (loader.loaded){
$("#entermission").removeAttr("disabled");
} else {
loader.onload = function(){
$("#entermission").removeAttr("disabled");
} }
// Load the mission screen with the current briefing
$('#missonbriefing').html(level.briefing.replace(/\n/g,'<br><br>'));
$("#missionscreen").show();
}, };
CHAPTER 5 ■ CREATing THE RTS gAmE WoRld
We define a singleplayer object with three methods: start(), exit(), and startCurrentLevel().
The start() method first hides all game layers and sets singleplayer.currentLevel to 0, which refers to the first level in the maps.singleplayer array that we defined earlier. It then sets the game.type and game.team variables to singleplayer and blue, respectively. We will use these values later once the game starts running. Finally, it calls the singleplayer.startCurrentLevel() method that we will call every time we want to load a level.
The exit() method hides all the game layers and takes us back to the main menu.
The startCurrentLevel() method first creates a level object that contains the metadata for our level.
It then temporarily disables the Enter Mission button on the screen and starts loading the level assets. For now, the only asset we are loading is the map image. Once the assets are loaded, the Enter Mission button is enabled so that the player can click it and enter the game.
Finally, the method puts the level briefing inside the missionbriefing div and displays the missionscreen div.
Note
■ We replace carriage returns with <br> tags so that they show up in the HTml. This way, we can easily break out the mission briefing into multiple paragraphs if we want.
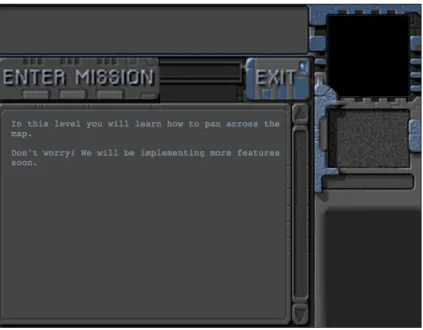
When we load the game in the browser and click the Campaign option, we should see the mission briefing screen for the first level, as shown in Figure 5-4.
Figure 5-4. The mission briefing screen for our first level
The advantage of displaying the briefing screen while loading the assets in the background is that players can spend their time reading the mission briefing while waiting for all the assets to load.
Clicking the Exit button should take us back to the main menu. We still can’t enter the mission until we implement the actual game interface and the game animation and drawing loops.
Implementing the Game Interface
The first thing we will do is add the HTML markup for the game interface screen into the body of our HTML file (index.html). The body will now look like Listing 5-10.
Listing 5-10. Adding the Game Interface Layer (index.html)
<body>
<div id="gamecontainer">
<div id="gamestartscreen" class="gamelayer">
<span id="singleplayer" onclick = "singleplayer.start();">Campaign</span><br>
<span id="multiplayer" onclick = "multiplayer.start();">Multiplayer</span><br>
</div>
<div id="missionscreen" class="gamelayer">
<input type="button" id="entermission" onclick = "singleplayer.play();">
<input type="button" id="exitmission" onclick = "singleplayer.exit();">
<div id="missonbriefing">Welcome to your first mission.
</div>
</div>
<div id="gameinterfacescreen" class="gamelayer">
<div id="gamemessages"></div>
<div id="callerpicture"></div>
<div id="cash"></div>
<div id="sidebarbuttons">
</div>
<canvas id="gamebackgroundcanvas" height="400" width="480"></canvas>
<canvas id="gameforegroundcanvas" height="400" width="480"></canvas>
</div>
<div id="loadingscreen" class="gamelayer">
<div id="loadingmessage"></div>
</div>
</div>
</body>
Our game interface layer consists of several different areas within it.
• Game area: This is where the player can see the map and interact with the buildings, units, and other entities within the game. This is implemented using two canvas elements:
gamebackgroundcanvas for the map and gameforegroundcanvas for the entities inside the level (such as buildings and units).
• Game messages: This is where the player can see system notifications or story-driven messages.
• Caller picture: This is where the player will see profile pictures of the person sending story- driven messages.
• Cash: This is where players will see their cash reserves.
• Sidebar buttons: This is where players will see buttons they can use for creating units and buildings within the game.
Now that the HTML is in place, we will add the CSS for the game interface screen to styles.css, as shown in Listing 5-11.
CHAPTER 5 ■ CREATing THE RTS gAmE WoRld
Listing 5-11. CSS for the Game Interface Screen /* Game Interface Screen */
#gameinterfacescreen {
background: url(images/maininterface.png) no-repeat;
}
#gameinterfacescreen #gamemessages{
position:absolute;
padding-left:10px;
top:5px;
left:5px;
width:450px;
height:60px;
color:rgb(130,150,162);
overflow:hidden;
font-size: 13px;
font-family: 'Courier New', Courier, monospace;
}
#gameinterfacescreen #gamemessages span { color:white;
}
#gameinterfacescreen #callerpicture { position:absolute;
left:498px;
top:154px;
width:126px;
height:88px;
overflow:none;
}
#gameinterfacescreen #cash { width:120px;
height:22px;
position:absolute;
left:498px;
top:256px;
color:rgb(130,150,162);
overflow:hidden;
font-size: 13px;
font-family: 'Courier New', Courier, monospace;
text-align:right;
}
#gameinterfacescreen canvas{
position:absolute;
top:79px;
left:0px;
}
#gameinterfacescreen #foregroundcanvas{
z-index:1;
}
#gameinterfacescreen #backgroundcanvas{
z-index:0;
}
We start by defining a separate background for the gameinterfacescreen div and then positioning the various other divs at the appropriate location above the interface area. Both game canvas elements are positioned at the same location with foregroundcanvas on top of backgroundcanvas by setting a higher z-index value for the foregroundcanvas. Elements with a higher z-index value are displayed above elements with a lower z-index value.
Next we will modify the game object inside game.js to initialize the canvas elements and define animation and drawing loops. The modified game object will now look like Listing 5-12.
Listing 5-12. Adding Animation and Drawing Loops to the Game Object (game.js) var game = {
// Start preloading assets init: function(){
loader.init();
$('.gamelayer').hide();
$('#gamestartscreen').show();
game.backgroundCanvas = document.getElementById('gamebackgroundcanvas');
game.backgroundContext = game.backgroundCanvas.getContext('2d');
game.foregroundCanvas = document.getElementById('gameforegroundcanvas');
game.foregroundContext = game.foregroundCanvas.getContext('2d');
game.canvasWidth = game.backgroundCanvas.width;
game.canvasHeight = game.backgroundCanvas.height;
},
start:function(){
$('.gamelayer').hide();
$('#gameinterfacescreen').show();
game.running = true;
game.refreshBackground= true;
game.drawingLoop();
},
// The map is broken into square tiles of this size (20 pixels x 20 pixels) gridSize:20,
// Store whether or not the background moved and needs to be redrawn backgroundChanged:true,
// A control loop that runs at a fixed period of time
animationTimeout:100, // 100 milliseconds or 10 times a second offsetX:0, // X & Y panning offsets for the map
CHAPTER 5 ■ CREATing THE RTS gAmE WoRld offsetY:0,
animationLoop:function(){
// Animate each of the elements within the game },
drawingLoop:function(){
// Handle Panning the Map
// Since drawing the background map is a fairly large operation, // we only redraw the background if it changes (due to panning) if (game.refreshBackground){
game.backgroundContext.drawImage(game.currentMapImage,game.offsetX,game.offsetY, game.canvasWidth,game.canvasHeight, 0,0,game.canvasWidth,game.canvasHeight);
game.refreshBackground = false;
}
// Call the drawing loop for the next frame using request animation frame if (game.running){
requestAnimationFrame(game.drawingLoop);
} }, }
We modified the init() method to save the canvas elements, their 2D context objects, and their width and height into variables.
We define a start() method that hides other layers and displays the game interface screen. It then sets the game.
running and game.backgroundChanged variables to true for later use. Finally, we call the drawingLoop() method for the first time.
We also define two different methods called animationLoop() and drawingLoop().
The animationLoop() method handles all control- and animation-related logic and needs to be run at a fixed interval (defined in animationTimeout). An animation timeout of 100 milliseconds is usually sufficient for a fairly smooth game. For now the animationLoop() method is empty with placeholders for handling map panning and animating the game elements.
The reason we break out the code into two different timer loops is because the animation code will contain logic such as pathfinding, processing commands, and changing the animation states of sprites, which will not need to be executed as often as the drawing code.
The animation code will also control the actual movement of units. By keeping this code independent of the drawing code, we ensure that units will move the same amount after each animation cycle. This will become very important when we handle multiplayer and need the game state to be synchronized across different machines. If we aren’t careful, slight calculation differences between browsers and machines can cause unexpected results such as a bullet hitting an enemy unit in one browser but missing the enemy in the other browser.
In case the code takes longer than 100 milliseconds to run, the next interval loop will not be executed until the current loop has completed. This may result in the game skipping and stuttering slightly on slower machines. Some games use a time-delta-based code to work around this by extrapolating unit movement. However, since we are going to be developing our game to handle multiplayer, extrapolation can get a little tricky. For now, we will assume that the player has a machine capable of running the game smoothly.
The drawingLoop() method handles the actual drawing of all the game elements onto the two game canvas objects. The method is called using requestAnimationFrame() and can run as often as the browser allows.
The first thing that the drawingLoop() method does is check whether the background has changed and needs to be redrawn. If so, it draws the map image (stored in currentMapImage when the map was loaded) using the panning offsets (offsetX, offsetY) and the canvas dimensions. It then resets the backgroundChanged flag. We use this optimization so that we don’t need to redraw the entire background after each refresh. Finally, the drawingLoop() method calls itself using requestAnimationFrame() as long as the game is still running.
Now that the game animation state is in place, we will need to implement the singleplayer.play() method inside singleplayer.js, as shown in Listing 5-13.
Listing 5-13. The singleplayer.play() Method (singleplayer.js) play:function(){
game.animationLoop();
game.animationInterval = setInterval(game.animationLoop,game.animationTimeout);
game.start();
},
This method is fairly simple. It calls the game.animationLoop() method for first time and then uses the
setInterval() method to call the method every 100 milliseconds (set in game.animationTimeout). Finally, it calls the game.start() method. The gameAnimationLoop() method is currently empty, but we will start using it when we add entities to our game in the next chapter.
If we run the game code we have so far, we should be able to click the Enter Mission button at the mission briefing screen and then see the game interface screen with the map loaded, as shown in Figure 5-5.
Figure 5-5. The game interface screen with the first map loaded
One thing you might notice is that the game starts off at the top-left corner of the map. To use the initial map offset settings that we provided in map.js, we will need to load the offset values when we start the level. We will do this by modifying the startCurrentLevel() method in singleplayer.js, as shown in Listing 5-14.
Listing 5-14. Setting the Map Offset Inside startCurrentLevel() (singleplayer.js) startCurrentLevel:function(){
// Load all the items for the level
var level = maps.singleplayer[singleplayer.currentLevel];
CHAPTER 5 ■ CREATing THE RTS gAmE WoRld
// Don't allow player to enter mission until all assets for the level are loaded $("#entermission").attr("disabled", true);
// Load all the assets for the level
game.currentMapImage = loader.loadImage(level.mapImage);
game.currentLevel = level;
game.offsetX = level.startX * game.gridSize;
game.offsetY = level.startY * game.gridSize;
// Enable the enter mission button once all assets are loaded if (loader.loaded){
$("#entermission").removeAttr("disabled");
} else {
loader.onload = function(){
$("#entermission").removeAttr("disabled");
} }
// Load the mission screen with the current briefing
$('#missonbriefing').html(level.briefing.replace('\n','<br><br>'));
$("#missionscreen").show();
},
We added just two new lines to set game.offsetX and game.offsetY based on level.startX and level.startY.
This time when we load the map, it loads at the offset we defined in the map. Now that we have finished loaded the map, we will implement panning around the map using the mouse.
Implementing Map Panning
The first thing we will do is set up mouse input by creating a mouse object inside mouse.js (see Listing 5-15).
Listing 5-15. Setting Up the Mouse Object var mouse = {
// x,y coordinates of mouse relative to top left corner of canvas x:0,
y:0,
// x,y coordinates of mouse relative to top left corner of game map gameX:0,
gameY:0,
// game grid x,y coordinates of mouse gridX:0,
gridY:0,
// whether or not the left mouse button is currently pressed buttonPressed:false,
// whether or not the player is dragging and selecting with the left mouse button pressed dragSelect:false,
// whether or not the mouse is inside the canvas region insideCanvas:false,
click:function(ev,rightClick){
// Player clicked inside the canvas },
draw:function(){
if(this.dragSelect){
var x = Math.min(this.gameX,this.dragX);
var y = Math.min(this.gameY,this.dragY);
var width = Math.abs(this.gameX-this.dragX) var height = Math.abs(this.gameY-this.dragY) game.foregroundContext.strokeStyle = 'white';
game.foregroundContext.strokeRect(x-game.offsetX,y-game.offsetY, width, height);
} },
calculateGameCoordinates:function(){
mouse.gameX = mouse.x + game.offsetX ; mouse.gameY = mouse.y + game.offsetY;
mouse.gridX = Math.floor((mouse.gameX) / game.gridSize);
mouse.gridY = Math.floor((mouse.gameY) / game.gridSize);
},
init:function(){
var $mouseCanvas = $("#gameforegroundcanvas");
$mouseCanvas.mousemove(function(ev) { var offset = $mouseCanvas.offset();
mouse.x = ev.pageX - offset.left;
mouse.y = ev.pageY - offset.top;
mouse.calculateGameCoordinates();
if (mouse.buttonPressed){
if ((Math.abs(mouse.dragX - mouse.gameX) > 4 || Math.abs(mouse.dragY - mouse.gameY)
> 4)){
mouse.dragSelect = true }
} else {
mouse.dragSelect = false;
} });
$mouseCanvas.click(function(ev) { mouse.click(ev,false);
mouse.dragSelect = false;
return false;
});
$mouseCanvas.mousedown(function(ev) { if(ev.which == 1){
mouse.buttonPressed = true;
mouse.dragX = mouse.gameX;
CHAPTER 5 ■ CREATing THE RTS gAmE WoRld
mouse.dragY = mouse.gameY;
ev.preventDefault();
}
return false;
});
$mouseCanvas.bind('contextmenu',function(ev){
mouse.click(ev,true);
return false;
});
$mouseCanvas.mouseup(function(ev) { var shiftPressed = ev.shiftKey;
if(ev.which==1){
//Left key was released mouse.buttonPressed = false;
mouse.dragSelect = false;
}
return false;
});
$mouseCanvas.mouseleave(function(ev) { mouse.insideCanvas = false;
});
$mouseCanvas.mouseenter(function(ev) { mouse.buttonPressed = false;
mouse.insideCanvas = true;
});
} }
There is a lot happening inside this object. First, we declare a mouse object and start by defining variables to store the mouse coordinates relative to the canvas (x,y), relative to the map (gameX,gameY) and in terms of the map grid (gridX,gridY). We also define several variables to store the mouse state (buttonPressed, dragSelect, and insideCanvas).
Next we define the click() method as a placeholder that gets called any time the mouse is clicked inside the canvas region. We will implement this method later.
Next we define a draw() method that checks whether the mouse is being dragged across the canvas and, if so, draws a white rectangle from the top-left corner to the bottom-right corner of the selected area. We subtract the map offset when calculating the coordinates of the rectangle so that it is drawn relative to the game map and it does not move even if the map is panned around.
We also define a method called calculateGameCoordinates() that converts the mouse x and y coordinates to game coordinates.
Finally, we define the init() method, which is the heart of the mouse object. This method sets up all the necessary mouse event listeners for the foreground canvas:
• mousemove: Whenever the mouse is moved, we calculate the different mouse coordinates and store them. We also check whether the mouse button is pressed and whether the mouse has been dragged at least 4 pixels and, if so, set the dragSelect option. The 4-pixel threshold prevents the game from confusing every click with a drag selection operation.
• click: Whenever a click operation is completed, we call our mouse.click() method and clear the dragSelect flag.
• mousedown: If the left mouse button is pressed down, we set the buttonPressed flag and save the coordinates into dragX and dragY. In addition, we prevent the default mouse click behavior (such as browser context menus when the right mouse button is pressed).
• contextmenu: We call the mouse.click() method and pass the rightClick parameter as true.
• mouseup: If the left mouse button is released, we clear the dragSelect and buttonPressed flags.
• mouseleave: When the mouse leaves the canvas area, we set the insideCanvas flag to false.
• mouseenter: Whenever the mouse reenters the canvas area, we set the insideCanvas flag to true and clear the buttonPressed flag.
Now that we have set up our mouse object, we will modify our game object inside game.js to use the mouse. The first thing we need to do is call the mouse.init() method from inside the game.init() method. The updated game.
init() method will look like Listing 5-16.
Listing 5-16. Calling mouse.init() from Inside game.init() (game.js) init: function(){
loader.init();
mouse.init();
$('.gamelayer').hide();
$('#gamestartscreen').show();
game.backgroundCanvas = document.getElementById('gamebackgroundcanvas');
game.backgroundContext = game.backgroundCanvas.getContext('2d');
game.foregroundCanvas = document.getElementById('gameforegroundcanvas');
game.foregroundContext = game.foregroundCanvas.getContext('2d');
game.canvasWidth = game.backgroundCanvas.width;
game.canvasHeight = game.backgroundCanvas.height;
},
Next we will define a handlePanning() method inside the game object. (See Listing 5-17.)
Listing 5-17. Defining the handlePanning() Method Inside the Game Object (game.js) // A control loop that runs at a fixed period of time
animationTimeout:100, // 100 milliseconds or 10 times a second offsetX:0, // X & Y panning offsets for the map
offsetY:0,
panningThreshold:60, // Distance from edge of canvas at which panning starts panningSpeed:10, // Pixels to pan every drawing loop
handlePanning:function(){
// do not pan if mouse leaves the canvas if (!mouse.insideCanvas){
return;
}
CHAPTER 5 ■ CREATing THE RTS gAmE WoRld if(mouse.x<=game.panningThreshold){
if (game.offsetX>=game.panningSpeed){
game.refreshBackground = true;
game.offsetX -= game.panningSpeed;
}
} else if (mouse.x>= game.canvasWidth - game.panningThreshold){
if (game.offsetX + game.canvasWidth + game.panningSpeed <= game.currentMapImage.width){
game.refreshBackground = true;
game.offsetX += game.panningSpeed;
} }
if(mouse.y<=game.panningThreshold){
if (game.offsetY>=game.panningSpeed){
game.refreshBackground = true;
game.offsetY -= game.panningSpeed;
}
} else if (mouse.y>= game.canvasHeight - game.panningThreshold){
if (game.offsetY + game.canvasHeight + game.panningSpeed <= game.currentMapImage.height){
game.refreshBackground = true;
game.offsetY += game.panningSpeed;
} }
if (game.refreshBackground){
// Update mouse game coordinates based on game offsets mouse.calculateGameCoordinates();
} },
We start by defining two new variables, panningThreshold and panningSpeed, that store how close to the canvas edge the mouse cursor needs to be for panning to occur and how fast the panning should be. The handlePanning() method itself checks to see whether the mouse is near any of the edges of the canvas and whether there is still any map left to pan in that direction. If there is, we adjust the offset in that direction by the panning threshold and set the background changed flag. Finally, if the map did pan, we refresh the mouse game coordinates since they will change any time the map pans.
The last change we will make to the game object is calling the handlePanning() and mouse.draw() method from inside game.drawingLoop(). The final drawingLoop() method will look like Listing 5-18.
Listing 5-18. Calling mouse.draw() from Inside game.drawingLoop() (game.js) drawingLoop:function(){
// Handle Panning the Map game.handlePanning();
// Since drawing the background map is a fairly large operation, // we only redraw the background if it changes (due to panning) if (game.refreshBackground){
game.backgroundContext.drawImage(game.currentMapImage, game.offsetX, game.offsetY, game.canvasWidth, game.canvasHeight, 0,0,game.canvasWidth,game.canvasHeight);
game.refreshBackground = false;
}
// Clear the foreground canvas
game.foregroundContext.clearRect(0,0,game.canvasWidth,game.canvasHeight);
// Start drawing the foreground elements // Draw the mouse
mouse.draw()
// Call the drawing loop for the next frame using request animation frame if (game.running){
requestAnimationFrame(game.drawingLoop);
} },
We start by calling the game.handlePanning() method that we defined just now. Next we clear the foreground canvas by resetting the canvas width. We then leave a placeholder for drawing the foreground elements such as buildings and units that we will implement later. Finally, we call the mouse.draw() method just before the end of the drawing loop.
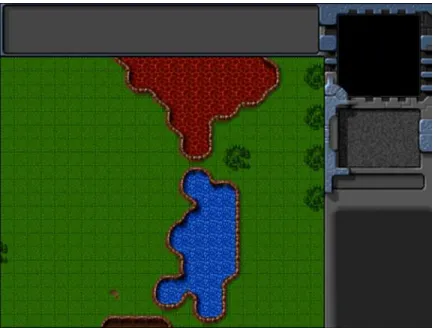
At this point, if we run the game, we should be able to pan around the map by moving the mouse near the edges of the canvas so that we can explore the entire map, as shown in Figure 5-6.
Figure 5-6. Panning around the map
CHAPTER 5 ■ CREATing THE RTS gAmE WoRld
Summary
In this chapter, we set out to develop the basic framework for our RTS game.
Just like in Chapter 2, we implemented a splash screen and a starting menu. We then created our first level by combining a map image and some basic level metadata.
We implemented a single-player object that loaded map data and displayed a mission briefing screen. We then created the game interface screen and set up the animation and drawing loop for the game so we could load and see the initial map on the canvas. Finally, we captured and used mouse events to let the user pan around the level.
While we have a lot of the essential elements of our game world, we are still missing the actual entities to interact with, such as buildings and vehicles.
In the next chapter, we will start adding these different entities to our level. We will draw them on the screen using sprite sheets and animation states. We will then set up a framework for selecting these entities so we can interact with them.