If you are not interested in using TEX or LATEX, you can ignore these paragraphs. Note that the information about thepgfpackage is also important since the style file that Jpgfdraw creates also uses the pgf package.
Installation
- LINUX AND SIMILAR OPERATING SYSTEMS 2
- Linux and Similar Operating Systems
- Windows
- WINDOWS 3
- WINDOWS 4
Click "Browse" and select jpgfdraw.jar (in the folder you created in step 1). Click on the button labeled "Change icon". j) Go to the Jpgfdraw home folder and then the icons folder. k) Select the file jpgfdraw.ico (l) Click "OK". m).
ACCESSIBILITY 6
ACCESSIBILITY 7
ACCESSIBILITY 8
Command Line Arguments
Note that these environment variables only have an effect if you use the jpgfdraw script to run the JRE. If you cannot use the jpgfdraw script, you can call Jpgfdraw from the command line with (no line breaks):. java hjava optionsi -jar jpgfdraw.jar hjpgfdraw optionsi hfilenamei.
THE SETTINGS MENU 10
The Settings Menu
- Styles
- Show Tools
- SHOW TOOLS 11
- SHOW RULERS 12
- Show Rulers
- Show Status Bar
- Grid
- Zoom
- PAPER 13
- Paper
- Configuration Dialog
- CONFIGURATION DIALOG 14
If the grid is closed, mouse clicks will translate to the nearest tick. This also means that when you move a point while not in edit mode, the point will be moved in intervals of the gap between tick marks.
CONFIGURATION DIRECTORY 15
Configuration Directory
CONFIGURATION DIRECTORY 16
Most buttons and menu items will only apply to the child window that currently has focus. If there are no child windows, or if they are all minimized, then the corresponding buttons and menu items will be disabled.
THE CANVAS 18
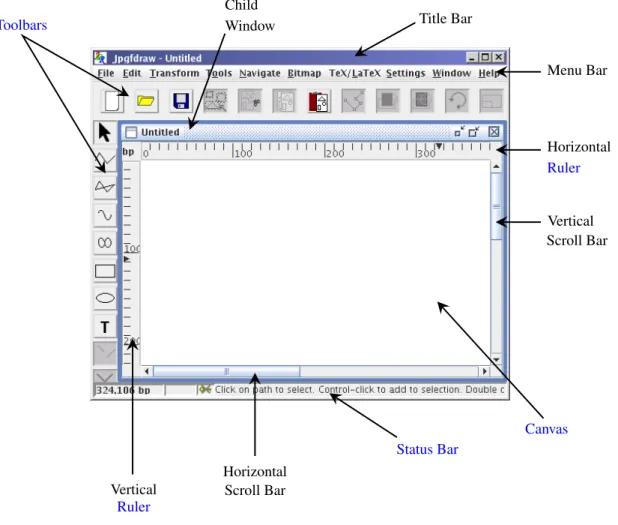
The Canvas
The Toolbars
The Rulers
The Status Bar
Using the File menu, you can create a new image, load an image from a JDR or AJR file, save the current image, export the current image to a supported format (such as a LATEX file), assign a description to the current image, print the current image, or close Jpgfdraw.
Open
Recent Files
Image Description
SAVE AND SAVE AS 20
Save and Save As
Export
PRINT 21
Close
Quit
QUIT 22
Complete the path by pressing the Enter key or by double-clicking (instead of single-clicking) the final vertex or by choosing Tools→Finish by clicking the finish button. Cancel the current path by pressing the Escape key or by choosing Tools→ Abandonor by clicking the cancel button.
Line Paths
Note that transferring focus to another Jpgfdraw child window or selecting a new tool while composing apath will complete the current path. Make a gap on the current path: After clicking the vertex where you want the gap to start, choose Tools→Gap, click the gap button or press Ctrl-M, then click on the canvas where you want the gap to end.
LINE PATHS 24
CURVE PATHS 25
Curve Paths
RECTANGLES 26
Rectangles
Ellipses
TEXT 27
Text
TEXT 28
TEXT 29
If there is insufficient memory in the JRE to load a bitmap, Jpgfdraw returns to draft mode to display that bitmap. Since LATEX and SVG files only contain a link to the bitmap, draft mode should not affect export to these formats.
Properties
As the photos tend to be quite large, there is not enough memory to load the final photo, so it is displayed in draft mode instead. Note that draft mode will also be used when printing or exporting to PNG, and a bitmap in draft mode will be ignored when exporting to EPS.
PROPERTIES 31
It will go back to the beginning when it reaches the end of the stack. It will go back to the beginning when it reaches the end of the stack. to select an object according to its description.
MOVING AN OBJECT 33
Moving an Object
COPY 34
Copy
Paste
Object Description
EDITING CONTROL POINTS 35
Editing Control Points
EDITING CONTROL POINTS 36
EDITING CONTROL POINTS 37
EDITING TEXT AREAS 38
Editing Text Areas
REDUCING TO GRAY SCALE 39
Reducing to Gray Scale
MOVING AN OBJECT TO THE FRONT 40
Moving an Object to the Front
Moving an Object to the Back
Rotating Objects
SCALING OBJECTS 41
Scaling Objects
SCALING OBJECTS 42
SCALING OBJECTS 43
SHEARING OBJECTS 44
Shearing Objects
SHEARING OBJECTS 45
SHEARING OBJECTS 46
SHEARING OBJECTS 47
SHEARING OBJECTS 48
GROUPING AND UNGROUPING OBJECTS 49
Grouping and Ungrouping Objects
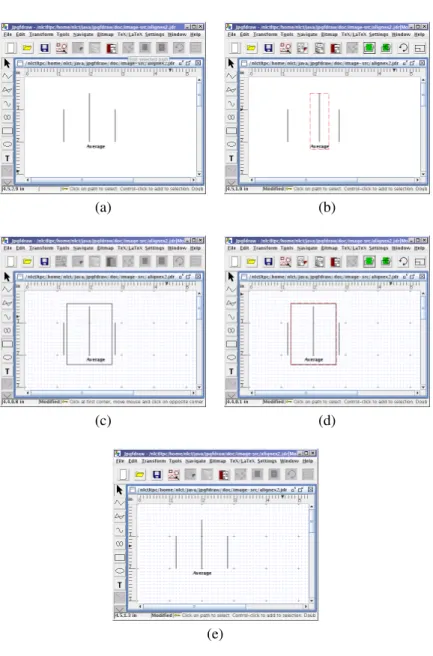
Aligning Objects
ALIGNING OBJECTS 50
ALIGNING OBJECTS 51
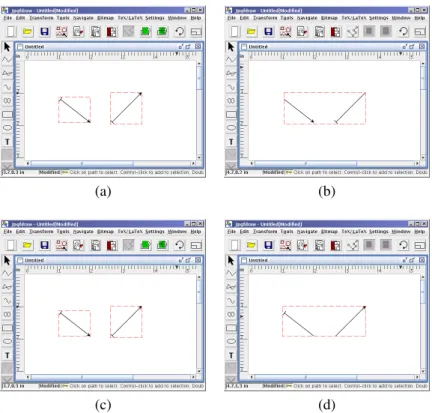
REVERSING A PATH’S DIRECTION 52
Reversing a Path’s Direction
Merging Paths
MERGING PATHS 53
MERGING PATHS 54
MERGING PATHS 55
MERGING PATHS 56
PATH UNION 57
Path Union
EXCLUSIVE OR FUNCTION 58
Exclusive Or Function
EXCLUSIVE OR FUNCTION 59
PATH INTERSECTION 60
Path Intersection
PATH SUBTRACTION 61
Path Subtraction
COMBINING A TEXT AREA AND PATH TO FORM A TEXT-PATH 62
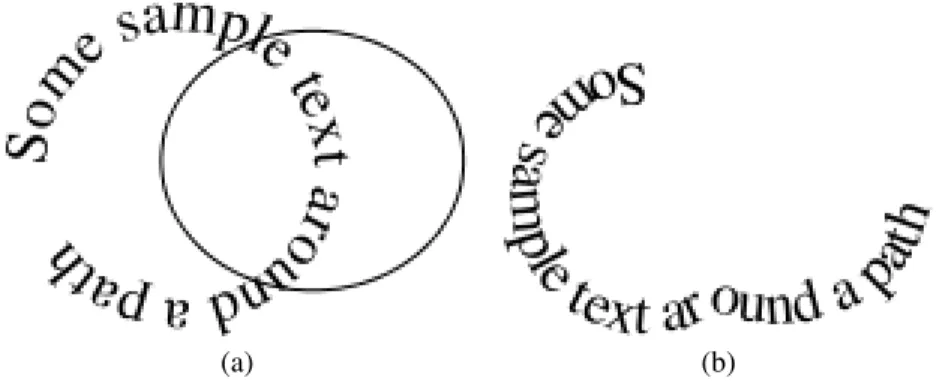
Combining a Text Area and Path to Form a Text- Path
COMBINING A TEXT AREA AND PATH TO FORM A TEXT-PATH 63
SEPARATING A TEXT-PATH INTO A TEXT AREA AND PATH 64
Separating a Text-Path into a Text Area and Path
Converting to a Path
CONVERTING TO A PATH 65
- CONVERTING A TEXT AREA OR TEXT-PATH TO A PATH 66
- Converting a Text Area or Text-Path to a Path
- Converting an Outline to a Path
To convert the outline of a text area or text path to apath, first select the text area or text path and choose the Transform→Convert Outline to Path menu item. The text will then be converted into a group of paths, each path approximating the shape of the corresponding character. Apply a stroke/fill color to the text (so that the text outline has a different color than the interior of the text.
You can, however, merge the paths, applying a single gradient similar to the original text area (see Figure 8-30). To convert a path's outline to a path, first select the path and select the Transform → Convert Outline To Path menu item. This new path now has a gradient color with a line width of 1 bp and no start or end arrows.
Splitting Text Areas
If you had a gradient ink text color, the gradient will be applied to each path. This has a line width of 10 bp, a circle start marker, a triangle end arrow, a gradient line color, and a yellow fill color.
SPLITTING TEXT AREAS 67
SPLITTING TEXT AREAS 68
The way a text area is displayed is determined by the text color, font, transformation matrix and (when exported to a LATEX file) the anchor. The way a text path appears is determined by the text color, font, anchor, transformation matrix, and underlying path. There is a preview panel at the top that illustrates the effects of the text area attributes you choose.
To change the style of an existing text area, first select the text area and then use the Edit→Textsub menu: the text color can be changed using Edit→Text→Text Color. If you have selected more than one text area, the selected attributes will be applied to all text areas in the selection. Note that the Edit→Textdialog boxes only affect selected text areas and do not affect new text areas. You should use Settings → Styles.
Line Color
The way apathis appears is determined by the line color, fill color, line styles (such as pen width and highlights), and wrap rule. There is a preview panel on the right that illustrates the effects of the path settings you choose. Any subsequent new paths or text areas will have the styles specified by the Settings.
The current styles are saved when you exit Jpgfdraw and will be in effect the next time you use Jpgfdraw unless you change the startup settings (see subsection 3.2.8). If you have selected more than one path, the selected attributes will be applied to all the paths in the selection. Note that the Edit → Path dialogs only affect selected paths and do not affect new paths.
FILL COLOR 70
Fill Color
LINE STYLE 71
Line Style
- Line Thickness (or Pen Width)
- Dash Pattern
- CAP STYLE 72
- Cap Style
- Join Style
- MARKERS 73
- Markers
- MARKERS 74
- MARKERS 75
- MARKERS 76
- MARKERS 77
- MARKERS 78
- MARKERS 79
- MARKERS 80
- WINDING RULE 81
- Winding Rule
Alt LaTeX Open N/A Dependent No. Triangle Open Required Dependent No Equilateral Filled Required Independent No Equilateral Open Required Independent No. Table 9.2: Available marker styles and dependencies for partial arrow style markers. Hook Up Required Dependent No Hook Down Required Depends No Half Spike Up Required Depends No Half Spike Down Required Depends No Half Spike 60 Up Required Depends No Half Spike 60 Down Required Depends No Half Spike 45 Up Required Dependent No Half Spike 45 Down Required Depend No Half Cusp Up Required Dependent No. Half Cusp Down Required Depend No. Table 9.3: Available marker styles and dependencies for data point style markers. Box Open Mandatory Independent Yes. Open 5 Pointed Star Required Independent Yes Filled 5 Pointed Star Required Independent Yes Open 6 Pointed Star Required Independent Yes Filled 6 Pointed Star Required Independent Yes Triangle Up Filled Required Independent Yes Triangle Up Open Required Independent Yes Triangle Down Filled Required Independent Yes Triangle Down Open Required Independent Yes Rhombus Filled Required Independent Yes Rhombus Open Required Independent Yes Pentagon Filled Required Independent Yes Pentagon Open Required Independent Yes Hexagon Filled Required Independent Yes Hexagon Open Required Independent Yes Octagon Filled Required Independent Yes Octagon Open Required Independent Yes Filled Semicircle Required Independent No Open Semicircle Required Independent No. Table 9.4: Available markup styles and dependencies for bracket style marks.
Alt Round Required dependent no. Alt Brace Required Dependent No. Table 9.5: Available tag styles and dependencies for cap style tags. Rectangular cap required Dependent no. Round cap required Dependent no. Triangular cap required Dependent no. Inverted Triangle Cap Required Dependent No. Chevron cap required Dependent no. Inverted chevron cap required Dependent no. Quick cap required Dependent no. Inverted quick cap required Dependent no. Table 9.6: Available marker styles and dependencies for decorative markers. Scissors Up Filled Required Dependent No Scissors Down Filled Required Dependent No Scissors Up Open Required Dependent No Scissors Down Open Required Dependent No Right Heart Filled Required Independent No Right Heart Open Required Independent No Heart Filled Required Independent No.

TEXT COLOR 82
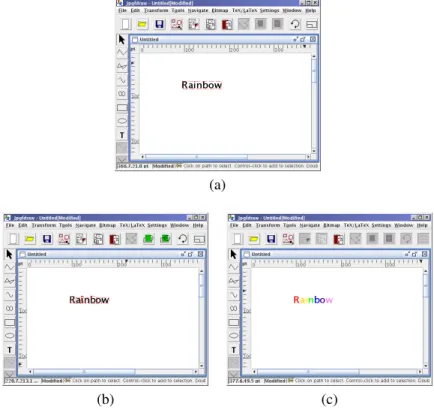
Text Color
TEXT STYLE 83
Text Style
- Font Family
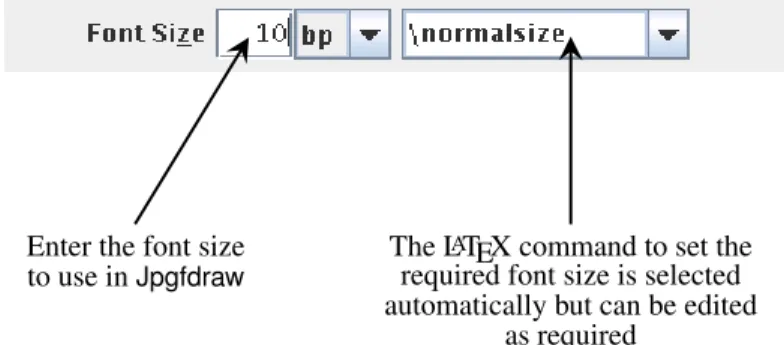
- FONT SIZE 84
- Font Size
- FONT SERIES 85
- Font Series
- FONT SHAPE 86
- Font Shape
- Text Transformation Matrix
- ANCHOR 87
- Anchor
- ANCHOR 88
- ANCHOR 89
- ANCHOR 90
- ANCHOR 91
- ANCHOR 92
2This code must be in the form of a statement (sets the font "from this point on") not a text block command (a command that sets its argument in the given font). Note that if you change the\normalsizevalue, you will have to reselect the font size for each of the text areas that are already present, unless the checkbox labeled Update all LaTeX font size declarations in current image is checked in the TeX/LaTeX Settings dialog box is selected. You can set the font series to medium (normal) or bold by selecting the appropriate item from the drop-down menu labeled Font Series (see Figure 9.17).
You can set the font style to portrait (normal) or italic by selecting the appropriate value from the drop-down list labeled Font Style (see Figure 9.18). If you export your image to a LATEX file, the font used in the document may not exactly match the font used in Jpgfdraw. The font used is a generic Java serif font and the text fills the entire field.
10 TEX/L A TEX
Settings
- Setting the Normal Font Size
- AUTOMATICALLY UPDATING THE TEXT ANCHOR 94
- Automatically Updating the Text Anchor
- Automatically Escaping TEX’s Special Characters
If the menu item TeX/LaTeX→Preferences→Auto Adjust Anchor is selected, group alignment will automatically change the anchor of any text area in the group. If you select the menu item TeX/LaTeX→Preferences→Auto Indent Special Characters, the 10 TEX special characters (\$ & % #{ } ˆ ˜) will be automatically replaced by the corresponding commands in the LATEX text equivalent when you create new areas of text. It does not apply to existing text areas (on the current image or loaded from a file) or when editing a text area.
Computing the Parameters for \parshape
COMPUTING THE PARAMETERS FOR \PARSHAPE 95
COMPUTING THE PARAMETERS FOR \PARSHAPE 96
COMPUTING THE PARAMETERS FOR \SHAPEPAR 97
Computing the Parameters for \shapepar
COMPUTING THE PARAMETERS FOR \SHAPEPAR 98
CREATING FRAMES FOR USE WITH THE FLOWFRAM PACKAGE 99
Creating Frames for Use with the flowfram Pack- age
- The flowfram Package: A Brief Summary
- DEFINING THE TYPEBLOCK 100
- Defining the Typeblock
- Defining a Frame
- DEFINING A FRAME 101
- ONLY DISPLAYING OBJECTS DEFINED ON A GIVEN PAGE 102
- Only Displaying Objects Defined on a Given Page
- ONLY DISPLAYING OBJECTS DEFINED ON A GIVEN PAGE 103
- ONLY DISPLAYING OBJECTS DEFINED ON A GIVEN PAGE 104
Once an object is identified as a frame, a gray rectangle will appear on the screen indicating the area in which the contents of the frame will be typed, along with the frame's type, identification label, and page list. Note that if the object is a group, the framing information will be applied to the entire group. If the option None is set, the frame will not get a border, and the object will only be used as an indication of the frame's size (or possibly shape) and location.
You can specify the page list on which to define the frame, using the Pages combo box. The frame can have margins between the border and the content area. The bottom row uses\shapepar: (lower left) too little text shrinks the shape; (bottom right) too much text enlarges the shape. The contents of the static frames were all set to a central vertical alignment.).

A House
A HOUSE 106
LETTUCE ON TOAST 107
Lettuce on Toast
LETTUCE ON TOAST 108
LETTUCE ON TOAST 109
LETTUCE ON TOAST 110
CHEESE AND LETTUCE ON TOAST 111
Cheese and Lettuce on Toast
An Artificial Neuron
AN ARTIFICIAL NEURON 112
AN ARTIFICIAL NEURON 113
AN ARTIFICIAL NEURON 114
AN ARTIFICIAL NEURON 115
AN ARTIFICIAL NEURON 116
AN ARTIFICIAL NEURON 117
AN ARTIFICIAL NEURON 118
BUS 119
BUS 120
BUS 121
BUS 122
BUS 123
A POSTER 124
A Poster
A POSTER 125
A POSTER 126
A POSTER 127
A POSTER 128
A HOUSE WITH NO MOUSE 129
A House With No Mouse
A HOUSE WITH NO MOUSE 130
A HOUSE WITH NO MOUSE 131
A HOUSE WITH NO MOUSE 132
A HOUSE WITH NO MOUSE 133
A HOUSE WITH NO MOUSE 134
A HOUSE WITH NO MOUSE 135
A HOUSE WITH NO MOUSE 136
A HOUSE WITH NO MOUSE 137
A HOUSE WITH NO MOUSE 138
A HOUSE WITH NO MOUSE 139
A HOUSE WITH NO MOUSE 140
A HOUSE WITH NO MOUSE 141
A NEWSPAPER 142
A Newspaper
A NEWSPAPER 143
A NEWSPAPER 144
A NEWSPAPER 145
A NEWSPAPER 146
A NEWSPAPER 147
A NEWSPAPER 148
A NEWSPAPER 149
A NEWSPAPER 150
A NEWSPAPER 151
A NEWSPAPER 152
A NEWSPAPER 153
A NEWSPAPER 154
A NEWSPAPER 155
A NEWSPAPER 156
A NEWSPAPER 157
A NEWSPAPER 158
A NEWSPAPER 159
A NEWSPAPER 160
Integers are stored as 32-bit integers, single-precision numbers are stored as 32-bit floats, double-precision numbers are stored as 64-bit doubles, and characters are stored as 16-bit Unicode characters. Writing:. g) An 8-bit byte representing the unit used for the rulers and grid. h) Two 32-bit integers representing the main grid divisions and the sub-divisions respectively. For example, if an image contains apath, a group, and a textarea, these three objects in the JDR file will be stored as a single group structure containing the three objects.
JDR1.3 onwards, where linecolor and fillcolor contain the line and fillcolor data (see below), hlinestyle is the linestyle data (see below). The start location, hstart locationi, is a 32-bit integer and can only take one of the following. Each marker type (start/middle/end) has the same format, but the file format varies as follows:. where hi is an 8-bit byte identifying the arrow type. hsizeiis 32-bit float represents the size of the arrow.