If you do not accept these license terms, your sole remedy is to return all unused product (hardware and software) within 14 days for a full refund, according to your retailer's refund policy. To reduce the possibility of heat-related injury or overheating of the computer, do not place the computer directly on your lap or obstruct the computer's air vents. Do not allow another hard surface, such as an adjacent optional printer, or a soft surface, such as pillows or carpets or clothing, block the airflow.
Also, do not allow the AC adapter to come into contact with the skin or a soft surface such as pillows or blankets or clothing during use. If your computer is configured as described, do not change the processor configuration setting in msconfig.exe from 4 or 2 processors to 1 processor.
1 Getting started
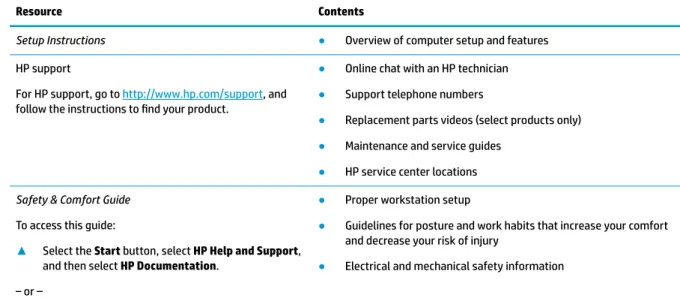
Finding information
2 Components
Locating hardware
Locating software
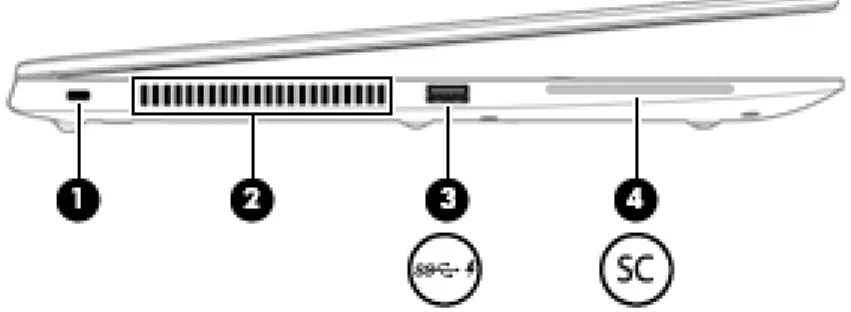
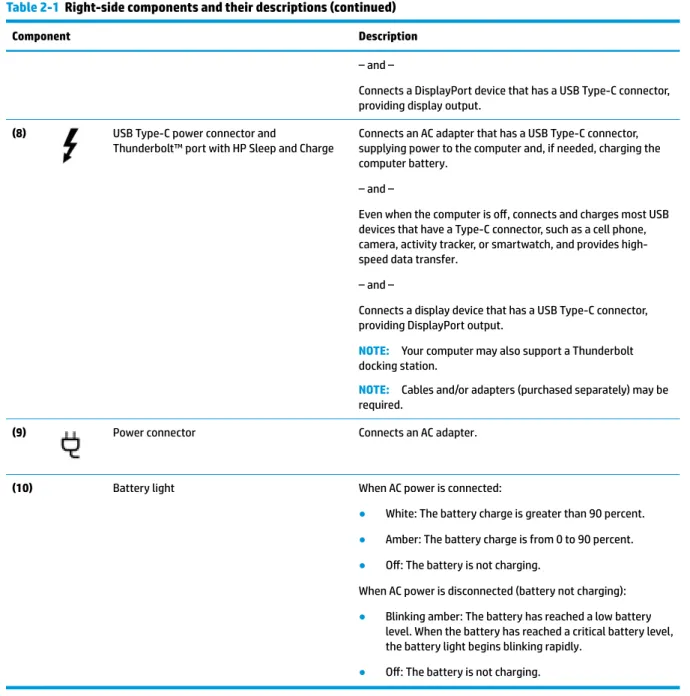
Right
Thunderbolt™ port with HP Sleep and Charge Connects an AC adapter that has a USB Type-C connector, which provides power to the computer and, if necessary, charges the computer battery. Even when the computer is off, most USB devices that have a Type-C connector, such as a mobile phone, camera, activity tracker or smartwatch, connect and charge, providing high-speed data transfer.
Left
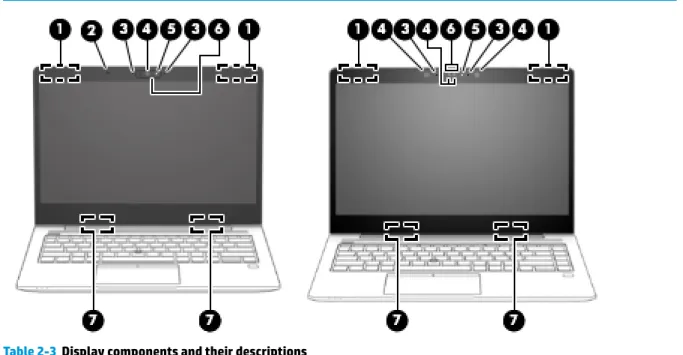
Display
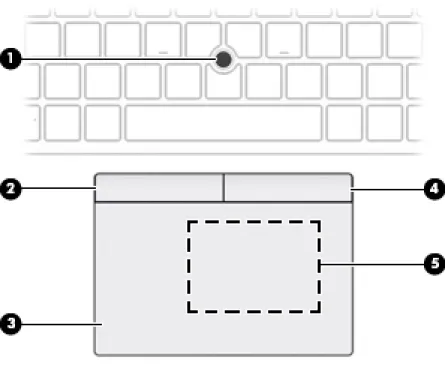
Keyboard area
TouchPad
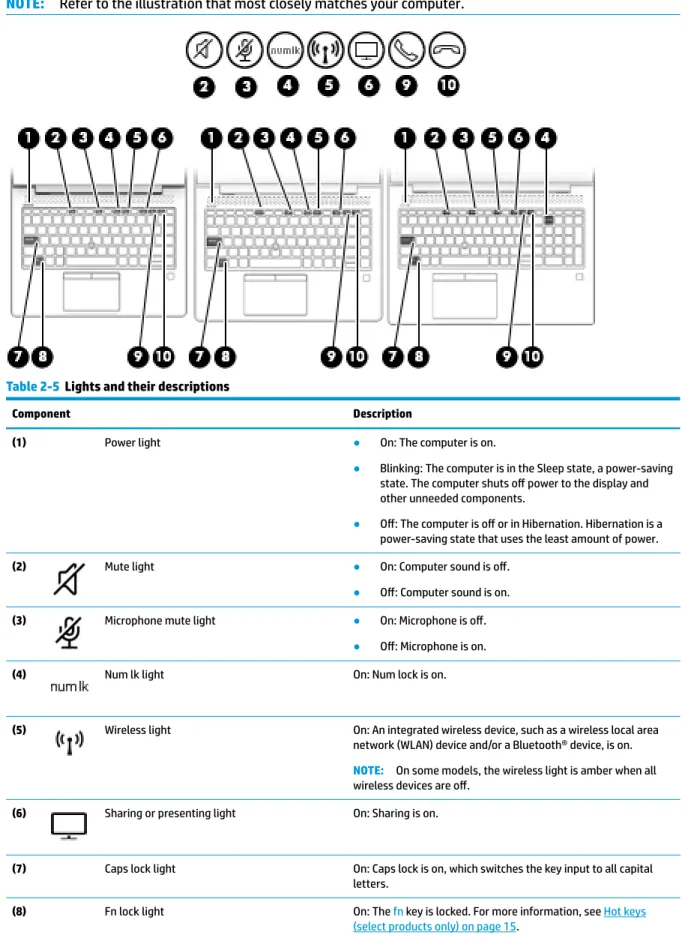
Lights
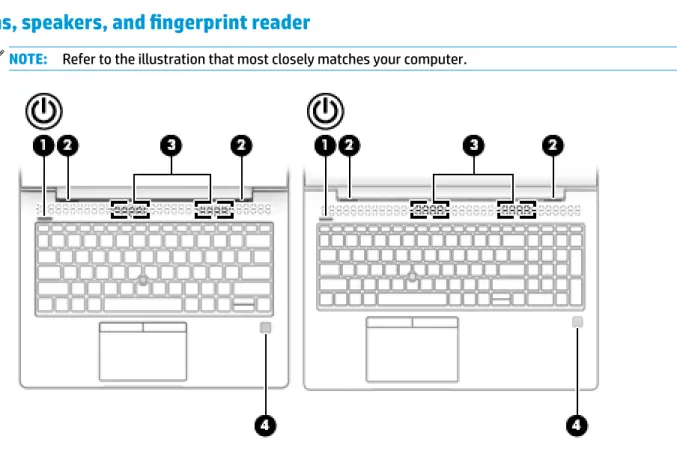
Buttons, speakers, and fingerprint reader
IMPORTANT: To prevent problems with fingerprint logon, make sure when registering your fingerprint that all sides of your finger are registered by the fingerprint reader.
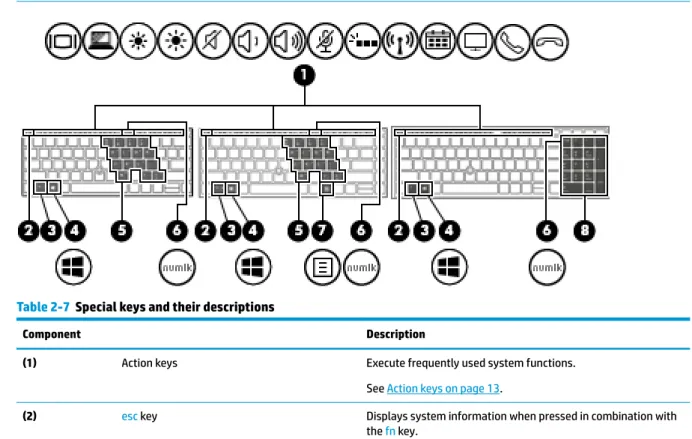
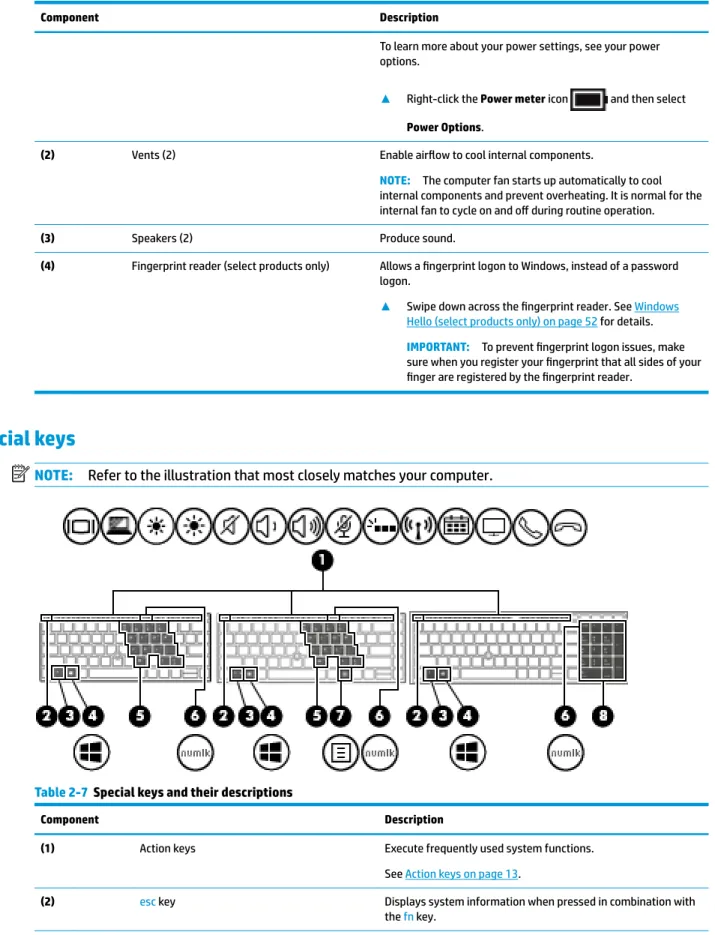
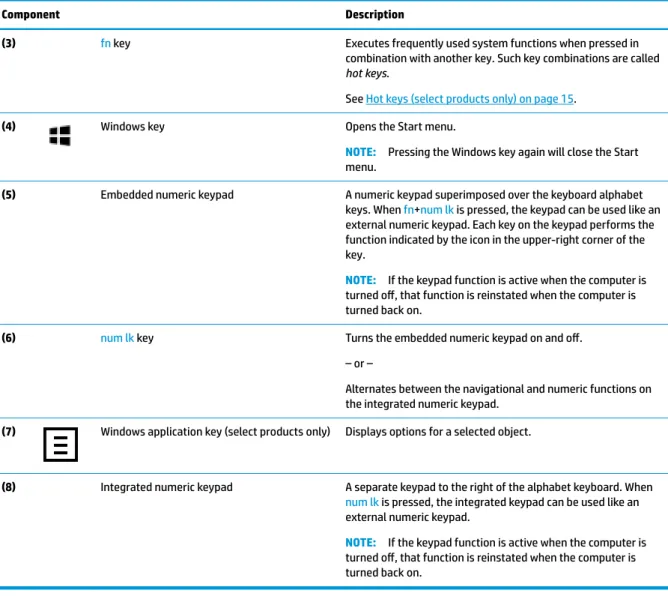
Special keys
When you press fn+num lk, you can use the keyboard as an external numeric keypad. Each key on the keyboard performs a function indicated by an icon in the upper right corner of the key. If the keyboard function is active when the computer is turned off, this function is restored when the computer is turned on again.
When num lk is pressed, the integrated keyboard can be used like an external numeric keypad. NOTE: If the keyboard function is active when the computer is turned off, that function is restored when the computer is turned on again.
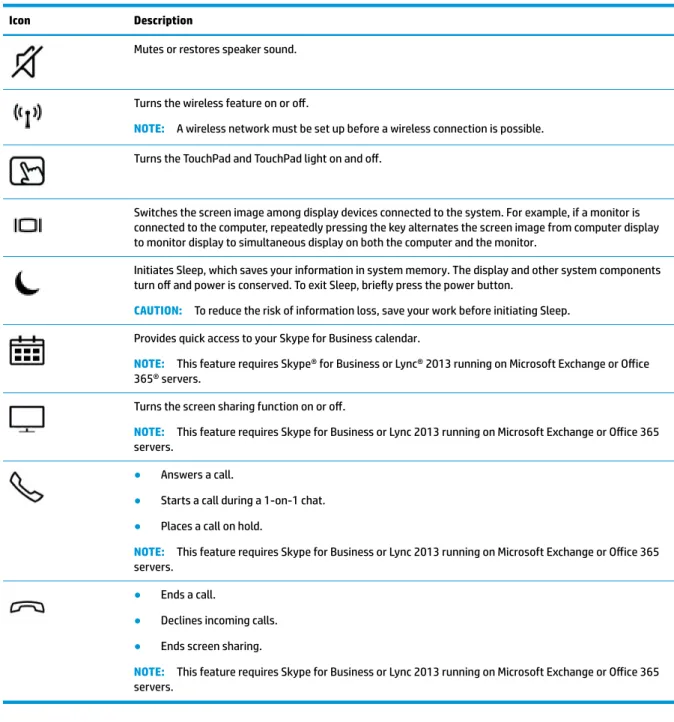
Action keys
For example, if a monitor is connected to the computer, repeatedly pressing the key alternates the screen image from the computer screen to the monitor screen in simultaneous display on both the computer and the monitor. NOTE: This feature requires Skype® for Business or Lync® 2013 to run on Microsoft Exchange or Office 365® servers. NOTE: This feature requires Skype for Business or Lync 2013 running on Microsoft Exchange or Office 365 servers.
You can disable this feature by pressing and holding the fn key and the left shift key. After you disable the action key function, you can still perform each function by pressing the fn key in combination with the appropriate action key.
Hot keys (select products only)
Bottom
Front
Labels
Wireless Certification Label(s) — Provide information about optional wireless devices and approval marks for the countries or regions in which the devices are approved for use.
Inserting a SIM card (select products only)
3 Network connections
Connecting to a wireless network
Using the wireless controls
Wireless button
Operating system controls
Connecting to a WLAN
Using HP Mobile Broadband (select products only)
A SIM card contains basic information about you, such as a personal identification number (PIN), as well as network information. If the SIM card is not preinstalled, it may be included in the HP Mobile. The broadband information that comes with your computer, or the mobile network operator, may provide it separately from the computer.
For information about HP Mobile Broadband and how to activate service with a preferred mobile network operator, see the HP Mobile Broadband information included with your computer.
Using GPS (select products only)
Using Bluetooth wireless devices (select products only)
Connecting Bluetooth devices
Using NFC to share information (select products only)
Sharing
Connecting to a wired network
Connecting to a local area network (LAN) (select products only)
NOTE: If the network cable contains noise reduction circuitry (3), which prevents interference from TV and radio reception, direct the circuit end of the cable toward the computer.
Using HP LAN-Wireless Protection (select products only)
Turning on and customizing HP LAN-Wireless Protection
Using HP MAC Address Pass Through to identify your computer on a network (select products only)
Customizing MAC Address Pass Through
4 Navigating the screen
Using TouchPad and touch screen gestures
Two-finger pinch zoom
Four-finger swipe (Precision TouchPad)
One-finger slide (touch screen)
Using an optional keyboard or mouse
Using an on-screen keyboard (select products only)
5 Entertainment features
Using a camera (select products only)
Using audio
Connecting speakers
Connecting headphones
Connecting headsets
Using sound settings
Using video
Connecting a DisplayPort device using a USB Type-C cable (select products only)
Connecting a Thunderbolt device using a USB Type-C cable (select products only)
Connecting video devices using an HDMI cable (select products only)
Setting up HDMI audio
Right-click the Speakers icon in the notification area, at the far right of the taskbar, and then select Playback Devices.
Discovering and connecting wired displays using MultiStream Transport
Connect displays to computers with AMD or Nvidia graphics (with an optional hub)
Connect displays to computers with Intel graphics (with an optional hub)
Connect displays to computers with Intel graphics (with a built-in hub)
Discovering and connecting to Miracast-compatible wireless displays (select products only)
Using data transfer
Connecting devices to a USB Type-C port (select products only)
6 Managing power
Using Sleep and Hibernation
Initiating and exiting Sleep
Initiating and exiting Hibernation (select products only)
Shutting down (turning off) the computer
If your computer has a user-replaceable battery (select products only), disconnect the computer from external power and then remove the battery.
Using the Power icon and Power Options
Running on battery power
Using HP Fast Charge (select products only)
Displaying battery charge
Finding battery information in HP Support Assistant (select products only)
Conserving battery power
Identifying low battery levels
Resolving a low battery level
Resolving a low battery level when external power is available
Resolving a low battery level when no power source is available
Resolving a low battery level when the computer cannot exit Hibernation
Factory-sealed battery
Running on external power
7 Security
Protecting the computer
BIOS administrator, boot, and DriveLock passwords are set in Computer Setup and are managed by the system BIOS. If you forget both the DriveLock user password and the DriveLock master password set in Computer Setup, the hard drive protected by the passwords will be permanently locked and can no longer be used. You can use the same password for a Computer Settings feature and for a Windows security feature.
Don't use the same password for multiple applications or websites, and don't use your Windows password for another application or website. Use the HP Client Security Password Manager feature to save your usernames and passwords for your websites and applications. The following tables list common Windows and BIOS administrator passwords and describe their functions.
Setting passwords in Windows
Setting passwords in Computer Setup
DriveLock User Password* Protects access to the DriveLock-protected internal hard drive and is set under DriveLock passwords during the enablement process.
Managing a BIOS administrator password
To save your changes and exit Computer Setup, select Main Menu, select Save Changes and Exit, and then select Yes. NOTE: If you use the arrow keys to highlight your choice, you must press Enter. Turn on or restart the computer and when the HP logo appears, press f10 to open Computer Setup.
Press the Power button together with the Volume Down button until the boot menu appears, then tap f10 to open Computer Settings. Select Security, select Change BIOS administrator password or Change password (select products only), and then press Enter. When prompted to retype your new password, leave the field blank and press Enter.
Entering a BIOS administrator password
Using DriveLock Security Options
Selecting Automatic DriveLock (select products only)
Enter the BIOS administrator password at the BIOS administrator password prompt, and then press enter. Use the Enter key, left mouse click, or touch screen to clear the Automatic DriveLock check box. While Automatic DriveLock is enabled and the drive remains connected to the original computer, you will not be prompted to enter a DriveLock password to unlock the drive.
However, if you move the drive to another computer or replace the system board on the original computer, you will need to enter the DriveLock password. If this happens, at the DriveLock Password prompt, type the BIOS administrator password for the original computer (using the same type of keys you used to set the password), then press enter to unlock the drive. After three incorrect password attempts, you must shut down the computer and try again.
Selecting manual DriveLock
Press the power button, and when the HP logo appears, press f10 to open Computer Setup. Select Security, select Hard Drive Utilities, select DriveLock/Automatic DriveLock, and then press enter. NOTE: You can enable DriveLock and set a DriveLock user password before exiting Computer Setup.
Disabling DriveLock
Entering a DriveLock password
Changing a DriveLock password
NOTE: The Change DriveLock Master Password option is only visible if the DriveLock master password was provided in the DriveLock Password prompt in step 3.
Windows Hello (select products only)
Using antivirus software
Using firewall software
To work around the problem temporarily, disable the firewall, perform the task you want to perform, and then re-enable the firewall.
Installing software updates
Using HP Client Security (select products only)
Using HP Device as a Service (select products only)
Using an optional security cable (select products only)
Using a fingerprint reader (select products only)
Locating the fingerprint reader
8 Maintenance
Improving performance
Using Disk Defragmenter
Using Disk Cleanup
Using HP 3D DriveGuard (select products only)
Identifying HP 3D DriveGuard status
Updating programs and drivers
Cleaning your computer
If you are not sure that the cleaning product is safe for your computer, check the product contents to make sure that the product does not contain ingredients such as alcohol, acetone, ammonium chloride, methylene chloride, hydrogen peroxide, petroleum, and hydrocarbon solvents. .
Cleaning procedures
Cleaning the display
Cleaning the sides or cover
Cleaning the TouchPad, keyboard, or mouse (select products only)
Traveling with or shipping your computer
When traveling by air, you must carry the computer as hand luggage; don't check it in with the rest of your luggage. Airport conveyor belts and similar security devices that check carry-on baggage use x-rays instead of magnetism and do not damage drives. If you plan to use the computer during a flight, listen for the in-flight announcement that tells you when you may use your computer.
If you are shipping the computer or a disk, use suitable protective packaging and label the package. If you are unsure about the policy that applies to using a wireless device in your computer, ask for authorization to use your computer before turning it on. Check the power cord and adapter requirements for each location where you plan to use the computer.
To reduce the risk of electric shock, fire, or damage to the equipment, do not attempt to power the computer with a voltage converter kit sold for devices.
9 Backing up, restoring, and recovering
Backing up information and creating recovery media
Using Windows tools
Using the HP Cloud Recovery Download Tool to create recovery media (select products only)
Restoring and recovery
Restoring, resetting, and refreshing using Windows tools
Recovering using HP Recovery media
Changing the computer boot order
10 Computer Setup (BIOS), TPM, and HP Sure Start
Using Computer Setup
Starting Computer Setup
Navigating and selecting in Computer Setup
Restoring factory settings in Computer Setup
Updating the BIOS
Determining the BIOS version
Downloading a BIOS update
NOTE: Your password settings and security settings will not change when you restore factory settings. Identify the latest BIOS update and compare it to the BIOS version currently installed on your computer. You may need this information to locate the update later after it has been downloaded to your hard drive.
Note the path to the location on your hard drive where the BIOS update is downloaded. You will need to enter this path when you are ready to install the update. NOTE: If you connect your computer to a network, consult your network administrator before installing software updates, especially system BIOS updates.
Using the hard drive path you recorded earlier, open the folder containing the update. NOTE: After an on-screen message reports a successful installation, you can delete the downloaded file from your hard drive.
Changing the boot order using the f9 prompt
TPM BIOS settings (select products only)
Using HP Sure Start (select products only)
11 Using HP PC Hardware Diagnostics
Using HP PC Hardware Diagnostics Windows (select products only)
Downloading HP PC Hardware Diagnostics Windows
Downloading the latest HP PC Hardware Diagnostics Windows version
Downloading HP Hardware Diagnostics Windows by product name or number (select products only)
Installing HP PC Hardware Diagnostics Windows
Using HP PC Hardware Diagnostics UEFI
Starting HP PC Hardware Diagnostics UEFI
Downloading HP PC Hardware Diagnostics UEFI to a USB flash drive
Downloading the latest HP PC Hardware Diagnostics UEFI version
Downloading HP PC Hardware Diagnostics UEFI by product name or number (select products only)
NOTE: To run diagnostics on a convertible computer, your computer must be in notebook mode and you must use the attached keyboard. Enter the product name or number, select your computer, and then select your operating system. In the Diagnostics section, follow the on-screen instructions to select and download the specific version of UEFI Diagnostics for your computer.
Using Remote HP PC Hardware Diagnostics UEFI settings (select products only)
Downloading Remote HP PC Hardware Diagnostics UEFI
Downloading the latest Remote HP PC Hardware Diagnostics UEFI version
Downloading Remote HP PC Hardware Diagnostics UEFI by product name or number
Customizing Remote HP PC Hardware Diagnostics UEFI settings
12 Specifications
Input power
Operating environment
13 Electrostatic discharge
14 Accessibility
Accessibility
Finding the technology tools you need
Our commitment
International Association of Accessibility Professionals (IAAP)
HP is a founding member and we joined to participate with other organizations to advance the field of accessibility. The IAAP will make our profession strong by globally connecting individuals, students and organizations to learn from each other.
Finding the best assistive technology
Assessing your needs
Accessibility for HP products
Standards and legislation
Standards
Web Content Accessibility Guidelines (WCAG)
Legislation and regulations
United States
21st Century Communications and Video Accessibility Act (CVAA)
Canada
Europe
United Kingdom
Australia
Worldwide
Useful accessibility resources and links
Organizations
Educational institutions
Other disability resources
Contacting support
Index
Precision TouchPad gestures four-finger tap 27 three-finger swipe 28 three-finger tap 27 two-finger swipe 26 two-finger tap 26 Privacy screen action key,.