The equipment required to administer a local anesthetic consists of the cartridge itself, a syringe and a needle, and sometimes a local anesthetic is also used. For this injection, the anesthetic solution is injected through the mandibular foramen, on the inner surface of the ramus of the lower jaw (Figure 14.8).

Local anaesthesia for extractions
This injection provides a relatively short duration, but deep depth, of anesthesia for the tooth and buccal and lingual gum on both sides of the injection site, but it does not numb the cheek, lip or tongue. The disadvantages are that it cannot be used where there is gingival infection, nor should it be used in the area of the mental foramen in the mandible, as the nerve can easily be damaged while the access hole is being drilled.
Local anaesthesia for restorative treatments
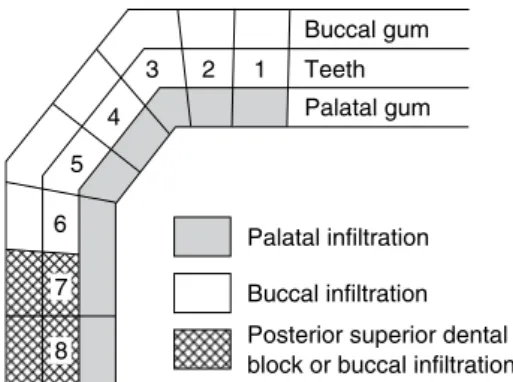
The technique is very old, but it has gained new life with the introduction of the Stabident kit, which contains a special drill for drilling compact bone and an ultra-short needle to inject directly into cancellous bone. A local buccal/labial infiltration is sufficient for routine restorative treatments, although an upper posterior dental block is sometimes preferred for second and third molars.
Preparation for local anaesthesia
Inoculation injury
OHA contact information should be stored in the infection control policy documentation. The incident must be recorded in the accident book (low risk of serious infection) or a RIDDOR report written (high risk of serious infection) and the RIDDOR process must be followed.
Patient advice following local anaesthesia
The patient's medical history form should be checked for known cross-infection risks, such as being HIV positive. Chewing food directly on the restored teeth that day should be avoided to prevent damage to the new restoration (unless the dentist has told you otherwise).
Anxiety control
When the anesthetic wears off, they will feel a tingling sensation in the area - this is called paraesthesia and is completely normal. They should wait until this "tingly" feeling has completely subsided before trying to eat or drink.
General anaesthesia
Young patients who require one or more extractions of deciduous or permanent carious teeth and who will not cooperate under local anesthesia or conscious sedation techniques. Elderly patients who require multiple third molar extractions, especially if a surgical technique is likely to be required for one or more teeth due to impaction.
Conscious sedation
An overdose of a sedative drug may cause respiratory depression, in which case the patient's airway should be supported. Full recovery takes several hours and the patient will need to be supervised by a responsible adult for the rest of the day.

The dental nurse’s duties
Immobilize and prepare the patient's arm for venepuncture and help to lift a vein when necessary. Dental nurses have an indispensable role in ensuring that the entire session runs smoothly, efficiently and with the utmost consideration for the patient's comfort.

Monitoring patients
It is clear from this report that dental nurses have an extremely busy time during conscious sedation sessions, and up to three appropriately trained dental nurses may be required. The GDC requires dental nurses to be sufficiently trained and experienced to assist with conscious sedation treatment, and this includes knowing how to monitor a patient's condition with the equipment available, and understanding the significance of their findings.
General anaesthesia and sedation emergencies
When the cuff is slowly deflated, blood begins to flow again (as the 'tick, tick' of the pulse) and this can be heard through the stethoscope or automatically sensed by the modern machine. As deflation of the cuff is continued slowly, the sound increases to a maximum and then disappears completely.
Blockage of the airway
Overdose of anaesthetic or sedative
Resuscitation
Emergency procedures
Other forms of anxiety control
Hypnosis
Acupuncture
Cavity size – is tooth restoration possible with a restorative filling alone, or should a fixed restoration (such as a crown) be considered? Glass ionomer restoration – in deciduous teeth (due to fluoride release) and in certain cavities where retention of the restoration is difficult.
Fillings
To restore the retentive shape of the tooth when it functions as a bridge stop or denture retainer. To relieve discomfort or pain that the patient experiences due to the initial presence of the cavity.
Classification of cavities
Amalgam restoration – in posterior teeth, where restoration strength and longevity are more of an issue than aesthetics. Composite restoration – in anterior teeth for esthetics, although more modern composite materials are also suitable for use in restorations in posterior teeth.
Cavity preparation
Thus, a Class II filling can be a mesial-occlusal (MO) filling on a premolar, or a mesial-occlusal-distal (MOD) filling on a molar. Thus, a Class V filling can be a cervical labial filling on an upper incisor or a lingual cervical filling on a lower molar.
Retention of fillings
Retention for plastic fillings is achieved simply by cutting small grooves in the walls of the cavity to make the inlet smaller than its internal dimensions, as shown in Figure 15.3. For fillings that span the occlusal and mesial, or occlusal and distal surfaces, a dovetail effect is created by scraping the cavity walls to prevent protrusion of the mesial or distal filling (see Figure 15.3).

Cavity lining
Protects the pulp from temperature fluctuations that can be transmitted by metal filling materials, and which are experienced as sensitivity or even pain in the tooth. Seals the pulp from any remaining caries bacteria, allowing secondary dentin to be laid down.
Moisture control
A rubber dam punch is used to punch a small hole in the rubber dam, which is then fitted so that the tooth protrudes through the hole. Floss or an additional piece of rubber dam material is used to process the layer between the teeth.

Equipment Handpieces
They are used for removing caries, cutting dentine (but not enamel), cutting dentures and other laboratory work. Short braids are also used for air turbine handles, but they have a simple shaft that gives a friction grip (Figure 15.10).

Role of the dental nurse during restorations
Temporary restorations
The biggest advantage of the cement over other temporary restorations is that it is soothing and non-irritating to the pulp and can be safely used in deep cavities. These various factors can be used to advantage depending on the specific use of the cement at the time.

Linings
Calcium hydroxide is the best material for lining non-metallic fillings, as it has no harmful effect on them or the pulp. Another base material must be inserted on top of the calcium hydroxide to provide a thicker layer of insulation against the conduction of heat or cold through the metal fillers.
Permanent restorations
The edges of the amalgam are fully adapted to the tooth surface using a polishing instrument so that no gaps or ridges remain. To avoid contamination of the air with mercury vapors, the following precautions must be taken.

Composite restorations
The procedure for placing a composite restoration is described below, along with a table of the additional instruments, equipment, and materials that may be required for the procedure. An overview of the materials and instruments involved is shown in Table 15.5, and the advantages and disadvantages of composite restoratives over others are shown in Table 15.6.

Non-surgical endodontics
The correct term for inflammation of the pulp is pulpitis, and this can present as one of the following events. Reversible pulpitis – does not cause pulp death and is only treated by a restorative filling of the tooth.
Diagnosis of irreversible pulpitis
In addition, periapical radiography can also be used as an indicator of tooth health. Patient medical history – some medical conditions contraindicate endodontic treatment due to the risk of residual infection.

Pulpectomy – conventional root canal therapy
The length of the root canal must be measured before further instrumentation is carried out - this is called the working length. The canal walls and the end of the master tip are coated with sealer and the tip is inserted into the root canal.

Pulpotomy
The pulp tissue is only removed from the pulp chamber within the crown of the tooth. Any potentially infected pulp tissue is only removed from the pulp chamber, using sharp sterile hand instruments, such as excavators, to separate it from the pulp lying in the root canal - the radicular pulp.
Open apex root filling
All pulpal stump bleeding is stopped using sterile cotton wool clamps and pressure. After a pulpotomy procedure, calcium hydroxide in the pulp chamber forms a hard tissue bridge that closes the entrance to the root canal, but in the open tooth filled with the root, it closes only the tip, gradually closing the size of the apical foramen. .
Pulp capping
The material must not be set so that it can be completely and easily removed and replaced at subsequent examinations while the tooth is undergoing treatment. The tooth is isolated from saliva contamination using moisture control techniques appropriate to the situation and to the patient.
Surgical endodontics
The procedure used to cap the tooth is illustrated in Figure 15.50 and is as follows. If a baby tooth is pulped, it can be left to exfoliate painlessly naturally.
Apicectomy
Local anesthesia is administered so that the tooth and all its surrounding soft tissues are numb. The tip is separated from the tooth with the help of a drill and removed from the bone cavity.
Use of antibiotics in endodontics
Prosthodontics is the branch of dentistry that involves the restoration or replacement of damaged or missing teeth using artificially constructed devices. This is then returned to the dentist for placement or fitting in the patient's mouth at a later date.
Impression materials used in prosthodontics
Because of this, it is necessary to take exact copies of the prepared teeth and/or dental arches and send them to the technician so that they can make an artificial restoration or replacement. The more commonly used elastic types of impression materials fall into one of the following categories.
Alginate impression material
Some alginates are presented as 'chromogenic' materials that change color during the mixing and curing phases to allow the tray to be loaded and the impression to be made at the optimal points. Table 16.1 Common impression materials used in dentistry. Once the material turns purple, it hardens and the impression can be removed from the patient's mouth.

Addition silicone impression material
The cure time for the silicone is usually 4 minutes or more, so adequate moisture control to maintain patient comfort is very important during this period. Paste materials are extremely sticky before they harden and must be handled carefully to avoid unnecessary mess.

Polyethers
While the one-stage technique is obviously faster, the two-stage technique ensures that adequate paste remains around the prepared tooth during tray insertion and gives a very accurate impression, while it can be displaced from the putty during tray insertion in the method with one phase. .
Impression handling
Attached work card, dentist reference, patient name and age, prosthesis to be made, material used, shade, additional features, delivery date for installation, disinfection details. Information on the work card should also be recorded in the patient's file or computer notes.

Impression trays
Those impressive trays available in a variety of child and adult sizes and preformed by the manufacturer are called "stock trays," while those hand-made in acrylic by the technician from an initial study model are called "special trays" (Figure 16.11).
Fixed prosthodontics
Temporary or permanent bridge - two or more crown-like units combined into a single device, at least one of which is intended to replace a missing tooth. Although some temporary crowns and bridges can be fabricated chairside using basic crown shapes or preoperative impressions to make them, all other fixed prostheses are sent by a technician to a fabrication lab.

Crowns
Fixed-fixed bridge where solid timber teeth are involved on either side of the missing teeth, as one solid design (Figure 16.27). Simple cantilever design where cantilever teeth are those that are only on one side of the pontic (Figure 16.29).

Oral hygiene instruction for crowns and bridges
A temporary bridge is needed between the bridge preparation and fitting visits to prevent tooth sensitivity, space closure and tipping or overeruption of the incisors. A composite-type resin (such as Tempase or Protemp) is placed in the part of the impression containing the incisors and pontic area, and the impression is then reinserted until the resin sets.
Veneers
The veneer is carefully tried on the tooth and the fit and shade are checked. The dual resin bond and cement are applied to the tooth and the veneer is carefully pushed over it with a driving action into the correct position.

Inlays
If the fit and color are satisfactory, the fitting surface of the veneer is coated with a silane agent, which allows the luting cement to chemically bond to it for good adhesion. Excess cement is carefully removed before light curing without disturbing the position of the veneer.
Removable prosthodontics
When fitting the inlay, the occlusion is checked as for crowns, and when correct, the inlay is cemented in place using any of the available cements. This prevents the ingress of saliva and reduces the possibility of the cement dissolving (dissolving), with subsequent loss of the inlay.
Full and partial acrylic dentures
Bite registration—the patient's existing or desired occlusal facial height is measured with a Willis bite gauge (Figure 16.39) and recorded on the occlusal edges by heating or Figure 16.38 Example of a denture clip. The bezels then hold the models in the correct position and angle for the fabrication of the dentures (Figure 16.40).

Full and partial chrome-cobalt dentures
Often a test of just the metal base is performed to ensure it is correct before proceeding with adding teeth to the design. A second test is then performed, with the teeth added and held in place with wax on the metal base.
Immediate replacement dentures
During the fitting phase, additional instructions are given to the patient to ensure that he or she never uses bleach-based denture cleaning products as they will corrode the metal. The aftercare instructions given to the patient on the day of extraction and placement are as follows.
Other removable prosthetic procedures
As a soft liner, when the soft tissue under the denture is constantly sore, for whatever reason, so that the denture cannot be worn routinely without causing great discomfort to the patient. The base of the prosthesis is then cut out by the technician and replaced by a soft tissue conditioner that acts as a cushion between the alveolar ridge and the prosthesis.
Obturators
Recording this real situation in an impression requires a material which takes hours while the prosthesis is being worn and used. When it is found to provide a comfortable and satisfactory fit, the prosthesis and its embedded impression are sent to the laboratory for the casting of a working model.
Overdentures
Orthodontic appliances
Fixed orthodontic appliances
Alastiks Elastic bands to hold the arch wire in the slots of each bracket Alastik holders Ratchet holders (similar to artery forceps) to apply the bracket. alastik on the brackets Brackets. Bracket Holders To hold each bracket and position it in the center of the tooth when replacement is required.

Removable orthodontic appliances
Regular use of revealing tablets to highlight problem areas where plaque is retained to minimize the risk of scaling. If the device must be removed for meals, ensure that it is placed securely in a rigid container to avoid breakage during meals.

Functional appliances
524 They are used to correct skeletal class II discrepancies where the mandible is further back from the ideal position and work by holding the mandible forward in the ideal class I position and allowing mandibular growth to occur and correct the malocclusion naturally. Since their success depends on the growth of the lower jaw, they can only be used while the patient is still growing, but after the premolars have erupted (these teeth are necessary for the retention of the appliance), so the ideal age is up to 14 years old.
General patient co-operation and motivation with orthodontic appliances
Any combination of these signs should alert the oral health team that treatment may not be successful, and cooperation should be intensified to ensure improvement or a decision should be made to discontinue treatment. A treatment interruption system should be in place so that patients are aware that failure to comply will result in premature removal of the device and incomplete treatment.
Dental implants
Operculectomy – surgical removal of the gingival flap covering a partially erupted tooth, especially a lower third molar. Periodontal flap surgery – surgical elevation and replacement of surgical flaps to enable subgingival debridement.

Extractions
Alveolectomy - surgical adjustment and removal of bone spurs from the alveolar ridge after tooth extraction to create a smooth base for denture placement. Soft tissue biopsies – partial or complete removal of soft tissue lesions in the mouth for pathological examination and diagnosis.
Reasons for tooth extraction
No replacement of the tooth can be performed to restore oral health until the tooth is extracted. The options available for the extraction procedure will then fall into one of the following categories.
Simple extractions
Right upper molars have curved handles and the beak blade is on the left side of the instrument. Lower molars have blades with beaks at right angles to the handles, to grasp the furcation of the two roots.

Surgical extractions
After the procedure, a complete list of postoperative instructions should be given verbally and in writing (Figure 17.9). Warm salt water mouth rinses should be performed after each meal, starting the day after the procedure for up to 1 week.
Extraction involving tooth sectioning
When the tooth only partially erupts and becomes impacted so that complete eruption cannot occur and the tooth becomes an area of stagnation. When a baby tooth cannot exfoliate because its root is attached to the alveolar bone and natural exfoliation cannot occur, the tooth is said to be ankylotic.
Extractions involving mucoperiosteal flaps
The mucoperiosteum is held tightly against the bone and must be cut and separated to its full thickness before bone removal can be performed – this is the mucoperiosteal flap (Figure 17.10). It must then be accurately stitched back into place long enough for reattachment to occur.

Tooth impaction
Horizontal impact – the tooth is lying on its side, pointing forwards, backwards or across the dental ridge. However, if the affected tooth is not causing any problems (that is, it is asymptomatic), then it is usually left in situ, as there are risks involved in having the tooth surgically extracted.

Complications of extractions
Bleeding – within a few hours of extraction (reaction bleeding) due to disruption of the blood clot and re-opening of ruptured blood vessels or after 24 hours (secondary bleeding) due to infection developing at the surgical site. Infection - between 2 and 4 days after the procedure and after the blood clot has been lost from the socket, the walls of the bone cavity become infected - the condition is called localized osteitis (dry cavity).
Tooth fracture
Oroantral fistula
Loss of the tooth
Bleeding
Infection
Blood clot infection can occur in neglected mouths where gum or periodontal infection is already present, and is especially likely to occur in patients who smoke. This breaks off the blood clot and leaves the socket bare, introducing microorganisms into the immediate vicinity.
The dental nurse’s duty
Hordes of microorganisms invade the socket, overwhelm the defensive white cells, disintegrate the blood clot and cause an acute inflammation of the unprotected bare bone of the socket. Disruption of the blood clot is caused by too much mouth rinsing shortly after extraction or by the patient poking at the extraction socket, especially with dirty fingers.
Accidental extraction
The periodontal membrane and pulp must retain their vitality and the tooth then erupts normally. The tooth should not be wrapped in anything, but should be left in the milk.
Use of antibiotics with minor oral surgery
As long as the periodontal membrane remains vital, the tooth can be pushed back into its socket, with complete success in many cases. Instruct them not to use any type of disinfectant or mouthwash solution to rinse the tooth.
Other minor oral surgery procedures
The source of infection is best removed by extracting the tooth or digging out any abscess present and draining as much pus as possible from the area. Third choice – erythromycin 250 mg four times a day for 5 days, for patients who are allergic to penicillin and its derivatives.
Operculectomy
The dangerous potentiating effect that antibiotics have in some drugs, especially oral anticoagulants - they increase the blood-thinning effect of anticoagulants, so that hemostasis cannot be achieved. Surgical removal of the operculum if the problem recurs, ideally using an electrosurgical cautery unit (Figure 17.20) rather than conventional techniques, as control of haemorrhage is far superior.
Alveolectomy and alveoplasty
Gingivectomy and gingivoplasty
This is the removal of the strip of the gingival margin at the level of the point of epithelial attachment (Fig. 17.22). Excess gum is removed with a gingivectomy knife or a knife used for periodontal flap surgery (see later).

Periodontal flap surgery
The remaining gingival flap is then reflected to reveal the underlying bone, root surface and any hidden subgingival calculus. Local delivery antibiotic systems such as Gengigel, Dentomycin, or Periochip can then be placed in these inaccessible areas to assist the healing process (see Figure 13.20).
Soft tissue biopsies
Cyst removal
Frenectomy
Patient monitoring during minor oral surgery procedures
Current patient monitoring for signs of complications includes the ability to observe the following. Preparation for practice – Registration Dental Team (GDC) learning outcomes 10, 31 prescription only medicines (POMS) 193–4 presenting oral health status 45.


