Part 1 Introduction
I
t’s important that you know about HTML5’s semantic markup basics and wide variety of APIs. For the introduction, we’ll cover these concepts briefly, but in heavy detail, to ramp you up.If you’re already building sites with HTML5’s new tag structure you could skip this section. However, you’ll miss advanced markup concepts such as ARIA and microdata (if you aren’t already familiar with them).
3
HTML5: from documents to applications
HTML5 is one of the hottest topics in web development, and with good reason. Not only is it the latest version of the markup language for the web, but it also defines a whole new standard for developing web applications. Previous iterations of HTML (and its rigid XML-based sibling, XHTML) have been centered primarily on the concept of HTML as a markup language for documents. HTML5 is the first version to embrace the web as a platform for web application development.
HTML5 defines a series of new elements that you can use to develop rich inter- net applications as well as a range of standard JavaScript APIs for browsers to imple- ment natively. A good example of HTML5’s new elements is <video>, which provides a means of playing video content in the browser without requiring an additional plug-in. HTML5 also provides the Media Element Interface that allows you to control video playback with JavaScript. It lets you create games, build mobile applications, and much more.
This chapter covers
■ The basics of using HTML5
■ New semantic markup and media features
■ New JavaScript APIs
■ Closely related web specifications
By the end of this chapter, you’ll have a broad sense of what HTML5 has to offer and be able to use it in your own web applications.
To get started, we’ll show you how to get up and running by creating an HTML5 document.
1.1 Exploring the markup: a whirlwind tour of HTML5
The best way to learn what’s new in HTML5 is to jump right in and explore. The goal of this section isn’t only to give you a high-level tour of the new features but also to give you enough knowledge to be able to update your existing applications to use HTML5 conventions, without upsetting users who don’t have the latest and greatest browsers.
In this chapter, you’ll learn
■ About great new features introduced in HTML5 and how to immediately use them in your web applications.
■ How to provide fallbacks and workarounds for users with older or incompatible browsers.
■ How to use ARIA (Accessible Rich Internet Applications) roles and microdata to further enhance the semantics of your HTML pages.
■ The wide range of JavaScript APIs available in HTML5 itself, as well as a number of closely related API specifications you can use in your applications.
Documents (HTML4) versus applications (HTML5)
Initially the web was all about documents. Forms were added by the Mosaic browser in 1993, but this was merely data entry; all application logic remained on the server.
The introduction of JavaScript in 1995 made browser-based applications theoretically possible, but things didn’t really take off until after the arrival of the XMLHTTPRequest object in 1999. The last major version of the HTML specification, 4.01, only became a recommendation in 1999. So it's not surprising that the 4.01 spec still concen- trated almost entirely on the use of markup to describe documents, what we now nor- mally refer to as semantic markup.
The next version of HTML has been a long time coming, and the web has changed a lot in the meantime. As you’ll see in the following sections, HTML5 contains improve- ments in the area of semantic markup. The majority of the differences and improve- ments in HTML5 over HTML4, however, are in facilities for building browser-based applications with JavaScript. Because of that, and because this book is focused on the new features of HTML5, we spend a lot more time dealing with JavaScript than with markup. We do cover some markup, but, as you’ll see, JavaScript is the real big deal in HTML5.
Let’s get started by examining the basic structure of an HTML5 document. If you’re not interested in the basics, you can read quickly until you reach section 1.2, which goes beyond semantic markup and into the HTML5 ecosystem.
1.1.1 Creating the basic structure of an HTML5 document
HTML5 documents are structured in the same way as older versions of HTML: you put a <!DOCTYPE> declaration at the top of the document and open and close the HTML document with matching <html> and </html> tags. Between these tags, you have a
<head> section, where you place <meta> information and other noncontent items such as stylesheets, and a <body> section, where your page content should go. If you’ve written HTML pages or applications before, none of this will be new to you, but you need to be aware of some subtle differences, which we’ll cover in this section:
■ The HTML5DOCTYPE declaration syntax.
■ How to use the opening <html> element.
■ How to use the shorter versions of the various elements in the <head> section.
Let’s look more closely at these differences by examining hello.html, the HTML5 equivalent of a “Hello, World!” application, shown in the following listing.
<!DOCTYPE html>
<html lang="en">
<head>
<meta charset="utf-8">
<title>Hello, HTML5!</title>
In this section, you’ll learn
■ How to create a basic HTML5 document structure.
■ How to use the new semantic elements to lay out a page.
■ How to deal with older versions of Internet Explorer that don’t recognize the new elements.
■ About the new form features you can implement immediately in HTML5.
■ How to use new UI elements, such as progress bars and collapsible sections.
Listing 1.1 hello.html—The basic structure of an HTML5 document
The DOCTYPE declaration in HTML5 is short and sweet—no ridiculously long DTDs and URLs to remember. This DOCTYPE will force standards mode in all modern browsers, so you can start using it in your applications immediately, without negative consequence.
The xmlns attribute from XHTML isn’t valid in the HTML serialization of HTML5, so don’t use it (see the sidebar “HTML and XML”). You should always use the lang attribute to specify the language of your documents.
The <meta> element now supports a charset attribute, allowing for a more memorable syntax than the older combination of http-equiv and content attributes for defining the page’s character set (in this case we’re using 8-bit Unicode). Note that in the XML serialization of HTML5 this tag is required to be self-closing (e.g., <meta charset="utf-8"/>).
See the sidebar “HTML and XML” for further details.
<link rel="stylesheet" href="style.css">
<script src="app.js"></script>
</head>
<body>
<h1>Hello, HTML5!</h1>
</body>
</html>
That’s a basic page structure. Next, we’ll show you how to use the new semantic ele- ments to construct a page—in this case, a sample blog post page.
1.1.2 Using the new semantic elements
If you’ve read about HTML5 before you picked up this book, chances are you’ve heard plenty about the new semantic elements. They’re important, particularly if you want search engines and assistive technologies such as screen readers to understand your pages better, but they’re no more difficult to use than the elements you know and love from HTML4.
Don’t get too excited about this new set of tags. If you’re expecting these new ele- ments to do something magical in terms of how they look on your page, you’re in for some disappointment. Using these new elements on your page is functionally equiva- lent to using a series of <div> elements; they behave as block elements by default and can be styled as required using CSS. Their importance comes from the standard semantic meaning they have.
HTML and XML
Previous versions of what we think of as the HTML specification were either HTML or XHTML. HTML markup was designed to be fairly forgiving, whereas XHTML was built around XML and a strict parsing model. XHTML required all elements to have closing tags (<br/> instead of <br>, for example) and all tags and attributes to be lowercase.
A single error would cause the whole page to fail. Because of this draconian error han- dling, most websites never properly implemented XHTML. They tended to use XHTML syntax forms but send pages with a content type of text/html, causing HTML pars- ing of the XML markup.
HTML5 unifies everything in a single specification by allowing both HTML and XML serializations; that is, the specification provides a vocabulary that can be expressed in either HTML or XHTML. The XHTML serialization must be sent with an XML content type such as application/xml+xhtml. It also conforms to XML parsing rules rather than HTML ones, requiring an xmlns declaration, closing tags, and so on. In the code download there are two additional versions of listing 1.1 showing the same markup in valid and invalid XHTML markup: hello-invalid.xhtml, which uses HTML syntax in an XML document, and hello-valid.xhtml, which corrects the markup to valid XML.
All modern browsers will assume that a stylesheet’s <link> element will have a type of text/css by default, so you can safely omit that attribute in your HTML5 documents.
Browsers assume that <script> elements have a type of text/javascript, so you don’t need to specify the attribute unless you’re using it for something other than JavaScript.
Consider, for example, a typical blog post, in which the web page contains a series of sections. First, you’d have the site heading and navigation, maybe some sidebar nav- igation, a main content area, a footer area with further navigation links, and perhaps some copyright and legal links. The next listing demonstrates how such a blog post might have been marked up in HTML4 or XHTML.
<div class="header">
<h1>My Site Name</h1>
<h2>My Site Slogan</h2>
<div class="nav">
<ul><!-- Main Site Nav here --></ul>
</div>
</div>
<div class="sidebar">
<h3>Links Heading</h3>
<ul><!-- Sidebar links --></ul>
</div>
<div class="main">
<h4>Blog Post Title</h4>
<div class="meta">
Published by Joe on 01 May 2011 @ 12:30pm </div>
<div class="post">
<!-- Actual blog post -->
</div>
</div>
<div class="footer">
<ul><!-- Footer links --></ul>
<!-- Copyright info -->
</div>
The previous code isn’t wrong. It’s perfectly valid to use it in HTML5, and you can absolutely continue to use <div> elements with semantic class names if you wish. But from a semantic point of view, this approach poses a couple of problems:
■ By using the old standard, you wind up separating areas of the blog post using named classes. This is fine, but the class-naming convention is up to the author.
Our “header” might be your “heading”; we call the main section “main,” but you might call it “body” or “article.”
■ Some people may prefer to use IDs instead of classes. They may use id=“header”
whereas others might use class=“header.”
In short, a search engine or other computer-controlled application has no way to reli- ably determine what each section represents.
This is where the new semantic elements come into play. Rather than using classes and IDs for sections like headings, navigation, and footers, you now use several different
Listing 1.2 html4-blog.html—HTML4 markup for a blog post
HTML elements, shown in the following listing. Add this code between the <body> tags of the hello.html file.
<header>
<hgroup>
<h1>My Site Name</h1>
<h2>My Site Slogan</h2>
</hgroup>
<nav>
<ul><!-- Main Site Nav Here --></ul>
</nav>
</header>
<nav>
<h1>Links Heading</h1>
<ul><!-- Sidebar links --></ul>
</nav>
<section>
<article>
<header>
<h1>Blog Post Title</h1>
<div class="meta">
Published by Joe on
<time datetime="2012-05-01T12:30+00:00">
01 May 2012 @ 12:30pm </time>
</div>
</header>
<section>
<!-- Actual blog post -->
</section>
</article>
</section>
<footer>
<ul><!-- Footer Links --></ul>
<!-- Copyright info -->
</footer>
TWOOTHERIMPORTANT HTML5 ELEMENTS: <ASIDE> AND <MARK>
We don’t want to move on without telling you about two other important HTML5 ele- ments that you’ll use a lot: <aside> and <mark>. You can use the <aside> element to define a section of a page that’s separate from the content area in which it’s defined.
Listing 1.3 html5-blog.html—HTML5 markup for a blog post
Reusable element for the title and other important details (blog post title, permalink, meta information).
Group’s numbered headings (<h1> to
<h6>).
You can have an <h1> in your <hgroup> and a separate <h1> in your <article>. Heading structure doesn’t operate as it did in HTML4.
Section of links within the article’s page. Specification says only “major navigation blocks” should use the
<nav> element, such as the main nav or table of contents.
Defines a chunk of content, such as a major wiki article section or an important form. Sections can have their own headers, navigation, and footers.
Marks a self-contained publishable component, which can be redistributed on its own, such as RSS entries, blog posts, comments, forum posts, news entries, and so on. Articles also allow headers, navigation, and footer elements.
Parsing dates is difficult, because of the many ways they’re presented. <time>
allows you to present the date/time format of your choice to the user along with a value computers can easily understand in the datetime attribute.
If the datetime attribute has been set, then the content of the
<time> element can be any text you want (e.g.,
“next Tuesday”), but if the datetime attribute is omitted, then the content has to be valid date and/or time format (see appendix B for examples).
This usually appears at the bottom of a page or section, typically used for things like related posts or links, copyright information, and metadata.
In a book or magazine, this might be represented as a sidebar that contains informa- tion on the same topic but doesn’t quite fit into the main article itself. For example, if you had a blog, you may have advertisements displaying alongside posts—these could be placed in an <aside> element. In a web application, you might use <aside> for a pop-up or a floating window that appears over the main part of the application itself.
You can use the <mark> element to represent a part of text in your document that should be marked or highlighted. A common use for this would be to highlight search terms within a document.
With the new semantic elements, not only is your page’s markup easier on the eye, but search engine spiders and assistive technologies will also more easily understand your pages. Speaking of assistive technologies brings us to our next important topic: ARIA roles.
1.1.3 Enhancing accessibility using ARIA roles
When building web applications, you must ensure that your application is accessible to all users, including those who require assistive technologies such as screen readers.
Ensuring that your documents are accessible requires careful consideration when it comes to the semantic meaning of your markup. Using simple HTML markup makes this relatively straightforward, and HTML5’s new elements improve the semantics even further. But when you’re creating web applications, it becomes much more difficult to cater to assistive technology. The increasing amount of JavaScript code used to dynamically modify web pages in modern web applications makes it far more difficult to deliver accessibility through good markup alone. This is where the Web Accessibil- ity Initiative (WAI) and ARIA standards come into play.
The WAI-ARIA specification aims to improve web applications by expanding on the accessibility information provided by the author of an HTML document. ARIA roles, relationships, states, and properties allow you to define exactly how your web applica- tion works in a way that an assistive technology such as a screen reader can under- stand. If, for example, you build a drop-down list out of a text input and an unordered list, you can apply the ARIA role combobox to the input element so that it can be rendered appropriately to the user’s device. The following listing shows an example of this style of markup taken directly from the WAI-ARIA 1.0 spec.
<input type="text"
aria-label="Tag"
role="combobox"
aria-autocomplete="list"
aria-owns="owned_listbox">
<ul role="listbox"
id="owned_listbox">
<li role="option">Zebra</li>
<li role="option">Zoom</li>
</ul>
Listing 1.4 ARIA combobox example from www.w3.org/TR/wai-aria/roles#combobox The role attribute allows you to
declare what sort of widget it is.
ARIA has a number of autocomplete types; in this case, a list will provide the combo values.
The element providing the autocomplete options will
have this ID. The unordered list has the role
listbox, to complement the type provided in the ARIA annotation.
This ID corresponds to the one given previously.
The HTML5 specification explicitly states that you may use the ARIA role and aria-*
attributes on HTML elements as described in the ARIA specification; this wasn’t allowed in HTML4. HTML5 also defines a set of default ARIA roles that apply to certain HTML elements. For example, it’s implied that a checkbox <input> element has an ARIA role of checkbox, and you shouldn’t explicitly use role or aria-* attributes that differ from those implied in these cases.
You’ll also find HTML elements where the native semantics can be modified so that they behave differently. For example, you might create an <a> element that behaves like a button and use it to submit a form after performing some validation. The HTML5 specification defines a list of valid semantics for these elements. When you use the <a> element to create a hyperlink, it assumes the link role by default, and if this is modified, its role can only be changed to one of the following: button, checkbox, menuitem, menuitemcheckbox, menuitemradio, tab, or treeitem.
For a complete list of the default, implied ARIA semantics, and the restrictions on how you can modify the semantics of certain elements, see the WAI-ARIA section of the HTML5 specification at http://mng.bz/6hb2.
1.1.4 Enabling support in Internet Explorer versions 6 to 8
A subject you may wonder about as you consider HTML5 elements is compatibility with older browsers, and rightly so. Each new version of HTML brings with it new elements that you can use in your documents. HTML5 is no different. Most modern browsers are more than capable of rendering these elements, even versions that don’t specifi- cally support them. The way that most browsers handle unrecognized elements is by rendering them like normal in-line <span> elements. All that is required is to set them to display: block with CSS. Unfortunately, Internet Explorer (IE) is the one exception.
In versions prior to IE9, the browser would render unrecognized elements but wouldn’t allow you to style them using Cascading Style Sheets (CSS). As you can imag- ine, this makes it difficult to start using the new HTML5 elements in a production application, because your users may still be using IE6, 7, or 8.
RENDERINGNEWELEMENTSPROPERLYIN IE
Fortunately, this problem has a simple remedy. If you want to use the element
<header> on your page and need to apply CSS styles, include the following snippet in the <head> section of your page. This will force IE to apply the CSS rules to the tag, even if the version of IE used doesn’t support a particular element natively:
<!--[if lte IE 8]>
<script>document.createElement("header");</script>
<![endif]-->
You’ll need to execute an equivalent of this JavaScript statement for every HTML5- specific element you wish to use in your page. As you’re doing this, it will cause IE ver- sions 6 to 8 to render the style correctly, with the problem persisting if you attempt to print the page.
RENDERINGNEWELEMENTSPROPERLYONPAGESPRINTEDFROM IE
Fortunately, a solution known as IE Print Protector fixes the printing issue. But rather than reinvent the wheel, we recommend you use an HTML shiv script. The most popular HTML5 shiv was originally created by Remy Sharp and has since been improved by many others. For more information and to get the latest version of the script, see http://mng.bz/50dt.
WARNING The HTML5 shiv solution requires JavaScript. If you want a JavaScript- free solution, you can use HTML5’s XML-based sibling, XHTML5, instead. See Eric Klingen’s post on the subject at http://mng.bz/QBIw.
What else can you do to boost the presence of your existing applications using HTML5? How about integrating easy features that jazz up your forms? Even though forms are ubiquitous, in HTML5 that doesn’t mean they have to be boring and plain.
1.1.5 Introducing HTML5’s new form features
It rarely receives acclaim, but the humble web form has played a major role in the emergence of the web as a platform for application development. HTML5’s focus on web applications led to many improvements in web forms, all of which you can use today, without breaking compatibility with older web browsers.
IMPROVINGTHESEMANTICSOFDATAINPUTUSINGNEWFORMINPUTTYPES
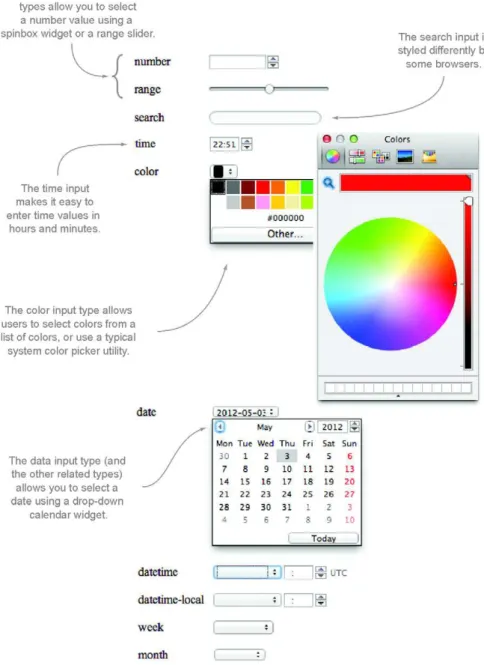
The basic text field has been used far beyond its primitive capabilities. In the same way that the <div> element was used in HTML4 for all sorts of block content, the text input is used for all sorts of textual input. HTML5 aims to ease its burden by offering a num- ber of new and backward-compatible types, each of which provides enhancements over the simple text field. Table 1.1 identifies the new input types in HTML5.
You can use these new input types in your web pages immediately because older browsers will fall back to a standard text input type when they find a type they don’t understand. Some of the new input types will also allow browsers to provide standard widget controls for given types of form fields. Figure 1.1 shows examples of these new widgets.
In chapter 2, you’ll learn about Modernizr, an HTML5 feature-detection script.
Using Modernizr, you’ll be able to detect if a browser supports a given input type, pro- viding a fallback JavaScript-powered widget if required.
Table 1.1 The new form input types introduced in HTML5
color date datetime datetime-local email
month number range search tel
time url week
NEWATTRIBUTESFORALTERINGTHEBEHAVIOROFFIELDS
In addition to new form field types, HTML5 introduces ten common attributes, shown in table 1.2, that allow you to alter the behavior of a given field. The placeholder
Figure 1.1 Examples of some of the new form input widgets introduced in HTML5. Note that not all browsers provide support for widgets yet.
attribute is an example of one of these new attributes, and it allows you to define text that will appear in the field before it contains a value. This is illustrated in figure 1.2.
Table 1.2 provides a list of the new input attributes introduced in HTML5. You’ll look at which attributes apply to which input types in chapter 2.
NEWATTRIBUTESFORPERFORMINGCLIENT-SIDEVALIDATION
Some of these attributes allow the browser to perform client-side validation without JavaScript. For example, the required attribute specifies that a field must be popu- lated, or the browser will produce an error. The pattern attribute allows you to define a regular expression that the input value will be tested against. The max and min attri- butes allow you to restrict the maximum and minimum values on number and date field types.
In addition, the browser will perform validation on some of the new input types to warn users when they have entered values in an incorrect format. If the user enters an invalid email address in an email input field, for example, the browser will flag an error and prevent the form from being submitted to the server.
WARNING You should never rely solely on client-side validation, whether it’s the new native browser validation in HTML5 or JavaScript validation code. It’s easy to bypass client-side validation, so you should always check input on the server side. Client-side validation should be used to improve the user experi- ence, not as application security.
You’ll learn much more about the new input types and attributes in chapter 2. First we’ll show you other new elements introduced in HTML5 that you can easily, and immediately, integrate into your applications.
1.1.6 Progress bars, meters, and collapsible content
HTML5 defines a series of new elements that you can use to convey information to the user. These include widgets that developers would previously have relied on third-party JavaScript libraries for, such as progress bars, meters, and collapsible sections.
Table 1.2 HTML5’s new input element attributes
autocomplete autofocus list max min
multiple pattern placeholder
required step Figure 1.2 You can use the new placeholder attribute to provide a piece of text that should be displayed in a field when it’s empty. This text is typically gray and will be removed when you populate the field with a value.
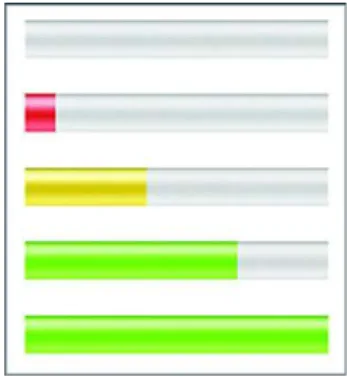
USINGPROGRESSBARSTOSHOWPERCENTAGECOMPLETION
The <progress> element allows you to present the user with either a determinate or indeterminate progress bar. A determinate progress bar has a given value, and the bar will fill up to that value—this is useful for displaying the progress of a file upload, where you dynamically update the value of the progress bar as the file is uploaded. An indeterminate progress bar has no particular value, and the bar will be full but ani- mated—this is useful for informing the user that the application is loading when you’re unsure of the exact progress of the operation. An example of both types of progress bar is shown in figure 1.3.
The code to create the progress bars in figure 1.3 is as follows:
<progress value="50" max="100"></progress>
<progress></progress>
USINGMETERSTOSHOWUSERSMEASURESWITHINKNOWNRANGES
Following along the same path as the <progress> element is the <meter> element.
You’d use the <progress> element primarily to show the percentage of completion of a task and you’d use the <meter> element to give a representation of a scalar measure- ment within a known range. In addition to showing the value using a filled bar graphic, the <meter> element allows you to define low, high, and optimum ranges that you can use to give further meaning. When the value is in the low range, the meter will display in red; in the medium range, it’ll display in yellow; and in the high and optimum ranges, it’ll display in green. Figure 1.4 illustrates the appearances the
<meter> element can have.
The code for the <meter> element in figure 1.4 is as follows:
<meter min="0" max="10" low="3" high="7" optimum="9" value="0"></meter>
<meter min="0" max="10" low="3" high="7" optimum="9" value="1"></meter>
<meter min="0" max="10" low="3" high="7" optimum="9" value="4"></meter>
<meter min="0" max="10" low="3" high="7" optimum="9" value="7"></meter>
<meter min="0" max="10" low="3" high="7" optimum="9" value="10"></meter>
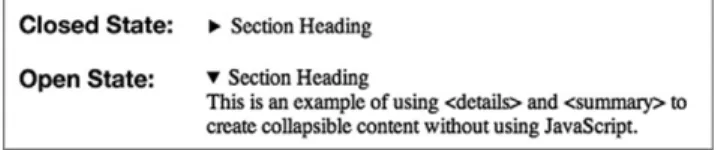
USINGDETAILSANDSUMMARYTOCREATECOLLAPSIBLECONTENTWITHOUT JAVASCRIPT
In the past, the only way to create collapsible content sections was to use JavaScript to toggle the display CSS property of the section so it would show or hide. HTML5 Figure 1.3 The left-hand progress bar is an example of a
determinate progress bar. In this example, the value of the bar is set to 50 percent, and the appearance of the bar reflects this because it’s half filled. The right-hand progress bar is an indeterminate bar and doesn’t have a value. It displays an animated full bar to indicate that something’s happening, but the percentage complete isn’t known.
Determinate progress bar must have a value and optionally a max attribute.
Indeterminate progress bar has no value.
Define the ranges of a meter using the min, max, low, high, and optimum attributes.
introduces the <details> and <summary> elements to provide a script-free method for providing such functionality. Figure 1.5 illustrates these new elements in action.
The code to create the <details> and <summary> example is as follows:
<details>
<summary>Section Heading</summary>
This is an example of using <details> and <summary>
to create collapsible content without using JavaScript.
</details>
Unfortunately, browser support for these new elements has been rather slow to date.
Fortunately, it’s simple to provide a fallback for this using JavaScript, several of which are provided at http://mng.bz/cJhc.
Using the techniques you learned in this section, you should now be able to update your existing applications to use HTML5 conventions, without having a nega- tive impact on users who lack the latest and greatest browser. In the next section, you’ll learn how you can take things further by going beyond HTML markup and using related concepts such as CSS3 and JavaScript to improve the style and interactiv- ity of your documents.
1.2 Beyond the markup: additional web standards
As we mentioned, the web is no longer all about documents; it’s a platform for applica- tion development. As a result, HTML5 doesn’t include only markup for outlining docu- ment structure; it also encompasses many more features and associated specifications
Figure 1.4 A screenshot of the states in which you can represent a <meter> element:
empty, low, medium, high, and full.
Figure 1.5 An example of the <details> and <summary>
elements in action, first in the closed state, where only the code inside the <summary> element is visible, and second in the open state, where the entire contents of the <details> element are visible.
for ensuring that your applications look great and provide the best possible experi- ence to the user. One example of this is microdata and the associated Microdata API, which enable you to provide additional semantics in your documents and then retrieve and modify them. Another example is CSS3; its evolved stylesheets allow you to apply the latest innovations in styling and effects—without relying on external images and JavaScript hacks.
To begin, let’s look at microdata.
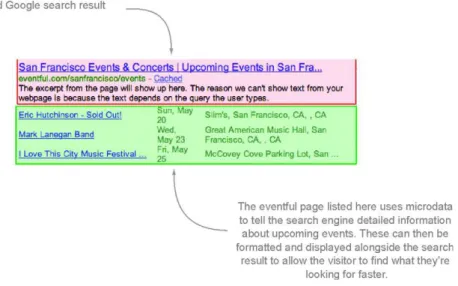
1.2.1 Microdata
Microdata in HTML5 allows you to add semantic information to a web page, which in turn could be used by applications such as search engines and web browsers to provide additional functionality to the user based on that data. An example of how Google uses microdata to provide smart search results is illustrated in figure 1.6.
In this section, you’ll learn
■ How to use microdata and microdata vocabularies to provide search engines with better information about your pages.
■ The microdata DOM API that lets you dynamically retrieve and modify microdata items using JavaScript.
■ Several of the new features in CSS3 that allow you to enhance the visual appeal of your applications while providing better user interactions and feedback.
■ How HTML5 treats JavaScript as a first-class citizen with detailed specifications and advanced APIs.
Figure 1.6 Google reads microdata from HTML documents to provide improved search results to users. By using microdata in your pages, you enable Google to provide similar search result listings for your website or application.
To use microdata, you need a vocabulary, which defines the semantics you’ll use. You can define your own vocabularies, but more likely you’ll want to use a published vocabulary, such as those provided by Google at www.data-vocabulary.org/, including Event, Organization, Person, Product, Review, Review-aggregate, Breadcrumb, Offer, and AggregateOffer. By using a published vocabulary, you can be sure search engines and other applications will interpret your microdata consistently.
Listing 1.5 illustrates microdata in action using an event item that adheres to Google’s Event microdata vocabulary at www.data-vocabulary.org/Event. This code creates a snippet of HTML code for an event, with defined microdata properties that will allow a search engine to unambiguously interpret the event information and use it to enhance search results, perhaps by showing the event date in a calendar or as a location on a map.
<div itemscope itemtype="http://data-vocabulary.org/Event">
<a href="http://example.com/event/1" itemprop="url">
<span itemprop="summary">John's 40th Birthday Party</span>
</a>
<span itemprop="description">To celebrate John turning 40, we're throwing a BBQ party in his honour this Friday evening at close of business. Please come and bring your friends and family!</span>
Location:
<span itemprop="location"
itemscope
itemtype=http://data-vocabulary.org/Address>
<span itemprop="street-address">500 Market Way</span>
<span itemprop="locality">Ballincollig</span>
<span itemprop="region">Cork</span>
</span>
Date and Time:
<time itemprop="startDate" datetime="2011-05-06T18:00+00:00">
Fri, May 6th @ 6pm </time>
</div>
The HTML5 specification also defines a DOM API that you can use to dynamically retrieve and modify microdata items using JavaScript. Descriptions of the API are pro- vided in table 1.3.
Listing 1.5 html5-microdata.html—Microdata in action
Table 1.3 The microdata DOM API
Method/property Description
document.getItems([types]) Gets all elements that are top-level microdata items (ele- ments with an itemscope attribute). You can use the types argument to filter by one or more itemtype attri- bute values.
The itemscope attribute tells the parser that this element and everything contained inside it describes the entity being referenced. The value of this attribute is Boolean and is usually omitted.
The itemtype attribute defines the URL at which the vocabulary for the item being specified is found.
The itemprop attribute indicates the name of the microdata property that the content of the element should be assigned to.
This attribute is the one you’ll likely use the most when working with microdata.
Using microdata is an excellent way to improve how your application (or document) looks in search results. In the next section, you’ll learn how you can use CSS3 to make your application visually stunning with the new styles and effects it has to offer.
1.2.2 CSS3
If you’ve been developing on the web for a long time, you may remember when styling HTML documents was facilitated by the use of elements like <font> and the clever use of <table> elements. Thankfully, the introduction of Cascading Style Sheets has meant that such approaches are no longer necessary.
As the web has evolved, developers have come up with innovative ways to present content, using effects like drop shadows, rounded corners, and gradients to improve their application’s visual appeal. Even more impressive has been the use of transition and animation to provide better feedback to and interaction with the user.
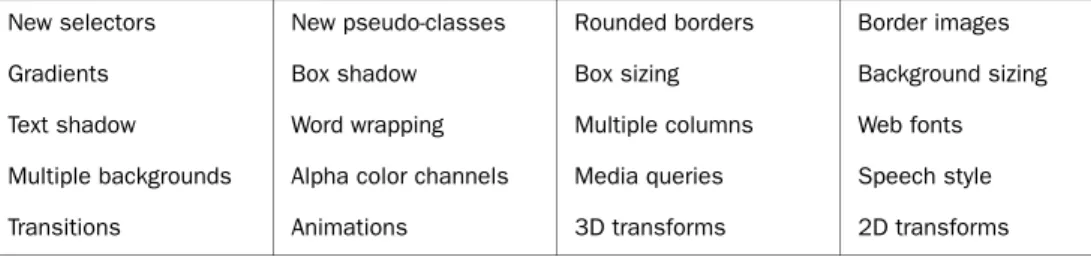
The main issue with all of these wonderful enhancements is that they’ve tradition- ally required a degree of trickery to implement using images and JavaScript (or at least required the use of a JavaScript library). CSS3 sets out to change that. Table 1.4 lists some of the new style features available in CSS3—all without JavaScript or the clever use of images.
As you work through the samples in this book, you’ll learn to build applications pri- marily using HTML and JavaScript. We do use CSS3 throughout for styling, but we won’t be covering it in the chapters themselves. You can download the CSS source for all the examples from the book’s web page. If you’re looking for detailed insight into CSS3, check out Hello! HTML5 and CSS3 (Manning, 2012). Rob Crowther, the author of that book, is one of this book’s coauthors.
element.properties Gets all item properties (those elements with an itemprop attribute) for a given microdata item (element).
element.itemValue[=value] Gets or sets the value of an item property.
Table 1.4 A partial list of the new features in CSS3
New selectors New pseudo-classes Rounded borders Border images
Gradients Box shadow Box sizing Background sizing
Text shadow Word wrapping Multiple columns Web fonts
Multiple backgrounds Alpha color channels Media queries Speech style
Transitions Animations 3D transforms 2D transforms
Table 1.3 The microdata DOM API (continued)
Method/property Description
1.2.3 JavaScript and the DOM
JavaScript and the Document Object Model (DOM) play a hugely important role in modern web applications. The ability to dynamically interact with elements on the page has enabled developers to provide rich functionality and interactivity previously found only in desktop applications. The advent of Asynchronous JavaScript and XML (AJAX) has removed the burden of page refreshes, allowing server-side actions to be updated inline, providing a much-improved user experience. JavaScript Object Nota- tion (JSON) has become the de facto data interchange format for web applications, with most server-side languages and frameworks now supporting it natively. In addi- tion, a range of powerful JavaScript frameworks and libraries has risen to provide an abstraction of JavaScript that allows developers to worry less about the cross-browser inconsistencies that plagued earlier web development, concentrating their efforts more on crafting highly functional applications.
WARNING Each and every chapter in this book shows you to how to build powerful applications using HTML5 and JavaScript. But this isn’t a book for JavaScript beginners. At the least, you should be familiar with JavaScript syn- tax and the basics like variable declarations, conditional statements, func- tions, closures, callbacks, and scopes as well as other concepts like AJAX, JSON, and interacting with the DOM. If you have experience using JavaScript libraries such as jQuery, you should be able to follow along. To learn more about JavaScript or if you’re feeling rusty, check out Ajax in Action (Manning, 2005) by David Crane and Eric Pascarello with Darren James and Secrets of the JavaScript Ninja (Manning, 2012) by John Resig and Bear Bibeault.
In previous versions of the HTML (and XHTML) specification, the only coverage of JavaScript was a minor section on use of the <script> element and some of the attri- butes that could be added to HTML elements to provide event-handling functionality.
In HTML5, JavaScript is treated as a first-class citizen, with each section of the specifi- cation detailing what DOM API methods and properties are available for any given element. In addition, HTML5 defines advanced APIs that allow you to develop appli- cations that use audio and video, work offline, store data locally on the client, and do much more. We’ll cover these APIs briefly later in this chapter and in greater detail throughout the book.
HTML5 vs. HTML Living Standard vs. HTML5 for web developers
The HTML5 specification has a long history. Without getting caught up in the details, the end result is that the specification has two versions, both with the same editor:
Ian Hickson of Google. The HTML5 specification is published by the W3C, whereas the HTML Living Standard specification is published by WHATWG (Web Hypertext Application Technology Working Group). To make things even more confusing, WHATWG also published a document, “HTML5: A technical specification for web developers,” which is more concise and easier to read.
In the next section, we’ll take a look at the DOMAPIs currently included in the HTML5 specification itself.
1.3 The HTML5 DOM APIs
DOMAPIs exist for nearly everything in HTML5. In fact, many have been around for a long time but have never been defined in the HTML specification itself. These include features that enable you to get a DOM element by its ID attribute and that allow you to manipulate form element values. All of this is included in HTML5 and the specifica- tion also defines new DOMAPIs for developing advanced applications, many of which aren’t at all associated with HTML elements.
We cover all of these topics in great detail throughout the book, with full working examples that often integrate multiple APIs at once. In this chapter, you’ll get a glimpse of what’s to come, starting with the new <canvas> element and its associ- ated API.
(continued)
The specifications are similar in many respects, but you’ll find considerable differ- ences. For example, the HTML Living Standard specification includes several APIs that are published as completely separate specifications by the W3C, such as Microdata, Web Storage, and Web Workers. For the latest differences between the specifications, see “Is this HTML5?” in the HTML Living Standard specification at http://mng.bz/PraC.
In this chapter, we treat the APIs that exist in the HTML Living Standard as “part of HTML5 itself” and any APIs outside of that specification as separate. As you progress in the book, you’ll see that we’re much less concerned about the differences and treat any of the new specifications as “HTML5.” For further discussion of the differ- ences between the WHATWG and W3C versions as well as the differences in approach between the WHATWG and W3C themselves, see appendix A.
This section provides an overview of the new DOM APIs in HTML5:
■ 2D Canvas
■ Audio and Video
■ Drag and Drop
■ Cross-document Messaging
■ Server-sent Events
■ WebSockets
■ Document Editing
■ Web Storage
■ Offline Web Applications
1.3.1 Canvas
HTML5 provides numerous elements that allow you to present information on a web page. You can style these in many different ways, and you can use JavaScript to ani- mate them and apply dynamic effects. If you’re comfortable with complex JavaScript code (and expect your users to be running high-performance browsers), you can do amazing things with HTML and JavaScript.
The problem is, designers and developers have many things they may want to implement that HTML doesn’t cater to. What if you want to insert a circle, square, or other shape? What if you want to display an image and dynamically alter it based on user selections, on the fly? You could use static images or a server-side solution, but these aren’t optimal. The only viable solution had been to use a third-party plug-in such as Adobe Flash.
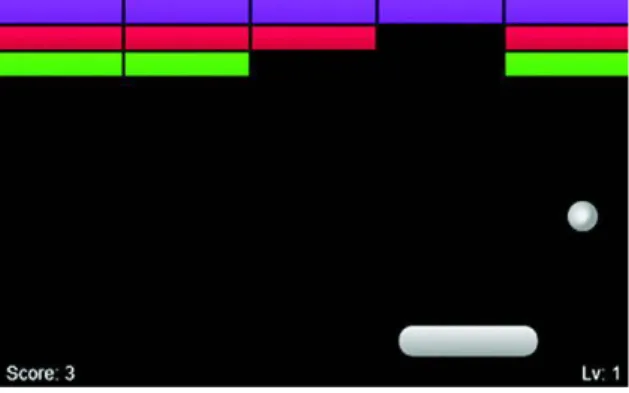
HTML5 introduces the <canvas> element and a series of related drawing APIs that will allow you to do amazing things, without requiring the user to install a plug-in. The <canvas> element’s name describes this new feature well: it’s a canvas for your web pages. Figure 1.7 depicts a game, “Canvas Break,” which we created entirely in HTML5 and JavaScript, with the game’s visuals output on a <canvas> ele- ment. Neat, huh? You’ll learn how to use the Canvas API as you build this game your- self in chapter 6.
The Canvas API defines a 2D context, which provides a series of methods for draw- ing on the canvas. These include methods to create shapes, define paths, use color and gradients, provide text, and much more. The API also provides developers with a way to export the current content of the canvas as a PNG or JPG format image using data URLs or Blob objects.
1.3.2 Audio and video
The majority of internet bandwidth in recent years has been driven by the delivery of multimedia content: video and audio. Today, the majority of web video is deployed in Flash video (FLV) format, an Adobe Flash container for various types of video codec. If users have a Flash plug-in installed, they can view the video. Some developers have raised questions about the security and performance of Flash as a platform for video
Figure 1.7 The <canvas> element allows developers to present information in more creative ways. You’ll learn how to build this game in chapter 6.
delivery and are looking for alternative solutions. In addition, the lack of support for Flash on mobile devices has meant that if you want your multimedia content to be available on devices such as the iPad, you’re out of luck.
HTML5 provides a solution for this with the new <video> and <audio> elements, which allow supported multimedia files to be played back natively by the browser, with no third-party plug-ins required. An example is shown in figure 1.8.
The <video> and <audio> elements both support the <track> element, which you can use to deliver accompanying text content such as subtitles. You can use the
<source> element to provide a variety of file formats, ensuring that visitors can con- sume the content, regardless of what OS or browser they’re using.
HTML5 also defines an API with a series of methods for controlling the playback of a video or audio file. These include methods for playing, pausing, fast-forwarding, rewinding, adjusting the volume, and more. You’ll learn about these APIs in detail as you build a working video jukebox with telestration capabilities in chapter 8.
1.3.3 Drag and drop
Lack of drag-and-drop interactivity had been an issue that has plagued web applica- tion developers for a long time. This type of functionality has been prevalent in desktop applications for as long as graphical UIs have been around. As a result, users have come to expect to be able to drag objects around applications and are sometimes shocked to learn that their favorite web applications can’t do it.
Attempts at implementing drag and drop in the browser began in the late 1990s, with Netscape 4.0 providing a basic implementation and Microsoft following up with a more complete offering in IE 5.0. At the time, it was seen as a nonstandard,
Figure 1.8 YouTube HTML5 video in action. As you can see from the code in the inspector, the YouTube video in this screenshot doesn’t use the Adobe Flash plug-in but is fully implemented using the HTML5
<video> element and related APIs.
browser-specific extension to IE, but over time other browser vendors adopted the same API, leading to its eventual inclusion in HTML5.
The great news is that HTML5 drag and drop is supported on all modern browsers, including IE from version 5.0 up. The bad news is that the original Microsoft imple- mentation used is, quite frankly, terrible. Ian Hickson, the editor of the HTML5 speci- fication, once tweeted, “The drag-and-drop API is horrible, but it has one thing going for it: IE6 implements it, as do Safari and Firefox.”
To use drag and drop in HTML5, you can use the draggable attribute on an ele- ment to explicitly define that element as draggable. (Many elements, such as images, are draggable by default.) You can then use a series of events to listen for changes as the user drags the element into and out of other elements and indeed when the user drops the element. The API allows you to set the data you want to associate with the drag operation and then to read this back when dropped.
A new feature of HTML5 drag and drop is the ability to drag files from your com- puter and drop them into a web application. An example of this functionality can be seen in Gmail, as shown in figure 1.9.
You’ll learn how to use drag and drop to import and export files from an applica- tion in chapter 3.
1.3.4 Cross-document messaging, server-sent events, and WebSockets
Web applications work on a request-response model, where the client issues a request to the server, and the server in turn sends a response to the client. After this, if the client requires further information from the server, the client needs to initiate another request.
This makes it difficult to send changes from the server to the client, without frequently sending requests to check for these changes. In this section, you’ll learn about some of the new messaging features in HTML5 that allow the server to communicate with the cli- ent. Before that, let’s look at how to use messaging to send updates between documents.
Figure 1.9 Gmail allows you to drag files into the browser window and drop them into a designated area to add them as attachments to your messages.
ENABLINGCOMMUNICATIONBETWEENCLIENTSWITHCROSS-DOCUMENTANDCHANNELMESSAGING
When working with web applications that use multiple browser windows, you’ll often want to pass messages between the documents in each window. Traditionally, this was accomplished using direct DOM manipulation. For example, an old airline reservation system may have opened a calendar widget in a new browser window, and when the user clicked a date, it would directly manipulate the value of the date form field on the parent window.
One problem with direct DOM manipulation is that it directly connects the two documents; each document has to have detailed knowledge of the structure of the other in order to manipulate each other to share information. HTML5 provides a much-improved solution in the form of cross-document messaging and channel mes- saging, illustrated in figure 1.10.
Cross-document messaging enables documents to communicate with each other via messages—one document posts a message, and the other document has an event handler registered to listen for any messages posted by the other document.
Another issue with direct DOM manipulation surfaces when you consider the security of including remote script files in your application—a common use case for imple- menting the likes of Google Analytics and Facebook “Like” buttons in your applica- tions. These scripts have complete access to your entire DOM—it’s not possible to give them only partial access when they’re loaded this way. Cross-document messaging works cross-domain, enabling messages to be sent between separate applications with- out exposing each application’s DOM.
Figure 1.10 A simple application demonstrating channel messaging. You'll build this in appendix J, one of the companion appendices to chapter 4.
ENABLINGONE-WAYCOMMUNICATIONSFROMSERVERTOCLIENTWITHSERVER-SENTEVENTS
Cross-document messaging is a great way to communicate between two clients—but what if you want to allow your web server to send mes- sages that can be read by the browser? Server- sent events are designed to do that. Using the EventSource interface, your application can subscribe to a server-side event stream, which will only receive messages when the server sends an update. This is a considerable improvement over approaches like AJAX long polling, which can be cumbersome to implement. This works well for a chat application, where you can post new chat messages using AJAX and receive any chat messages from other users over the event stream. Figure 1.11 is a screenshot of such an application, which you’ll build later on.
ENABLINGTWO-WAYCOMMUNICATIONSBETWEENSERVERANDCLIENTWITH WEBSOCKETS
The obvious drawback with server-sent events is that they only facilitate one-way com- munication—messages can only be sent from the server to the client, not vice versa. If you need two-way communication, HTML5 provides WebSockets—bare-bones net- working between clients and servers, without the overhead associated with HTTP. Web- Sockets are great for passing small amounts of data quickly, which is critical in applications like online multiplayer games and time-sensitive financial systems.
In chapter 4, you’ll learn how to use all three of these new messaging technologies as you build a simple chat application and a multiuser planning board, using server- sent events and WebSockets via Node.js, and then allow them to communicate with each other through cross-document messaging.
1.3.5 Document editing
Earlier in this chapter, we talked about the new forms features in HTML5. Web forms are a great means of capturing simple plain-text user input, but they don’t allow the user to edit HTML content. Sure, you could load HTML source code in a <textarea>
element and allow the user to edit that, but wouldn’t it be great if you could allow the user to edit the content using a series of rich-text editing controls?
HTML5 defines two new attributes that allow you to enable rich-text editing in your HTML documents. The first, contenteditable, can be set on any HTML element in your page to make that element editable. The second, designMode, can be set on the HTML document itself to make the entire document editable.
These attributes are supported by all modern browsers and were first introduced by Microsoft in IE 5.5.
Figure 1.11 A chat application implemented using server-sent events
When an element or document is editable, you can manipulate its content using the API method document.execCommand, part of the Editing DOM API in HTML5. This method accepts a wide selection of commands that will be applied to the current selection or block, such as Bold, Italic, CreateLink, and many others. An example of the type of editor you can create with this functionality is shown in figure 1.12; even better, you’ll learn how to use these new features as you build that rich-text editor in chapter 3.
1.3.6 Web storage
For many years, web applications have used cookies to store small chunks of data in the client that persist for the session or between multiple sessions. This is the technol- ogy underlying web authentication systems—they store on the client a cookie that
Figure 1.12 The Super HTML5 Editor application that you’ll learn to build in chapter 3 uses the designMode attribute and the Editing DOM API to allow users to edit HTML markup using a set of rich-text editing controls. The toolbar in this screenshot allows you to use Bold, Italic, Underline, Strikethrough, List, Link, and Image formatting commands on the contents of the area below the toolbar.
holds some form of identifier used to tell the application who’s logged in. Cookies present a number of issues, making them less useful for storing all but the smallest chunks of data.
The first issue is that most browsers limit the size of cookies to 4 kilobytes, and the number of cookies stored per domain to 20. After reaching these limits, the browser will start discarding older cookies to make way for the newer ones, which means there’s no guarantee it’ll keep them. Another issue is that when an application uses cookies, those cookies are sent in every HTTP request made for the session, adding overhead to each and every transaction. This might not be an issue if you’re using one or two cookies, but what if you use several? And consider that the cookies will be sent along with every HTTP request—slowing down every page load and AJAX request your application makes.
The Web Storage DOM API provides a JavaScript alternative to cookies for web applications. It defines two interfaces:
■ sessionStorage—Client-side data storage that persists for the length of the current session only
■ localStorage—Client-side data storage that persists for multiple sessions These APIs expose methods that allow developers to
store simple key/value pair data in a client-side store. The data items stored using these interfaces are accessible only by pages in the same domain. In chapter 5 you’ll build the application shown in fig- ure 1.13, which stores user settings and preferences in local storage.
Although the Web Storage API can store mega- bytes of data (5 megabytes is the limit imposed by most browsers), it’s not ideal for storing complex data structures that would typically be stored in a database. Later in this chapter, you’ll learn about IndexedDB, which defines a full indexed database API for storing data locally on the client.
1.3.7 Offline web applications
These days, it seems we’re permanently online—our internet connections are always on, our mobile devices have data plans that work over cellular data networks, and now we can even get connected as we travel by air. That said, we may still have times when we need to make do with working offline. Maybe your network
connection is down, or you’re abroad and don’t want to pay exorbitant data roaming fees. Or you’re using one of the few devices that doesn’t have a wireless data connection.
Figure 1.13 In chapter 5, you’ll learn how to use the
localStorage interface to persist user settings in a mobile task-management application.
Solutions have long existed for saving HTML documents for offline use. As useful as these are for reading static content like news articles, they’re useless when it comes to web applications. HTML5 goes a step beyond saving documents, by providing develop- ers the ability to define a cache manifest file that defines how their applications’ files should be cached for offline use.
The cache manifest file can also define those files that shouldn’t be cached for offline use. In this case, a fallback can be provided that will be loaded by the browser when the user is offline. This enables you to provide separate files for online and offline use.
An example use case might be where your application saves data to a database on a server. When online, the application may perform AJAX requests to retrieve and update data on this database. In the background, the application may be storing data locally in an IndexedDB database, which we’ll talk more about in an upcoming sec- tion. Now, when the user is offline, the application could load a JavaScript file specifi- cally designed for use in offline mode. Instead of firing AJAX requests to the server, it would retrieve and modify the data in the local IndexedDB database. The next time the user connects to the network, the application can then submit the data from the local database to the server-side database.
You’ll learn how to develop the offline-capable web application shown in figure 1.14 in chapter 5.
1.4 Additional APIs and specifications
As you learned earlier, the HTML5 family doesn’t stop at the HTML5 specification itself. A host of other technologies and specifications exist that define new functionality,
Figure 1.14 A screenshot of the mobile application with offline capabilities that you’ll create in chapter 5
which modern browser vendors are steadily including in their latest offerings, such as the Geolocation API; the IndexedDBAPI; the File Reader, File Writer, and File System APIs; and SVG and WebGL.
We’ll talk about each ancillary yet important specification, starting with Geolocation.
1.4.1 Geolocation API
As mobile device usage has surged in recent years, so has the use of location-aware applications. The Global Positioning System (GPS) sensors found on modern smart- phones enable applications to locate users to a high degree of accuracy. If GPS isn’t available (if the device doesn’t have a sensor, or if the user is out of satellite line of sight), devices can fall back to other means of tracking location, using information such as your cellular network, Wi-Fi network, or IP address.
The Geolocation API defines methods that allow web applications to find a user’s location. When these methods are called, the browser will notify the user that the appli- cation is requesting access to their location. The user can then choose to accept or reject this request, ensuring that applications don’t track user location without their express prior permission. If the user accepts the request, the API then provides the application with a series of data about the user’s location including coordinates (latitude and longi- tude), altitude, heading, and speed, as well as the level of accuracy of the result.
You’ll learn how to use geolocation in chapter 3, where you’ll use it to get the user’s current location and include a map of that location in an HTML document (fig- ure 1.15).
1.4.2 Indexed database (IndexedDB API)
The IndexedDBAPI provides developers with a means of storing complex data struc- tures in a full client-side database. The main advantage of the IndexedDBAPI over the Web Storage API is that in Web Storage the only index is the key of the key/value pair, whereas in IndexedDB the values are fully indexable too, making it a more viable solu- tion for any application where you need to search or filter data. The trade-off is that the API for IndexedDB is much more complex, and it can be difficult to get to grips with initially.
In this section, you’ll learn
■ The Geolocation API and how you can use it to determine a user’s geographic location
■ The IndexedDB API and how it allows you to store an entire database on the cli- ent side
■ File-oriented specifications and how you can use them to work with and store files locally on the user’s filesystem
■ SVG and WebGL and how they’re enabling developers to produce impressive high-quality vector graphics and 3D animations on the web