199
SVG: responsive in-browser graphics
Scalable Vector Graphics (SVG), an XML language for creating vector graphics, has been around since 2001. Its draft isn’t part of HTML5, but the HTML5 specification gives you the ability to use SVG directly in your HTML markup. When you harness SVG’s power, simple shapes, gradients, and complex illustrations will automatically adjust to your website and application’s layout. What could be better than images that automatically resize without degrading? How about creating images inside HTML5 documents without graphical editing programs like Photoshop or Illustra- tor? That’s the power of SVG.
As the chapter unfolds, you’ll glide through a refresher on bitmaps and vectors to understand how SVG works. Then, you’ll start constructing the chapter’s teach- ing application, SVG Aliens, by developing SVG assets for constructing UFOs, ships, and shields with simple XML tags. With all the necessary components set up, you’ll
This chapter covers
■ Comparing bitmap and vector graphics
■ Creating SVG from scratch
■ Harnessing SVG for liquid layout graphics
■ Using JavaScript with SVG
■ Using SVG versus Canvas
focus on integrating JavaScript to bring your creations to life and allow players to interact with the game’s assets. You’ll polish your application by adding screen tran- sitions, a score counter, and progressively enhanced difficulty. Finally, you’ll decide whether Canvas or SVG would be best for your next project with a summary review of Canvas and SVG features.
After completing this chapter on SVG, you’ll be ready to build your own SVG appli- cations, use SVG inside HTML documents, and take advantage of SVG’s CSS support.
To get started, let’s review the pros and cons of vectors.
7.1 How bitmap and vector graphics compare
Resizable files such as SVG use vectors (mathematical equations that create shapes) instead of bitmaps (arrays of image data), letting you change the height and width of an image without degrading its quality. Although vector graphics may seem like a replacement for all graphics, they bring with them several issues. If you’re familiar with the differences between bitmaps and vectors, this section might be a review for you; if you’d like, glance at table 7.1 for a quick summary, or skip to section 7.2 and start building the game.
As the dominant form of computer graphics on the web, bitmap has been ruling with .gif, .jpg, and .png formats. Opening a bitmap in a text editor reveals data for every
Why build SVG Aliens?
In our SVG tutorial, SVG Aliens, you’ll find lots of great content you won’t find else- where, such as:
■ A reusable SVG JavaScript design pattern
■ How to control a dynamically resizable SVG element via attributes and CSS
■ Optimized SVG animation with CSS for imported graphics
■ How to manage large-scale SVG groups
Table 7.1 Major differences between bitmap and vector (SVG). Note that neither has a clear advantage.
Topic Bitmap Vector (SVG)
Files .gif, .jpg, .png .svg, .ai, .eps
Created with Pixels Math equations
Created in programs like Photoshop, Gimp Illustrator, Inkscape When you enlarge images Image deterioration No issues
Mainly used for Websites, photography Icons, logos
File size Large Small
3D usage Textures Objects (shapes)
Core API
pixel in an image. Because a fixed number of pixels are individually declared, bitmaps suffer from image deterioration when you increase the size. When it comes to resiz- ing, SVG has a clear advantage because it doesn’t pixelate images when you enlarge them (see figure 7.1).
Another advantage is that you can write SVG directly into an HTML document with- out a file reference. It also requires less code to create graphics, resulting in faster page loads.
You’ve probably worked with an .ai, .eps, or .svg vector file for a website’s logo. Vec- tor images are composed of mathematical equations with plotted points, Bezier curves, and shapes. Because of their mathematical nature, these images don’t suffer from resizing limitations, also shown in figure 7.1.
WILSON, THERESIZABLESMILEY
To help you see how a vector graphic works, we’ve created a simple smiley face known as Wilson with SVG’s XML tags, as shown in figure 7.2.
Look at our first listing, where you can see that Wilson is composed entirely of XML data. Drop the code for Wilson into a file called wilson.svg and open it in any modern browser to see its smooth edges and amazing ability to resize.
<?xml version="1.0" encoding="UTF-8"?>
<!DOCTYPE svg PUBLIC "-//W3C//DTD SVG 1.1//EN" "http://www.w3.org/Graphics/
SVG/1.1/DTD/svg11.dtd">
<svg version="1.1" xmlns="http://www.w3.org/2000/svg" x="0px" y="0px"
viewBox="0 0 140 140" xml:space="preserve">
<circle cx="70" cy="70" r="70" style="fill:#ff0"/>
Listing 7.1 wilson.svg—SVG code sample
Figure 7.1 Effects of zooming into a vector versus a bitmap image. Our evil coffee cup demonstrates that vector is the clear winner. But great zoomability comes with great issues when you’re creating complex graphics.
Figure 7.2 Wilson is capable of changing to any size at will, and you can edit him in a graphical editing program like Illustrator. No JavaScript is required to create him, only SVG tags and a little bit of CSS.
SVG tags usually contain XML data, version number, a viewBox, and more.
Circles are the equivalent of Canvas’s arc() draw method.
<path d="M38,57 A7,7 0 0,1 52,57 z" style="fill:#777;"/>
<path d="M88,57 A7,7 0 0,1 102,57 z" style="fill:#777;"/>
<path d="M40,90 A30,30 0 0,0 100,90 z" style="stroke:#000;
fill:#fff;"/>
<path d="M30,40 L30,70 L60,70 L60,40 L30,40 z
M60,60 L80,60 M80,40 L80,70 L110,70 L110,40 L80,40 z"
style="stroke:#000; stroke-width:3; stroke-linejoin:round;
fill:none;"/>
</svg>
Creating Wilson’s .svg file requires an XML declaration with specific attributes on an
<svg> tag. If you open Wilson’s file in a browser and resize the window, you’ll notice that it conforms to the new size. Wilson’s face could move if you used a simple <animate>
tag, and it could respond to mouse clicks with a little bit of JavaScript.
All modern browsers can open SVG files, which is why using SVG in your HTML docu- ments works well for drawing shapes and scaling graphics. But support waivers if you try to perform complicated animations or use features implemented only in a specific browser. This makes sense, because the W3C Recommendation for SVG is a gigantic document (http://www.w3.org/TR/SVG); you can’t expect browser vendors to inte- grate everything. No need to worry; the features you’ll use in the proceeding code will be consistent across modern browsers unless otherwise noted.
Vectors aren’t a perfect image format, but they have a clear advantage over bit- maps for simple graphics and illustrations. By running Wilson’s code example, you’ve seen how seamlessly SVG can resize graphics in a liquid website layout.
Now, let’s take your new SVG knowledge and use it to create graphic assets for this chapter’s game, SVG Aliens.
7.2 Starting SVG Aliens with XML
Before building your SVG game (see figure 7.3), play it at the HTML5 in Action website (http://html5inaction.com/app/ch7). After a few test runs, head over to http://
manning.com/crowther2/ and download the source code. Inside a zip file, you’ll find ufo.svg, mothership.svg, and cursor.png, all of which go into your application’s root directory.
In the previous chapter, you built Canvas Ricochet, a game using a ball and paddle to destroy bricks. SVG Aliens uses similar mechanics but adds a few layers of complex- ity. Your paddle will become a ship that moves left or right. Lasers will replace a bouncing ball, destroying both friend and foe. Instead of bricks, aliens progressively scurry toward the ship to destroy it. With increased complexity comes more difficulty, so we’ll show you how to add a life counter and shields to help ships survive incoming laser fire.
Basic SVG support 4 3 9 9 3.2
Path tags work similarly to Canvas’s paths, except you declare everything in one line.
Note that SVG requires the use of a modern browser. Chrome seems to have the smoothest SVG performance, but you can use any browser except for Opera, which lacks the bounding box support you need to complete this chapter’s application.
Please note that SVG is a massive specification and no browser supports it 100%.
In this section, you’ll start building SVG Aliens by setting up an SVGXML tag in an HTML document, along with CSS and a JavaScript file. You’ll also make a flexible view- ing window similar to Wilson’s by configuring the viewBox property on an <svg> tag.
Let’s get started with the basic game setup.
In this section, you’ll learn the following reusable SVG techniques:
■ How to integrate SVG’s XML language into an HTML document
■ How to create text and simple shapes
■ How to make simple illustrations with paths
■ How to use XLink to inject .svg files into a page
■ How to animate elements with properties
■ How to tweak SVG shapes with CSS
■ How to work with the viewBox property for liquid layouts
Inline SVG in HTML5 7 4 9 11.6 5.1
Figure 7.3 Get ready to defend Earth from the coming apocalypse in SVG Aliens. Play the game at http://html5inaction.com/
app/ch7 before you build it from scratch.
Download the source code from http://www.manning.com/crowther2/.
The game’s artwork is by Rachel Blue, http://www.linkedin.com/pub/rachel- blue/23/702/99b.
7.2.1 Setting up SVG inside HTML
As you move through the rest of this section, you’ll follow seven steps that will yield the basic framework for a resizable, browser-based game:
■ Step 1: Set up SVG tag basics.
■ Step 2: Create your CSS file.
■ Step 3: Add shapes for the Game Start screen.
■ Step 4: Add text to the screen and animate it.
■ Step 5: Import existing SVG files via XLink.
■ Step 6: Create the Game Over screen.
■ Step 7: Configure the game’s flexible viewBox.
Let’s get started.
STEP 1: SETUP SVG TAGBASICS
Open a simple text editor to create three files called index.html, style.css, and game.js, and save them all to the same folder. In this section, we’ll start populating the first two files.
Create a file called index.html in the root and paste listing 7.2 into it. Inside the pasted code you now have an <svg> tag that accepts parameters for width, height, and an additional declaration for its viewing window called viewBox. We’re going to hold off configuring your viewBox, because you need some CSS for it to work.
<!DOCTYPE html>
<html>
<head>
<title>SVG Aliens</title>
<meta charset="UTF-8">
<link rel="stylesheet" type="text/css" href="style.css" />
</head>
<body>
<div id="container">
<svg
id="svg"
version="1.1"
xmlns="http://www.w3.org/2000/svg"
xmlns:xlink="http://www.w3.org/1999/xlink">
</svg>
<div id="instructions">
<p>Arrow keys or mouse to move. Space or click to shoot.</p>
</div>
</div>
<script type="text/javascript" src="game.js"></script>
Listing 7.2 index.html—Default html
Core API
Your application’s colors and basic layout are determined by a CSS file.
Wrapping your SVG tag with a container allows
more placement control. XML naming scheme. Using
<svg> requires an xmlns (XML naming scheme) so your browser knows how to process the XML data.
XML naming scheme for XLink (XML Linking Language).
It’s considered a best practice to display game controls in an easy-to-see location.
game.js will be responsible for your game’s functionality.
</body>
</html>
STEP 2: CREATEYOUR CSS FILE
Create a style.css file with the following listing and place it in your root next to index.html. Its contents will configure your game’s color and layout. You must have cur- sor.png in your root folder from Manning’s website for the following listing to work.
body { margin: 0; background: black; color: #999;
-webkit-user-select: none; -moz-user-select: none;
-ms-user-select: none; user-select: none; }
#container { margin: auto auto; text-align: center }
#instructions { position: absolute; display: block; bottom: 1%; width:
100%; height: 10% }
#instructions p { font-size: 1em; margin: 0 0 5px; padding: 0 } svg {
overflow: hidden;
display: block;
height: 90%;
position: absolute;
top: 0%;
width: 100%;
min-height: 500px;
min-width: 500px;
font: bold 14px arial;
cursor: url('cursor.png'), default;
cursor: none;
fill: #ddd;
}
#screenWelcome text { font-size: 20px; }
#screenWelcome #title1 { font: bold 130px arial }
#screenWelcome #title2 { font: bold 73px arial; fill: #0af } text#more { font: 28px 'Courier New', Courier, monospace }
#goTitle { font: bold 45px arial; fill: #c00 }
#retry { font: 20px 'Courier New', Courier, monospace } .quote { font: bold 12px arial; fill: #000 }
.life, .player, .shield, .ship { fill: #0af } .ufo .a { fill: #8C19FF } .ufo .b { fill: #1EE861 } .ufo .c { fill: #FFE14D } .closed .anim1, .open .anim2 { display: none } .open .anim1, .closed .anim2 { display: inherit }
TRYITOUT
Refresh your browser to reveal a black screen with one line of text. Don’t be alarmed that your mouse has disappeared. We had you replace the default mouse cursor with a
Listing 7.3 style.css—Primary CSS
Core API
The CSS property user- select prevents users from accidentally highlighting text or images.
Width needs to be set at 100%, and make sure to set a minimum width and height so your viewing window doesn’t get too small.
‘cursor.png’ replaces a user’s mouse with a blank 1px image for all browsers except IE.
Setting cursor: none will hide the cursor from IE. Usually, a mouse cursor vanishes via the Pointer Lock API, but it isn’t supported across enough browsers.
The fill property is how SVG determines color. Fills are the equivalent of CSS’s color and background combined into one property because they literally “fill” objects.
You can overwrite the color of an imported SVG file by setting a fill via CSS. More on that in a later section.
blank image called cursor.png from the assets you downloaded earlier (placed in your root folder).
7.2.2 Programming simple shapes and text
Those who actively use CSS3 are probably guessing that CSS or JavaScript determines SVG Alien’s animation, gradients, and other complex features. Thankfully, SVG has an
<animate> tag and built-in gradient support. With these features in mind, let’s create your Game Start and Game Over screens.
STEP 3: ADDSHAPESFORTHE GAME STARTSCREEN
The start screen in figure 7.4 requires a game title, information about the point sys- tem, and a message that clicking activates game play. We’ll create this start screen first.
CREATINGSIMPLESHAPES
To create a square, use the rectangle tag <rect x y width height>. You can create cir- cles with <circle cx cy r>, ellipses with <ellipse cx cy rx ry>, lines with <line x1 x2 y1 y2>, polylines with <polyline points>, and polygons with <polygon points>.
These shapes usually take x and y coordinates, whereas others require multiple points HTML5 Pointer Lock API and CSS coloring alternative
Normally when you want to collect movement data and hide the cursor, you lock the mouse in a specific position. Although browsers don’t allow you to toggle OS move- ment controls for security reasons, there’s an HTML5 API called Pointer Lock that allows you to collect mouse data with movement locked. See http://www.w3.org/TR/
pointerlock/ for more information from the latest W3C draft.
An alternative to declaring CSS fills would be adding the property fill="#453"
directly to XML tags. Professional frontend developers consider inline styles bad prac- tice with applications, because repeating properties on HTML elements can quickly make files an unmaintainable mess.
Figure 7.4 SVG Alien’s Welcome screen teaches players about its point system and allows them a chance to initiate gameplay.
Core API
plotted out on a Cartesian graph. Each shape accepts attributes for fill, stroke colors/
width, and even gradients. Table 7.2 offers an overview on how to use these tags.
You can combine XML tags from table 7.2 into a group as follows: <g>content</g>.
Think of groups as <div>s for storing complex shape creations. You can easily target groups with JavaScript and CSS selectors instead of individually selecting every ele- ment inside. Create your first group and a gradient by integrating the following listing inside your <svg> tag.
<svg id="svg" version="1.1" xmlns="http://www.w3.org/2000/svg"
xmlns:xlink="http://www.w3.org/1999/xlink" clip-path="url(#clip)">
<defs>
<radialGradient id="background" cx="0.5" cy="0.3" r="0.7">
<stop offset="0%" stop-color="#333" />
<stop offset="70%" stop-color="#000" />
</radialGradient>
<clipPath id="clip">
<rect x="0" y="0" width="100%" height="100%" />
</clipPath>
</defs>
<rect x="0" y="0" width="500" height="500"
fill="url(#background)" />
<g id="screenWelcome"></g>
<g id="screenGameover"></g>
</svg>
Table 7.2 Shapes you can create with SVG and corresponding examples
Shape Formatting example
Rectangle <rect x="5" y="20" width="80" height="20" fill="#c00" />
Circle <circle cx="130" cy="43" r="20" fill="black" stroke="#aaa"
stroke-width="5" />
Ellipse <ellipse cx="45" cy="130" rx="40" ry="20" fill="#00f" />
Line <line x1="110" x2="160" y1="110" y2="150" fill="#000" />
Polyline <polyline points="5 200 20 220 30 230 40 210 50 240 60 200 80 210 90 190 60 300 5 200" fill="transparent"
stroke="orange" stroke-width="5" />
Polygon <polygon points="110 200 110 240 130 280 150 240 150 200"
stroke="#0f0" fill="#000" stroke-width="5" />
Listing 7.4 index.html—Background setup
Core API
<svg clip- path> clips the SVG container with the referenced id #clip.
Stores special SVG rendering instructions.
Your radial gradient acts like a fillable gradient for SVG tags. It goes from its center (cx=0.5) to one-third (cy=0.3) of the way down its container.
Size of the radial gradient is set to 70% (r=0.7) of the shape it resides in.
Literal declaration of the gradient’s stop colors
clipPath declares a clipping path (similar to Illustrator’s pathfinder). Setting a simple <clipPath>
at 100% width and height will hide any overflowing elements.
This rectangle is the same width and height as your application’s viewing window. A radial gradient definition is applied to your rectangle with fill="url(#background)".
When you refresh your screen, you should see a black background with a subtle circu- lar gradient. Don’t be alarmed that your gradient is off-center (you’ll fix that when the viewBox is set up). If you cannot see the background gradient on your monitor, adjust
<stop offset="0%" stop-color="#333" /> to a brighter color such as #555.
STEP 4: ADDTEXTTOTHESCREENANDANIMATEIT
With a background set up, it’s time for typography. Each <text> tag accepts x and y coordinates for placement. You might have noticed that “Click To Play” slowly faded in when you demonstrated the complete SVG Aliens game. You perform fades by inserting an <animate> tag inside text tags. You create animation by targeting the CSS (attributeType), declaring a specific style attribute (attributeName), start (from) and end (to) values, and the duration (dur) in seconds. Nest an <animate> tag inside most SVG elements, and you’ll be able to create animation without the need for JavaScript or CSS3. Create your text with animation by including the following snippet inside <g id="screenWelcome"></g>:
<g id="screenWelcome">
<text id="title1" x="110" y="137">SVG</text>
<text id="title2" x="115" y="200">ALIENS</text>
<text id="more" x="130" y="400">
<animate attributeType="CSS" attributeName="opacity" from="0"
to="1" dur="5s" />
Click To Play </text>
</g>
7.2.3 Using XLink and advanced shapes
With basic shapes, text, and gradients set up, we’ll make use of more advanced SVG tags to create graphics. First, we’ll start by showing you a shortcut method to pull graphics in through XLink. After that, you can create graphics from scratch using a <path>.
XLink, a W3C specification, stands for XML Linking Language. We’re primarily using it to import SVG files, but it serves other purposes, such as creating links inside SVG through the <a> element.
What else can you animate?
In addition to CSS, you can animate transforms and movement directions and more.
Visit http://www.w3.org/TR/SVG11/animate.html to delve into the nitty-gritty details.
Be warned, the document contains more than 14,000 words and seems to favor browser vendors over developers in its terminology and examples.
Want more information on XLink?
Would you like to learn more about XLink? Check out Jakob Jenkov’s tutorial, “SVG:
a Element” at http://tutorials.jenkov.com/svg/a-element.html.
Core API
Core API
Although you could draw your UFOs from scratch in SVG, you’ll find it easier to use
<image> with XLink to import an .svg file. You can quickly resize imported .svg files and create them with popular vector-editing programs such as Adobe Illustrator or Inkscape. The only trick is that creating files in a visual editor requires you to save as .svg in the Save As menu.
WARNING Before proceeding, make sure the mothership.svg and ufo.svg assets you retrieved from Manning’s website are in your root folder. Without these files, nothing will appear where XLink images should be.
STEP 5: IMPORTEXISTING SVG FILESVIA XLINK
Create a player’s ship using a <path> tag, by inserting the following code snippet into
<g id="screenWelcome">. Notice that your path’s d attribute contains a series of points to create your ship’s shape. Insert your new XLink images and path by append- ing the following listing inside <g id="screenWelcome"></g>.
<image x="200" y="230" width="25" height="19" xlink:href="ufo.svg" />
<text x="233" y="247">= 1pt</text>
<text x="145" y="328">+1</text>
<path class="ship" d="M 175 312 m 0 15 l 9 5 h 17 l 9 -5 l -2 -5 l -10 3 l -6 -15 l -6 15 l -10 -3 l -2 5" />
<text x="217" y="328">life = 100pts</text>
<image x="185" y="270" width="40" height="20" xlink:href="mothership.svg" />
<text x="233" y="287">= 30pts</text>
USINGPATHSFORADVANCEDSHAPES
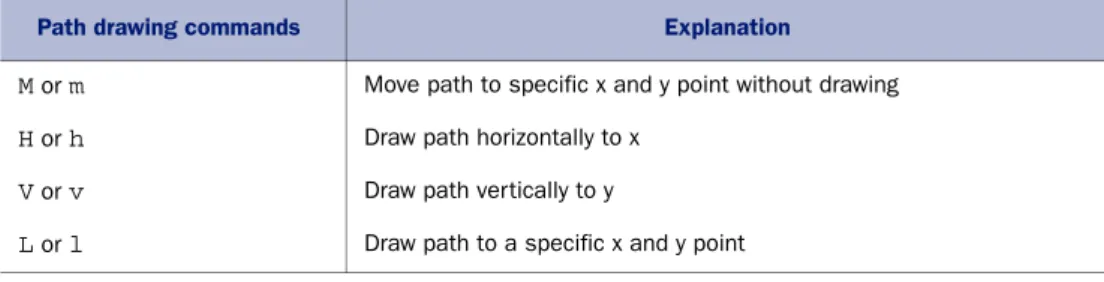
You probably noticed that the previous listing’s <path> used a series of letters and numbers to indicate particular directions. For an explanation of the different move- ment commands, see table 7.3.
Listing 7.5 index.html—Using XLink
Table 7.3 Capital letters indicate measurements relative to the SVG element; lowercase letters indicate measurements relative to previous x and y coordinates.
Path drawing commands Explanation
M or m Move path to specific x and y point without drawing
H or h Draw path horizontally to x
V or v Draw path vertically to y
L or l Draw path to a specific x and y point
xlink:href allows you to include SVG files in your HTML.
Declares a drawing path with a d attribute. Notice that paths don’t have x and y attributes; instead they use M followed by an x and y declaration to set the initial position. m, l, and h move the drawing points.
Core API
Using a capital letter to declare a location, such as V, indicates the measurement is rel- ative to the <svg> tag’s position in your HTML document. Using a lowercase letter, such as v, indicates it’s relative to any previously declared x and y coordinates.
CODEANDPROGRESSCHECK
You’ve integrated several different code snippets throughout this chapter. Double- check index.html against the following listing to verify that you’ve properly set up your SVG code.
<g id="screenWelcome">
<text id="title1" x="110" y="137">SVG</text>
<text id="title2" x="115" y="200">ALIENS</text>
<image x="200" y="230" width="25" height="19" xlink:href="ufo.svg" />
<text x="233" y="247">= 1pt</text>
<image x="185" y="270" width="40" height="20"
xlink:href="mothership.svg" />
<text x="233" y="287">= 30pts</text>
<text x="145" y="328">+1</text>
<path class="ship" d="M 175 312 m 0 15 l 9 5 h 17 l 9 -5 l -2 -5 l -10 3 l -6 -15 l -6 15 l -10 -3 l -2 5" />
<text x="217" y="328">life = 100pts</text>
<text id="more" x="130" y="400">
<animate attributeType="CSS" attributeName="opacity" from="0"
to="1" dur="5s" />
Click To Play </text>
</g>
After a browser refresh, your screen should look identical to the Welcome screen shown in figure 7.5.
Listing 7.6 index.html—Welcome screen
Figure 7.5 The Welcome screen should look like this one after you refresh your browser.
Make sure to set display to none for your Welcome screen by inserting the following code snippet at the bottom of style.css. Hiding your Welcome screen makes creating the Game Over screen, explained in the next step, much easier.
#screenWelcome { display: none }
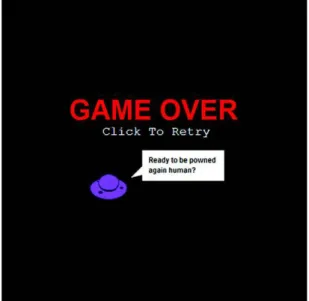
STEP 6: CREATETHE GAME OVERSCREEN
Ideal Game Over screens entertain and encourage players to try again. Using the same tools from the Welcome screen, you can quickly assemble what you need to cre- ate the Game Over screen shown in figure 7.6.
Use the following listing to replace <g id="screenGameover"></g> right after
<g id="screenWelcome"></g>. It uses all the same tags and attributes used to create your Welcome screen. Therefore, its code content should be straightforward.
<g id="screenGameover">
<text id="goTitle" x="110" y="199">GAME OVER</text>
<text id="retry" x="165" y="224">Click To Retry</text>
<image x="145" y="289" width="60" height="40" xlink:href="ufo.svg" />
<rect x="230" y="249" width="134" height="50" />
<path d="M 231 274 l -20 20 L 231 289 L 231 284" />
<text class="quote" x="240" y="269">Ready to be powned</text>
<text class="quote" x="240" y="286">again human?</text>
</g>
STEP 7: CONFIGURETHEGAME’SFLEXIBLEVIEWBOX
Let’s configure your viewBox by altering <svg> to conform to a user’s window size, without affecting the game’s Cartesian graph. Set viewBox with four different attributes
Listing 7.7 index.html—Game Over screen
Figure 7.6 Nothing makes people rage quite like getting powned by an SVG alien.
Game Over screens are a great way to encourage players to develop addictive behaviors (such as playing repeatedly).
Core API
for min-x, min-y, width, and height (<svg viewBox="min-x min-y width height">).
You don’t need a minimum x and y because you want to center the game, so feed it 0 values for both. Then set the width and height to 500, which is the size of your SVGapplication.
Your modified <svg> tag should look like the following snippet:
<svg id="svg" viewBox="0 0 500 500" version="1.1"
xmlns="http://www.w3.org/2000/svg"
xmlns:xlink="http://www.w3.org/1999/xlink" clip-path="url(#clip)">
Confirm that your game’s flexible layout is working with a browser refresh; then replace
#screenWelcome { display: none } with #screenGameover { display: none } in your style.css. You should now see the Welcome screen when you refresh your browser.
#screenWelcome { display: none }@@@@@@@@@@@@@@@@@@@@@@@@@@@@@@@@@@@@@@@@@@@@@@@@@@@@@@@@@@@@@@@@@@@@@@@@@@@@@@@@@@@@@@@@@@@@@@@@@@@@
#screenGameover { display: none }
Understanding how <svg>’s viewBox parameter works is difficult if you’re new to the concept of vector-based viewports. If you’re confused about how all the resizing works, we recommend tinkering with the viewBox parameter before proceeding.
Wow, you created two game screens that dynamically resize with HTML, XML, and CSS. Although it would be ideal to finish the game with these languages, it’s not possi- ble. We’ll have to rely on JavaScript to create game logic, collisions, and artificial intel- ligence (AI).
7.3 Adding JavaScript for interactivity
When you consider how easy it is to create vector assets with SVG, you might expect it to have revolutionary JavaScript integration. Sadly, it doesn’t. In fact, it can be clunky to access and modify SVG because it relies heavily on the DOM. It would be nice to stick with SVG tag attributes, but using the language at its full potential requires JavaScript (just like HTML5APIs).
Matters become further complicated because JavaScript needs extra configuration at times to play nicely with XML. Because of these limitations, a clever design pattern is required to program your game. Never fear. We’ve a couple of JavaScript solutions that will ride in to save the day.
In this section, you’ll learn
■ How to create an SVG JavaScript engine
■ How to create a simple SVG design pattern
■ How to dynamically generate elements
■ How to properly get XML data through JavaScript with a naming scheme
■ How to use CSS to simplify complicated path animations
Core API
Until recently, you had to work with VML (Vector Markup Language), Flash, or another program to use vector graphics on the web. Because IE8 and below don’t sup- port SVG, in production applications you may want to use a JavaScript vector graphics library that generates code that can be rendered by both older and newer browsers.
Currently, the most popular of these libraries is RaphaelJS, which was used to create the tiger in figure 7.7.
RaphaelJS uses SVG and its predecessor Vector Markup Language (VML) to create vector graphics. It also has great plug-ins that calculate complex math for pie charts and other data visualizations. RaphaelJS’s competitor is svgweb, which uses Flash to render SVG elements. If you don’t need to support older browsers, d3.js (http://
d3js.org) is a good library to consider.
Because we aren’t concerned with old versions of IE, you’ll be using JavaScript without a fallback library to write your game. We’ll walk you through the creation of a basic SVG design pattern, plus teach you to create reusable a reusable asset with JavaScript objects. Then you’ll develop shields to protect players from enemy fire. As a
XML namespace issues
Before proceeding, we need to warn you about namespaces and JavaScript.
Namespaces are keys that define what kind of information you’re asking the browser to interpret (in this case XML or HTML data). When interacting with XML, you must declare a namespace or the browser won’t know you’ve changed namespaces.
Some of the symptoms of incorrect namespace usage include incorrectly returned data, new DOM elements inserting into the wrong location, and instability in gen- eral. To prevent namespace issues, make use of methods ending in NS such as get- AttributeNS(NS,element). For a complete list of namespace methods, visit Mozilla’s documentation on JavaScript DOM elements athttps://developer.mozilla.org/en-US/
docs/DOM/element#Methods.
Major JavaScript libraries such as jQuery and MooTools are ignorant of namespaces in most situations, meaning they won’t mix well with manipulating SVG elements.
Core API
Figure 7.7 RaphaelJS is capable of creating astounding graphics in all modern-day browsers.
final step, you’ll set up the UFO flock, which is a bit complex because it requires you to create 50-plus objects.
To make a complex task somewhat easier, we’ve broken the work down into three groups of steps.
First up, the core programming of the game’s engine.
7.3.1 Game engine essentials and using screens
Because building SVG Aliens involves complex logic, an effective design pattern is required for organizing your code. At the core you’re going to need an object called Game that acts as an engine to manage initializing, updating objects, screen transitions, Game Overs, removing objects, and more.
STEP 1: SETUPBASICGAMEUTILITIES, METADATA, AND XML NAMINGSCHEMES
From here on out, place all of your code inside a self-executing function to prevent JavaScript variables from leaking into the global scope. The following provides every- thing your game engine needs to set up the game’s basic utilities, metadata (such as width and height), XML naming schemes, and anything extra that doesn’t belong in your other objects. Place all of the following code into game.js.
(function() { var Game = {
svg: document.getElementById('svg'),
welcome: document.getElementById('screenWelcome'), restart: document.getElementById('screenGameover'), support: document.implementation.hasFeature(
"http://www.w3.org/TR/SVG11/feature#Shape", "1.1"), width: 500,
height: 500,
ns: 'http://www.w3.org/2000/svg', xlink: 'http://www.w3.org/1999/xlink',
Group 1: Engine and basic object setup Group 2: Complex objects and overlap
Group 3: The UFO flock
■Step 1: Set up basic game utilities, metadata, and XML naming schemes.
■Step 2: Integrate screen transitions.
■Step 3: Create the big UFO.
■Step 4: Create the player’s ship.
■Step 5: Make the player respond to keyboard input.
■Step 6: Capture keyboard and mouse controls.
■Step 1: Create shields for defense.
■Step 2: Construct lasers.
■Step 3: Integrate laser colli- sion detection.
■Step 4: Create the heads-up display.
■Step 1: Set up the UFO flock.
■Step 2: Generate paths for the UFOs.
■Step 3: Animate the UFOs.
■Step 4: Make the UFOs randomly shoot.
Listing 7.8 game.js—Game engine base
Store your screens to easily access them later.
Using this property, you can easily detect SVG support.
Name schemes are sometimes necessary for JavaScript to properly access XML data.
run: function() {
this.svg.addEventListener('click', this.runGame, false);
},
init: function() { Hud.init();
Shield.init();
Ufo.init();
Ship.init();
UfoBig.init();
if (!this.play) {
this.play = window.setInterval(Game.update, 20);
} },
update: function() { Ship.update();
UfoBig.update();
Laser.update();
} };
var Ctrl = { init: function() {}
};
window.onload = function() { Game.run();
};
}());
Your engine starts out with run() to test for SVG support, then moves on to setting up all of the game’s objects. The update() method is responsible for removing and/or changing game assets. You’ll notice that a few of the init() items aren’t in the update() because they require a separate timer to fire.
WARNING Although it might seem like a good idea to use the animation timer requestAnimationFrame here—as you did in the Canvas game in chapter 6—
don’t. Clearing an animation timer is difficult, programming in polyfills for inter- vals and/or timeouts is very buggy, and some browsers don’t like SVG coupled with timer-based animation. Until support improves, you’re better off using set- Timeout() and setInterval() unless you’re working with a Canvas application.
STEP 2: INTEGRATESCREENTRANSITIONS
In order to make use of the Welcome and Game Over screens you created earlier, you’ll need the code in the following listing to add a few more methods for deleting SVG elements and mouse-click monitoring.
var Game = {
runGame: function() {
Game.svg.removeEventListener('click', Game.runGame, false);
Game.svg.removeChild(Game.welcome);
Listing 7.9 game.js—Screen transitions
All of your object setup methods are run here.
Creates animation for the SVG elements.
update() method handles x/y attributes, collision data, and advanced game logic.
Placeholder controller object to prevent listing 7.9 from crashing.
Starts the game after the user clicks Start.
Ctrl.init();
Game.init();
},
restartGame: function() {
Game.svg.removeEventListener('click', Game.restartGame, false);
Game.restart.setAttribute('style', 'display: none');
Game.init();
},
endGame: function() { window.clearInterval(UfoBig.timer);
window.clearInterval(Ufo.timer);
this.elRemove('.shield .player .life .laser #flock #ufoShip #textScore #textLives');
this.restart.setAttribute('style', 'display: inline');
this.svg.addEventListener('click', this.restartGame, false);
},
elRemove: function(name) { var items = name.split(' '), type, string, el;
for (var i = items.length; i--;) { type = items[i].charAt(0);
string = items[i].slice(1);
el = (type === '.') ?
document.getElementsByClassName(string) : document.getElementById(string);
if (type === '.') { while(el[0])
el[0].parentNode.removeChild(el[0]);
} else {
if (typeof el === 'object' && el !== null) this.svg.removeChild(el);
} } } };
Everything is set up to maintain your game’s objects. Now let’s create them. You’ll start with the simplest objects and work your way toward more complex ones in the next section.
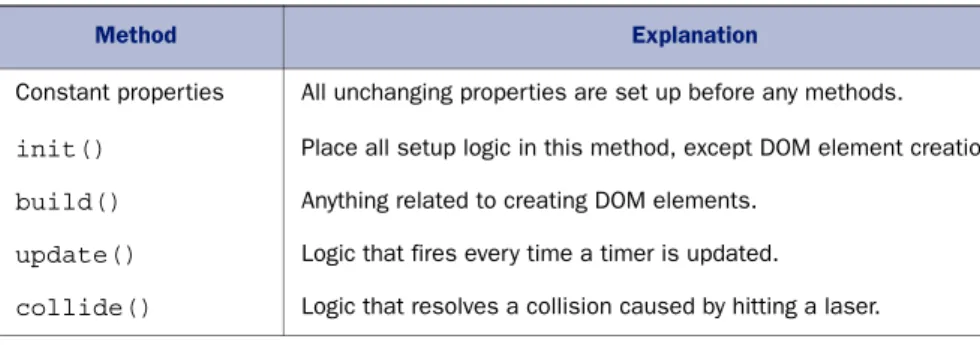
7.3.2 Design patterns, dynamic object creation, and input
Every game object created will follow a design pattern with specific methods. You’ll place all nonchanging properties for an object at the top before any methods. Some of these properties will include path data, width, height, speeds, and so on. All objects require an init() method that handles all necessary setup for x/y coordinates and timers and resets properties. init(), which should also call to an object’s build() method if necessary, will create any DOM-related data. Use update() to execute any
Resets all game data;
should occur after clicking a Game Over screen.
Logic for handling a Game Over. It clears out all active elements and waits for a user to restart the game.
To remove all the leftover DOM elements at the end of a game, you add a cleanup helping method. It'll remove multiple elements with one call.
Core API
logic that needs to fire inside a timer. The last method you’ll need to use is collide(), which handles collision logic. To review how your objects are structured, see table 7.4.
Now that you know how to organize your objects, let’s start programming one of the larger UFOs.
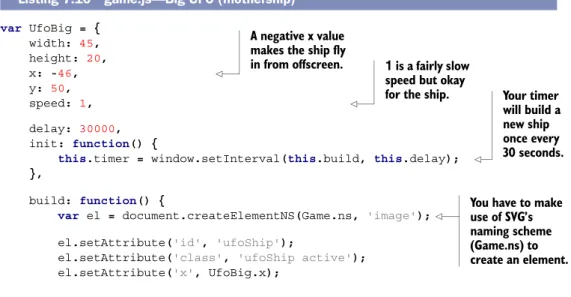
STEP 3: CREATETHEBIG UFO
Big UFOs (see figure 7.8) spawn out of view in the top left after a set amount of time. You’ll want to create them at an x coordinate equal to negative their width so they’re hidden initially from view. For instance, if a ship is 45px wide, spawn it at x = -45px. Killing a big UFO will reward players with a nice sum of 30 points because of their rarity.
Using the previously discussed design pattern, create a big UFO object by pasting the code from the following listing into the self-executing function after the Game object declaration.
var UfoBig = { width: 45, height: 20,
x: -46, y: 50,
speed: 1, delay: 30000,
init: function() {
this.timer = window.setInterval(this.build, this.delay);
},
build: function() {
var el = document.createElementNS(Game.ns, 'image');
el.setAttribute('id', 'ufoShip');
el.setAttribute('class', 'ufoShip active');
el.setAttribute('x', UfoBig.x);
Table 7.4 An explanation of major methods used in the SVG Aliens design pattern
Method Explanation
Constant properties All unchanging properties are set up before any methods.
init() Place all setup logic in this method, except DOM element creation.
build() Anything related to creating DOM elements.
update() Logic that fires every time a timer is updated.
collide() Logic that resolves a collision caused by hitting a laser.
Listing 7.10 game.js—Big UFO (mothership)
Figure 7.8 A big UFO that randomly appears. Players may shoot it down for bonus points.
A negative x value makes the ship fly
in from offscreen. 1 is a fairly slow speed but okay
for the ship. Your timer will build a new ship once every 30 seconds.
You have to make use of SVG’s naming scheme (Game.ns) to create an element.
el.setAttribute('y', UfoBig.y);
el.setAttribute('width', UfoBig.width);
el.setAttribute('height', UfoBig.height);
el.setAttributeNS(Game.xlink, 'xlink:href', ' mothership.svg');
Game.svg.appendChild(el);
},
update: function() { var el = document.getElementById('ufoShip');
if (el) {
var x = parseInt(el.getAttribute('x'), 10);
if (x > Game.width) {
Game.svg.removeChild(el);
} else {
el.setAttribute('x', x + this.speed);
} } },
collide: function(el) { Hud. updateScore(30);
Game.svg.removeChild(el);
} };
Your big UFO ship object wasn’t too difficult to create. Let’s tackle the player’s ship next, because it follows similar mechanics but adds an input monitor and SVG path.
STEP 4: CREATETHEPLAYER’SSHIP
Because you created a path for a player’s green ship with the Welcome screen, you can reuse that code. Path d attributes have x and y coordinates built in, so you’ll need to separate the x/y coordinates and path data into two separate parameters. By doing so, you can dynamically generate an x/y position for the ship’s graphic. Create the player’s ship with the following listing.
var Ship = { width: 35, height: 12, speed: 3,
path: 'm 0 15 l 9 5 h 17 l 9 -5 l -2 -5 l -10 3 l -6 -15 l -6 15 l -10 -3 l -2 5', init: function() {
this.x = 220;
this.y = 460;
this.build(this.x, this.y, 'player active');
},
build: function(x, y , shipClass) { var el = document.createElementNS(Game.ns,'path');
Listing 7.11 game.js—Player ship setup
XLink must be set with a separate NS from Game.xlink.
Moves the ship from left to right and then removes it.
When destroyed, the red ship will grant 30 points.
Path contains only the shape data of the ship; x and y information will be generated later.
Sets the default spawning
location at game startup. You need to make the build method take parameters so it’s reusable later to draw lives in the heads-up display.
var pathNew = 'M' + x + ' ' + (y + 8) + this.path;
el.setAttribute('class', shipClass);
el.setAttribute('d', pathNew);
Game.svg.appendChild(el);
this.player = document.getElementsByClassName('player');
} };
STEP 5: MAKETHEPLAYERRESPONDTOKEYBOARDINPUT
In addition to the previous listing, you’ll need an update() method to add values for monitoring keyboard input. Using a mouse will also be available, but it’s stored inside a Ctrl object that you’ll create. First, finish your Ship object with the code in the next listing.
var Ship = {
update: function() {
if (Ctrl.left && this.x >= 0) { this.x -= this.speed;
} else if (Ctrl.right && this.x <= (Game.width - this.width)) { this.x += this.speed;
}
var pathNew = 'M' + this.x + ' ' + (this.y + 8) + this.path;
if (this.player[0]) this.player[0].setAttribute('d', pathNew);
},
collide: function() {
Hud.lives -= 1;
Game.svg.removeChild(this.player[0]);
Game.svg.removeChild(this.lives[Hud.lives]);
if (Hud.lives > 0) { window.setTimeout(function() {
Ship.build(Ship.x, Ship.y, 'player active');
}, 1000);
} else {
return Game.endGame();
} } };
Note that you can test your new blue ship by commenting out uncreated objects in Game to suppress errors. Be careful to check your browser’s console log to make sure no errors accidentally fire. If you choose to tinker with your game, make sure to repair it to look like our previous listings before proceeding. You may need to suppress any errors from missing objects to make the following snippets work too.
STEP 6: CAPTUREKEYBOARDANDMOUSECONTROLS
Many tutorials depend on jQuery or another library to create keyboard bindings.
Most keyboard keys are consistent enough between browsers these days that you don’t Listing 7.12 game.js—Player ship interactivity
Sets x and y to generate the ship’s path at a specific position.
Move left if keyboard input is detected and not against a wall.
Move right if keyboard input is detected and not against a wall.
Updates a player with the latest x and y coordinates.
Logic for when the player’s ship gets hit by a bullet.
Removes a life visually and decrements a counter.
Whether to generate a new ship or shut down the game.
need a library. You can safely implement arrow keys, a spacebar, letters, mouse move- ment, and a mouse click at the least, which is what you’ll do in the next listing by replacing your existing Ctrl object.
var Ctrl = {
init: function() { window.addEventListener('keydown', this.keyDown, true);
window.addEventListener('keyup', this.keyUp, true);
window.addEventListener('mousemove', this.mouse, true);
window.addEventListener('click', this.click, true);
},
keyDown: function(event) { switch(event.keyCode) {
case 32:
var laser = document.getElementsByClassName('negative');
var player = document.getElementsByClassName('player');
if (! laser.length && player.length)
Laser.build(Ship.x + (Ship.width / 2) - Laser.width, Ship.y - Laser.height, true);
break;
case 39: Ctrl.right = true; break;
case 37: Ctrl.left = true; break;
default: break;
} },
keyUp: function(event) { switch(event.keyCode) {
case 39: Ctrl.right = false; break;
case 37: Ctrl.left = false; break;
default: break;
} },
mouse: function(event) { var mouseX = event.pageX;
var xNew = mouseX - Ship.xPrev + Ship.x;
if (xNew > 0 && xNew < Game.width - Ship.width) Ship.x = xNew;
Ship.xPrev = mouseX;
},
click: function(event) {
var laser = document.getElementsByClassName('negative');
var player = document.getElementsByClassName('player');
if (event.button === 0 &&
player.length &&
!laser.length)
Listing 7.13 game.js—Keyboard/mouse setup
Binds all mouse and keyboard events to their proper methods.
Passes an event on keydown to move or shoot.
Spacebar key.
Right-arrow key.
Left-arrow key.
Stops movement or shooting input on keyup.
Makes sure your player’s ship stays inside the game’s boundaries.
For firing lasers, a click() method is used. It only fires if a laser isn’t present and a player’s ship is still alive.
Only player’s lasers are marked as negative.
These are retrieved to verify that no laser is already firing.
Laser.build(Ship.x + (Ship.width / 2) - Laser.width, Ship.y - Laser.height, true);
} };
After suppressing any errors, you should be able to move your players around via key- board and mouse. Make sure if you fiddle with any code to reset it to the previous list- ings, as mentioned before.
Now that the player’s ship is set up and your input bindings are complete, it’s time to work through the steps in group 2, in which you’ll start programming objects that are a bit complex. These objects will require more logic, because they’re more depen- dent on data in their surrounding environment.
7.3.3 Creating and organizing complex shapes
In group 2 you’ll create a couple of objects that require abstract logic for movement and placement.
■ Group 2: Complex objects and overlap – Step 1: Create shields for defense.
– Step 2: Construct lasers.
– Step 3: Integrate laser collision detection.
– Step 4: Create the heads-up display.
You’ll start by creating blue shields that protect a player’s ships from incoming fire.
After that, you’ll create laser rounds, which need to handle the game’s collision logic.
Lastly, you’ll set up the HUD, which presents a player’s remaining lives and accumu- lated points. Here we go.
STEP 1: CREATESHIELDSFORDEFENSE
The shield in figure 7.9 is more complex than anything you’ve created because it comprises several pieces. Every shield piece must have hit points (hp) and an opac- ity value attached to it. Hit points are a measurement of how many times something can take damage.
You’ll create four shields, each with eight different pieces. Assemble them with the following listing.
Fires laser from center of the ship.
Figure 7.9 Shields comprise eight different pieces (right image) that take three shots each before disappearing.