LIMITATION OF LIABILITY / DISCLAIMER OF WARRANTY: THE PUBLISHER AND THE AUTHOR MAKE NO REPRESENTATIONS OR WARRANTIES AS TO THE ACCURACY OR COMPLETENESS OF THE CONTENTS OF THIS WORK AND SPECIFICALLY DISCLAIM ALL WARRANTIES, INCLUDING BUT NOT LIMITED TO WARRANTIES OF FITNESS FOR A PARTICULAR PURPOSE . THIS WORK IS SOLD WITH THE UNDERSTANDING THAT THE PUBLISHER IS NOT INVOLVED IN PROVIDING ANY LEGAL, ACCOUNTING OR OTHER PROFESSIONAL SERVICES.
Introduction
About This Book
Throughout this book you see sidebars (text in gray boxes) and material marked with the Technical Stuff icon. If you are reading this book in print and want to visit one of these web pages, simply enter the web address exactly as it appears in the text, pretending that the line break does not exist.
Foolish Assumptions
This book not only shows you the technology, but also shows how all the pieces fit together to create a dynamic web application. There are plenty of tools to help you get the job done, and with this book you'll find out which tools help you with which features of your application.
Icons Used in This Book
Beyond the Book
Where to Go from Here
If you're interested in learning how to use any of the framework packages available for PHP, check out Book 7, Chapter 1. Or, if you're interested in everything, start with Book 1, Chapter 1, and read to the very last moment. end.
1 Getting Started with Web
Programming
Contents at a Glance
Examining the Pieces of Web Programming
Creating a Simple Web Page
Chapter 1
A way for the document reader to display formatted text the same way on any type of device. This section describes the technology that made online document viewing work as it does today.
Kicking things off with the World Wide Web
After all that, you still had to have the correct word processing software on your computer to view the document.
Making sense of markup languages
The HTML version 4.01 standard has been the backbone of websites for many years and is still used by many websites today. This book focuses on HTML5; all code included in this book uses this standard.
Retrieving HTML documents
Web clients
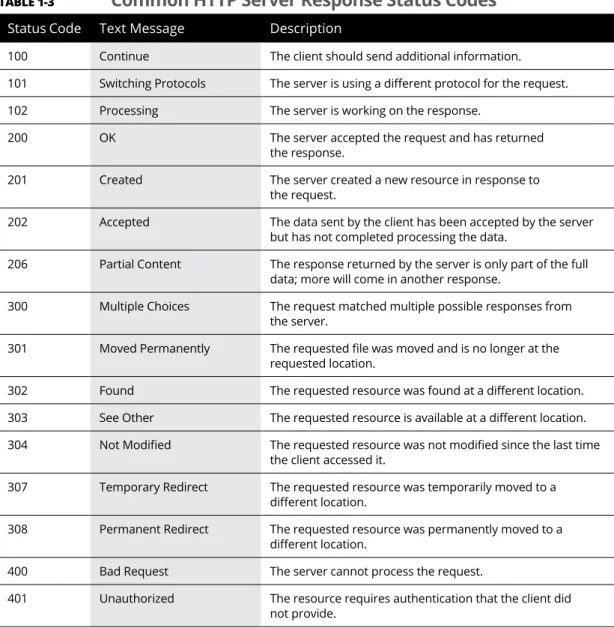
As shown in Table 1-2, when you request to view a web page from a client browser, the browser sends an HTTP GET request to the server specifying the file name of the web page.
Web servers
415 Unsupported media type The server does not know how to process the requested resource file. Not supported The server does not support the HTTP standard used by the client in the request.
Styling
Style sheets
An external style sheet lets you define styles in the same way as the internal method, but in a separate file called a style sheet. When the browser sees this tag, it downloads the external style sheet and applies the styles you defined in it to the document.
CSS standards
You may be wondering how assistive technology tools work to change the way web pages are viewed for people with visual impairments. However, one thing was still missing: the ability to easily change content on the web page.
Creating a Dynamic Web Page
The core layout of the web page may remain the same, but the data presented is constantly changing. A processor reads the program code and dynamically generates HTML to display content on the Web page, as shown in Figure 1-1.
Client-side programming
JavaScript
As shown in Figure 1-2, the entire web page with the embedded JavaScript code is downloaded to the client's browser. The downside of JavaScript is that because it runs in the client browser, you are at the mercy of how the individual web browser interprets the code.
In the early days of JavaScript, different browsers would implement different JavaScript features using different methods. It wasn't unusual to come across a website that worked fine for one type of browser, but didn't work at all in another type of browser – all due to JavaScript processing inconsistencies.
Server-side programming
Unlike client-side programming, there are many popular server-side programming languages in use these days, each with its own set of pros and cons.
CGI scripting
Java
The Microsoft ASP.NET family
Study of Pieces of Web Programming combined server-side programming and Windows desktop programming. The advantage of using Node.js is that you only need to learn one language for both client- and server-side programming.
Combining client-side and server-side programming
With server-side programming, you cannot validate the data until the visitor fills out and submits the form to the server. To solve this problem, you can embed JavaScript code in the form to check when the visitor enters data in the form.
Storing Content
If any form fields are empty when the Submit button is clicked, the JavaScript code can block the form submission and show the empty field. Then, when all the data is complete and the form has been successfully submitted, the PHP code on the server can process the data to ensure it is the correct data type and format.
Using a Web Server
Recognizing What’s Required
Chapter 2
The web server
Unless you have a specific reason not to use the Apache web server, you should use it for your development environment, especially if you know your production web server environment will use it.
The PHP server
This was a very popular and long running version, but is no longer supported by PHP with security patches.
The database server
The advantage of running MySQL in the cloud is that you are assured of a perfect up-time for the database, because it is distributed over several servers in the cloud. The downside, however, is that this can get expensive and is only recommended for commercial web applications that need the extra server power of the cloud.
Considering Your Server Options
Using a web server Each version has some minor updates to the MySQL database engine, but for most dynamic web applications the differences will not play a significant role in your application's performance or features, so it does not matter which of these three versions your system user. Instead of installing and running your own MySQL server, you can rent space on their MySQL cloud server.
MySQL AND MariaDB
The following sections walk you through each of these scenarios and the pros and cons of each.
Using a web-hosting company
These days, almost anyone can install PHP and MySQL server software on a server and sell space, so many mom-and-pop web-host companies now offer this service. Often, you'll find that these smaller web hosting sites use outdated server versions that haven't been upgraded or patched with security updates, making them vulnerable to attack.
Building your own server environment
One of the main advantages of using a cloud service is that your application is hosted on multiple servers that share the traffic load and are redundant for backup purposes.
Web servers in Linux
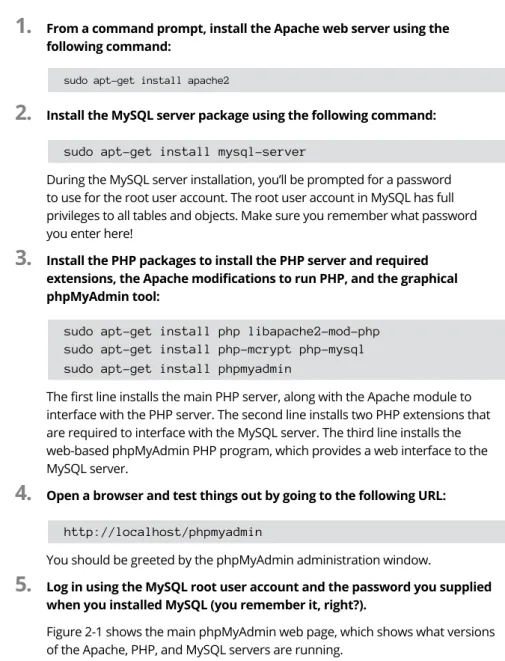
- From a command prompt, install the Apache web server using the following command
- Install the MySQL server package using the following command
- Install the PHP packages to install the PHP server and required extensions, the Apache modifications to run PHP, and the graphical
- Open a browser and test things out by going to the following URL
- Log in using the MySQL root user account and the password you supplied when you installed MySQL (you remember it, right?)
- From a command prompt, install the Apache web server using the following commands
- Install the MySQL server package using the following commands
- Install the PHP packages using the following commands
- Log in using the root user account in MySQL along with the password you defined when you installed MySQL
The PHP server does not run as its own service - the Apache web server creates it when needed. Log in with the MySQL root user account along with the password you specified when you installed MySQL.
Web servers in Windows and Mac
When you install MariaDB, the package sets the password of the root user account to an empty string. When you run this script, it will ask you to answer a few questions, such as the new password for the root user account, whether the root user account should be restricted to only logging in from the local host, or the anonymous mouse user feature, and whether the test database must be removed.
Using premade servers
- Look for the Download section of the web page and click the link for the OS you’re using
- After the download finishes, run the downloaded file in your OS environment
- Click the Next button to go to the Select Components window, shown in Figure 2-3
- Click the Next button to continue the installation
- Select the installation folder for XAMPP
- Click the Next button to continue the installation
- You can learn more about Bitnami by leaving the Learn More about Bitnami for XAMPP check box checked, or if you’d like to skip this step,
- Click the Next button to begin the software installation
- You can keep the check mark in the check box to start XAMPP, and then click the Finish button to end the wizard
- From the XAMPP Control Panel main window, click the Config button for the Apache web server
- Select the menu option to edit the httpd.conf configuration file
- Look for the line
- Change the 80 in the line to 8080, a common alternative TCP port to use for HTTP communications
- Save the updated configuration file in the editor, and then exit the editor window
- Click the Start button for the Apache web server
- Click the Start button for the MySQL database server
By default, XAMPP configures the Apache web server to use TCP port 80 for HTTP connections. In the main window of the XAMPP control panel, click the Config button for the Apache web server.
Tweaking the Servers
Customizing the Apache Server
Defining the web folder location
For Linux environments, it has become somewhat common to use /var/www/html as the DocumentRoot folder. If you choose to move the DocumentRoot folder to another folder location on the server, make sure that the user account running the Apache web server has access to at least the files read from the folder.
Setting the default TCP port
The htdocs folder is the normal default used for the Apache web server in Windows and macOS environments (for macOS it is located in /Applciations/ . XAMPP/htdocs).
USING ENCRYPTION
Interacting with the PHP server
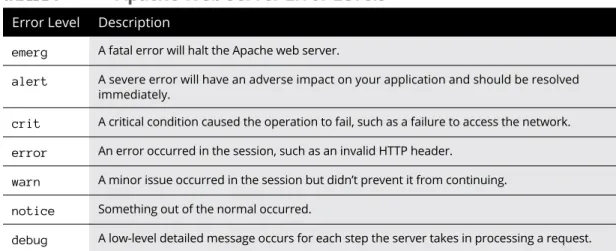
Tracking errors
The debug log level can be useful for troubleshooting problems, but is not recommended for normal activity because it generates a lot of output. Apache allows you to decide what information appears in the log file, which can be handy when trying to troubleshoot specific problems.
Customizing the MySQL server
Using a web server As with the Apache web server, the MySQL database server has lots of options you can change in the configuration file to fine-tune how things work. The following sections walk you through some of the settings you should become familiar with.
The core server settings
Working with the InnoDB storage engine
The second parameter defines the initial amount of disk space that the InnoDB storage engine allocates. It defines what the InnoDB storage engine does when the space allocated for the save file becomes full.
Customizing the PHP server
The XAMPP installation process places the php.ini file in the c:\xampp\apache\bin folder. It uses labels to indicate the error level and bitwise Boolean operators to combine levels - the tilde (~) indicates the NOT operator.
Building a Development Environment
Knowing Which Tools to Avoid
Chapter 3
Once you've created the web page layout, you click a button and the tool automatically generates all the HTML and CSS code required to build the web page. Click another button and the tool will automatically upload the files to your web hosting server and you will have a complete web page.
Web-hosting sites
Graphical desktop tools allow you to create a web page using a purely graphical interface, without any coding required. When you use a graphical desktop tool to create your website, you are stuck with that tool forever.
Word processors
Working with the Right Tools
Text editors
If you’re running Microsoft Windows
Notepad works well as a programming tool, but you'll want to change some of the settings before you start coding in Notepad, just to make things easier.
DISABLING WORD WRAP
AVOIDING DEFAULT FILE EXTENSIONS
- Choose File ➪ Save As from the menu bar at the top of the editor
- In the drop-down list at the top of the Save As dialog box, navigate to the folder where you want to save the program file
- From the Save As Type text box near the bottom of the Save As dialog box, select All Files (*.*)
- In the File Name field, enter the filename for your program file, including the file extension you want to use
- Click Save to save the program file
In the drop-down menu at the top of the Save As dialog box, navigate to the directory where you want to save the program file. Select All Files from the Save as type text box near the bottom of the Save as dialog box.
SEEING FILE EXTENSIONS
- In Windows 8 or 10, type File Explorer Options in the search bar and press Enter
- Click the icon for the File Explorer Options tool that appears in the search results
- In Windows 7, click the File Explorer Options icon in the Control Panel
- Click the View tab
- Remove the check mark from the Hide Extensions for Known File Types check box, as shown in Figure 3-4
- Click OK
In the File name field, enter the file name for your program file, including the file extension you want to use. Click the icon for the File Explorer Options tool that appears in the search results.
SETTING THE DEFAULT APPLICATION
Navigate to the program file, and right-click the filename
In the menu that appears, select Open
Select Notepad from the list of programs, and then select the check box to always open files of this type using the program
If you’re running macOS
- Choose TextEdit ➪ Preferences
- On the New Document tab, in the Format section, select the Plain Text radio button
- In the Options section, remove the check mark from the following check boxes
- Click the Open and Save tab (see Figure 3-7)
- In the When Opening a File section, check the Display HTML Files as HTML Code Instead of Formatted Text check box
- In the When Saving a File section, remove the check mark from the Add
- Close the Preferences dialog box to save the settings
On the New Document tab, in the Format section, select the Plain Text radio button. In the When opening a file section, check the "Display HTML files as HTML code instead of formatted text" checkbox.
If you’re running Linux
THE GNOME EDITOR
THE KDE EDITOR
Program editors
Notepad++
Scintilla and SciTE
Integrated development environments
Building a Development Environment Both commercial and open-source IDE packages are available for PHP. To give you a general idea of how IDE packages work, this section discusses two of the more popular packages: Netbeans and Eclipse.
Netbeans
Not only does it show the code completion listing, as you can see in Figure 3-14, but it also shows you the manual PHP definition of the function.
Eclipse
The Debugger tool can help you point out errors in your PHP code as you type, or it can debug your code as you run it in the Eclipse editor window. Having an advanced PHP debugger at your fingertips can be a great time saver when you're developing large applications.
Browser debuggers
Browser debuggers can show you exactly where something went wrong in the HTML or CSS code. Building a development environment When developing web applications, it's critical that you test, do some more.
2 HTML5 and CSS3
The Basics of HTML5
Diving into Document Structure
Elements, tags, and attributes
Attributes provide further instructions to the browser on how to interact with the content in the element. The style attribute shown here defines additional styles that the browser should apply to the content within the element.
Document type
In this case, the browser will change the font color of the text to red.
Page definition
- Open the editor, program editor, or integrated development environ- ment (IDE) package of your choice
- Enter the following code into the editor window
- Start the XAMPP servers
- Open the browser of your choice, and enter the following URL
HTML5 basics must always appear after the head element in the page definition. The header element specifies the address of the web page, which, as shown in Figure 1-1, appears in the address bar of the web browser.
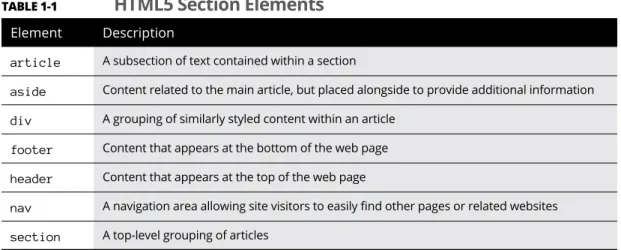
Page sections
Although there is no one standard, there are some basic rules that you can follow when placing sections on the web page. Almost every web page has a header section at the top of the page that identifies it to site visitors.
A WORD ABOUT WHITE SPACE
COMMENTING YOUR CODE
HTML5 Basics Now that you know how to define different sections of a web page, the next section discusses how to add content to them.
Looking at the Basic HTML5 Elements
Headings
When you get to the sixth heading level, it is quite difficult to tell the difference between the heading and normal text on the web page.
Text groupings
If you want to preserve text formatting on a web page, use the pre element. The browser will display the text on the web page exactly as it appears in the HTML5 code.
Breaks
Marking Your Text
Using hypertext
Because the anchor element is a text-level element, you use it to highlight text within a block. When a site visitor clicks on the hyperlink, the browser automatically takes the visitor to the referenced web page in the same browser window.
Displaying a hyperlink
Specifying a hyperlink
You can use hyperlinks to force the browser to jump to a specific location on the same web page. You can also place files in a subfolder under the location of the current web page.
Working with Characters
The protocol specifies the network protocol that the browser should use to download the file. The filename part specifies the exact directory path and filename to reach the file on the server.
Character sets
Because the meta element provides additional information about your website, you should place it within the main element section of the HTML code. The tag allows you to specify other features of your web page to the browser so that it knows how to process the body of the web page and identify the web page content to the servers that automatically scan your web pages. for search engines.
Special characters
HTML5 Basics Although the HTML5 standard specifies a default character set, it is a good idea to specify the character set in your web pages so that you can be sure that the client's browser is using the same character set to render your content . Both methods work equally well, so use whichever method you're most comfortable with.
Making a List (And Checking It Twice)
If you search the web for UTF-8 characters, you will find many websites that show the associations between the UTF-8 numbers and character abbreviations.
Unordered lists
The Basics of HTML5 Bullets are fairly generic, similar to what you'll see in most word processing documents.
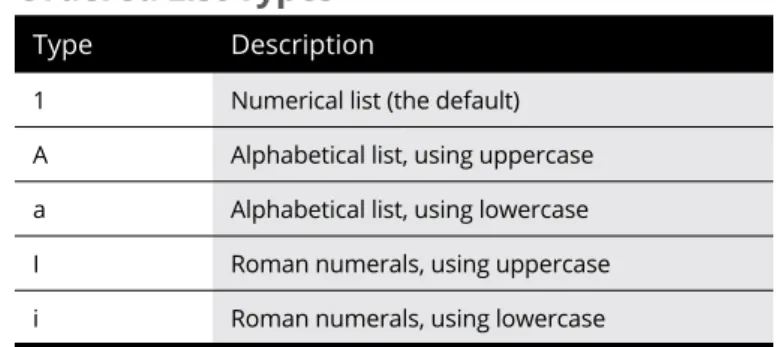
Ordered lists
Fortunately, you can spice things up a bit using CSS by defining different types of bullets to use. If you don't want to use numbers, there are some other options available with the type attribute.
Description lists
When using embedded lists, it is very important to match the opening and closing tags for each item in the list, as well as the lists themselves. The browser automatically separates the terms from the descriptions on the display, making it easier to see which is which.
Building Tables
Define the table element
Define the table rows and columns
Define the table headings
Defining a table
Earlier versions of HTML added attributes to the
| tag. Now the second cell in the row will span all three columns of data for that row, as shown in Figure 1-11. The Basics of CSS3 Understanding StylesThe CSS standard specifies ways to define the color, size, and font of text that appears on web pages. Now you're ready to take a deeper dive into how to use CSS3 in your web applications. Defining the rules of CSS3At the time of this writing, it's currently at version 3 - you'll often see it referred to as CSS3, and that's what I call it in this book. This section goes through how CSS3 works and how you can use it to make your web pages look great. Element type As you can see from this example, you can apply the same class attribute value to different element types, making this a very versatile way to style sections of your web page. Pseudo-elementThe after and before pseudo-elements might sound a bit strange because there is no content to style before or after the element. They are most often used to place images after or before the content in an element. Pseudo-classAll of these pseudo-class rules apply to all anchor elements on a web page and use different colors for hyperlink text depending on the state of the hyperlink. Many pseudo-class style rules (such as first-child and last-child) work with the element's location within the Document Object Model (DOM). 
Applying style rulesCSS3 Basics You can use any of these locations to define your style rules, or you can use them all at once. If two or more style rules apply to the same element on the web page, CSS3's cascading feature kicks in. Cascading style rulesMost browsers allow users to define their own style features, such as specifying contrasting foreground and background colors or changing the font size to make text more readable. Now that you've seen how to define CSS3 rules and where to define them, the next step is to start learning some of the rules you'll use on your web pages. Styling TextEntire books have been written trying to cover all the different rules and features, such as CSS3 For Dummies by John Paul Mueller (Wiley). The remaining sections in this chapter walk you through some of the most commonly used rules that you'll want to keep in mind as you design your dynamic web applications. Setting the fontMany of your website visitors may have some type of visual disability that prevents them from viewing your content the way you style it. Finding a familyThe browser will try to use the font presented first in the list, and if it is not available, it will try to use the next font and continue down the list. Instead of searching for a specific font, the browser can use any font included in the font group. Picking a sizeRelative units of measurement set the size of the font in relation to other elements on the web page. This tells the browser to size the h1 element twice the size of the text on the web page. 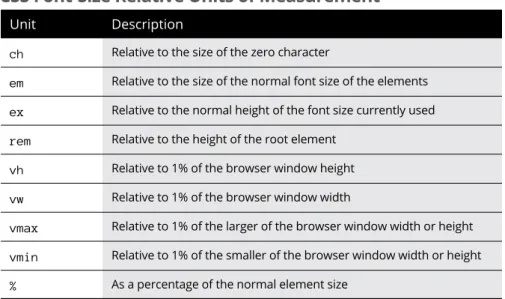
Playing with color
Using the keywords makes setting font sizes easier, but you're still a bit at the mercy of the browser. If you are using XAMPP, launch the XAMPP control panel and then click the Start button for the Apache web server. Working with the Box ModelModify the p and h1 element styles to set the element margins to 0px and add 10px of paddingCSS3 Basics Note: You may need to change the port in the URL to your web. Notice that the white space is gone and that the background space around the text in headings and paragraphs is larger. Styling Tables
You can add borders around any element of the table family: table, th, tr, or td. Fortunately, you can add a little more space around the data in the table cells using some additional CSS properties. 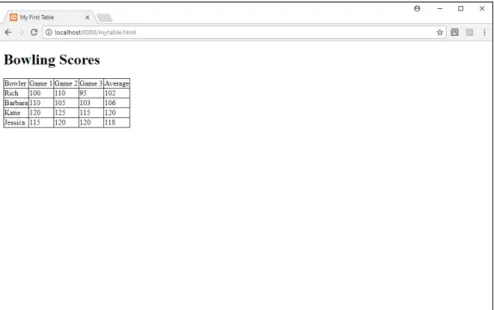
Padding the cells Aligning text in the cells Coloring tables Positioning ElementsOpen your favorite text editor, program editor, or IDE package, and enter the following code Start the web server, open your browser, and go to the following URL Close the browser and stop the web server Putting elements in a specific placeModify the styles defined so they look like this Start your web server, open a browser, and go to the following URL Close the browser and stop the web server Floating elementsModify the HTML code to add a div parent element around the nav, section, and aside elements Start your web server, open your browser, and go to the following URL Close the browser and stop the web serverIn a fluid layout, if you resize the browser window, the individual section elements are also resized. If you make the browser window too small, the browser automatically moves the elements so that they all appear in the window. HTML5 Forms Understanding HTML5 Forms Defining a formGET: The HTTP GET method sends the form data as part of the URL to the server. PUT: The PUT method sends the data behind the scenes in the HTTP request packets instead of using the URL. Working with form fieldsThis means that the form used the GET method to return two form fields to the server. The data sent by the PUT method is still sent in plain text in the HTTP request message. Using Input Fields Text boxesYou can define a default value that appears in the form field using the value attribute. With this format, you can use CSS to style and position both the label field and the text box. Password entryThe legend element allows you to define the text that appears in the border area of the field array. The great thing about the array of fields is that you can assign it an id attribute and then apply specific styles to the entire array in CSS3. Check boxesYou can also set a default state for the check box, but not by using the value attribute. If it appears in the input element, the checkbox appears with a checkmark in it. Radio buttonsTo set a default value for the radio button group, add the checked attribute to that radio button element. Hidden fieldsThe hidden form field does not appear in the form itself, so you must use the value attribute to assign a value to the form field that is sent to the server. When the website visitor clicks the Submit button to submit the form data, any hidden form fields defined are submitted along with the normal form field data. File uploadThis ensures that the binary data in the uploaded file is loaded in binary format and that the data in the other form fields is correctly encoded for upload. Buttons Button Reset Submit Adding a Text AreaYou'll notice that in my text area examples, there is nothing between the opening and closing tags of the text area. Any text you enter between the opening and closing tags appears as the default text in the text area. Using Drop-Down ListsIf they type more than 30 lines of text, the browser will add a scroll bar to the right of the text area and allow them to continue typing. You can change that behavior by setting the multiple attribute in the Enhancing HTML5 FormsThe browser displays the text between the opening tags, but sends the value attribute of the item your site visitor selects to the server. This can be useful if you want to use abbreviations or codes in your data, but want to show the full text to the site visitors. Data listsThe list attribute in the tag refers to the value of the id attribute of the data list to be used by the data list. In this example, as I typed characters, matching data list values appeared in the drop-down box, limiting my choices. Additional input fields
Note that the match is case insensitive and that the match is made anywhere in the text string of the option values. Save the file as inputtypestest.html in the DocumentRoot folder for your web server (such as c:\xampp\htdocs for XAMPP in Windows, or / Application/XAMPP/htdocs for XAMPP in macOS). Using HTML5 Data Validation Holding your place Making certain data required Validating data typesType the following code Start the Apache web server from XAMPP Close the browser, and stop the XAMPP web server Advanced CSS3 Rounding Your CornersChapter 4It does this by allowing you to specify the radius of the imaginary circle used to create rounded corners. All border radius properties use a size value to set the radius of the circle for the corner. Using Border ImagesThe segment value defines which parts of the border image to use for the border. For the segment value, specify the size of the image pieces to use for the individual border images. 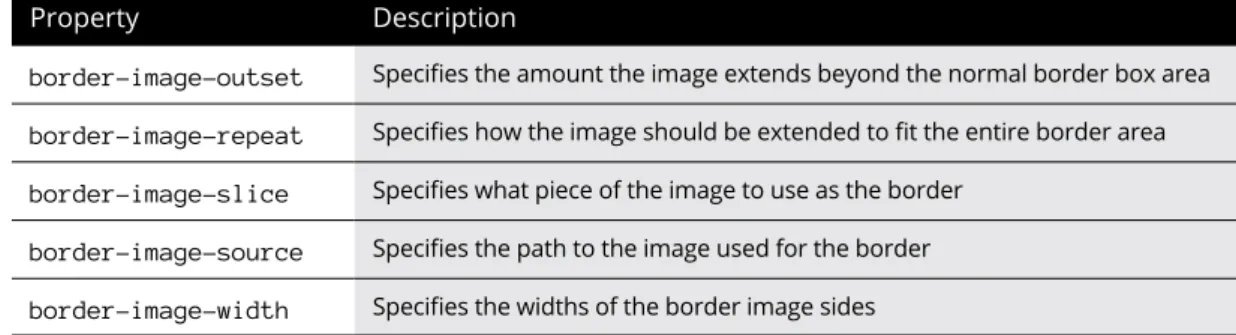
Looking at the CSS3 ColorsTo determine a particular color shade, you need to know its location on the color wheel. Higher percentages produce darker shades of color, while lower percentages produce lighter shades of color. Playing with Color Gradients Linear gradients Radial gradientsYou also want to define two or more colors to create the gradient effect in the image. This creates an elliptical radial gradient, centered in the element, radiating outward to the furthest corner. Adding Shadows Text shadowsAdvanced CSS3 The CSS3 text-shadow style property allows you to define how the shadow should look. By default, the size of the shadow is the same as the object; by adding the spread value you can increase or decrease the size of the shadow. Creating Fonts Focusing on font files Working with web fontsThe src property defines the location of the font file on your server, either as an absolute or relative path. Following those two properties, you can add descriptions that indicate when the font should be used (such as for bold or for text in italics). Handling Media Queries Using the @media commandThese two @media commands define two sets of style rules: one for when the web page appears on a monitor and one for when the web page is printed. It is up to the browser to determine which situation dictates which @media command set to use. Dealing with CSS3 media queriesThe first rule only applies to devices that have a maximum viewport width of 100 pixels. The second rule only applies to devices that have a maximum viewable area of 500 pixels (such as a mobile device). 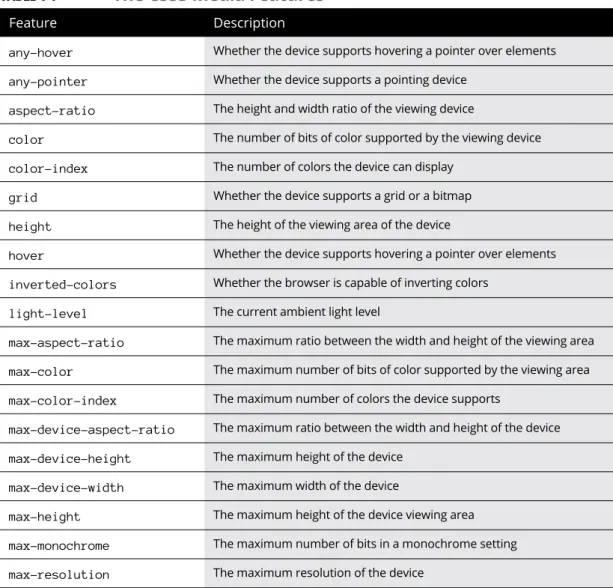
Applying multiple style sheetsIt uses a font size of 10 pixels for the text on the web page to make it smaller. HTML5 and Multimedia Working with ImagesChapter 5 Placing images Styling images
Find two of your favorite image files and copy them to the same folder as the imagetest.html file. Either rename them to image1.jpg and image2.jpg or change the code in the imagetest.html file to match your image filenames. Linking imagesIt's also a good idea to add the border-style property to the anchor-style element and set it to 0 pixels to prevent the browser from drawing an ugly border around the image to indicate it's a link. Working with image maps Gambar 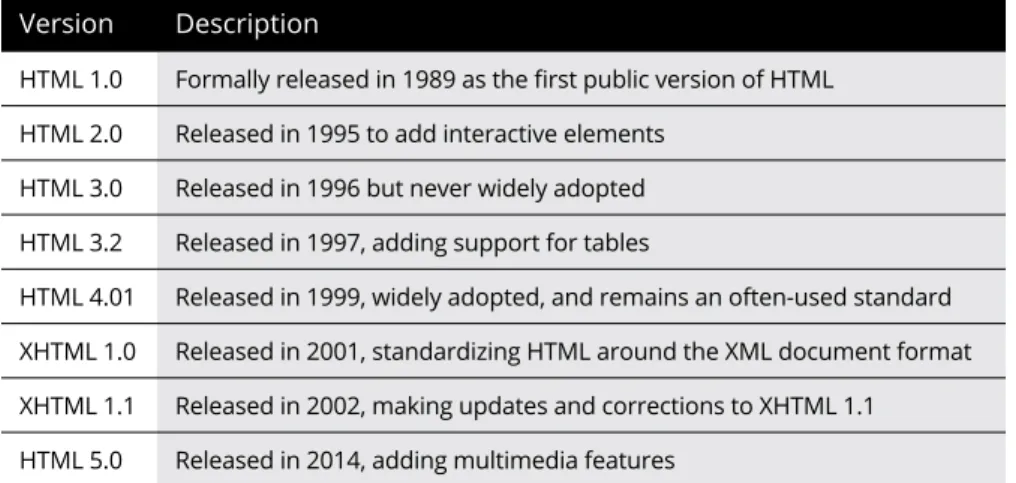

+7
Garis besar Dokumen terkait |