Printed in the USA. The paper in this book is certified under a sustainable forestry program. The playing area of the hall was hourglass shaped, narrower in the middle than at the two ends.
EQUIPMENT AND GEAR
In the correct overhand grip, the thumb of the racket hand should touch the first knuckle of the middle finger. The speed of nylon shuttles is usually indicated by the color of the band around the head of the shuttle.
GAME RULES AND SCORE KEEPING
At the start of the game and when the server's score is tied, the server serves from the correct service court. At the beginning of the game and when the server's score is tied, the server serves from the right court.
WARM-UP AND COOL-DOWN
RESOURCES
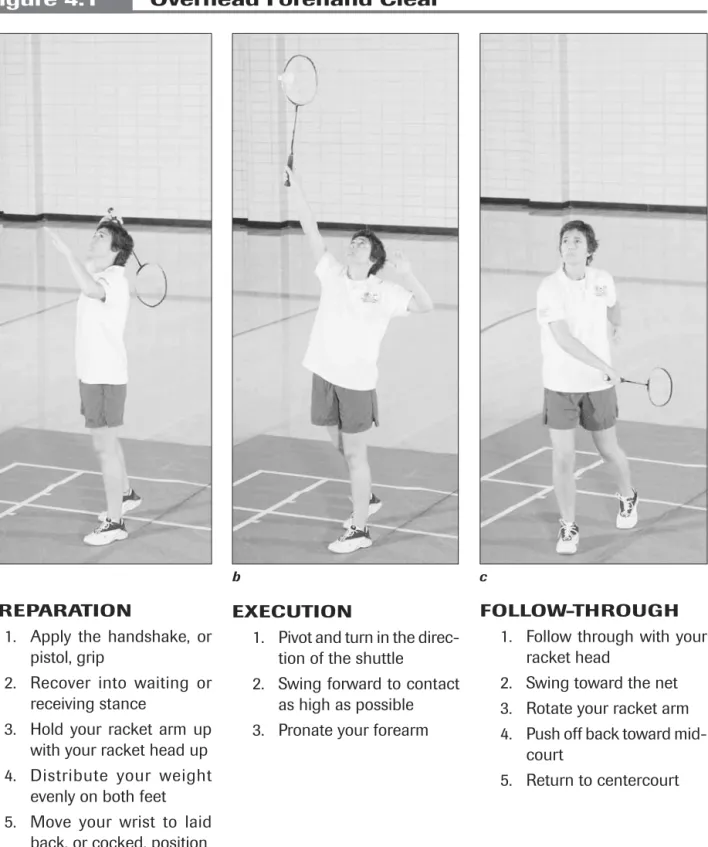
Key to Diagrams
STEP
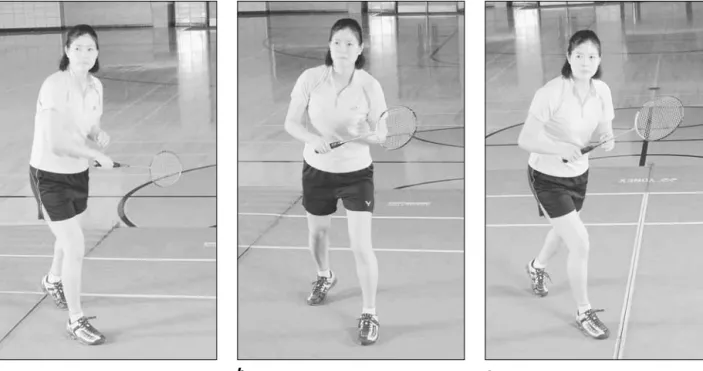
Racket Handling and Footwork
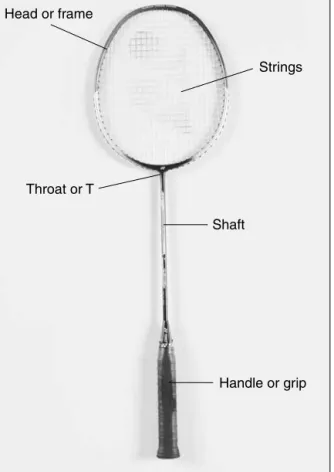
HANDLING THE RACKET
For the backhand, the only change is that your thumb is straight up and down on the upper left slant of the handle instead of wrapped around it (Figure 1.2b). For the backhand, the only change is that your thumb is straight up and down on the top left bevel of the handle instead of wrapped around it.
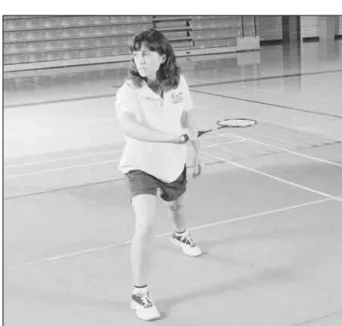
GETTING INTO READY POSITION
This small change also contributes to an increase in power and ease of movement in the backhand stroke when executed correctly. Hold your racket up and move quickly as soon as you determine the direction of your opponent's return.
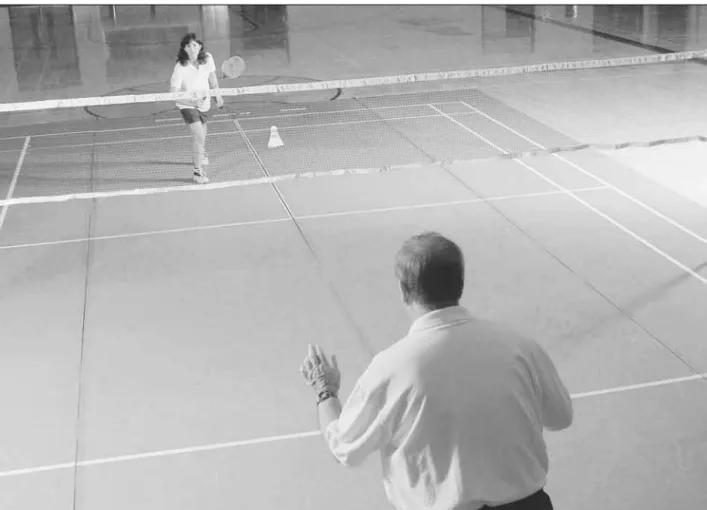
Ready Position Drill. Ready Position
MOVING YOUR FEET
Forehand and backhand returns require you to recover to midcourt using the same three-step pattern as before: racquet leg, alternate leg, racquet leg. You then recover to midcourt using the same three-step pattern as before - racket leg, other leg, racket leg - and assume the ready position.
Footwork Drill 2. Gravity Shadow Footwork
Footwork Drill 3. Sashay Step Shadow Footwork
Footwork Drill 4. Footwork and Movement
GETTING READY FOR SHOTS
Spend some time practicing and repeating drills to develop speed and efficient movement on the field. Try to see how the shot hits your opponent's racket and don't focus on his or her upper body movements.
Racket and Bird Control Drill 1. Handshake
Quickly return to the center of the court after each shot and stop before your opponent hits his or her return.
Racket and Bird Control Drill 2. Shuttle Bounce
Racket and Bird Control Drill 3. Shuttle Scoop
Racket and Bird Control Drill 4. Shuttle Toss and Catch
Racket and Bird Control Drill 5. Bird Carry
Complete one round trip to the net from the back boundary line without dropping the bird = 5 points Complete one round trip to the net from the back boundary line, dropping the bird once = 3 points Complete one round trip to the net from the back boundary line, drop the bird twice = 1 point Your score.
SUCCESS SUMMARY OF
RACKET HANDLING AND FOOTWORK
Serve
LONG SERVE
Service Drill 1. Bird on a String
Hold the bird in your hand without the racket and drop the racket and try to touch it as it drops from your hand.
Service Drill 2. Long Serve
Drop and hit the long serve into a high, flat wall until you make consistent good contact with the shuttle. Practice your underhand serve until you can consistently make good contact with the shuttle.
SHORT SERVE
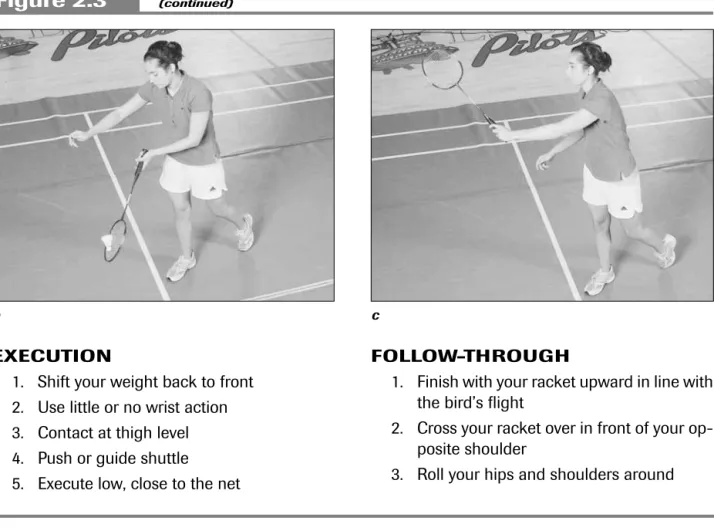
Contact the short backhand serve (figure 2.4a-c) in front of your body with a square or slightly staggered stance. Some players actually stand on their toes to serve a higher and slightly flatter trajectory on the short serve.
Service Drill 3. Short Serve
Service Drill 4. Under the Rope
DRIVE AND FLICK SERVES
However, as your racket hand comes forward, there is a powerful wrist action as the shuttle is hit higher than your opponent can reach, but not high enough for him or her to turn and make an effective return. The receiver sits very close, almost on the short serve line, allowing the server to deliver a successful drive or swing serve.
Service Drill 5. Drive and Flick Serves
Service Drill 6. Target Serves
Service Drill 7. Over the Rope Drill
RETURN OF SERVE
Serve Return Drill 1. Four Corners Target Drill
Evaluate how accurately you directed returns from your right court to each corner of your opponent's doubles court by visually noting where your shots landed. Evaluate how accurately you directed returns from your right court to each midcourt area of your opponent's doubles court by visually noting where your shots landed.
Provide a bigger goal by landing the shuttle anywhere between the short service line and the back service line for double play.
SUCCESS SUMMARY OF THE SERVE
When you've scored at least 90 points out of a possible 130, you're ready to move on to the next step.
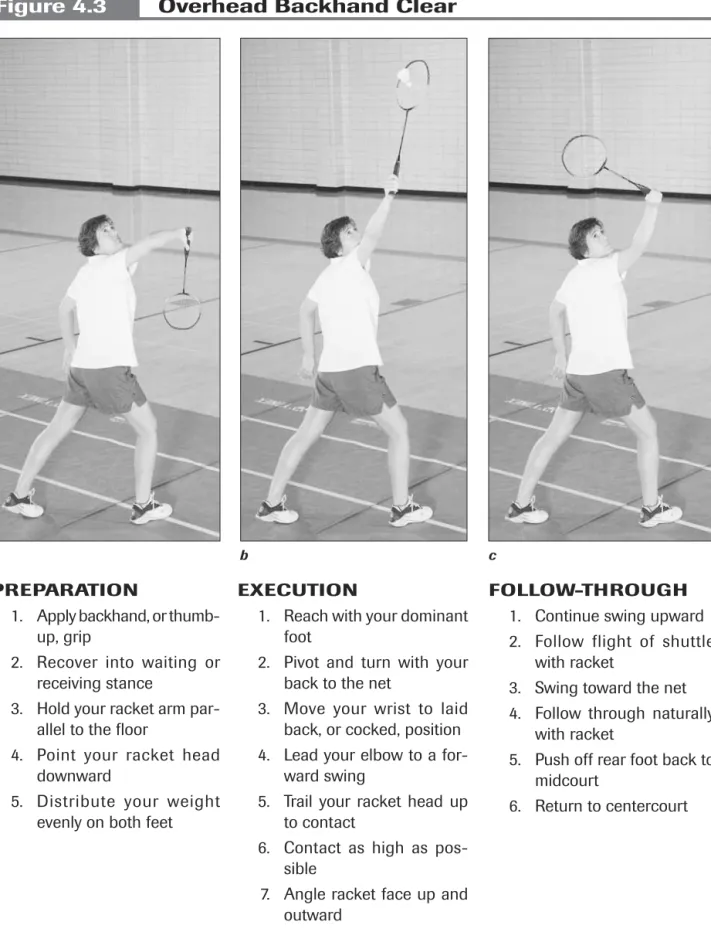
Backhand Overhead
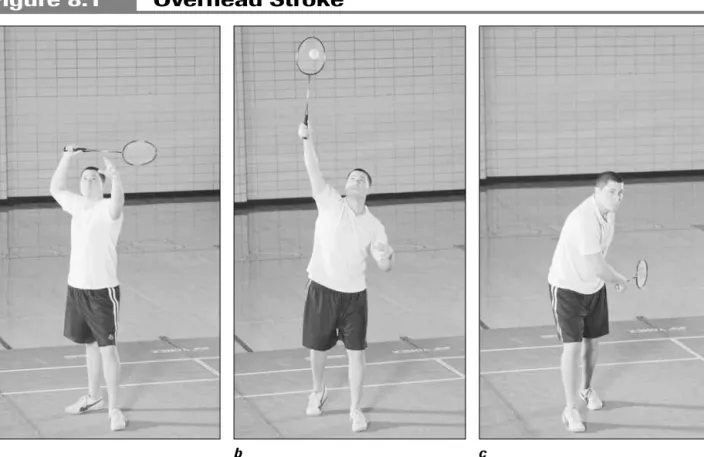
Throw your racquet up to meet the shuttle with the edge of the racquet leading. Your racket then crosses in front of and on the opposite side of your body.
BACKHAND OVERHEAD STROKE
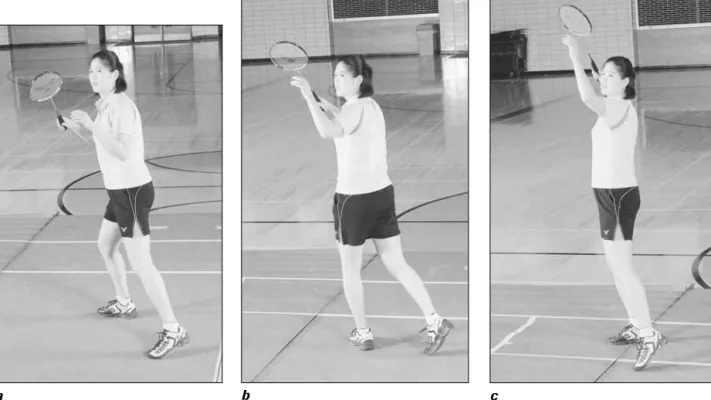
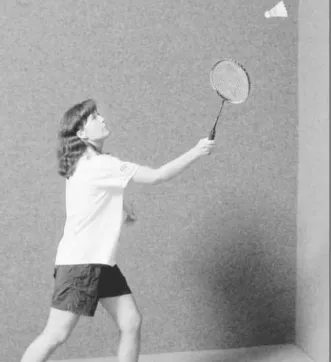
As the shuttle is hit upward to your side of the court, turn your body so that your feet are perpendicular to the net. Contact the shuttle at the highest possible point, preferably in front of your body.
Overhead Stroke Drill 1. Racket Cover Overload
Raise the arm from the shoulder with the forearm parallel to the floor and the racket head pointing down (figure 3.2b). The quick swing of the forearm will cause the racket face to roll until it is almost flat at contact.
Overhead Stroke Drill 2. Mirror Drill
Overhead Stroke Drill 3. Backhand Towel Drill
Overhead Stroke Drill 4. Wall Rally
After the shuttle leaves your racquet, quickly lift your arm off the shoulder and place your racquet head downward at the end of your backswing. Your racket face should direct the shuttle up and out, and your hand guides the racket before contacting the shuttle.
Overhead Stroke Drill 7. Touch Tag
Overhead Stroke Drill 8. Shuttle Clears
Overhead Stroke Drill 9. Backhand Clears
SUCCESS SUMMARY OF THE FOREHAND AND BACKHAND OVERHEAD
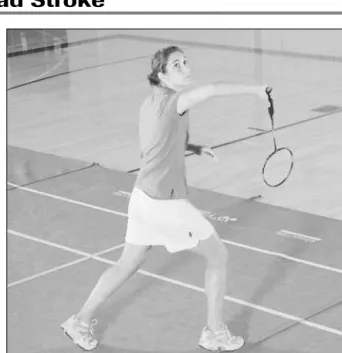
Clear
Touch the ball in front of your body and as high as possible so that the racket ends up in the direction of the ball's path. Touch the racket with the racket hand, palm down, in front of the body and as high as possible.
SuCCESS Summary oF ThE ClEar
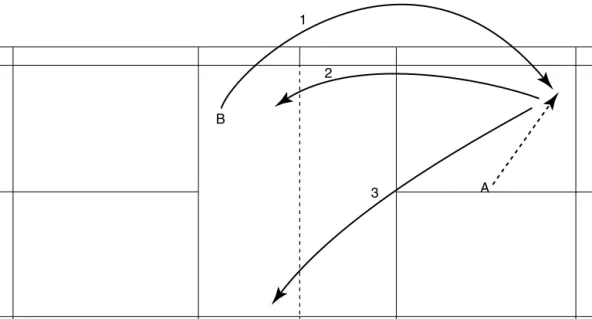
Each player can start the exercise by clearing the cross court to their partner's deep forehand. This off-speed shot gives your opponent a bit of time and requires them to move forward close to the net in order to return.
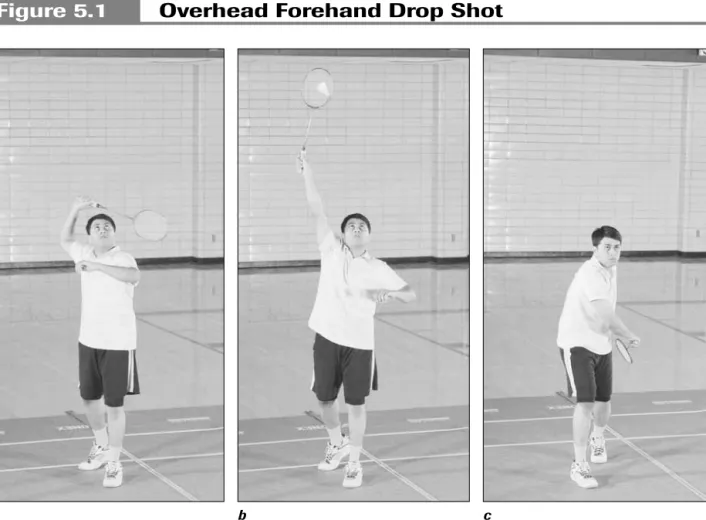
Drop Shot
The shuttle bounces off the face of the racket and literally falls over the net from lack of speed. Therefore, the faster you get to the shuttle at the net, the less time your opponent will have to retrieve your returned drop shot at the net.
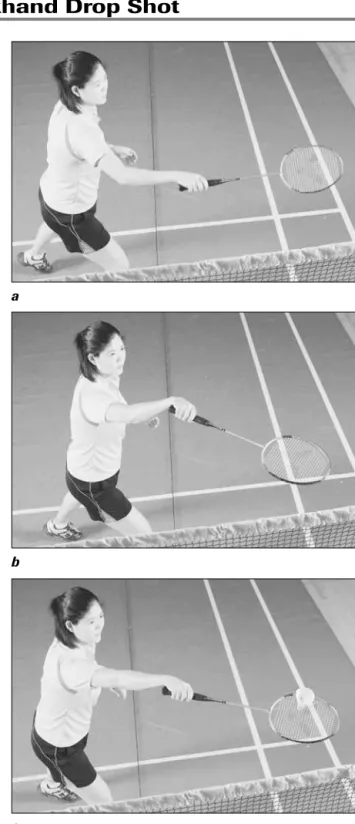
BACKHAND DROP SHOT
Fully extend the racquet arm and make contact with the shuttle with the racquet blade pointing down to send the shuttle into a trajectory that only goes down to your opponent's court. As the shuttle falls into the striking area, lift your racket to make contact with the shuttle and knock it just over the net (Figure 5-4).
Drop Shot Drill 1. Underhand Drop Shot at Net
Drop Shot Drill 2. Crosscourt Drop Shot at Net
Drop Shot Drill 3. Tumble Drop Shot at Net
Drop Shot Drill 4. Hairpin Drop Shot at Net
Drop Shot Drill 5. Self Toss-Overhead Drop Shot Return
Good returns land between the net and the short service line on the setter's side of the court.
Drop Shot Drill 7. Drop Shot Three-Shot Rally
Drop Shot Drill 9. Diagonal Drop Shot Rally
Split the drill into two parts, one for front drilling only and one for back drilling only.
SUCCESS SUMMARY OF THE DROP SHOT
When you've scored at least 70 points out of a possible 100, you're ready to move on to the next step. It kills or ends the rally and scores a point for the person or team that wins the rally.
Smash
Your racket head must be moving at a fast speed as it goes out to meet the shuttle. Take your racket back and drop the racket head down behind your shoulder blades with the elbow of your racket arm pointing up.
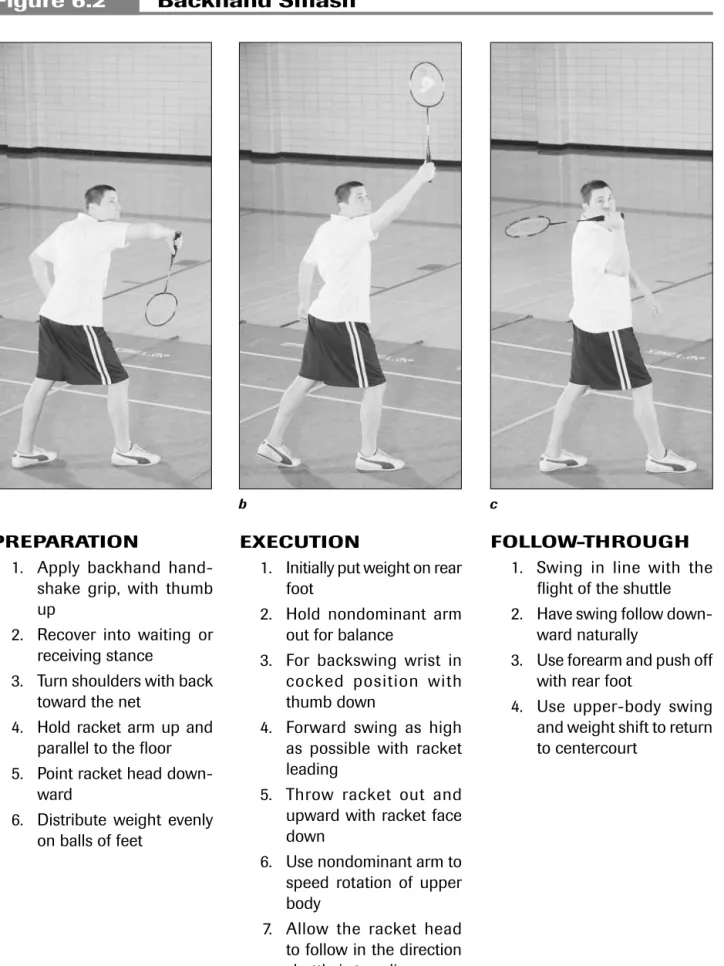
BACKHAND SMASH
Another motive for using the smash or half-smash in doubles is to set up your partner for a kill near the net. The shot is often hit from deep in the backcourt, not to win the point because it will likely be returned, but so your partner can get to the net for the kill.
Smash Drill 1. Shadow Smash
Smash Drill 2. Self-Toss and Smash Return
The partner setting up the other player starts with five or six shuttles because it is not a rally. The receiving partner returns each serve with either a forehand or backhand overhead stroke that results in a smash return at his or her partner's feet (figure 6.3).
Smash Drill 3. Serve and Return Smash
The receiving partner moves into the net and returns the drop shot with an underhand clean. Player B must move into the net to return the drop shot (shot 3) with an underhand shot (shot 4).

Smash Drill 6. Smash Return Down the Line
Smash Drill 7. Diagonal Forehand Smash Rally
Have your partner deliver tighter drop shots closer to the net so you have to move further or faster to make an effective return. This mix of cross lane drop shots will require you to move further or faster to make an effective return.
SUCCESS SUMMARY OF THE SMASH
Block the shuttle with the racket close to the net on the return of the smash. When you have scored at least 75 points out of a possible 100, you are ready to move on to the next step.
Drive
As you swing your racket arm forward, place your body weight on your dominant foot. Hit the shuttle in front of your racket foot at the highest possible point and far away from your body so your swing is not restricted.
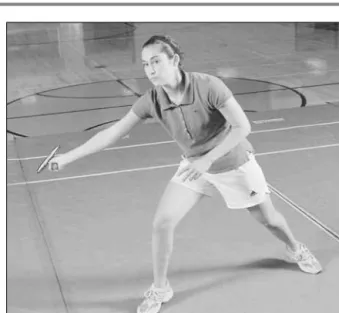
BACKHAND DRIVE
Extend your racket arm, roll your forearm over and make contact with the shuttle as the wrist relaxes (Figure 7-2b). Your racket passes through the contact area and then forward in the direction of the shuttle's flight (Figure 7.2c).
Drive Drill 1. Shadow Drive
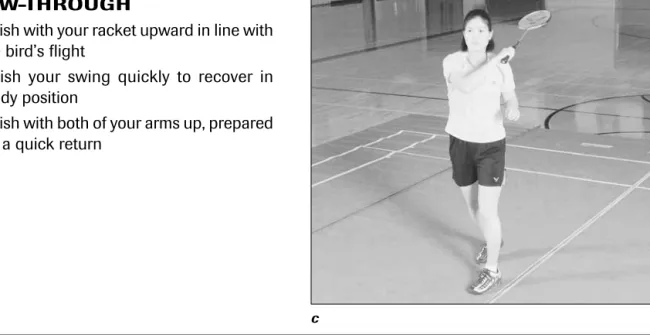
Drive Drill 2. Push or Drive Return From Midcourt
Hit three good backhand drives = 5 points Hit two good backhand drives = 3 points Hit one good backhand drive = 1 point Your score.
Drive Drill 3. Crosscourt Drive Shot at Net
Drive Drill 4. Toss and Hit Drive
Drive Drill 5. Return With Drive
Drive Drill 6. Drive Four-Way Rally
Drive Drill 7. Continuous Drive Rally
SUCCESS SUMMARY OF THE DRIVE
Advanced Techniques
OVERHEAD STROKES
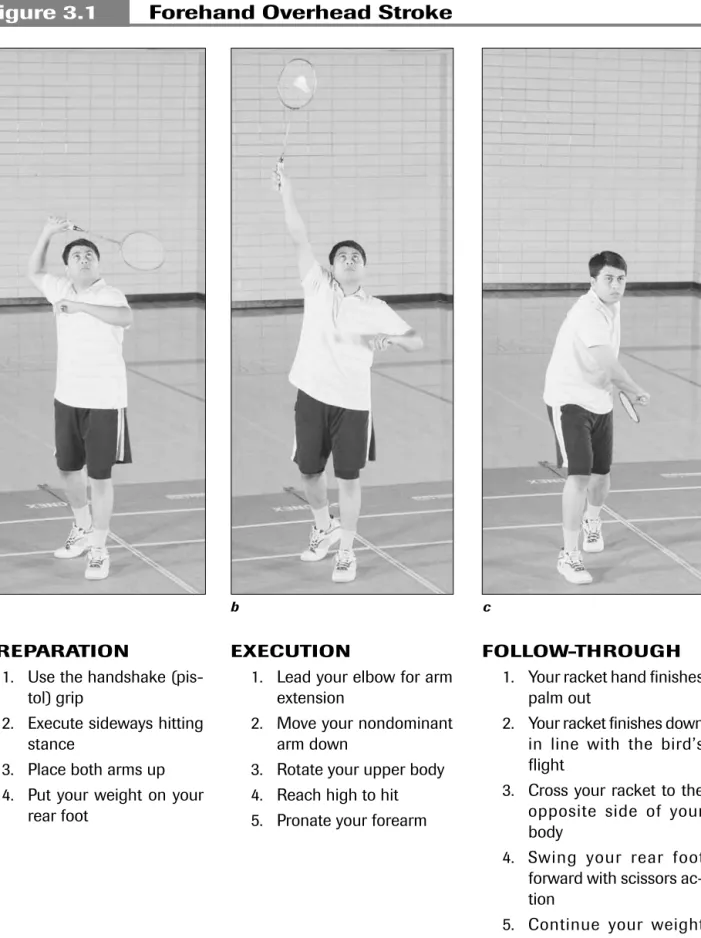
Position your racquet face out to meet the shuttle with your leading hand and hit the shuttle in an upward trajectory. Let your rocket follow the path of the ship with powerful upper body rotation.
Around-the-Head Shot
The overhead kick requires a player to hit the shuttle over his or her non-dominant shoulder. When the opponent's return is hit on the backside, the shot around the head provides a potentially strong and fast return.
Attacking Clear
These types of overhead shots are necessary when the boat is hit fast and on a flat trajectory towards you and you don't have time to change your shot attitude. The face of the missile comes out to meet the ship and hits it in a flat trajectory.
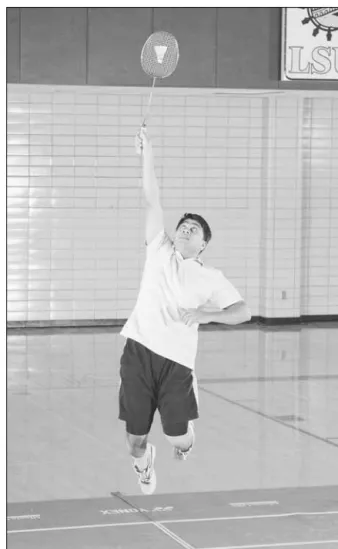
Jump Smash
Throw the racket up to meet the oncoming shuttle in front of your dominant shoulder. Throw racket and hand out to meet the shuttle at the same time and direct the shuttle forward rather than up.
You can improve the angle of attack by jumping in the air to hit the ship as fast as possible. Face the missile to meet the ship and hit it in a flat trajectory.
Half Smash and Fast Drop
Allow the racket to follow the path of the shuttle with powerful upper body rotation 5. Dominant hand guiding the racket causing the shuttle to travel too deep into the opponent's lane.

Backhand Smash
Its added speed gives your opponent less time to react and reduces the options for his or her possible returns. The path of the rapid drop is definitely at a downward angle and should not have an arc or loop to its path.
Sliced Crosscourt Drop Shot
Reverse Sliced
Crosscourt Drop Shot
Backhand Crosscourt Drop Shot
A quick, slashing backside crosscourt drop shot differs from a basic straight drop shot in that it travels deeper into the opponent's court when it reaches the net. This cross backhand stroke is struck down with the same preparatory motion used in the backhand stroke (see Figure 6.2, page 82, for the backhand stroke).
Overhead Strokes Drill 1. Smash and Block Shot Return in Mixed Doubles
Contact is made at about eleven o'clock, over your dominant shoulder with the club slightly angled to slide the tip of the club to create a cutting effect.
Overhead Strokes Drill 2. 12-Shot Rallies
NET PLAY
Tumble Drop Shot
Underhand Crosscourt Drop Shot
Drop Shot Drill 1. Forehand Corner
Drop Shot Drill 2. Alternate Corners
Drop Shot Drill 3. Three Corners
SERVE AND RETURN OF SERVE
Reverse Brushed Serve
Brush shuttle with carving using a downward swing with a slight slope of the racket face. Make sure to contact the shuttle below the waist and keep the racket head under any part of the racket hand.
Half-Court Push Return
Your racket head moves down and over the tip of the shuttle from left to right for a right-handed player. Your wrist and hand end up palm down due to the slant action of the racquet face at contact.
Serve and Service Return Drill 1. Half-Court Push Return
Learn to hit the boat with enough force to get it where you want it to go, but also with enough finesse to keep it in bounds.
Serve and Service Return Drill 2. Push Shot Rally
DECEPTION
By arriving at the ship early, placing the missile under the approaching ship and holding it there, you can then see your opponent inside. If he or she moves, then switch from the drop shot return to an open or open opening.
Hold Return During Overhead Motion
You can hold the return of a shot from the bottom position and then change the return.
Hold Return of Drop Shot
Hold Return of Short Serve
Misdirect the Shot
Misdirection on serve returns or shots at the net is most often accomplished by subtle changes in the angle of the racket face. Slight changes in the angle of the racquet's face allow for what appear to be miraculous saves.
Push Into the Body
A swinging action with your racket before hitting the shuttle allows you to feint one way and hit the other. But most of the time, elite athletes have been in that situation before and have practiced potential returns in that situation thousands of times.
Deception Drill 1. Hold Return of Short Serve
The push into the body of the serve return is meant to be a controlled, subtle return - not a heavy stroke. Mark your success Successfully return 10 or more serves away from the server = 10 points Successfully return 6 to 9 serves away from the server = 5 points Successfully return 1 to 5 serves away from the server = 1 point Your score.
Deception Drill 2. Short Serve and Push Into the Body Return
TRICK SHOTS
Around-the-Back Smash Return
Between-the-Legs Smash Return
Between-the-Legs Clear Return
Below-the-Waist
Underhand Clear Return
Trick Shot Drill 3. Below the Waist Underhand Clear Return
SUCCESS SUMMARY OF ADVANCED TECHNIQUES
Advanced players must score at least 90 points out of a possible 115 before moving to the next step. The next step in scoring strategies introduces concepts related to the new gathering point scoring system.
Tactics and Strategies
You may want to be aggressive on your serve and more secure, more conservative, on your opponent's serve. Also, learn the limits of singles or doubles, so you don't play your opponent's returns that would have been out.
STRATEGY UNDER THE RALLY POINT SCORING SYSTEM
Singles Strategy Under Rally Point Scoring
From right field, hit a clear attack to your opponent's backside, a quick drop straight forward or a quick drop shot across. Your serve or return is weak or out of bounds, giving your opponent an easy score.
Doubles Strategy Under Rally Point Scoring
Tactics Drill 1. Short Serve–Push Return
Tactics Drill 2. Short Serve–Net Drop Shot
TACTICAL PRACTICE
The drop shot is useful when your opponent uses a clear stroke to return the shuttle very high (figure 9.4). If the drop shot is executed differently than the clear shot, it becomes too predictable.
Overhead Drop Shot and Hairpin at the Net
You fail to return to midfield and are out of position for your opponent's return.
Overhead Smash
Your partner stands near the short service line and gives you a long, high backcourt return for you to smash with one full swing. Because the stroke is more physically demanding than other strokes, limit your stroke practice to about 15 strokes per side for three repetitions before switching roles with your partner.
Overhead Smash,
Hairpin at the Net, and Overhead Drop Shot
Player B hits straight ahead of Player A, who blocks his or her partner's shot with a shot return or returns his or her partner's shot with a clear return.
Tactics Drill 4. Four-Shot Rally
Tactics Drill 5. Wide Doubles Serve–Net Shot Rally
Tactics Drill 6. Flat Drive Continuous Rally
Tactics Drill 7. Six-Shot Rallies
TIPS FOR SINGLES PLAY
You fail to make your opponent move and thus give him or her more time with less effort. Each of your returns should have the objective of removing your opponent from his center court.
Tactics Drill 8. Modified Singles
TIPS FOR DOUBLES PLAY
The server and receiver partners are located in the back position near the middle court. Always believe that you can win every match and do not lose this belief until the last point of the match.
SUCCESS SUMMARY OF TACTICS AND STRATEGIES
The server and receiver are both placed in an up position near the short service line in the middle of the court. A well-documented memory of a particular team's doubles match will be valuable information for you as you prepare for your next match against the same team.
Doubles Play
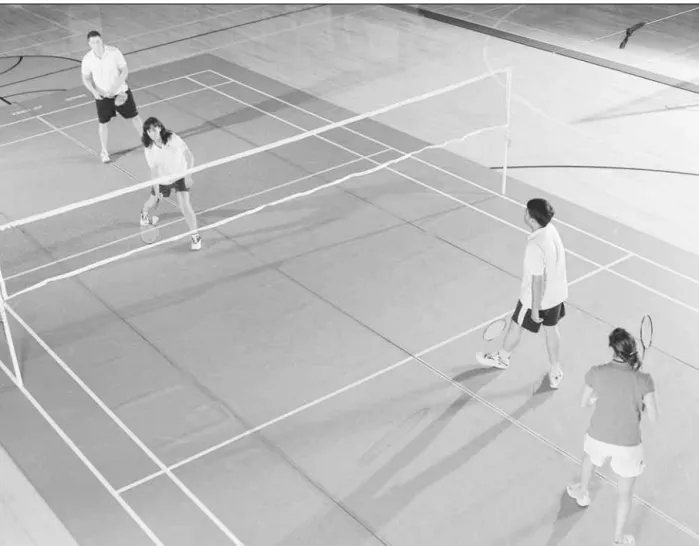
COURT POSITIONING FOR DOUBLES
If you or your partner are able to hit a back-down and force your opponents to raise the ship, then you should switch to the up-back formation. Another example of moving into the up-back formation would be the high service provided to you or your partner.
PLAYING AS A TEAM
The same is true in reverse when either you or your partner starts a high service. Even if your returns lack speed, such as quick drops or half smashes, your opponents will be required to hit their returns to you or your partner.
Doubles Drill 1. Wide Doubles Short Serve Drill
A straight net drop shot is usually preferable to a one hit cross court unless your opponent is directly in front of you over the net. Doubles team A and B are on opposite sides of the net in up and back positions (figure 10.4).
Doubles Drill 3. Short Serve–Push Return Rally
Doubles Drill 4. Modified Doubles
Doubles Drill 6. Mini-Minton
Doubles Drill 7. Net Put-Away
Doubles Drill 8. Triangle Doubles
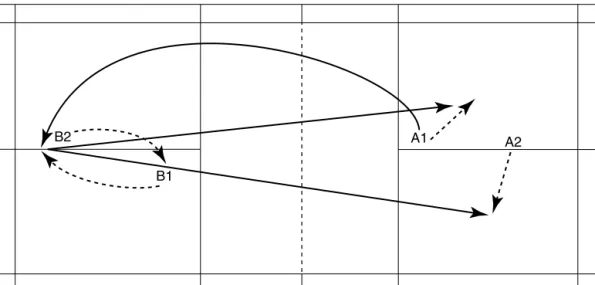
Players A1 and B1 rotate to the left back court, players A3 and B3 move to the right back court, and players A2 and B2 are the net players until the end of the game. Slow returns are the least attractive and will mostly be put away by the net player.
SUCCESS SUMMARY OF DOUBLES PLAY
Conditioning
COMPONENTS OF FITNESS
Along with the physical exercises to develop these factors, be sure to include a healthy diet, adequate sleep and rest, and acceptable exercise regimens.
Muscular Strength and Muscular Endurance
Aerobic Training or Cardiovascular
Anaerobic Training
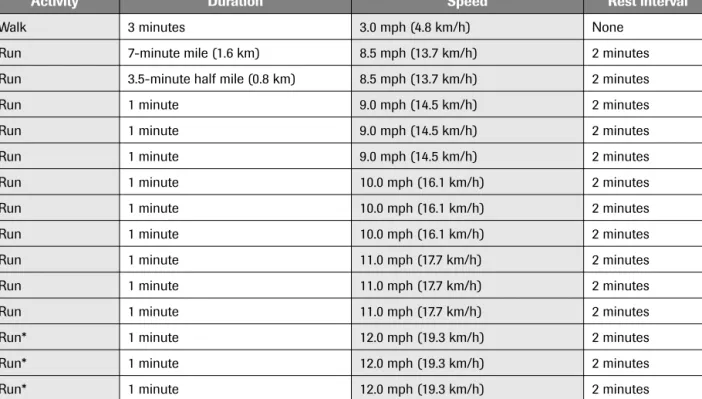
For rest intervals, reduce the treadmill speed to 3.0 miles per hour (4.8 km/h) and walk for the duration of the rest interval. Each of the suggested programs should be followed by a cool down walk of at least 5 minutes on the treadmill at 3 miles per hour (4.8 km/h) and 0 elevation gain.
Flexibility
This stretching movement helps stretch and helps warm up the shoulder joints and muscles. Return to the crossed position by crossing the left leg over the right and repeat the stretch.
Concentration
Reverse the position of the legs and then stretch the calf muscle of the other leg. Alternate stretches and warm up the calf muscle or gastrocnemius in both lower legs.
Prevention of Injuries
If any of the seven ligaments in each knee is stretched or torn, the knee becomes very unstable. Certain electrolyte solutions (Gatorade, Powerade, and All Sport, for example) seem to prevent muscle soreness when consumed.
Weight Training
Conditioning Drill 1. Box of 50
Conditioning Drill 2. Forehand Clear and
Conditioning Drill 3. Three-Shot Continuous Rally
Conditioning Drill 4. Crosscourt Three-Shot
Conditioning Drill 5. Six-Shooter Footwork Rally
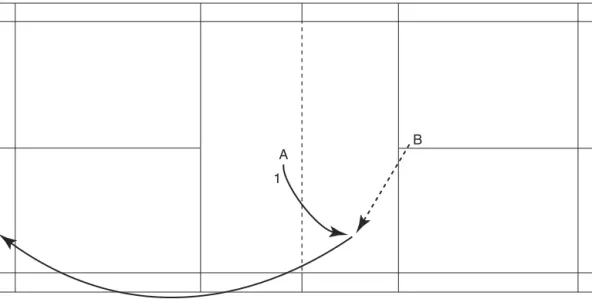
Player A, placed at the net, immediately hits the net shot with a quick, flat return to player B's deep right court.
Conditioning Drill 6. Speed Attack
Conditioning Drill 7. Deep Base Attack
Conditioning Drill 8. Footwork on Command
Conditioning Drill 9. By the Numbers
MOVEMENT AND REACTION
A continuation of the explosive movement drill requires the player to shade a net shot and take one step back to the center. The player must make the cross court shot and execute a backhand on the same line.
SUCCESS SUMMARY OF CONDITIONING
The smash can be made from either side of the court with cross court returns. Suggestions to increase or decrease the difficulty of the exercises allow you to tailor your progress to your ability.
Glossary
The International Badminton Federation - IBF was previously the governing body for the games and competitions of badminton around the world. This can also apply to any drop backs played from a point close to the net.
Additional Resources
BOOKS
EQUIPMENT SUPPLIERS
About the Author