USER MANUAL TBEN-L/TBDP-L Compact
IO modules for Ethernet/
PROFIBUS-DP
All brand and product names are trademarks or registered trade marks of the owner concerned.
Edition 05/2014
© Hans Turck GmbH, Muelheim an der Ruhr
All rights reserved, including those of the translation.
No part of this manual may be reproduced in any form (printed, photocopy, microfilm or any other process) or processed, duplicated or distributed by means of electronic systems without written permission of Hans Turck GmbH & Co. KG, Muelheim an der Ruhr.
Subject to alterations without notice
Table of contents
1 About this manual
1.1 Documentation concept ...1-2 1.2 Explanation of symbols used...1-3 1.2.1 Warnings...1-3 1.2.2 Further notes ...1-3 1.3 General notes...1-4 1.3.1 Prescribed use ...1-4 1.3.2 Notes concerning planning/installation of this product ...1-4
2 General Information
2.1 Safety Applications ...2-2 2.2 Safety in the web server...2-2 2.2.1 Webserver-logout ...2-2 2.3 PROFIenergy ...2-2
3 General technical data
3.1 General ...3-2 3.2 General information on TBEN-L ...3-3 3.3 General information on TBDP-L ...3-3 3.4 General technical data ...3-4 3.4.1 Technical data...3-4 3.4.2 Dimension drawing ...3-6
4 Connection options at the gateway
4.1 Field bus ...4-2 4.1.1 Connection to Ethernet...4-2 4.1.2 Connection to PROFIBUS...4-3 4.2 Supply voltages ...4-4 4.2.1 Pin assignment...4-4 4.2.2 Supply concept ...4-5 4.3 Inputs/outputs ...4-6 4.4 Grounding/ shielding concept...4-7 4.4.1 Grounding the station (FE)...4-8
5 Module types
5.1 Block diagrams TBxx ...5-2 5.2 TBxx-Lx-16DIP ...5-3 5.2.1 Technical data...5-3 5.2.2 Wiring diagrams...5-4 5.2.3 Parameters...5-4 5.2.4 Diagnostic messages ...5-5
5.3 TBxx-Lx-16DOP ... 5-6 5.3.1 Technical data ... 5-6 5.3.2 Wiring diagrams ... 5-6 5.3.3 Parameters ... 5-7 5.3.4 Diagnostic messages ... 5-7 5.4 TBxx-Lx-8DIP-8DOP ... 5-8 5.4.1 Technical data ... 5-8 5.4.2 Wiring diagrams ... 5-9 5.4.3 Parameters ... 5-9 5.4.4 Diagnostic messages ...5-10 5.5 TBxx-Lx-16DXP... 5-11 5.5.1 Technical data ...5-11 5.5.2 Wiring diagrams ...5-12 5.5.3 Parameters ...5-12 5.5.4 Diagnostic messages ...5-13
6 Module family TBEN-L
6.1 Configuration ... 6-3 6.1.1 Device configuration files ... 6-3 6.1.2 Address assignment Ethernet ... 6-3 6.1.3 Resetting the IP address, switch position "000"... 6-5 6.1.4 Factory reset (F_Reset), switch position „900“ ... 6-6 6.1.5 Functional difference: switch position "000" and "900"... 6-6 6.1.6 Set-button ... 6-6 6.1.7 Addressing via PACTware™ - I/O-ASSISTANT 3 (FDT/DTM) ... 6-7 6.1.8 Addressing via web server... 6-7 6.2 Module status... 6-8 6.2.1 LED behavior ... 6-8 6.2.2 Status and Control Word of the TBEN-L stations...6-10 6.3 Protocols... 6-12 6.3.1 Multi protocol functionality ...6-12 6.3.2 Explicit/manual protocol selection ...6-12 6.3.3 Protocol dependent functions...6-12 6.4 Modbus TCP... 6-13 6.4.1 Implemented Modbus functions ...6-17 6.4.2 Modbus-registers...6-18 6.4.3 Data width of the I/O-modules in the Modbus-register area ...6-20 6.4.4 Register mapping of the TBEN-L stations ...6-21 6.4.5 Register 100Ch: „Station-Status“ ...6-26 6.4.6 Register 1130h: „Modbus-Connection-Mode“ ...6-27 6.4.7 Register 1131h: „Modbus-Connection-Timeout“...6-27 6.4.8 Register 0x113C and 0x113D: „Restore Modbus-Connection-Parameters” ...6-27 6.4.9 Register 0x113E and 0x113F: "Save Modbus-Connection-Parameters" ...6-28 6.4.10 Bit areas: mapping of input-discrete- and coil-areas ...6-28 6.4.11 Error behavior (watchdog) ...6-28 6.4.12 Parameters and diagnostic messages of the I/O channels ...6-29 6.5 EtherNet/IP™... 6-30
6.5.2 EDS-file ... 6-32 6.5.3 Diagnostic messages via process data ... 6-32 6.5.4 QC - QuickConnect ... 6-33 6.5.5 Device Level Ring (DLR) ... 6-34 6.5.6 EtherNet/IP™ Standard Classes ... 6-35 6.5.7 VSC-Vendor Specific Classes... 6-55 6.6 PROFINET ... 6-63 6.6.1 Install GSD files... 6-65 6.6.2 FSU - Fast Start-Up (prioritized startup) ... 6-65 6.6.3 MRP (Media Redundancy Protocol) ... 6-66 6.6.4 PROFINET-diagnostics ... 6-67 6.6.5 Parameters... 6-71 6.6.6 Description of user data for acyclic services... 6-72 6.6.7 Description of the acyclic I/O-channel user data... 6-74
7 Module family TBDP-L
7.1 Configuration...7-2 7.1.1 General ...7-2 7.1.2 GSD files...7-2 7.1.3 Address setting ...7-2 7.1.4 Transmission rates ...7-2 7.1.5 Bus termination...7-2 7.2 Module status ...7-3 7.2.1 LED-displays ...7-3 7.3 Diagnostics...7-5 7.3.1 Module-status (device specific diagnostics)...7-5 7.3.2 Channel specific diagnostics...7-5 7.4 Parameterization ...7-8 7.4.1 Station parameters ...7-8 7.4.2 Parameters for I/O channels ...7-8
8 The web server
8.1 IP address ...8-2 8.2 Start page of the web server (Home) ...8-3 8.3 Station Diagnostics ...8-4 8.4 Ethernet Statistics ...8-5 8.5 Links...8-6 8.6 Login / password ...8-7 8.7 Change Admin Password ...8-8 8.8 Network Configuration ...8-9 8.8.1 Change network parameters (port settings, IP address, etc.) ... 8-10 8.9 Station Configuration ... 8-11 8.9.1 Configuration of the field bus interface... 8-11 8.10 I/O-parameters ... 8-12
8.10.1 Parameterization of the in-/ outputs ...8-12
9 Access via I/O-ASSISTANT 3 (FDT/DTM), PACTware
9.1 General ... 9-2 9.1.1 Addressing via I/O-ASSISTANT 3 (FDT/DTM) ... 9-3
10 Guidelines for Electrical Installation
10.1 General notes ... 10-2 10.1.1 General ...10-2 10.1.2 Cable routing...10-2 10.1.3 Lightning protection ...10-3 10.1.4 Transmission media ...10-3 10.2 Electromagnetic compatibility (EMC) ... 10-4 10.2.1 Ensuring electromagnetic compatibility...10-4 10.2.2 Grounding of inactive metal components ...10-4 10.2.3 PE connection ...10-4 10.3 Shielding of cables... 10-5 10.4 Potential compensation ... 10-6 10.4.1 Switching inductive loads ...10-6 10.4.2 Protection against Electrostatic Discharge (ESD)...10-6
11 Glossary
12 Index
1 About this manual
1.1 Documentation concept... 2
1.2 Explanation of symbols used ... 3
1.2.1 Warnings ...3
1.2.2 Further notes ...3
1.3 General notes ... 4
1.3.1 Prescribed use ...4
1.3.2 Notes concerning planning/installation of this product ...4
About this manual
1.1 Documentation concept
This manual contains all information about the product families TBEN and TBDP, the TURCK block I/Os in protection class IP65/IP67/IP69K.
TBEN-L:
Compact I/O-modules for Ethernet with multiprotocol functionality ((EtherNet/IP™, Modbus TCP and PROFINET).
TBDP-L:
Compact I/O-modules for PROFIBUS-DP
The following chapters contain:
the general technical data and station properties,
a description of the function and the features of the single devices in this type series
a description of the stations' representation in the different Ethernet-protocols,
a description of the devices' handling in the different PLC-applications,
Explanation of symbols used
1.2 Explanation of symbols used
1.2.1 Warnings
Action-related warnings are placed next to potentially dangerous work steps and are marked by graphic symbols. Each warning is initiated by a warning sign and a signal word that expresses the grav- ity of the danger. The warnings have absolutely to be observed.
1.2.2 Further notes
CALL TO ACTION
This symbol identifies steps that the user has to perform.
RESULTS OF ACTION
This symbol identifies relevant results of steps DANGER!
DANGER indicates an immediately dangerous situation, with high risk, the death or severe injury, if not avoided.
WARNING!
WARNING indicates a potentially dangerous situation with medium risk, the death or severe injury, if not avoided.
CAUTION!
CAUTION indicates a potentially dangerous situation with low risk, middle or low injury, if not avoided.
ATTENTION!
ATTENTION indicates a situation that may lead to property damage, if it is not avoided.
NOTE
In NOTES you find tips, recommendations and important information. The notes facilitate work, provide more information on specific actions and help to avoid overtime by not follow- ing the correct procedure.
TECHNICAL BASICS
The TECHNICAL BASICS offer technical information, basics and background information. This information lead to a better understanding of the device functions for example. The experi- enced user can skip this information.
About this manual
1.3 General notes
Please read this section carefully. Safety aspects cannot be left to chance when dealing with electrical equipment.
This manual includes all information necessary for the prescribed use of the TBEN-L and TBDP-L-sta- tions. It has been specially conceived for personnel with the necessary qualifications.
1.3.1 Prescribed use
The devices described in this manual must be used only in applications prescribed in this manual or in the respective technical descriptions, and only with certified components and devices from third party manufacturers.
Appropriate transport, storage, deployment and mounting as well as careful operating and thorough maintenance guarantee the trouble-free and safe operation of these devices.
1.3.2 Notes concerning planning/installation of this product
All respective safety measures and accident protection guidelines must be considered carefully and without exception.
2 General Information
2.1 Safety Applications ... 2
2.2 Safety in the web server... 2
2.2.1 Webserver-logout ...2
2.3 PROFIenergy ... 2
General Information
2.1 Safety Applications
At the moment, TURCK does not offer TBEN/TBDP-modules for Safety applications.
2.2 Safety in the web server
In the web server, a default-password is assigned in the TBEN-L-module for the administrator access (see also Change Admin Password (page 8-8)).
In order to make misuse by third parties more difficult, it can be necessary to change the password.
This should be done in the context of the network security concept for the complete facility in which the modules are placed.
2.2.1 Webserver-logout
In order to disconnect a logged in user/PC with administrator rights from the web server, a logout is necessary.
If only the web browser is closed, the last active access is reactivated when opening the web server again from the same PC, which means, possibly with all administrator rights.
2.3 PROFIenergy
Not supported at the moment.
3 General technical data
3.1 General... 2
3.2 General information on TBEN-L ... 3
3.3 General information on TBDP-L ... 3
3.4 General technical data ... 4
3.4.1 Technical data ...4
3.4.2 Dimension drawing ...6
General technical data
3.1 General
This chapter contains device-independent data such as dimensions, general technical data, etc. for the stations of the product lines TBEN-L and TBDP-L.
NOTE
Station-specific information can be found in the single station descriptions within the respec- tive chapters of this manual.
General information on TBEN-L
3.2 General information on TBEN-L
The devices of the TBEN-L product family provide the following features:
direct connection of up to 16 digital in- and outputs to the field bus
protocols: EtherNet/IP™, Modbus TCP and PROFINET RT in one single device
channel-related short-circuit diagnosis of outputs and slot-related short-circuit diagnosis of the sen- sor/actuator supply voltage
Ethernet-connection with two 4-pole, d-coded M12 x 1 connectors
integrated Ethernet-switch for building up a line-topology
3.3 General information on TBDP-L
The devices of the TBDP-L product family provide the following features:
direct connection of up to 16 digital in- and outputs to the field bus
channel-related short-circuit diagnosis of outputs and slot-related short-circuit diagnosis of the sen- sor/actuator supply voltage
PROFIBUS-DP-connection with two 5-pole, b-coded M12 x 1 connectors
General technical data
3.4 General technical data
3.4.1 Technical data
Table 3-1:
Technical data of the TBxx-stations
Supply voltage
V1 (incl. electronics supply) 24 V DC
Permissible range 18 … 30 V DC
V2 24 V DC
Permissible range 18 … 30 V DC
Electrical isolation galvanic isolation between V1 and V2
Connectors
Ethernet 2 x M12-female (OUT), 4-pole, D-coded
PROFIBUS 1 x M12-male (IN), 5-pole, B-coded
1 x M12-female (OUT), 5-pole, B-coded
Power supply 7/8" connector, 4-/5-pole
Inputs / Outputs M12-connector, 5-pole
Isolation voltages
V1 to V2 ≥ 500 V AC
V1/V2 to field bus ≥ 500 V AC
Protocol properties Modbus TCP
Address assignment Static IP (rotary coding switch),
BOOTP, DHCP
Supported Function Codes FC1, FC2, FC3, FC4, FC5, FC6, FC15, FC16, FC23
Number of connections 8
EtherNet/IP™
address assignment according to EtherNet/IP™ standard
Quick Connect (QC) < 150 ms
Device Level Ring (DLR) supported
Number of connections 3
PROFINET
Address assignment DCP
General technical data
Fast Start-Up (FSU) < 150 ms
Diagnosis according to PROFINET Alarm Handling
Topology detection supported
Automatic address assignment supported
Media Redundancy Protocol (MRP) supported
Housing Fibre-glass reinforced Polyamide (PA6-GF30)
Size 60.4 × 230.4 × 24 mm (B × L × H)
Window material Lexan
Screw material 303 Stainless Steel
halogen-free yes
Mounting via 2 through-holes, Ø 6.3 mm
Mounting distance station to station ≥ 50 mm
Valid for operation in the ambient temperatures mentioned below, with sufficient ventilation as well as maximum load (horizontal mounting).
In case of low simultaneity factors and low ambient temperatures, mounting distances of < 50 mm may be possible.
Protection class IP65/IP67/IP69K
Tests
Vibration test according to EN 60068-2-6/ IEC 68-2-47
Acceleration up to 20 g
Drop and topple according to IEC 60068-2-31/ IEC 60068-2-32 1
Shock test according to EN 60068-2-27
EMC according to EN 61131-2
Temperature range
– Operating temperature - 40 °C to + 70 °C (- 40 °F to + 158 °F) – Storage temperature - 40 °C to + 70 °C (- 40 °F to + 158 °F)
General technical data
3.4.2 Dimension drawing
Figure 3-1:
Dimensions for the TBxx-stations
218 230,5
C5 C6 C7 C8
6,3 38,8
60,4
C1 C2 C3 C4 30,2 24
X2 X1
P2 P1
4 Connection options at the gateway
4.1 Field bus... 2
4.1.1 Connection to Ethernet ...2
– Ethernet connection for QC-/FSU-applications ...2
4.1.2 Connection to PROFIBUS...3
4.2 Supply voltages ... 4
4.2.1 Pin assignment...4
4.2.2 Supply concept ...5
4.3 Inputs/outputs ... 6
4.4 Grounding/ shielding concept ... 7
4.4.1 Grounding the station (FE) ...8
– General...8
– Dismounting the metal clamp ...8
– Mounting the metal clamp...8
Connection options at the gateway
4.1 Field bus
4.1.1 Connection to Ethernet
The connection to Ethernet is realized via the integrated auto-crossing switch is done using two 4-pole, D-coded M12 x 1-Ethernet-connectors.
Ethernet connection for QC-/FSU-applications
Further information concerning QuickConnect and FSU can be found here:
QuickConnect in TBEN-L (page 6-33)
FSU - Fast Start-Up (prioritized startup) (page 6-65) Figure 4-1:
Pin assignment of M12 x 1-Ethernet- female connec- tors, 4-pole
Ethernet M12 x 1
ETH1 (P1) ETH2 (P2)
NOTE
Please observe the following for QuickConnect (QC)- and Fast Start-Up (FSU)-applications:
–do not use a crossover-cable
– ETH1 = connector for incoming Ethernet-line – ETH2 = connector for outgoing Ethernet-line
v
4
1 3
2
P1
1 = TD + 2 = RD + 3 = TD – 4 = RD –
v
4
1 3
2
P2
1 = RD + 2 = TD + 3 = RD – 4 = TD –
Field bus
4.1.2 Connection to PROFIBUS
PROFIBUS-DP-connection with two 5-pole, b-coded M12 x 1 connectors Figure 4-2:
Pin assignment of M12 x 1-Ethernet- female connec- tors, b-coded
PROFIBUS M12 x 1
BUS IN (P1), male connector BUS OUT (P2), female connector
w
4 3 1
2 5
1 = 5 V 2 = BUS-A 3 = GND 4 = BUS-B 5 = n.c.
Flansch = Schirm
v
4
1 3
2 5
Connection options at the gateway
4.2 Supply voltages
4.2.1 Pin assignment
The power supply is realized via 7/8" male connectors on the module.
TBEN-L1 series: 5-pole
TBDP-L2 series: 5-pole
TBEN-L4 line: 4-pole
V1 and V2 are galvanically isolated.
Figure 4-3:
Power supply
Supply voltage 7/8“, 5-pole
X1= voltage IN
X2 = voltage OUT for supplying the next node V1 = supply voltage 1 (incl. supply of electronics) V2 = supply voltage 2
Supply voltage 7/8“, 4-pole
X1= voltage IN
X2 = voltage OUT for supplying the next node V1 = supply voltage 1 (incl. supply of electronics) V2 = supply voltage 2
NOTE
V1 and V2 are fed and monitored separately. In case of an undercut of the admissible voltage, the connectors are switched-off according to the module's supply concept (see Supply con- cept (page 4-5)).
In case of an undervoltage at V2, the "POWER" LED changes from green to red. In case of an undervoltage at V1, the "POWER" LED is turned off.
1 = V2 (–) 2 = V1 (–) 3 = FE 4 = V1 (+) 5 = V2 (+) 3
4 5
2 1
w v
3 4 5 2 1
X1 X2
w v
1 2
3 4
1 = 24 VDC V2 2 = 24 VDC V1 3 = GND V1 4 = GND V2
1 2 3 4
X1 X2
Supply voltages
4.2.2 Supply concept
All TBxx-modules are supplied via two separate voltages V1 and V2.
The I/O-channels are therefore consequently separated into the different potential groups "detachable I/O" (supplied through V2) and "non-detachable" I/O (supplied through V1).
This allows a safety shutdown of parts of an installation via emergency-off circuits even when using the highly flexible 16DXP-module variants.
V1 = supply of module electronics and the respective connectors
V2 = supply of module electronics and the respective connectors (separately detachable) Figure 4-4:
Module supply - overview
TBxx-L1-16DIP TBxx-L1-16DOP
TBxx-L1-8DIP-8DOP TBxx-L1-16DXP
V1 V2
V1 V2
V1 V2
V1 V2
Connection options at the gateway
4.3 Inputs/outputs
The connection of sensors and actuators is realized via 8 M12 x 1-connectors.
Figure 4-5:
M12 x 1-connec- tors. for in- and outputs
Inputs/outputs M12 x 1
The pin assignment and the wiring diagrams can be found in the module descriptions chapter 5, Module types.
4
1 3
2 5
v
Grounding/ shielding concept
4.4 Grounding/ shielding concept
The grounding/ shielding concept of the TBxx-modules allows the separate grounding of fieldbus- and I/O-part.
The metal clamp (1) at the M12-connectors for the fieldbus connection (P1, P2) connects the shield of the fieldbus lines.
The metal ring (2) is situated under the metal clamp an connects the functional earth of the
7/8'' connectors for the voltage supply (pin 3) to the FE of the M12-connectors (pin 5) for the connection of the sensors and actuators.
By mounting the module onto a mounting plate through the mounting hole, the mounting screw is used to realize the connection to the reference potential of the installation.
Figure 4-6:
Equivalent circuit diagram shielding concept
Figure 4-7:
Grounding com- ponents 1metal clamp 2metal ring 3mounting screw
1 nF 2,2 MΩ X1
C1
C2
C3
C4
P1
X2
C5
C6
C7
C8
P2 4 x 15 nF
1
2
3
Connection options at the gateway
4.4.1 Grounding the station (FE)
General
Metal clamp and metal ring are connected.
The mounting screw (3) through the station's mounting hole connects the shield of the fieldbus lines to the FE of power supply and sensors/actuators and the installation's reference potential.
If a common reference potential is not desirable, remove the metal clamp for decoupling and/or mounting the station by using a plastic screw.
Dismounting the metal clamp
Use a slim slotted screwdriver in order to lift up and remove the metal clamp.
Mounting the metal clamp
Place the metal clamp between the fieldbus connectors by using a screwdriver in such way that the clamp contacts the metal housing of the connectors.
The shielding of the fieldbus lines is now again connected to the metal clamp.
NOTE
Further information about cable routing, shielding etc. of TBxx-modules can be found in chapter 10: Guidelines for Electrical Installation.
Figure 4-8:
Dismounting the metal clamp
Figure 4-9:
Replacing the metal clamp
5 Module types
5.1 Block diagrams TBxx... 2 5.2 TBxx-Lx-16DIP ... 3 5.2.1 Technical data ...3 5.2.2 Wiring diagrams ...4 – Inputs...4 5.2.3 Parameters...4 5.2.4 Diagnostic messages ...5 5.3 TBxx-Lx-16DOP ... 6 5.3.1 Technical data ...6 5.3.2 Wiring diagrams ...6 – Outputs...6 5.3.3 Parameters...7 5.3.4 Diagnostic messages ...7 5.4 TBxx-Lx-8DIP-8DOP ... 8 5.4.1 Technical data ...8 5.4.2 Wiring diagrams ...9 – Inputs...9 – Outputs...9 5.4.3 Parameters...9 5.4.4 Diagnostic messages ... 10 5.5 TBxx-Lx-16DXP ... 11 5.5.1 Technical data ... 11 5.5.2 Wiring diagrams ... 12 – Analog inputs and outputs... 12 5.5.3 Parameters... 12 5.5.4 Diagnostic messages ... 13
Module types
5.1 Block diagrams TBxx
Figure 5-1:
Block diagrams
Rotary switches ERR
BUS
µC Supply
μC +4 –
2 + 5 –
1 FE 3
V1 V2
+4 –
2 +
5 – 1 FE
3
V1 V2
X1 X2
IN Diag
IN Diag
V1 Diag V2 Diag
OUT Diag
OUT Diag
P2 P1
4
1 3
2
4
1 3
ETH2 2 ETH1
Ethernet Ethernet
1 VAUX1
4 IN 2 IN 3 V1 – 5 FE
120 mA
Input
Input
1 VAUX2
4 OUT 2 OUT 3 V2 – 5 FE
120 mA
Output
Output
V1 + V1 +
V2 +
V2 +
IN Diag OUT Diag
IN Diag OUT Diag
1 VAUX1
4 IN/OUT 2 IN/OUT 3 V1 – 5 FE
120 mA
In/Output
I/O
1 VAUX2
4 IN/OUT 2 IN/OUT 3 V2 – 5 FE
120 mA
In/Output
I/O V1 +
V2 + Bus
Bus
P2 P1
PROFIBUS PROFIBUS
Bus
4 3 1
2
5 4
1 3
2
5
TBxx-Lx-16DIP
5.2 TBxx-Lx-16DIP
The station offers sixteen digital inputs for 3-wire PNP sensors.
5.2.1 Technical data
Table 5-1:
Technical data TBxx-Lx-16DIP
Type designation TBxx-Lx-16DIP
Power supply 24 V DC from operating voltage
Permissible range 18 … 30 V DC
Operational current (from V1) < 150 mA
Sensor/actuator supply VAUX1 Supply connector C1-C8 from V1
120 mA per connector, short-circuit proof Digital inputs
Number of channels 16
Input type PNP
Switching threshold EN 61131-2 type 3, PNP
Low level signal voltage < 5 V
High level signal voltage > 11 V
Low level signal current < 1.5 mA
High level signal current > 2 mA
Switch-on delay 2.5 ms
Type of input diagnostics channel diagnostics
Electrical isolation galvanic isolation to the field bus
NOTE
General technical data concerning the products of the TBxx-Lx-series can be found in chapter 3.
Module types
5.2.2 Wiring diagrams
→ Field bus (page 4-2)
→ Supply voltages (page 4-4) Inputs
5.2.3 Parameters
Further information about the parameters can be found in the fieldbus specific chapters.
TBEN-L
EtherNet/IP™: Digital Versatile Module Class (VSC117) (page 6-60) ff.
Modbus TCP: Register mapping of the TBEN-L stations (page 6-21) ff.
PROFINET: Parameters (page 6-71) TBDP-L
chapter 7.4, Parameterization (page 7-8) Figure 5-2:
Inputs, pin assignment
Table 5-2:
Parameters
Parameter name Value Description
Adefault setting
Invert digital input (Inv. DIx)
0 = noA
1 = yes Inverts the digital input signal.
Pulse stretching input 0 - 255 Stretching of the input signal from 10 to 2550 ms.
Default setting:
0 = pulse stretching deactivated (standard pulse = 2,5 ms) example:
10 = pulse of 100 ms 5 FE 4 BK
1 BN + 3 BU – 3 BU –
2 WH vC1...C8
TBxx-Lx-16DIP
5.2.4 Diagnostic messages
Further information about the diagnostic data mapping can be found in the fieldbus specific chapters.
TBEN-L
Modbus TCP: Register mapping of the TBEN-L stations (page 6-21) ff.
EtherNet/IP™: Digital Versatile Module Class (VSC117) (page 6-60) ff.
PROFINET: PROFINET-diagnostics (page 6-67) TBDP-L
chapter 7.3, Diagnostics (page 7-5) Table 5-3:
Diagnostic mes- sages
Diagnosis Description
SCSx Overload of the supply voltage at the respective connector
Module types
5.3 TBxx-Lx-16DOP
The station offers sixteen digital inputs for DC actuators.
5.3.1 Technical data
5.3.2 Wiring diagrams
→ Field bus (page 4-2)
→ Supply voltages (page 4-4) Outputs
Table 5-4:
Technical data TBxx-Lx-16DOP
Type designation TBxx-Lx-16DOP
Power supply 24 V DC from operating voltage
Permissible range 18 … 30 V DC
Operational current (from V1) < 150 mA
Sensor/actuator supply VAUX2 Supply connector C1-C8 from V2,
120 mA per connector, short-circuit proof Digital outputs
Number of channels 16
Output type PNP
Output voltage 24 VDC from potential group
Load type ohmic, inductive, lamp load
Simultaneity factor 0,28 for entire module,
total current max. 9 A per module
Type of output diagnostics channel diagnostics
Electrical isolation galvanic isolation to the field bus
NOTE
General technical data concerning the products of the TBxx-Lx-series can be found in chapter 3.
Figure 5-3:
Outputs, pin assignment
5 FE 4 BK 1 BN + 2 WH 3 BU –
vC1...C8
TBxx-Lx-16DOP
5.3.3 Parameters
Further information about the parameters can be found in the fieldbus specific chapters.
TBEN-L
EtherNet/IP™: Digital Versatile Module Class (VSC117) (page 6-60) ff.
Modbus TCP: Register mapping of the TBEN-L stations (page 6-21) ff.
PROFINET: Parameters (page 6-71) TBDP-L
chapter 7.4, Parameterization (page 7-8)
5.3.4 Diagnostic messages
Further information about the diagnostic data mapping can be found in the fieldbus specific chapters.
TBEN-L
Modbus TCP: Register mapping of the TBEN-L stations (page 6-21) ff.
EtherNet/IP™: Digital Versatile Module Class (VSC117) (page 6-60) ff.
PROFINET: PROFINET-diagnostics (page 6-67) TBDP-L
chapter 7.3, Diagnostics (page 7-5) Table 5-5:
Parameters
Parameter name Value Description
Adefault setting
Manual output reset after overcurrent (SROx)
0 = no A The output switches on automatically after an over- load.
1 = yes The output is manually switched-off after an over- load until a new set-command is given (rise and fall).
Table 5-6:
Diagnostic messages
Diagnosis Description
SCSx Overload of the supply voltage at the respective connector SCOx Overcurrent at the respective output
Module types
5.4 TBxx-Lx-8DIP-8DOP
The station offers eight digital inputs for 3-wire PNP-sensors and eight digital outputs for DC actuators.
5.4.1 Technical data
Table 5-7:
Technical data TBxx-Lx-8DIP- 8DOP
Type designation TBxx-Lx-8DIP-8DOP
Power supply 24 V DC from operating voltage
Permissible range 18 … 30 V DC
Operating current < 150 mA
Sensor/actuator supply VAUX1/VAUX2 supply of connectors C1 - C4 from V1 C5 - C8 from V2
120 mA per connector, short-circuit proof Digital inputs
Number of channels 8
Input type PNP
Switching threshold EN 61131-2 type 3, PNP
Low level signal voltage < 5 V
High level signal voltage > 11 V
Low level signal current < 1.5 mA
High level signal current > 2 mA
Switch-on delay 2.5 ms
Type of input diagnostics channel diagnostics
Digital outputs
Number of channels 8
Output type PNP
Output voltage 24 VDC from potential group
Load type ohmic, inductive, lamp load
Simultaneity factor 0,56 for entire module,
total current max. 9 A per module
Type of output diagnostics channel diagnostics
Electrical isolation galvanic isolation to the field bus
NOTE
General technical data concerning the products of the TBxx-Lx-series can be found in
TBxx-Lx-8DIP-8DOP
5.4.2 Wiring diagrams
→ Field bus (page 4-2)
→ Supply voltages (page 4-4) Inputs
Outputs
5.4.3 Parameters
Figure 5-4:
Inputs, pin assignment
Figure 5-5:
Outputs, pin assignment
Table 5-8:
Parameters
Parameter name Value Description
Adefault setting
Invert digital input (Inv. DIx)
0 = no A
1 = yes Inverts the digital input signal.
Pulse stretching input
0 - 255 Stretching of the input signal from 10 to 2550 ms.
Default setting:
0 = pulse stretching deactivated (standard pulse = 2,5 ms) example:
10 = pulse of 100 ms Manual output reset
after overcurrent (SROx)
0 = no A The output switches on automatically after an over- load.
1 = yes The output is manually switched-off after an over- load until a new set-command is given (rise and fall).
5 FE 4 BK 1 BN + 3 BU – 3 BU –
2 WH vC1...C4
5 FE 4 BK 1 BN + 2 WH 3 BU –
vC5...C8
Module types
Further information about the parameter data mapping can be found in the fieldbus specific chapters.
TBEN-L
EtherNet/IP™: Digital Versatile Module Class (VSC117) (page 6-60) ff.
Modbus TCP: Register mapping of the TBEN-L stations (page 6-21) ff.
PROFINET: Parameters (page 6-71) TBDP-L
chapter 7.4, Parameterization (page 7-8)
5.4.4 Diagnostic messages
Further information about the diagnostic data mapping can be found in the fieldbus specific chapters.
TBEN-L
Modbus TCP: Register mapping of the TBEN-L stations (page 6-21) ff.
EtherNet/IP™: Digital Versatile Module Class (VSC117) (page 6-60) ff.
PROFINET: PROFINET-diagnostics (page 6-67) TBDP-L
chapter 7.3, Diagnostics (page 7-5) Table 5-9:
Diagnostic mes- sages
Diagnosis Description
SCSx Overload of the supply voltage at the respective connector SCOx Overcurrent at the respective output
TBxx-Lx-16DXP
5.5 TBxx-Lx-16DXP
The station is equipped with sixteen channels, which can be configured individually, depending on the specific application requirements. Up to sixteen 3-wire PNP sensors or sixteen
PNP DC actuators with a maximum output current of 2 A per output can be connected.
5.5.1 Technical data
Table 5-10:
Technical data TBxx-Lx-16DXP
Type designation TBxx-Lx-16DXP
Power supply 24 V DC from operating voltage
Permissible range 18 … 30 V DC
Operating current < 150 mA
Sensor/actuator supply VAUX1/VAUX2 supply of connectors C1 - C4 from V1 C5 - C8 from V2
120 mA per connector, short-circuit proof Digital inputs
Number of channels 16
Input type PNP
Switching threshold EN 61131-2 type 3, PNP
Low level signal voltage < 5 V
High level signal voltage > 11 V
Low level signal current < 1.5 mA
High level signal current > 2 mA
Switch-on delay 2.5 ms
Type of input diagnostics channel diagnostics
Digital outputs
Number of channels 16, DC actuators
Output type PNP
Output voltage 24 VDC from potential group
Load type ohmic, inductive, lamp load
Simultaneity factor 0,56 for entire module,
total current max. 9 A per module
Type of output diagnostics channel diagnostics
Electrical isolation galvanic isolation to the field bus
NOTE
General technical data concerning the products of the TBxx-Lx-series can be found in chapter 3.
Module types
5.5.2 Wiring diagrams
→ Field bus (page 4-2)
→ Supply voltages (page 4-4) Analog inputs and outputs
5.5.3 Parameters
Further information about the parameter data mapping can be found in the fieldbus specific chapters.
TBEN-L
EtherNet/IP™: Digital Versatile Module Class (VSC117) (page 6-60) ff.
Modbus TCP: Register mapping of the TBEN-L stations (page 6-21) ff.
PROFINET: Parameters (page 6-71) TBDP-L
chapter 7.4, Parameterization (page 7-8) Figure 5-6:
Inputs/outputs, pin assignment
Table 5-11:
Parameters
Parameter name Value Description
Adefault setting
Invert digital input (Inv. DIx)
0 = noA
1 = yes The digital input signal is inverted.
Pulse stretching input
0 - 255 Stretching of the input signal from 10 to 2550 ms.
Default setting:
0 = pulse stretching deactivated (standard pulse = 2,5 ms) example:
10 = pulse of 100 ms Manual output reset
after overcurrent (SROx)
0 = no A The output switches on automatically after an over- load.
1 = yes The output is manually switched-off and on again.
Activate output (EN DOx)
0 = no 1 = yes A 5 FE 4 BK
1 BN + 3 BU – 3 BU –
2 WH vC1...C8
Sensor orActuator Sensor orActuator
TBxx-Lx-16DXP
5.5.4 Diagnostic messages
Further information about the diagnostic data mapping can be found in the fieldbus specific chapters.
TBEN-L
Modbus TCP: Register mapping of the TBEN-L stations (page 6-21) ff.
EtherNet/IP™: Digital Versatile Module Class (VSC117) (page 6-60) ff.
PROFINET: PROFINET-diagnostics (page 6-67) TBDP-L
chapter 7.3, Diagnostics (page 7-5) Table 5-12:
Diagnostic mes- sages
Diagnosis Description
SCSx Overload of the supply voltage at the respective connector SCOx Overcurrent at the respective output
Module types
6 Module family TBEN-L
6.1 Configuration... 3 6.1.1 Device configuration files ...3 6.1.2 Address assignment Ethernet...3 – Mode: Static rotary ...3 – Mode: BootP (300) ...4 – Mode: DHCP (400)...4 – Mode: PGM (500)...5 – Mode: PGM-DHCP (600)...5 6.1.3 Resetting the IP address, switch position "000" ...5 – Default setting of the gateway...5 6.1.4 Factory reset (F_Reset), switch position „900“...6 6.1.5 Functional difference: switch position "000" and "900" ...6 6.1.6 Set-button...6 6.1.7 Addressing via PACTware™ - I/O-ASSISTANT 3 (FDT/DTM)...7 6.1.8 Addressing via web server ...7 6.2 Module status ... 8 6.2.1 LED behavior...8 6.2.2 Status and Control Word of the TBEN-L stations ... 10 – Status Word... 10 – Control Word ... 11 6.3 Protocols ... 12 6.3.1 Multi protocol functionality ... 12 – General... 12 6.3.2 Explicit/manual protocol selection... 12 6.3.3 Protocol dependent functions ... 12 6.4 Modbus TCP ... 13 – Common Modbus description ... 13 – Protocol description ... 14 6.4.1 Implemented Modbus functions... 17 6.4.2 Modbus-registers ... 18 6.4.3 Data width of the I/O-modules in the Modbus-register area... 20 6.4.4 Register mapping of the TBEN-L stations... 21 – TBEN-Lx-16DIP ... 21 – TBEN-Lx-16DOP ... 22 – TBEN-Lx-8DIP-8DOP ... 23 – TBEN-Lx-16DXP ... 24 – Meaning of the register bits ... 25 6.4.5 Register 100Ch: „Station-Status“ ... 26 6.4.6 Register 1130h: „Modbus-Connection-Mode“ ... 27 6.4.7 Register 1131h: „Modbus-Connection-Timeout“ ... 27 – Behavior of the BUS LED... 27 6.4.8 Register 0x113C and 0x113D: „Restore Modbus-Connection-Parameters”... 27 6.4.9 Register 0x113E and 0x113F: "Save Modbus-Connection-Parameters"... 28 6.4.10 Bit areas: mapping of input-discrete- and coil-areas ... 28 6.4.11 Error behavior (watchdog)... 28 – Behavior of outputs... 28 – Behavior of the BUS LED... 29 6.4.12 Parameters and diagnostic messages of the I/O channels ... 29
Module family TBEN-L
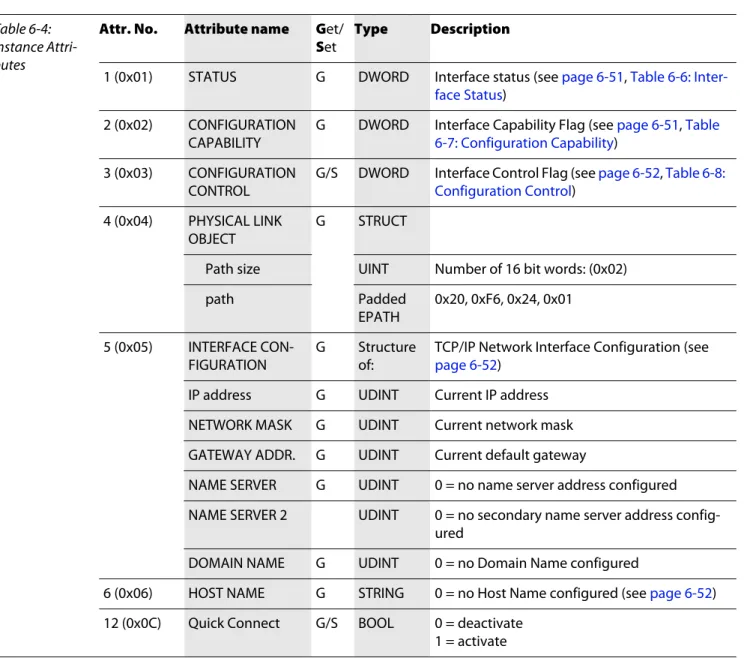
6.5 EtherNet/IP™ ... 30 6.5.1 The EtherNet/IP™ Communications Profile...30 – Communication profile for TBEN-L ...31 6.5.2 EDS-file ...32 6.5.3 Diagnostic messages via process data...32 – Summarized Diagnostics ...32 – Scheduled Diagnostics (manufacturer specific diagnosis)...32 6.5.4 QC - QuickConnect ...33 – Ethernet cabling for TBEN in QC applications ...33 – QuickConnect in TBEN-L ...33 6.5.5 Device Level Ring (DLR)...34 6.5.6 EtherNet/IP™ Standard Classes... 35 – Identity Object (0x01) ...35 – Assembly Object (0x04)...37 – Configuration Assembly ...38 – Process data mapping TBEN-Lx-16DIP ...43 – Process data mapping TBEN-Lx-16DOP ...44 – Process data mapping TBEN-Lx-8DIP-8DOP...45 – Process data mapping TBEN-Lx-16DXP...46 – Meaning of Process data bits ...48 – Connection Manager Object (0x06)...49 – TCP/IP Interface Object (0xF5) ...50 – Ethernet Link Object (0xF6) ...53 6.5.7 VSC-Vendor Specific Classes...55 – Class instance of the VSC ...55 – Gateway Class (VSC 100) ...57 – Process Data Class (VSC102) ...59 – Digital Versatile Module Class (VSC117)...60 – Miscellaneous Parameters Class (VSC 126) ...62 6.6 PROFINET ... 63 6.6.1 Install GSD files ...65 6.6.2 FSU - Fast Start-Up (prioritized startup)...65 – Ethernet cabling for TBEN-L in QC applications ...65 – FSU in TBEN-L...65 6.6.3 MRP (Media Redundancy Protocol) ...66 6.6.4 PROFINET-diagnostics...67 – TBEN-Lx-16DIP – diagnostic data mapping ...67 – TBEN-Lx-16DOP – diagnostic data mapping...68 – TBEN-Lx-8DIP-8DOP – diagnostic data mapping ...69 – TBEN-Lx-16DXP – diagnostic data mapping ...70 6.6.5 Parameters ...71 – General station parameters (turck-tben) ...71 – Parameters for I/O channels ...72 6.6.6 Description of user data for acyclic services ...72 – Description of the acyclic gateway user data...73 6.6.7 Description of the acyclic I/O-channel user data ...74
Configuration
6.1 Configuration
This sub-chapter describes the configuration of the Ethernet-connection.
Details concerning the necessary protocol-specific configurations (Modbus TCP, EtherNet/IP™, PROF- INET) can be found in the respective sub-chapters.
6.1.1 Device configuration files
The actual device configuration files for the stations can be downloaded from the TURCK-website www.turck.com.
Information about the protocol-specific files can be found in the respective sub-chapters.
6.1.2 Address assignment Ethernet
Setting the address mode is done through the 3 rotary coding-switches on the gateway.
Mode: Static rotary
switch position: 001 - 254
When using the rotary-mode, the last byte of the station’s IP address can be set via the rotary coding switches.
Addresses in the range from 0 to 255 can be allocated, whereas 1 is normally reserved for the default- gateway and 0 and 255 for broadcast messages in the subnet.
In TURCK devices, 0 is used to reset the device to the default IP address (see Resetting the IP address, switch position "000" (page 6-5)).
Figure 6-1:
Decimal rotary coding-switches for address setting
ATTENTION!
Protective cover opened
Protection class IP65/IP67/IP69K not warranted
Screw the protective cover over the rotary coding-switches firmly
Check if seal of the protective cover is correctly placed
NOTE
After every change of the address-mode, a voltage reset must be done.
NOTE
We therefore recommend addresses in the range of 2-254.
x 10 x 1
000: 192.168.1.254 1 - 254: static rotary 300: BootP
400: DHCP 500: PGM 600: PGM-DHCP 900: F_Reset
x 100
Module family TBEN-L
Mode: BootP (300)
switch position: 300
Address setting is carried out by a BootP-server in the network after the start-up of the gateway.
PROFINET
Please assure, that in PROFINET-applications, the address assigned via a BootP-server corresponds to the address, which is assigned in the configuration tool.
Mode: DHCP (400)
switch position: 400
Address setting is carried out by a DHCP-server in the network after the start-up of the gateway.
DHCP supports three mechanisms for IP address allocation:
In "automatic allocation", the DHCP-server assigns a permanent IP address to a client.
In "dynamic allocation", DHCP assigns an IP address to a client for a limited period of time. After this time, or until the client explicitly relinquishes the address, the address can be re-assigned.
In "manual allocation", a client's IP address is assigned by the network administrator, and DHCP is used simply to convey the assigned address to the client.
PROFINET
Please assure, that in PROFINET-applications, the address assigned via a BootP-server corresponds to the address, which is assigned in the configuration tool.
NOTE
The IP address, as well as the default subnet mask assigned to the station by the BootP-server, are stored permanently in the station’s EEPROM.
In case of switching the device to rotary- or PGM-mode, the settings carried out via BootP (IP address, subnet mask, etc) will be taken from the module’s EEPROM.
NOTE
The IP address, as well as the default subnet mask assigned to the station by the DHCP-server, are stored permanently in the station’s EEPROM.
In case of switching the device to rotary- or PGM-mode, the settings carried out via DHCP (IP address, subnet mask, etc) will be taken from the module’s EEPROM.
Configuration
Mode: PGM (500)
switch position: 500
The PGM-mode enables access of the software I/O-ASSISTANT to the module’s network settings.
Mode: PGM-DHCP (600)
switch position: 600
The device sends DHCP-requests until a IP address is assigned (DHCP-server, PROFINET-controller).
The assigned IP-address is stored to the device and the DHCP-client is stopped.
Even after a restart of the device, the device sends no further DHCP-requests.
PROFINET
This mode assures a PROFINET-compliant operation of the modules.
6.1.3 Resetting the IP address, switch position "000"
With this setting the rotary coding-switches to "000" followed by a voltage reset, the module is set to the address 192.168.1.254 for IP-based services (seeDefault setting of the gateway (page 6-5)).
Default setting of the gateway
The stations' default-settings are as follows:
IP address 192.168.1.254
Subnet mask 255.255.255.0
default gateway 192.168.1.1
NOTE
In the PGM-mode, all network settings (IP address, subnet mask, etc.) are send to the module’s internal EEPROM and stored permanently.
NOTE
If a DHCP-server is used within the network, problems may occur during IP-assignment.
In this case, both, the DHCP-server as well as the PROFINET-controller (via DCP), try an IP- address-assignment.
NOTE
Setting "000" is no operation mode! Please set the device to another mode after having reset the IP address to the default values.
NOTE
The stations can be reset by the user to these default settings at any time.
To reset the module, set the 3 coding-switches on the gateway to "000" followed by a power- on reset.
ATTENTION!
Protective cover opened
Protection class IP65/IP67/IP69K not warranted
Screw the protective cover over the rotary coding-switches firmly
Check if seal of the protective cover is correctly placed
Module family TBEN-L
6.1.4 Factory reset (F_Reset), switch position „900“
F_Reset (Reset to factory setting) switch position: 900
This mode sets all device-settings back to the default values and deletes all data in the device's internal flash.
6.1.5 Functional difference: switch position "000" and "900"
6.1.6 Set-button
The Set-button is placed left to the rotary coding switches under the cover at the device.
Pushing the Set-button causes a device-restart.
NOTE
Setting 900 is no operation mode! Please set the device to another mode after having reset the IP address to the default values.
ATTENTION!
Protective cover opened
Protection class IP65/IP67/IP69K not warranted
Screw the protective cover over the rotary coding-switches firmly
Check if seal of the protective cover is correctly placed
Table 6-1:
Functional differ- ence "000" and
"900" Reset of...
Switch position
000 900
IP address, subnet mask, gateway
Parameters -
PROFINET device name -
Figure 6-2:
Set-button
ATTENTION!
Protective cover opened
Protection class IP65/IP67/IP69K not warranted
Screw the protective cover over the rotary coding-switches firmly
Check if seal of the protective cover is correctly placed
x 10 x 1
x 100 x 10 x 1
x 100
Configuration
6.1.7 Addressing via PACTware™ - I/O-ASSISTANT 3 (FDT/DTM)
The software-tool I/O-ASSISTANT enables direct access to the Ethernet-network via the Ethernet cable.
The IP address, as well as the subnet mask of the TURCK Ethernet stations, can be changed according to the application by using the Busaddress Management function of the BL Service Ethernet interface (TCP/IP) in the software I/O-ASSISTANT.
Further information about using this software can be found in chapter 9: Access via I/O-ASSISTANT 3 (FDT/DTM), PACTware (page 9-1).
6.1.8 Addressing via web server
The device's network settings can be changed under "Network Configuration" only by users having administrator rights.
Further information concerning the web server of the TBEN-L devices and it's use can be found under chapter 8, The web server (page 8-1).
Module family TBEN-L
6.2 Module status
6.2.1 LED behavior
The following table describes the protocol-independent behavior of the module LEDs.
The description of protocol-specific LED-behavior can be found in the respective sub-chapters.
Table 6-2:
LED-displays of TBEN-L stations
LED Color Status Meaning Remedy
PWR
TBEN-Lx-16DIP green off V1 missing or < 18 V DC Check V1
on V1 OK
TBEN-Lx-16DOP TBEN-Lx-8DIP-8DOP TBEN-Lx-16DXP
green off V1 missing or < 18 V DC Check V1
on V1 and V2 OK -
red on V2 missing or < 18 V DC Check V2
ETHx green on Link established, 100 Mbps
flashing Ethernet Traffic, 100 Mbps yel-
low
on Link established, 10 Mbps flashing Ethernet Traffic, 10 Mbps
off No Ethernet link. Check the Ethernet-
connection
ERR green on No diagnostic message avail-
able
red on Diagnostic message pending
BUS green on Active connection to a master -
flashing Device is ready for operation - red on IP address conflict or restore
mode or timeout
control IP addresses in the network waiting for the device to be ready for opera- tion
flashing Blink-/wink-command active - red /
green
on Autonegotiation and/or waiting for DHCP-/BootP-address assignment.
Module status
Acan also occur in combination
1 to 16
TBDP-Lx-16DIP green flashing A Input active, 24 V at input red flashing A Overload of the supply voltage
at
the respective connector Both LEDs at the connector are flashing
Check the sensor sup- ply
off Input inactive
TBEN-Lx-16DOP green flashing A Output active
red on Output active,
overload/overcurrent at output flashing A Overload of the supply voltage
at the respective connector Both LEDs at the connector are flashing
Check the sensor sup- ply
off Output inactive
TBEN-Lx-16DXP green flashing A Output or input active red on output active, overload/over-
current at output
flashing A Overload of the supply voltage at the respective connector Both LEDs at the connector are flashing
Check the sensor sup- ply
off Output or input active 1 to 8
TBEN-Lx-8DIP-8DOP green flashing A Input active, 24 V at input red flashing A Overload of the supply voltage
at the respective connector Both LEDs at the connector are flashing
Check the sensor sup- ply
off Table 6-2:
LED-displays of TBEN-L stations
LED Color Status Meaning Remedy
Module family TBEN-L
6.2.2 Status and Control Word of the TBEN-L stations
The Status as well as the Control Word are mapped into the station's process data.
EtherNet/IP™
In EtherNet/IP™, the mapping can be disabled (see Gateway Class (VSC 100), GW Status Register (page 6-58) and GW Control Register (page 6-58)).
Modbus TCP
→ see Register 100Ch: „Station-Status“ (page 6-26)
PROFINET
→ see PROFINET-diagnostics (page 6-67) Status Word
9 to 16
TBEN-Lx-8DIP-8DOP green flashing A Output active
red on Output active,
overload/overcurrent at output flashing A Overload of the supply voltage
at the respective connector Both LEDs at the connector are flashing
Check the sensor sup- ply
off Output inactive
ATTENTION!
Activate/deactivate the Status and Control Word in EtherNet/IP™
Changes in the process data mapping
Observe that activating/deactivating the Status and Control Word causes changes in the process data mapping.
Byte Bit 7 Bit 6 Bit 5 Bit 4 Bit 3 Bit 2 Bit 1 Bit 0
Status 0 V2 - - - - - - Diag
Warn
1 - FCE - - CFG COM V1 -
Table 6-2:
LED-displays of TBEN-L stations
LED Color Status Meaning Remedy
Module status
Meaning of the status bits
Control Word
The Control Word has no function at the moment, it is reserves for further use.
Table 6-3:
Meaning of the status bits
Name Meaning
Diag Warn
Group diagnostics of the device. At least 1 channel sends diagnostics.
V2 V2 too low (< 18 V DC).
V1 V2 too low (< 18 V DC).
COM I/O Communication Lost Error
No Communication on the module bus.
CFG I/O Cfg Modified error
The I/O-configuration has be changed and is no longer compatible.
FCE Force Mode Active Error
The Force Mode is activated, which means, the actual output values may no match the ones defined and sent by the field bus.
Module family TBEN-L
6.3 Protocols
6.3.1 Multi protocol functionality
GeneralThe compact I/O-stations of the TBEN-L product line combine the three Ethernet-protocols:
Modbus TCP (description page 6-13 ff.),
EtherNet/IP™ (description page 6-30) and
PROFINET (description page 6-3 ff.) in one device.
A multi-protocol device can be operated without intervention of the user (which means, without changes in the parameterization) in all of the three Ethernet protocols mentioned.
During the start-up, after a power-on, the module runs in "snooping" mode and detects the Ethernet protocol which requests a link connection by listening the traffic.
If a protocol is detected, the device is set automatically to the respective protocol. After this an access to the device from other protocols is read-only.
6.3.2 Explicit/manual protocol selection
The protocol can also be determined manually. This skips the snooping-phase and the device is perma- nently set to the selected protocol. An access to the device from other protocols is read-only.
The explicit protocol selection allows thus an additional locking mechanism.
6.3.3 Protocol dependent functions
PROFINET Fast Start-UP (FSU), see FSU - Fast Start-Up (prioritized startup) (page 6-65)
Topology discovery
Address assignment via LLDP
MRP, see MRP (Media Redundancy Protocol) (page 6-66) EtherNet/IP™
QuickConnect (QC), see QuickConnect in TBEN-L (page 6-33)
DLR (Device Level Ring), see Device Level Ring (DLR) (page 6-34)
Modbus TCP
6.4 Modbus TCP
Common Modbus description NOTE
The following description of the Modbus protocol is taken from the Modbus Application Pro- tocol Specification V1.1 of Modbus-IDA.
TECHNICAL BASICS
Modbus is an application layer messaging protocol, positioned at level 7 of the OSI model, that provides client/server communication between devices connected on different types of buses or networks.
The industry’s serial de facto standard since 1979, Modbus continues to enable millions of automation devices to communicate. Today, support for the simple and elegant structure of Modbus continues to grow.
The Internet community can access Modbus at a reserved system port 502 on the TCP/IP stack.
Modbus is a request/reply protocol and offers services specified by function codes. Modbus function codes are elements of Modbus request/reply PDUs (Protocol Data Unit).
It is currently implemented using:
– TCP/IP over Ethernet. (that is used for the TBEN-L modules and described in the following) – Asynchronous serial transmission over a variety of media (wire: RS232, RS422, RS485, opti-
cal: fiber, radio, etc.)
– Modbus PLUS, a high speed token passing network.
Schematic representation of the Modbus Communication Stack (according to Modbus Appli- cation Protocol Specification V1.1 of Modbus-IDA):
Modbus Application Layer
Modbus TCP TCP
IP
andere Master/Slave Client/Server
Physical layer Modbus plus Physical layer
Rsxxx Physical layer
Ethernet
Physical layer
Module family TBEN-L
Protocol description TECHNICAL BASICS
The Modbus protocol defines a simple protocol data unit (PDU) independent of the underly- ing communication layers.
The mapping of Modbus protocol on specific buses or network can introduce some addi- tional fields on the application data unit (ADU).
The Modbus application data unit is built by the client that initiates a Modbus transaction.
The function code indicates to the server what kind of action to perform.
The Modbus application protocol establishes the format of a request initiated by a client.
The field function code of a Modbus data unit is coded in one byte. Valid codes are in the range of 1... 255 decimal (128 – 255 reserved for exception responses).
When a message is sent from a Client to a Server device the function code field tells the server what kind of action to perform. Function code "0" is not valid.
Sub-function codes are added to some function codes to define multiple actions.
The data field of messages sent from a client to server devices contains additional information that the server uses to take the action defined by the function code. This can include items like discrete and register addresses, the quantity of items to be handled, and the count of actual data bytes in the data field.
The data field may be non-existent (= 0) in certain kinds of requests, in this case the server does not require any additional information. The function code alone specifies the action.
If no error occurs related to the Modbus function requested in a properly received Modbus ADU the data field of a response from a server to a client contains the data requested.
Modbus TCP
Data model
The data model distinguishes four basic data types:
If an error related to the Modbus function requested occurs, the field contains an exception code that the server application can use to determine the next action to be taken.
Table 6-4:
Data types for Modbus
Data Type Object type Access Comment
Discrete Inputs bit Read This type of data can be provided by an I/O system.
Coils bit Read-Write This type of data can be alterable by an application pro- gram.
Input Registers
16 bit, (word)
Read This type of data can be provided by an I/O system.
Holding Registers
16 bit, (word)
Read-Write This type of data can be alterable by an application pro- gram.
TECHNICAL BASICS
For each of these basic data types, the protocol allows individual selection of 65536 data items, and the operations of read or write of those items are designed to span multiple con- secutive data items up to a data size limit which is dependent on the transaction function code.
It’s obvious that all the data handled via Modbus (bits, registers) must be located in device application memory.
Access to these data is done via defined access-addresses (see Modbus-registers (page 6-18)).
Module family TBEN-L
The example below shows the data structure in a device with digital and analog in- and outputs.
TBEN-L devices have only one data block, which can be accessed via different Modbus functions. The access can be carried out either via registers (16-bit-access) or, for some of them, via single-bit-access.
Figure 6-3:
Picture of the data memory of the TBEN-L modules
Modbus TCP
6.4.1 Implemented Modbus functions
The TBEN-L stations for Modbus TCP support the following functions for accessing process data, param- eters, diagnostics and other services.
Table 6-5:
Implemented functions
Function codes No. Function
Description
1 Read Coils
Serves for reading multiple output bits.
2 Read Discrete Inputs
Serves for reading multiple input bits.
3 Read Holding Registers
Serves for reading multiple output registers.
4 Read Input Registers
Serves for reading multiple input registers.
5 Write Single Coil
Serves for writing a single output bit.
6 Write Single Register
Serves for writing a single output register.
15 Write Multiple Coils
Serves for writing multiple output bits.
16 Write Multiple Registers
Serves for writing multiple output registers.
23 Read/Write Multiple Registers
Reading and writing of multiple registers.