Empirical Study on ISP Activity and Maintenance With MikroTik Router
BY
SIYAM AHMED ID: 171-19-1963
This Report Presented in Partial Fulfillment of the Requirements for the Degree of Bachelor of Science in Electronics and Telecommunication
Engineering, this Report was presented
Supervised By Ms. Sirajum Munira Lecturer (Senior Scale)
Department of Electronics and Telecommunication Engineering Faculty of Engineering Daffodil International University
DAFFODIL INTERNATIONAL UNIVERSITY
©Daffodil International University ii
APPROVAL
This report title “Empirical Study on ISP Activity and Maintenance with MikroTik Router” submitted by Siyam Ahmed to the department of Electronics and Telecommunication Engineering (ETE), Daffodil International University, has been accepted as satisfactory for the partial fulfillment of the requirements for the degree of B.Sc. Electronics and Telecommunication Engineering and approved as to its style and contents. The presentation will be held on March 2021.
BOARD OF EXAMINERS
Md. Taslim Arefin Chairman
Associate Professor & Head Department of ETE
Faculty of Engineering
Daffodil International University
Prof. Dr. A.K.M. Fazlul Haque Internal Examiner
Professor & Associate Dean Department of ETE
Faculty of Engineering
Daffodil International University
Dr. M. Shamim Kaiser External Examiner
Professor, IIT, JU Department of IIT Jahangirnagar University
DECLARATION
I want to note that this report is preparing by me Siyam Ahmed, ID: 171-19-1963 Department of Electronics and Telecommunication Engineering (ETE), Ms. Sirajum Munira, Lecturer (Senior Scale), Faculty of Engineering, Department of Electronics and Telecommunication Engineering (ETE) under my honorable supervisor. I shall also declare that I collect data for my internship from ISP-based company, Internet, book and, Daffodil Online Limited (DOL).
Supervised By,
Ms. Sirajum Munira Lecturer (Senior Scale)
Department of Electronics and Telecommunication Engineering Faculty of Engineering Daffodil International University
Submitted By,
Siyam Ahmed ID: 171-19-1963
©Daffodil International University iv
ACKNOWLEDGEMENT
At first, I want to express my gratitude to the almighty Allah for charitable everything to me. In the true spirit of achievement, through quality commitment and time to the internship program, a goal of completion is achieved.
Without the coordination, assistance, and support provided to may be many personalities, I am so grateful for carrying out my mission. This internship report is not consuming possible without the provision and direction of Ms. Sirajum Munira, Lecturer (Senior Scale), Department of Electronics and Telecommunication Engineering (ETE), Daffodil International University Dhaka. Under the direction I choose this subject, In the staff of the department of Electronics and Telecommunication (ETE) at the Daffodil International University. For the kind assistance and also to other faculty participants, must grant this for final internship with the partial support of my family members.
ABSTRACT
The operating system of the Mikrotik router is designed for a Network router and it can be installed on a PC and will turn into a Router. The main objective of this report is to set up bandwidth and Mikrotik router management. Actually, Mikrotik is a low-cost and effective device for small and big networks from both areas like security and management. In this report work based on Networking, given OS on Mikrotik router, Mikrotik Ethernet Route, then the basic configuration of Mikrotik router, Installation of Mikrotik router, Winbox Dashboard, Winbox interface menu, Interface, Ip addressing, DNS server Firewall, IP ping, Ip routing, NAT, DHCP configuration, PPPoE configuration, Wireless connection, ARP/AP configuration, IP service, Bandwidth management, User ID name password change and many more features are included. In the critical connection of basic networks, networks equipment is connected to computers and several devices, switches, routers, and wireless access points. Now today, we can’t imagine a day without internet technology and almost everyone feels the advantage. Information is repeated in the summary section for convenience.
©Daffodil International University vi
TABLE OF CONTENTS
CONTENTS PAGES
CHAPTER 1: INTRODUCTION 1-3
1.1 Introduction 1
1.2 Motivation of Reports 1
1.3 Objectives 2
1.4 Report Layout 3
CHAPTER 2: Introduction of Mikrotik 4-8
2.2 Networking 4
2.2 Types of Network 4
2.2.1 LAN 4
2.2.2 MAN 5
2.2.3 WAN 6
2.3 Training Served 7
2.4 Mikrotik OS 8
CHAPTER 3: Basic Configuration of Mikrotik 9-17
3.1 Mikrotik OS installation on VMware 9-10
3.2 OS installation On VMware 11
3.3 Mikrotik Interface 12
3.4 Basic configuration of Mikrotik 13
3.5 Gateway Configuration 14
3.6 NAT Configuration 15
3.7 DNS Server Configuration 16
3.8 IP Ping 17
CHAPTER 4: Activity and Maintenances 18-32
4.1 Bandwidth Configuration 18-19
4.2 DHCP Client Configuration 19-20
4.3 PPPoE Configuration 20-23
4.4 ARP/AP Configuration 24-25
4.5 Firewall Configuration 25-26
4.6 Wireless Configuration 26-29
4.7 Brust 30
4.8 User ID setup 31
4.9 Reset Process 32
CHAPTER 5:
Conclusion 33
Future scope 33
REFERENCE 35
©Daffodil International University viii
List of Figures
Figure Name Page
Figure 2.2.1 Local Area Network 5
Figure 2.2.2 Metropolitan Area Network 6
Figure 2.2.3 Wide Area Network 7
Figure 3.1.1 Download software and Installation of VMware 9
Figure 3.1.2 Mikrotik OS installation in VMware 10
Figure 3.2: OS installation in VMware 11
Figure 3.3: Winbox connection and it’s Interface 12
Figure 3.4: Basic Configuration of Mikrotik 13
Figure 3.5: Gateway Configuration 14
Figure 3.6: NAT Configuration 15
Figure 3.7: DNS Server Configuration 16
Figure 3.8: IP Ping 17
Figure 4.1: Bandwidth Management 19
Figure 4.2: DHCP Client Configuration 20
Figure 4.3.1: PPPoE configuration 21
Figure 4.3.2: PPPoE Configuration 22
Figure 4.3.3: PPPoE Configuration 23
Figure 4.3.4: PPPoE Configuration 23
Figure 4.4.1: ARP Configuration 24
Figure 4.4.2: ARP/AP Configuration 25
Figure 4.5: Firewall Configuration 26
Figure 4.6.1: Wireless Configuration 27
Figure 4.6.2: Wireless Configuration 28
Figure 4.6.3: IP Pool create 28
Figure 4.6.4: DHCP Server configuration 29
Figure 4.7: Brust Configuration 30
Figure 4.8: User ID setup 31
Figure 4.9: Router reset process 32
Chapter 1 Introduction
1.1 Introduction
This is internet information technology that is part and parcel of our everyday life. It is the vast number of people who use it all over the world. It relies on the server for internet communication. Internet service interface technology is not possible without a DNS server.
In the internship, the practice of making students real work is the practice. That is the area of internship employment in a vital position of accounts, engineering medical science. each of them is their importance in internship and before degree award. This is a show focused on software and internet networking technology for e-commerce.
Different types of services such a banking software, credit card, ATM technology, debit card, mobile banking, online transaction, etc. To prepare me for the competitive network and system management job market in my internship program Mikrotik platform. The appropriate opportunity is provided by Daffodil online Ltd. In this ISP-based company.
knowledge is gathered from the network.
1.2 Motivation of Reports
I am currently monitoring my degree in Electronics and Telecommunication Engineering (ETE) at Daffodil International University. The key reason for the interest in the network system of Mikrotik is to ensure that the people in Bangladesh have a better and faster source of networking. I am pursuing the importance of expanding national data, in which the learning of the path book continues and cables me to stand in the often-broad subject of the Mikrotik network. I was completely capable of learning the Mikrotik Networking of the Mikrotik router from the day it was announced. As a web enters the supplier, I have communicated to a great standard sound. What is at the lead of my thoughts, interacting with individuals paying attention to their requirements and giving them better organization.
In my collecting knowledge of my ability to evaluate and cover the state of the law broadly
2
1.2 Objectives
Nowadays, ICT is one of the main elements necessary for building a position. The objective of this work on the Mikrotik Network is:
To control the functional system Bandwidth to Achieve User Prosperity standard.
MikroTik, as a network router. The use of a machine to become a reliable network router is the operating system and software for that. A range of features for the IP network and wireless network are included in the computer.
To pop up the Router OS-based system intended for installation on the MikroTik Router Board. It can also be run on a PC and converted into a firewall router, a VPN server client, and an access point. A suitable portal based on a wireless access device will support the system.
To learn how to install, configure, manage and develop the solution from Mikrotik Network. This is a very high level for network security systems. For that reason, and for the subject, I chose an internship.
©Daffodil International University
1.4 Report Layout
In the Chapter 1
Introduction, Objective and Motivation of the Internship have been described.
In the Chapter 2
Networking, types of networking, Introduction of Mikrotik have been described.
In the Chapter 3
Basic configuration of Mikrotik such as the, (OS installation, Winbox Dashboard, Interface, IP Addressing, DNS Server, NAT, IP Ping) have been described.
In the Chapter 4
The Mikrotik fundamental charge at the Activity and Maintenance about various kind of operation, Setup (DHCP, Bandwidth Management, PPPoE, ARP, Firewall, Brust, Reset Process) have been described.
In the Chapter 5
About of my report decision and future extent of MikroTik have been described.
©Daffodil International University 4
Chapter 2
Introduction of Mikrotik
2.1 Networking
In the present, networking is also an important thing to communicate. I cannot think of sharing data from one place to another without networking. Through networking nowadays, data can now be easily exchanged from one location to another. By allocating data between many computers, I can create a network. [2], MikroTik is a Latvian company founded in 1996 to build routers and wireless ISP systems. In most countries around the world, MikroTik currently offers network ownership hardware and software systems. The perception of standard laptop hardware and complete routing systems in the victimization industry allowed America to develop the Router OS computer code in 1997 that provides intensive stability Controls for all types of interfaces and routing of information. I appear to set out to build their own hardware in 2002, and the whole router board was born as well.
In most parts of the world, there are resellers, and most likely buyers in each country on the planet.[2]
2.2 Types of Network
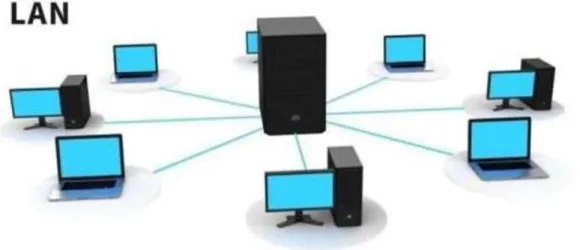
2.2.1 Local Area Network (LAN)
In our everyday lives, it uses the local area network. It is mainly intended to use title- medium workplace-court and business trade networks to form small medium office lamps and share information and resources between system time and could be saved for electronic printer equipment scanner, etc. The native space network will not improve computers and alternative network devices so that the system will share one of the other resources. The computer network is that because of the design of the computer network, the sole use of the cable is limited by the computer network at most distance and spare choice.[2]
Figure 2.2.1 Local Area Network (LAN)
2.2.2 Metropolitan Area Network (MAN)
MAN stands for Networks in the Metropolitan Region, one in each of a number of networks. A person may be a fairly new category of a network. MAN is the wider space network than a local area of a neighborhood} and, as its name suggests, encompasses the city's world. MAN, seldom reaches over 100 kilometers and instead requires a mixture of varied hardware and transmitting media. It's one form of cable TV network or it's a method of connecting a number of PC networks to an even larger network, so in addition to device- to-device, resource area unit shared PC networks to LAN. A community network such as Cable TV Network, covering the entire city or a gaggle of several indigenous networks, is created by a person. The resource is shared from network to network and from laptop computer to laptop computer to boot during this process. MAN is typically owned by large corporations to interconnect different branches within a city. [2]
©Daffodil International University 6 Figure 2.2.2 Metropolitan Area Network (MAN)
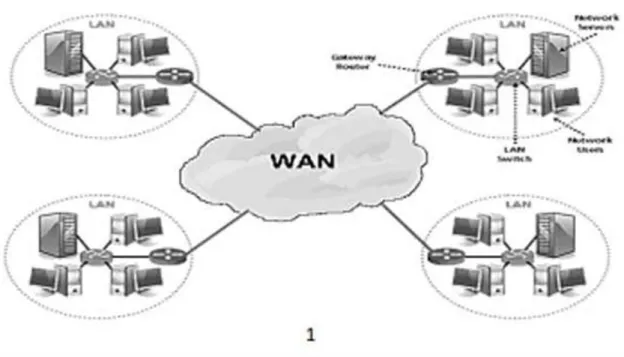
2.2.3 Wide Area Network (WAN)
The Large Area Network is established with LAN and MAN in the broad geographical field. This form of network is built with the use of the telephone company only because it is difficult to grow a wide-area network, with special areas and technology used to connect to various LANs. It is very difficult to handle WAN of the plans to build more than the LAN because it is important to create a LAN across the globe, so the satellite is used in many cases. Most Wide Area networks run at a speed of 1,544 Mbps at 56kbps.
Wide Area Network features
✓ These networks can expand in a large region and their costs can be distributed across the world.
✓ Generally, they have a very High bit error rate.
✓ Any Internet-wiring system such as router-modem switches, etc., must be used by the Wide Area Network.
Figure 2.2.3 Wide Area Network (WAN)
2.3 : Training Served
I have completed three months of Mikrotik Router training from Daffodil online limited (DOL). At the beginning I have not enough knowledge about Networking, at first, I have learned about IP configuration and different types of Ip subnetting, it’s very important because we cannot go away without knowing subnetting. Then I have learned about Mikrotik router creation history. Then, if we want to configure a new Mikrotik device, we have to reset it first. Then we have learned about Mikrotik ports, there is 4 ports and their uses. Then we have learned about, how to connect Mikrotik router by the help of Winbox.
Then we have learned flowing topics in three months:
First Month I have learned,
• Network components Learning and Understanding
• IP subnetting
• Basic analysis and comprehension
• Commands keys and Mikrotik History
©Daffodil International University 8 Second Month I have Learned,
• Mikrotik OS installation on VMware
• IP Addressing principle
• IP configuration
• IP Subnetting
• Interface list, VLAN
• Bridge configuration
Last Month I have Learned,
• DHCP and Static
• DNS
• PPoE
• ARP/AP config.
• NAT
• Bandwidth Management
• Firewall and Firewall security
• Wireless Configuration
2.4 : Mikrotik OS
The operating system is MikroTik OS. There are various license levels for the operating system, ranging from 0 to 6, where 0 is a 24-hour trial version. You can test all Router OS features free of charge in the trial mode. The different license level characteristics can be compared here. It's very quick to install the Router OS. You can either download the ISO file, burn it to a CD, and boot it. Alternatively, Router OS will be written to any secondary drive you have connected to our Windows PC by Net Install. Switch and boot the drive to our Router PC. You can find all installation methods, plus update files and more here.[3]
Chapter 3
Basic configuration of Mikrotik
3.1
: Mikrotik IOS installation in VMware
Step 1: First I have downloaded Mikrotik Winbox, OS6.47(stable) version and then install Virtual Machine/VMware. Then go to the VMware and open it then click on create new virtual machine> click on next.
Figure3.1.1: Download software and Installation of VMware
Step 2: After click on next we have finished to create a virtual machine then I have done Mikrotik OS installation in it. Click on Edit virtual machine settings > scroll down and select CD/DVD> Then choose IOS Image file and click on Browse > Then select the downloaded OS file and press OK. Then Power on the Virtual machine.
©Daffodil International University 10 Figure 3.1.2: Mikrotik OS Installation in VMware
3.2
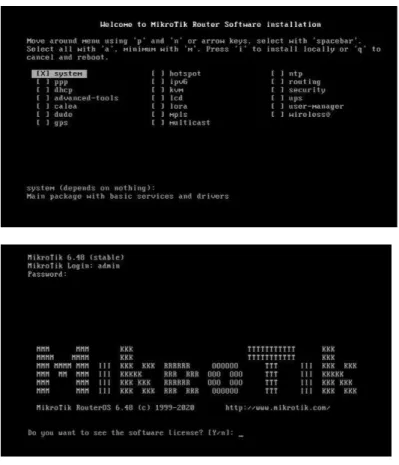
: OS Installation on VMware
After clicking on Power on virtual machine, a welcome screen will come. Where Press ‘a’
for select all options and press ‘i’ for install and ‘q’ for cancel. Here I was press ‘I’ then this system will ask you if you want to keep the old configuration then press ‘Y’. Then press two time ‘Y’ after that our installation is completed.
Figure 3.2: OS installation in VMware
©Daffodil International University 12
3.3
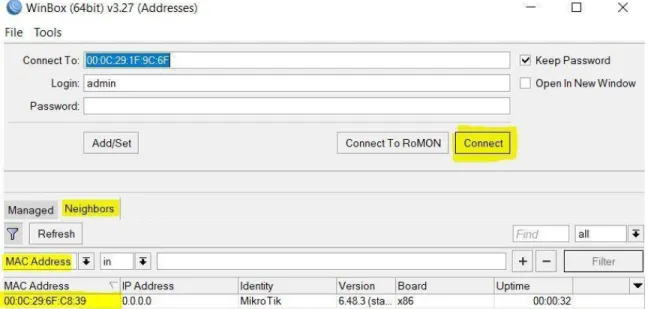
: Winbox Interface
After finishing Mikrotik OS installation then click on downloaded Winbox. Then scroll down and click on neighbors’ button where the MAC address belongs 00:0C: 29:6F:C8:39 sometimes it takes time to show the MAC address for that reason press the Refresh Button.
Then Click on MAC address and then press connect. There is no need to type password.
After that it will shows a welcoming screen.
Figure 3.3: Winbox connection and it’s Interface
3.4
: Basic Configuration of Mikrotik
After finishing all setup, now I have done real configuration of Mikrotik. For the basic configuration, first I have learned connect RJ45 cable in PC. Then I have configured LAN and WAN IP addressing.
LAN IP Addressing:
First click on IP to Addresses option then click on pulse sign (+), click on Address and type an IP (192.168.1.112/24) which is provided from the ISP. Now, add network address (192.168.1.0). Then click on apply and ok.
WAN IP Addressing:
Same way, click again on Pulse sign (+) and put LAN gateway IP addresses and press Apply, OK.
Now, I have completed assigning WAN AND LAN IP address. Then I am assigning gateway actually which is provided by ISP.
Figure3.4: Basic Configuration of Mikrotik
©Daffodil International University 14
3.5
: Gateway Configuration
After finishing LAN and WAN IP set up, now we have to setup a gateway that servers an access point to another network. Example IP address 192.168.1.10 cannot travel directly to destination it needs to a default gateway for unlimited routing.
Configuration Process:
First click on IP & Select Routes, then click on plus sign (+), now add gateway which is provide by ISP, Click on Apply & OK. Then our gateway configuration is completed.
Figure3.5: Gateway Configuration
3.6
: NAT Configuration
NAT configure is important because without NAT configuration LAN users cannot access internet through the router. Here I am showing how to configure NAT/ Masquerade Firewall rule:
Fist we click on IP and select Firewall, click NAT near Filter Rules, then click on plus (+).
New NAT Rule window will come.
Then select general menu and in the Chain, menu select “srcant”, then we put LAN block
“Source Address” on input box.
Lastly from New NAT Rule tab we have select “Action” bar choose “musqured” then apply and hit the OK.
Figure3.6: NAT Configuration
©Daffodil International University 16
3.7
: DNS Server Configuration
Full form Domain Name Server, for the web communication it’s very important.
Communication between a computer and a server is done by IP addressing but It’s impossible to remembering huge amount of Public IP address for human. To solve this problem DNS, introduce computer network. When we search anything by domain name in browser like (www.daffodil.com) first it sends a request to the DNS server and asked for an IP address of the domain name, if DNS server replies with leagued IP address then we can communicate with the web server.
Configuration Process:
Click on IP> scroll down and click on DNS> Add Server IP address> click on Allow Remote Request> press Apply and Ok. So, the settings of server are 8.8.8.8 click on allow remote request,
Figure3.7: DNS Server Configuration
3.8
: IP Ping
After configure IP, Gateway, NAT and DNS server, now I have ensured my all configuration is okay, for that reason I have to check IP Ping. If configuration is ok, we will get the Ping otherwise it shows error.
First Click on New Terminal, then write PING and IP address, press Enter then New terminal will continuously showing the Pings.
After completing DNS server configuration, also we can check DNS ping in new terminal like google.com, facebook.com.
Figure3.8: IP Ping
©Daffodil International University 18
Chapter 4
Activity and Maintenance
In this Chapter I have described,
• Bandwidth Management
• DHCP Client Configuration
• PPPoE Configuration
• ARP/AP Configuration
• Firewall Configuration
• Wireless Configuration
• Brust Limit
• User ID setup
• Reset Process
Mikrotik router used for both setup, maintenance and security. Here I have shown all of the configuration step by step.
4.1
: Bandwidth Management
Mikrotik Routers are worldwide mostly popular for this Bandwidth management and the services manage bandwidth in Mikrotik router is Queues where we can control maximum bandwidth. Because we can’t provide 100% bandwidth. Example, here in the figure I am assigned 1 Mbps bandwidth, the user will get maximum 1 Mbps speed when he/she browsing or uploading, Same way users can download maximum 5Mbps speed if bandwidth is available otherwise users will get less than 1Mbps upload,5 Mbps download.
Configuration Process:
Click on Queues>in simple queues interface click on (+)> Set a name> set target IP>
Then set max upload and download Limit> Click on apply.
Apply this process we can create users’ queues list.
Figure4.1: Bandwidth Management
4.2
: DHCP Client Configuration
DHCP is a client server protocol, in this process there is one server and single or multiple clients are present. Here clients collect IP information from the server and configure the network interface so that, they connect to the internet.
I have learned only DHCP client configuration because every ISP already has DHCP server Configured. After gateway interface configured as a DHCP clients, it will automatically obtain IP address, subnet mask, DNS, Default gateway.
Configuration process:
First, I have assigned an IP address. Then click on IP, scroll down and select DHCP clients, click on plus (+) sign a new DHCP client wizard will open, then select the interface ether2 because my ISP provides connections to ether2 and ether1 for WAN.
©Daffodil International University 20 Figure4.2: DHCP Client Configuration
4.3
: PPPoE Configuration
It is most popular than DHCP configuration. PPPoE and DHCP work are same they provide IP information to the users and user configure the information to their network card. When we configure PPPoE in Mikrotik we have to configure it in an Interface like ether1, ether2 interface. If we have multiple interfaces, we run multiple PPPoE server in it. PPPoE server have a huge data base, where all user name and password are added. Basically, PPPoE is a dialup protocol like, when a user dials his user’s name and password to the PPPoE server then PPPoE server authenticate the information and provide IP information. Here IP information means, DNS, Gateway, IP, Subnet Mask. Then User configure this information to the network card. Then user can connect with the internet. So, this is the basic concept of PPPoE I have learned.
Configuration Process:
Step1:
First login into winbox and click on PPP a new wizard will appear, then select PPPoE server, then click on plus (+) sign a new PPPoE service window will open. Then type a name, select interface ether1, then touch the check mark one session per host so that, user cannot connect to the internet by using same user name and password. Lastly, in authentication section Uncheck pap option, it means plain text authentication, if we check the pap option then if anyone attack in the network by Man IN THE MIDDLE then whole user name and password will exposed. Then Press Apply and OK.
Figure4.3.1: PPPoE configuration
©Daffodil International University 22 Step2:
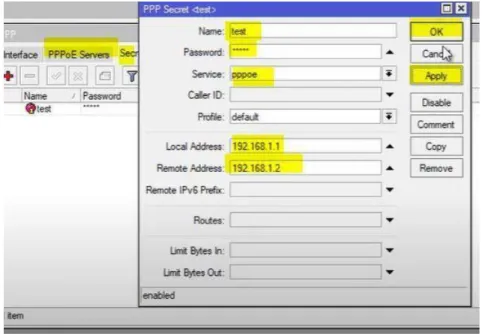
Now, from the PPP interface select “secrets” option and click on plus (+) sign a PPP secrets window will open. Then type the user’s name, here for testing purpose I was typed “test”, then type a password, then select a service you want to provide. I am configuring PPPoE so, I have selected PPPoE. Then I have to provide an IP address and Remote IP address to the users and it should be same block IP. I have given IP address 192.168.1.1 and Remote IP address same block 192.168.1.2 Therefor when use dialup this user name and password, user will get this 192.168.1.1 as gateway and 192.168.1.2 as IP address. Then press Apply and OK.
Figure 4.3.2: PPPoE Configuration
Step3:
Then go back to the PPP interface and select profile option, here we can see a default option then double click on it, a PPP profile window will open for the default profile. Then select General option and setup some DNS address like 8.8.8.8. Then user will get DNS IP. Then press Apply and OK.
Figure 4.3.3: PPPoE Configuration
Step4:
Now I have used this user name and password to connected to the network. For this I have to create a dialer in my computer. First right clicks on computer LAN card and click open network and sharing option. Then click on “Setup a new connection” then select connect to the internet and click next. Then select Broadband (PPPoE) and click on Next. Now a new will open same as give figure, type user name and password and click on connect.
©Daffodil International University 24
4.4
: ARP/AP Configuration
ARP/AP is mostly used for secure a network. It’s full-form, Address Resolution Protocol and it provides a mapping between two different forms of addresses. Basically, it calls MAC address binding with IP and help for increasing security level in Mikrotik Router.
Because ISP provides Bandwidth based on IP addresses, if a user changes the IP address and configure a free IP address then User can access that router bandwidth minimum, maximum or unlimited bandwidth. For that reason, we have to restrict the user’s so that they cannot change their IP. We achieve this by using ARP/ MAC binding feature.
Configuration Process:
First, I go to the IP click on it and select ARP, then ARP list interface will come, click on plus sign (+) for creating a new mapping, On IP address type 192.168.1.12 then copy and paste the MAC address, select which interface will provide Bandwidth, here I have used VMware so that only ether1 port is enable. Then click on Apply and OK. Now, I have done a mapping for 192.168.1.12 IP address and ether1 interface.
Figure4.4.1: ARP Configuration
Now, I go to the Interface and select ether1 and double click on it then interface <ether1>
screen will come. Here I have scroll down click on ARP arrow button and select reply- only. Therefore, Router will only allow to connecting which IP and MAC address combinations are already in ARP table.
Figure4.4.2: ARP/AP Configuration
4.5
: Firewall Configuration
We use Firewall for multiple purpose, most important is router protect itself and clients from unauthorized access. I have learned when two host are communicated what type of language or information they have exchanged, it’s called IP packet. Then I have learned about IP packet structure. IP packet carry lots of information like, source port, source IP, source MAC, dst IP, dst MAC, dst IP and port. Here, I have learned about Port. When two host are communicating, they use a logical port not physical port. We know every IP have total number of port 2^16= 65,535. For identify one host to another host they use source IP and destination IP. Then I have learned about Firewall filtering concept. In these concepts control the packet flow from Internet to LAN site, we can reject specific packet, allow, drop, jump and return by the help of filtering.
Configuration Process:
First click on IP scroll down and click on Firewall, then a new interface will come. Here select Filter Rules option and simply click on plus sign (+). Then new firewall rules window will open. In the General section, Chain section it selects the traffic direction.
There are three chain input, output, forward chain. I have learned input chain will define that traffic who hit the router.
Form the general section let’s select input chain and it’s going match all packets that going
©Daffodil International University 26 Figure4.5: Firewall Configuration
4.6
: Wireless Configuration
After completing PPPoE client configuration, I have learned how to configure wireless connection. For that, I have created a security profile from Wireless interface.
Step1:
Open Winbox and click on Wireless option, then select security profile option, then click on plus (+) sign a new security window will open. Select general option and put Name, then in Authentication option check mark “WPA PSK” & “WPA2 PSK”. Then put the same password in WPA and WPA2 section. Now, press Apply and OK.
Figure4.6.1: Wireless Configuration
Step2:
Then simply click on Wi-Fi interface and select our created wlan1 option and double click on it a new wizard will open. Then select wireless interface change the mode to AP bridge.
Then put SSID number. Then type or select security profile name. Now, press Apply and OK.
©Daffodil International University 28 Figure4.6.2: Wireless Configuration
Step3:
Then I have created an IP pool so, first go to IP and scroll down and click on Pool. Then click on Plus (+) sign and add required information. Then press OK.
Figure4.6.3: IP Pool create
Step4:
Then I have configured DHCP server because a user cannot get an IP information with out DHCP server. First go to IP and scroll down click on DHCP server, then click on plus (+) sign. Then type Name and select interface ether1. Now, press Apply and OK.
Figure4.6.4: DHCP Server configuration
After complete these processes again I have configured DNS, Firewall, NAT, Routes. I already describe these configurations in previous pages. After complete these configurations our wireless configuration is done.
©Daffodil International University 30
4.7
: Brust
Actually, it’s a very interesting topic, it allows higher data rate for a short time like ISP select some users and give them a short time high speed data. When we are open our PC or laptop and connect to the internet, we noticed browser and videos are loading fast and after some time we fell network is slow down. In a word, when user first connect to the internet, first 1min or 2 min user will get high speed data.
Configuration Process:
Click on queues and click plus sign a new simple queue will open. Then type name in the name section, then type target IP or if you want to provide ether1 interface users then select ether1. Then select targeted IP burst limit, here I have picked 10M upload and download.
Here also we can select specific date and time. Here I have added whole week and time 60sec. Now, press apply and OK.
Figure4.7: Brust Configuration
4.8
: User ID setup
In this section, I have learned how to setup user ID. Basically Mikrotik routers have standard login system “admin” where password and name site left blank. Which is a security threat, for overcome this threat now Mikrotik has a new window where we can create password and user name. In this figure, I have configured a user ID.
Configuration Process:
First open Winbox and click on “System”, scroll down and click on “User” a user list window will open, then click on Plus (+) sign. Then put “Name” select the group “Full”
for that new user will get full control. Now, Address section we can specified an address or keep it blank. Then, type a password and confirm it. Now, press Apply and OK.
Figure4.8: User ID setup
©Daffodil International University 32
4.9
: Reset Process
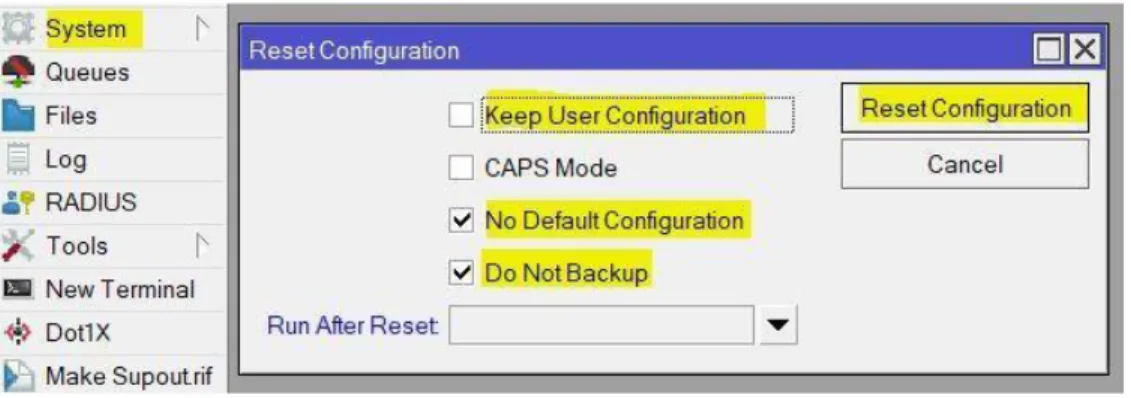
Mikrotik routers are easy to reset. Just click on “System” scroll down and click on “Reset Configuration”. Then, click on check mark “no default configuration” and “do not backup”.
If you want to keep the old configuration then click the check mark option. Then, press
“Reset configuration”. Router take couple of second and automatically go to login window.
Figure 4.9: Router reset process
CHAPTER 5
Conclusion
5.1 Conclusion
This internship at Daffodil Online Limited has been a wonderful and rewarding experience.
After completing my three months internship at Daffodil online limited (DOL), I can claim that, if anyone has completed this training from DOL he/she will be able to operate and maintains the Mikrotik router also able to manage different jobs like ISP companies. After completing this course, now I am very good at running and maintains Mikrotik router. I even learned how to create a network institution through ISP. Also learned about time managements, Service holder’s life, planning as well as self-motivation.
5.2 Future Scope
Career opportunities are available in different areas under Mikrotik, but if I don’t have any experience then it will be hard to finding work. The career opportunities’ in Mikrotik router configuration and maintenance not only the ISP platforms also we can provide services in others companies where Mikrotik routers are used to control the companies network. As a successful internship my future scope will be to work with ISP based company, IT company, to work as a support engineer also can configuration and maintains routers in our real life.
©Daffodil International University 34
REFERENCES
[1] Learn about the company (DOL) at: << http://www.daffodilnet.com/>> Last visit on 10th July 2021 at 5pm
[2] Learn about types of Network and its importance: << http://www.daffodilnet.com/>> Last visit on 24th July 2021 at 12:10 am
[3] Mikrotik Routers: << https://mikrotik.com/ >> Last visit 2 September 2021 at 8 pm
[4] Learn maximum things at: << https://www.wikipedia.org/>> Last accessed 10 September 2021 at 11:00 pm.
[5] Get some points and information from: << http://dspace.daffodilvarsity.edu.bd:8080/ >> Last visit on 10th November 2021 at 3pm.