VoI 8, No 1, January - March 1999 Insertion and removal of
Implanon
31Insertion
and removal of a single implant
contraceptive
releasing
3-ketodeso gestrel
Biran Affandi
Abstrak
Implanon@ dikembangknn dengan tujuan untuk mendapatkan kontrasepsi implan dengan efektivitas dan penerimaan yang tinggi serta aman. Implanon@ merupakan kontrasepsi implant generasi kedua. Terdiri dari satu batang etilin vinil asetat yang berisi
etonoges-trel atau 3-ketodesogestrel. Implanon@ disusukkan (insersi) subdermal di lengan atas bagian dalarn dengan atau tanpa anestesia loknl. Implanon dikemas dalam inserter "disposable" yang steril. Untuk melakulan insersi yang baik dan benatr hal-hal berikut ini harus diperhatikan: pencegahan infeksi, insersi subdermal, dengan telcnik yang betul. Waktu rata-rata insersi 1,2 menit. Pencabutan
memer-Iukan waktu lebih lama. Bila Implanon@ dipasang dengan bailç pencabutan tidak sulit. Pencabutan dilakuknn dengan teknik " Pop-out" atau teknik standar Waktu rata-rata pencabutan 5 menit. Langkah demi langkah pemasangan dan pencabutan Implanon@ dipaparkan. Pelatihan pemasangan dan pencabutan harus diikuti oleh mereka yang aknn memberikan pelayanan Implanon@.
Abstract
With the objective to discover a single implantable contraceptive that highly effective, acceptable and safe a single ethylene vinyl ocetate-rod containing j-ketodesogesÛel (Implanon@) was developed. Implanon is a second-generation ofimplantable contraceptive. It is to be inserted subdermally into the inner side of the upper arm with or without using local anesthesia. Implanon@ was delivered in the needle of a sterile, disposable, specially designed insertetr individually packed. In order to have a proper insertion one should pay special attention to: infection prevention, conect subdermal placement of the implant, and careful technique to minimize trauma. The average
insertion time is 1.2 minutes. Removal take longer time than insertion. With pop-out technique or standard technique, removal will not
be dfficult provided the implant inserted properly. The avera.ge of removal time is 5.0 minutes. The step by step of insertion and removal procedures (practical guidelines) is described. In order to be competence in inserlion and removal training is mandatory for doctors or
midwives/nurses who wish to participate in Implanon services. This is the third paper of three papers reported on phase II study with a
single implant containing 3 -ketode so ge srre I.
Keywords: Implanon@, implant contraceptive, insertion and removal.
Research on contraceptive implants has already been initiated
during
the
1960sby
Croxatto and col-leagues.l Abreakthrough was reached by 1978 when the Population Council demonstrated the feasibility of a new contraceptive implant system consistingof
six lgvonorgestrel-containing capsules for subdermal insertion (Norplanto).2 Norplant@ was introduced in 1983 in Finland and subsequentlyin
many other countries.After
the
introductionin
the
U.S.A. in 1991,its
use increased rapidlywith
already about half a million American women using the method by1994. Although perceived as an effective and
accept-able method of contraception (both contraceptive
ef-Klinik Raden Saleh, Department of Obstetrics and Gynecology Faculty of Medicine, University of Indonesia/
Dr Cipto Mangunkusumo National Hospital, Jakarta, Indonesia
ficacy and continuation rates appeared to be superior
to
oral
contraceptives), Norplant@lost
popularity when reports appeared about the difficult removalof
the implants.3,a This was followed by legal action in the U.S.A. that drew attention of both the lay mediaand health action groups. The result was that the
Nor-planl@ prescription rate reduced sharply, mainly be-cause
of
(a) reduced acceptance by women becauseof fear of side effects induced by a tangle and hostile press, and (b) reduced prescription rates by doctors
because of fear of litigation.
In
order to improve in-sertion and removalof
Norplant, emphasis was put on proper trainingof
doctors andfamily
planningnursess as well as on improved removal techniques.6
Another approach to prevention of the difficult inser-tion and removal of contraceptive implants would be
cur-32
Affandirently under clinical development and one of these is
Implanon. Implanon
is
an
ethylenevinyl
acetate(EVA)
single-rod contraceptive implant containing etonogestrel (3-ketodesogestrel), the active metabo-lite of the widely used progestogen desogestrel. Theobjectives
in
the developmentof
Implanon were tocreate (a) a single-rod system (to improve insertion
and removal), (b) a release of etonogestrel (ENG)
of
at least 3O ltglday (the amount which is needed for complete inhibition of ovulation), @ a dwation of use of 2-3 years (to allow birth-spacing), and (d) an im-plant with a small diameter (to allow use of aninjec-tion
systemfor
insertion)7 Feasibility andpharma-cological studies have indicated that all four
objec-tives have been met, expressed by the convenient and
fast insertion and removal procedures, and ENG
re-lease
rate
of
>30
ltglday throughoutthe
recom-mended duration of use and the induction of ovula-tion inhibition.s,eThe objectives of this paper ire:
1.
Describe the step by step (practical guidelines)of
the technique of insertion and removal.
2.
To report the results of the insertion and removaltechnique described above.
MAIERIALS AND
METHODSImplant
Implanon@ is a single-rod implantable contraceptive
with a length of 40 mm and a diameter of 2 mm
con-taining approximately 68 mg of etonogestrel (ENG),
3-ketodesogestrel. The rod is made of ethylene vinyl acetate (EVA) with an etonogestrel core surrounded
by an EVA
membrane. The initial release rate of etonogestrelfrom
Implanonis
approximately 67pslday.
Implanon@ was delivered
in
the needleof
a sterile,disposable, specially designed inserter individually
packed in an aluminium sachet.
Desigr
of the
studyTwo hundred women were recruited in the study. The
inclusion criteria were age between 18 and 40 years,
sexually active and
of
childbearing potential, goodphysical and mental health, normal cycles
with a
length of 24-35 days and a variation of < 3 days, abil-ity and willingness to accuratelyfill
in the diary cardMed
I Indones
with information on bleeding, accept the implant as the sole method of contraception, willing to return to
the clinic at the stipulated time-points, and willing to give informed written consent.
The exclusion criteria were : pregnancy, breast
feed-ing, within two weeks after an abortion, before the
first menses after delivery, use of an injectable or im-plant hormonal method of contraception within a
pe-riod of six months or the use of other hormonal con-traceptives within a period of two months, history
of
ectopic pregnancy, past or present significant
gyneco-logical disorders of the uterus and/or the ovaries, un-controlled significant endocrine, disorder,
haemoglo-bin
(Hb) less than 10 g/dl, breast discharge (other than lactation), pastor
present disturbanceof
liver function i.e. cholestatic jaundice, a history of jaun-dice of pregnancy or jaundice due to previous (oral)contraceptive use, Rotor syndrome or Dubin Johnson
syndrome, history
of
hyperlipoproteinaemia, hyper-tension i.e. systolic BP >140 mmHg and/or diastolicBP > 90 mmHg, use of one or more of the following drugs : sex steroids, hydantoins, barbiturates,
primi-done, carbamazepine, rifampicin and griseofulvin, a
history of (within 12 months) alcohol or drug abuse,
and administration
of
investigational drugs within 3 months prior to this study.Characteristics
of
implantImplanon is a single-rod implant with a length of 40 mm and
a
diameterof 2 mm
containing approxi-mately 68 mg. The rod is made of EVA with an ENGsurrounded
by
and EVA membrane. Theinitial
re-lease rate of ENG from Implanonis
approximately 67 trtglday.Implanon@ was delivered
in
the needleof
a sterile,disposable, specially designed inserter individually
packed in an aluminium sachet. The sachets were la-belled with the protocol number, storage conditions, information on content
of
sachet, expiry date,pack-ing number and the subject number.
If
a subject metall
entry criteria and a written in-formed consent form was signed, screening assess-ment were to be done. Resultsof
these assessment had to be available before implantation.The experimental flow of the study after completion of the screening assessment is demonstrated in Table 1. The implant was to remain in situ for 24,36 or 48
volun-Vol 8, No 1, Januctry - March 1999
teers
to give their
consentto the
extensionof
the study. Assessments were scheduled at 3-monthinter-vals during the study. To allow some flexibility to the
subjects,
a l-month
deviation was allowed. During the whole study period occurrence of adverse experi-ences as well as use of concomitant medication wereto be reported.
If
suspected at any time in the study,a pregnancy test was to be performed. Data on the subject's bleeding pattern were to be recorded by the subject on a daily basis in a diary card.
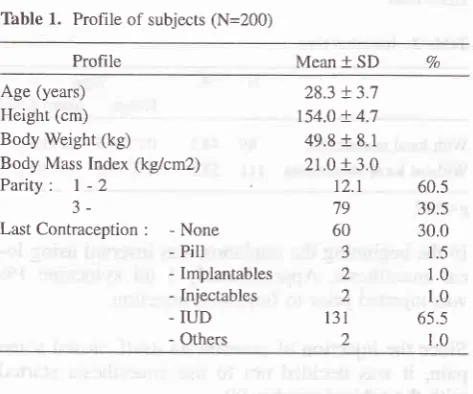
Profile
of the
subjectsThe profile of the subjects are described in Table 1. Age ranged from 20 to 35 years old with mean 28.3 years (SD 3.7).
Table 1. Profile of subjects (N=200)
Profile Mean +
SD
VoInsertion and removal of
Implanon
33It is important that the implant be placed superficially just beneath the skin (dermis). Deep placement
will
make removal much more difficult.
Steps
in
insertion1.
The client should wash her arm thoroughly withsoap and water. The client may lie down
horizon-tally
on the table and herleft
arm (right arm is usedif
patient is left handed) is placed on a sup-portor
she maysit
ona
chair and her arm is placed on a table. The left arm should becomfort-able extended straight or slightly bent.
2.
Identify the insertion site. This could be inside the upper arm about 6-8 cm above the fold of theel-bow.
With or without wearing sterile gloves, apply the antiseptic solution.
Pick up the disposable package which contains a sterile disposable inserter
with
an Implanon-rod in it.5.
Remove the sterile disposable inserter from the package.6.
Romove the capof
introduce needle under theskin of inner side of the upper arm, up to the
syr-inge. During insertion the needle should be tilted upward, tenting the skin, to keep the implant in superficial plane. Do not force the needle and
if
resistance is felt, try another angle.7.
Break seal by turning long plunger support while faxing the inserter with the other hand.8.
Turn the plunger 180 degrees.9.
Keep plungerfixed
by
pressing small plungersupport downward and pull inserter backwards by which the implant is released from the needle.
10.The inserter is thrown away.
Technique
of
removalAn easy removal depends on correct insertion.
Rou-tine
removalstake
longerthan
insertions-usually from 2-5 minutes.It
is helpful to locate the implant first with ungloved fingers. Some clinicians mark the positionsof
im-plant with a pen. The area is washed with-'soap andwater and then swabbed with antiseptic solution
be-fore a local anesthetic is applied to the incision site.
The clinician should apply the anesthetic under the end of the implant; anesthetic applied over the
cap-a J
4 Age (years)
Height (cm) Body Weight (kg)
Body Mass Index (kgicm2)
Parity:
I -2J-LastContraception
:
-None - PiII- Implantables - Injectables - IUD - Others
28.3 !3.7 t54.0 + 4.7 49.8 + 8.1 21.0 + 3.0 t2.1 79 60 3 2 2 131 2
60.5 39.5 30.0 1.5 1.0 1.0 65.5 1.0
The mean body weight was 49.8 + 8.1 kg, while the mean height was 154.0
*
4.7 cm, making the meanBody Mass Index 21.0 + 3.0 kg/cmz.
All
the subjects have already experienced at least one delivery para3or
above. With regard to last contraceptive method use being 65,5Vo IUD and 30Vo of them had used nomethod at all.
Technique
of
insertionThe
implant mustbe
placed beneathan
areaof
healthy skin on the inner aspect of the upper arm. Usethe arm that the woman uses less.
First, wash the skin with soap and water, then swab with antiseptic. The implant is introduced by a spe-cially designed disposable inserter.
The implant
is
fed through the inserter and placed just beneath skin. Sutures are not required; a simple [image:3.595.73.310.290.487.2]34 Affandi
sules may obscure them.
Only
one small incision should be made, through which the implant is removed. The incision should be no longer than 3 mm.If the
implant prove difficult to remove, heroic meas-ures should not be taken to remove them. Total time for removal should not exceed 5-10 minutes. In this situation, the woman should be asked to return when the area isfully healed (about
4-6 weeks) and a sec-ond attempt made. Hard-to-find implant can be lo-cated through x-raysor by
ultrasound. Finally, the clinician should work gently and carefully to avoid injuring the client's arm.Steps
in
removalThe position of the client and the infection prevention procedure are the same as for insertion.
1.
Palpate the implant and mark its position. After prepping and draping the area, apply local anes-thetic under the proximal end of the implant.2.
With a scalpel make a 3 mm incision at the endof
the implant.
3.
Push the implant gently towards the incision with the frngers.4.
When thetip of
the implantis
seen by using a scalpel dissect the fibrous tissue at the end of the implantto
open the fibrous capsule.By
poping out the implant is expeled.5.
Or grasp the implantby
a Mosquito forcep and than clean the frbrous tissue using a scalpel or a gauze.6.
After the implant has been removed the incision is closed and bandaged.Client instructions and follow-up.
Wound care
Keep the area dry and clean for at least 48 hours. The incision could become infected
if
the area gets dirty, wet while bathing or washing clothes.There may be bruising, swelling or tenderness at the insertion site for a few days. This is normal.
Routine work can be done immediately, but do not put unusual pressure on the area for a few days. After the incision has healed, the woman may touch the skin over the implant. The soft, flexible implant
can-Med J Indones
not break inside the body, so she should not be con-cerned about putting normal pressure on the area.
Leave the gauze pressure bandage
in
placefor
48 hours and the bandaid or surgical tape in place until the incision heals (3-5 days).If
signs of infection occur, such as feveq inflamma-tion (redness with heat) at the site, orif
there is per-sistent pain for several days, return to the clinic.RFST,I-jIs
Insertion
Thble 2. Insertion time
N Vo
TimeRange Mean
t
SD With local anaesthesiaWithout local anaesthesia
89
4.5
0.05-4.5 0.710.5t1l 55.5
0.03-3.0 0.510.2 p<0.01In the beginning the implanon was inserted using lo-cal anaesthesia. Approximately 1
ml
xylocaine IVo was injected prior to Implanon insertion.Since the injection of anaesthesia itself caused some pain,
it
was decided notto
use anaesthesia started with the subject number 90.The insertion time is described in Table 2. The mean insertion time with local anaesthesia is 0.7
t
0.5 min-utes. The mean insertion time without local anaesthe-sia is 0.510.2 minutes. The difference is statistically significant.Thble 3. Condition of implant site
Condition One
week
Time after insertionOne yearNVoNVo
Swelling
Redness
Haematoma Pain Expulsion No Abnormalities
0
5
J
15
0
177
0.0 2.5
1.5
2.5 0.0 93.5
0 0 0 I 0 t99
0.0 0.0 0.0 0.5 0.0 99.5
Vol 8, No 1, January - March 1999
Pain, redness and haematoma were the main
com-plaint and condition among Implant users, one week
after insertion. After one year, only one subject
com-plaint about pain.
Removal
Tâble 4. Removal
Time (minutes)
Insertion and removal of
Implanon
35Learning guide
for
Implanon@ counseling skillsObjectives
Task/activity
Counseling (insertion)
Initial
intemiew (clicnf recepti.on area)1.
Greet woman respectfully and with kindness2. Establish purpose
of
thevisit
and answerques-tions
3. Provide general information about
family
plan-rungGive the woman information about the
contracep-tive choices available and the risks and benefits
for each:
-
Show where and how Implanon@ for each-
Explain how they works and their effectiveness-
Explain possible side effects and other healthproblems
-
Explain benign nature of the common sideef-fects
Explain what to expect during the clinic visit
Method-specific counseling (counseling area) Assure necessary privacy
Obtain biographic information (name, address,
etc)
Ask the client about her reproductive goals. (Does
she want to differ or space or limits births?) Explore
any
attitudesor
religious beliefs thateither favor or rule out one or more methods
Discuss client's needs, concerns and fears in a through and sympathetic manner
Help client begin to chose an appropriate method
If
she chooses Implanon@Screen client carefully
to
make sure there is nomedical condition that would be a problem (com-plete Client Screening Checklist)
Explain potential side effects and make sure that each is
fully
understoodPre-insertian
counseling
Qtrocedure/examinaiion area)1. Review Client
Screening Checklist to determineif
client is an appropriate candidate for Implanon@and
if
she has any problems that should be moni-tored while Implanon@ are place_ 1.9
2.0-
4.9 5.0-
9.9 10.0 - 15.01lt 30 t0 6
70.7 19.1 6.4
3.8 4.
157 100.0
Mean + SD 2.1 + 7.7
The mean removal time was
2.I
+ 7.65 minutes withthe range between 0.2 - 15.0 minutes.
DISCUSSION
This is the third paper of three papers reported the
re-sults of Phase
II Study
with a single implantcontra-ceptive releasing 3-ketodesogestrel.
It
is
estimated there are at least3
million
womenfrom all over the world using Norplant@ as their
con-traceptive method.l2 However, despite apparent popularity, Norplant@ has several disadvantages. One of the main disadvantages is insertion and removal
of
6
capsules.It must have been
easierif the implant
consist
of
1 rod. The insertion time of Implanon@ is 0.7 + 0.5 minutes and the removal time is2.I
+ 7.65 minutes whichis much less compared
to
insertion and removal time of Norplant@ being7.4 minutes and 21.8 minutes.In order to help the providers learn the steps or tasks involved in implanon services, three learning guides have been developed:
o Learning Guide for
Implanon@ Counseling Skillso
Learning Guide for Implanon@ Clinical Skills:In-sertion
o
Learning Guidefor
Implanon@ ClinicalSkills
:Removal
5.
1. 2.
J.
4.
5.
6.
1.
5. J. 4.
6. 7.
8.
36 Affandi
2.
Check that client is within seven (7) days of onsetof menstrual period
3.
Check for pregnancy if beyond day 7. (Non-medi-cal) counselors must refer client for furtherevalu-ation)
4.
Performfurther
evaluation (physical examina-tion),if
indicated. (Non-medical counselor mustrefer client for further evaluation)
5.
Describethe
insertion processand what the
woman should expect during and afterwards
P ostinsertion couns eling
1.
Complete client record including drawingposi-tion of implant
2.
Discuss what to doif
the client experiences any side effects of problemsProvide followup visit instruction
Remind
client
of
3-year effectivelife
of
Im-planon@
Assure client she can return to the same clinic at
any time
to
receive adviceor
medical attention and,if
desired, to have the implant removed.Ask the client to repeat instructions Answer client questions
Observe client for at least 15 minutes before
send-ing home.
Counseling (removal)
Pre-remaval counseling (clicnt reception area)
1.
Greet woman respectfully and with kindness2.
Establish purpose of visitMethod-specific counseling (counsekng area)
1.
Ask client her reason for removal and answer anyquestions
2.
Ask client about her present reproductive goals.(Does she want to continue differing or spacing or limiting births?)
3.
Describethe
removal processand
what
she should expect during the removal and afterwardsPostremoval courxeling
1.
Instruct client regarding wound care and makere-turn visit appointment,
if
needed2.
Discuss what to doif
client experiences any prob-lems (e.g. fever)3.
Ask client to repeat instructions4.
Answer any questionsMed J Indones
5.
Review general and method-specific informationabout family planning methods
if
client wants tocontinue differing or spacing or limiting births
6.
Assist
client
in
obtainingnew
contraceptivemethod
or
provide temporary method (barrier) until method of choice can be started7.
Observe client for at least 15 minutes beforesend-ing home
Learning guide
for
implanon insertionGetting ready
1.
Determine that client has been counseledfor
in-sertion procedure
2.
Reviewclient
screening checklistand
furtherevaluate client,
if
indicated3.
Check to be sure client has thoroughly washed herentire arm
4.
Help position client onto table5.
Select and position woman's arm and place clean,dry cloth under her arm
6.
Determine insertion areaby
measuring8
cmabove the elbow fold
7.
Determine that sterile Implanon@ package ispre-sent
Pre-insertion tasks
1.
Wash hands thoroughly with soap and water anddry with clean, dry cloth
2.
Prepare injection/insertion siteby
applyinganti-septic solution to area
Insertion
Remove sterile disposable inserter from pouch
Inject insertor at a shallow angle (While tenting the skin)
While tenting the skin, slowly and smoothly
ad-vance insertor to the upper end of the needle
Break seal by tuming long plunger support while fixing the inserter with the other hand
Turn plunger 180o degrees
V/ithdraw inserter while fixing plunger with left
hand. The implant is released from the needle
Palpate implant to check that implant has been
in-serted properly
Post-insertion tasks
1.
Press down on injection site with gauze finger tostop bleeding
2.
Closeit
with bandaid or surgical tape1.
2.
3
4.
5.
6.
Vol 8, No 1, January - March 1999
3.
Apply pressure dressing to injection site and wrapgauze bandage snugly around the arm to ensure
hemostasis and minimize bruising
4.
Advise client to return to clinicif
pus, blood or implant comes out of injection site5.
Fill
syringe(with
needle attached)with 0,5Vo
chlorine solution and soakfor
10 minutes. Dis-poseof
needle and syringe by placingin
punc-ture-proof container6.
Disposeof
waste materials accordingto
guide-lines7.
'Wash hands thoroughly with soap and water anddry with clean, dry cloth
8.
Draw location of implant in the client record andnote anything unusual
9. Observe
client for at least 15 minutes beforesend-ing her home
Learning guide
for
Implanon@ removalGetting ready
Ask client her reason for removal
Ask client
if she
understands removal procedure Ask client about allergies to anesthetic agentCheck to be sure client has thoroughly washed her
entire arm
Help position client on to table
Select and position woman's arm and place clean,
dry cloth under her arm
Palpate implant to locate point for removal
inci-sion
Determine that required sterile or high-level dis-infected instruments are present
Open sterile instrument pack
Pre-removal tasks
1.
Wash hands thoroughly with soap and water anddry with clean, dry cloth
2.
Put
sterileor
high-level disinfected gloves on both hands;if
gloves are powdered, wipepow-dered, wipe powder
off
glove fingers with gauzesoaked in sterile or boiled water
3.
Arrange instruments and supplies4. Prepare
removal site by applying antiseptic solu-tion to area, beginning at incision site and moving outùard in a circular motion for 8 to 13 cm; allow to air dry5.
Place sterileor
high-level disinfected surgicaldrape over arm (optional)
Insertion and removal of Implanon 37
6.
Inject local anesthetic (IVo without epinephrine)at the incision site under the end of the implant.
7.
Checkfor
anesthetic effect before makinginci-sion
Removal: standard technique
1.
Make small (4 mm) incision with scalpel about 5mm below the tip of implant nearest the elbow
2.
Gently push implant towards the incision until tip is visible(if
possible)3.
Grasp andof
implantwith
curved (mosquito or Crile) forceps and gently bring it into the incision4.
Cleanoff
and open fibrous sheath surrounding implant with sterile gauze (or scalpel)5. Grasp exposed
implant with second forceps and release first forceps6.
Slowly and gently remove implant and placeit
ina bowl containing O.5Vo cl:/rorine solution
7.
Inject more anestheticif
requiredRemoval:
6{J"
technique1.
Make a small (4 mm) skin incision vertically over the implant above the tip nearest the elbow fold2. Insert
tip of Implant-holding (or no-scalpelvasec-tomy-holding) forceps and, while stabilizing rod,
advance tip of forceps until it touches the implant
3. Grasp
implant at right angles and gently pull rodinto the incision (flip handles 180"
if necessary)
4.
Cleanoff
and open fibrous tissues sheath withsterile gauze (or scalpel)
if needed
5.
Grasp exposed endof
implantwith
curvedfor-ceps, remove implant and place in bowl contain-ing 0.5Vo chlorine solution
Removal: pop-out technique
1.
Push on proximal end of implant with a finger2.
When the distaltip
pushesup
underthe
skin, make a small (2to
3 mm) incision over the tip with the scalpel3.
Squeeze the tip between the thumb and finger sothat it pushes up into the incision
4.
Insert the scalpel blade into the incisionuntil it
just touches the tip of the implant andif
necessarycut the fibrous tissue surrounding the
tip of
the rod5.
With the sheath opened, gently squeeze the tissue surroundingthe
tip of
the implant with
boththumbs to bring the tip into view
1. 2. 3. 4.
5. 6.
7.
8.
38 Affandi
6.
Apply gently pressure on the proximal end of theimplant to make
it
"pop out" of the incision7.
Place implantin
bowl containing 0.57o chlorinesolution
Post-removal tasks
1.
After removal of implant show it to client2.
Close the incision with bandaid or surgical tape3.
Apply pressure dressing to removal area and wrapgauze bandage snugly around the arm to ensure
hemostasis and minimize bruising
4.
Instruct client regarding wound care. Advisecli-ent to return to clinic
if
pus or blood come outof
removal site
5. Fill
syringe(with
needle attached)with
0,5Vochlorine solution and soak
for
10 minutes.Dis-pose of needle and syringe by placing in a
punc-ture-proof container. Alternatively, process
syr-inge for reuse and dispose of needle
6.
Place intrumentsin
0,5Vo chlorine solution andsoak
for
10 minutes7.
Disposeof
waste materials and Implanon@ac-cording to guidelines
8.
Briefly
immerse gloved handsin
chlorinesolu-tion.
If
disposingof
gloves, placein
leak-proofcontainer or plastic bag.
If
reusing gloves, soakgloves in 0,5Vo chlorine solution
for
10 minutes9.
Wash hands thoroughly with soap and water anddry with clean, dry cloth
10, Observe client for at least 15 minutes before
send-ing her home
Acknowledgement
This study was conducted as part of Implanon@
Re-search and Development Program sponsored and
co-ordinated by NV Organon, Oss, the Netherlands.
Thanks are due to Dr. Stevenson from N.V. Organon
Holland
for
Good Clinical Practice Monitoring, toDrs. Wardojo Gadroen, Bandar Damanik and Susilo
from Organon Indonesia
for
study coordination, toDra. Rosminah from
Klinik
Raden Saleh for subjectscoordination,
to
Drs.
AGM
Theeuwes and RMVStoleman from SOG
NV
Organonfor
data analysisand to Ms Ernie for typing the manuscript.
Med J Indones
REFERENCES
l.
Croxatto H,Diaz S, Vera R, Etchart M, Atria P. Fertilitycon-trol in women with progestogen released in microquantities
from subcutaneous silastic capsules. Am J Obstet Gynecol
1969; 105: 1135-8
2. Coutinho E, da Silva AR, Mattos CE, Nielsen NC, Osler M, Wiese J. Contraception with long-acting subdermal implants: I. An effective and acceptable modality in international clini-cal trials. Contraception 1978; l8: 315-33.
3. Hatasaka H. Implantable levonorgestrel contraception: 4 years of experience with Norplant@. Clin Obstet Gynecol
1995;38:859-71.
4. Oloto E, Bromham D. Norplant@ removal: a review. Br J Fam Plann 1995; 2l(Suppl): 21-4.
5. Bromham D, Davey A, Gaffikin L, Ajello C. Materials, meth-ods, and the results of the Norplant training program. Adv
Contracept 1995;
ll:
255-62.6. Rosenberg MJ, Alvarez
fl
Barone MA, Waugh MS, Brache V, Pollack AE. A comparison of "U" and standard techniques for Norplant removal. Obstet Gynecol 19971'89: 168-73.7. Vemer HM, Bergink EW. Implanon: a promise for the future. In: Moeloek FA, Affandi B, Trounson AO, eds. Advances in
Human Reproduction. New York: Parthenon 1995; l3l-2.
8. Diaz S, Pavez M, Moo-Young, Bardin CW, Croxatto HB.
Clinical trial with 3-ketodesogestrel subdermal implants. Contraception 1991 ; M: 393-408.
9. Davies G, Li XF, Newton JR, Beek A van, Coelingh Bennink HJT. Release characteristics, ovarian activity and menstrual bleeding pattern with a single contraceptive implant releasing 3-ketodesogestrel. Contraception 1 993; 4'7 : 251 -61. 10. Darney PD. Hormonal Implants: Contraception for a New
Century. Am J Obstet Gynecol 1994 170: 1536-43. I
l
Affandi B, Prihartono J, Lubis S et al. Insertion and Removalof Norplanto by Physicians and Nonphysicians. Studies in Family Planning 1997; 18 302-6.
12. Affandi B. Manual on Implanon@ for Providers. Organon In-donesia, JakarLa, 1997 .
13. Organon. Implanon@, 68 mg etonogestrel, single rod implant. Scientific Information, 1997.
14. Mc Intosh N , Riseborough P, Davis C. Norplant@ Guidelines For Family Planning Service Programs, A Problem Solving Reference Manual. JHPIEGO Corporation, Baltimore, Mary-land, USA, 1996.