Microsoft
®Access
®2010
VBA Programming
Inside Out
1005 Gravenstein Highway North Sebastopol, California 95472
Copyright © 2011 by Andrew Couch
All rights reserved. No part of the contents of this book may be reproduced or transmitted in any form or by any means without the written permission of the publisher.
ISBN: 978-0-7356-5987-2
1 2 3 4 5 6 7 8 9 M 6 5 4 3 2 1
Printed and bound in the United States of America.
Microsoft Press books are available through booksellers and distributors worldwide. If you need support related to this book, email Microsoft Press Book Support at [email protected]. Please tell us what you think of this book at http://www.microsoft.com/learning/booksurvey.
Microsoft and the trademarks listed at http://www.microsoft.com/about/legal/en/us/ IntellectualProperty/Trademarks/EN-US.aspx are trademarks of the Microsoft group of companies. All other marks are property of their respective owners.
The example companies, organizations, products, domain names, email addresses, logos, people, places, and events depicted herein are fictitious. No association with any real company, organization, product, domain name, email address, logo, person, place, or event is intended or should be inferred.
This book expresses the author’s views and opinions. The information contained in this book is provided without any express, statutory, or implied warranties. Neither the author, O’Reilly Media, Inc., Microsoft Corporation, nor its resellers, or distributors will be held liable for any damages caused or alleged to be caused either directly or indirectly by this book.
Acquisitions and Developmental Editor: Kenyon Brown Production Editor: Teresa Elsey
Editorial Production: Octal Publishing, Inc. Technical Reviewer: Alan Cossey
Indexer: Denise Getz
Contents at a Glance
Part 1: VBA Environment
and Language
Chapter 1
Using the VBA Editor and Debugging Code . . . 3
Chapter 2
Understanding the VBA Language Structure 39
Chapter 3
Understanding the VBA Language Features . . 89
Part 2: Access Object Model
and Data Access Objects (DAO)
Part 3: Working with Forms
and Reports
Table of Contents
What do you think of this book? We want to hear from you!
Microsoft is interested in hearing your feedback so we can continually improve our books and learning resources for you . To participate in a brief online survey, please visit:
microsoft .com/learning/booksurvey
Introduction . . . xix
Part 1: VBA Environment and Language
Chapter 1:
Using the VBA Editor and Debugging Code . . . . 3
Debugging Code on a Form . . . .4
Entering the VBA Editor . . . .5
The Application and VBA Code Windows. . . .6
Creating Modules and Procedures . . . .8
Creating a Module . . . 10
Creating a Procedure . . . 11
Executing a Subroutine . . . 13
Executing a Function . . . 15
Viewing and Searching Code . . . 16
Split Window . . . 17
Searching Code . . . 19
Debugging Code in a Module. . . 20
Debug Commands . . . 23
Breakpointing Code. . . 23
Set Next Command. . . 25
Breakpoint Step and Run Commands . . . 26
Displaying Variables in the Locals Window . . . 29
Tracing Procedures with the Call Stack . . . 30
Watching Variables and Expressions . . . 31
Adding Conditional Watch Expressions . . . 32
Working with the Immediate Window . . . 33
Changing Code On-the-Fly. . . 34
Using the Object Browser and Help System . . . 35
Configuring the Help System . . . 35
Working with the Object Browser . . . 36
Table of Contents ix
Table of Contents xi
Documenting a Database by Using the DAO. . . 224
Finding Objects in a Database by Using the DAO. . . 225
Summary . . . 227
List Boxes. . . 286
Table of Contents xiii
Chapter 13:
Integrating Microsoft Office . . . . 437
Table of Contents xvii
DSNs and Relinking Applications . . . 656
Depending on References . . . 656
Updating Applications . . . 656
Summary . . . 657
Chapter 18:
Using ADO and ADOX . . . . 659
ActiveX Data Objects. . . 660
Cursors . . . 661
Asynchronous Operations . . . 662
Forms and ADO Recordsets . . . .662
Working with SQL Server . . . 663
Connection Strings . . . 663
Connecting to SQL Server . . . 664
Command Object . . . 666
Stored Procedures. . . 666
Multiple Active Result Sets and Performance . . . 668
MARS and Connections . . . 669
ADOX . . . 672
Summary . . . 673
Introduction
Microsoft Visual Basic for Applications (VBA) is an exceptional programming language and environment. The language has grown out of a need to have a programming language that would allow more business-focused individuals to write programs, but equally support the programming features that developers look for in a product. The environment is as impor-tant as the language because of its unique features, allowing code to be quickly modified while being debugged.
The Access Basic language in early product versions evolved into the VBA language, which provided a cross-product language for the Microsoft Office products. This all coincided with the revolution of an event-driven approach to programming, which was very impor-tant, because the emphasis on being a programmer shifted from writing thousands of lines of code to writing snippets of code in response to events. This also led to a change of emphasis from writing large libraries of code to understanding how to manipulate the object models in the environment—a focus which has progressed with .NET, albeit using namespaces instead of object models.
Even with the introduction of object-oriented programming, VBA has kept pace with the expectations of modern programming. The two products that have shaped VBA the most are Microsoft Excel and Microsoft Access; Excel introduced VBA and originally gained VBA programming features in advance of these becoming available within Access.
A significant strength of VBA is that it is universal to the Microsoft Office suite of programs; all the techniques we describe in this book can be applied to varying degrees within the other Office products. A major turning point for these products was the ability through OLE Automation to be able to drive one product from another, and to cut and paste code between the different environments with a minimum amount of change to the code. This was a revolutionary feature introduced with the programming language of Access Basic, conforming to the new VBA standard established in Excel. VBA suddenly provided the long-awaited platform for the simple integration of the Office products and building solutions that could easily exploit the strengths of each component product in the Office suite. The combination of Access and VBA offers an extremely productive environment within which to construct applications.
In the .NET world, the conflict between using VB.NET, which originates from VBA, and C# continues, because even though the objects being manipulated are now common, there are subtle differences between the languages, which means that developers moving from VBA to C# can often feel that they are being led out of their comfort zone, especially when they need to continue to use VBA for other applications.
Access has often been criticized for creating poor performance applications where a proto-type turns into a business critical system, propagating a support nightmare for information technology departments, and leading to applications that eat up network bandwidth. It has also been stated that the product is never used for mission-critical applications. The truth is that both Access and Excel are pivotal to many organizations, but the people answering that mission-critical question are often not willing to admit to this because it is perceived as vulnerability. The problem with using Access and Excel is that Rapid Application Develop-ment (RAD) can often come to mean final application without recourse to a more struc-tured oversight of what is being developed, and as data volumes and user communities grow, so too the inevitable flaws in not having designed a scalable solution are exposed. This book details how Access and VBA are not a problem, although their success is often their downfall in the hands of those lacking some direction on how to effectively develop applications. The big problem with Access is that the underlying database engine is extremely efficient and can compensate for a design that normally would not scale. So if you convert your Access database data to be located in Microsoft SQL Server, Microsoft SQL Azure, or Microsoft SharePoint, you might find that the existing application design techniques for searching and displaying data need to be revised. Our advice is to take into account the mantra of Client-Server design, which is to minimize the amount of data being transferred in any operation.
In this book, we would like to make our contribution toward creating a better informed community of developers, and show how to better develop applications with VBA.
Who This Book Is For
This book is aimed at two types of reader. First, we want to enable the reader who has worked with Access and developed applications to move to the next level of development. We want to help that reader to more fully develop applications with a deeper understand-ing of what it means to program with VBA.
Introduction xxi
Assumptions About You
We make a basic assumption in this book that you are experienced either in working with Access or that you have a strong programming background, which means that you can learn VBA programming in Access very quickly. We will spend no time explaining how to create a table, form, or report, and if you cannot do this, you need to first learn these actions in more detail. We recommend our companion text Microsoft®Access®2010 Inside Out by Jeff Conrad and John Viescas.
If you have some VBA Programming experience, you can skim over Chapters 1–3. If your experience level is not such that you are comfortable skipping chapters, Chapters 1–3 will, we hope, give you a key appreciation of the power of the VBA development environment.
How This Book Is Organized
This book allows you to either start at the beginning and work through each chapter or to dip into specific chapters or topics to investigate a particular feature of VBA. To enable dip-ping into the book, each part is designed to be self-contained.
Part 1, “VBA Environment and Language”
In Chapters 1, 2, and 3, we provide a foundation that demonstrates how to program with VBA. We start by showing you how to debug, write, and modify code (gaining confidence with the VBA environment is the first step to efficiently developing applications within it). Then we move on to an in-depth exposition of the VBA language, which can act both as a reference for coding syntax and a solid introduction to the language.
Part 2, “Access Object Model and Data Access Objects (DAO)”
Chapters 4 and 5 dig deep into programming with the objects that make up Access, includ-ing the DAO programminclud-ing language, which is the bread and butter programminclud-ing tech-nique for any Access VBA developer.
Part 3, “Working with Forms and Reports”
Chapters 6, 7, and 8 illustrate how to apply VBA when working with forms, controls, and reports. This develops your core techniques in understanding how to apply VBA for build-ing the key interface components in applications.
Part 4, “Advanced Programming with VBA Classes”
computing by using object-oriented programming. There are a lot of cunning tricks and techniques in these chapters that are worth reading about, and many of the ideas in these chapters will take you forward in also handling development with .NET.
Part 5, “External Data and Office Integration”
In Chapters 12 and 13, we address the issue of how to link Access to external data and write VBA to communicate both with other Office applications and external data sources such as SQL Server and SharePoint.
Part 6, “SQL Server and SQL Azure”
Chapters 14, 15, and 16 provide a comprehensive description of how to extend the reach of Access applications by moving the back-end data into SQL Server, and then onto SQL Azure. Chapter 14 is dedicated to equipping developers with a solid understanding of how to develop code with SQL Server, during which we explain both how to use the SQL Server Management Studio and write programs using Transact SQL (T-SQL).
Chapter 15 moves on to look at converting Access Databases to SQL Server by using both the Upsizing Wizard and the SQL Server Migration Assistant (SSMA). Chapter 16 discusses how to move your databases into the cloud either by using the SQL Server Import and Export Wizard feature in the SQL Server Management Studio from a local SQL Server, or SSMA from an Access Database. We discuss how you can exploit the unique features of Office in directly constructing links to Azure, building multi-tenanted solutions and using the soon to be released new Data Sync features in SQL Azure.
Part 7, “Application Design”
Features and Conventions Used in This Book xxiii
Features and Conventions Used in This Book
This book uses special text and design conventions to make it easier for you to find the information you need.
Text Conventions
Convention Meaning
Boldface type This indicates user input that you are instructed to type; for example, “Click the Save As command, name the file NewFile_01, and then click OK.”
Ctrl+F Keystroke combinations are presented as Ctrl+G, which means to hold down the Ctrl key and press the letter G on the keyboard, at the same time.
Object names When we need to draw your attention to a specific technical term, program elements, or an object in the sample database, it will be presented in italic; for example, “Open the form frmSample and right-click the ListBox control.”
Design Conventions
INSIDE OUT
This statement illustrates an example of an “Inside Out” headingThese are the book’s signature tips . In these tips, you get the straight scoop on what’s going on with the software—inside information about why a feature works the way it does . You’ll also find handy workarounds to deal with software problems .
Note
About the Companion Content
You’ll see references to the sample files and bonus content throughout the book. A com-plete list of the key database files follows (we have not listed all the smaller support files for each chapter).
We have also included in the bonus content (which is located within the file sets for Chap-ters 5, 7, and 18) additional application files that contain more code examples and provide useful utilities to add to your program libraries.
To access and download the companion content, visit: http://go.microsoft.com/ FWLink/?Linkid=223727.
Chapter or topic Content
Chapter 1 ● VBAEnvironment.accdb
Chapter 2 ● VBAExamples.accdb
Chapter 3 ● VBAFeaturesExamples.accdb
Chapter 4 ● AccessObjectModel.accdb
Chapter 5 ● DAOExamples.accdb
● CountryLibrary.accdb ● Find_IT.accdb ● DocDAO.accdb
Chapter 6 ● FormExamples.accdb
Chapter 7 ● Controls.accdb
● TreeBuilder.accdb
Chapter 8 ● Reports.accdb
Chapter 9 ● BuildingClasses.accdb
● BuildingClassesAfterExportImport.accdb
Chapter 10 ● ClassesAndEvents.accdb
Chapter 11 ● ClassesAndForms.accdb
Chapter 12 ● Employees_be.accdb
About the Companion Content xxv
Chapter or topic Content
Chapter 13 ● ExcelAnalysis.accdb ● OfficeApplications.accdb ● OutlookContacts.accdb ● WordQuote.accdb
Chapter 14 ● SQLServerExamples.accdb ● SQL Server Script files
Chapter 15 ● Northwind_ProblemsAndFixes.accdb ● SQLServerCodeExamples.accdb ● SQL Server Script files
Chapter 16 ● Northwind_ForAzure.accdb ● SQLAzureCodeExamples.accdb ● SQL Azure Script files
Chapter 17 ● ApplicationDevelopment.accdb ● ApplicationDevelopment64Bit.accdb ● ApplicationDevelopment_2007.accdb
Chapter 18 ● ADOExamples.accdb
● DocADOX.accdb ● SQL Server Script files
Bonus Content ● Chapter 5: Find_IT.accdb, DocDAO.accdb ● Chapter 7: TreeBuilder.accdb
● Chapter 18: DocADOX.accdb
Access Versions
All of the examples in the book are designed to run with Access 2010 32-bit.
The majority of the code examples in this book will work on older versions of Access, and we have provided a set of .mdb files for this in Access 2002–2003 file format. However, the older the version that you use, the less likely will be the compatibility. There are several top-ics in Chapters 4, 5, 13, and 17 which were either not present in earlier versions of Access or have undergone a significant amount of change.
Acknowledgments xxvii
Acknowledgments
A good technical book needs an author who is well informed and passionate, and I hope I can live up to that expectation. But it also needs contributions from a team of people to turn the idea into a reality.
First, my thanks to Kenyon Brown at O’Reilly Media; without his asking me to propose to write this book, it would have never have been started. Your diligence throughout the entire process has been splendid.
Next, I offer immense gratitude to Alan Cossey, who acted as technical reviewer on this book; having acted as a technical reviewer myself, I can greatly appreciate all of his time and recommendations made during the review process.
I would also like to thank Bob Russell at Octal Publishing, Inc., for acting as my copy editor; Bob has not only ensured that the flow of the book has a professional polish, but also caused me to reflect on the meaning of many parts of the text.
I would like to thank my good friend Jeff Conrad at Microsoft. Jeff is a great advocate for Access and helped wonderfully in answering and passing along many of my comments and questions to the Microsoft teams.
Numerous thanks also to those members of UK Access User Group for helping in testing my solutions to difficult technical issues. You can’t beat a good community of developers! My thanks also to Dianne Russell at Octal Publishing, Inc., for managing the copy edit-ing and composition, and Betsy Waliszewski, senior marketedit-ing manager, for promotional activities.
Finally, I would like to thank my wife, Pamela, for her patience, and my son, Michael, for his assistance at various stages in helping with chapter layouts.
Support and Feedback
The following sections provide information on errata, book support, feedback, and contact information.
Errata & Support
We’ve made every effort to ensure the accuracy of this book and its companion content. Any errors that have been reported since this book was published are listed on our Micro-soft Press site at oreilly.com:
http://go.microsoft.com/FWLink/?Linkid=223727
If you find an error that is not already listed, you can report it to us through the same page.
If you need additional support, email Microsoft Press Book Support at mspinput@microsoft. com.
Please note that product support for Microsoft software is not offered through the addresses above.
We Want to Hear from You
At Microsoft Press, your satisfaction is our top priority, and your feedback our most valu-able asset. Please tell us what you think of this book at
http://www.microsoft.com/learning/booksurvey
The survey is short, and we read every one of your comments and ideas. Thanks in advance for your input!
Stay in Touch
How to Access Your Online Edition Hosted by Safari xxix
How to Access Your Online Edition
Hosted by Safari
The voucher bound in to the back of this book gives you access to an online edition of the book. (You can also download the online edition of the book to your own computer; see the next section.)
To access your online edition, do the following:
1. Locate your voucher inside the back cover, and scratch off the metallic foil to reveal your access code.
2. Go to http://microsoftpress.oreilly.com/safarienabled.
3. Enter your 24-character access code in the Coupon Code field under Step 1.
(Please note that the access code in this image is for illustration purposes only.)
4. Click the CONFIRM COUPON button.
A message will appear to let you know that the code was entered correctly. If the code was not entered correctly, you will be prompted to re-enter the code.
5. In this step, you’ll be asked whether you’re a new or existing user of Safari Books Online. Proceed either with Step 5A or Step 5B.
5B. If you are a new user, click the NEW USER – FREE ACCOUNT button under Step 2.
■ You’ll be taken to the “Register a New Account” page.
■ This will require filling out a registration form and accepting an End User Agreement.
■ When complete, click the CONTINUE button.
6. On the Coupon Confirmation page, click the My Safari button.
7. On the My Safari page, look at the Bookshelf area and click the title of the book you want to access.
How to Download the Online Edition
to Your Computer
In addition to reading the online edition of this book, you can also download it to your computer. First, follow the steps in the preceding section. After Step 7, do the following:
1. On the page that appears after Step 7 in the previous section, click the Extras tab.
How to Download the Online Edition to Your Computer xxxi
A new browser window or tab will open, followed by the File Download dialog box.
3. Click Save.
4. Choose Desktop and click Save.
5. Locate the .zip file on your desktop. Right-click the file, click Extract All, and then follow the instructions.
Note
PART 1
VBA Environment and
Language
Chapter 1
Using the VBA Editor and Debugging Code . . .3
Chapter 2
Understanding the VBA Language Structure 39
Chapter 3
ChAPTER 1
Using the VBA Editor and
Debugging Code
Debugging Code on a Form . . . .4
Creating Modules and Procedures . . . .8
Debugging Code in a Module . . . .20
Breakpointing Code . . . .23
Using the Object Browser and Help System . . . .35
T
he Microsoft Visual Basic for Applications (VBA) Editor is more than a simple editing tool for writing program code. It is an environment in which you can test, debug, and develop your programs. Understanding the unique way in which the editor allows you to make modifications to application code while the execution of the code is paused will help you to learn how to quickly develop your applications and master the techniques for debugging code.In addition to changing code on-the-fly as it executes, you can switch across to the Micro-soft Access 2010 application window while your code is paused, create a query, run the query, copy the SQL to the clipboard, and then swap back to the programming environ-ment to paste the SQL into your code. It is this impressive flexibility during the develop-ment cycle that makes developing applications with VBA a productive and exhilarating experience.
In this chapter, you will work with examples of program code written in the VBA language. The VBA language itself is systematically explained in Chapter 2, “Understanding the VBA Language Structure,” and in Chapter 3, “Understanding the VBA language Features.” So, before reading this chapter (or while you’re reading it) you might want to either skim read those chapters or simply refer to specific topics as they arise in this chapter. We have also included some examples of Data Access Object (DAO) programming code. In this chapter, we will be providing only limited explanations of the DAO development environment, just to place it into the context of building real applications. For more detailed information about it, see Chapter 5, “Understanding the Data Access Object Model.”
Ch
ap
te
r 1
By the end of this chapter, you will understand:
● The different ways that you can run and debug sections of program code.
● How to modify program code while it is paused and then resume execution. ● How to work with the different windows in the programming environment. ● Where code is stored in a VBA application.
● How procedures are created.
Note
As you read through this chapter, we encourage you to also use the companion content sample database, VBAEnvironment .accdb, which can be downloaded from the book’s catalog page .
Debugging Code on a Form
To begin, open the sample database, VBAEnvironment.accdb, which opens the startup form, frmVBAStartsHere, shown in Figure 1-1.
Figure 1-1 The startup form, frmVBAStartsHere.
Ch
ap
te
r 1
Debugging Code on a Form 5
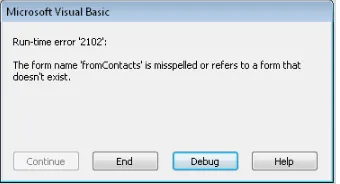
Click the button labeled Look At The Table Of Contacts. A pop-up window appears, as shown in Figure 1-2.
Figure 1-2 In this Access pop-up window, you can either end the code execution or click Debug to investigate the error.
If you click the End button, the program code stops executing. But as you want to debug the code, click the Debug button.
Entering the VBA Editor
When entering debugging mode, the program stops in the VBA editor and highlights the line of code at which it failed in yellow, as shown in Figure 1-3.
Figure 1-3 Choosing Debug opens the VBA Editor and highlights the program code line that generated the error.
Ch
ap
te
r 1
Figure 1-4 Code stopped at the error line. Notice in the Project Explorer pane on the left that the entry form _frmVBAStartsHere is highlighted. This tells you that you are viewing the form’s code module.
DoCmd.OpenForm is a command that allows the program code to open the specified form. DoCmd is a shorthand way of saying, ”do the macro command.” After correcting the mis-spelling, you can either press the F5 key or click the Continue button on the toolbar to allow the program to continue execution. Figure 1-5 demonstrates the results after con-tinuing to execute the code, which now opens the frmContacts form.
Figure 1-5 After correcting the programming error, you can see the result of executing DoCmd.OpenForm, which opens the requested Access form.
The Application and VBA Code Windows
Ch
ap
te
r 1
Debugging Code on a Form 7
Figure 1-6 With the VBA editor open, you have two windows for Access, and you can switch between the application window and the VBA Editor window.
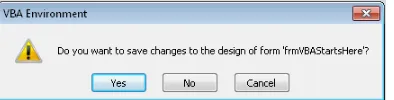
If you choose to close the forms you will be prompted to save the changes that you have made to the code on the form, as shown in Figure 1-7.
Figure 1-7 The prompt to save changes to the frmVBAStartsHere form.
Caution
!
It is very easy to click the wrong button and lose your design changes . Ensuring that you click the Save button after making any changes to code means that you always know that your changes have been saved . If your program code closes objects as part of its execution, separate dialog boxes for saving changes can pop up, and you can eas-ily forget to save a change . In the unlikely event that the Access application crashes and you have not been saving your design changes, any unsaved changes will be lost .
INSIDE OUT
Code behind a form or report is located in the class module of a form or reportThe last example illustrates how program code can be located in a form’s class module . Code is written behind a form (“Code Behind a Form” or CBF) to respond to events when the user interacts with the form and the form’s controls, Figure 1-8 shows the relationship between controls on a form and the procedures in the form’s class module .
Form/Report Form/Report Class Module procedure control
Ch
ap
te
r 1
The term class module relates to VBA classes discussed later in the book, the form’s module is called a class module because it can handle events from the controls and form sections; this is a feature that you can construct within your own module classes . When code is written behind a form’s event, it is a subroutine, but it is also possible to have functions and subroutines on a form that are not directly associated with any single control . This normally occurs when you have a need for an operation to be per-formed by several controls . In this case, the code will be marked in the General section of the form’s class module .
You have now learned that:
● When a code problem occurs, you can click Debug to display the code and fix the
problem.
● VBA programs can be edited when the code is paused and then instructed to
con-tinue execution after you have fixed any errors.
● Regularly saving your changes after altering code is good practice. ● Program code can be stored in the class module of a form or report.
Creating Modules and Procedures
In the last section, you saw that when the program code goes into Debug mode, the Editor window is displayed. However, you can access the editing environment by using several dif-ferent methods, as described in the following list:
● Press Alt+F11 (this applies to all Microsoft Office products).
● Press Ctrl+G. This displays the Immediate window in the Editor and automatically
opens the Editor window, if it is not already open.
● On the ribbon, on the Create tab, click Module. This creates a new module and enters
the Editor.
● In a form or report, on the ribbon, on the Design tab, click the View Code icon. ● Click any of the modules shown in the Navigation window.
● Right-click a Form/Report’s sections or controls, and then select Build Event, where
Ch
ap
te
r 1
Creating Modules and Procedures 9
If you are not already in the Editor, then open the sample database and press Alt+F11 to go there.
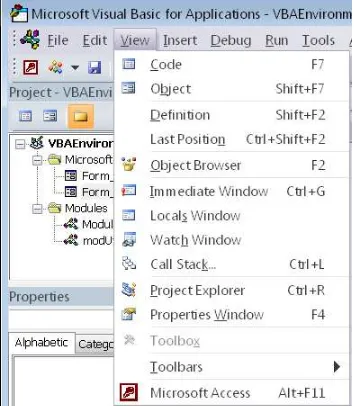
The VBA Editor comprises a number of windows. If you accidently close one, or need to show a window that is not already displayed, click View on the menubar to open the win-dow, as shown in Figure 1-9.
Figure 1-9 From the View menu, you can open different types of Editor windows. Note the Proj-ect window in the background with its expandable folders. This is a map of all the code modules in the application. Double-click any form or report to open the document’s code module.
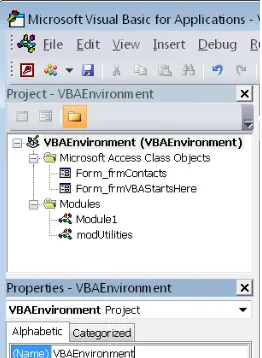
The Project pane normally contains two folders. The first folder, Microsoft Access Class Objects, contains your forms and reports (only objects with an associated code module are shown). Clicking one of these objects displays the existing code module. The term Class refers to the special nature of a Form/Report module; it handles the events for the object. These are sometimes simply called Form/Report modules. The separate Modules folder below the Form/Report modules contains general purpose program code that can be used in various parts of your application; these are sometimes called general or global modules (this folder is only shown after you have created a module).
Ch
ap
te
r 1
Figure 1-10 The Project pane displays all forms and reports that have code modules. You can use the Modules tab for writing code that is not tied to a particular form or report.
Creating a Module
You can use the Project window to create a new module. There are several different ways to add a new module; the method shown in Figure 1-11 involves right-clicking the Modules tab, and then selecting Insert | Module from the shortcut menu that appears. This method is used when you want to concentrate on setting up new modules when you are in the middle of writing and debugging code.
Ch
ap
te
r 1
Creating Modules and Procedures 11
When you create a new module, it is automatically assigned a default name (for example Module1). When you click the save button, you will be prompted to give the module a permanent, more meaningful name. Figure 1-12 shows the new module before it has been saved with an alternative name. You might also notice that when you save the new module, it contains two special Option keyword lines of text. This is explained in detail in Chapter 2, but for the moment, you can ignore this.
Figure 1-12 After creating a new module, it will be displayed using a default name such as Module1, Module2, Module3, and so on.
When you click the save option on the toolbar or close the database, you are prompted to replace the default module name with something more meaningful.
Creating a Procedure
Ch
ap
te
r 1
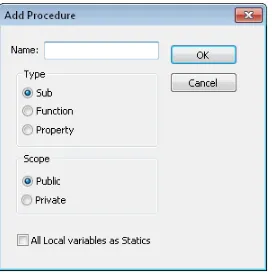
Figure 1-13 The Add Procedure dialog box.
There is another, quicker mechanism for creating a new procedure: click any empty area, type the keyword Sub {name} or Function {name} (be sure you are not inside an existing sub or function), and then press the Enter key. The VBA environment adds an End Sub key-word automatically to complete the procedure block, as shown in Figure 1-14).
Figure 1-14 Creating a new procedure by using the Sub keyword. The window in the back-ground shows the keyword and the procedure name typed in; the foreback-ground window shows the result after pressing return.
Ch
ap
te
r 1
Creating Modules and Procedures 13
Figure 1-15 The built-in pop-up MsgBox procedure has three parts: the text to display; a con-stant that is used to indicate what buttons and images to display; and finally, the title for the window.
Executing a Subroutine
The subroutine code you created can be executed two ways. The first way is to click the green Continue button on the toolbar menu or press the F5 key (you need to have the cur-sor positioned inside the procedure on any part of the code). This should then display the message box.
The second way is to type the name of the subroutine into the Immediate window, and then press Return, as demonstrated in Figure 1-16.
Figure 1-16 You can type a subroutine name into the Immediate window, and then press the Return key to execute it.
The second type of procedure in VBA is called a function. The key difference between a function and a subroutine is that functions are always expected to return a value. Functions are fully explained in Chapter 2.
Ch
ap
te
r 1
INSIDE OUT
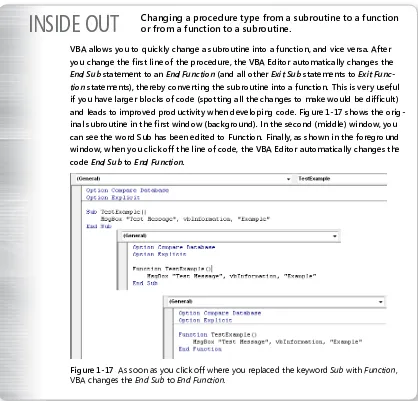
Changing a procedure type from a subroutine to a function or from a function to a subroutine .VBA allows you to quickly change a subroutine into a function, and vice versa . After you change the first line of the procedure, the VBA Editor automatically changes the
End Sub statement to an End Function (and all other Exit Sub statements to Exit Func-tion statements), thereby converting the subroutine into a function . This is very useful if you have larger blocks of code (spotting all the changes to make would be difficult) and leads to improved productivity when developing code . Figure 1-17 shows the orig-inal subroutine in the first window (background) . In the second (middle) window, you can see the word Sub has been edited to Function . Finally, as shown in the foreground window, when you click off the line of code, the VBA Editor automatically changes the code End Sub to End Function .
Figure 1-17 As soon as you click off where you replaced the keyword Sub with Function, VBA changes the End Sub to End Function.
Because a function returns information, you are going to modify the program code to match Figure 1-18 so that it returns a value.
Ch
ap
te
r 1
Creating Modules and Procedures 15
Figure 1-18 The MsgBox function prompts the user with two buttons (Yes and No), and then tests to see which button the user pressed.
After you have typed in a call to either a built-in procedure or your own procedure, you can right-click the shortcut menu to display information on the parameters for the procedure or get assistance with selecting constant values (see Figure 1-19). The MsgBox function has alternative constants for the second parameter (vbYesNo) shown in Figure 1-18, which con-trol the buttons and graphics displayed in a message box. To change a constant value in the MsgBox routine, hover the mouse over the existing value, right-click to display the shortcut menu, and then select List Constants. This simplifies entering a new constant value.
Figure 1-19 Accessing the shortcut menu to display information about the parameters for the procedure. Other options on this menu include providing quick information on the function.
Executing a Function
Ch
ap
te
r 1
function name; a function needs to show that it accepts parameters even when it has no parameters.
Figure 1-20 Executing a function from the Immediate window. Use the ? (question mark) character to return a value from the function.
In this section, you have seen how program code can be written in a module that is not connected to a form or report. These code units are called standard modules, or sometimes general modules or global modules. Figure 1-21 illustrates how a standard module is an object that is independent of any form or report. Compare this to Figure 1-8, which showed a class module of a form or report that is attached to the Form/Report. Code written in these procedures can link to other procedures in the same or different modules. The code will normally not be specific to a single form. Form-specific code is better written inside a form’s class module
Module
procedure
Figure 1-21 A schematic view of a module, which can contain one or more procedures. The procedures can be a combination of functions and subroutines.
You should now understand that program code can be written either in the class module of a form or report (when the code is specific to the Form/Report), or it can be written in a standard module (when it is not specific to a Form/Report).
Viewing and Searching Code
Ch
ap
te
r 1
Creating Modules and Procedures 17
Procedure View Full Module View
Figure 1-22 Using the buttons in the lower-left corner of the code window, you can display either a single procedure or a scrollable list of all the procedures in the module.
Split Window
The module code window can also be switched to a Split view (see Figure 1-23). This gives you the ability to compare code in two different procedures, one above the other.
Figure 1-23 Use the Window menu to enable the Split view option.
Ch
ap
te
r 1
Figure 1-24 Viewing two procedures at the same time in Split view mode.
Dragging the splitter bar to the very top of the screen and releasing it will remove the split view. Similarly, by moving the mouse to the top right, just above the vertical scroll bars, the mouse pointer will change shape and you can drag down the splitter bar (this can be a little tricky to do and you will find the Window menu easier to use for this).
Use the drop-down menu located on the upper-right portion of the window to select any procedure within a module (see Figure 1-25). This applies to each of the windows when using the split view, as well.
Figure 1-25 Use the drop-down menu to quickly display any function or subroutine in a mod-ule. For standard modules the drop-down on the top left only has one available choice called General; for class modules there will be other values shown in the drop-down.
Note
Ch
ap
te
r 1
Creating Modules and Procedures 19
Figure 1-26 In a Form/Report class module, the drop-down menu on the left lists the controls and sections in the document. The drop-down menu on the right shows all possible events for the selected section or control. Events that have code associated with them are displayed in a bold font.
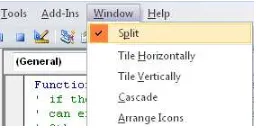
If you have multiple code windows open, you can use the Windows menu to change between the open windows. You also have the option to tile (horizontally or vertically) or cascade the open windows, as shown in Figure 1-27.
Figure 1-27 The Window menu in the Editor allows multiple, open module windows to be viewed in Tile mode or Cascade mode.
Searching Code
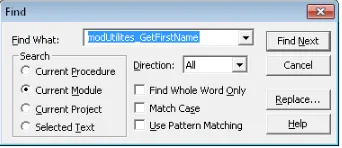
If you need to find a procedure or a piece of code, press Ctrl+F to open the Find dialog box and locate the code in the current procedure, module, project, or block of selected text (use the mouse to select and highlight the text before pressing Ctrl+F), as demonstrated in Figure 1-28.
Ch
ap
te
r 1
To view the definition of a variable or procedure (see Figure 1-29), position your cursor on it, right-click to open the shortcut menu, and then click Definition. Alternatively, again with your cursor on the procedure or variable, press Shift+F2 to go to the definition. If the code is in a different module, the appropriate module will be opened automatically.
Figure 1-29 Viewing the definition of a procedure or variable.
Additionally, referring still to Figure 1-29, if you click the text modUtilites_GetFirstName in the subroutine ProcessNames, and then press Shift+F2, the body of the code for the proce-dure is displayed.
Debugging Code in a Module
To demonstrate how code is debugged, we will use a routine that splits a person’s name from a combined field in the frmContacts form into separate first name and surname. Fig-ure 1-30 shows the Contact Name in the first record split into the FirstName and Surname fields.
Figure 1-30 Using VBA code, the contact’s full name, which is contained in the Contact Name field, is split into corresponding FirstName and Surname fields.
Return now to the opening frmVBAStartsHere form, and then press the button labeled Break Apart The Contact Name Into First Name And Surname, as shown in Figure 1-31.
Figure 1-31 Click the Break Apart The Contact Name Into First Name And Surname button on the frmVBAStartsHere form to trace through and debug the application code for splitting apart the Contact Name field.
Ch
ap
te
r 1
Debugging Code in a Module 21
Figure 1-32 Hardcoded (permanent) breakpoints using the Stop keyword are a useful reminder when developing code that it is incomplete, but they should not be included in any final application.
Notice in Figure 1-32 that the code has stopped in the modUtilities module, and not in the form’s class module.
Figure 1-33 presents the code behind the button. This code calls the procedure Process-Names in the module modUtilities.
Figure 1-33 The code behind the button is written in the Click() event. This code calls the ProcessNames routine, which is has been written in a module.
In Chapter 2, you will learn about naming conventions. The convention adopted in this book is to add a prefix to procedures in modules so that we can easily see in which mod-ule a procedure is defined. In the preceding example, if you had called the modUtilities_ ProcessNames procedure rather than ProcessNames, it would be easier to see how the code on the form linked to the code in the module (in this case, we have not followed the con-vention to illustrate the point).
Ch
ap
te
r 1
Figure 1-34 The Call Stack is a visual aid that helps to establish where you are in the code. In this example, reading from top to bottom, you are in the code unit modUtilites_ProcessNames, which was called from the code unit cmdBreakApart_Click, which is in the form frmVBAStartsHere.
INSIDE OUT
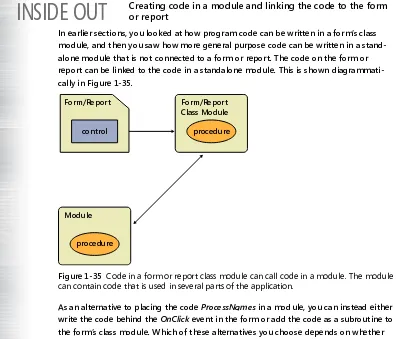
Creating code in a module and linking the code to the form or reportIn earlier sections, you looked at how program code can be written in a form’s class module, and then you saw how more general purpose code can be written in a stand-alone module that is not connected to a form or report . The code on the form or report can be linked to the code in a standalone module . This is shown diagrammati-cally in Figure 1-35 .
Form/Report Form/Report Class Module procedure
Module procedure
control
Figure 1-35 Code in a form or report class module can call code in a module. The module can contain code that is used in several parts of the application.
Ch
ap
te
r 1
Breakpointing Code 23
Debug Commands
Debugging code involves several operations. These operations are:
● Stopping or breakpointing the code so that it pauses at the correct point for
investigation.
● Examining and monitoring variables.
● Modifying and repeating the code execution.
Debug.Print is a command that displays values of program variables or expressions in the Immediate window when developing code:
Debug.Print strCombinedName, rst!FirstName, rst!Surname
There is another debug command called Debug.Assert, which can be used to halt the exe-cution of program code when a specific condition is False. For example, the following code halts execution when lngCount = 5(note that the Debug.Assert stops when the condition is false):
Sub modUtilities_DebugAssertExample() ' Example showing Debug.Assert Dim lngCount As Long
For lngCount = 1 To 10 Debug.Print lngCount Debug.Assert lngCount <> 5 Next
End Sub
Breakpointing Code
The Stop and Debug.Assert statements are hardcoded breakpoints, but you can also have soft breakpoints that you can use when you interact with a block of code and need to find out why the code is failing or behaving in a particular way.
There are three ways to enter a breakpoint. First, you need to locate the line in which you want to insert the breakpoint, and then do one the following:
● Press the F9 Key.
● On the Debug tab, click Toggle Breakpoint.
● Click in the margin next to the line of code (this is the easiest method).
Ch
ap
te
r 1
Figure 1-36 The code discontinues execution at the Stop statement. Note the highlighted break-point farther down the page
Unlike Stop statements, which need eventually to be removed from the code, breakpoints are not remembered after you close the database. You can use the Debug menu to clear all breakpoints in the application, or you can press Ctrl+Shift+F9.
With the breakpoint set, you want the code to execute until it reaches it. Use the Continue button (see Figure 1-37) or press F5 to instruct the code to continue execution until it either completes, or reaches a breakpoint.
Continue Break
Reset
Figure 1-37 Three of the buttons on the Run menu are also displayed on the menu bar— Continue (F5), Break (Ctrl+Break), and Reset (which halts code execution).
Ch
ap
te
r 1
Breakpointing Code 25
Figure 1-38 Code continues to execute until it either reaches the next breakpoint or completes execution.
The ProcessNames routine is an example of programming with a RecordSet object, which is discussed in Chapter 5, “Understanding the Data Access Object Model.” The program code loops through each record in the table and changes the Firstname and Surname fields. If you switch to the Access application window and open the table tblCompanyContact, you can investigate whether your code has worked. And as it turns out, it has not worked as desired; Figure 1-39 shows that the entire contact name has been copied into the First-Name field. The name was not split apart, as intended.
Figure 1-39 With the code paused at a breakpoint, you can switch to the application window and open other Access objects (in this case a table) to see the changes made to the data. Here, you can see that the code has not split apart the Contact Name.
Set Next
Command
If you move the cursor over the first line in the loop and then right-click, you can use the Set Next statement to make the code go back and repeat the operation. This is typical of how code is debugged. After identifying an error, you can move back to an earlier point in the code to investigate it.
Ch
ap
te
r 1
Click this first line and then right-click to display the shortcut menu
Figure 1-40 Changing the current execution point to a different line by using Set Next Statement.
After you click Set Next Statement, the yellow highlighted line changes, as shown in Figure 1-41. Notice also that you can display the values of the variable by hovering the mouse over it. (This is not restricted to variables in the highlighted line of code; you can hover the mouse over variables on other lines to view their values, too.)
Figure 1-41 Hovering the mouse over any variables in the program code will display the variable values.
As an alternative to using Set Next Statement to change the execution point, you can also grab the yellow arrow on the side margin and drag it to a different line of code.
Breakpoint Step and Run Commands
Ch
ap
te
r 1
Breakpointing Code 27
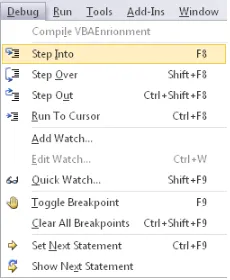
Figure 1-42 Using the Step commands on the Debug menu, you can trace through the execution of your code.
You can do this in several ways. One way is to keep clicking the Debug menu options, but it is much faster to use the following function key combinations to step through the code:
● F8 Follows the code execution to the next step.
● Shift+F8 Moves over a procedure call and executes everything in the procedure,
but does not show you the detailed execution steps.
● Ctrl+Shift+F8 Indicates that you have examined the procedure in enough detail
and want to complete the execution of this current procedure, but stops once you have returned to the calling code.
● Ctrl+F8 or right-clicking and selecting Run To Cursor Process all the lines until
you reach the current position of the cursor.
● Locate a line, right click, and then select Set Next Statement.
It is important to remember that when you press either Shift+F8 or Ctrl+Shift+F8, both operations cause any code to execute. If you do not want the code to execute, then locate the next line that you do want to execute, and then use Set Next Statement to change the execution point.
For the purposes of this example, keep pressing the F8 key until you arrive at the point shown in Figure 1-43.
Ch
ap
te
r 1
Figure 1-43 Pressing F8 repeatedly brings you to this point in the code. Notice the displayed value for the variable.
The bug in this code occurs because of a space in a name. The position of the space could be represented by a value of lngPosSpace 6, yet the code states that when lngPosSpace <> 0, we have found the entire name. So the logical test is the wrong way around. The fol-lowing line needs to be changed from:
If lngPosSpace <> 0 Then
to:
If lngPosSpace = 0 Then
The problem with the code in Figure 1-43 is that it has branched into the wrong part of the processing. You would have expected the code to branch into the statements after the Else keyword. The mistake here is in testing for <> when you should be testing for =. You need to now fix the code.
Ch
ap
te
r 1
Breakpointing Code 29
Figure 1-44 After changing the <> operator to =, right-click the mouse over the line where you changed the code and select Set Next Statement to go back and repeat executing the step from the code line that has now been corrected.
As before, press F8 to follow the code execution (you will also need to fix a similar coding error in the procedure modUtilites_GetSurname). Figure 1-45 shows how the code execu-tion point has branched to the correct point to extract the first name.
Figure 1-45 This time, pressing F8 to step through the code takes the program to the correct processing statements.
There are a number of ways to see the result of evaluating an expression. The easiest method is to hover the mouse pointer over the expression, but you can also paste a code fragment into the Immediate window and see the result before executing the line of code (this is useful when you want to see the values for different parts of a complex expression).
Displaying Variables in the Locals Window
Ch
ap
te
r 1
Figure 1-46 You can use the Locals window to both display and change values in variables. In either the Locals window or the Immediate window, you can directly edit the values in variables, as shown by the highlighted value in Figure 1-47.
Figure 1-47 Variables can also be assigned values in the Immediate Window.
Tracing Procedures with the Call Stack
The Call Stack shows you where you are once your code has moved through several layers of execution (see Figure 1-48). You can also use it to move to any of the procedures shown by just clicking on the procedure itself in the Call Stack dialog box and then pressing the Show button.
Ch
ap
te
r 1
Breakpointing Code 31
In Figure 1-48, the top line in the Call Stack dialog box shows the current routine that is executing. Below that is the succession of routines that were called to take the execution to its current point. Double-click any routine in the call stack to display that routine’s code (note that the execution point remains unchanged if you do this).
Watching Variables and Expressions
The Watches window is particularly useful for monitoring values as you iterate in a loop. With the Watches window displayed, you can right-click and add an expression or variable to be monitored. Figure 1-49 shows the shortcut menu to add a Watch variable.
Figure 1-49 The Watches window is particularly useful when debugging repeating loops in code.
INSIDE OUT
Investigating values in variables with complex structuresCh
ap
te
r 1
Figure 1-50 A Recordset variable is an object variable; rather than holding a single value, it has a more complex structure, shown here being added to the Watches window.
Figure 1-51 demonstrates how more complex variables can be directly edited in the Watches window . You might find this easier than changing values in the Immediate window .
Figure 1-51 The values for watched variables can be directly edited.
The ability to drill up and down into more complex structures is also a feature shared by the Locals window .
Adding Conditional Watch Expressions
Ch
ap
te
r 1
Breakpointing Code 33
Figure 1-52 Adding a Watch expression to break the execution of the code.
One last word regarding the Watches window: be aware that the settings are not perma-nent. They are cleared once you exit the application.
Working with the Immediate Window
The Immediate window is a scratch pad for performing calculations as well as a powerful tool to display and modify properties of tables, queries, and forms as they are executing. Figure 1-53 presents some examples that you should try typing into the Immediate win-dow. Type a question mark beside the item that you want to calculate, and then press Enter.
Ch
ap
te
r 1
Figure 1-53 The Immediate window is a combination scratch pad and a tool to display and modify properties of tables, queries, and forms.
Changing Code On-the-Fly
Throughout this chapter, you have seen how to change your program code while it is exe-cuting, and you might wonder if there are limitations on doing this? The answer is yes, but it doesn’t often get in the way of your development.
In the example shown in Figure 1-54, we have defined a new variable while the code is executing.
Figure 1-54 The new variable ‘i’ has been added while code is executing.
If you try deleting (or changing) variables while the code is executing, you will be presented with a warning that this will cause the code to stop executing (you might decide to add a comment after the variable to remind yourself to delete it later when the code is no longer executing).
Ch
ap
te
r 1
Using the Object Browser and Help System 35
Figure 1-55 A warning appears if you attempt to delete variables while the code is executing.
Using the Object Browser and Help System
In this section, you will look at how you can configure the behavior of the Help system and the use of the Object Browser as an alternative method for locating help on objects.
Configuring the Help System
VBA has an excellent Help system. To use it, simply click a word that you do not under-stand, and then press F1. However, it's best to have the Help system set to work with Show Content Only From This Computer; otherwise, many of the help topics might not easily locate help for a particular keyword, function, or method. Figure 1-56 shows this setting being changed at the bottom of the figure.
Figure 1-56 With the Help screen open, setting the Help system to Show Content Only From This Computer can offer better identification of keywords.
Ch
ap
te
r 1
Figure 1-57 Press F1 when you have the cursor on a VBA keyword to locate the keyword in the VBA Help system.
Working with the Object Browser
As you move into more advanced programming (as well as progress through this book), you will see that when you work with objects outside of the Office suite, getting help by pressing F1 will not always display the help information for the object. In this case, you can use the Object Browser (Figure 1-58) either by using the toolbar or pressing the F2 key. Later in this book, we add references to other libraries (for example Microsoft Excel). Help is then also available on these external libraries through the object browser.
Figure 1-58 You can use the object browser to locate objects and help on your project code and the built-in features in Access.
Ch
ap
te
r 1
Summary 37
Figure 1-59 When you have located an item in the object browser, press F1 to display the help file that describes the object.
Summary
The VBA Editor and debugging environment in Access offers many useful features to assist you and enhance your productivity in developing applications. Among these features are:
● VBA allows you to significantly modify program code while it is executing. The
fea-tures for stepping backwards and forwards through the code while it is paused per-mits you to very quickly isolate logic errors in your code and rectify them. There are minor restrictions on the changes that you can make to the code without the need to restart the code.
● The ability to have both code executing and being able to redesign associated
objects such as queries and forms (other than the form that is currently executing the code) is another useful productivity feature.
● The Immediate window is one of the most productive features of the VBA
environ-ment. With it, you can test and modify properties of the executing form while the form is executing code.
● The search features that allow you to locate code either by pressing Shift+F2 on an
executing procedure or Ctrl+F for general searching. Again, these tools offer unique productivity.
Ch
ap
te
r 1
Mixed Versions of Access
Since Access 2007, you might experience problems if you are developing with multiple ver-sions of the Office products on a single computer. This is because different verver-sions of the product require different core libraries to be loaded when switching between the versions. Although it is possible to develop with multiple versions on a single computer, it is not rec-ommended, and we would suggest that for all versions prior to Access 2007, you can use a single computer, but for versions including and after Access 2007, you should consider hav-ing separate virtual or physical computers. There is a switch over feature to support differ-ent versions on a single computer, but you might find that either it takes an unacceptable amount of time to switch or you easily become vulnerable to any issues if library references are not correctly switched over.
Expression Builder
The Expression Builder is an indispensible tool when building applications to find the cor-rect syntax when referring to controls on a form. Unfortunately, the VBA environment does not have an Expression Builder option. The easiest way to get around this problem is to go into the Query design tool, create a dummy query, and then go to the Criteria and right-click, selecting Build, which will bring up the Expression Builder (Chapter 4, “Applying the Access Object Model,” discusses this in more detail).
Object Browser
When using 32-bit Microsoft ActiveX controls in a 64-bit operating system, the controls might appear to work well, but there appear to be problems that cause Access to crash when using the Object Browser to display the associated help information.
Debugging Modal Forms
ChAPTER 2
Understanding the VBA Language
Structure
VBA Language Settings . . . .40
Working with Constants and Variables . . . .49
Functions and Procedures . . . .66
Control Statements and Program Flow . . . .77
T
he popularity of Microsoft VBA as a programming language comes from the sim-plicity and productivity that the language offers. You will easily pick up the general principles and syntax of VBA; the more complex part of programming is in under-standing the use of the language to control how your code interacts with other objects, such as tables, queries, forms, and reports that make up your application.With Microsoft Access/VBA, you can often solve a problem by using several different tech-niques. It is this flexibility that is so valuable when you have a difficult problem that you cannot easily solve by using one method; you can often take an alternative approach to solving the problem. Deciding on the best approach to solving a problem can be challeng-ing, and as you gain experience with the language, you will find your own preferred meth-ods for solving different types of problems.
Chapter 1, “Using the VBA Editor and Debugging Code,” focused on familiarizing you with the programming environment. In this chapter, you’re going to look at a large number of VBA code examples that take you through the structure of the language. If you are new to VBA, you should review this chapter in conjunction with Chapter 1 to strengthen your understanding of both the language and environment.
After reading this chapter, you will:
● Have an overview of all the key language features and know where to refer back to
when you need help with syntax.
● Understand how application code is structured and how you should plan to organize
and develop your own code.
● Feel confident in writing program code and following the code written by other
Ch
ap
te
r 2
Note
As you read through this chapter, we encourage you to also use the companion content sample database, VBAExamples .accdb, which can be downloaded from the book’s cata-log page .
VBA Language Settings
In this section, we discuss the different settings in the VBA environment that affect how the language operates. You can customize how the VBA Editor behaves as you write code by making adjustments in the Options dialog box. There are also some options that have a more subtle impact on your development. To access the Options dialog box, click Tools | Options, as shown in Figure 2-1.
Figure 2-1 VBA Editor Options are available from the Tools menu.
From the perspective of writing code, one option that some developers choose to switch off is Auto Syntax Check.With this option enabled, the VBA Editor monitors the syntax of your code as you type. When it detects an error, it displays a warning message box. Some developers find that this slows them down, thus they switch off the option. But even when this option is disabled, syntax errors are still highlighted in colored code; only the message boxes are not shown. We would recommend that when starting out you leave this option active and later evaluate whether it helps or hinders your entering code.