by Margaret Levine Young, David Kay,
and Richard Wagner
FOR
FOR
by Margaret Levine Young, David Kay,
and Richard Wagner
FOR
Hoboken, NJ 07030-5774
Copyright © 2004 by Wiley Publishing, Inc., Indianapolis, Indiana Published by Wiley Publishing, Inc., Indianapolis, Indiana Published simultaneously in Canada
No part of this publication may be reproduced, stored in a retrieval system or transmitted in any form or by any means, electronic, mechanical, photocopying, recording, scanning or otherwise, except as permitted under Sections 107 or 108 of the 1976 United States Copyright Act, without either the prior written permis-sion of the Publisher, or authorization through payment of the appropriate per-copy fee to the Copyright Clearance Center, 222 Rosewood Drive, Danvers, MA 01923, (978) 750-8400, fax (978) 646-8600. Requests to the Publisher for permission should be addressed to the Legal Department, Wiley Publishing, Inc., 10475 Crosspoint Blvd., Indianapolis, IN 46256, (317) 572-3447, fax (317) 572-4355, e-mail: [email protected].
Trademarks:Wiley, the Wiley Publishing logo, For Dummies, the Dummies Man logo, A Reference for the Rest of Us!, The Dummies Way, Dummies Daily, The Fun and Easy Way, Dummies.com, and related trade dress are trademarks or registered trademarks of John Wiley & Sons, Inc. and/or its affiliates in the United States and other countries, and may not be used without written permission. WordPerfect is a registered trademark of Corel Corporation and/or its subsidiaries in Canada, the United States and/or other coun-tries. All other trademarks are the property of their respective owners. Wiley Publishing, Inc., is not asso-ciated with any product or vendor mentioned in this book.
LIMIT OF LIABILITY/DISCLAIMER OF WARRANTY: THE PUBLISHER AND THE AUTHOR MAKE NO REP-RESENTATIONS OR WARRANTIES WITH RESPECT TO THE ACCURACY OR COMPLETENESS OF THE CON-TENTS OF THIS WORK AND SPECIFICALLY DISCLAIM ALL WARRANTIES, INCLUDING WITHOUT LIMITATION WARRANTIES OF FITNESS FOR A PARTICULAR PURPOSE. NO WARRANTY MAY BE CRE-ATED OR EXTENDED BY SALES OR PROMOTIONAL MATERIALS. THE ADVICE AND STRATEGIES CON-TAINED HEREIN MAY NOT BE SUITABLE FOR EVERY SITUATION. THIS WORK IS SOLD WITH THE UNDERSTANDING THAT THE PUBLISHER IS NOT ENGAGED IN RENDERING LEGAL, ACCOUNTING, OR OTHER PROFESSIONAL SERVICES. IF PROFESSIONAL ASSISTANCE IS REQUIRED, THE SERVICES OF A COMPETENT PROFESSIONAL PERSON SHOULD BE SOUGHT. NEITHER THE PUBLISHER NOR THE AUTHOR SHALL BE LIABLE FOR DAMAGES ARISING HEREFROM. THE FACT THAT AN ORGANIZATION OR WEBSITE IS REFERRED TO IN THIS WORK AS A CITATION AND/OR A POTENTIAL SOURCE OF FUR-THER INFORMATION DOES NOT MEAN THAT THE AUTHOR OR THE PUBLISHER ENDORSES THE INFOR-MATION THE ORGANIZATION OR WEBSITE MAY PROVIDE OR RECOMMENDATIONS IT MAY MAKE. FURTHER, READERS SHOULD BE AWARE THAT INTERNET WEBSITES LISTED IN THIS WORK MAY HAVE CHANGED OR DISAPPEARED BETWEEN WHEN THIS WORK WAS WRITTEN AND WHEN IT IS READ.
For general information on our other products and services or to obtain technical support, please contact our Customer Care Department within the U.S. at 800-762-2974, outside the U.S. at 317-572-3993, or fax 317-572-4002.
Wiley also publishes its books in a variety of electronic formats. Some content that appears in print may not be available in electronic books.
Library of Congress Control Number: 2004110663 ISBN: 0-7645-7808-1
Manufactured in the United States of America 10 9 8 7 6 5 4 3 2 1
In high school, Margaret Levine Youngwas in a computer club before there were high school computer clubs. She stayed in the field throughout college, graduated from Yale, and went on to become one of the first PC managers in the early 1980s at Columbia Pictures, where she rode the elevator with big stars whose names she wouldn't dream of dropping here.
Since then, Margy has co-authored more than 25 computer books about the topics of the Internet, UNIX, WordPerfect, Microsoft Access, and (stab from the past) PC-File and Javelin, including Access 2003 All-in-One Desk Reference For Dummies, Dummies 101: The Internet For Windows 98, UNIX For Dummies, and WordPerfect for Linux For Dummies(all published by Wiley Publishing, Inc.), Poor Richard's Building Online Communities(published by Top Floor Publishing), and Windows XP: The Complete Reference and Internet: The Complete Reference(published by Osborne/McGraw-Hill). Aside from explain-ing computers to anyone who will listen, her other passion is her children, along with music, Unitarian Universalism (www.uua.org), reading, and any-thing to do with eating. She lives in Vermont (see www.gurus.com/margy for some scenery).
David C. Kayis a writer, engineer, artist, and naturalist, combining disparate occupations with the same effectiveness as his favorite business establish-ment, Acton Muffler, Brake, and Ice Cream (now defunct). Dave has written or contributed to more than a dozen computer books, including various editions of WordPerfect 11 For Dummies, Graphics File Formats,and The Complete Reference, Millennium Edition.
Besides writing computer books, Dave consults and writes for high-tech firms, and also teaches about wildlife and edible plants. For recreation, he paints theatrical sets, makes strange blobs from molten glass, sings Gilbert and Sullivan choruses in public, and hikes in whatever mountains he can get to. He longs for the Rocky Mountains of Canada, pines for the fjords of New Zealand, and dreams of tracking kiwis and hedgehogs in Wanaka. He feels silly writing about himself in the third person like this and will stop now.
I dedicate this book to Kimberly and the entire team at Jeta Workshop.
Acknowledgments
Some of the people who helped bring this book to market include the following:
Acquisitions, Editorial, and Media Development
Project Editor:Susan Pink
Acquisitions Editor:Tiffany Franklin
Technical Editor:Lee Musick
Editorial Manager:Carol Sheehan
Media Development Supervisor:
Richard Graves
Editorial Assistant:Amanda Foxworth
Cartoons:Rich Tennant (www.the5thwave.com)
Production
Project Coordinator: Adrienne Martinez, Maridee Ennis
Layout and Graphics: Lauren Goddard, Denny Hager, Joyce Haughey, Michael Kruzil, Melanee Prendergast
Proofreaders: John Greenough, Carl Pierce, TECHBOOKS Production Services
Indexer: TECHBOOKS Production Services
Publishing and Editorial for Technology Dummies
Richard Swadley,Vice President and Executive Group Publisher
Andy Cummings,Vice President and Publisher
Mary Bednarek,Executive Acquisitions Director
Mary C. Corder,Editorial Director
Publishing for Consumer Dummies
Diane Graves Steele,Vice President and Publisher
Joyce Pepple,Acquisitions Director
Composition Services
Gerry Fahey,Vice President of Production Services
Introduction ...1
Part I: Exploring the Essentials ...7
Chapter 1: WordPerfect Basics: Out of the Box and Raring to Go ...9
Chapter 2: Cruising Your Document ...23
Chapter 3: Discovering “Perfect” Text Editing ...43
Chapter 4: Working with the Spelling and Grammar Tools ...65
Chapter 5: On Paper at Last — Printing Stuff ...79
Part II: Formatting Your Text ... 95
Chapter 6: Giving Your Documents Character ...97
Chapter 7: Sensational Sentences and Pretty Paragraphs ...111
Chapter 8: Perfect Pages and Dashing Documents ...139
Chapter 9: Documents with Style ...161
Part III: Making Your Documents Come Alive ...181
Chapter 10: Formatting Beyond the Text ...183
Chapter 11: Saying It with Pictures ...211
Chapter 12: Working with Templates and OfficeReady ...229
Part IV: All the World’s a Page: Going Beyond
Your Desktop...253
Chapter 13: Publishing for the Web ...255
Chapter 14: Using WordPerfect in a Microsoft Office World ...267
Chapter 15: Mail Merge: Printing to the Masses ...273
Part V: More Stuff You Can Do with Your
Documents ...289
Chapter 16: Managing Your Documents ...291
Chapter 17: Reveal Codes: Getting Ultimate Control Over Your Document ...301
Part VI: The Part of Tens ...319
Chapter 18: Ten Ways to Tweak WordPerfect ...321
Chapter 19: Ten Really Good Editing Suggestions ...337
Introduction...1
How to Use This Book ...1
Conventions Used in This Book ...1
Foolish Assumptions ...2
How This Book Is Organized ...2
Part I: Exploring the Essentials ...3
Part II: Formatting Your Text ...3
Part III: Making Your Documents Come Alive ...3
Part IV: All The World’s a Page: Going Beyond Your Desktop ...3
Part V: More Stuff You Can Do with Your Documents ...4
Part VI: The Part of Tens ...4
Icons Used in This Book ...4
Where to Go from Here ...5
Part I: Exploring the Essentials ...7
Chapter 1: WordPerfect Basics: Out of the Box and Raring to Go . . . .9
Starting WordPerfect ...10
A Perfectly Good Window ...10
Typing Something ...12
Wrapping Your Text for You ...13
Saving Documents ...13
Saving a document for the first time ...14
Saving a file for the second time ...15
Saving a document the third, fourth, and fifth times ...16
Filename rules ...16
Opening and Editing Files ...17
Printing Your Document ...18
Leaving WordPerfect ...19
Getting Some Help ...19
Using the Help menu ...20
Getting context-sensitive help ...21
Asking PerfectExpert ...21
Chapter 2: Cruising Your Document . . . .23
Telling WordPerfect What to Do ...24
Choosing commands from menus ...24
Avoiding toil by using toolbars ...27
Using dialog boxes ...31
Controlling Your Document with the Ruler ...32
Navigating Your Document ...33
Mousing around ...34
Using the keyboard: Staying close to home ...38
Going anywhere and getting back again ...40
Chapter 3: Discovering “Perfect” Text Editing . . . .43
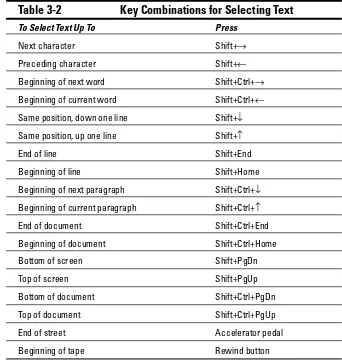
Selecting Text: The Point-and-zShoot Approach ...44
Using the Mouse to Select Words, Sentences, and More ...46
The QuickMenu approach ...48
The Menu bar approach ...48
Selecting Text with the Keyboard ...49
Extending Selections ...50
Doing Stuff with Selected Text ...51
Copying and pasting with the Clipboard ...51
Cutting and pasting with the Clipboard ...53
Copying and moving text with your mouse ...53
Deleting text ...54
Using Insert and Typeover modes ...55
Just (Un)Do It ...56
Using Undo and Redo effectively ...57
Tweaking the way Undo behaves ...57
The Search for Sanity — Finding Text in a Document ...58
Changing the way you search ...59
Searching for sanity and finding insanity ...60
Getting picky about what you find ...60
Finding and Replacing Text ...61
Find and replace tips ...62
Finding and replacing all forms of a word ...63
Chapter 4: Working with the Spelling and Grammar Tools . . . .65
Proofreading as You Type ...66
Spell-As-You-Go makes you see red ...66
Grammar-As-You-Go says that you blue it! ...67
Turning on and off Spell- and Grammar-As-You-Go ...67
Prompt-As-You-Go suggests perfect words ...68
QuickCorrect changes your words even as you type them ...68
Flying Spell Checker Yourself ...70
Dealing with Real Words that WordPerfect Doesn’t Know ...73
Adding words to WordPerfect’s vocabulary ...73
Correcting and customizing WordPerfect’s vocabulary ...73
Dealing with Grammatik ...74
Taming the Roar of the Mighty Thesaurus ...75
Chapter 5: On Paper at Last — Printing Stuff . . . .79
Ready to Print? ...79
Printing an Entire Document ...81
Printing Part of a Document ...83
Printing selected text ...84
Printing a specific page ...84
Printing several pages ...84
Printing random pages ...85
Other Cool Ways to Print ...86
Printing on both sides ...86
Printing several copies ...88
Printing enlarged or reduced documents ...89
Printing a Document from Disk ...90
Printing Several Documents ...91
Canceling a Print Job ...92
WordPerfect, stop printing! ...93
Windows, stop printing! ...93
Part II: Formatting Your Text ...95
Chapter 6: Giving Your Documents Character . . . .97
Adding Emphasis ...97
Typing and formatting at the same time ...98
Getting a clue from the property bar ...98
Changing the formatting of selected text ...99
The Amazing Shrinking (or Expanding) Text ...100
Fontificating about Typefaces ...101
Changing the font for a selection of text ...102
Choose a font for the rest of the document ...103
Embedding fonts in your document ...104
Character Formatting Central ...104
Hot properties in the Font Properties dialog box ...105
Formatting an entire document ...107
Changing the default font for your documents ...107
Copying Character Formatting ...108
Linking and Unlinking Formatting ...109
Changing Capitalization ...109
Chapter 7: Sensational Sentences and Pretty Paragraphs . . . .111
The Ruler (Kinda Sorta) Rules ...112
What are all those doodads on the ruler? ...113
Marginal Improvements ...114
Dragging the margin lines ...115
Using the Margins dialog box ...116
Changing margins for the rest of the document ...118
Indenting paragraphs ...120
How We Justify Things ...121
Our five favorite justifications ...121
Justifications for text: Left, center, right, and their friends ...122
Justification for skipping Center and Flush Right ...123
Using Hyphens to Hack Words in Half ...124
Pulling Out the (Tab) Stops and Other Tab Tricks ...126
Setting your tab stops where you want them ...126
Slithering tab stops across the ruler ...128
Removing unwanted tab stops ...129
Setting new tab stops ...129
To Tab or Not to Tab? ...130
Indenting the first line of every paragraph ...130
Words of wisdom on tabs ...131
Tabbing yourself in the back ...132
Single Space, Double Space, Any Space ...133
Changing the Spacing between Paragraphs ...134
Beyond the List Horizon ...135
Adding bullets to existing paragraphs ...135
Creating a new bulleted list ...135
Using an arrow, block, or smiley for a bullet ...136
Creating multiple levels of bullets ...137
Numbering an existing set of paragraphs ...138
Creating a new numbered list ...138
Chapter 8: Perfect Pages and Dashing Documents . . . .139
Setting the Page Size ...139
Adjusting the Top and Bottom Margins ...141
Starting a New Page ...142
Keeping Text Together ...143
Avoiding broken homes (widows and orphans) ...143
Keeping your text together ...144
Keeping your head together ...145
Centering a Page, Top to Bottom ...146
Looking at Different Views of Your Document ...147
Numbering Pages ...148
For all you roman numeral fans ...149
Starting over again at 1 ...150
Adding Heads and Feets ...151
Making a header or footer ...151
Controlling where headers and footers print ...154
Don’t print it here! ...155
Discontinuing headers and footers ...156
Getting rid of a header or footer ...156
Splish, Splash . . . Adding a Watermark to Your Document ...156
Adding and editing a watermark ...157
Tweaking your watermark settings ...158
Restricting or removing your watermark ...159
The Big Squeeze: Using Make It Fit to Tweak Your Document’s Length ...159
Chapter 9: Documents with Style . . . .161
Direct Formatting: Natural but Highly Inefficient ...162
Using Styles to Get Consistent Document Appearance ...163
Understanding the Types of Styles ...164
Creating Styles with QuickStyle ...164
Creating a character style using QuickStyle ...164
Creating a paragraph style using QuickStyle ...166
Applying Styles ...166
Understanding Built-In Styles ...169
Heading styles ...169
DocumentStyle ...169
More built-in styles ...170
Exploring the Styles Dialog Box ...170
Creating and Modifying Styles ...171
Creating a style from scratch ...173
Modifying styles ...175
Creating and applying a document style ...175
Turning Off Styles ...176
Reusing Styles ...177
Copying styles from an existing document ...177
Adding styles to the default WordPerfect template ...178
Saving styles in a separate file ...179
Getting Rid of Styles ...180
Part III: Making Your Documents Come Alive ...181
Chapter 10: Formatting Beyond the Text . . . .183
Adding Borders and Backgrounds ...184
Basic borders ...184
Phil . . . for all that white space behind your text ...186
Dividing Text into Columns ...187
Adding columns with just two mouse clicks ...188
Adding columns with precision ...189
Turning off the Columns function ...190
Bad breaks and what to do about them ...191
Presenting Text in Tables ...192
Making tables with Table QuickCreate ...192
Adding rows and columns ...193
Deleting tables, rows, and columns ...194
Changing column width ...195
Formatting with SpeedFormat ...196
Dealing with incredibly complex spreadsheet-like tables ...198
Corralling Text in Text Boxes ...201
Selecting your box ...202
Moving a box to more or less where you want it ...202
Making a box more or less the right size ...203
Changing everything else about a box ...203
The Graphics drop-down menu ...204
Moving a box exactly where you want it ...204
Making a box exactly the right size ...206
Adding captions to your boxes ...207
Text wrapping ...207
Drawing Lines and Arrows in Your Document ...209
Chapter 11: Saying It with Pictures . . . .211
Working with Graphics ...211
Inserting some of Corel’s clipart into your document ...213
Selecting clipart from the Internet ...215
Inserting a picture from somewhere else into your document ....215
Creating Your Own Graphics ...216
Drawing a line in a document ...217
Being careful where you click ...217
Whipping shapes into your drawings ...220
Putting text in your drawings ...222
TextArt?! Text by Artists ...223
Using Graphs and Charts ...225
Chapter 12: Working with Templates and OfficeReady . . . .229
What Are Templates? ...229
Using Templates ...230
Creating Your Own Templates ...232
Creating a normal template ...232
Creating a pseudo template ...233
Creating Letters ...233
Getting WordPerfect to write your letter for you ...233
Skipping space for the letterhead on stationery ...236
Dating your letter and numbering the pages ...237
Saving your letter as a prototype document ...237
Creating Envelopes ...238
Printing the address on the envelope ...238
Creating Mailing Labels ...240
Printing addresses on mailing labels ...240
Selecting which labels to print ...242
Tips for printing labels ...242
Creating Half-Sized Booklets ...242
Creating a booklet document ...243
Printing your booklet — the magic part ...244
Working with Master Documents ...244
Master documents and subdocuments ...245
Expanding the master document ...246
Saving a master document ...246
Editing a master document ...247
Creating a Table of Contents ...248
Using WordPerfect OfficeReady Templates ...250
Part IV: All the World’s a Page: Going
Beyond Your Desktop ...253
Chapter 13: Publishing for the Web . . . .255
Creating Hyperlinks and Bookmarks ...256
Creating a bookmark — a place you jump to ...256
Creating a hyperlink — a way to jump somewhere ...257
Using the Hyperlink property bar ...259
Publishing Your Documents as Web Pages ...261
Previewing your document in a browser ...262
Stuff you can do in WordPerfect that you can’t do on a Web page ...263
Stuff that WordPerfect and Web pages do differently ...263
Publishing in Adobe Acrobat (PDF) Format ...264
Chapter 14: Using WordPerfect in a Microsoft Office World . . . .267
Sharing Microsoft Word Documents ...267
Opening Microsoft Word documents ...268
Preserving Microsoft Word format when you save documents ...268
Problems moving between WordPerfect and Microsoft Word ...269
Using Microsoft Outlook Contacts in WordPerfect ...271
Making WordPerfect Look (Kinda) Like Microsoft Word ...271
Chapter 15: Mail Merge: Printing to the Masses . . . .273
Exploring the Everyday Uses of Merge ...273
How Does Document Merge Work? ...274
Creating a WordPerfect Data File ...275
Making the data file ...276
Entering your data ...278
Viewing tasteful data files ...279
Viewing ugly data files ...279
Making corrections ...280
Creating a Form Document ...281
Merging and Printing Your Files ...285
Printing Your Data File ...288
Part V: More Stuff You Can Do with
Your Documents ...289
Chapter 16: Managing Your Documents . . . .291
Working on Two Documents at the Same Time ...292
Switching between open documents ...292
Working with multiple documents ...292
Maxing out ...294
Closing the curtains ...294
Combining Documents ...294
Inserting one document into another one ...295
Saving a chunk of text as a separate document ...295
Finding a File with a Forgotten Name ...296
File Management, the WordPerfect Way ...298
Creating a folder ...298
Moving a file ...298
Copying a file ...299
Deleting a file ...300
Chapter 17: Reveal Codes: Getting Ultimate Control
Over Your Document . . . .301
What Are Reveal Codes? ...302
Uncovering Reveal Codes ...303
Exploring the Reveal Codes window ...304
Adjusting the size of the window ...305
Cracking the Codes ...305 Looking at codes ...306 Modifying codes ...306 Deleting codes ...306 Understanding the Open Style code ...307 Working with Character Codes ...307 Removing and Editing Character Formatting Codes ...308 Removing character formatting ...309 Editing formatted text ...309 Removing Sentence and Paragraph Formatting ...309 Removing Page and Document Formatting ...310 Finding Codes ...311 Finding all codes of one type ...312 Finding specific codes ...314 Knowing what to do after you find your code ...315 Replacing Codes Automatically ...315 Replacing specific codes with other codes ...316 Replacing codes with other codes ...317 Deleting all the codes ...318 Dealing with mysterious codes ...318
Part VI: The Part of Tens ...319
Chapter 18: Ten Ways to Tweak WordPerfect . . . .321
Changing Workspaces ...322 Setting Your Favorite Font ...324 Tweaking Your WordPerfect Settings ...324 Choosing Which Hidden Symbols Appear and Other
Display Settings ...326 Telling WordPerfect about Folders and Backups ...327 More Useful Environment Settings ...329 Picking up where you left off ...330 Selecting less than an entire word ...331 Customizing Toolbars and Property Bars ...331 Moving and Morphing Toolbars ...333 Assigning Different Meanings to Keys ...334 Reading and Recording Information about Your Documents ...335
Chapter 19: Ten Really Good Editing Suggestions . . . .337
Don’t Number Your Pages Manually ...339 Backing Out of Edit➪Find and Replace ...339 Make Frequent Timed Backups ...340 Save Early and Often ...340 Save Periodic Versions of Your Document ...341 Create a Halfway House for Semi-Abandoned Text ...341 Back Up Your Work ...341
I
f you thought that the purpose of word processing was to write, not to do amazing things on a computer . . . If you ever secretly wondered who in the world actually uses allthose features advertised on the box your software came in . . . If you’d rather create nice-looking, readable documents, not try to use every possible feature in WordPerfect in 90 seconds flat . . . If you’re smart enough to say, “Call me what you will — I just want to get some work done, please!” . . . Congratulations — you’ve come to the right place.How to Use This Book
This book is a reference book, so when some feature in WordPerfect has you tying knots in your mouse cord, you can just look up what you want in the table of contents or the index.
If your brow is already furrowed from merely looking at the pictures of Word-Perfect on the box, check out the early chapters first. These chapters are writ-ten for beginners; they speak of mice and menus and similar basics. They help you get used to the what, why, and how of giving commands to WordPerfect. After you understand the basics, though, you don’t have to read the chapters in any sequence.
Conventions Used in This Book
We try to avoid conventions (too many long lines to the restroom). Mostly, you find full, robust sentences, not cryptic abbreviations or other so-called conventions. On the other hand, if we always used instructions such as
Move the mouse so that the mouse pointer covers the word Edit on the menu bar and then press the left mouse button. A menu appears, contain-ing the word Cut. Move the mouse so that the mouse pointer covers the word Cut. . .
We also use a few other conventions to make things more readable. When we want you to type something, it appears in bold type. Internet addresses look like this. When we suggest pressing two keys at the same time, such as the Ctrl key and the C key, we use a plus sign, like this: Ctrl+C.
Foolish Assumptions
This section explains what we assume about you, our esteemed (and, thanks to the joy of software, occasionally steamed) reader:
⻬You use a PC with Windows and WordPerfect Office 12 installed.
⻬You want to create text documents that look nice.
⻬You know some basics of working in Microsoft Windows, probably enough to at least browse the Web or check your e-mail.
⻬If you’re lucky, you have a guru available — an expert, like one of those infuriatingly clever 10-year-olds born with a computer cable for an umbilical cord — for the really tough stuff.
⻬You have a typical installation of WordPerfect Office 12. WordPerfect is accommodating almost to a fault and lets itself be twisted and restruc-tured like a ball of Silly Putty. If buttons and things on your screen don’t look like the buttons in the figures in this book or if your keyboard doesn’t work as this book describes, be suspicious that someone got clever and changed things. The differences might be small enough that you can figure out what to do anyway. If not, go find the person who changed things and ask for help.
Although we assume that lucky readers have a computer guru at their dis-posal, we also know that gurus can be hard to coax down from the top of the mountain. So we teach you a few of the important guru-type tricks where it’s practical.
How This Book Is Organized
Part I: Exploring the Essentials
Part I gets you up and running by showing you how to use the essential fea-tures of WordPerfect. This part is the place to go for the basics of using menus and toolbars to navigate your document and control WordPerfect. You also explore how to create a document, edit it, check the spelling, and make it come out of your printer.
Part II: Formatting Your Text
A few holdouts from the 1960s probably still love to create documents that look like they were typed on an old manual typewriter — monospaced text with double-spaced paragraphs. But we suspect that you’ve probably moved into the 21st century and would like to create some snazzy-looking docu-ments that include fancy fonts, page numbers, and text styles. If so, check out Part II. It’s all there.
Part III: Making Your Documents
Come Alive
In this era of digital cameras, scanners, and ink jet printers, creating a docu-ment often involves more than just typing plain old text, no matter how nice the font looks. Part III enables you to “get with the program” as you discover how to make your documents come alive with pictures, tables, borders, and other types of cool formatting.
Part IV: All The World’s a Page:
Going Beyond Your Desktop
Part V: More Stuff You Can Do
with Your Documents
Nestled in WordPerfect are some nifty features that allow you to manage and work with multiple documents. Check out Part V to find out about these capabilities. What’s more, if you ever wanted to put on a trench coat and do some sleuthing, now’s your chance. This part also explores how to work with reveal codes, WordPerfect’s secret coding language behind your documents.
Part VI: The Part of Tens
In honor of the decimal system, the Ten Commandments, and the fact that humans have ten fingers, Part V is where we stick other useful stuff. We would have made this part an appendix, but appendixes have no fingers and . . . look, just check it out, okay?
Icons Used in This Book
Icons are pictures that are far more interesting than the actual words they represent. They also take up less space than words, which is why they’re used on computer screens in such blinding profusion.
This icon alerts you to the sort of stuff that appeals to people who secretly like software. It’s not required reading unless you’re trying to date a person like that (or are married to one).
This icon flags useful tips or shortcuts.
This icon suggests that we’re presenting something useful to remember so that you don’t wear out your book by looking it up all the time.
Where to Go from Here
If WordPerfect is installed on your computer, you may have already tried to do something in the program and are likely intrigued, perplexed, or annoyed. Flip to the section of the book that meets your present needs:
⻬If you’re just getting your feet wet with WordPerfect or Microsoft Windows, turn to Chapter 2.
⻬If you’re ready to dive into the basics of text editing, check out Chapter 3.
⻬If you’ve already created documents that you want to look great, see Chapters 6 through 9.
⻬If you just got a new digital camera and want to show off your pictures in your documents, check out Chapter 11.
⻬If you want to publish Web pages using WordPerfect, turn to Chapter 13.
WordPerfect Basics:
Out of the Box and
Raring to Go
In This Chapter
䊳Starting WordPerfect䊳Looking at the WordPerfect window
䊳Typing your text
䊳Naming, editing, and printing files
䊳Leaving WordPerfect
䊳Switching to other Windows programs
䊳Getting help
Starting WordPerfect
To begin using WordPerfect, you have to start the program. You don’t need to step on the clutch, but you do need to follow these steps:
1. Choose Start➪All Programs (or Start➪Programs if you’re using Windows ME).
A list of all the programs installed on your computer appears.
2. Choose WordPerfect Office 12.
Another list appears, showing all the programs that are part of WordPerfect Office 12.
3. Choose WordPerfect.
WordPerfect fires up, and the WordPerfect window appears. Or, if this is the first time you’ve run WordPerfect 12, a dialog box appears, asking you what mode you want to work in.
4. If you see a dialog box, asking what mode you want to work in, click the OK button to select WordPerfect mode.
WordPerfect 12 allows you to work in different modes. For now, just click OK to select WordPerfect mode. (See Chapter 18 for details on modes.) And if you’d prefer not to see this dialog box when you start
WordPerfect, uncheck the Show at startup box.
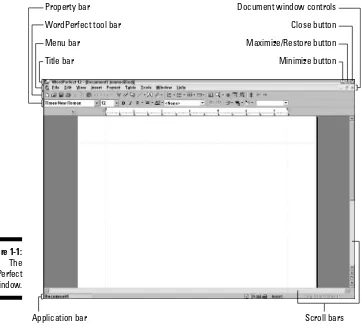
A Perfectly Good Window
After WordPerfect is running, you see the WordPerfect window, as shown in Figure 1-1. The wide expanse of white screen is a digital version of that plain old piece of white paper you can hold in your hand.
The following list describes in more detail what you see in Figure 1-1:
⻬Title bar:The title bar is at the top of the window, displaying the words WordPerfect 12 – [Document1 (unmodified)]. This line tells you the name of the document you’re editing (more about documents later) and reminds you that you are, in fact, running WordPerfect. The (unmodified)part tells you that you haven’t typed anything yet.
running when you minimize it. You can return the program to the way it was by clicking the WordPerfect 12 button on the taskbar.
⻬Maximize/Restore button:The middle button lets you switch back and forth between having WordPerfect fill the whole screen (maximized) and filling just a part of it. Click it once to maximizethe document. Click it again, and you restore WordPerfect to its original size. The button changes its name and appearance from Maximize to Restore.
⻬Close button: To put things simply, this button makes WordPerfect go away. It exits, disappears, terminates, goes poof! This button is useful, but it’s also kind of dangerous if you’re in the middle of working on a document. Not to fear, however, because WordPerfect asks you to save changes before going bye-bye. For more information, see the section called “Leaving WordPerfect,” later in this chapter.
⻬Document window controls:You can use these three buttons to do the same thing as the WordPerfect window controls, only for your docu-ment. Minimize, maximize (or restore), or close a docudocu-ment. We talk all about editing many documents at the same time in Chapter 16.
⻬Menu bar:The row of words just below the title bar is WordPerfect’s main menu bar. We talk more about commands in Chapter 2.
⻬WordPerfect 12 toolbar:Below the menu bar is a row of buttons that make up the WordPerfect 12 toolbar, which from here on we call, simply, “the toolbar.” The buttons usually have little pictures on them. Later in this chapter, we show you how to use some of these buttons to save and print a document.
⻬Property bar:The property bar has a bunch of controls that let you change how things look in your document. Whatever you’re doing in WordPerfect, the property bar changes to let you control all the charac-teristics, or properties, of what you’re working with. It’s pretty neat, actually.
⻬Application bar:The bottom line of the WordPerfect window shows you which documents you’re working with in WordPerfect (we discuss using multiple documents more in Chapter 16) and status information about what’s happening in WordPerfect right now. Several controls are also on the application bar, and we talk about them in Chapter 2.
Typing Something
As a word processor, WordPerfect is designed for assembling pieces of text into something meaningful. As a result, the task of typing all those letters, words, phrases, and sentences seems like a rather important part of using WordPerfect.
Whatever you type appears at the cursor’s location. You can use the mouse or the keyboard to move that cursor (as Chapter 2 explains). By default, you’re in insert mode,which means that whatever you type is inserted into the text. If your cursor is between two letters and you type a new letter, the new one is inserted between the two original letters.
Close button
Maximize/Restore button
Minimize button Document window controls
WordPerfect tool bar Property bar
Title bar Menu bar
Scroll bars Application bar
Figure 1-1:
To undo text you’ve just typed, click the Undo button on the toolbar. (The Undo button looks like a left arrow.) Or you can press Ctrl+Z, or click Edit on the menu bar and then click Undo. (See Chapter 2 for more details.) To fix an earlier mistake, first move the cursor to the text that you want to change. If you want to delete just a letter or two, you can move the cursor just after the letters and then press the Backspace key a couple of times to wipe them out. Or you can move the cursor right before the letters and press the Delete key. Same difference — the letters disappear. See Chapter 3 to find out how to delete larger amounts of text.
Wrapping Your Text for You
After you begin typing, you can go ahead and say what you have to say. But what happens when you get to the end of the line? Unlike a typewriter, WordPerfect doesn’t go “Ding!” to tell you that you’re about to type off the edge of the paper and get ink on the platen. Instead, WordPerfect (like all word processors) does something called word wrap.It figures out that you are almost at the right margin and moves down to the next line all by itself.
Not pressing the Enter key at the end of each line is important. WordPerfect, like all word processors, assumes that when you press Enter, you’re at the end of a paragraph. If you press Enter at the end of each line, you’ll have a hard time making formatting changes to your document later on.
If you change the margins later or use a different font, WordPerfect adjusts the formatting so that your paragraphs fit within the new margins.
If you want to split one paragraph into two, simply position your cursor just before the letter where you want the new paragraph to begin and press Enter. Voilà! WordPerfect moves the rest of the line down to a new line and refor-mats the rest of the paragraph to fit.
Saving Documents
Saving a document for the first time
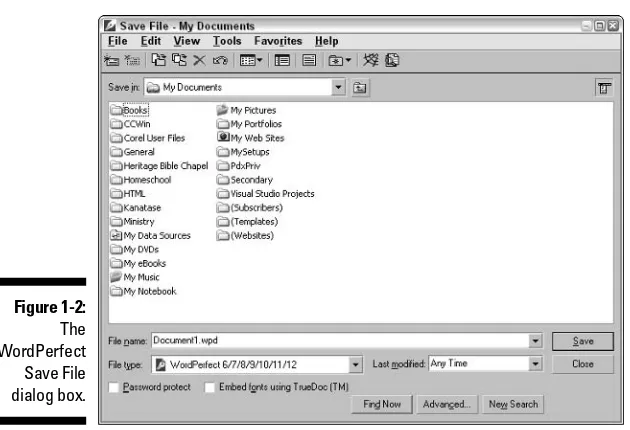
You can save a document in at least three ways. We’re sure that your insatiable curiosity will drive you to find out all three, but the following method is our favorite:
1. Click the Save button on the toolbar.
The toolbar is the row of little buttons just below the title bar. If you don’t like clicking tiny buttons, choose File➪Save. Or, if you love press-ing key combinations, press the Ctrl+S. The Save File dialog box appears, as shown in Figure 1-2. (Check out Chapter 2 to find out more than you ever wanted to know about working with dialog boxes.)
2. In the File Name box, type a name for the document.
When the Save File dialog box first appears, WordPerfect tries its best to supply a name for your document by putting the first line, sentence, or series of words into the File Name box, followed by a .wpdextension tacked on the end.
The text is highlighted so you can type a new name if you don’t like the one WordPerfect gave you. Feel free to name your document (almost) anything you want. (You don’t have to type the .wpdpart, although you may if you really, really want to.)
You can press the Esc key at any time to cancel saving the file.
Figure 1-2:
3. If you want, choose a different folder or disk drive for your docu-ment file:
• To save your document in some other folder in My Documents, double-click any folder shown in the dialog box.
• To create a new folder, choose File➪New➪Folder; type a name for the new folder that appears, and then press the Enter key.
• To save somewhere outside My Documents (or on another disk drive), click the down arrow next to My Documents. In the list that appears, click to choose any other folder or drive (such as A: for your floppy disk drive).
If you’ve used other Windows programs before, you might be surprised to see a menu bar in the Save File dialog box. Enjoy the added functionality — on the house!
4. Press the Enter key on your keyboard or click the Save button.
WordPerfect saves the document in the file that you chose. You can tell that this procedure worked because the document’s title bar changes from Document1to whatever you named your file.
Saving a file for the second time
If you make changes to a file after you’ve saved it, you need to save your changes. If you want to keep two versions of the document (the original and the revised version, for example), you can do that, too. What you can’t do is have two documents with the same name in the same folder; WordPerfect over-writes the old version of the file with the new version — after warning you.
When you try to save a file for a second time but you don’t change the name slightly, a Save As dialog box appears, telling you that the file already exists and asking whether you really want to replace it (irrevocably deleting the existing file in the process). You have two, count ’em, two options here:
⻬Yes, to replace the existing file
⻬No, to enter a different name for your new file
From there, saving the file is the same as described in the preceding section, “Saving a document for the first time.” Press the Esc key if you have second thoughts about saving the file. The dialog box disappears.
Saving a document the third,
fourth, and fifth times
When you want to save the contents of the document without renaming it, you can simply click the Save button. WordPerfect assumes you want the document saved with the same filename and folder as before.
WordPerfect automatically saves a backup of your document every ten min-utes. See Chapter 19 for details on how you can change the setting to another interval.
Filename rules
Whether you were the teacher’s pet or the rebel at the back of the class, you must follow certain rules for naming files in WordPerfect (and in other Windows programs for that matter). There’s no way around them. Here they are:
⻬Filenames can be as long as 255 characters. Try to rein it in, now!
⻬Most filenames contain a period (.). What follows the period is called an extension, is usually three letters, and usually describes the type of the file. WordPerfect documents use the extensions .wpd(which stands for word-processing document), .frm(which stands, obscurely, for mail merge forms, covered in Chapter 15), and .dat(mail merge data files, also in Chapter 15).
⻬You can omit the period and the extension if you want. (WordPerfect adds them by default.)
⻬Although you can use any extension you want for your document, we strongly recommend sticking with the standard .wpdextension. Windows looks at the extension to determine what kind of file it is and allows you to perform certain actions based on the file type. If you don’t use a stan-dard extension, Windows won’t know what to do with the document.
⻬You can use letters, numbers, spaces, and almost all punctuation in the name and extension. However, certain characters are no-no’s to use in the filename, including the following: \, /, :, *, ?, and <>|. If you try to use one of these characters, WordPerfect politely tells you about the problem and allows you to change the name.
Opening and Editing Files
Sometimes you make a brand-new document from scratch. But often, you want to edit a document that’s already stored on your computer. It may be a document that you made earlier and saved, a document created by someone else, or a love note left for you by a secret admirer. (Hmmm, secret admirers are getting more high-tech these days, aren’t they?) Whatever the document is, you can look at it in WordPerfect. This process is called opening,or load-ing,the document.
Here’s how to open a saved document:
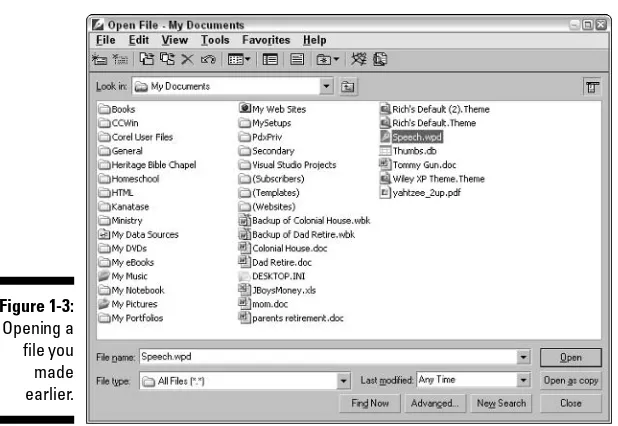
1. Click the Open button on the toolbar.
This button is the one with a tiny yellow folder on it — usually, the second button from the left. If you don’t like clicking little buttons, choose File➪Open, or press Ctrl+O.
WordPerfect displays the Open File dialog box, as shown in Figure 1-3. Displaying this dialog box is the program’s subtle way of saying that it wants to know which file you want to open. The Open File dialog box can show you the files in only one folder at a time; the name of the folder you’re currently looking in appears in the Look In box.
2. Choose a file from the list.
To choose a file, click a name in the list of displayed names. WordPerfect highlights the name by displaying it in another color to show that it knows the one you want.
Figure 1-3:
Can’t see your file? To look for it in any folder shown in the dialog box, double-click the folder. To look in other disk drives or folders on your PC, click the down arrow next to the Look In box. Double-click any folder or disk drive that appears. The place WordPerfect usually keeps its files is in your My Documents folder.
3. Click the Open button (or press the Enter key).
WordPerfect opens the file, reads the document, and displays it on-screen. Now you can make changes in the document, save it again, print it, or whatever. You can also just double-click the filename to open the document.
When you open a document created in another software program, you briefly see a little box with the message that a conversion is in progress. For more details, see the discussion of file types in Chapters 13 and 14.
Printing Your Document
After you type a document or edit it until it looks the way you want it to look, you’ll probably want to print it. After all, the goal of most word processing is to produce — on paper — a letter, memo, report, or what have you. If you work in the Paperless Office of the Future (just down the hall from the Paperless Bathroom of the Future), you may be able to send your memo or letter elec-tronically at the touch of a button. For the rest of us, though, paper works well.
These steps show a fast way to print your document:
1. Save the document first, just in case something goes wacky while you’re trying to print it.
To save, click the Save button on the toolbar. (Refer to “Saving Documents,” earlier in this chapter, if you don’t know what we’re talking about.)
2. Turn on your printer and make sure the printer has paper.
3. Click the Print button on the toolbar.
The Print button has a little printer with a piece of paper sticking out of the top — it’s usually the fourth button from the left.
A big Print To (your printer name here) dialog box appears.
4. Click the Print button in the Print To dialog box.
If you don’t like the way your polished prose looks on the page, go to Chapter 6 to find out how to choose which typeface (or typefaces) to use for the text. Chapter 8 tells you how to center and justify text, number pages, and print page headers and footers.
Leaving WordPerfect
Because Windows allows you to run multiple programs at the same time, you don’t have to leave WordPerfect every time you want to check your e-mail, browse Amazon.com, or play a little game of Solitaire. In fact, you may choose to leave WordPerfect running all day so that you can switch back to it in a jiffy. But sooner or later, you may want to close WordPerfect.
To shut down WordPerfect, choose File➪Exit. (We talk more about how to use commands in Chapter 2.) If you’ve created or changed a document but haven’t saved the document in a file, WordPerfect asks whether you want to save the document now. Click Yes to save the document, click No to skip saving it, or click Cancel to return to WordPerfect without exiting.
Choose No only if you’re sure that the document doesn’t contain anything you ever want to see again.
You can leave WordPerfect also by clicking the shiny red Close button at the top of the WordPerfect window.
Never turn off the computer without exiting WordPerfect and Windows; you may catch these programs unawares (with their digital pants down, as it were) before they could save your documents. If something unexpected hap-pens and your computer chokes before you can exit WordPerfect, you may get some complaints the next time you start the computer. (See Chapter 19 for information about what to do if you see them.)
Getting Some Help
We’re not even going to try to explain everything that this Dream Team of life-savers can do. Instead, we just give you the simplest way to use Help. For the fancy stuff, we recommend that you play around in Help to your heart’s content.
Using the Help menu
The simplest part is calling for Help. Click Help on the menu bar (or press Alt+H). At this point, it’s a good thing that you’re not literally drowning when you call for help in WordPerfect, because now you must decide precisely how you’re going to ask for help. The Help Topics option is reasonable and straightforward. The Ask the PerfectExpert option is so cool that we talk about it in its own section (see “Asking PerfectExpert,” later in this chapter).
If you select Help Topics, you see a Help window with several tabs at the top, the first three of which are found in the Help windows of many programs:
⻬Contents:This option is associated with an icon that looks like a closed book. You can see a list of topics or you can click one of the question marks to see the Help information for a particular topic.
⻬Index:WordPerfect Help displays a list of all topics, arranged alphabeti-cally. As you type the first few letters of the topic you’re interested in, WordPerfect displays the index entry that starts with what you typed.
⻬Find:Okay, what you were looking for wasn’t in the index. That’s okay; WordPerfect Help can flip through the entire Help file, looking for any word you want. But wait — this is Windows. The first time you try to find something, a Find Setup Wizard asks you technical questions about how you want to search the Help file. Just click the Next button and the Finish button, and then go get a cup of coffee while Windows creates a word list. When it’s finished, you see a screen very much like the one on the Index tab. As you type your word, WordPerfect Help shows you which words match what you typed. Click a matching word, and WordPerfect Help shows you some Help topics.
⻬Corel Knowledge Base:If you can’t find the information you’re looking for in the first three tabs, the Corel Knowledge Base serves as the last line of help for answers to common questions. To use the Knowledge Base, type a term you want information about (such as thesaurus) and click the Search button. If you’re connected to the Internet, your Web browser launches, takes you directly to the Corel Web site (www.corel. com), and looks up the answer for you. The results of your search are displayed in your default Web browser.
want to find your way back, look for a Back button at the top of the Help window and click it. To make the Help window go away, the easiest thing to do is click the button with the Xin it (the Close button) in the upper-right corner.
Getting context-sensitive help
If you want the Help feature to pare down the list of topics to things that are related to whatever you’re doing right now, you can get context-sensitive Help by pressing F1. When you’re in the middle of using a menu or a dialog box, press F1. Zap! WordPerfect figures out exactly which topic you ought to be interested in. If you press F1 with the pointer in the middle of your text, you see the same Help window that appears when you choose Help➪Help Topics on the menu bar.
Another form of context-sensitive help is available. In the upper-right corner of almost all dialog boxes, you find a button with a question mark on it. Click that button, and your mouse pointer turns into a little cartoon “thought bal-loon” with a question mark on it. Click something in the dialog box, and a little yellow Help box pops up with a description of the thing you clicked.
These steps show you how to ask for help with menu commands and buttons:
1. Press Shift+F1.
Or, if you’re in a dialog box, click the question mark button at the top of the dialog box. The mouse pointer turns into a little pointer with a car-toon thought balloon attached to it.
2. Point to a menu command or button, and click it.
3. If you’re looking in a menu, scroll through the menu until you find the topic you want help with.
4. Release the mouse button.
The context-sensitive Help for that command appears.
Asking PerfectExpert
Here are some tips for using PerfectExpert:
⻬Begin with the Start button and end with the Finish button. The buttons you click in between Start and Finish are up to you.
⻬Each time you click a button, you get more buttons to click; or you can just write a document in the document window, as usual.
PerfectExpert’s buttons simply step you through the same features you could access through WordPerfect’s commands and buttons.
⻬To begin a new document, click Start. You can then click the Blank Document button that’s displayed to create a new, blank document. If you choose the New Project/Existing Document button instead, a PerfectExpert dialog box appears — the same one that appears if you choose File➪New from Project on the menu bar.
To see a Help screen, click the More Help On button, at the bottom of the PerfectExpert panel.
See Chapter 12 for more on how to use PerfectExpert to create a variety of documents.
Figure 1-4:
Cruising Your Document
In This Chapter
䊳Choosing commands from menus
䊳Making WordPerfect behave with the toolbar, the property bar, and the application bar
䊳Working with dialog boxes
䊳Using QuickMenus for even more ways to choose commands
䊳Ruling your document
䊳Moving around in the document with your mouse and keyboard
䊳Scrolling the document using your mouse wheel
䊳Navigating with the Go To dialog box
Y
ou’ve figured out the basics of starting WordPerfect. Now it’s time to have some fun and go cruising through WordPerfect and your docu-ments. That reminds me of a song I once heard from an obscure group called the Wordsmith Boys:Well, she got her daddy’s ’puter
And she cruised through the document text, now
Seems she forgot all about the spreadsheet
Like she told her old man, now
And, with the autoscroll scrolling
She goes cruising just as fast as she can, now
And she’ll have fun, fun, fun
Till her daddy takes WordPerfect away
Fun, fun, fun, till her daddy takes WordPerfect away
menu, toolbar, and some nifty commands. In other chapters, we tell you what to do when you get there, such as deleting things and moving text around (Chapter 3) and making the text look different (Chapters 6 and 7). We guaran-tee that this’ll be fun, fun, fun . . .
Telling WordPerfect What to Do
Have you ever traveled overseas and dined at a restaurant where no one spoke your native tongue? To order a meal, you can communicate with the waiter in one of three ways:
⻬The difficult but highly impressive way: Speak the lingua franca.
⻬Order by number, if you’re lucky enough to get a restaurant with num-bered entrées.
⻬Point at the entrée on the menu and murmur, hoping the waiter is able to figure out what you want to order.
Over the years, using a computer has involved similar communication options. In the days before Windows, you had to “speak the language” by knowing which commands to type. That technique worked great if you knew the commands, but it stunk if you were clueless about what to type next. Next, software started allowing you to give commands reminiscent of “order-ing by number” us“order-ing special keys and menus. Today, software applications are all equipped with toolbars, dialog boxes, and pop-up menus that enable you to just point and murmur — and WordPerfect figures out the rest.
The result of all this highly obliging, verging-on-sycophantic user-friendliness is that you now have three more-or-less alternative ways to order
WordPerfect around:
⻬Using the menu
⻬Typing commands from the keyboard
⻬Clicking toolbars, dialog boxes, and QuickMenus
Each of these options are discussed in the following sections.
Choosing commands from menus
Table 2-1
WordPerfect Menus
Menu Description Cross-Reference
File Basic file and document Chapters 1, 5, and 12 operations (open, save, print)
Edit Common document editing Chapters 3 and 4 functions
View Options and functions for Chapter 17 viewing a document and
WordPerfect
Insert Functions to add text, graphics, Chapters 10 and 11 or special formatting to your
document
Format Formatting operations Chapters 6, 7, 8, and 9
Tools Commands that support your Chapter 4 word processing
Table Operations for creating and Chapter 10 formatting a table
Window Functions for managing your Chapter 16 open files
Help Commands for accessing Help Chapter 1
Clicking the menu bar
To see what’s in a menu, click the name of the menu in the menu bar. The menu name becomes highlighted, and a drop-down menu (sometimes called a pull-down menu) appears. For example, choose File➪New, and the New menu option is highlighted.
If you don’t find anything that you like, close the menu by clicking the menu name again or by clicking elsewhere in the WordPerfect window.
Figure 2-1:
Choosing a command
To choose a command from a menu, simply click the command. Related com-mands are clumped together and separated from other command clumps by a line.
In addition to the commands, you may find other suggestive symbols — sort of like the little red dots next to the hot stuff on a Chinese menu. This list shows what a few of those symbols mean:
⻬A right arrow after the command: The arrow indicates that the menu has a submenu. Click the arrow to see more.
⻬A check mark next to the command: The check mark means that a menu option is already turned on. You can turn off the option by clicking the command.
⻬An ellipsis (. . .) after the command:The ellipsis tells you that the mand has more to say, if you ask. If you click the command, the com-mand gift-wraps its thoughts in attractive little dialog boxes, which we discuss in the following section.
What do all those keys with Fs on them do?
Back in the days before mice, WordPerfectusers did everything with function keys.
Function keys are the keys with Fs on them in the top row of your keyboard; their jobs change with every program you run. Although most people who use WordPerfect point and click with the mouse to perform a command, those with a penchant for function keys use them instead. Here are some that you might find useful:
F1 Help (we discuss Help at the end of this chapter)
F2 Find and Replace (see Chapter 4)
Shift+F2 Find Next (to search for a spe-cific item in a document)
F3 Save As (to change the filename before saving)
Shift+F3 Save (to save a file that already has a filename)
F4 Open File (this one’s self-explanatory)
F5 Print (same with this one)
Avoiding toil by using toolbars
The WordPerfect window features several bars containing buttons and con-trols, which WordPerfect calls, loosely, toolbars.We focus on the three most prominent of them:
⻬The WordPerfect 12 toolbar (alias “the toolbar”): This is the Mother of All Toolbars, a collection of buttons for some of the most common tasks people do in WordPerfect. You can start here if you want to open, save, and print documents, among other tasks.
⻬The property bar: In WordPerfect, the property bar is the spot where you can modify the properties (such as boldness) of text in your documents.
⻬The application bar: The application bar is the bar at the very bottom of the WordPerfect window. Its buttons perform a hodgepodge of tasks.
We explain these toolbars in detail in the following sections.
Your very own toolbar primer
Here are some general facts to know abouttoolbars and their buttons:
⻬ A toolbar button provides hints. If you want an explanation of a button, just move your pointer above it (don’t click). A little yellow box delivers a brief one-liner about the button and lists its keyboard shortcut, if there is one.
⻬ You can turn some toolbar buttons off and on. A few of the buttons, such as the Bold, Italic, and Underline buttons, remain “on” and look like they’re pressed down when you click them. To turn them off, click them again.
⻬ Some toolbar buttons contain drop-down menus. To the right of some toolbar buttons are little down arrows. Click an arrow to see a drop-down menu of choices.
⻬ You can hide toolbars from view. To display or remove a particular toolbar from your screen, choose View➪Toolbars. In the Toolbars dialog box, click to add or remove
a check mark in the box next to the toolbar you want to show or hide, respectively. Click OK to close the Toolbars dialog box.
⻬ You can move toolbars.Except for the appli-cation bar, you can move toolbars to differ-ent areas of the WordPerfect window. To do so, move the mouse pointer to the gray area around the buttons. The pointer turns into a little four-headed arrow. Drag the toolbar to its new location.
You can attach the toolbar to any of the four sides of the WordPerfect window. As you drag the toolbar, its outline changes to the same size as the side of the window. When you release the mouse button, the toolbar docks onto the new location and stays there until you decide to move it again. If you want to let the toolbar float, simply drag it toward the center of the screen.
Working with the WordPerfect 12 toolbar
The toolbar (whose formal name is the WordPerfect 12 toolbar) is a collec-tion of buttons for some of the most common WordPerfect tasks, such as opening, saving, and printing documents. You can also find buttons for cut-ting, copying, and pasting text. And if you want to add bullets or numbers to your text, look no further than the toolbar. Figure 2-2 shows the toolbar and some of the most common buttons you’ll use on it.
Producing results with the property bar
Any object you can hold in your hand has certain characteristics, or proper-ties,associated with it. There’s nothing magical about this fact; it’s just the way things are. Take, for instance, a blue coffee mug filled with the hot, beany liquid. If you were asked to describe the cup’s properties, you might answer that it has several traits: a pretty indigo blue color, a 12-ounce capacity, burn-ing hot sides due to its contents, and so on.
Each piece of a document — whether it’s a single word, a chunk of text, a paragraph, a picture, or a table — has similar characteristics. A word, for example, has a font typeface, color, and style attributes (bold,italic, or underlined). In WordPerfect, boldface text is said to have a bold property.
You can change properties in WordPerfect by using menu bar commands, but that approach takes longer. Like the toolbar, the property bar is a conve-nience, meant to keep the important text style options a single click away.
Because the property bar is all about the properties of whatever you’re typing, the bar changes on its own, depending on where your cursor is! When you start typing, your property bar looks like the one shown in Figure 2-3. But say, for example, that you decide to add a little table to your document.
Cut Use columns
Save Create new
(You’ve been reading Chapter 10, haven’t you?) Suddenly, the property bar includes buttons that offer information about your table, as well as telling you about the text in the table’s columns, as shown in Figure 2-4.
If you’re a control freak, you may not like all this change going on around you without your permission. But take our word for it; this feature is quite useful. It means that you don’t have to go searching through WordPerfect’s menus to find out exactly which commands might be relevant to what you’re working on. Instead, WordPerfect puts the things it thinks you might be interested in right there on the property bar.
Some buttons on the property bar (the Bold, Italic, and Underline buttons, for instance) appear to be on (pressed) whenever your cursor (insertion point) is among text that has that button’s property. If your cursor is among bold text, for instance, the B button appears pressed.
Some of the property bar buttons are really drop-down lists more than they are buttons. Click the arrow on the far-left side of the property bar in Figure 2-3, for example, to see a list of fonts. Then click a font to choose it. (We talk more about fonts in Chapter 6.)
Applying yourself to the application bar
The application bar is kind of a gray area — both literally (it’s the gray area at the bottom of the WordPerfect window) and figuratively (its purpose in life is kind of murky, filled with a hodgepodge of tasks). Figure 2-5 shows you what’s on this bar.
Figure 2-4:
The property bar when you’re working with a table.
Figure 2-3:
The WordPerfect application bar displays buttons that reveal or control vari-ous aspects of WordPerfect or your document. These buttons are as follows:
⻬Document buttons: The left side of the application bar displays the name of the document you’re working on. As we discuss in Chapter 12, this feature comes in handy when you’re working with more than one document. Clicking the name of the document activates it in the window.
⻬Digital signature: Clicking the icon with the pad and pen displays a dialog box that allows you to digitally sign a document for security pur-poses. You may not really need this kind of security. If so, ignore this button unless you’re James Bond!
⻬Shadow cursor:The button that has a kind of blurry-looking capital I enables you to switch the shadow cursor on or off. While the regular cursor is the blinking vertical line after which text appears when you type, the shadow cursorshows you where the cursor or insertion point wouldgo if you were to click the mouse button. Click the blurry picture once or twice, move your mouse around the document, and you’ll get the idea. (See Chapter 4 for more information on the cursor.)
⻬All Caps:The button labeled AB enables you to switch between typing normally and typing in all uppercase. It does the same thing as the Caps Lock key on your keyboard, but it’s more helpful: You know All Caps is turned on because the button has a pressed-in state.
⻬Print:The printer icon takes you to the Print To dialog box. From there, you can set up your printer or print your document. See Chapter 6 for more on printing.
⻬Insert/typeover mode:The button where the word Insertappears in Figure 2-5 controls whether you’re typing in insert or typeover mode. This button does the same thing as the Insert key on your keyboard. (See Chapter 4 for more on insert and typeover modes.)
If you use styles (see Chapter 9), a style name will appear in this space instead of Insert.
When you’re editing something fancy, such as a table or a merge file, other information may appear in this box.
Your document's name Digital signature
Type in all capitals
Insert or typeover
Shadow cursor on/off Set up printer
⻬Text cursor position:At the far right, the application bar tells you where you are in your document, including the page number (Pg), how far down the page you are (Ln), and where you are across the page (Pos).
Using dialog boxes
If you click a menu command that has an ellipsis (. . .) after it, a dialog box appears.The dialog box is charged with gathering specific information from you to perform a command. For example, you use the Font Properties dialog box (choose Format➪Font) to specify the font you want to use, and the Print dialog box (choose File➪Print) enables you to specify how you want your document printed.
Each dialog box has various doohickeys that take various shapes and sizes, such as check boxes, lists, and buttons. These items are properly called con-trols,but we think doohickeyssounds a whole lot more fun.
The two most common and important doohickeys you’ll see in almost every dialog box are the OK and Cancel buttons. Clicking OK means “Do it — and do it the way this box says to do it.” Clicking Cancel means “Forget it — I didn’t really want to do this. Get me outta here, and ignore everything I said in this box.”
You could say that some WordPerfect dialog boxes have a mutt of a button — Close. The Close mutton . . . er . . . button is a cross between the OK and Cancel buttons. Like Cancel, it exits the dialog box without performing the primary dialog box action. However, like OK, any settings you changed while you were in the dialog box are processed and can’t be canceled.
Using QuickMenus
Another standard, though less obvious, way of performing a task is through QuickMenus, sometimes referred to in other Windows programs as pop-up menusor right-click menus.A QuickMenu appears when you right-click a button or menu item.
To illustrate, select a word in a document and perform these steps to see a QuickMenu:
1. Move your mouse pointer over text in your document or any part of the WordPerfect window.
2. Right-click anywhere.