core
S
ERVLETS AND
J
AVA
S
ERVER
P
AGES
V
OLUME
2–A
DVANCED
T
ECHNOLOGIES
M
ARTY
H
ALL
L
ARRY
B
ROWN
Y
AAKOV
C
HAIKIN
Upper Saddle River, NJ • Boston • Indianapolis • San Francisco New York • Toronto • Montreal • London • Munich • Paris • Madrid Capetown • Sydney • Tokyo • Singapore • Mexico City
core
S
ERVLETS AND
J
AVA
S
ERVER
P
AGES
V
OLUME
2–A
DVANCED
T
ECHNOLOGIES
Many of the designations used by manufacturers and sellers to distinguish their products are claimed as trademarks. Where those designations appear in this book, and the publisher was aware of a trademark claim, the designations have been printed with initial capital letters or in all capitals.
The authors and publisher have taken care in the preparation of this book, but make no expressed or implied warranty of any kind and assume no responsibility for errors or omissions. No liability is assumed for incidental or consequential damages in connection with or arising out of the use of the information or programs contained herein.
The publisher offers excellent discounts on this book when ordered in quantity for bulk purchases or spe-cial sales, which may include electronic versions and/or custom covers and content particular to your busi-ness, training goals, marketing focus, and branding interests. For more information, please contact: U.S. Corporate and Government Sales
(800) 382-3419
For sales outside the United States please contact: International Sales
Visit us on the Web: www.prenhallprofessional.com Library of Congress Control Number: 2003058100 Copyright © 2008 Pearson Education, Inc.
All rights reserved. Printed in the United States of America. This publication is protected by copyright, and permission must be obtained from the publisher prior to any prohibited reproduction, storage in a retrieval system, or transmission in any form or by any means, electronic, mechanical, photocopying, recording, or likewise. For information regarding permissions, write to:
Pearson Education, Inc
Rights and Contracts Department 501 Boylston Street, Suite 900 Boston, MA 02116
Fax (617) 671 3447
ISBN-13: 978-0-13-148260-9 ISBN-10: 0-13-148260-2
v
Contents
Contents
INTRODUCTION
xvii
Who Should Read This Book
xviii
Conventions
xix
About the Web Site
xx
ACKNOWLEDGMENTS
xxi
ABOUT THE AUTHORS
xxii
1
USING AND DEPLOYING WEB APPLICATIONS
2
1.1
Purpose of Web Applications
3
Organization
4
Portability
4
Separation
4
Contents vi
1.3 Registering Web Applications with the Server
9
Registering a Web Application with Tomcat
10
Registering a Web Application with Other Servers
12
1.4 Development and Deployment Strategies
14
Copying to a Shortcut or Symbolic Link
15
Using IDE-Specific Deployment Features
16
Using Ant, Maven, or a Similar Tool
16
Using an IDE in Combination with Ant
17
1.5 The Art of WAR: Bundling Web
Applications into WAR Files
17
1.6 Building a Simple Web Application
18
Download and Rename app-blank to testApp
18
Download test.html, test.jsp, and TestServlet.java
19
Add test.html, test.jsp to the testApp Web Application
19
Place TestServlet.java into the
testApp/WEB-INF/classes/coreservlets Directory
20
Compile TestServlet.java
20
Declare TestServlet.class and the URL
That Will Invoke It in web.xml
21
Copy testApp to tomcat_dir/webapps
23
Start Tomcat
23
Access testApp with the URL of the Form
http://localhost/testApp/someResource
23
1.7 Sharing Data Among Web Applications
25
2
CONTROLLING WEB APPLICATION
BEHAVIOR WITH WEB.XML
34
2.1 Purpose of the Deployment Descriptor
35
2.2 Defining the Header and the Root Element
36
2.3 The Elements of web.xml
37
Version 2.4
38
Version 2.3
40
Contents vii
Defining Custom URLs
44
Naming JSP Pages
50
2.5 Disabling the Invoker Servlet
52
Remapping the /servlet/ URL Pattern
53
Globally Disabling the Invoker: Tomcat
55
2.6 Initializing and Preloading Servlets and JSP Pages
56
Assigning Servlet Initialization Parameters
56
Assigning JSP Initialization Parameters
60
Supplying Application-Wide Initialization Parameters
63
Loading Servlets When the Server Starts
64
2.7 Declaring Filters
68
2.8 Specifying Welcome Pages
71
2.9 Designating Pages to Handle Errors
72
The error-code Element
73
The exception-type Element
75
2.10 Providing Security
78
Designating the Authentication Method
78
Restricting Access to Web Resources
80
Assigning Role Names
83
2.11 Controlling Session Timeouts
83
2.12 Documenting Web Applications
84
2.13 Associating Files with MIME Types
85
2.14 Configuring JSP Pages
86
Locating Tag Library Descriptors
86
Configuring JSP Page Properties
87
2.15 Configuring Character Encoding
93
Contents viii
3
DECLARATIVE SECURITY
104
3.1 Form-Based Authentication
106
Setting Up Usernames, Passwords, and Roles
108
Telling the Server You Are Using Form-Based
Authentication; Designating Locations of Login
and Login-Failure Pages
110
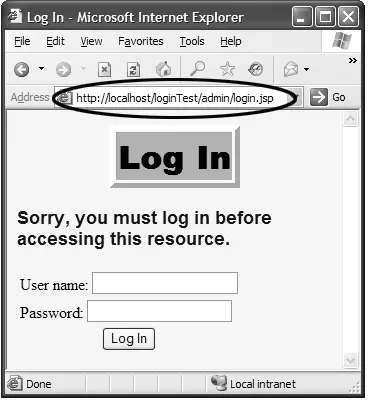
Creating the Login Page
111
Creating the Page to Report
Failed Login Attempts
114
Specifying URLs That Should Be Password Protected
115
Listing All Possible Abstract Roles
118
Specifying URLs That Should Be
Available Only with SSL
119
Turning Off the Invoker Servlet
120
3.2 Example: Form-Based Authentication
122
The Home Page
122
The Deployment Descriptor
123
The Password File
127
The Login and Login-Failure Pages
128
The investing Directory
129
The ssl Directory
132
The admin Directory
138
The NoInvoker Servlet
140
Unprotected Pages
141
3.3 BASIC Authentication
143
Setting Up Usernames, Passwords, and Roles
145
Telling the Server You Are Using BASIC
Authentication; Designating Realm
145
Specifying URLs That Should Be Password Protected
146
Listing All Possible Abstract Roles
146
Specifying URLs That Should Be
Available Only with SSL
147
3.4 Example: BASIC Authentication
147
Contents ix
The Deployment Descriptor
149
The Password File
151
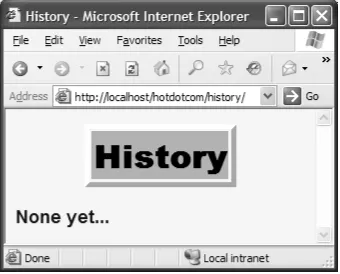
The Financial Plan
152
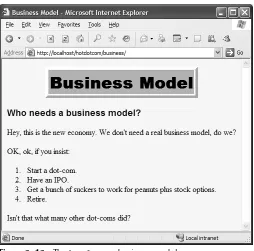
The Business Plan
154
The NoInvoker Servlet
156
3.5 Configuring Tomcat to Use SSL
156
3.6 WebClient: Talking to Web Servers Interactively
164
3.7 Signing a Server Certificate
167
Exporting the CA Certificate
170
Using WebClient with Tomcat and SSL
175
4
PROGRAMMATIC SECURITY
178
4.1 Combining Container-Managed
and Programmatic Security
180
Security Role References
182
4.2 Example: Combining Container-Managed
and Programmatic Security
183
4.3 Handling All Security Programmatically
188
4.4 Example: Handling All Security Programmatically
190
4.5 Using Programmatic Security with SSL
195
Determining If SSL Is in Use
195
Redirecting Non-SSL Requests
195
Discovering the Number of Bits in the Key
196
Looking Up the Encryption Algorithm
196
Accessing Client X.509 Certificates
197
4.6 Example: Programmatic Security and SSL
197
5
SERVLET AND JSP FILTERS
202
5.1 Creating Basic Filters
204
Contents x
Register the Filter with the Appropriate
Servlets and JSP Pages
207
Disable the Invoker Servlet
209
5.2 Example: A Reporting Filter
210
5.3 Accessing the Servlet Context from Filters
217
5.4 Example: A Logging Filter
218
5.5 Using Filter Initialization Parameters
221
5.6 Example: An Access Time Filter
223
5.7 Blocking the Response
226
5.8 Example: A Prohibited-Site Filter
227
5.9 Modifying the Response
234
A Reusable Response Wrapper
235
5.10 Example: A Replacement Filter
237
A Generic Modification Filter
237
A Specific Modification Filter
239
5.11 Example: A Compression Filter
245
5.12 Configuring Filters to Work with RequestDispatcher
251
5.13 Example: Plugging a Potential Security Hole
253
5.14 The Complete Filter Deployment Descriptor
260
6
THE APPLICATION EVENTS FRAMEWORK
266
6.1 Monitoring Creation and Destruction
of the Servlet Context
270
6.2 Example: Initializing Commonly Used Data
271
6.3 Detecting Changes in Servlet Context Attributes
277
6.4 Example: Monitoring Changes to
Commonly Used Data
278
6.5 Packaging Listeners with Tag Libraries
288
6.6 Example: Packaging the Company Name Listeners
290
6.7 Recognizing Session Creation and Destruction
297
6.8 Example: A Listener That Counts Sessions
298
Disabling Cookies
305
Contents xi
6.11 Identifying Servlet Request
Initialization and Destruction
314
6.12 Example: Calculating Server Request Load
315
6.13 Watching Servlet Request for Attribute Changes
322
6.14 Example: Stopping Request Frequency Collection
323
6.15 Using Multiple Cooperating Listeners
325
Tracking Orders for the Daily Special
326
Resetting the Daily Special Order Count
334
6.16 The Complete Events Deployment Descriptor
339
7
TAG LIBRARIES: THE BASICS
346
7.1 Tag Library Components
348
The Tag Handler Class
348
The Tag Library Descriptor File
349
The JSP File
352
7.2 Example: Simple Prime Tag
353
7.3 Assigning Attributes to Tags
357
Tag Attributes: Tag Handler Class
357
Tag Attributes: Tag Library Descriptor
358
Tag Attributes: JSP File
359
7.4 Example: Prime Tag with Variable Length
359
7.5 Including Tag Body in the Tag Output
362
Tag Bodies: Tag Handler Class
362
Tag Bodies: Tag Library Descriptor
363
Tag Bodies: JSP File
363
7.6 Example: Heading Tag
364
7.7 Example: Debug Tag
368
7.8 Creating Tag Files
371
7.9 Example: Simple Prime Tag Using Tag Files
372
7.10 Example: Prime Tag with Variable
Length Using Tag Files
374
Contents xii
8
TAG LIBRARIES: ADVANCED FEATURES
378
8.1 Manipulating Tag Body
380
8.2 Example: HTML-Filtering Tag
381
8.3 Assigning Dynamic Values to Tag Attributes
385
Dynamic Attribute Values: Tag Handler Class
385
Dynamic Attribute Values: Tag Library Descriptor
386
Dynamic Attribute Values: JSP File
386
8.4 Example: Simple Looping Tag
387
8.5 Assigning Complex Objects
as Values to Tag Attributes
391
Complex Dynamic Attribute
Values: Tag Handler Class
391
Complex Dynamic Attribute
Values: Tag Library Descriptor
391
Complex Dynamic Attribute Values: JSP File
392
8.6 Example: Table Formatting Tag
393
8.7 Creating Looping Tags
398
8.8 Example: ForEach Tag
399
8.9 Creating Expression Language Functions
404
8.10 Example: Improved Debug Tag
407
8.11 Handling Nested Custom Tags
410
8.12 Example: If-Then-Else Tag
412
9
JSP STANDARD TAG LIBRARY (JSTL)
418
9.1 Installation of JSTL
420
9.2 c:out Tag
421
9.3 c:forEach and c:forTokens Tags
422
9.4 c:if Tag
424
9.5 c:choose Tag
425
9.6 c:set and c:remove Tags
427
9.7 c:import Tag
430
9.8 c:url and c:param Tags
433
9.9 c:redirect Tag
435
Contents xiii
10
THE STRUTS FRAMEWORK: BASICS
440
10.1 Understanding Struts
441
Different Views of Struts
441
Advantages of Apache Struts (Compared to
MVC with RequestDispatcher and the EL)
442
Disadvantages of Apache Struts (Compared to
MVC with RequestDispatcher and the EL)
444
10.2 Setting Up Struts
446
Installing Struts
446
Testing Struts
448
Making Your Own Struts Applications
448
Adding Struts to an Existing Web Application
449
10.3 The Struts Flow of Control and the
Six Steps to Implementing It
450
Struts Flow of Control
450
The Six Basic Steps in Using Struts
454
10.4 Processing Requests with Action Objects
458
Understanding Actions
458
Example: One Result Mapping
463
Example: Multiple Result Mappings
470
Combining Shared Condition (Forward) Mappings
479
10.5 Handling Request Parameters with Form Beans
481
Struts Flow of Control: Updates for Bean Use
482
The Six Basic Steps in Using Struts
484
Understanding Form Beans
486
Displaying Bean Properties
488
Example: Form and Results Beans
490
10.6 Prepopulating and Redisplaying Input Forms
504
Struts Flow of Control
504
The Six Basic Steps in Using Struts
506
Using Struts html: Tags
508
Prepopulating Forms
510
Contents xiv
URL Design Strategies for Actions
523
Redisplaying Forms
525
Example: Redisplaying Forms
528
11
THE STRUTS FRAMEWORK: DOING MORE
538
11.1 Using Properties Files
539
Advantages of Properties Files
540
Struts Flow of Control—Updates for Properties Files
540
Steps for Using Properties Files
542
Example: Simple Messages
546
Dynamic Keys
552
Parameterized Messages
553
11.2 Internationalizing Applications
554
Loading Locale-Specific Properties Files
554
Setting Language Preferences in Browsers
554
Example: Internationalizing for
English, Spanish, and French
555
Results
556
11.3 Laying Out Pages with Tiles
558
Tiles Motivations
558
Prerequisites for Tiles
558
The Four Basic Steps in Using Tiles
560
Example: Simple Tiles
563
Handling Relative URLs
568
Example: e-boats Application
570
11.4 Using Tiles Definitions
582
Tiles Definitions Motivations
583
Contents xv
12
THE STRUTS FRAMEWORK:
VALIDATING USER INPUT
592
12.1 Validating in the Action Class
594
Struts Flow of Control
594
Performing Validation in the Action
596
Example: Choosing Colors and Font Sizes for Resume
599
12.2 Validating in the Form Bean
607
Struts Flow of Control
607
Performing Validation in the ActionForm
609
Example: Choosing Colors and
Font Sizes for a Resume (Take 2)
612
Using Parameterized Error Messages
620
Example: Validation with Parameterized Messages
620
12.3 Using the Automatic Validation Framework
624
Manual versus Automatic Validation
624
Client-Side versus Server-Side Validation
624
Struts Flow of Control
625
Steps in Using Automatic Validation
627
Example: Automatic Validation
633
APPENDIX
DEVELOPING APPLICATIONS WITH APACHE ANT
644
A.1 Summarizing the Benefits of Ant
646
A.2 Installing and Setting Up Ant
646
A.3 Creating an Ant Project
648
Defining the Ant Project
648
Writing Targets
650
Assigning Tasks to Targets
651
Running an Ant Target
651
A.4 Reviewing Common Ant Tasks
652
The echo Task
652
Contents xvi
The delete Task
654
The copy Task
656
The javac Task
658
A.5 Example: Writing a Simple Ant Project
661
A.6 Using Ant to Build a Web Application
668
Ant Dependencies
669
A.7 Example: Building a Web Application
670
The prepare Target
670
The copy Target
671
The build Target
672
A.8 Using Ant to Create a WAR File
675
The jar Task
676
The manifest Task
678
A.9 Example: Creating a Web Application WAR File
679
The war Target
679
xvii
Chapter
Introduction
Introduction
Suppose your company wants to sell products online. You have a database that gives the price and inventory status of each item. However, your database doesn’t speak HTTP, the protocol that Web browsers use. Nor does it output HTML, the format Web browsers need. What can you do? Once users know what they want to buy, how do you gather that information? You want to customize your site for visitors’ prefer-ences and interests, but how? You want to keep track of user’s purchases as they shop at your site, but what techniques are required to implement this behavior? When your Web site becomes popular, you might want to compress pages to reduce band-width. How can you do this without causing your site to fail for those visitors whose browsers don’t support compression? In all these cases, you need a program to act as the intermediary between the browser and some server-side resource. This book is about using the Java platform for this type of program.
Introduction xviii
Web servers for Windows, UNIX (including Linux), Mac OS, VMS, and mainframe operating systems now support servlet and JSP technology either natively or by means of a plug-in. With only a small amount of configuration, you can run servlets and JSP in Microsoft IIS, the Apache Web Server, IBM WebSphere, BEA WebLogic, Oracle Application Server 10g, and dozens of other servers. Perfor-mance of both commercial and open-source servlet and JSP engines has improved significantly.
To no one’s surprise, this field continues to grow at a rapid rate. As a result, we could no longer cover the technology in a single book. Core Servlets and JavaServer Pages, Volume 1: Core Technologies, covers the servlet and JSP capabilities that you are likely to use in almost every real-life project. This book, Volume 2: Advanced Technologies, covers features that you may use less frequently but are extremely valu-able in robust applications. For example,
• Deployment descriptor file. Through the proper use of the deployment descriptor file, web.xml, you can control many aspects of the Web application behavior, from preloading servlets, to restricting resource access, to controlling session time-outs.
• Web application security. In any Web application today, security is a must! The servlet and JSP security model allows you to easily create login pages and control access to resources.
• Custom tag libraries. Custom tags significantly improve the design of JSPs. Custom tags allow you to easily develop your own library of reusable tags specific to your business applications. In addition to creating your own tags, we cover the Standard Tag Library (JSTL). • Event handling. With the events framework, you can control
initialization and shutdown of the Web application, recognize destruction of HTTP sessions, and set application-wide values. • Servlet and JSP filters. With filters, you can apply many pre- and
post-processing actions. For instance, logging incoming requests, blocking access, and modifying the servlet or JSP response. • Apache Struts. This framework greatly enhances the standard
model-view-controller (MVC) architecture available with servlets and JSPs. More importantly, Apache Struts still remains one of the most common frameworks used in industry.
Who Should Read This Book
Introduction xix
Ant—you may want to first start with the technologies of most interest, and then later read the remaining material. Most commercial servlet and JSP Web applications take advantage of the technologies presented throughout, thus, at some point you may want to read the complete book.
If you are new to servlets and JSPs, you will want to read Core Servlets and Java-Server Pages, Volume 1: Core Technologies. In addition to teaching you how to install and configure a servlet container, Volume 1 provides excellent coverage of the servlet and JSP specifications. Volume 1 provides the foundation material to this book.
Both books assume that you are familiar with basic Java programming. You don’t have to be an expert Java developer, but if you know nothing about the Java program-ming language, this is not the place to start. After all, servlet and JSP technology is an application of the Java programming language. If you don’t know the language, you can’t apply it. So, if you know nothing about basic Java development, start with a good introductory book like Thinking in Java,Core Java, or Core Web Programming, all from Prentice Hall.
Conventions
Throughout the book, concrete programming constructs or program output are pre-sented in a monospaced font. For example, when abstractly discussing server-side programs that use HTTP, we might refer to “HTTP servlets” or just “servlets,” but when we say HttpServlet we are talking about a specific Java class.
User input is indicated in boldface, and command-line prompts are either generic (Prompt>) or indicate the operating system to which they apply (DOS>). For instance, the following indicates that “Some Output” is the result when “java SomeProgram” is executed on any platform.
Prompt> java SomeProgram
Some Output
URLs, file names, and directory names are presented in a sans serif font. So, for example, we would say “the StringTokenizer class” (monospaced because we’re talking about the class name) and “Listing such and such shows SomeFile.java” (sans-serif because we’re talking about the file name). Paths use forward slashes as in URLs unless they are specific to the Windows operating system. So, for instance, we would use a forward slash when saying “look in install_dir/bin” (OS neutral), but use backslashes when saying “see C:\Windows\Temp” (Windows specific).
Introduction xx
Core Approach
Pay particular attention to items in Core Approach sections. They indicate techniques that should always or almost always be used.
Core Notes and Core Warnings are called out in a similar manner.
About the Web Site
The book has a companion Web site at
http://volume2.coreservlets.com/
. This free site includes:• Documented source code for all examples shown in the book, which can be downloaded for unrestricted use.
• Links to all URLs mentioned in the text of the book. • Up-to-date download sites for servlet and JSP software. • Information on book discounts.
xxi
Acknowledgments
Acknowledgments
Many people helped us with this book. Without their assistance, we would still be on the second chapter. Chuck Cavaness (Cypress Care, Inc.), Bob Evans (JHU Applied Physics Laboratory), Randal Hanford (Boeing), Kalman Hazins (JHU Applied Phys-ics Laboratory), Michael Kolodny (Raba Technologies), Kyong Park (Raba Technolo-gies), Eric Purcell (Lockheed-Martin), Ylber Ramadani (George Brown College), and Richard Slywczak (NASA Glenn Research Center) provided valuable technical feedback on many different chapters. Their recommendations improved the book considerably.
Teresa Horton spotted our errant commas, awkward sentences, typographical errors, and grammatical inconsistencies. She improved the result immensely. Vanessa Moore designed the book layout and produced the final version; she did a great job despite our many last-minute changes. Greg Doench of Prentice Hall believed in the concept from before the first edition and encouraged us to write a second edition. Thanks to all.
xxi i
About the Authors
About the Authors
Marty Hall is president of coreservlets.com, Inc., a small company that provides training courses and consulting services related to server-side Java technology. He also teaches Java and Web programming in the Johns Hopkins University part-time graduate program in Computer Science, where he directs the Distributed Com-puting and Web Technology concentration areas. Marty is the author of five books from Prentice Hall and Sun Microsystems Press: the first and second editions of Core Servlets and JavaServer Pages, More Servlets and JavaServer Pages, and the first and second editions of Core Web Programming. You can reach Marty at [email protected].
Larry Brown is a Network and Systems manager at a U.S. Navy Research and Development laboratory. He is the co-author of the second editions of Core Web Programming, also from Prentice Hall and Sun Microsystems Press. You can reach Larry at [email protected].
core
S
ERVLETS AND
J
AVA
S
ERVER
P
AGES
V
OLUME
2–A
DVANCED
T
ECHNOLOGIES
U
SING AND
D
EPLOYING
W
EB
A
PPLICATIONS
Topics in This Chapter
• The purpose of Web applications
• The structure of Web applications
• Web application registration
• Development and deployment strategies
• WAR files
3
Chapter
Chapter
1
Web applications (or “Web apps”) let you bundle a set of servlets, JavaServer Pages (JSP) pages, tag libraries, Hypertext Markup Language (HTML) documents, images, style sheets, and other Web content into a single collection that can be used on any server compatible with the servlet specification. When designed carefully, Web apps can be moved from server to server or placed at different locations on the same server, all without making any changes to any of the servlets, JSP pages, or HTML files in the application.
This capability lets you move complex applications around with a minimum of effort, streamlining application reuse. In addition, because each Web app has its own directory structure, sessions, ServletContext, and class loader, using a Web app simplifies even the initial development because it reduces the amount of coordina-tion needed among various parts of your overall system.
1.1 Purpose of Web Applications
Chapter 1 ■ Using and Deploying Web Applications 4
Organization
The first advantage of Web applications is that you know where everything goes: Web apps have a standard location for each type of resource. Individual Java class files always go in the directory called
WEB-INF/classes
, JAR files (bundles of Java class files) always go inWEB-INF/lib
, theweb.xml
configuration file always goes in theWEB-INF
directory, and so on. Files directly accessible to clients (e.g., Web browsers)go into the top-level directory of your Web app or any subdirectory under the top-level directory except
WEB-INF
.In addition, it’s very common for developers to move from one project to another. Having a standard way of organizing your application’s resources saves you from hav-ing to come up with an application structure every time you start a new project and it also saves a new developer joining your project from having to learn your particular file organization.
Portability
Because the servlet specification provides a specific file organization, any compli-ant server should be able to deploy and run your application immediately. This affords you much freedom in choosing the vendor of your Web server. As long as a server is compliant, you can pick up your application and, with almost no changes, deploy and run it on a server from a different vendor, thus avoiding the dreaded “vendor lock-in.” For example, you could start developing your applica-tions using a free Web server and move to a more established, vendor-supported server closer to deployment time.
Separation
Different Web applications deployed on the same server do not interfere with each other. Each application has its own uniform resource locator (URL) with which it can be accessed, its own ServletContext object, and so on. Two Web applications deployed on the same server act as if they were deployed on separate servers. Neither needs to know about the other.
1.2 Structure of Web Applications 5
1.2 Structure of Web Applications
As mentioned earlier, a Web application has a standardized format and is portable across all compliant Web or application servers. The top-level directory of a Web application is simply a directory with a name of your choosing. Within that directory, certain types of content go in designated locations. This section provides details on the type of content and the locations in which it should be placed.
Locations for Various File Types
Figure 1–1 shows a representative example of a Web application hierarchy. For a step-by-step example of creating your own Web application, download the
app-blank
Web app fromhttp://volume2.coreservlets.com/
and follow the instructions in Sec-tion 1.6 (Building a Simple Web ApplicaSec-tion).Figure 1–1 A representative Web application.
JSP Pages
Chapter 1 ■ Using and Deploying Web Applications 6
webAppPrefix
/filename.jsp
(if the pages are in the top-level directory of the Web application) orhttp://
host/
webAppPrefix/subdirectory/filename.jsp
(if the pages are in a subdirectory).It depends on the server whether a default file such as
index.jsp
can be accessed with a URL that specifies only a directory (e.g.,http://
host/
webAppPrefix/)
without the developer first making an entry in the Web app’sWEB-INF/web.xml
file. If you wantindex.jsp
to be the default file name, we strongly recommend that you make an explicit welcome-file-list entry in your Web app’sweb.xml
file. For example, the followingweb.xml
entry specifies that if a URL specifies a directory name but no file name, the server should tryindex.jsp
first andindex.html
second. If neither is found, the result is server specific (e.g., a directory listing).<welcome-file-list>
<welcome-file>index.jsp</welcome-file> <welcome-file>index.html</welcome-file> </welcome-file-list>
On the use of
web.xml
, see Chapter 2 (Controlling Web Application Behavior with web.xml).HTML Documents, Images, and
Other Regular Web Content
As far as the servlet and JSP engine is concerned, HTML files, GIF and JPEG images, style sheets, and other Web documents follow exactly the same rules as do JSP pages. They are placed in exactly the same locations and accessed with URLs of exactly the same form.
Individual Servlets, Beans, and Helper Classes
Servlets and other
.class
files are placed either inWEB-INF/classes
or in a subdirec-tory ofWEB-INF/classes
that matches their package name.To access one of these servlets, you need to designate the specific URL for it by specifying the servlet-mapping element in the
web.xml
deployment descriptor file that is located within theWEB-INF
directory of the Web application. See Section 1.3 (Registering Web Applications with the Server) for details.There is a second way to access servlets without having to specify a custom URL. It is with URLs of the form
http://
host/
webAppPrefix1.2 Structure of Web Applications 7
the resource is accessed, it could also be a potential security hole in your applica-tion. Third, the user is forced to type in a URL that contains the fully qualified name of your servlet. This name includes the entire package structure with the class name. Such URLs look ugly and users find them hard to remember. There-fore, this approach would score very low on the Web application usability meter. Fourth, if you ever decide to change the name of your class or to repackage your classes, the URL must change, forcing you to update every place in your entire application where this URL was used. Besides the maintenance problem, this will also confuse users who have already bookmarked the original URL, once again hurting usability of your application.
In fact, we recommend that you explicitly block the user from accessing the serv-lets in your Web application without mapping a custom URL. The mapping could be specified with the help of the servlet-mapping element of
web.xml
. Seeweb.xml
of theapp-blank
sample application for an example of this. You can downloadapp-blank
fromhttp://volume2.coreservlets.com/
.Servlets, Beans, and Helper Classes
(Bundled in JAR Files)
If the servlets or other
.class
files are bundled inside JAR files, then the JAR files should be placed inWEB-INF/lib
. If the classes are in packages, then within the JAR file they should be in a directory that matches their package name. On most servers, JAR files can also be shared across multiple Web applications. However, this feature is not standardized, and the details vary from server to server. On Tomcat, you place shared JAR files intomcat_dir
/shared/lib
.Deployment Descriptor
The deployment descriptor file,
web.xml
, should be placed in theWEB-INF
subdirec-tory of the main Web application direcsubdirec-tory. For details on usingweb.xml
, see Chap-ter 2 (Controlling Web Application Behavior with web.xml). Note that a few servers have a globalweb.xml
file that applies to all Web applications. For example, Tomcat usestomcat_dir
/conf/web.xml
for global configuration settings. That file is entirely server specific; the only standardweb.xml
file is the per-application one that is placed within theWEB-INF
directory of the Web app.Tag Library Descriptor Files
Chapter 1 ■ Using and Deploying Web Applications 8
<%@ taglib uri="/WEB-INF/tlds/myTaglibFile.tld" ...%>
Because it is the server, not the client (e.g., Web browser), that accesses the TLD file, the prohibition that content inside of WEB-INF is not Web accessible does not apply.
When deployed inside a JAR file, the .tld file should be placed inside the
META-INF directory or any subdirectory of META-INF. The switch in location from
WEB-INF to META-INF is because JAR files are not Web application archives and thus don’t contain a WEB-INF directory. See Chapter 7 (Tag Libraries: The Basics) for a more detailed discussion of TLD files.
Tag Files
Tag files should be placed in the
WEB-INF/tags
directory or a subdirectory ofWEB-INF/tags
. As with TLD files, tag files are still accessible to JSP pages eventhough they are located inside of the protected
WEB-INF
directory. Tag files are also declared inside a JSP page through the taglib directive. However, instead of uri, they use the tagdir attribute. For example, if we placed themyTagFile.tag
file inside of theWEB-INF/tags
directory of our Web application, the taglib directive of a JSP page would look something like this:<%@ taglib tagdir="/WEB-INF/tags" ...%>
In this scenario, the server automatically generates the TLD for the tag files, so no custom mapping is necessary.
You can also include tag files bundled in a JAR file. The JAR file itself would have to be placed inside of the
WEB-INF/lib
directory as we mentioned earlier. However, within the JAR file, the tag files should be placed inside of the META-INF/tags direc-tory. In this case, the server does not automatically generate the TLD. You must declare the tag file and its path within a .tld file. Note that the .tld file can contain declarations of other types of custom tags as well. See Chapter 7 (Tag Libraries: The Basics) for a more detailed coverage of tag files.WAR Manifest File
When you create a WAR file (see Section 1.5), a MANIFEST.MF file is placed in the
META-INF subdirectory. Normally, the jar utility automatically creates MANIFEST.MF
1.3 Registering Web Applications with the Server 9
1.3 Registering Web Applications
with the Server
As we explained earlier, Web applications are portable. Regardless of the server, you store files in the same directory structure and access them with URLs of the same form. For example, Figure 1–2 summarizes the directory structure and URLs that would be used for a simple Web application called myWebApp. This section illus-trates how to install and execute this simple Web application on different platforms.
Figure 1–2 Structure of the myWebApp Web application.
Although Web applications themselves are completely portable, the registration process is server specific. For example, to move the
myWebApp
application from server to server, you don’t have to modify anything inside any of the directories shown in Fig-ure 1–2. However, the location in which the top-level directory (myWebApp
in this case) is placed will vary from server to server. Similarly, you use a server-specific pro-cess to tell the system that URLs that begin withhttp://
host/myWebApp/
should apply to the Web application.This section assumes that you already went through the steps of installing and set-ting up your server. For information on setset-ting up your server, read your server’s doc-umentation, see the introductory chapter of the first volume of this book, or (for Tomcat users) refer to the continually updated Tomcat setup and configuration guide
at
http://www.coreservlets.com/
. Here, we present a brief example, then giveexplicit details for Tomcat in one of the following subsections. For a complete step-by-step example of developing and deploying a simple Web application on Tom-cat, see Section 1.6 (Building a Simple Web Application).
As we show in Section 1.4 (Development and Deployment Strategies), the usual strategy is to build Web applications in a personal development environment and peri-odically copy them to various deployment directories for testing on different servers. We recommend that you avoid placing your development directory directly within a server’s
http://host/myWebApp/myPage.html http://host/myWebApp/myPage.jsp
Chapter 1 ■ Using and Deploying Web Applications 10
deployment directory—doing so makes it hard to deploy on multiple servers, hard to develop while a Web application is executing, and hard to organize the files. Instead, use a separate development directory and deploy by means of one of the strategies outlined in Section 1.4 (Development and Deployment Strategies). The simplest approach is to keep a shortcut (Windows) or symbolic link (UNIX/Linux) to the deployment directo-ries of various servers, and simply copy the entire development directory whenever you want to deploy. For example, on Windows you can use the right mouse button to drag the development folder onto the shortcut, release the button, and select Copy.
Registering a Web Application with Tomcat
With Tomcat, creating a Web application consists of creating the appropriate direc-tory structure and copying that direcdirec-tory structure into the
tomcat_dir
/webappsdirectory. Tomcat will take care of the rest. The ability to deploy a Web app by simply copying its directory structure into some server directory is usually referred to as hot-deployment or auto-deployment. The directory within the server that allows this functionality is referred to as a hot-deploy directory or an auto-deploy directory. Most, if not all modern Web servers provide this feature. For extra control over the process, you can modify
tomcat_dir
/conf/server.xml
(a Tomcat-specific file) to refer to the Web application.The following steps walk you through what is required to create a Web app that is accessed by means of URLs that start with
http://
host
/myWebApp/
.1. Create a Web application directory structure with the top-level directory called myWebApp. Because this is your personal develop-ment directory structure, it can be located at any place you find conve-nient. This directory structure should be organized as we showed in Section 1.2 (Structure of Web Applications). You can reduce the amount of manual work you have to do in this step by simply downloading the
app-blank
Web application fromhttp://volume2.coreservlets.com/
. Italready contains all the required directories and a sample
web.xml
deployment descriptor. All you have left to do is rename the top-level directory fromapp-blank
tomyWebApp
.However, if you decide to create these directories by hand, here is what you will need to do. Create a directory called
myWebApp
any-where on your system outside of your server’s installation directory. Right under it, create a directory calledWEB-INF
. UnderWEB-INF
, cre-ate a directory calledclasses
. Create the deployment descriptor file,web.xml
, and place it into theWEB-INF
directory. We discuss thedeployment descriptor in detail in Chapter 2 (Controlling Web Appli-cation Behavior with web.xml). For now, however, just copy the
exist-ing
web.xml
file fromtomcat_dir
/webapps/ROOT/WEB-INF
or use the1.3 Registering Web Applications with the Server 11
Once you have created the proper directory structure, place a simple JSP page called
myPage.jsp
into themyWebApp
directory. Put a simple servlet calledMyServlet.class
into theWEB-INF/classes
directory.2. Declare the servlet and map it to a URL by editing the web.xml
deployment descriptor file. Unlike JSP files, servlets need to be explicitly declared. We need to tell the server that it exists by provid-ing the fully qualified class name of the servlet. In addition, we need to inform the server which URLs requested by the client should invoke
MyServlet.class
. Both of these steps can be accomplished by adding the following entries inweb.xml
:<servlet>
Theservlet element and its subelements inform the server of the name we want to use for declaring our servlet as well as the fully qual-ified name of the servlet class. The servlet-mapping element and its subelements tell the server which servlet should be invoked when the client requests a URL that matches the pattern provided by the value of the url-pattern element. Thus, the servlet declared as MyName can be invoked with
http://
host/myWebApp/MyAddress
. 3. Copy the myWebApp directory to tomcat_dir/webapps. Forexam-ple, suppose you installed Tomcat in
C:\
tomcat_dir
. You would then copythe
myWebApp
directory to thewebapps
directory, resulting inC:\
tomcat_dir
\webapps\myWebApp\HelloWebApp.jsp
,C:\
tomcat_dir
\
webapps\myWebApp\WEB-INF\classes\HelloWebApp.class
, andC:\
tomcat_dir
\webapps\myWebApp\WEB-INF\web.xml
. You could also wrap the directory inside a WAR file (Section 1.5) and simply drop the WAR file intoC:\
tomcat_dir
\webapps
.4. Optional: Add a Context entry to tomcat_dir/conf/server.xml. By default, Tomcat configures your Web application to have a URL prefix that exactly matches the name of the top-level directory of your Web app. If you are satisfied with these default settings you can omit this step. However, if you want a bit more control over the Web app registration process, you can supply a Context element in
Chapter 1 ■ Using and Deploying Web Applications 12
completely prevent Tomcat from running. However, for the later ver-sions of Tomcat, the recommended approach is to place the Context element (and its subelements) by itself into the
context.xml
file. Then, placecontext.xml
alongside theweb.xml
deployment descriptor intothe
WEB-INF
directory of your Web application.TheContext element has several possible attributes that are docu-mented at
http://jakarta.apache.org/tomcat/tomcat-5.0-doc/config/
context.html
. For instance, you can decide whether to use cookies orURL rewriting for session tracking, you can enable or disable servlet reloading (i.e., monitoring of classes for changes and reloading servlets whose class file changes on disk), and you can set debugging levels. However, for basic Web apps, you just need to deal with the two required attributes: path (the URL prefix) and docBase (the base installation directory of the Web application, relative to
tomcat_dir
/
webapps
.) This entry should look like the following snippet.<Context path="/some-web-app" docBase="myWebApp" />
Note that you should not use
/examples
as the URL prefix; Tomcat already uses that prefix for a sample Web application.Core Warning
Do not use
/examples
as the URL prefix of a Web application in Tomcat. 5. Access the JSP page and the servlet. The URLhttp://
host
/
myWebApp/myPage.jsp
invokes the JSP page, andhttp://
host
/
myWebApp/MyAddress
invokes the servlet. During development, youprobably use
localhost
for the host name. These URLs assume that you have modified the Tomcat configuration file (tomcat_dir
/conf/
server.xml
) to use port 80 as recommended in the Tomcat setup andconfiguration guide at
http://www.coreservlets.com/
. If you haven’t made this change, usehttp://
host
:8080/myWebApp/myPage.jsp
andhttp://
host
:8080/myWebApp/MyAddress
.Registering a Web Application
with Other Servers
1.3 Registering Web Applications with the Server 13
other servers is very similar. In this subsection we summarize the server-specific reg-istration process for some of the more popular servers today.
BEA WebLogic
Like Tomcat, WebLogic provides an auto-deploy directory used to register and deploy Web applications. First, if you haven’t done so already, create a new domain called
myDomain
. This can be done by running WebLogic’s configuration wizardconfig.cmd
on Windows orconfig.sh
on UNIX/Linux, both located in thebea/
weblogic_dir
/common/bin
directory, and following its instructions. Once this is done, simply copy your entire Web application directory structure (including the top-level directory) or a WAR file to thebea/user_projects/domains/myDomain/applications
directory. You can also use WebLogic’s Web console application to deploy a Web app. Log into the console by going tohttp://localhost:7001/console/
. (Note that this assumes you left the default settings for the port number unchanged and that you are running the server on your local machine.) In the left pane, expand theDeployments
node and clickWeb Application Modules
. Then, clickDeploy a
New Web Application Module
. This starts a browser-based deployment wizard.Simply follow the step-by-step instructions for the wizard. After you deploy the Web application, the JSP page can be accessed by going to
http://local-host:7001/myWebApp/myPage.jsp
and the servlet by going tohttp://local-host:7001/myWebApp/MyAddress
.JBoss
In JBoss, registering a Web application is almost as easy as in Tomcat. In fact, by default, JBoss uses Tomcat as its embedded Web server. To register your Web appli-cation, start by first renaming your top-level directory
myWebApp
tomyWebApp.war
. Note that you are not actually creating a WAR file, but simply renaming the top-level directory to end with.war
. JBoss insists that to be deployable, not only should WAR file names end in.war
, which is required by the servlet specification, but the top-level directory name of your Web app should end in.war
as well. Once this is done, copy themyWebApp.war
directory to the jboss_dir/server/default/deploy
directory. Assuming you didn’t change any default configuration settings when installing JBoss, you can invoke the JSP page by going to
http://localhost:8080/
myWebApp/myPage.jsp
and invoke the servlet by going tohttp://localhost:8080/
myWebApp/MyAddress
. If you do package your Web application into a WAR file, youshould place
myWebApp.war
into the same JBoss directory to deploy it.Caucho Resin
Chapter 1 ■ Using and Deploying Web Applications 14
configuration settings of the server, you can access the JSP page by going to
http://localhost:8080/myWebApp/myPage.jsp
and the servlet by going tohttp://localhost:8080/myWebApp/MyAddress
.1.4 Development and
Deployment Strategies
Whenever you are ready to start developing a new Web application, follow these three steps:
1. Create the Web app directory structure. In your development directory, make a new directory structure that follows the Web applica-tion structure (including the
web.xml
file withinWEB-INF
) discussed ear-lier in this chapter. The easiest way to do this is to copy and rename theapp-blank
application. (Remember, you can downloadapp-blank
and allthe other code from the book at
http://volume2.coreservlets.com/
.) 2. Create your code. Place HTML and JSP pages into the top-leveldirectory or into subdirectories other than
WEB-INF
orMETA-INF
. Place individual Java class files intoWEB-INF/classes/
subdirectory-match-ing-package-name
. Place JAR files intoWEB-INF/lib
. Place.tag
and.tagx
files intoWEB-INF/tags
and so on.3. Deploy the app. Copy the entire Web application directory structure (including the top-level directory) to your server’s auto-deploy direc-tory. There are a number of strategies you can use to simplify this third step, but here are the most popular ones:
• Copying to a shortcut or symbolic link
• Using deployment features specific to an integrated development environment (IDE)
• Using Ant or a similar tool
• Using an IDE in combination with Ant
If you are just beginning with servlets and JSP, you should probably start with the first option. Learning how to use Ant or a specific IDE could get in the way of you getting comfortable with the servlet and JSP technology itself. Note, however, that we do not list the option of putting your code directly in the server’s deployment directory. Although this is one of the most common choices among beginners, it scales so poorly to advanced tasks that we recommend you steer clear of it from the start.
1.4 Development and Deployment Strategies 15
Copying to a Shortcut or Symbolic Link
On Windows, go to the directory that is one above the server’s auto-deployment directory. On Tomcat, this would position you inside the root installation directory,
tomcat_dir
. Right-click the auto-deploy directory (e.g.,webapps
on Tomcat), and select Copy. Then go to the directory that is one above your top-level development directory (e.g., one abovemyWebApp
), right-click, and select Paste Shortcut (not just Paste). Now, whenever you are ready to deploy your Web app, click and hold the right mouse button on your development directory (e.g.,myWebApp
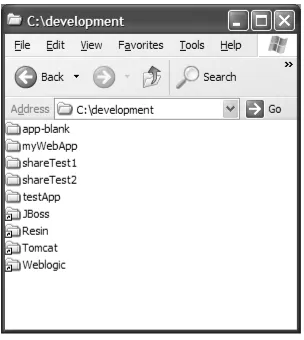
), then drag onto the deployment directory shortcut, and release the button. A pop-up menu will appear. Select the Copy Here option. Figure 1–3 shows an example setup that sim-plifies testing of this chapter’s examples on Tomcat, WebLogic, JBoss, and Resin. On UNIX, you can use symbolic links (created with ln -s) in a manner similar to that for Windows shortcuts.Figure 1–3 Using shortcuts to simplify deployment.
An advantage of this approach is that it is simple. Therefore, it is good for begin-ners who want to concentrate on learning servlets and JSP technology, not deploy-ment tools or IDEs.
Chapter 1 ■ Using and Deploying Web Applications 16
Using IDE-Specific Deployment Features
Most servlet- and JSP-savvy development environments (e.g., IBM WebSphere Stu-dio Application Developer, Sun ONE StuStu-dio, NetBeans, Oracle JDeveloper, Borland JBuilder, Eclipse with MyEclipseIDE or NitroX plug-ins) let you configure your environment so you can deploy your Web application to a test, development, or pro-duction server with the click of a button.
With all the clear advantages of IDEs, there are a number of disadvantages as well. Most worthwhile IDEs have a steep learning curve. This prevents you from concentrating on real development, at least at the beginning. In addition, it’s very common for developers to switch projects and for projects to have one specific IDE everyone must use to have one common development environment on the team. If you switch, and the new project uses a different IDE for compilation and deploy-ment than the one you are used to, you will be forced to learn and get used to yet another IDE. This wastes additional time.
Using Ant, Maven, or a Similar Tool
Developed by the Apache Foundation, ant is a tool similar to the UNIX make util-ity. However, ant is written in the Java programming language (and thus is portable) and is touted to be both simpler to use and more powerful than make. Many servlet and JSP developers use ant for compiling and deploying. The usage of ant is dis-cussed in the Appendix (Developing Applications with Apache Ant).
For general information on using ant, see
http://jakarta.apache.org/ant/manual/
.See
http://jakarta.apache.org/tomcat/tomcat-5.5-doc/appdev/processes.html
forspecific guidance on using ant with Tomcat.
The main advantage of this approach is flexibility: ant is powerful enough to han-dle everything from compiling the Java source code to copying files to producing Web archive (WAR) files (see Section 1.5).
Another tool that is attracting a lot of attention in the Java world is maven. Maven extends ant, so it is very similar to ant in some respects and drastically dif-ferent in another. Although maven is just as flexible as ant, its focus is on simplic-ity of use. It accomplishes this simplicsimplic-ity by utilizing conventions. For example, maven can compile the code without the developer ever specifying where the code is located with the project folder. This is because maven assumes, by convention, that the Java code is located in the
src/main/java
folder. Of course, this assumption can be reconfigured, but why bother? Unlike ant, these conventions allow maven configuration files to be very short and easy to understand. You can learn more about maven athttp://maven.apache.org
.1.5 The Art of WAR: Bundling Web Applications into WAR Files 17
adapting the usage of ant or maven as their standard, non-IDE-specific deployment tool, so chances are high that learning ant or maven will pay off in the future.
Using an IDE in Combination with Ant
IDEs help us be more productive by helping us write the code, but restrict us in terms of portability. ant lets us develop portably, but doesn’t help at all with actual code writing. What should we do?
One way to bridge the gap a little between the two options is to adapt the use of an IDE that integrates with ant. This way you can still use your favorite IDE to help you write code and with the click of a button invoke ant scripts to compile and deploy your application. Even if your favorite IDE is not integrated with ant (most modern IDEs are), you can still use this approach, but you’ll have to switch between the command prompt and your IDE quite a bit.
This approach works really well in a real-world project. The developers get to keep using their favorite IDEs, which helps them be most productive, and the project doesn’t suffer from deployment inconsistencies because the compilation and deployment is done by the same portable ant script. We have participated in projects where several IDEs were used by different developers on the team working on the same Web applications; some even used different operating systems for their environments. The application deployment stayed consistent and the developers were happy to be able to use whatever made each one personally more productive. Isn’t a happy developer what this is all about?
1.5 The Art of WAR: Bundling Web
Applications into WAR Files
Web archive (WAR) files provide a convenient way of bundling Web apps in a single file. Having a single large file instead of many small files makes it easier to transfer the Web application from server to server.
A WAR file is really just a JAR file with a
.war
extension, and you use the regular jar command to create it. For example, to bundle the entiresome-web-app
applica-tion into a WAR file namedsome-web-app.war
, you would navigate to thesome-web-app
directory and execute the following command:jar cvf some-web-app.war *
Chapter 1 ■ Using and Deploying Web Applications 18
Of course, you can use other jar options (e.g., to digitally sign classes) with WAR files just as you can with regular JAR files. For details, see
http://java.sun.com/j2se/
1.5.0/docs/tooldocs/windows/jar.html
(Windows) orhttp://java.sun.com/j2se/
1.5.0/docs/tooldocs/solaris/jar.html
(UNIX/Linux).1.6 Building a Simple Web
Application
Well, enough talk. Let’s get down to it and build our first Web application. We’ll be using Tomcat as our server, but similar steps could be applied to other servers as well. See Section 1.3 (Registering Web Applications with the Server) for more details.
Here is the outline of steps we’ll be following.
1. Download and rename
app-blank
totestApp
(
http://volume2.coreservlets.com/
).2. Download
test.html
,test.jsp
, andTestServlet.java
(
http://volume2.coreservlets.com/
).3. Add
test.html
,test.jsp
to thetestApp
Web application.4. Place
TestServlet.java
into thetestApp/WEB-INF/classes/coreservlets
directory.5. Compile
TestServlet.java
.6. Declare
TestServlet.class
and the URL that will invoke it inweb.xml
. 7. CopytestApp
totomcat_dir
/webapps
.8. Start Tomcat.
9. Access
testApp
with the URL of the formhttp://localhost/testApp/
someResource
.The following subsections will walk you through these steps in some detail.
Download and Rename app-blank to testApp
This step is pretty easy. Simply download
app-blank.zip
fromhttp://volume2.core-servlets.com/
. This file contains the proper directory structure everyJ2EE-compli-ant Web application needs. It also contains a starting point for your application’s deployment descriptor,
web.xml
, with a servlet mapping that disables the invoker servlet. We’ll look at servlet mapping in a little more detail when we get to mappingour
TestServlet
to a URL. For now, just unzipapp-blank.zip
to a directory of your1.6 Building a Simple Web Application 19
Download test.html, test.jsp,
and TestServlet.java
As in the previous step, these files can be downloaded from
http://volume2.coreserv-lets.com/
. You can either download them one by one or bundled intotestApp-Files.zip
and unzip them into a directory of your choice.Add test.html, test.jsp to
the testApp Web Application
Put
test.html
,test.jsp
into thetestApp
directory, createsomeDirectory
inside thetestApp
directory, put a copy oftest.html
,test.jsp
intotestApp/someDirectory
. Thetest.html
file contains a static message, andtest.jsp
contains a scriptlet that outputsthe URL used to access the page. Listings 1.1 and 1.2 show the complete code of these files.
Listing 1.1
test.html
<!DOCTYPE HTML PUBLIC "-//W3C//DTD HTML 4.0 Transitional//EN"> <HTML>
<HEAD><TITLE>HTML Test</TITLE></HEAD> <BODY BGCOLOR="#FDF5E6">
<H1>HTML Test</H1> Hello.
</BODY></HTML>
Listing 1.2
test.jsp
<!DOCTYPE HTML PUBLIC "-//W3C//DTD HTML 4.0 Transitional//EN"> <HTML>
<HEAD><TITLE>JSP Test</TITLE></HEAD> <BODY BGCOLOR="#FDF5E6">
<H1>JSP Test</H1> URL you used:
Chapter 1 ■ Using and Deploying Web Applications 20
Place TestServlet.java into the testApp/
WEB-INF/classes/coreservlets Directory
TestServlet.java declares that it belongs to the coreservlets package. Therefore, you have to place
TestServlet.java
into it before compiling. As withtest.jsp
,TestServlet.class
contains code that outputs the URL used to access the servlet. See Listing 1.3 for the complete code ofTestServlet.java
.Compile TestServlet.java
Remember that your CLASSPATH should include the servlet application program-ming interface (API). Tomcat bundles it into the
servlet-api.jar
file, which is located in thetomcat_dir
/common/lib
directory. On Windows you can set your CLASS-PATH by going to the DOS command prompt and typing the following command:set CLASSPATH=tomcat_dir\common\lib\servlet-api.jar
Listing 1.3
TestServlet.java
package coreservlets;
import java.io.*; import javax.servlet.*; import javax.servlet.http.*;
public class TestServlet extends HttpServlet { public void doGet(HttpServletRequest request, HttpServletResponse response) throws ServletException, IOException { response.setContentType("text/html"); PrintWriter out = response.getWriter(); String docType =
"<!DOCTYPE HTML PUBLIC \"-//W3C//DTD HTML 4.0 " + "Transitional//EN\">\n";
out.println (docType + "<HTML>\n" +
"<HEAD><TITLE>Servlet Test</TITLE></HEAD>\n" + "<BODY BGCOLOR=\"#FDF5E6\">\n" +
"<H1>Servlet Test</H1>\n" +
"URL you used: " + request.getRequestURL() + "\n" + "</BODY></HTML>");
1.6 Building a Simple Web Application 21
On UNIX/Linux compatible systems, you can set the CLASSPATH by opening a console and typing the following command:
CLASSPATH=tomcat_dir/common/lib/servlet-api.jar
Once the CLASSPATH is set, you can compile
TestServlet.java
by navigating to thetestApp/WEB-INF/classes/coreservlets
directory and typing the following command:javac TestServlet.java
After compilation,
TestServlet.class
should reside in thetestApp/WEB-INF/classes/
coreservlets
directory.Declare TestServlet.class and the
URL That Will Invoke It in web.xml
Navigate to the
testApp/WEB-INF
directory and openweb.xml
with your favorite Extensible Markup Language (XML) or text editor. To declareTestServlet.class
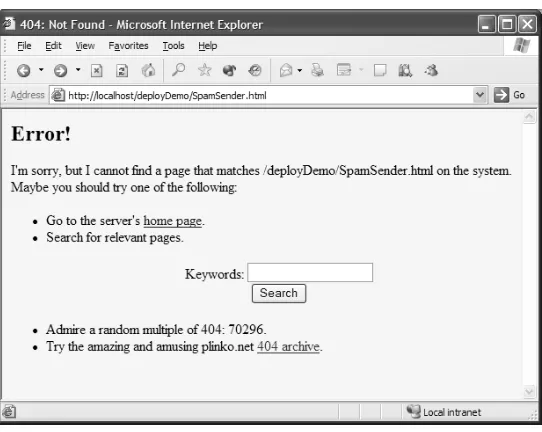
, you need to add the following lines right after the <!-- Your entries go here. --> XML comment:<servlet>
<servlet-name>Test</servlet-name>
<servlet-class>coreservlets.TestServlet</servlet-class> </servlet>
In these few lines, we declared a servlet with the name Test to represent our
TestServlet.class
. Note that the <servlet-class> element lists the fully qualifiedname of the servlet class, which has the form packageName.className (without the.class ending.)
Now, we need to tell Tomcat which URLs will invoke the declared Test servlet. This can be accomplished by adding the following lines to
web.xml
, right after the ending </servlet> element:<servlet-mapping>
<servlet-name>Test</servlet-name> <url-pattern>/test</url-pattern> </servlet-mapping>
Chapter 1 ■ Using and Deploying Web Applications 22
Listing 1.4
web.xml
<?xml version="1.0" encoding="ISO-8859-1"?> <!-- web.xml from the app-blank template Web app
from http://courses.coreservlets.com/Course-Materials/. Includes two standard elements: welcome-file list and a servlet-mapping to disable the invoker servlet. -->
<web-app xmlns="http://java.sun.com/xml/ns/j2ee"
xmlns:xsi="http://www.w3.org/2001/XMLSchema-instance" xsi:schemaLocation=
<servlet-name>Test</servlet-name>
<servlet-class>coreservlets.TestServlet</servlet-class> </servlet>
<servlet-mapping>
<servlet-name>Test</servlet-name> <url-pattern>/test</url-pattern> </servlet-mapping>
<!-- Disable the invoker servlet. --> <servlet>
<servlet-name>NoInvoker</servlet-name>
<servlet-class>coreservlets.NoInvokerServlet</servlet-class> </servlet>
<servlet-mapping>
<servlet-name>NoInvoker</servlet-name> <url-pattern>/servlet/*</url-pattern> </servlet-mapping>
<!-- If URL gives a directory but no file name, try index.jsp first and index.html second. If neither is found,
the result is server-specific (e.g., a directory listing).
-->
<welcome-file-list>
<welcome-file>index.jsp</welcome-file> <welcome-file>index.html</welcome-file> </welcome-file-list>