Wiley Publishing, Inc.
10475 Crosspoint Boulevard Indianapolis, IN 46256
www.wiley.com
Copyright © 2006 by Wiley Publishing, Inc., Indianapolis, Indiana Published simultaneously in Canada
ISBN-10: 0-7645-7401-9 ISBN-13: 978-0-7645-7401-6
Manufactured in the United States of America 10 9 8 7 6 5 4 3 2 1
1MA/QV/RQ/QV/IN
Library of Congress Cataloging-in-Publication Data Willis, Thearon.
Beginning Visual Basic 2005 / Thearon Willis and Bryan Newsome. p. cm.
Includes bibliographical references and index. ISBN-13: 978-0-7645-7401-6 (paper/website) ISBN-10: 0-7645-7401-9 (paper/website)
1. Microsoft Visual BASIC. 2. BASIC (Computer program language) I. Newsome, Bryan, 1971- II. Title. QA76.73.B3W5573 2005
005.2'768--dc22
2005010385
No part of this publication may be reproduced, stored in a retrieval system, or transmitted in any form or by any means, electronic, mechanical, photocopying, recording, scanning, or otherwise, except as permitted under Sections 107 or 108 of the 1976 United States Copyright Act, without either the prior written permission of the Publisher, or authorization through payment of the appropriate per-copy fee to the Copyright Clearance Center, 222 Rosewood Drive, Danvers, MA 01923, (978) 750-8400, fax (978) 646-8600. Requests to the Publisher for permission should be addressed to the Legal Department, Wiley Publishing, Inc., 10475 Crosspoint Blvd., Indianapolis, IN 46256, (317) 572-3447, fax (317) 572-4355, or online at www.wiley.com/go/permissions.
LIMIT OF LIABILITY/DISCLAIMER OF WARRANTY:THE PUBLISHER AND THE AUTHOR MAKE NO REPRE-SENTATIONS OR WARRANTIES WITH RESPECT TO THE ACCURACY OR COMPLETENESS OF THE CONTENTS OF THIS WORK AND SPECIFICALLY DISCLAIM ALL WARRANTIES, INCLUDING WITHOUT LIMITATION WAR-RANTIES OF FITNESS FOR A PARTICULAR PURPOSE. NO WARRANTY MAY BE CREATED OR EXTENDED BY SALES OR PROMOTIONAL MATERIALS. THE ADVICE AND STRATEGIES CONTAINED HEREIN MAY NOT BE SUITABLE FOR EVERY SITUATION. THIS WORK IS SOLD WITH THE UNDERSTANDING THAT THE PUBLISHER IS NOT ENGAGED IN RENDERING LEGAL, ACCOUNTING, OR OTHER PROFESSIONAL SERVICES. IF PROFES-SIONAL ASSISTANCE IS REQUIRED, THE SERVICES OF A COMPETENT PROFESPROFES-SIONAL PERSON SHOULD BE SOUGHT. NEITHER THE PUBLISHER NOR THE AUTHOR SHALL BE LIABLE FOR DAMAGES ARISING HERE-FROM. THE FACT THAT AN ORGANIZATION OR WEB SITE IS REFERRED TO IN THIS WORK AS A CITATION AND/OR A POTENTIAL SOURCE OF FURTHER INFORMATION DOES NOT MEAN THAT THE AUTHOR OR THE PUBLISHER ENDORSES THE INFORMATION THE ORGANIZATION OR WEB SITE MAY PROVIDE OR RECOM-MENDATIONS IT MAY MAKE. FURTHER, READERS SHOULD BE AWARE THAT INTERNET WEB SITES LISTED IN THIS WORK MAY HAVE CHANGED OR DISAPPEARED BETWEEN WHEN THIS WORK WAS WRITTEN AND WHEN IT IS READ.
For general information on our other products and services please contact our Customer Care Department within the United States at (800) 762-2974, outside the United States at (317) 572-3993 or fax (317) 572-4002.
About the Authors
Thearon Willisis a Senior Consultant with over 20 years of programming experience. He started writing applications using the BASIC language in 1980 and later moved on to Visual Basic and finally to Visual Basic .NET.
Thearon began working with databases in 1987 and has been hooked on writing database applications every since. He has experience with SQL Server, Oracle, and DB2 but works with SQL Server on a daily basis. Thearon has programmed in several other languages, some of which include C++, assembly lan-guage, Pascal, and COBOL. However, he enjoys Visual Basic .NET the best because it provides the fea-tures needed to quickly build Windows and Web applications, as well as components and Web Services.
Thearon currently develops intranet applications, Web Services, and server-side and client-side utilities using Visual Basic .NET. Most of these applications and utilities are database-driven and make use of XML and XSL. Thearon lives with his wife Margie and daughter Stephanie in the Raleigh, North Carolina, area.
Credits
Acquisitions Editor
Katie Mohr
Development Editor
Sydney Jones
Technical Editor
Todd Meister
Production Editor
William A. Barton
Copy Editor
Publication Services, Inc.
Editorial Manager
Mary Beth Wakefield
Vice President & Executive Group Publisher
Richard Swadley
Vice President and Publisher
Joseph B. Wikert
Project Coordinator
Ryan Steffen
Graphics and Production Specialists
Andrea Dahl Lauren Goddard Lynsey Osborn Alicia South Julie Trippetti
Quality Control Technicians
Leeann Harney Carl William Pierce
Media Development Specialists
Angela Denny Kit Malone Travis Silvers
Proofreading and Indexing
As always, I want to thank my wife Margie and my daughter Stephanie for the patience they have shown while I write another book. Without their love and support, none of this would be possible.
—Thearon Willis
To all of the friends and family that make my life special in the past, present, and future: Jennifer (love you, honey), Katelyn, Mom (I miss you), Dad, Ashley and Leslie, Judy and Tony, Jennifer S. and Steven. All my love and happiness to each of you.
Contents
Acknowledgments xxvii
Introduction xxix
Who Is This Book For?
xxix
What Does This Book Cover?
xxix
What Do I Need to Run Visual Basic 2005?
xxx
Conventions xxxi
Customer Support
xxxii
How to Download the Sample Code for the Book
xxxii
Errata
xxxii
p2p.wrox.com
xxxiii
Why This System Offers the Best Support xxxiii
Chapter 1: Welcome to Visual Basic 2005
1
Windows Versus DOS Programming
2
Installing Visual Basic 2005
3
The Visual Basic 2005 IDE
6
The Profile Setup Page
7
The Menu
7
The Toolbars
8
Creating a Simple Application
9
Windows in the Visual Studio 2005 IDE 10
The Toolbox
13
Modified Hungarian Notation
17
The Code Editor
18
Using the Help System
22
Summary
23
Exercise
23
Chapter 2: The Microsoft .NET Framework
25
Microsoft’s Reliance on Windows
25
MSN 1.0
26
The .NET Vision
27
This Sounds like Java
28
Where Now?
29
The .NET Framework Classes
30
Executing Code
31
Common Language Runtime
33
Code Loading and Execution
33
Application Isolation
33
Security
34
Interoperation
34
Exception Handling
34
The Common Type System and Common Language Specification
35
Summary
36
Chapter 3: Writing Software
37
Information and Data
37
Algorithms
38
What Is a Programming Language?
39
Variables
39
Working with Variables
40
Comments and Whitespace
42
Comments
42
White Space
44
Data Types
44
Working with Numbers
44
Common Integer Math Operations 45 Integer Math Shorthand 47 The Problem with Integer Math 48 Floating-Point Math 49
Other States 50
Single-Precision Floating-Point Numbers 50
Working with Strings
51
Concatenation 52 Using the Concatenation Operator Inline 54 More String Operations 55
Substrings 56
Formatting Strings 57 Localized Formatting 58 Replacing Substrings 59
Using Dates
60
xiii
Why Use Methods?
72
Methods You’ve Already Seen 72
Building a Method
76
Choosing Method Names
79
Scope
80
Summary
82
Exercises
82
Exercise 1
82
Exercise 2
82
Chapter 4: Controlling the Flow
83
Making Decisions
83
The If Statement
84
The Else Statement
86
Allowing Multiple Alternatives with ElseIf
87
Nested If Statements
88
Single-Line If Statement
88
Comparison Operators
88
Using Not Equal To 89 Using the Numeric Operators 90 The And and Or Operators 93 More on And and Or 97
String Comparison
97
Select Case
99
Using Select Case
100
Case-Insensitive Select Case
103
Multiple Selections
106
The Case Else Statement
107
Different Data Types with Select Case
108
Loops
108
The For . . . Next Loop
109
Step 111
Looping Backwards 112
The Do . . . Loop Loops
114
Do While . . . Loop 116 Acceptable Expressions for a Do . . . Loop 118 Other Versions of the Do . . . Loop 118
Nested Loops
119
Quitting Early
120
Quitting Do . . . Loops 122
Infinite Loops
123
Summary 124
Exercises 124
Exercise 1
124
Exercise 2
124
Chapter 5: Working with Data Structures
125
Understanding Arrays
125
Defining and Using Arrays
126
Using For Each . . . Next
128
Passing Arrays as Parameters
130
Sorting Arrays
133
Going Backwards
133
Initializing Arrays with Values
135
Understanding Enumerations
136
Using Enumerations
136
Determining the State
140
Setting Invalid Values
142
Understanding Constants
143
Using Constants
143
How It Works
145
Different Constant Types
145
Structures 145
Building Structures
146
Adding Properties to Structures
149
Working with ArrayLists
149
Using an ArrayList
150
Deleting from an ArrayList
153
Showing Items in the ArrayList
156
Working with Collections
157
Creating CustomerCollection
158
Adding an Item Property
159
xv
Contents
Using Hashtables
161
Cleaning Up: Remove, RemoveAt, and Clear
164
Case Sensitivity
167
Advanced Array Manipulation
168
Dynamic Arrays
168
Using Preserve
170
Summary 171
Exercises 172
Exercise 1
172
Exercise 2
172
Chapter 6: Building Windows Applications
173
Responding to Events
173
Setting Up a Button Event
174
Building a Simple Application
178
Building the Form
178
Counting Characters
180
Counting Words
182
Creating the Show Me! Button Code
185
Creating More Complex Applications
186
The Text Manipulation Project
186
Creating the Toolbar
186
Creating the Status Bar
190
Creating an Edit Box
191
Clearing the Edit Box
191
Responding to Toolbar Buttons
194
Understanding Focus
198
Using Multiple Forms
199
Help About
199
Summary 203
Exercises 203
Exercise 1
203
Exercise 2
203
Chapter 7: Displaying Dialog Boxes
205
The MessageBox Dialog Box
205
Available Icons for MessageBox
206
Available Buttons for MessageBox
207
Setting the Default Button
207
Miscellaneous Options
207
Example Message Boxes
209
The OpenDialog Control
213
The OpenFileDialog Control
213
The Properties of OpenFileDialog
214
The Methods of OpenFileDialog
215
Using the OpenFileDialog Control
216
The SaveDialog Control
220
The Properties of SaveFileDialog
220
The Methods of SaveFileDialog
221
Using the SaveFileDialog Control
221
The FontDialog Control
225
The Properties of FontDialog
225
The Methods of FontDialog
226
Using the FontDialog Control
226
The ColorDialog Control
229
The Properties of ColorDialog
230
Using the ColorDialog Control
231
The PrintDialog Control
232
The Properties of PrintDialog
233
Using the PrintDialog Control
234
The PrintDocument Class
234
The Properties of the PrintDocument Class 234
Printing a Document
234
The FolderBrowserDialog Control
241
The Properties of FolderBrowserDialog
242
Using the FolderBrowserDialog Control
242
How It Works 244
Summary 245
Exercises 246
Exercise 1
246
Exercise 2
246
Chapter 8: Creating Menus
247
Understanding Menu Features
247
Images
248
Access Keys
248
Shortcut Keys
248
Check Marks
248
The Properties Window
249
Creating Menus
250
Designing the Menus
250
xvii
Contents
Coding the View Menu and Toolbars
259
Testing Your Code
260
Context Menus
262
Creating Context Menus
263
Enabling and Disabling Menu Items and Toolbar Buttons
266
Summary 270
Exercise
270
Chapter 9: Debugging and Error Handling
271
Major Error Types
272
Syntax Errors
272
Execution Errors
275
Logic Errors
275
Debugging 277
Creating a Sample Project
277
Setting Breakpoints
293
Debugging Using the Watch Window
300
Debugging with the Locals Window
302
Error Handling
304
Using Structured Error Handling
305
Summary 307
Exercises 308
Exercise 1
308
Exercise 2
308
Chapter 10: Building Objects
309
Understanding Objects
309
Encapsulation
311
Methods and Properties
311
Events
311
Visibility
312
What Is a Class?
313
Building Classes
313
Reusability 314
Designing an Object
315
State
316
Behavior
316
Storing State
317
Real Properties
319
Read/Write Properties
323
The IsMoving Method
325
Creating a Constructor
327
Inheritance 329
Adding New Methods and Properties
331
Adding a GetPowerToWeightRatio Method
333
Changing Defaults
335
Polymorphism: Scary Word, Simple Concept
336
Overriding More Methods
337
Inheriting from the Object Class
339
Objects and Structures
340
The Framework Classes
340
Namespaces
341
The Imports Statement
343
Creating Your Own Namespace
343
Inheritance in the .NET Framework
345
Summary 346
Exercises 346
Exercise 1
346
Exercise 2
346
Chapter 11: Advanced Object-Oriented Techniques
347
Building a Favorites Viewer
347
Internet Shortcuts and Favorites
348
Using Classes
350
Scanning Favorites
355
Viewing Favorites
363
An Alternative Favorite Viewer
365
Building a Favorites Tray
365
How It Works
368
Displaying Favorites
368
Using Shared Properties and Methods
371
Using Shared Procedures
372
Using Shared Methods
376
Understanding Object-Oriented Programming and Memory Management
378
Garbage Collection
379
Releasing Resources
380
Defragmentation and Compaction
381
Summary 382
xix
Contents
Chapter 12: Building Class Libraries
383
Understanding Class Libraries
384
Creating a Class Library
384
Building a Class Library for Favorites Viewer
386
A Multitiered Application
388
Using Strong Names
389
Signing Assemblies
390
Assembly Versions
392
Registering Assemblies
392
Gacutil Utility
393
Why Is My Assembly Not Visible in the References Dialog Box?
393
Designing Class Libraries
395
Using Third-Party Class Libraries
396
Using InternetFavorites.dll
396
Viewing Classes with the Object Browser
397
Summary 398
Exercise
398
Chapter 13: Creating Your Own Custom Controls
399
Windows Forms Controls
400
Creating and Testing a User Control
400
Exposing Properties from User Controls
404
Adding Properties
404
Exposing Methods from User Controls
405
Exposing Events from User Controls
406
Design Time or Run Time
411
Creating a Form Library
413
Building the Form Library Project Login Form
413
Testing the FormsLibrary
420
Hooking Up the Events
422
Summary 425
Exercise
426
Chapter 14: Programming Custom Graphics
427
Building a Simple Paint Program
427
Creating a Project with User Controls
428
How Drawing Programs Work
428
The GraphicsItem Class
430
Screen and Client Coordinates
432
Listening to the Mouse and Drawing GraphicsCircle Objects
434
Invalidation
438
Optimized Drawing
439
Choosing Colors
440
Creating the ColorPalette Control and Sizing the Control 440
Responding to Clicks
446
Dealing with Two Colors
449
Indicating the Assigned Buttons
451
Using Advanced Colors
457
Using the Color Dialog Box 459 Using System Colors 460
Using Different Tools
461
Implementing Hollow Circle
461
Working with Images
466
Drawing Images
467
Scaling Images
469
Preserving the Aspect Ratio
471
More Graphics Methods
473
Summary 474
Chapter 15: Accessing Databases
475
What Is a Database?
475
Microsoft Access Objects
476
Tables
476
Queries
476
The SQL SELECT Statement
477
Queries in Access
479
Creating a Customer Query
479
Data Access Components
483
DataSet
483
DataGridView
484
BindingSource
484
BindingNavigator 484
TableAdapter
484
Data Binding
485
Summary 491
Exercises 492
Exercise 1
492
xxi
Contents
Chapter 16: Database Programming with SQL Server and ADO.NET
493
ADO.NET
494
ADO.NET Data Namespaces
494
The SqlConnection Class
495
Working with the Connection String Parameters 495 Opening and Closing the Connection 497
SqlCommand
497
The Connection Property 497 The CommandText Property 498 The Parameters Collection 498 The ExecuteNonQuery Method 499
SqlDataAdapter 499
The SelectCommand Property 500 Using Command Builders to Create the Other Commands 502 The Fill Method 502
The DataSet Class
504
DataView
504
The Sort Property 505 The RowFilter Property 505 The Find Method 506
The ADO.NET Classes in Action
507
Examining a DataSet Example
507
How It Works 511
Data Binding
515
BindingContext and CurrencyManager
516
Binding Controls
517
Binding Example 518 How It Works: FillDataSetAndView 525
Summary 546
Exercises 547
Exercise 1
547
Exercise 2
547
Chapter 17: Web Forms
549
Thin-Client Architecture
550
Web Forms versus Windows Forms
551
Windows Forms Advantages
551
Web Forms Advantages
551
Web Applications: The Basic Pieces
552
Web Servers
552
HyperText Markup Language
552
VBScript and JavaScript
553
Cascading Style Sheets
553
Active Server Pages
553
Benefits
553
Special Web Site Files
554
Global.asax 554
Web.config 554
Development
554
Controls: The Toolbox
554
Building Web Applications
555
Creating a Web Form for Client- and Server-Side Processing
555
Performing Data Entry and Validation
561
Designing the Site’s Look and Feel
565
How It Works 571
Using the GridView to Build a Data-Driven Web Form
575
Web Site Locations with VS 2005
580
Summary 582
Exercise
583
Chapter 18: Forms Authentication
585
Web Site Authentication
585
Windows Authentication
585
Forms Authentication
586
Web Site Administration Tool (WAT)
586
How It Works 594
Login Controls
595
Summary 607
Exercises 608
Exercise 1
608
Exercise 2
609
Chapter 19: Visual Basic 2005 and XML
611
Understanding XML
611
What Does XML Look Like?
612
XML for Visual Basic Newcomers
614
The Address Book Project
615
Creating the Project
615
The SerializableData Class
616
xxiii
Contents
Changing the Data
625
Sending E-mail
625
Creating a List of Addresses
627
Ignoring Members
631
Loading Addresses
633
Adding New Addresses
634
Navigating Addresses
636
Deleting Addresses
638
Testing at the Edges 639
Integrating with the Address Book Application
640
Demonstrating the Principle of Integration
640
Reading the Address Book from Another Application
642
Summary 647
Exercises 647
Exercise 1
647
Exercise 2
647
Chapter 20: Web Services and .NET Remoting
649
What Is a Web Service?
649
How Does a Web Service Work?
650
SOAP
651
Building a Web Service
653
A Web Services Demonstration
654
Adding More Methods
656
The Picture Server Service
657
Creating the Project
658
Returning Arrays
660
Returning Complex Information
664
The Picture Server Client
668
Web Services Description Language
668
Creating the Client
668
Adding a Web Reference
670
Displaying the Folder List
671
Displaying the File List and Choosing Files
675
.NET Remoting
678
Generating the Proxy 682
Summary 685
Exercises 686
Exercise 1
686
Chapter 21: Deploying Your Application
687
What Is Deployment?
687
ClickOnce Deployment
688
XCOPY Deployment
693
Creating a Visual Studio 2005 Setup Application
693
Creating a Setup application
694
User Interface Editor
697
Deploying Different Solutions
700
Private Assemblies
700
Shared Assemblies
701
Deploying Desktop Applications
702
Deploying Web Applications
702
Deploying XML Web Services
702
Useful Tools
702
Summary 703
Exercises
703
Exercise 1
703
Exercise 2
704
Chapter 22: Building Mobile Applications
705
Understanding the Environment
705
Common Language Runtime
706
ActiveSync
706
Common in the Compact Framework
707
The Compact Framework Classes
708
Building a Pocket PC Game
711
Summary 723
Exercise
723
Appendix A: Where To Now?
725
Online Resources
726
P2P.Wrox.com
726
Microsoft Resources
726
Other Resources
727
Offline Resources (Books)
727
Professional VB .NET, 2nd Edition
727
xxv
Contents
Appendix B: Implementing the Microsoft Solutions Framework
731
Software Development Life Cycle
732
Microsoft Solutions Framework
732
The Envisioning Phase
733
Problem Statement 733
Goals 733
Define Roles 733 Create a Scope Document 734 Risk Analysis 734
The Planning Phase
734
The Developing Phase
734
Setup: Building Staging Areas for Development and Testing 734 Completing the Prototype 735 Completing the Code 735 Supply Application Documentation 735
The Testing Phase
735
The Deployment Phase
735
Managing Tradeoffs
736
Defining Success with the MSF
737
Summary 737
Appendix C: An Introduction to Security
739
Code Access Security (CAS)
740
Permissions
741
Security Policy
741
Evidence
741
Secure Sockets Layer
742
Finding Answers
743
Summary 744
Appendix D: Solutions
745
Acknowledgments
This project was made possible by a number of people. First, thanks go out to Thearon for helping me get involved in a project like this. Thanks buddy. Next is everyone at Wiley Publishing, especially Sydney Jones, Katie Mohr, and Todd Meister. Without the help from you three, I would have been so lost and this book would not have been possible. Also, thanks to Annette Cloninger for helping me. And finally, thanks to my beautiful wife, Jennifer, for putting up with me while I put my life on hold for so many months to get this done (and some pretty late nights too).
Introduction
Visual Basic 2005 is Microsoft’s latest version of the highly popular Visual Basic .NET programming lan-guage, one of the many languages supported in Visual Studio 2005. Visual Basic 2005’s strength lies in its ease of use and the speed at which you can create Windows applications, Web applications, mobile device applications, and Web Services.
In this book, we will introduce you to programming with Visual Basic 2005 and show you how to create the types of applications and services mentioned above. Along the way you’ll also learn about object-oriented techniques and learn how to create your own business objects and Windows controls.
Microsoft’s .NET Framework provides Visual Basic 2005 programmers with the ability to create full object oriented programs, just like the ones created using C# or C++. The .NET Framework provides a set of base classes that are common to all programming languages in Visual Studio 2005, which provides you with the same ability to create object-oriented programs as a programmer using C# or C++.
This book will give you a thorough grounding in the basics of programming using Visual Basic 2005; from there the world is your oyster.
Who Is This Book For?
This book is designed to teach you how to write useful programs in Visual Basic 2005 as quickly and eas-ily as possible.
There are two kinds of beginners for whom this book is ideal:
❑ You’re a beginner to programming and you’ve chosen Visual Basic 2005 as the place to start. That’s a great choice! Visual Basic 2005 is not only easy to learn; it’s also fun to use and very powerful.
❑ You can program in another language but you’re a beginner to .NET programming. Again, you’ve made a great choice! Whether you’ve come from Fortran or Visual Basic 6, you’ll find that this book quickly gets you up to speed on what you need to know to get the most from Visual Basic 2005.
What Does This Book Cover?
and controls, how your code should handle unexpected events, what object-oriented programming is, how to use it in your applications, and so on) we’ll show you some of the areas you might want to try your hand at next:
❑ Chapters 1 through 8 provide an introduction to Visual Studio 2005 and Windows programming.
❑ Chapter 9 provides an introduction to application debugging and error handling.
❑ Chapters 10 through 12 provide an introduction to object-oriented programming and building objects.
❑ Chapters 13 and 14 provide an introduction to graphics in Windows applications.
❑ Chapters 15 and 16 provide an introduction to programming with databases and covers Access, SQL Server, and ADO.NET.
❑ Chapter 17 provides an introduction to ASP.NET and shows you how to write applications for the Web.
❑ Chapter 19 provides a brief introduction to XML; a powerful tool for integrating your applica-tions with others—regardless of the language they were written in.
❑ Chapter 20 introduces you to Web Services; a technology whereby functionality offered on the Internet can be accessed by your applications and seamlessly integrated into them.
❑ Chapter 21 introduces you to building applications for mobile devices using the Compact Framework classes.
What Do I Need to Run V isual Basic 2005?
Apart from a willingness to learn, all you’ll need for the first 14 chapters are a PC running Windows 2000, Windows XP (Home or Professional Edition), or Windows Server 2003; Internet Explorer; and of course:
❑ Microsoft Visual Basic 2005 Express Edition
or
❑ Microsoft Visual Basic 2005 Standard Edition
or
❑ Microsoft Visual Basic 2005 Professional Edition
or
❑ Microsoft Visual Basic 2005 Team System
xxxi
Introduction
❑ Chapter 15 requires Microsoft Access 2000.
❑ For Chapter 16, you will need to have access to SQL Server 2000, SQL Server 2005, or SQL Server 2005 Express.
Don’t worry if you don’t have these products already and want to wait a while before you purchase them. You should still find that you get a lot out of this book.
Conventions
We’ve used a number of different styles of text and layout in this book to help differentiate between the different kinds of information. Here are examples of the styles we use and an explanation of what they mean.
Try It Out
How Do They Work?
1. Each step has a number. 2. Follow the steps through.
3. Then read the subsequent “How It Works” to find out what’s going on.
Background information, asides, and references appear in text like this.
❑ Bullets appear indented, with each new bullet marked like this.
Code has several styles. If it’s a word that we’re talking about in the text—for example, when discussing a For. . . Nextloop, it’s in this font. If it’s a block of code that can be typed as a program and run, it’s also in a gray box:
Private Sub btnAdd_Click(ByVal sender As System.Object, _ ByVal e As System.EventArgs) Handles btnAdd.Click Dim n As Integer
n = 27
MessageBox.Show(n) End Sub
Sometimes you’ll see code in a mixture of styles, like this:
Private Sub btnAdd_Click(ByVal sender As System.Object, _ ByVal e As System.EventArgs) Handles btnAdd.Click Dim n As Integer
n = 27 n = n + 2
MessageBox.Show(n) End Sub
Customer Suppor t
We always value hearing from our readers, and we want to know what you think about this book: what you liked, what you didn’t like, and what you think we can do better next time. You can send us your comments by e-mail to [email protected]. Please be sure to mention the book title in your message.
How to Download the Sample Code for the Book
When you visit the Wrox site, www.wrox.com/, simply locate the title through our Search facility or by using one of the title lists. Click Download in the Code column or Download Code on the book’s detail page.
The files that are available for download from our site have been archived using WinZip. When you have saved the attachments to a folder on your hard drive, you need to extract the files using a decom-pression program such as WinZip, PKUnzip, or UltimateZip. When you extract the files, the code is usu-ally extracted into chapter folders. When you start the extraction process, ensure that your
decompression software is set to use folder names.
Errata
We’ve made every effort to make sure that there are no errors in the text or in the code. However, no one is perfect, and mistakes do occur. If you find an error in one of our books, like a spelling mistake or a faulty piece of code, we would be very grateful to have your feedback. By sending in errata, you may save another reader from hours of frustration, and of course, you will be helping us provide even higher quality information. Simply e-mail the information to [email protected]; your information will be checked and, if correct, posted to the errata page for that title or used in subsequent editions of the book.
To find errata on the Web site, go to www.wrox.com/, and simply locate the title through our Advanced Search or title list. Click the Book Errata link, which is below the cover graphic on the book’s detail page.
If you wish to query a problem in the book directly with an expert who knows the book in detail, then e-mail [email protected], with the title of the book and the last four numbers of the ISBN in the sub-ject field of the e-mail. A typical e-mail should include the following things:
❑ The title of the book, last four digits of the ISBN (4019), and page number of the problem in the Subject field
❑ Your name, contact information, and the problem in the body of the message
We won’t send you junk mail. We need the details to save your time and ours. When you send an e-mail message, it will go through the following chain of support:
❑ Customer Support—Your message is delivered to our customer support staff, who are the first people to read it. They have files on most frequently asked questions and will answer anything general about the book or the Web site immediately.
xxxiii
Introduction
❑ The authors—Finally, in the unlikely event that the editor cannot answer your problem, they will forward the request to the author. We do try to protect the author from any distractions to their writing; however, we are quite happy to forward specific requests to them. All Wrox authors help with the support on their books. They will e-mail the customer and the editor with their response, and again all readers should benefit.
The Wrox Support process can offer support only to issues that are directly pertinent to the content of our published title. Support for questions that fall outside the scope of normal book support is provided via the community lists at http://p2p.wrox.com/forum.
p2p.wrox.com
For author and peer discussions, join the P2P mailing lists. Our unique system provides programmer-to-programmer contact on mailing lists, forums, and newsgroups, all in addition to our one-to-one e-mail support system. If you post a query to P2P, you can be confident that it is being examined by many Wrox authors and other industry experts who are present on our mailing lists. At p2p.wrox.comyou will find a number of different lists that will help you, not only while you read this book, but also as you develop your own applications. Particularly appropriate to this book are the beginning_vband vb_dotnet lists.
To subscribe to a mailing list just follow these steps:
1. Go to http://p2p.wrox.com/.
2. Choose the appropriate category from the left menu bar. 3. Click the mailing list you wish to join.
4. Follow the instructions to subscribe and fill in your e-mail address and password. 5. Reply to the confirmation e-mail you receive.
6. Use the subscription manager to join more lists and set your e-mail preferences.
Why This System Offers the Best Support
1
Welcome to V isual
Basic 2005
The goal of this book is to help you come up to speed with the Visual Basic 2005 language even if you have never programmed before. You will start slowly and build on what you learn. So take a deep breath, let it out slowly, and tell yourself you can do this. No sweat! No kidding!
Programming a computer is a lot like teaching a child to tie his shoes. Until you find the correct way of giving the instructions, not much gets accomplished. Visual Basic 2005 is a language in which you can tell your computer how to do things. But, like a child, the computer will understand only if you explain things very clearly. If you have never programmed before, this sounds like an arduous task, and sometimes it is. However, Visual Basic 2005 gives you a simple language to explain some complex things. Although it never hurts to have an understanding of what is happening at the low-est levels, Visual Basic 2005 frees the programmer from having to deal with the mundane complexi-ties of writing Windows programs. You are free to concentrate on solving problems.
Visual Basic 2005 helps you create solutions that run on the Microsoft Windows operating system. If you are looking at this book, you might have already felt the need or the desire to create such programs. Even if you have never written a computer program before, as you progress through the Try It Out exercises in this book, you will become familiar with the various aspects of the Visual Basic 2005 language, as well as its foundation in Microsoft’s .NET Framework. You will find that it is not nearly as difficult as you have been imagining. Before you know it, you will be feeling quite comfortable creating a variety of different types of programs with Visual Basic 2005. Also (as the name .NET implies) Visual Basic 2005 can be used to create applications for use over the Internet. You can also create mobile applications for Pocket PCs and SmartPhones. However, when learning any new technology, you have to walk before you can run, so in this book you will begin by focusing on Windows applications before extending your boundaries to other platforms.
In this chapter, we will cover the following subjects:
❑ The installation of Visual Basic 2005
❑ How to create a simple Windows program
❑ How to use and leverage the integrated help system
Windows Versus DOS Programming
A Windows program is quite different from its ancient relative, the MS-DOS program. A DOS program follows a relatively strict path from beginning to end. Although this does not necessarily limit the func-tionality of the program, it does limit the road the user has to take to get to it. A DOS program is like walking down a hallway; to get to the end you have to walk down the hallway, passing any obstacles that you may encounter. A DOS program would only let you open certain doors along your stroll.
Windows, on the other hand, opened up the world of event-driven programming. Eventsin this context include, for example, clicking a button, resizing a window, or changing an entry in a text box. The code that you write responds to these events. To go back to the hallway analogy: In a Windows program, to get to the end of the hall, you just click on the end of the hall. The hallway can be ignored. If you get to the end and realize that is not where you wanted to be, you can just set off for the new destination with-out returning to your starting point. The program reacts to your movements and takes the necessary actions to complete your desired tasks (Visual Basic 2005).
Another big advantage in a Windows program is the abstraction of the hardware; which means that Windows takes care of communicating with the hardware for you. You do not need to know the inner workings of every laser printer on the market just to create output. You do not need to study the schematics for graphics cards to write your game. Windows wraps up this functionality by providing generic routines that commu-nicate with the drivers written by hardware manufacturers. This is probably the main reason that Windows has been so successful. The generic routines are referred to as the Windows Application Programming Interface(API).
Before Visual Basic 1.0 was introduced to the world in 1991, developers had to be well versed in C and C++ programming, as well as the building blocks of the Windows system itself, the Windows API. This complexity meant that only dedicated and properly trained individuals were capable of turning out soft-ware that could run on Windows. Visual Basic changed all of that, and it has been estimated that there are now as many lines of production code written in Visual Basic as in any other language.
Visual Basic changed the face of Windows programming by removing the complex burden of writing code for the user interface (UI). By allowing programmers to drawtheir own UI, it freed them to concen-trate on the business problems they were trying to solve. Once the UI is drawn, the programmer can then add the code to react to events.
Visual Basic has also been extensiblefrom the very beginning. Third-party vendors quickly saw the mar-ket for reusable modules to aid developers. These modules, or controls, were originally referred to as VBXs (named after their file extension). Prior to Visual Basic 5.0, if you did not like the way a button behaved, you could either buy or create your own, but those controls had to be written in C or C++. Database access utilities were some of the first controls available. Version 5 of Visual Basic introduced the concept of ActiveX, which allowed developers to create their own ActiveX controls.
Visual Basic. There was no need to rely on third-party controls. Microsoft accomplished this task with the introduction of Data Access Objects(DAO), which allowed programmers to manipulate data with the same ease as manipulating the user interface.
Versions 4.0 and 5.0 extended the capabilities of Version 3.0 to allow developers to target the new Windows 95 platform. Crucially they also made it easier for developers to write code, which could then be manipulated to make it usable to other language developers. Version 6.0 provided a new way to access databases with the integration of ActiveX Data Objects(ADO). The ADO feature was developed by Microsoft to aid Web developers using Active Server Pages to access databases. All of the improve-ments to Visual Basic over the years have ensured its dominant place in the programming world. It helps developers write robust and maintainable applications in record time.
With the release of Visual Basic .NET in February 2002, most of the restrictions that used to exist have been obliterated. In the past, Visual Basic has been criticized and maligned as a “toy” language, as it did not provide all of the features of more sophisticated languages such as C++ and Java. Now, Microsoft has removed these restrictions and made Visual Basic .NET a very powerful development tool. This trend continues with Visual Basic 2005. Although not as drastic a change as from Visual Basic 6 to Visual Basic .NET, there are enough improvements in the language and integrated development environment that Visual Basic 2005 is a welcome upgrade and is a great choice for programmers of all levels.
Installing V isual Basic 2005
You may own Visual Basic 2005 in either of the following forms:
❑ As part of Visual Studio 2005, a suite of tools and languages that also includes C# (pronounced “C-sharp”), J# (pronounced “J-sharp”), and Visual C++. The Visual Studio 2005 product line includes Visual Studio Standard Edition, Visual Studio Professional Edition, Visual Studio Tools for Office, and Visual Studio Team System. All of these versions come with progressively more tools for building and managing the development of larger, enterprise-wide applications.
❑ As the Express Edition, which includes a reduced set of the tools and features that are available with Visual Studio 2005.
Both enable you to create your own applications for the Windows platform. The installation procedure is straightforward. In fact, the Visual Studio Installer is smart enough to figure out exactly what your com-puter requires to make it work.
The descriptions in the Try It Out exercise that follows are based on installing Visual Studio 2005 Architect Edition. Most of the installation processes are very straightforward, and you can accept the default instal-lation options for most environments. So, regardless of which edition you are installing, the instalinstal-lation process should be smooth when accepting the default installation options.
Try It Out
Installing Visual Basic 2005
1.
The Visual Studio 2005 CD has an auto-run feature, but if the Setup screen does not appear after inserting the CD, you have to run setup.exefrom the root directory of the CD. To do this, go to your Windows Start menu (usually found right at the bottom of your screen) and select Run. Then type d:\ setup.exeinto the Open box, where dis the drive letter of your CD drive. After the setup program initializes, you will see the screen as shown in Figure 1-1.3
2.
This dialog box shows the order in which the installation takes place. To function properly, Visual Basic 2005 requires that several updates be installed on your machine, such as Service Pack 1 for Windows XP. The setup program will inform you if these updates are not installed. You should then install any required updates before proceeding with the installation of Visual Studio 2005. Step 1 installs Visual Studio 2005, so click the Install Visual Studio link.Figure 1-1
3.
After agreeing to the End User License agreement, click Continue to proceed to the next step.4.
As with most installations, you will be presented with an option list of components to install (see Figure 1-2). You can choose to install only the features that you need. For example, if your drive space is limited and you have no immediate need for Visual C++ 2005, you can exclude it from the installation. You will also be given the chance to select the location of items (although the defaults should suffice unless your particular machine has special requirements). Any option that is not chosen at the initial setup can always be added later as your needs or interests change. However, if you plan on developing database applications such as those discussed in Chapter 16, you should choose to install SQL Server 2005 Express, which is the last option in the list.Three sections of information are given for each feature:
❑ The Feature description box gives you an outline of each feature and its function.
❑ The Feature Install path section outlines where the required files will be installed.
❑ Finally, the Space Allocation section illustrates how the space on your hard drive will be affected by the installation as a whole.
Figure 1-2
5.
After you have chosen all the features you want, click Install. Installation will begin and you can sit back and relax for a bit. The setup time varies depending on how many features you chose to install. As a reference, the installation process took around 20 minutes on a 2.4-GHz computer with 512 MB RAM running Windows XP Professional.6.
When installation is completed, you will see a dialog informing you that the installation has completed.Here you will see any problems that setup encountered along the way. You are also given the chance to look at the installation log. This log provides a list of all actions taken during the installation process. Unless your installation reported errors, the installation log can safely be ignored. The Visual Studio 2005 setup is nearly complete. Click Done to move on to installing the documentation.
7.
The MSDN Library installation is simple and straightforward, and this section covers the high-lights. The first screen that you will see is the initial welcome screen. Click Next to proceed.8.
You will be allowed to select the amount of the documentation you want to install, as shown in Figure 1-3. Click Next to start the installation process.If you have the spare hard drive space, it is a very good idea to install the full documentation. That way you have access to the full library, which will be important if you choose a limited set of options during the install and later add more features.
9.
After the MSDN documentation has been installed, you are returned to the initial setup screen again, and the Service Releases option is available.5
Figure 1-3
It is a good idea to select Service Releases to check for updates. Microsoft has done a good job of making software updates available through the Internet. These updates can include anything from additional documentation to bug fixes. You will be given the choice to install any updates via a Service Pack CD or the Internet. Obviously, the Internet option requires an active connection. Since updates can be quite large, a fast connection is highly recommended.
Once you have performed the update process, Visual Studio 2005 is ready to use. Now the real fun can begin! So get comfortable, relax, and let us enter the world of Visual Basic 2005.
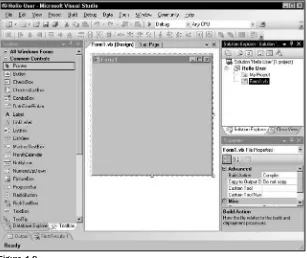
The V isual Basic 2005 IDE
The Profile Setup Page
An IDE is a way of bringing together a suite of tools that makes developing software a lot easier. Fire up Visual Studio 2005 and see what you’ve got. If you used the default installation, go to your Windows Start menu and then Programs (All Programs on Windows XP and Windows Server 2003)➪Microsoft Visual Studio 2005➪Microsoft Visual Studio 2005. A splash screen will briefly appear, and then you should find yourself presented with the Choose Default Environment Settings dialog box. Select the Visual Basic Development Settings option and then click Start Visual Studio. The Microsoft Development Environment will appear, as shown in Figure 1-4.
Figure 1-4
The Menu
By now, you may be a bit eager to start writing some code. But first, begin your exploration of the IDE by looking at the toolbar and menu, which, as you will learn are not really all that different from the toolbars and menus you have seen in other Microsoft software such as Word, Excel, and PowerPoint.
Visual Studio 2005’s menu is dynamic, meaning that items will be added or removed depending on what you are trying to do. While you are looking at the blank IDE, the menu bar will consist only of the File, Edit, View, Data, Tools, Window, Community, and Help menus. When you start working on a project, however, the full Visual Studio 2005 menu appears as shown in Figure 1-5.
Figure 1-5
7
At this point, there is no need to cover each menu topic in great detail. You will become familiar with each of them as you progress through the book. Here is a quick rundown of what activities each menu item pertains to:
❑ File:It seems every Windows program has a File menu. It has become the standard where you should find, if nothing else, a way to exit the application. In this case, you can also find ways of opening and closing single files and whole projects.
❑ Edit:The Edit menu provides access to the items you would expect: Undo, Redo, Cut, Copy, Paste, and Delete.
❑ View:The View menu provides quick access to the windows that exist in the IDE, such as the Solution Explorer, Properties window, Output window, Toolbox, and so on.
❑ Project:The Project menu allows you to add various files to your application such as forms and classes.
❑ Build:The Build menu becomes important when you have completed your application and want to run it without the use of the Visual Basic 2005 environment (perhaps running it directly from your Windows Start menu, as you would any other application such as Word or Access).
❑ Debug: The Debug menu allows you to start and stop running your application within the Visual Basic 2005 IDE. It also gives you access to the Visual Studio 2005 debugger. The debugger allows you to step through your code while it is running to see how it is behaving.
❑ Data: The Data menu helps you to use information that comes from a database. It appears only when you are working with the visual part of your application (the [Design] tab will be the active one in the main window), not when you are writing code. Chapters 15 and 16 will intro-duce you to working with databases.
❑ Format: The Format menu also appears only when you are working with the visual part of your application. Items on the Format menu allow you to manipulate how the controls you create will appear on your forms.
❑ Tools: The Tools menu has commands to configure the Visual Studio 2005 IDE, as well as links to other external tools that may have been installed.
❑ Window: The Window menu has become standard for any application that allows more than one window to be open at a time, such as Word or Excel. The commands on this menu allow you to switch between the windows in the IDE.
❑ Community: The Community menu provides access to developer resources, where you can ask questions, search for code snippets, and send product feedback.
❑ Help: The Help menu provides access to the Visual Studio 2005 documentation. There are many different ways to access this information (for example, via the help contents, an index, or a search). The Help menu also has options that connect to the Microsoft Web site to obtain updates or report problems.
The Toolbars
options. For example, the leftmost icon (New Project) on the default toolbar (called the Standard tool-bar), shown in Figure 1-6, is available from the menu by navigating to File➪New ➪ Project.
Figure 1-6
The toolbar is segmented into groups of related options, which are separated by a vertical bar. The first five icons provide access to the commonly used project and file manipulation options available through the File and Project menus, such as opening and saving files.
The next group of icons is for editing (Cut, Copy, and Paste). The third group of icons is for undoing and redoing edits and for navigating through your code.
The fourth group of icons provides the ability to start your application running (via the green triangle). You can also choose a configuration for your solution and target specific platforms.
The next section allows you to find text in your code throughout the entire document, project, or solution.
The final group of icons provides quick links back to the Solution Explorer, Properties window, Toolbox, Object Browser, Start Page, and other windows. If any of these windows is closed, clicking the appropri-ate icon will bring it back into view.
If you forget what a particular icon does, you can hover your mouse pointer over it so that a ToolTip appears displaying the name of the toolbar option.
You could continue to look at each of the windows by clicking on the View menu and choosing the appropriate window. But, as you can see, they are all empty at this stage and therefore not too revealing. The best way to look at the capabilities of the IDE is to use it while writing some code.
Creating a Simple Application
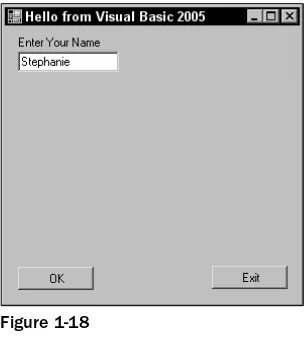
To finish your exploration of the IDE, you need to create a project, so that the windows shown earlier in Figure 1-4 actually have some interesting content for you to look at. In the following Try It Out, you are going to create a very simple application called HelloUser that will allow you to enter a person’s name and display a greeting to that person in a message box.
Add Item
Try It Out
Creating a HelloUser Project
1.
Click the New Project button on the toolbar.2.
The New Project dialog box will open. Make sure you have Visual Basic selected in the Project Types tree-view box to the left. Next, select Windows Application in the Templates box on the right. Finally, type Hello Userin the Name text box and click OK. Your New Project dialog box should look like Figure 1-7.Figure 1-7
3.
The IDE will then create an empty Windows application for you. So far, your Hello User pro-gram consists of one blank window, called a Windows Form (or sometimes just a form), with the default name of Form1.vb, as shown in Figure 1-8.Whenever Visual Studio 2005 creates a new file, either as part of the project creation process or when you create a new file, it will use a name that describes what it is (in this case, a form) followed by a number.
Windows in the Visual Studio 2005 IDE
At this point, you can see that the various windows in the IDE are beginning to show their purposes, and you should take a brief look at them now before you come back to the Try It Out. Note that if any of these windows are not visible on your screen, you can use the View menu to select and show them. Also, if you do not like the location of any particular window, you can move it by clicking on its title bar (the blue bar at the top) and dragging it to a new location. The windows in the IDE can float(stand out on their own) or be docked(as they appear in Figure 1-8). The following list introduces the most common windows:
Figure 1-8
❑ Toolbox: The Toolbox contains reusable controls and components that can be added to your application. These can range from buttons to data connectors to customized controls that you have either purchased or developed.
❑ Design window:The Design window is where a lot of the action takes place. This is where you will draw your user interface on your forms. This window is sometimes referred to as the Designer.
❑ Solution Explorer:The Solution Explorer window contains a hierarchical view of your solution. Asolutioncan contain many projects, whereas a projectcontains forms, classes, modules, and components that solve a particular problem.
❑ Properties:The Properties window shows what propertiesthe selected object makes available. Although you can set these properties in your code, sometimes it is much easier to set them while you are designing your application (for example, drawing the controls on your form). You will notice that the File Name property has the value Form1.vb. This is the physical file name for the form’s code and layout information.
Try It Out
Creating a HelloUser Project (cont.)
1.
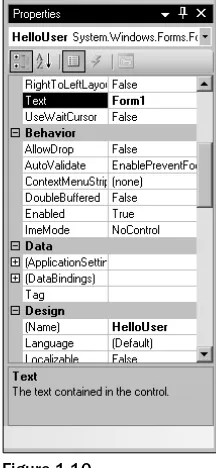
Change the name of your form to something more indicative of what your application is. Click on Form1.vbin the Solution Explorer window. Then, in the Properties window, change the File Name property from Form1.vbto HelloUser.vband press Enter, as shown in Figure 1-9. When changing properties you must either press Enter or click off the property for it to take effect.11
Figure 1-9
2.
Notice that the form’s filename has also been updated in the Solution Explorer to read HelloUser.vb.3.
Now click the form displayed in the Design window. The Properties window will change to dis-play the form’s Form properties (instead of the File properties, which you have just been look-ing at). You will notice that the Properties window is dramatically different. The difference is the result of two different views of the same file. When the form name is highlighted in the Solution Explorer window, the physical file properties of the form are displayed. When the form in the Design window is highlighted, the visual properties and logical properties of the form are displayed.The Properties window allows you to set a control’s properties easily. Properties are a particular object’s set of internal data; they usually describe appearance or behavior. In Figure 1-10 you can see that properties are grouped together in categories — Accessibility (not shown), Appearance (header is not shown), Behavior, Data, Design, Focus (not shown), Layout (not shown), Misc (not shown), and Window Style (not shown).
You can see that under the Appearance category (header not shown), even though we changed the file name of the form to HelloUser.vb, the text or caption of the form is still Form1.
4.
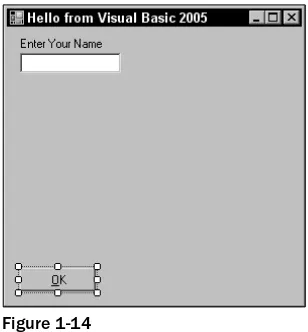
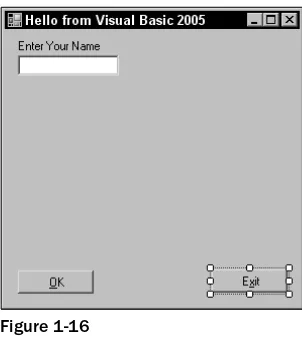
Right now, the title (Text property) of your form (displayed in the bar at the top) is Form1. This is not very descriptive, so change it to reflect the purpose of this application. Locate the Text property in the Appearance section of the Properties window. Change the Text property’s value to Hello from Visual Basic 2005and press Enter. Notice that the form’s title has been updated to reflect the change.If you have trouble finding properties, click the little AZ button on the toolbar toward the top of the Properties window. This changes the property listing from being ordered by category to being ordered by name.
Figure 1-10
That was simple, but your little application isn’t doing much at the moment. Let us make it a little more interactive. To do this, you are going to add some controls — a label, a text box, and two buttons to the form. This will let you see how the Toolbox makes adding functionality quite simple. You may be won-dering at this point when you will actually look at some code. Soon! The great thing about Visual Basic 2005 is that you can develop a fair amount of your applicationwithoutwriting any code. Sure, the code is still there, behind the scenes, but, as you will see, Visual Basic 2005 writes a lot of it for you.
The Toolbox
The Toolbox is accessed via the View➪Toolbox menu option, the Toolbox icon on the Standard menu bar, or by pressing Ctrl+Alt+X. Alternatively, the Toolbox tab is displayed on the left of the IDE; hover-ing your mouse over this tab will cause the Toolbox window to fly out, partially coverhover-ing your form.
The Toolbox contains a Node type view of the various controls and components that can be placed onto your form. Controls such as text boxes, buttons, radio buttons, and combo boxes can be selected and thendrawnonto your form. For the HelloUser application, you will be using only the controls in the Common Controls node. In Figure 1-11, you can see a listing of common controls for Windows Forms.
Controls can be added to your forms in any order, so it does not matter if you add the label control after the text box or the buttons before the label. In the next Try It Out, you start adding controls.
13
Figure 1-11
Try It Out
Adding Controls to the HelloUser Application
1.
Stop the project if it is still running, because you now want to add some controls to your form. The simplest way to stop your project is to click the _ button in the top-right corner of the form. Alternatively, you can click the blue square in the IDE (which displays a ToolTip that says “Stop Debugging” if you hover over it with your mouse pointer).2.
Add a Label control to the form. Click Label in the Toolbox and drag it over the form’s Designer and drop it in the desired location. (You can also place controls on your form by double-clicking on the required control in the Toolbox or clicking on the control in the Toolbox and then draw-ing it on the form.)3.
If the Label control you have just drawn is not in the desired location, it really isn’t a problem. Once the control is on the form, you can resize it or move it around. Figure 1-12 shows what the control looks like after you place it on the form. To move it, click the dotted border and drag it to the desired location. The label will automatically resize itself to fit the text that you enter in the Text property.window, set your new label’s Text property to Enter Your Name. Notice that, once you press enter or click off of the property, the label on the form has automatically resized itself to fit the Text property. Now set the Name property to lblName.
Figure 1-12
5.
Now, directly beneath the label, you want to add a text box, so that you can enter a name. You are going to repeat the procedure you followed for adding the label, but this time make sure you select the TextBox control from the toolbar. After you have dragged-and-dropped (or double-clicked) the control into the appropriate position as shown in Figure 1-13, use the Properties window to set its Name property to txtName.Notice the sizing handles on the left and right side of the control. You can use these handles to resize the text box horizontally.
Figure 1-13