•
•
•
•
•
Practical
LEGO
Technics
Contents at a Glance
n
About the Author ...ix
n
About the Technical Reviewer ...x
n
Acknowledgments ...xi
n
Introduction ...xii
n
Chapter 1: Getting Started with LEGO Technic ...1
n
Chapter 2: Creating a Motorized LEGO Technic Vehicle ...21
n
Chapter 3: Steering and Controlling Your LEGO Technic Creation ...49
n
Chapter 4: Light It Up with LEGO Lights! ...71
n
Chapter 5: Creating an All-Terrain LEGO Technic Vehicle ...81
n
Chapter 6: Technic Construction Vehicles and Equipment ...117
n
Chapter 7: LEGO Technic Aviation: Airplanes and Helicopters ...159
n
Appendix A: Parts List ...205
I kept building with LEGO, and I am now 40 years old. Now I have accrued many sets and have filled two large boxes with pieces. I have kids of my own, but if I wasn’t so busy writing and being a father, I would create worlds for LEGO minifigs and build just about every machine that I could with these bricks.
This book is for any LEGO builder that dares to dream and then build what they can imagine.
I would also like to dedicate this book to my wife, who showed me how to do a “photobox” that helped me to photograph my LEGO creations.
Also helpful were Katie Sullivan and James Markham, the editorial team from Apress who made this project much easier.
Introduction
During the 1980s, the LEGO company used the phrase “Toys to Grow Up With” as their slogan. While many play with these “toys” at a young age, most stop playing with LEGO as they reach adolescence. I stopped playing when I was 12, simply because I thought this is what a person of my age was “supposed” to do. Even though I had “quit” LEGO building, I never got rid of my old LEGO sets. Eventually, I remembered the joy that building with LEGO had brought me and went back to building.
such as the axles, connector pins, and gears, looked strange to me. Considering that the basic LEGO construction is from the bottom up, the LEGO Technic allows the user to build out from the sides, which allows for a lot of “out-of-the-box” thinking.
LEGO Technic is able to be an educational toy while still remaining fun at the same time. And when I say “fun,” I am not talking about mindless amusement like watching bad television, but the type of fun that involves the brain, like Sudoku or crossword puzzles. LEGO actually makes children think more, and the Technic sets teach a lot about basic machinery. Children are often quite curious about how things like automobiles and other technological wonders work, but as adults, we don’t care about how machines work but rather that our machines work. With LEGO Technic, my technological curiosity was well-sated.
With LEGO Technic, I learned that steering is not just turning the wheel and the tires just move. I saw that a steering mechanism was no longer magic, but the simple application of rack and pinion technology. I even found that the steering wheel in my LEGO Go-Kart was not too different from what most cars actually use to steer.
Over the years, these expert sets became increasingly more complex. LEGO Technic is not to be confused with the LEGO Mindstorms series, although there are a lot of similarities. Apress has published many books about that particular series if you are interested in building more programmable LEGO Creations, such as:
• Winning Design! LEGO MINDSTORMS NXT Design Patterns for Fun and Competition
by James Jeffrey Trobaugh (Apress, 2010).
• LEGO Spybotics Secret Agent Training Manual by Ralph Hempel (Apress, 2002). • LEGO MINDSTORMS NXT:Mars Base Command by James Floyd Kelly (Apress,
2006).
• LEGO MINDSTORMS NXT-G Programming Guide (First and Second Editions) by
James Floyd Kelly (Apress, 2007 and 2011).
• LEGO MINDSTORMS NXT 2.0 The King’s Treasure by James Floyd Kelly (Apress,
2009).
• LEGO MINDSTORMS NXT The Mayan Adventure by James Floyd Kelly (Apress,
2006).
• Extreme NXT: Extending the LEGO MINDSTORMS NXT to the Next Level (First and
Second Editions) by Michael Gasperi and Philippe E. Hurbain (Apress, 2007 and 2009).
• Extreme MINDSTORMS An Advanced Guide to LEGO MINDSTORMS by Michael
Gasperi, Ralph Hempel, Luis Villa, and Dave Baum (Apress, 2000).
• Dave Baum’s Definitive Guide to LEGO MINDSTORMS, Second Edition by Dave
Baum (Apress, 2002).
• Competitive MINDSTORMS, A Complete Guide to Robotic Sumo Using LEGO MINDSTORMS by David J. Perdue (Apress, 2004).
How To Use This Book
I have seen a lot of interesting books about LEGO, and many of these “idea books” show a model so you can imitate it yourself, piece by piece. There is nothing wrong with copying, as learning by repetition and the imitation of what has come before is the only way we can advance to build more original and improved models. After all, you cannot solve complex differential equations unless you have learned 2 + 2. However, true mathematics involves discovery of new problems, solutions, and equations—and textbook problems must be left behind for that to happen.
What I don’t want to do is show how to create a Corvette, and then have you, the reader, just follow the numbered steps to create one of your own at home. Instead, I want to show you how to make a successful LEGO frame for a vehicle, how to motorize and take remote control of it with Power Functions, and how add other features onto your LEGO creation to make it as lifelike as possible (in a scale model a fraction of its size).
What you will see in this book are designs to help you create LEGO Technic masterpieces, and I will show you basic ways to do basic functions on a LEGO Technic creation. What you will see in this book are some models that were created with the help several programs, which include LEGO Digital Designer and LDraw. This is not meant to be a book with just fully completed models. I could have done so by creating a wordless book where all you do is just work LEGO steps one through whatever. To heck with that! The real challenge (and fun) of LEGO is to create something very new, something that no one has built before. I guarantee that you will feel quite a surge as you apply some new method of LEGO technology to your own creation. To me, nothing beats the rush of creating something new, and I hope to share that with you.
In other words, think of this book as an abridged LEGO cookbook. I will show you how to make complex ingredients, and you will need to decide how best to combine these complex ingredients together to make some terrific LEGO Technic recipes.
How This Book Is Ordered
I organized the chapters in a way that they build upon each other, and if you want to skip ahead to chapters because you feel that you have already mastered the ones that came before it, please don’t feel that I would be somehow offended. I fully realize that most books don’t recommend skipping chapters, but this book permits you to do whatever is valuable to you as far as LEGO Technic is concerned.
• Chapter 1: Getting Started with LEGO Technic. This is essentially a chapter for
• Chapter 6: Technic Construction Vehicles and Equipment. In this chapter, I cover
how to assemble features on a LEGO model that you would be used at a
construction site. I’m talking about swivels, bulldozer scoops, cranes, and dump truck mechanisms.
• Chapter 7: LEGO Technic Aviation: Airplanes and Helicopters. This chapter is
n n n
Getting Started with LEGO Technic
LEGO is no longer just for children, and the Technic series encourages both children and adults to build complex vehicles and machines from these simple bricks. The purpose of this book is to show you how to create interesting LEGO Technic creations, but I fully encourage your own creativity and improvisation.
I figure that there are two types of people reading this book. There are those folks who have been playing with LEGO for as long as they can remember (perhaps in their Duplo or Quattro days) and are quite familiar with traditional LEGO pieces. The second type is just starting with LEGO Technic. Ideally, I hope that you are an adult trying to teach a child or teenager how machines work via the power of LEGO. If you are of the second type, you are probably wondering where to begin. You also probably can’t wait to get started building some of the models you saw when you flipped through the printed book or
previewed the e-book. It’s fully possible to construct these models in a digital program, and there are a few programs devoted to LEGO building that I will detail later. However, if you are like me, then you want to build these LEGO models in real life—and even play with them. Yeah, you know what I’m talking about. My first bit of advice is to make certain that you have all the pieces that you need before you begin building. This is why all the steps of my LEGO models include a list (with pictures) of the necessary parts. There is even a list of all the parts for each model in the Appendix. LEGO Technic bricks differ from that of traditional sets, and if you are looking for certain pieces, I recommend LEGO Pick a Brick or other online LEGO catalogs like BrickLink.com for getting the components you need. I will discuss those online catalogs later, but right now I want to discuss the different types of LEGO Technic pieces including bricks, beams, levers, gears, racks, axles, bushes, connector pegs, cross blocks, angle elements, steering parts, and more.
These bricks are not included in the recent Technic sets since the switch to more “studless” forms, but they were the groundbreaking bricks of the first generation of Technic, the Expert Builders. This book is full of LEGO Technic models, but very few will be using this type of LEGO Technic pieces. The majority of models in this book will be made with studless beams.
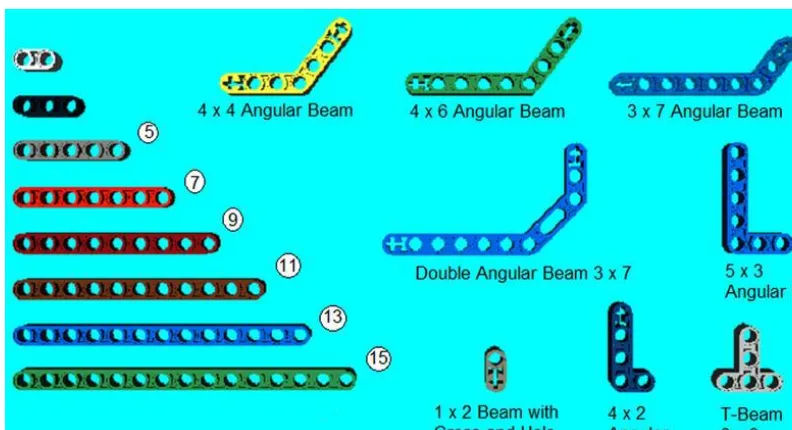
Beams
Circa 2000, Technic became less about actual bricks with studs and more about beams. Many of the Technic sets do not have any traditional studded bricks. Some people have stated that the studless construction makes it harder to build a LEGO Technic model, and I will have to say that I agree with them.
The issue with the studless beams and other parts is that you must have a good idea of the shape of your finished product before you begin to build. Fortunately, there is always room for improving your model, and in some cases studless bricks can be replaced more easily than traditional top-down
traditional LEGO bricks. Each beam is about as thick as a 1 x 1 brick, and they are measured just like their studded counterparts: based on the number of studs they take up. The difference between studded bricks and studless beams is that the measurement of a beam is always equal to the number of holes on it. The straight beams in Figure 1-2 are designated with a number; this is so you can quickly determine the beam that you need without doing too much hole counting. While LEGO Technic studded bricks are usually even-numbered, LEGO beams are usually odd-numbered, with the exception of the 2M.
You will notice that the beams come in a variety of angles. The 4 x 4 Angular Beam, 4 x 6 Angular Beam, and 3 x 7 Angular Beam are at 53.1 degrees, and the Double Angular Beam 3 x 7 offers two angles. The 90 degree angle pieces include the 3 x 5, 4 x 2, and the 3 x 3 T-Beam.
Another thing that you will notice about some of the angular pieces is that they end with cross holes. These are made to hold axles, and any axle inserted in these cross holes is well anchored. The 1 x 2 beam has a cross and hole, making it useful in all manner of ways.
Levers
This is a very broad category of Technic pieces, and the first thing you should know about them is that a lever is half has thick as a beam. In other words, you must stack two levers together to form something the width of a beam.
The levers in sizes 4M and below have cross-shaped openings that accommodate an axle (also known as a cross hole) at their ends, while the 5M half beams are made for loosely accepting connector pins and axles. Levers are often used for joining two beams together. Note the other odd shapes like the Comb Wheel, 3 x 120, and the Triangle. They also come in a simple 3 x 3 90 degree formation as well as some fancy half beam curves that also do a 90 degree angle with three different measurements (see Figure 1-3). Note the variation of the 4M Technic Lever that has a notch in it, which is about 1M thick.
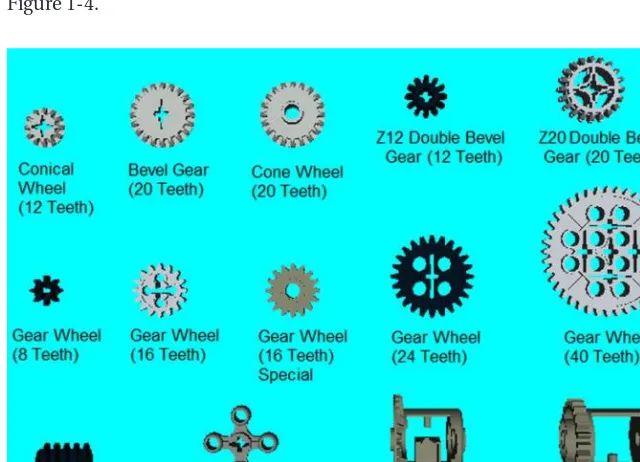
Gears
Where would any machine be without the gears that set other gears into motion? These pieces most certainly set the Technic world apart from the usual sets. They come in many forms, as you can see in Figure 1-4.
Figure 1-3. Technic levers
The conical wheels, also known as bevel gears, are flat on one side but toothed around the edges. There are two types: both have 20 teeth but one has an axle and the other has a regular connector hole. The Double Conical Wheel (available in 12 and 20 teeth) has teeth on both sides. The Conical and Double Conical Wheels can work in a parallel and perpendicular fashion. This means you can place two Double or Single Conical Wheels at 90 degrees to each other, and one will turn another.
The regular gear wheels can only turn in parallel to each other, and they come in 8, 16, 24, and 40 tooth versions. The 16 tooth version comes in two forms: an axle hole and connector pin hole (similar to the conical wheel gears).
The Worm Gear works by using another regular gear on it. Turning the Worm Gear will turn the regular gear wheel, but turning the regular gear will not turn the Worm Gear. Models in later chapters will
demonstrate the usefulness of a Worm Gear.
The Angular Wheel is very handy for doing a perpendicular gear method. To get them to mesh together, you need one in a plus shape and one in an X shape but they work in closer quarters than the Double Conical Wheels. The Differential uses three Conical Wheels (12 Teeth) that are meshed together perfectly, and it comes in handy for a free spinning axle.
Racks
Axle pieces can do more than just join two wheels together, but these particular cross-shaped rods really bring the world of Technic LEGO to life. You will see how handy they are later in the book.
Bushes
I have no idea how these pieces got their name, but if axles are the bolts of the Technic kingdom, bushes are the nuts (see Figure 1-7). They are designed to cap off axle pieces in a way that makes them snug where they are. You will see many demonstrations of this in the models of later chapters. Like axles, Technic creations would not be possible without bushes.
There are two sizes: the more circular one is a 1/2 Bush, and it is half the size of the 1M Bush for Cross Axle.
Figure 1-6. Various types of axles
Figure 1-7. Technic bushes
Connector Pegs
Cross Blocks
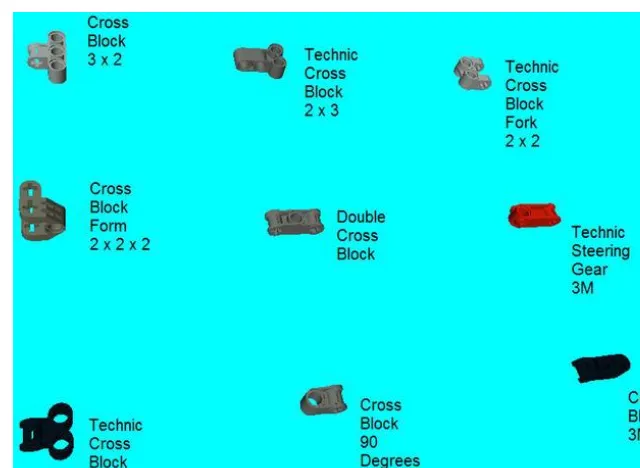
The one thing you will discover as you build with LEGO Technic is how the connector peg holes on the beams only go in one direction, but your model may call for you to place another beam at 90 degrees. Fortunately, LEGO has all kinds of pieces designed to link pieces together in odd ways; these are the cross blocks. Figure 1-9 shows some examples. I put them at an angle so you can see their unique abilities. Generally, these pieces have an odd mix of connector peg holes and cross or axle holes, each of them at 90 degrees from the other. You will use them in various models featured throughout this book. The most common ones are the Cross Block 90 Degrees, the Double Cross Block, and the Cross Block 3M.
The 3M Connector Peg can take up 2M worth of space, but there is a stop on the 1M. The Connector Peg/Cross Axle is one way to join a Cross Hole piece with a Connector Peg hole, and the 2M Snap with Cross Axle can join an axle with a connector hole. Other unique pieces include the Module Bush, Double Bush 3M, and the Beam 3M with Double Snaps.
Angle Elements
Angle elements are essentially a way of linking two axle pieces together at a certain angle. Each one is a different angle, and they have a numerical designation printed on them (but this isn’t visible in Figure 1-10).
1. 0 Degrees 2. 180 Degrees 3. 157.5 Degrees 4. 135 Degrees 5. 112.5 Degrees 6. 90 Degrees
Figure 1-9. LEGO Technic cross blocks
Panels
These panels are essentially large pieces that can fill up a lot of space, but they add a realistic looks to your LEGO Technic model. A lot of them are wing-shaped; the wing-shaped ones have a number that is actually on the part itself (like the angle elements).
In addition to these wing-shaped panel pieces, LEGO Technic also has several panels and frames that take up a lot of space but are very handy as they have through-holes for connector pegs and axles on all sides.
With Angle Elements, you can make all kinds of designs at various angles. For example, if you have eight #4 angle pieces and eight 2M axles, you can make a perfect octagon. If you have sixteen #5 pieces and 16 axles of identical measurement, you can link them together to form something that almost resembles a perfect circle. If you don’t believe me, try it.
Steering Pieces
I don’t really know how to classify the steering pieces (see Figure 1-11), but they come into play in Chapter 3. You will need them if you want to build a car with some suspension.
Extensions, Catches, and Other Miscellaneous Technic Pieces
The extensions link two axles together. Of the two types, the one with ribs holds the two axles together more firmly. A standard Catch is just an axle with a cross hole attached to the end, and the catch with the cross hole has a Bush attached in lieu of the axle. The Change-Over Catch is an excellent piece with some interesting features. The Toggle Joint is a way of joining two axles together at an angle you select, provided there is a connector peg in the through-hole. The Universal Joint is a very handy piece as it allows an axle to freely spin and bend at any angle, provided it is less than 90 degrees. See Figure 1-13.Figure 1-12. Examples of panels and beam frames in LEGO Technic
Obtaining LEGO Pieces for Your Models
In your current LEGO collection you may find every piece that you need to build some of these models. If not, then it becomes a matter of improvising. I will show you that there are several ways of doing any one thing in Technic. If you can’t do it with the pieces that you have, I highly recommend finding another way of doing it. For example, if you do not have a beam frame, you might be able to construct what you need with some beams and a few cross blocks.
Pick a Brick is one way of getting Technic pieces for specific LEGO projects, but it is not an exhaustive catalog. In other words, you will probably find that it doesn’t have every piece you require, even though you know the proper name or element ID. I also recommend using BrickLink, an unofficial LEGO site that has an extensive catalog so you can order pieces or even sets. Speaking of sets, Peeron and Brickfactory are two other sites you may find helpful if you want to build a particular LEGO set that existed in the past.
LEGO Pick a Brick
If you are like me, then you have arbitrarily named your LEGO pieces over the years. I remember playing with my sister and asking if she had any “black flat one-by-twos” or “blue two-by-fours.” After a while, you start to develop a language to describe pieces, but it may be difficult for an outsider to translate.
Let me give you another example. I once worked at a factory that made integrated circuit boards. One of the reasons I liked the work was that it reminded me of building with LEGO; the electric components were often very colorful and had to be placed on a green circuit board reminiscent of a LEGO baseplate. As you may have guessed, it was necessary to give each of the thousands of electrical components a specific identifying number just so we could keep them in some sort of order. The company decided to give the components a seven-digit number that was kind of like a phone number. The first three digits designated the type of part (resistor, capacitor, diode, transformer, or other). The last four digits represented the specific type of part from that group (for example, all the resistors had a different number that also signified its number of Ohms, the unit of resistance).
In the same manner, every LEGO piece has an official name and number as designated by the company. You can go on the LEGO site and purchase individual LEGO bricks just like you can purchase sets.
The official LEGO site (http://shop.LEGO.com/en-US/Pick-A-Brick-ByTheme) lets you pick your LEGO order piece by piece. The brick search window allows you to choose a category. The categories range from accessories to windows and doors. I won’t bother listing the many categories, but there are eight pages in the Technic category. You can also do a search by color (black, blue, green, grey, orange-brown, purple, red, white, and yellow). The category and color family are mutually exclusive choices. In other words, you cannot pick “Technic” as the category and “Grey” as the color and see a list of all the grey Technic pieces available; you must pick “Technic” or “grey.” Yeah, someone should probably do something about that, and I hope it’s fixed before you read this.
• Price: The cost per item.
You can always go back to the chart. Do not try to go back on your browser, as it will just go to whatever page you were looking for before the LEGO Pick a Brick site. You can also add to your bag from this section. Another feature worth noting is that you can find the same color of piece by hitting the “All bricks in same color,” which can open up quite a list of bricks in the same color of your selection. If you hit the “Same Brick in All Colors,” you can get the same shape of piece in multiple colors.
BrickLink
Another source for LEGO Technic pieces is BrickLink (www.bricklink.com). BrickLink is an unofficial LEGO marketplace, and it is often referred to as the “eBay of LEGO” (see Figure 1-14). If you want to buy or sell LEGO sets, new and used, this is the online place to shop.
Click “Buy” to find sets, books, gear, catalogs, and parts. At the time of writing, there are over 116 million parts available for purchase. Selecting “Parts” will result in a category tree that branches out into several types of pieces. There are 16 sub-categories for Technic including:
• Axle: Anything that is an axle or has an axle attachment.
• Brick: Any Technic brick shown in Figure 1-1 (and some I didn’t show).
• Connector: This is an umbrella term that refers to angle elements and cross blocks.
• Disk: These are disk-shaped pieces that I did not describe because I don’t use any in this book and I don’t really see them in recent sets.
• Figure Accessory: At one point in time, Technic had figures that were to the scale of the Technic vehicles. They don’t make them anymore, but here is where you can find accessories like helmets and feet.
• Flex Cable: Some Technic sets have a flexible cable that helps to create a more curvaceous shape. If you’re interested in this piece, here is a place to find it.
• Gear: A source for the parts listed in Figure 1-4.
• Liftarm: This refers to pieces like beams and levers, and all of their variations.
• Liftarm, Decorated: This refers to pieces that have stickers or printed graphics on them.
• Link: A good example of a piece like this would be the track rod shown in Figure 1-11.
• Panel: Like the examples in Figure 1-12, plus more.
• Panel, Decorated: Also like the pieces in Figure 1-12, but these often have stickers or some type of graphics on them.
• Pin: This is where you will find various types of connector pegs.
• Plate: These are flat bricks with Technic holes in them. I didn’t discuss them and don’t use any in this book.
• Shock Absorber: I discuss these pieces in Chapter 5.
• Steering: These parts are shown in Figure 1-11.
Figure 1-15. Go to www.peeron.com/scans for LEGO set instructions from LEGO’s beginning to 2008.
Figure 1-16. You will find many scans of LEGO set instructions and catalogs at www.brickfactory.com.
On either site, I highly recommend searching the catalog if you are looking for old Technic LEGO instructions. Generally, LEGO Technic sets are given a number in the 8000 range or higher, with the exception of the 900 series (from the beginning in 1977). Several model series like Bionicle are filed under the same umbrella as advanced Technic sets.
Many of the models in Peeron and BrickFactory have most of their pieces available on Pick a Brick. Peeron is especially good at cataloguing the individual pieces of a set; a search for any set will reveal the individual pieces, including their individual element ID. For example, you can see Technic set 8002 from the year 2000 with a complete list of all of its parts). Unfortunately, you may discover that the element ID on Peeron, BrickLink, or whatever site is not a perfect match to the element ID on Pick a Brick.
Also, a lot of LEGO instruction booklets show all the pieces on a single page, but this is only for recent sets available on their current catalog. You can even download these instructions as PDF files for viewing in Adobe Reader. If you want to make something that was not “new this year,” check on Peeron and BrickFactory, and order the parts on Pick a Brick or BrickLink if you can.
I would have to say that there is no “ultimate set” of Technic. The current selection in their catalog is for individual models, and some have many of one part but not so many of another part. If you’re not interested in spending too much money on LEGO, you’ll learn to adapt using the pieces that you have. Most LEGO enthusiasts simply build from whatever parts they have from particular sets that they bought in the past.
I suggest that you find a way to keep your pieces organized, as you will waste a lot of time rummaging through a pile looking for that piece that you need so you can move on to the next step. I recommend buying some kind of tackle box because the little drawers and storage containers are good at keeping pieces separate from each other. Of course, you may not want this type of organization, and that is fine. The important thing is that you are having fun.
Using Computer Graphics to Create LEGO Technic Models
You may have noticed that some of the illustrations throughout this book have been rendered to look like LEGO instructions. This was done because I did not feel a need to photograph my models as they were being assembled, and I found it much easier to use computer graphics to build the model. Granted, this may not be for everyone. If you are more comfortable getting out pieces and trying to assemble a model yourself, don’t let me get in your way. There are some advantages and disadvantages of working in 3D.Advantages of Building a Model in a Digital LEGO Program
• You can see whether or not what you are planning will actually work in reality. I once created a model of a hood that actually pops open by pulling a lever. I found that it works just as well in a 3D digital world as it does as an actual model.
• If you want to rebuild a section that is hard to access in a real model, you can just delete the section instead of having to take apart other sections of your model just to get to it. This way, you can know whether or not your rebuild will work beforehand.
model, even though I had actually built the model and proved that it would work. For some reason, the modeling program wouldn’t let me do it. I discovered that it was because the beams were not properly lined up. This is something that I could have simple tweaked on a real LEGO model, but the computer doesn’t know how to tweak. It will accept whatever model you give it.
• The more unconventional your build, the harder it is to build in 3D. When you are trying to build models with beams at certain angles, it is easier to do in real life than in a digital program. This is especially true of flexible pieces, which I will admit is one of the most difficult things to master in the 3D world.
There are three computer programs that you can download that will help you construct a LEGO creation using 3D graphics: LEGO Digital Designer, MLCAD, and LeoCAD. Each of these programs deserves its own book, but I will attempt to briefly explain how to use them. I recommend trying each one for an extended period of time. As stated before, programming in 3D takes a while to learn before it becomes instinctual and natural to the user, but the more you do it, the easier it becomes.
LEGO Digital Designer
LEGO Digital Designer is a free program that was created by the LEGO Group itself. It allows you to build models and create instructions for them in a digital world. You can download it for a Windows PC and Mac OSX at www.ldd.LEGO.com.
LEGO Digital Designer is the simplest to use of the three programs that I discuss here, and it is one of the programs that I used to create all of the LEGO instructions in this book. You just select a brick in the left column. The pieces have been put into many groups so you can find the correct one. If you can’t find a certain piece, you can type in its name in the search engine (keep in mind that you may have to go on one of the other web sites mentioned previously to find its proper name or number). You can then put your piece on the building board to the right and adjust it so it faces up, down, or to the side using the arrow keys on your computer. The arrows on the side of the screen allow you to pan along your work as if you are using a camera, and you can render a 3D representation of what your model will look like.
There are eight individual tools that you can use while building. Here is a brief explanation of what you can do with them:
• Clone tool: This allows you to select a piece and create a copy that you can manipulate like the select tool. This is very handy for cases when you use the same pieces over and over again.
• Hinge tool: If you have a piece that can rotate or is on a hinge of some type, this will allow you to adjust its angle. All you need to do is click the piece and some green arrows will appear that allow you to manipulate what you are working with. You can even manually adjust the angles. I found this handy when putting two gears together that would not mesh; I turned one 45 degrees and the other gear would often fit perfectly after that.
• Align tool: This tool allows you to line up two pieces that normally don’t go together. It helps when you have two beams and want to line up connector holes that are at different angles. It is very useful for many complex building projects.
• Flex tool: Some LEGO pieces can bend, and if you are looking to create models with some of those, I recommend using this button for that.
• Paint tool: If you want to simply change a color of a piece, you don’t have to remove it and replace it with one of an identical color, like you would in real life. Simply use this and select a different color.
• Hide tool: Sometimes you may have to put a piece in a place that would be hard to reach or even see on LEGO Digital Designer. If you use this tool, you can render certain pieces invisible so that you can see where to put the pieces where they belong.
• Delete tool: Use this to delete a piece.
One of the great advantages I had with working with this system was that I could use the Building Guide Mode, represented by the numbered block in the upper right hand corner. This allowed me to create a step-by-step guide that made writing this book a whole lot easier. Keep in mind that if you have built a model and then decide to add pieces later, this will change all of your building instructions, possibly every single step. I’m not certain how the building instructions work on this, but it tends to give the instructions in a way that will make it the most simple for an outside builder.
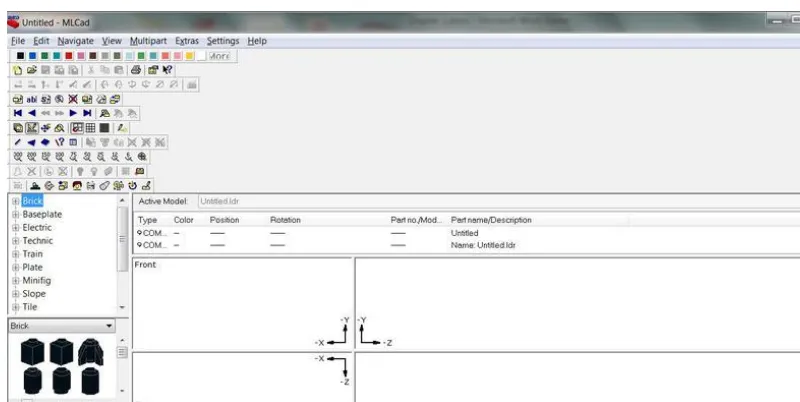
MLCad
Figure 1-17. A screenshot of MLCad, another program for building LEGO models digitally
MLCad is all about working in 3D with quadrants. The lower right-hand corner is where you insert your LEGO, and you can manipulate it along with the particular axis (x, y, and z). You can see the bricks available in picture form in the lower left-hand corner and above it are the groups. The other toolbars above it can be customized so you can manipulate pieces for your creation.
LeoCAD
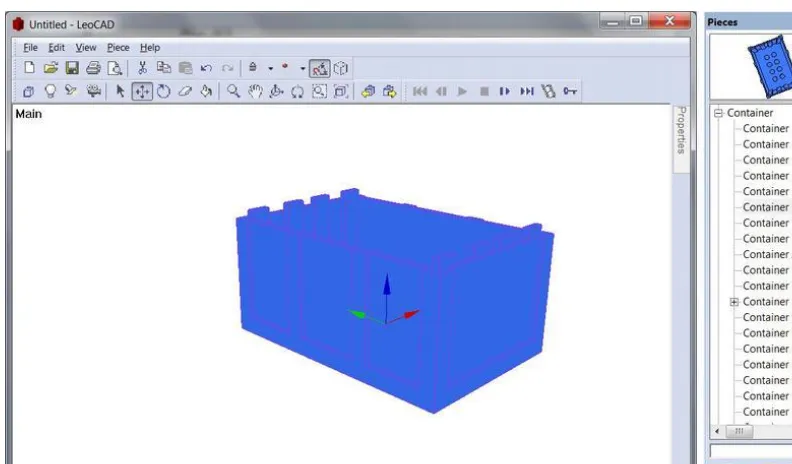
One of the things that makes LeoCAD interesting is that the program has six virtual cameras built in so you can switch from main to front, back, top, under, left, and right.
Summary
Technic pieces come in all different varieties. Some of them look like traditional LEGO bricks and plates, but they have since become more studless; other pieces include beams, levers, axles, bushes, connector pegs, and many other types.
If you want to start your own LEGO collection and would like to purchase them piece by piece, you can do so. You can use LEGO’s own Pick a Brick to have them shipped to your door, but you may find a cheaper and more diverse selection at Bricklink.com.
Once you have assembled the pieces that you need for your creation, you may want to look at instructions from past sets. I recommend using Peeron or Brickfactory for that.
Assuming that you have all the pieces that you need and you know exactly what you want to build, you may want to hold off on the physical building and instead first try your model in one of the digital designer programs available online. LEGO puts out LEGO Digital Design (LDD); MLCad and LeoCad are also
Now that I have introduced the basic LEGO Technic pieces, it is time to get into the basics of construction. You will discover that building in LEGO Technic will be easier if you follow the following three precepts of LEGO architecture:
• If you build it, build it strong: Every LEGO structure has to be fortified so it can simply stand on its own without any danger of crumbling. For this reason, fortify weak links in your structure as best as you can with two connector pegs on every studless connection.
• Ease your pain: Once you have figured out what you want to build with LEGO Technic, you might have an easier method of building if you create a wireframe model. This is when you find a picture of it and make a LEGO Technic model of it with just the frame and no other interior details.
• Go the distance: Now that you have built your wire-frame model, figure out where you will put details like the steering column and other features that you want to have. Plan out the LEGO Power Functions battery box first, as well as the motor, since these take up the most volume.
This chapter is about forming the basic structure of the most common Technic creation: the automobile. I will also get into how to put a motor on your four-wheeled vehicle so it can zip across the floor.I’m sure you are anxious to figure out how to make it do more than just go in a straight line, but steering will have to wait until Chapter 3. I will introduce you to some of the LEGO Power Functions (LPF) that will help you to do the propulsion for now.
Get to Know Your Power Functions
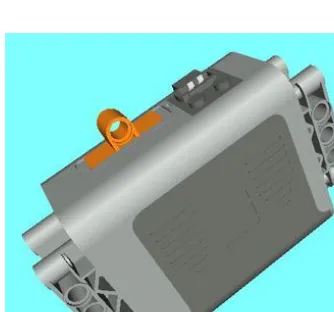
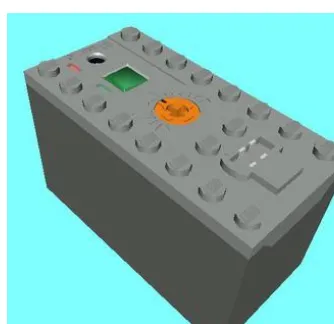
According to the official LEGO site, the 8881 is the first Power Functions battery box. The 8881 holds six AA batteries, and I suggest you invest in some rechargeable AAs if you are going to use it for power. The Power Functions plug is on top right next to the switch, and the switch has three positions: one for forward, the middle for off, and the other for reverse. In between the Power Functions plug is a green LED
As of this writing, you can go online to the LEGO catalog and purchase these special parts that come in three types: Power, Control, and Action. I will discuss Control in the next chapter, but for now, I want to focus on Power and Action. Power consists of the battery boxes that are needed to get the Action functions of motors spinning for propulsion and steering.
Power
One of the things that I enjoy about LEGO Technic is the motorized parts of the LPF collection. The first LEGO motorized set that I ever encountered, back in the late seventies, was the 901 Universal Motor Set. It had an electric battery box for C batteries as well as an electric train motor. These were wired together with the curly wire, and suddenly the LEGO builder was free to make their creations go forward and backward with the flip of a switch.
The Power Functions battery box essentially uses the same design with three types of LPF battery boxes. The battery boxes are smaller than that of the 901 kit, use smaller batteries, but they still take up a lot of space compared to the size of most LEGO Technic models. While the connecting piece lacks the curly, phone-cord type of look, power cords attach on a Power Functions plug (the 2 x 2 studded area that you can see by the switch in Figure 2-1). Also, control is no longer a wired affair, and I will discussed IR remotes in the next chapter. For now, let’s discuss the three types of LPF battery boxes.
Action
These are the pieces that connect to the power sources, and the ones that I will address in this chapter are essentially motors designed to simply spin. All that is required is sticking in an axle 1M deep into the motor, and whatever is on that axle, like a wheel, will spin freely. The motors are good for creating other functions besides wheels, and they come in two basic types: the XL-Motor and the M-Motor.
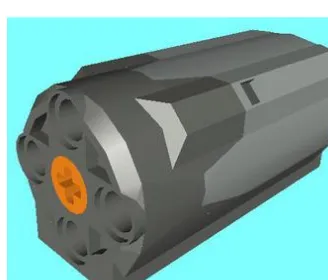
The 8882 is an XL-Motor, and it is ready to spin very fast (Figure 2-3). I generally use this motor for propulsion and I will explain how to do so later in this chapter. It is easy to mount with the two connector holes on each side, and it has no LEGO studded areas on it whatsoever.
Figure 2-2. Piece 8878: Rechargeable battery box
As stated previously, it is necessary to connect the battery box to the motor to make your vehicle motorized. In some cases, the battery box and motor can extend your creations out of reach. You can use this particular piece, 8871, to make certain that your battery pack can be far from the thing that you are powering. This piece measures at about 20 centimeters. I have heard that they make a 50 centimeter version, but you might not be able to find it in the current LEGO catalog.
Now that you are familiar with some of the basic LEGO Power Functions parts, let’s talk about building with Technic.
LEGO Architecture
About 10 years ago, I built the ultimate LEGO Technic spaceship. I essentially made three round spheres and linked them together, and it was quite large at half my height. In case you are wondering why I did not use it as an illustration in this chapter, here is why. I wanted to get a shot of me holding the ship, but as I was holding it in front of the camera, it fell apart. Had I not been a grown man, I probably would have cried. As it was, I almost did.
I feel that you must always learn from your failures, and that LEGO Technic spaceship taught me a lot about LEGO architecture that day. When I say LEGO architecture, I am talking about basic steps in building that are required so that your structure will hold together. You don’t build LEGO structures for decades
Even though the M-Motor is the medium-sized motor, this doesn’t mean that it still doesn’t spin pretty fast (Figure 2-4). Unlike the XL-Motor, it does not have any connector peg holes along the side, and the bottom side can connect to studded pieces. I usually use this motor for steering functions, and I have several models in this book that show how to do this.
As you can see from Figure 2-5, I made certain that the overlap of bricks was more than two studs. The more you can overlap on LEGO, the better the stability you will have when you stack bricks atop one another. So if you are in a situation where you need to click two bricks together, and these bricks will bear a load, build it strong.
Figure 2-6 shows how to bring two bricks together and how one piece that links two pieces together is much better if it is above and below the pieces, with as many links overlapped as possible.
those baseplates, and they are only half as thin as the average LEGO flat piece. I didn’t want a repeat of my previous spaceship collapse, so I decided to use the baseplates, but I reinforced them with regular bricks. I set up rows like a garden and then capped them with flat pieces or plates,as shown in Figure 2-5.
In traditional LEGO studded creations, this allows for all kinds of models with non-perpendicular angles. In Technic studless creations, the connector-pin-and-axle connection is really the only method of linking pieces. The advantage is that Technic LEGO creations stay together better than traditional ones, and some individual pieces can be switched out with minimal difficulty.
Technic pieces have a unique way of allowing the builder to reinforce their creations on the sides as well as the top and bottom. The side holes on the bricks allow for the insertion of axles and pin connectors, which can connect two bricks together side-by-side instead of the traditional top-to-bottom. As you can see in Figure 2-7, a connection of two Connector Pins will allow for a strong bond, and one will allow a dimension of flexibility as one LEGO brick can spin around on an axis.
Figure 2-6. Connection options in order of strength
nourishing this instinct. For example, my son, who is eight years old and builds with traditional LEGO bricks, loves to look at car lots in order to get LEGO ideas. I have started a similar habit of looking at a vehicle and wondering how I would build it using the pieces that I have in my LEGO collection. The other day, I was looking at the steering mechanism on a cart, and all I could think about was how I could make something like it using LEGO Technic pieces.
One of the keys to building a realistic Technic model is to simply find a picture of something and mimic it in real life using a wireframe model. A wireframe model is simply a visual presentation of a physical object in 3D computer graphics by drawing lines at the location on each edge. In this case, I am using the term to describe a typical look of a LEGO Technic model with the engine, steering, or other details missing. I will cover these details in later chapters of this book.
For example, let’s say I want to design a model of a Smart Car in LEGO. I notice that LEGO currently doesn’t have a Smart Car in their catalog, but my “thinking in LEGO” instinct seems up to the challenge. To get started, I need a picture of a Smart Car, and it is pretty simple to get one online these days. Just go to Google or another internet search engine and click on the “Images.” You should have no trouble finding an image of what you are looking for (see Figure 2-8).
Armed with a good side view, I looked around my LEGO Technic pieces and found several studless pieces that would form a wireframe about it. I’m not so concerned about details of the shell of the car. At this point, agonizing over details like headlights, windshield wipers, and other things would just get in the way of this step. I am also not worried about the width of the car, as I know this will be filled with several features later.
Eventually, I came up with the model in Figure 2-10.
When it comes to creating a wireframe model, you can do this any way that you like. In Figure 2-9, I used a typical drawing program just to get an idea of the shape of the creation. I did not use any curves except for the wheels. Considering that most LEGO pieces are straight by nature, I didn’t see any reason to go into any great detail. The fact that the angles don’t look right is also immaterial at this point, as they can be fixed when creating the actual LEGO model.
If you want to put a lot of features on your Technic model, you may discover the fun and frustration of having to build and rebuild your creation. If you have the ability to “think in LEGO” so well that you can build a working and feature-rich LEGO Technic creation from beginning to end on the first try, then I salute you.
with.
Go The Distance
Okay, now that you have a wireframe of your LEGO Technic model, you can figure out what you can do to make it as feature-rich as possible. In other words, you want your vehicle to move, steer, and do whatever it can, just like the vehicle that inspired it. Take your wireframe and figure out loosely where you are going to put all of the features that you want on it, as I did in Figure 2-11.
I’m going to discuss steering and giving LEGO creations remote control life in the next chapter, and some of the other features in Figure 2-11 in Chapter 8, but for now, I’ll talk about how to create a solid foundation upon which to build your vehicle creations.
Constructing a Non-Motorized LEGO Vehicle
In Chapter 1, you learned about some basic Technic LEGO pieces that will allow you to create some terrific creations. I’m sure that you are anxious to begin building, and I fully intend to show you instructions formany models that you can make.
The first thing that I want to teach you to build is a basic LEGO automobile frame. This is the base frame of an automobile that I will use in the next few chapters. I will also show you how to make some interesting features on it, such as a motor, steering mechanism, and other things. I recommend using this as something to get yourself started with building with LEGO Technic and make alterations as you see fit with your vehicles.
Project 2-1: Constructing the LEGO Chassis Base
This LEGO base is simply the bottom part of a car, minus other important parts that would make it a car like a dashboard, windshield, roof, and everything else. Remember what I said about wireframing in the previous “LEGO Architecture” section? This next model is the LEGO wireframe base of a car made out of beams, panels, connector pegs, and all the pieces necessary to “build it strong.” The sole purpose of it is to have some realistic looking fenders that are made for wheels (which you will add in the next section).
One of the complaints of working with studless pieces is that you must have a good idea of what you are going to build before you build it; otherwise, you will have to build and rebuild in order to fit the features of your model. In the case of this chassis, it is perfectly designed for the front axle and motorized axle that I will show you later in this chapter. I don’t necessarily recommend building this way for all LEGO Technic creations, as building a solid base of your creation might hinder you from creating features later. In other words, you may want to build the axles and other features first, and then build a base or chassis around it.For those who want to get started on making a LEGO base, you should try making something like this by completing the instructions in Figures 2-12 through 2-26.
Figure 2-13. This step requires a Connector Peg and a Double Angular Beam that link together in two places. Note the location of the 3M Connector Pegs.
Figure 2-14. The 3M Connector Peg links the two Double Angular Beams together, with the “ring notch” on the side as shown. Note the application of the Connector Pegs on the 5 x 3 Angular Beam.
Figure 2-16. As you can see here, a 5M Beam joins the three 3M Connector Pegs. Another 5 x 7 Beam Frame joins up there, along with two new 3M Connector Pegs.
Figure 2-19. Connect a 15M Beam to the end of the 5 x 3 Angular Beam, and insert two Connector Pegs to that Beam as shown.
Figure 2-20. Place a 5 x 3 Beam on the two Connector Pegs from the last step here, and then place two more Connector Pegs on the new 5 x 3 Beam.
Figure 2-22. I switched the angle so you can see what to do in this step. Join another 5 x 3 Angular Beam with the structure, then place a Connector Peg and a Connector Peg with Cross Axle on another 5 x 3 Beam.
Figure 2-23. A Double Angular Beam is added to the construction to form a fender shape.This only uses one Connector Peg, and another Connector Peg and Connector Peg with Cross Axle join the 5 x 3 Angular Beam.
Figure 2-25. This requires a 5 x 11 Beam H Frame.The 3M Beams fill in the space and the 3M Connector Peg attaches it. Insert the 3M Connector Peg into the center hole on the 3M Beam and attach it to the Beam Frame as shown. The H-Frame and other parts will not be officially connected until the next and last step.
Project 2-2: Assembling theLEGOAxle (Non-motorized)
If you built your LEGO chassis correctly, then you will want to put it on the floor to see how it runs. For this, you will need wheels, so here are some instructions on how to build a front axle with wheels. If you don’t want to create a non-motorized vehicle, you can simply create two of these front axles, put them on the base frame, and push across the floor. Otherwise, I will show you how to create a motorized axle later in this chapter. Follow the steps in Figures 2-27 through 2-39.
Figure 2-27. The very small beginning of your LEGO front axle, a Technic Angular Beam 4 x 2.
Figure 2-30. A 4 x 2 Beam fits on the end with two Connector Pegs and one in the middle.
Figure 2-31. Another 4 x 2 Beam fits inverted on the first, and a Cross Axle gets put on the 7M Axle and fits perfectly at 1M.
Figure 2-33. It is necessary to join a 4 x 2 Beam to this 11M Beam.
Figure 2-34. An inverted 4 x 2 Beam joins with this other one.
Figure 2-36. Except for the Connector Pegs, the action of this step takes place with sliding the 5M Axle in between the two 4 x 2 Beams, with the Bush in the middle.
Figure 2-37. This step involves attaching a 4 x 2 Beam to the Connector Pins and Axle, and a 5 x 3 Beam with a 3M Connector Peg. Note the application of the Bush on the 7M Axle.
Now that your axles are done, it is simple to put them on the chassis base frame. You will find the 3 x 5 Angle Beams on the axles line up with the 3 x 5 Beams on the chassis frame. You should have something that looks like Figure 2-40.
Figure 2-39. Now that the axle is complete, the only step left to do is to add the tires. These tires are low wide 62.4 x 20 with rims that are 43.2 H x 18 W.
Figure 2-40. What your chassis base will look like when you add two non-motorized axles.
Motorize Your LEGO Vehicle
Figure 2-41. The LEGO Technic base has an excellent place for installing battery box 8881.
Now I’m going to show you a simple way to install a motor that will turn both back wheels. The motor can go in back or in front depending if you want front-wheel or rear-wheel drive. Adding this one
motorized axle will just make it go forward or backward in a straight line; I will explain in the next chapter how to make it steer. Of course, you will need an axle for two front tires, but I already explained how to do that.
Project 2-3: Adding a Motorized Axle
Figure 2-42. The first step in adding motorized wheels is to add two 4 x 2 Beams directly in the center of a 12M Axle.
Figure 2-43. A Double Conical Wheel (12 Teeth) is placed on the left side of the axle, with a Bush and a Half Bush.
Figure 2-45. A 4 x 2 Beam needs to slide onto the axle and then connect with the parts from Step 3. A Half Bush needs to be put on each side, but the right side requires a tube.
Figure 2-46. In this step, a 4M Axle is connected to a Cross Axle Extension. Then another Conical Wheel (12 Teeth) is added, and this must mesh perfectly with the other gear. A Half Bush is attached there and then inserted in the hole as shown.
Figure 2-48. The XL-Motor needs a 2M Axle, as well as a Double Conical Wheel Z20. Before the M-Motor is connected to the pegs from the last step, it must mesh perfectly with the gear. These things need to fit together tight, but not too tight.
Figure 2-51. A 4M Axle is slid into the hole with the Cross Axle with a Half Bush and Bush on one side and a Half Bush on the other. This should be a very good fit.
Figure 2-52. In addition to the Connector Peg, two Cross Axles cap off the large Axle.
Figure 2-54. A 2M Axle secures the 4 x 2 Beam in position.The Cross Axle gets the 3M Axle, and two Connector Pegs prepare for the next step.
Figure 2-55. This 5 x 3 Beam attaches to the Connector Pegs and receives two 3M Connector Pegs.
Now that you have finished the back of the car, go ahead and put it onto the base. Like the battery box, you might need to remove the axles to put it on, but it should fit quite well. Just get the 5 x 3 Beams to line up and use the Connector Pegs. You will see the reason why the 4 x 2 Beams stand up perpendicular from the rest of the back axle. This is so the rest of the car base can rest on this. If you want to connect them in some other way, feel free. Anything you can do to make your Technic structure stronger is always better.
The same method you used to connect the back axle with the motor can be used to connect this front axle in the front of the car. Just line up the 5 x 3 Beams and your car should look like the one in Figure 2-59.
Figure 2-57. Add another 4 x 2 Beam added to the other side.
Now, go ahead and turn it on.If you built it right, the gears should turn pretty fluidly. If the gears are too loose, you may discover that they occasionally grind. Tighten up your construction to see if this fixes your grinding gear problem.
Summary
Making a four-wheeled, motorized LEGO Technic vehicle is pretty easy. You will need the Lego Power Functions battery box and a motor (preferably the XL) to make this happen.
First, build a frame or chassis for a vehicle and apply the three rules of Lego architecture. By building it strong, you will insure that the frame can stand the rigors of the road and be able to be held in your hand. Building strong involves using connector pegs to hold the beams together and reinforcing weak points on the structure.
Second, you can ease your pain by creating a wireframe model of what you want to build and making a crude LEGO Technic model of what you want.
Third, you can go the distance by figuring out what sort of features you want on your LEGO Technic creation.
Once you have built your frame or chassis, you can decide if you want it to be motorized. You can then make two non-motorized axles, or you can make a motorized axle and a non-motorized one. Be sure your creation has room for the battery and motorized power functions, as they take up a lot of room.
Following the instructions in this chapter will create a motorized LEGO Technic automobile that will go across the floor, but in just one dimension (backward or forward). If you want to make it steer, read the next chapter!
In Chapter 2, I talked about creating a basic frame for a Technic vehicle, but the only feature I shared was how to make it motorized. The reason to motorize your vehicle is to make it more exciting, but in all honesty, a vehicle that can only go backwards and forwards, albeit motorized, is going to get real old, real fast.
What would a car be without a steering wheel? Needing tracks, that’s what. This chapter will cover how to create a steering system on your Technic vehicle. If you have ever looked at a real vehicle and studied its steering mechanisms, it isn’t too different from what most Technic vehicle kits provide. I’ll show you two ways to create steering systems. The first is the rack and pinion, which serves to steer a lot of Technic vehicles. The second is the double engine method, which comes in handy for vehicles with treads like armored tanks.
As mentioned in Chapter 2, I highly suggest putting your motor in back and your steering system in front. You could reverse it so the steering is in back, but this does make the steering less instinctual. If you set up your controls with a back wheel steering, then your vehicle will go left when your wheels turn right and vice versa. The only machine I have ever driven like that was a forklift during my summer job, and I essentially had to unlearn everything I knew about steering to drive it.
n
Note
If you are interested in creating a vehicle with four-wheel drive with a steering mechanism in front, refer to
Chapter 5.
I will also cover how to take even more control by adding a remote control. For this, you will need Power Functions pieces like one of the battery boxes and the motors discussed in the last chapter. You will also need the LEGO Power Functions for control.
Know Your Control LEGO Power Functions
The LEGO Power Functions IR Remotes
The IR-RX really is the only LEGO Power Function used to enable remote control power, but there are two different remotes that you can use with it.
The IR-TX Remote Control
The IR-TX (Item 8885) shown in Figure 3-2 requires Item 8884 in order to function, as well as a battery box. It is capable of controlling up to eight different Power Functions with one remote, by connecting two
The IR-RX Remote Control IR Receiver
The IR-RX piece is required for most remote control functionality in LEGO models. You will need the IR-TX or Speed Remote Control to get true remote control ability, and I will explain them in just a bit.
For now, I want to make it clear that you will need to plug the IR-RX into the battery box with the Power Function port. It has two outputs (red and blue) to connect up to two different power functions, and it operates on four different channels, enabling the user to control four different models at the same time, provided one has four of these IR-RX parts. You can attach the IR-RX to a LEGO model with studs or using the connector peg holes shown in Figure 3-1.
The Speed Remote Control
Like the IR-TX, the Speed Remote Control shown in Figure 3-3 requires the IR-RX and the battery box. Using a few motors will give you better control of your speed. I found that using this particular remote control is really good for controlling vehicles on tracks or other stationary models. It really isn’t good for steering and I can’t say that I recommend it, but I will discuss some things it is good for in the next chapter.
You will have to figure out how to make them work together for your Technic creation, I will explain how to set up two motors to allow for both motion and direction in the next section of this chapter.
Figure 3-2. Item 8885 IR-TX
Although you can’t see this in Figure 3-4, both the receiver and IR controller have a big orange switch with numbers that go from 1 to 4 (see Figure 3-1 to see the channel switching switch on the IR-RX). These are four different channels, enabling control of four different models at the same time. This is very helpful for a situation in which you have four different models each with the IR-RX in them, but only one IR remote. All you need to do is sync the channels and you can operate them all. You can even quickly shift the channels on the IR remote and take control of each of them very quickly. By the way, you must have the same number on the IR remote as on the IR-RX controller or your model will not work.
I will go into more detail on the IR remotes later in this chapter, but let me quickly state that it is possible to have more than one Action element on the red and blue sections. As you can see in Figure 3-5,
Using the Remote Control Power Functions
I will spend the rest of the chapter discussing how to take control of a vehicle. You will need the IR-RX receiver and the IR-TX (8885). Let’s begin with a quick discussion of the IR-RX receiver.
Reviewing the Receiver
As you can see on the left side of Figure 3-4, the IR-RX has two power sockets (red and blue), which provide power to two action elements like the engines, but at intervals that the user determines. It is possible to set up the IR-RX with two action elements and take control of them individually or together with the IR remote such as the IR-TX (8885). I won’t recommend the IR Speed Remote Control, but the IR-TX has a red and blue area that essentially allow the user to increase the speed on the engine parts with a simple flick of the finger. On the right side of Figure 3-4 is the IR remote (IR-TX), which has red and blue levers. As you might have guessed, pushing a lever up makes a connected engine go one direction and pulling it down makes it go another direction.
Reviewing the IR Controllers
In addition to the IR receiver, you will need one of the IR controllers, either the IR-TX or Speed Remote Control, in order to give power to the selected power sockets to the Action elements on the receiver. As you can see from the setups in Figure 3-7, both of them work in the same manner. This means that you can put two engines in your Technic vehicle, which means that you are going to have to figure out how to place them in the overall construction of your LEGO Technic creation.
For most of your LEGO creations, you are going to want to put an engine for motion on one power socket and an engine for steering on another power socket. I highly recommend using the XL-Motor to motorize the vehicle and using the smaller engine or M-Motor for controlling the steering (Figure 3-6).
the same time.
You will notice that each of these IR controllers have axle holes, and for the IR-RX, you can insert axles to make levers. These will help you to take better control of speed, like punching the stick controls on an airplane.
As for the IR Speed Remote Control, you can insert other things like round steering wheels, which come in handy when you want to steer. I highly recommend doing that so you can have more instinctive control. The main difference on the IR Speed Remote Control is the big red buttons; these tend to stop whatever it is that you are doing on your motors and sort of locks them up.
Both remote controls feature direction changers (those tiny switches that can go from forward to backward with a flick of a finger). I suppose that if you needed to use those, you could, but you could also just go backwards on the controls.
Note that the controllers must be within line-of-sight in order to work. For some reason, they aren’t radio-controlled or via Bluetooth, which would really come in handy for controlling something with a mobile phone or tablet. The range is usually pretty good, but you might find that you will have to point it at the IR-RX to really get it working.
Okay, now that all of the Power Functions stuff is out of the way, let’s commence with how to actually build a steering method for your Technic vehicle.
Steering Systems for Technic Vehicles
The next two projects feature a pair of the more popular steering systems: rack and pinion, and double motor. I spent a lot of time looking at LEGO Technic instructions and I found that most instructions over the last 30 years include some form of rack and pinion steering to maneuver a vehicle. The double motors approach is good for construction vehicles like bulldozers or trackhoes where the wheels are treads. It also creates a vehicle that is much more maneuverable and can almost “turn on a dime.”
I want to emphasize that these are most certainly not the only way to steer a vehicle, and I am certain that engineers will find even more clever ways of steering in the future.
You should choose the type of steering system that best suits the type of vehicle you want. In other words, if you want to make this a vehicle that you can push around and play with (and you know who you are), I recommend putting the steering wheel atop of the vehicle so you can push it for motion and steer it. Note that you may have to do some interesting gear formations to get this to work.
The rack and pinion model in this project is designed to be compatible with the LEGO basic frame shown in Chapter 2, and it will allow you to take control of the motion and the steering. Follow the directions in Figures 3-9 through 3-21.
Figure 3-8. Note the rack and pinion steering in the front of this vehicle. This is used on many LEGO Technic creations.
Figure 3-9. Place the two Axles on the ends of the 3M Beam. Leave a 1M space on the end of both Axles after the Half Bushes.
Once you have the four 2 x 2 Technic Bearing Plates on the 2 x 4 Plate, you need to place the M-Motor on top. The angle shown in Figure 3-10 is provided so you do not follow the studs when you put it on. Note how the right side of the M-Motor’s bottom side covers about only 1/2M and the left side covers 1 1/2 M. The nature of the Technic Bearing Plates with their hollow circular studs allows this unusual type of construction. It is important that you follow this design so it will line up on the model. See Figures 3-11 through 3-20.
Figure 3-10. Place four 2 x 2 Technic Bearing Plates back-to-back on a 2 x 4 Plate.
Figure 3-13. Add this section on to the one from Step 4. This section involves two Double Cross Blocks, a 3M Connector Peg, and a Connector Peg/Cross Axle.
Figure 3-14. The part you built in steps 4 and 5 is joined up with the completed step 3 via 7M Beam.
Figure 3-16. Two Connector Pegs/Axles are placed with the 3M Lever on the center of the M-Motor.
Figure 3-19. Add a 3M Axle to the Technic Plate as shown via a Half Bush. Then add a 3M Connector Peg along with a Double Cross Block at the end of the 7M Beam.
Figure 3-20. This image shows where the 3M axle with Bush goes. In other words, it mirrors the opposite side. You can see that the 3M Connector Peg and the 4 x 2 Angular Beam go near the top.
Figure 3-21. Now make one side look like the other until the construction is completely symmetrical.
Figure 3-22. Note where you place the Connector Pin/Axles on the 4 x 2 Angle Beams, as well as the 3M Beam in the center.
Figure 3-23. Put a Double Cross Block on two 5M Axles. Then stick a 5M Axle into the motor and put the 4M Technic Lever with Notch (the black piece at the top right of the parts diagram) in the same position shown in the parts diagram, with the notch pointed toward the motor.
Figure 3-24. Put a gear (Z12 Gear) on the end of the axle from the motor. Then build the rack underneath it with a 7M Rack, a 7M Beam, two 3M Connector Pegs, and two Connector Peg/Cross Axles. Make certain that it lines up because you will connect it in the next step.
Figure 3-25. The 3M Beams join up with the rack. If you connect the M-Motor to a Battery Pack, and it turn it on, you will see the rack shift to the left or the right.
I am going to assume that you are going to want to create a vehicle that has one motor for motion and one for steering. In that case, it is quite simple to use the motorized back axle from Chapter 2 with this steering method (shown completed in Figure 3-28).
Figure 3-27. Link the wheel with the 3M Axle, the 4M Axle, and then with the Cross Axle Extension. Attach the Double Cross Block and two Bushes. Do this twice for the wheels.
It is then relatively simple to attach the IR-RX to your vehicle to make it go a certain direction and to steer it. Hopefully, you can see how it works. See Figure 3-30 for a photo of the physical model.
Figure 3-29. When both motors are connected to the IR-RX, you can access them with an IR controller— provided the battery box is turned on and everything is properly connected.
Figure 3-30. An IR-RX IR receiver is connected to the M-Motor for steering to the blue Power Functions Port and the XL-Motor for propulsion is connected to the red Power Functions Port. This model, with the IR-TX remote control, is ready to go.
Remember, the IR remotes tend to overdo controls, so you need to make certain that your LEGO Technic model can handle extended times where the pinion is turned all the way to the left and right. This is why the steering method that I have provided has a Technic Lever on it so it will strike a side of