A Practical Guide to
NETWORKING
AND SECURITY
IN iOS 8
By Glenn Fleishman
Welcome
Welcome to
A Practical Guide to Networking and Security in iOS 8
,
version 1.0.0, published in February 2015 by Aperiodical LLC.
This book describes how to use your iPhone, iPod touch, or iPad with iOS 8
on Wi-Fi and cellular/mobile networks securely, making connections with
ease while protecting your data. It also covers Bluetooth networking,
track-ing an iOS device, Personal Hotspot, two-step verification with Apple ID,
using AirDrop and AirPlay, and solving connection problems.
Visit
our updates page
to check for new versions and re-download any of
the ebook files. Use the password nimbleskull.
Sign up for our
announce-ment email list
, and you’ll be notified about free updates to this edition of
the book, as well as receive a note and a discount coupon when we release
future editions covering newer versions of Apple’s operating system. We will
not sell, rent, or share your information. Find us on the Web at
http://glennf.
com/guides
.
This book was written by Glenn Fleishman, edited by Jeff Carlson, and
copyedited and proofread by Scout Festa. The cover illustration is by
Christa Mrgan. (This is an update of a book originally published by Take Control Publishing, and edited by Tonya Engst and Michael Cohen.)
If you have the ebook edition and want to share it with a friend, we ask that you do so as you would with a physical book: “lend” it for a quick look, but ask your friend to
Introduction
Networking should be simple, and security should be automatic. And money
should grow on trees. Despite how intuitive it is to pick up and use an iOS
device, requiring little thought as to how it connects to a cellular or Wi-Fi
network, it becomes quite complex as soon as you drill down to any details.
This is especially true when connectivity fails,and you try to troubleshoot.
Security is an even denser area. Apple makes the default choices in
iOS reasonably secure, but to ensure real protection for your data— while
your bits are traveling through the æther or in the event that your device is
stolen—you need to know how it all works.
NETWORKING
Connect to a Wi-Fi
Network
Wi-Fi works quite simply in iOS, but there’s a lot of hidden detail. In this
chapter, you’ll learn how to interpret the Wi-Fi settings view, manipulate
custom network settings, and troubleshoot common problems.
Join a Network
Open the Settings app and tap Wi-Fi to view nearby networks. Tap a net-work name to join it.
The first time you tap a network name to connect, your device joins
the network immediately unless encryption is enabled on the network.
In that case, you are prompted for a password; once you’ve entered the
password and tapped the Join button, you join the network.
Note:
For more on connecting with a password or other methods, see
Connect to a
Secure Wi-Fi Network
in the Security section of the book.
Tip:
Are you tired of your device popping up a list of nearby Wi-Fi networks while
you’re trying to do something else? Turn off Ask to Join Networks, described a couple
of pages ahead.
Tip:
You can remove a stored network’s entry only when you’re connected to it.
See
Forget This Network
.
Managing Wi-Fi Connections
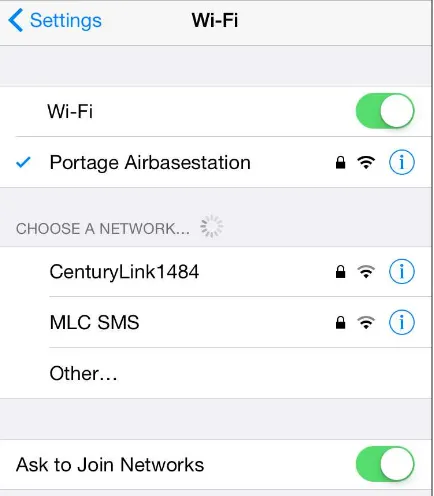
iOS centralizes Wi-Fi management in the compact space of the Wi-Fi settings view (Figure 1). To reach it, open the Settings app and tap Wi-Fi.
Figure 1: The Wi-Fi view has a list of available networks.
The Wi-Fi view always has three elements, with an optional fourth:
■
Wi-Fi switch: Tap this switch to disable and enable the Wi-Fi radio.■
Choose a Network:▸ Network name: A network uses this name to advertise itself to Wi-Fi
adapters that are looking to make a connection. The network name is also called the SSID (Service Set Identifier) in some of the geekier base station configuration tools.
▸ Lock icon: A lock may appear, indicating that there’s some form of
protection on the network.
▸ Signal-strength indicator: One, two, or all three radio waves in the
indicator are black (starting at the bottom) to show the strength of the signal being received by the device.
▸ Information: Tapping the info
button—carefully, because it’s
a small target—reveals technical details about the network, as well as an option to forget the network. For more about these details, see Drill Down to Network Details, a few pages ahead.
■
Set Up an AirPort Base Station: This option appears only if your devicedetects a nearby unconfigured Apple-branded base station. (I talk more
about that in Take Control of Your Apple Wi-Fi Network, a guide to wireless networking with Apple base stations and hardware, published by Take Control Books.)
■
Ask to Join Networks: With this switch, you can choose whether to be
alerted about nearby networks to which the device hasn’t previously con-nected.
Tip:
If Ask to Join Networks is off, you won’t be alerted about new networks nearby
when a known network isn’t available. However, the Choose a Network list always
shows all named networks around you.
Drill Down to Network Details
For most network connections, you don’t need to go beneath the surface. However, for an unusual connection, such as one requiring a fixed, or static, network address or a different domain name server than the net-work’s default, go to Settings > Wi-Fi and then tap the info
button for
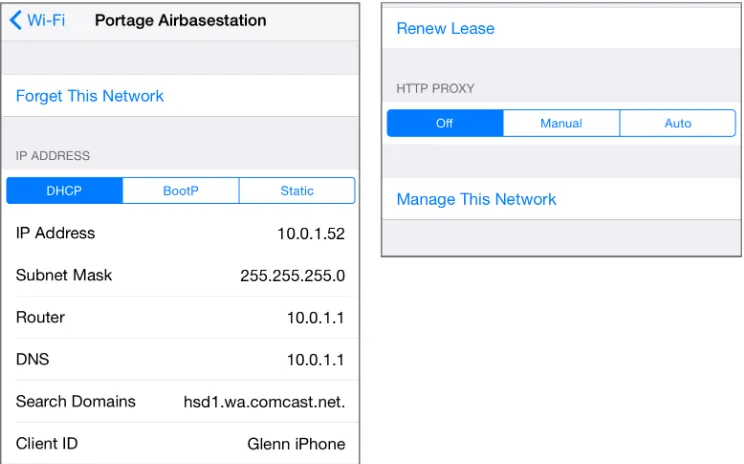
the current network (a checkmark is by the listing) to set up the connec-The resulting view has the network name at its top and three or four configuration areas, depending on the network (Figure 2). Let’s look at
each in turn.
Figure 2: You can view or set network connection values. (Top of view at left; bottom at right.)
Forget This Network
Tap the Forget This Network button to remove the network from the list of previously joined Wi-Fi networks. This also disconnects the
device from the network immediately and prevents it from connect -ing to that network automatically in the future. Forgetting a network can solve network problems, too, by letting iOS dump any corrupted or cached information before the next time you connect.
Auto-Join/Auto-Login
As described in Auto-Join and Auto-Login the Next Time, these options appear only for hotspot networks for which the device has retrieved cer -tain settings that allow it to make an automatic Web-based login behind
IP Address
The IP Address section covers TCP/IP values used for the Internet’s ad-dressing and routing system, divided vertically into sections. You start
with three kinds of standard network connection methods, which you
can see as the DHCP, BootP, and Static buttons near the top of Figure 2,
above. Tap a button to display the related choices underneath. You should
almost never need to change these values. DHCP (Dynamic Host Configu-ration Protocol) is the most common method of obtaining an address. DHCP lets your mobile gear request a network address from a router on
the network, and then use it to interact on the local network and beyond.
When your device uses DHCP to get an address on the local network, you can’t change the IP Address, Subnet Mask, or Router fields, as those val-ues are provided by the DHCP server on the router.
DNS (Domain Name System) is used to convert human-readable domain
names, like www.glennf.com, into machine-readable IP addresses, like
173.255.209.35. The DNS field in the DHCP settings can be modified or
added to. This can be useful if the network to which you’re connected has poorly run or slow default DNS servers. Use a comma to separate multiple
entries.
Use the Client ID Field for a Fixed Network Address
On a home or work network, you may want to assign a fixed address to your devices. Apple
offers this option as DHCP Reservation in the AirPort Extreme, Time Capsule, and AirPort
Express base stations.
In your device’s DHCP settings, if you set Client ID to a unique value, like
Glenn’s iPad 4, you can set your base station to assign the same local network address to your device
every time it connects over Wi-Fi to the network.
Tip:
Unfortunately, you can’t set DNS globally for iOS—you can set it only for individual
network connections. It may not be worth the effort to set it for connections you use
infrequently, but it’s worthwhile for a network that you use often, such as your home
Wi-Fi connection.
For certain network configurations that you will never have to enter for a public Wi-Fi network, you may need to tap the Static option and enter settings for IP address, subnet mask, router, and DNS. Those values would be provided by a system administrator or an ISP. Likewise, BootP
is almost never used anymore, but remains for backward compatibility.
The Renew Lease button is specific to DHCP. A lease is the assignment of
This option, located at the bottom of the detail view, is typically used
battery life, turn off Wi-Fi by tapping Settings > Wi-Fi and then setting the Wi-Fi switch to Off. (See Airplane Mode for more details.)
Capture the Page
in a browser, and have your browser be redirected by the network to the
login page. Instead, iOS (and Mac OS X since Lion) does a test that de-After you carry out any of those actions, iOS should close the special screen and Wi-Fi service should be available. These pages are still often absurdly not customized for mobile devices, and the type and buttons are tiny. You’ll need to pinch to zoom in almost all of the time.
Connect to a Captive Portal If It’s Not Detected
If the special screen doesn’t appear, you can reach the captive portal by launching the Safari
app. Most of the time, the previously visited page in Safari will try to load; if you have a blank
page, enter any site address, like
example.comor
apple.com, and tap Go.
After you enter any required data, the login system should redirect you to the Web page you
tried to visit in the first place.
Mobile Device Hotspot Access via Boingo
You have an alternate way to pay for hotspot access. Boingo Wireless resells access at a flat
monthly rate to over 400,000 hotspots worldwide. Boingo’s
iOS
and other apps
automat-ically join free networks, too, bypassing the special screen and login procedure you often
have to go through.
Boingo has two unlimited usage plans that each cost $9.95 a month (and half off on the first
month), with only a monthly service commitment. The mobile plan lets you connect to any
of its hotspots worldwide using up to two phones, tablets, cameras, or the like at a time. A
North and South America plan allows two devices of any kind, including laptops, at a time.
Boingo also has regional and global plans, as well as an hourly and pay-as-you-go service.
While Wi-Fi is typically free in America, elsewhere in the world Wi-Fi for a single night at a
hotel or a few hours in a coffeeshop can cost more than the monthly plan.
Apple doesn’t let hotspot apps run in the background to manage logins. You must launch the
Boingo app before you connect, and it handles getting you in.
Auto-Join and Auto-Login the Next Time
access. This can lead to problems if that information is no longer valid or if the device doesn’t present it correctly.
In my testing, iOS often shows the same screen for login again without automatically filling it, especially if there’s an Agree button to tap in or-der to avoid you agreeing to terms that might have changed.
You can disable joining and logging in to the network again in this fashion by turning off Auto-Join or Auto-Login for the connection, an option that is available only when you are connected to the Wi-Fi net-work, even if you haven’t logged in or proceeded past the connection Web page (Figure 3).
Figure 3: When you connect via a portal to a hotspot, the detail page provides additional options.
To turn off Auto-Join or Auto-Login, follow these steps:
1. In the Settings app, tap Wi-Fi.
2. In the Choose a Network list, tap the info
button to the right of the
Time-Limited Hotspot Access
Wi-Fi Troubleshooting
While Wi-Fi generally works well, you may at times be unable to get a live
network connection. Here is troubleshooting advice for common cases.
Can’t See Wi-Fi Networks
If your device can’t see a Wi-Fi network you think should be available:
■
Swipe from the bottom to reveal the Control Center (or launch Settings) to be sure that Wi-Fi isn’t turned off. This has happened to me more times than I’d like to admit.■
It’s possible that you are out of range. Move the device closer to where you know (or think) a base station is located. Although every iOS device sports an excellent Wi-Fi radio, Wi-Fi reception can be blocked by thickobstructions, such as solid stone and brick walls, or by walls made of chicken wire covered by plaster.
Note:
It’s also possible that the base station, not your handheld, is in trouble. And I
have seen the Wi-Fi radio in an iOS device fail intermittently or completely, requiring
that the device be entirely replaced.
No Wi-Fi Signal Strength in the Indicator
You’ve selected a network and, if necessary, entered a password, and tapped Join—but the signal-strength indicator in the upper left still
Try connecting again. If that fails, restart your device: Press the Sleep/ Wake button until you see a red slider for powering down. Slide it, wait until the spinning indicator disappears and the screen goes entirely black, and then hold down the button again for a few seconds. An Apple
icon appears and the device starts up.
Too Many Wi-Fi Networks
There are times when so many Wi-Fi networks in the vicinity may make it hard to select the one you want to join. If you know the network’s exact name, you can type it in:
1. Launch Settings.
2. Tap Wi-Fi.
3. Slide down until you can tap the Other button (Figure 4).
Figure 4: The Other Network option lets you enter a network name and optional password from scratch.
4. Enter the network name exactly and, if there’s a password:
a. Tap Security.
b. Select the method (almost certainly WPA2).
c. Tap Other Network to return to the previous screen.
d. Enter the password in the Password field.
Tip:
If you don’t know the kind of network security on the network you’re trying to
join and you have a Mac nearby, hold down the Option key and select the Wi-Fi menu,
then hover over the network name. A small popup displays the security type.
Correct Password Not Accepted
As described in the chapter, Connect to a Secure Wi-Fi Network, a net
-work that requires either a password or a username and password will reject your device if you enter it improperly.
But what if you’re positive you’re entering the password or username
No Internet Service after Connecting
You connected to a Wi-Fi network but cannot access the Internet from any programs you try. Here’s how you can figure out what’s wrong.
Check a Web Page with Safari
The most common cause of this problem is that you’ve connected to a network, likely a hotspot network but possibly a guest network, that
requires a password, button tap, or other action.
Launch Safari and try to reach any page, such as google.com:
■
If you are redirected to a login page, follow the instructions. You may-Remember to forget: Because you’ve connected successfully to the Wi-Fi network, even though you haven’t been granted access to the Internet, you need to remove the network from the list of those you’ve previously joined or you’ll have this problem every time you’re in range. Tap Settings > Wi-Fi, tap the info
button beside the network name, and then tap Forget This Network. Confirm.
■
If Safari throws up a connection error, try the next fix.Check or Ask about the Base Station
If you’re on a network where you can control the base station or ask someone who has access (a friend, barista, network administrator, or the like), you might ask them to confirm that there’s no problem.
In some cases, a base station can continue to provide service to users who are already connected, but not properly allow new users to connect. Some
have limits, as low as five or 10 connected devices, and that limit may
only rarely be hit.
Check IP Address Settings
This may sound obscure, but it’s an easy way to see if your device is ob-taining a network address from the router you’ve connected to. To check on your assigned IP address, follow these steps:
1. In Settings, tap Wi-Fi.
2. Tap the info
button to the right of the currently connected network’s
name.
The IP Address section should be set to DHCP for almost all networks; another value should be chosen only if you’ve been told otherwise. (See
Drill Down to Network Details, earlier in this chapter.)
Here are several ideas for fixing the IP address:
■
Tap Renew Lease; this causes iOS to ask again for a network address. If successful, the IP address will change from a number starting with 169 toan address starting with another range, typically 192.168 or 10.
■
In the main Wi-Fi view, tap the Wi-Fi switch to Off, wait a moment, and tap it back to On. Tap the network name’s info button to see if the ad -dress is now assigned.■
If you’re at an event or a hotspot venue, ask the network’s operator, the front desk, or whomever. The router may have crashed. (You can look around and see if other people look frustrated, too.)Make a Mobile Hotspot
Every iPhone and every “Wi-Fi + Cellular” iPad has, in addition to a Wi-Fi
radio, a built-in data modem that lets the device access high-speed mobile
data networks. The logical question in the iPhone’s early years was: why
can’t we use that same modem with our laptops (or other devices) when
we’re traveling instead of having to buy a separate cellular modem or router
and pay a separate monthly service fee?
Fortunately, Apple followed the suit of other smartphone makers and added
Personal Hotspot, which lets you use your phone or tablet as a conduit to
the mobile Internet. While the name implies a Wi-Fi hotspot connection,
which is one component of it, you may also use Bluetooth or USB with
desktop computers and other devices to extend access. All three methods
may even be used simultaneously.
Personal Hotspot’s availability varies by carrier, although operators around
the world offer it:
consult this list by Apple
to check on yours. In North
America, all carriers in America and Canada allow its use except for two tiny
ones in Canada.
In America, the four largest carriers all include mobile hotspot use in their
current plans, and count bandwidth consumed just as they do any other
data used by an iPhone or iPad.
Note:
In this chapter, I talk about a mobile hotspot or Personal Hotspot to refer to
all the features, but I use the term tethering when the discussion is specifically about
Bluetooth or USB.
Turn On Personal Hotspot
There are two ways to turn on the Personal Hotspot feature: directly on your iOS device or through another computer or iOS device.
Whenever you use these methods, the device that turns on the Personal Hotspot then automatically connects to it.
WARNING! Devices that connect to a Personal Hotspot typically don’t treat it
any differently than a regular Wi-Fi or Ethernet network—which can mean it’s easy to rack up huge amounts of usage. You will want to pause or dis-able sync services, like Dropbox, and online backup systems, like Backblaze or CrashPlan. You may also want to avoid using any streaming video ser-vices or digital media downloads while connected via a Personal Hotspot.
Turn On in iOS 8
Enable it in Settings > Cellular Data (iPad) or Settings > Cellular (iPhone). Tap Personal Hotspot to open the Personal Hotspot screen. Now you can switch the hotspot on and set a Wi-Fi password. The screen is also full of connection information (Figure 5).
After the first time you tap On, Personal Hotspot appears as an option on
the Settings app’s left pane (iPad) or main screen (iPhone) so you can ac-cess it quickly.
Turn On via Another Device
Figure 5: The Personal Hotspot view lets you turn access on or off as well as set a Wi-Fi password.
Instant Hotspot is part of Continuity, a set of connections between your iOS devices and between iOS and Mac OS X. However, the devices must meet a list of conditions for Continuity to work:
■
You have iOS 8.1 or OS X 10.10 Yosemite installed on the computer or device you’re using to activate the hotspot, and iOS 8.1 on the iOS device you’re using as a hotspot.■
Your Mac is a model released in mid-2012 (MacBook Air and MacBook Pro) or later (Mac Pro, Mac mini, and iMac).■
Your iOS device was released in the last 2 to 3 years. (See complete list.)■
Your iPhone and the other iOS device or Mac are signed in to the sameiCloud account.
■
Both devices have Bluetooth enabled and are on the same Wi-Fi network. On a Mac, select the Wi-Fi menu, and choose the device in the menu under Personal Hotspot (Figure 6).On another iOS device, launch Settings, tap Wi-Fi, and choose the device in the Personal Hotspots list (Figure 7).
Figure 7: In iOS, pick a device from the Personal Hotspots list.
Even if you’re not planning to connect, you can see the battery life, signal strength, and connection strength of your iOS device as a compact set of graphics in the menu or list.
You Can’t Always Use Cell Data while Talking
It can be a little confusing to tell whether an iPhone can continue to have an active cellular data connection while a voice call is underway. On some
carrier networks, data is suspended; on others, it slows; and all that is
changing right now, with the right iPhone models, too. Wi-Fi data al-ways works during a voice call, but when you’re using Personal Hotspot, you’re always relying on the cellular network for data backhaul.
Because of both the different cell technology employed by AT&T,
T-Mobile, and most other networks around the world (called GSM), and that used by Sprint and Verizon (known as CDMA), and the generation
of hardware you have, the option to talk and use data at the same point
Digital cell technology is divided up into second-, third-, and
fourth-generation (2G, 3G, and 4G) standards, plus some interim ones like EDGE (2.5G) and 3G+ (often called 4G). 2G was the first to carry dig-ital voice, and all forms of it allow either data (at dial-up modem speeds)
or voice, but not both at once.
The 3G standard that GSM network operators picked could carry voice and pure data at once, but Sprint and Verizon opted for a flavor of net-work that would carry data only over 3G. Some non-Apple CDMA phones
have two radios, to allow a 2G voice call and a 3G data connection at the same time.
Data networking today when a call comes in
As a result, you see the following behavior on most iPhones and on most networks when there is an incoming call or you place a call:
■
Verizon, Sprint, and most CDMA networks: Data use, including PersonalHotspot, is immediately suspended.
■
AT&T, T-Mobile, and GSM networks: Data use continues, but is shuntedto a 3G, 3G+, or pre-LTE 4G network.
If you don’t answer a call or when you hang up, data use returns to the highest-speed available network.
Data networking with a VoLTE call
The list of requirements to make or receive a VoLTE call is daunting at the time of this writing:
■
Requires an iPhone 6 or 6 Plus. Even though earlier iPhone models seemingly had the circuitry, these two models are the only ones sup-ported at the time of this writing by the four American carriers, andlikely worldwide by others.
■
Carrier must have deployed. This sounds obvious, but it’s hard to sort out. AT&T has deployed part of its VoLTE footprint and plans to finish in 2015. Verizon and T-Mobile have upgraded their LTE networkscompletely. Sprint plans to wait for a future carrier interoperable version
of VoLTE.
If you meet these requirements—and the moon is half full and it’s a Tuesday—receiving a call or placing one will happen over VoLTE, vand your Personal Hotspot or other data use will continue at full LTE speeds. Yes, it’s a mess.
Note:
Alongside VoLTE, carriers have been rolling out HD Voice, a higher-quality
com-pression algorithm for voice calls. It sounds more like a Skype-to-Skype or FaceTime
Audio call than a cellular call. Most VoLTE rollouts are happening alongside HD Voice,
which also doesn’t work across different carrier networks. Sprint is rolling out HD
Voice alone.
Set a Wi-Fi Password
When you first turn on Personal Hotspot, iOS creates a strong WPA2 password. To connect a device over Wi-Fi to the hotspot, you must enter
this password on that device.
The default password created by your phone is sometimes a sequence of
recognizable words and numbers; other times, it may appear to be ran-dom. (At one point, the difference seemed to be by carrier, but now it’s impossible to tell.)
You can’t decide not to use a password at all, but you may choose to compose your own. You have to pick one that’s eight characters or more, although you can make that 12345678 if you must. Tap to enter your own password.
For this kind of connection, where it’s not a base station in a fixed lo-cation that someone might try to access, I suggest thinking of an eight- or nine-letter word and adding two punctuation marks to the end, like
Extra Security with Personal Hotspot
Using USB, Bluetooth, or Wi-Fi to connect to a hotspot device provides a strong layer of
security around your connection, which is reassuring if you’re at a location like a coffee
shop, where the network may not be well secured. USB is a physical connection and can’t be
monitored. Bluetooth has its own strong automatic security. Apple’s required use of WPA2
Personal for Wi-Fi ensures protection there, too. (See
Connect to a Small Network
.)
Although the backhaul to the mobile broadband network isn’t impregnable, it does require
either a dedicated effort to crack your particular communication or a wiretap at the carrier to
intercept data. Personal Hotspot lets you secure the local link at a location where you would
otherwise use Wi-Fi but where I would recommend using a VPN (virtual private network) to
prevent interception by those around you.
Name Your Wi-Fi Network
The Wi-Fi network has the same name as your iOS device. This is typi-cally your name, or that of whichever account you used to set up the iOS device (Figure 8). If you don’t feel like broadcasting your account name
whenever you turn on Personal Hotspot, you can change it.
Figure 8: The Wi-Fi network name (left) is identical to the name of your device, which you can see in iTunes (right) or in Settings.
Wi-Fi, click the device’s icon in the top bar in iTunes, then click its name to select it, which highlights the name. Type a new name, and click again or press Return.
You need to turn Personal Hotspot off and back on for the new name
to be broadcast.
Consider Turning Off Certain Radios
Now that you’ve turned on Personal Hotspot, you might not want it to be available through Bluetooth or Wi-Fi, because nearby devices of yours might accidentally connect to it. The only way to prevent a connection from a device with the right credentials is to turn off the Bluetooth or Wi-Fi radio.
WARNING! Disabling radios turns off OS X Continuity features.
To turn off Bluetooth, tap Settings > Bluetooth and slide the switch to Off. To disable Wi-Fi, tap Settings > Wi-Fi and slide the switch to Off. With either or both Bluetooth and Wi-Fi turned off, the Personal Hotspot feature pops up a warning when it’s switched on (Figure 9).
You can also change the Personal Hotspot Wi-Fi password to prevent devices that previously connected from gaining access again (see Set a Wi-Fi Password, slightly earlier).
Connect to Personal Hotspot
With Personal Hotspot on, you have three choices for how to connect:
tooth at the same time.
Tip:
Wi-Fi can use more battery power than Bluetooth, so you might opt for Bluetooth
tethering. However, the data rate isn’t stellar: Bluetooth 4.0, found on the iPhone 4S
and later and on the 3rd-generation or later iPad, has a raw data rate of 3 Mbps for
continuous connections, and an effective throughput of 2.1 Mbps. That’s far below
GSM 3G/4G rates and well below LTE rates.
There is a maximum of five total connections across all these methods. If
you have five devices connected and try to connect another, the connec-tion will be refused.
I explain how to make a connection shortly; for now, I want to mention that once you make a connection, a blue pulsing banner appears across the top of the iPhone or iPad’s screen (Figure 10). The banner shows the
number of devices connected, too.
Figure 10: A banner lets you know whenever your device is acting as a cellular modem for a computer via USB, Wi-Fi, or Bluetooth.
Note:
Windows computers, Android phones, and other devices can also connect via
Wi-Fi; many devices can also connect via Bluetooth; and Windows at least can also
tether via USB. The process is identical on those platforms to hooking into a Wi-Fi,
Bluetooth, or USB shared network, and it neither needs special software nor displays
any special indicators as in iOS and Mac OS X.
Access via Wi-Fi
Using Wi-Fi to connect to a Personal Hotspot is the easiest case because
no special setup is required. You use whatever method you normally
employ to connect to a Wi-Fi network from the device, and I provide di-rections for several common operating systems just ahead. The name of your iOS device is the name of the Personal Hotspot network.
Connect via Wi-Fi in Mac OS X
In Mac OS X, you can use the Wi-Fi
menu on the menu bar to select
the Personal Hotspot network by name:
1. Click the Wi-Fi menu to see a list of available networks.
2. Choose the network’s name.
▸ For an iOS 8.1 or later Personal Hotspot and Yosemite, it appears as
it does in Instant Hotspot: an item with the cellular connection type, battery level, and signal strength (Figure 12). (If Personal Hotspot is not active on the device, selecting the hotspot in the OS X menu turns it on.)
Figure 12: Select the hotspot under Personal Hotspot.
▸ For an iOS 8.0 or earlier, or with earlier versions of OS X than Yosemite,
Personal Hotspot shows up in the main list of networks with a linked-chain icon just to the left of the signal strength icon (Figure 13).
Figure 13: In iOS 8.0 and earlier, the Personal Hotspot’s network name appears in the Wi-Fi menu’s networks list.
Figure 14: Enter the network’s password to connect.
You’re now connected. Your Mac will stay connected as long as the Per-sonal Hotspot feature is active. The next time you turn on the Personal Hotspot, your Mac will reconnect if you stored the password and if your Mac isn’t already associated with a Wi-Fi network.
Disconnect from Personal Hotspot Wi-Fi
To stop using the Personal Hotspot, hold down the Option key and then select the Wi-Fi menu. Now select Disconnect From Network Name and
your link is severed.
Don’t auto-join in the future
If you want to prevent the Mac from connecting automatically in the
future, follow these steps:
1. Launch System Preferences and select the Network pane.
From and to an iOS 8.1 or later device
1. Select Settings > Wi-Fi.
2. Choose the network from the Personal Hotspots list (Figure 15).
3. Enter the password when prompted.
You are now connected. The chain icon appears at the left of the iOS status bar instead of the normal Wi-Fi icon.
To or from an iOS 8.0 or earlier device
Figure 15: Look for the chain icon or in the Personal Hotspots section.
2. Choose the network from the list. Personal Hotspot networks are shown
with a special chain icon in iOS 4.3 and later.
3. Enter the password when prompted.
You are now connected. The chain icon appears at the left of the iOS status bar instead of the normal Wi-Fi icon.
Automatic reconnection
As long as the password is stored for the iOS network and isn’t changed, your iOS device will reconnect automatically whenever it’s in range and the Personal Hotspot Wi-Fi connection is active. To stop using the mobile hotspot right away, choose another network from the list or turn off the Wi-Fi adapter.
If you want to prevent connecting automatically in the future, while
the hotspot connection is active, tap the blue info
button next to the network name and then tap Forget This Network. This removes the network’s stored setting and disconnects the device from the Per-sonal Hotspot immediately.
Disable Wi-Fi sharing in iOS
You can also block all existing connections from client devices by chang-ing the Wi-Fi password on the Personal Hotspot screen. This will also prevent devices with a stored password from reconnecting automatically or manually until you provide the changed password.
Tether with USB in Mac OS X
With Personal Hotspot enabled, connect your hotspot device to your com-puter using a USB cable. The first time you enable Personal Hotspot and plug the device into a Mac via USB, Mac OS X alerts you that the interface is added and the Mac’s Network system preference pane adds an adapter entry (Figure 16).
Figure 16: An entry appears in the adapters list.
Mac OS X automatically activates a tethered link and turns that red dot green.
Not active? If you’re not seeing this, you may need to launch iTunes the first time you tether. iTunes doesn’t seem to have anything to do with USB tethering except initial activation.
To halt the active USB tethering connection, disconnect the USB cable. Alternatively, you can disable the iOS adapter profile. In the Network system preference pane in Mac OS X, select the iPhone USB or iPad USB
Once you’re sure it’s enabled, you can make a Bluetooth connection from Mac OS X or iOS, as I describe next.
Bluetooth uses less power than Wi-Fi, almost nothing in standby mode, so a Bluetooth connection could allow both an iOS device and a paired piece of hardware to work longer without AC power.
Note:
I cover Bluetooth in more detail in
Set Up Bluetooth
if you’d like to learn more.
Bluetooth tethering with Mac OS X
Follow these steps to set up a Bluetooth connection between your hotspot device and a Mac running Yosemite or later (instructions are substan-tially different in earlier versions of OS X):
1. Launch System Preferences, and select the Bluetooth pane.
2. Your iPhone or iPad should appear in the list of devices (Figure 17). Click
Pair. (If it doesn’t appear, check that Bluetooth is enabled on the iOS device and that it’s within a few dozen feet of your computer.)
Figure 17: Initiate pairing from OS X.
Figure 18: The Mac and iOS device both display the same code.
4. Confirm that the code is identical, which prevents a so-called man- in-the-middle attack with someone nearby trying to intercept the con-nection. (That’s very unlikely, but it could happen.) The additional cue is the name of the device. Click Pair on the hotspot device. On the Mac, your iOS device should now appear in the list (Figure 19).
5. Now, in System Preferences, click Show All, then select Network.
Figure 19: The device is paired in OS X and connected.
6. In the adapters list at left, you’ll notice a new Bluetooth PAN entry; PAN
stands for Personal Area Network, and it’s the kind of network that Blue-tooth creates. Your device should be selected in the Device pop-up menu (Figure 20). Click Connect.
7. On the Mac, you’ll see the Status label set to Connected (Figure 20), and
if the Bluetooth system menu icon is showing, it will have dots bisect-ing it horizontally. On your hotspot device, the Internet tethering banner
will appear.
To disconnect Bluetooth tethering, you can do any of the following:
■
In the Network preference pane, with Bluetooth PAN selected in theFigure 20: The Network preference pane lets you manage the connection over USB.
■
On your hotspot device, in Settings > Personal Hotspot, tap the Personal Hotspot switch to Off.■
Turn off Bluetooth networking. In iOS, tap Settings > Bluetooth; on the Mac, look in the Bluetooth system preference pane or the Bluetoothmenu on the menu bar.
Bluetooth tethering with iOS
Although all iOS devices have Wi-Fi built in, Bluetooth consumes less
battery power and may be a more appropriate choice. You can set up
a Bluetooth connection between any iOS device running iOS 4.3 or later
and a hotspot device quite simply:
1. View Settings > Bluetooth.
2. If Bluetooth is off, tap the switch to turn it on.
Figure 21: The Personal Hotspot appears in the Devices list; here, it’s “Executive Privilege.”
Figure 22: Tap Pair on both devices to proceed.
4. If the codes match, tap Pair on both devices.
The iOS device is now connected over Bluetooth, and a chain icon
appears at the left of the status bar instead of the normal Wi-Fi icon. To disconnect from the Personal Hotspot, you can do either of the fol-lowing:
■
On the connected device: Slide Bluetooth’s switch to Off.■
On the hotspot device: Turn off the Personal Hotspot feature or turn offBluetooth.
You might want to discard a stored Bluetooth pairing from the Devices list if, for instance, you’re using a friend’s device or you don’t want someone else using your iOS device with the paired connection. To re-move the pairing, tap the info
button next to the device name and then tap Forget This Device.
Use Bluetooth Tethering from iOS to a Laptop
A side benefit of the capability to tether over Bluetooth is that you can also use your iOS
de-vices to grab Internet access from a laptop. For instance, if you’re in a hotel or other location
in which you have to pay for each device you connect to a Wi-Fi network, you were
previ-ously out of luck in relaying an Internet connection from a laptop to an iPhone, iPod touch,
or iPad. Now you can.
Under Mac OS X, use the Sharing system preference pane’s Internet Sharing option to share
the Wi-Fi connection via Bluetooth PAN. Choose Wi-Fi from the Share Your Connection From
pop-up menu, and check the Bluetooth PAN box in the To Computers Using list (
Figure 23
).
Then check the box next to Internet Sharing in the Service list at left.
Figure 23: You can share your Wi-Fi connection via the Bluetooth PAN to iOS devices.
Choose to Use Cellular
Data or Wi-Fi
There are plenty of good reasons to pay attention to whether a cellular iOS
device is accessing the Internet via a Wi-Fi network or mobile broadband.
You may need greater bandwidth than the cellular network can provide, be
budgeting data on a low-bandwidth plan, or be away from your home
car-rier territory and want to keep usage low.
Whatever the reason, you can determine which network you’re on and set
the type of network to which your device connects.
Which Network Are You On?
iOS has an indicator in the status bar (near the upper left) that shows which network connection is active (Table 1). The range of bandwidth is huge (such as 30 to 300 Mbps as the top rate), because iOS 8 runs on devices that span generations of cellular and Wi-Fi equipment. And each iOS device supports many rates for each standard while also offering backward-compatible support for older networks.
Select Which Service to Use
Table 1: Deciphering Indicator Icons
Indicator
Explanation
Bandwidth
No service
Can’t connect to any network. You may also
see five underscores.
None.
Connected to a Wi-Fi network. The number
of white waves, from one (shown as a dot) to
three, indicates signal strength from weakest
to strongest.
Rates as high as 30–300 Mbps,
but limited by the broadband
service to which a Wi-Fi router
connects.
LTE
Connected via LTE.
From 5–100 Mbps downstream,
2–25 Mbps upstream.
4G
Connected via 4G (GSM only).
Downstream up to 6 Mbps
and upstream up to 1.9 Mbps.
3G
Connected via 3G.
GSM: Down 1.7–4 Mbps; up 384
Kbps–1.9 Mbps.
CDMA: Down, 600 Kbps–1.4
Mbps; up, 500–800 Kbps.
E
Connected via EDGE, a 2.5G standard (GSM
only).
Roughly 200 Kbps downstream
(all GSM iOS devices); 40–50 Kbps
upstream
GPRS
Connected via 2G using either GPRS (GSM) or
1xRTT (CDMA).
Roughly 40–50 Kbps.
To enable or disable cellular service:
■
To use a cellular connection solely and avoid Wi-Fi, perhaps to keep a continuous VPN connection or for security reasons, either:▸ Swipe up to show the Control Center and tap the Wi-Fi icon to disable
it.
▸ Tap Settings > Wi-Fi, and then set the Wi-Fi switch to Off.
Avoid a flaky Wi-Fi network: If a Wi-Fi network is acting flaky, you can avoid the problem by switching off Wi-Fi. Or, use the method noted in
Forget This Network to forget the network.
■
To rely only on Wi-Fi, accepting that you may have times during which you have no Internet connectivity, tap Settings > Cellular Data (iPad) or Settings > Cellular (iPhone), and then set Cellular Data to Off. (In the case of an iPad, this disables all features related to using the mobile net-work; however, for an iPhone, voice calling, voicemail, and messaging remain available.)WARNING! There’s one odd situation to look out for. When you’re using
Manage Cell Data Usage
When Apple introduced the iPhone, it also managed to get AT&T and then
other carriers to offer unlimited data plans in the United States and in a few
other countries. That didn’t last, especially as networks became congested
with heavy data use.
There are still millions of people grandfathered into old plans that allow
un-limited data use, but most of us—and all new users and network switchers—
are either on plans that have a fixed amount of data included in each billing
period and then charge fees for overages, or on plans that allow “unlimited”
usage, but after a certain amount of data is consumed, the connection is
throttled from Mbps to Kbps for the remainder of the billing period.
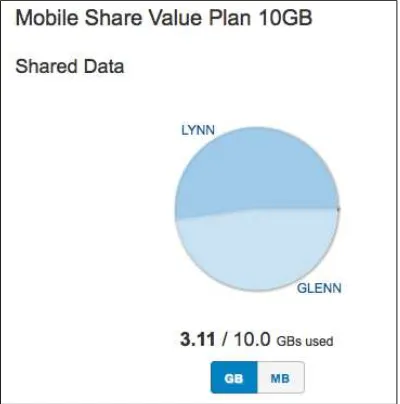
I’m on a family plan with AT&T that allows 10 GB of use per month among all
our cellular-enabled devices, and then charges $15 per additional gigabyte.
After many months on this plan, we haven’t exceeded our allocation.
This chapter offers a variety of advice on keeping your usage down.
Keep Usage Restrained
You can have mobile access when you need it without breaking your lim-its, incurring overages, or paying for more chunks of data—if you ration usage. What you need is a strategy.
■
It’s not guaranteed to be accurate. Your carrier’s records are definitive (Figure 24). In practice, it’s pretty close.■
It isn’t aligned with your billing period. Rather, it’s a total of all data consumed since the last time you tapped Reset Statistics at the very bot-tom of the Cellular or Cellular Data view.Figure 24: AT&T’s online data statement is the only one you can rely on for billing.
You can, of course, visit your carrier’s Web site and get usage informa-tion that’s typically accurate to within 24 hours, sometimes much less. If you’d like this number to be more useful, set yourself a reminder in your calendar for the first of each month (or the start of your billing pe-riod if it’s another increment) to visit Settings > Cellular and tap Reset Statistics (Figure 25).
Check Usage in Settings
Figure 25: Tap Reset Statistics to zero out your current cellular data numbers.
Figure 26: You can discover Personal Hotspot’s portion of overall cellular data consumed.
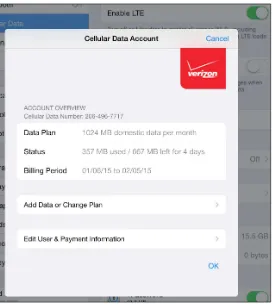
Check Cellular Usage an an iPad
Figure 27: A Wi-Fi + Cellular iPad only shows information via Settings > Cellular Data > View Account, and only for the current billing plan period.
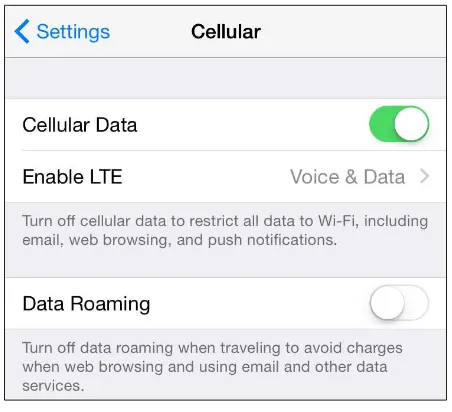
Turn Cellular Data On Only When You Need It
There are times when you’d prefer not to have an active cellular con-nection or cellular data link on an iPhone or cellular iPad, notably when you’re close to the maximum of your monthly service plan or travel-ing outside an area included in your data plan (out of the country or in certain remote areas, typically). You can change how the cellular radio
interacts with a network in two ways:
Figure 28: The Cellular Data switch lets you turn all mobile broadband access on or off. Data Roaming affects use outside your home service area.
■
To shut off the entire cellular connection, set Airplane Mode to On in the upper left of the main Settings screen, or tap the Airplane Mode button in the Control Center. Airplane Mode turns off all radios, not just cellular. See Use Airplane Modefor details. It also dramatically extends your bat-tery life in most cases.
You can also control other cellular data parameters:
■
Setting Enable LTE to Off will eliminate use of 4G LTE networks and rely on slower 2G and 3G networks. This is useful when LTE networks near you are spotty and you’re having trouble staying connected as your device swaps back and forth between 2G/3G and 4G LTE. This can alsoreduce battery consumption in some cases.
■
In some markets, the Enable LTE option may read Voice & Data, and let you pick 2G, 3G, or LTE as network options.Limit Your Activities on the Cell Network
Unless you are connected with Wi-Fi, limit your Internet-related activities to those that don’t use much data, such as checking email or viewing Web pages.
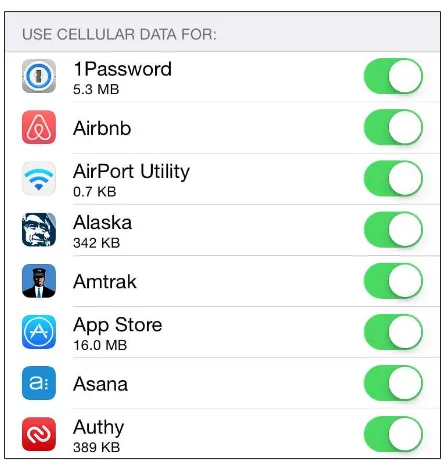
Various items in Settings let you limit whether cellular data can be used for an app or activity, including:
■
Use the options in Cellular Data (iPad) or Cellular (iPhone) to prevent excessive use of certain services from consuming a lot of your data allocation. You can turn on and off specific apps, and see their data consumption (see Figure 29).Figure 29: Opt out of cell data for certain iPhone apps.
■
In the Safari settings, you can disable syncing the reading list, which is relatively low bandwidth depending on how you use it.■
In iCloud > iCloud Drive, swipe to the bottom and you can disable syncingall items in the list over cellular.
■
You can also enable or disable cellular use via settings within certain apps. For instance, the podcast app Overcast has a cellular data switch in its Downloads area to let you grab a specific episode or download any available episode via cellular whenever it’s available (Figure 30).Figure 30: Overcast is blunt about what might happen.
More generally, you should avoid using or disable the cellular use in Settings for:
■
Audio-streaming apps, such as those used by radio stations and net-works. Usage is generally small, but it can add up.■
Video-streaming apps like Hulu Plus, YouTube, Netflix, and Vimeo. It’s easy to run through a gigabyte or more in an hour, depending on yourdevice and connection.
■
Photo-browsing apps like Flickr. Depending on the app, even swiping past a photo might download a megabyte or more.Note:
The Maps app used to consume lots of data because Apple loaded image data
from Google to power its software, even after Google switched to offering
vector
data
for plain maps. Vector data uses scale-independent points and arcs and straight lines
between them to represent maps, using vastly less data. Apple’s own Maps app and the
revised Google Maps app both use vector data. In looking at heavy usage of Google
Maps for a three-month period, my iPhone shows only 94 MB of data consumed over
cellular.
Airplane Mode
Before you’re flying so high with some guy in the sky, you need to disable
radio communications on your mobile device. The Airplane Mode switch
makes this simple.
Until recently, the FAA enforced a kind of commercial urban myth: that the
cellular radios in cell phones as well as personal electronics could cause
interference with the avionics (electronic flight systems) on commercial
air-craft.
This was out of an abundance of caution even years after it was clearly
proven that there was no such risk—and after it was shown that cell phones
are routinely left on, or even used, in flight without any adverse effects.
The latest flight rules in the U.S. allow the use of handheld personal
elec-tronics below 10,000 feet, even though laptops and other large devices
are supposed to be stowed so they don’t become projectiles. (1,000-page
books are still OK, bizarrely.)
Cellular radios remain banned, and one ostensibly isn’t supposed to use
Bluetooth at all, and should not turn on Wi-Fi unless in a plane equipped
with Wi-Fi service.
What’s Airplane Mode?
Saves battery life, too: If you don’t need to use any of the radios for net-work access, peripherals, or location, Airplane Mode is an effective way to extend battery life, too.
WARNING! Airplane Mode effectively hobbles Find My iPhone. If you’re con
-cerned about losing your device and not being able to find it later, Airplane Mode disables all the necessary network access and GPS data to allow loca-tion tracking.
When you turn on Airplane Mode in the Settings app, iOS turns off four separate radio systems on an iPhone or cellular iPad: cellular, GPS, Wi-Fi,
and Bluetooth. On a Wi-Fi–only iPad or any iPod touch, Wi-Fi and Blue-tooth are disabled.
Sleep doesn’t disable radios or activity: When you push the Sleep/ Wake button on the top or side of your iOS device to put it to sleep, you might think the entire device is suspended. But this standby mode is pretty active. Certain background operations continue, and a cellular iPad and any iPhone can receive email and other updates via push over a cellular data connection. iOS also maintains Wi-Fi connections on a minimal continuous level. Sleep is more like lightly daydreaming for an iOS device.
On flights on which Wi-Fi is available for Internet access—this option is available on many U.S. aircraft—you can separately tap Wi-Fi in the Set-tings app.
When you turn Airplane Mode back to Off after leaving a plane, all your previous settings for access are flipped back on.
Turning Radios Off Separately
You can choose to separately turn off both radios in a Wi-Fi–only iPad or any iPod touch and three of the four radios in an iPhone or cellular iPad without engaging Airplane Mode:
■
Wi-Fi: Swipe up to reveal the Control Center and tap the Wi-Fi icon; or, in Settings, tap Wi-Fi, and set Wi-Fi to Off.■
Bluetooth: Swipe up to reveal the Control Center and tap the Bluetooth icon; or, in Settings, tap Bluetooth, and set Bluetooth to Off.■
GPS: Tap Settings > Privacy > Location Services, and set Location Services to Off.Is GPS really off? GPS is a receive-only system; with Location Services off, ostensibly, the GPS receiver isn’t powered up and attempting to find data, so it’s “off” in that sense.
WARNING! Disabling Location Services prevents iOS from using GPS, Wi-Fi,
and cell-tower based information to provide location data to apps and the operating system.
There is no way to disable the cellular radio separate from Airplane Mode,
Set Up Bluetooth
Bluetooth wireless networking lets you connect peripherals like
battery-powered headphones, earpieces, headsets, and keyboards to
an iOS device for listening to music and entering text.
Read this chapter to learn how to set up and manage Bluetooth devices.
Tethering: Bluetooth can provide Internet service to an iOS device from another piece of hardware, such as an iPhone with Personal Hotspot en-abled, a laptop, or a cellular router with Bluetooth as an option. See the earlier chapter Make a Mobile Hotspot for details.
Bluetooth Basics
The Bluetooth SIG, a trade group, certifies devices as Bluetooth compliant for particular profiles, which include things like text entry, stereo audio, file transfer, and modem access. Apple’s iOS devices work with any de-vice that meets the Bluetooth spec for several profiles, including audio, peer-to-peer transfer, and external keyboards.
Note:
Apple documents iOS device compatibility in a support note at
http://support.
apple.com/kb/HT3647
.
When you connect with Bluetooth, the process is known as pairing. Some devices can be paired with several hosts (like computers or mobile devices); others can pair with only one host at a time, and must be re-paired to switch. Bluetooth devices are discoverable when they are set to allow a pairing connection.
peripherals under My Devices and Other Devices. The My Devices list
shows any devices that have been previously attached to the device and
the current status of such devices. The Other Devices list displays any discoverable devices within range.
Bluetooth 4.0 and Low Energy (LE)
Bluetooth 4 brought a low-power mode called Bluetooth LE (sometimes called Bluetooth
Smart) to the mix. It lets devices with tiny batteries that are meant to be changed infrequently
communicate in tiny, power-conserving bursts. You could have Smart devices in your home’s
alarm system, and an iOS app could let you tap to see if any windows are ajar, for instance.
Apple has used Bluetooth LE extensively in later releases of iOS and Mac OS X to enable
signaling between devices for AirDrop (see
Exchange Files with AirDrop
) and some of the
Continuity features, like Instant Hotspot (see
Turn On via Another Device
).
Bluetooth LE is also part of Apple’s iBeacon, where a piece of hardware with location-specific
information—such as a map in a mall, information about a historical site, or a coupon offered
by a restaurant—can be sent over short distances to your phone or tablet.
Pairing Any Device
To start pairing, follow these general steps (the specifics for particular profiles are given later in this chapter):
1. Tap Settings > Bluetooth.
2. Activate Bluetooth discovery on the other device. Turning on discovery
varies by device; check the manual. Typically, you hold down a button
(sometimes a special pairing button) for several seconds.
On your iOS device in the Bluetooth view, the other device appears, natu-rally enough, in the Other Devices list (Figure 31).
3. Tap the desired device. iOS attempts to connect.
4. Depending on the device, iOS will do one of the following:
▸ Simply proceed: iOS pairs without requiring a code or confirmation.
Figure 31: An unpaired device (my MacBook Air) is discovered.
▸ Show a Pair button: In some cases, you don’t need to type a pairing
code, but you get a dialog like the one in Figure 32 on each device.
Compare the code, and tap Pair on each to confirm.
Figure 32: iOS devices and Macs just ask you to confirm.
▸ Show a field in which you enter a code: The code will either be provided
by the other device or—in the case of a peripheral without a way to
choose or display characters—noted in its manual. It’s typically 0000.
▸ Display a code that you enter on the other device:Your iOS device
generates a PIN (called a “passkey” here) to be entered in the pairing
device.
The paired device is now shown as Connected in the list.
iOS shows a Connected label for paired devices that are turned on and available, and Not Connected for those that aren’t in range or are turned off (Figure 33).
Figure 33: The MacBook Air is paired and connected; the iPad is paired but not connected.
Tip:
To remove a pairing, select the peripheral in the Devices list, tap the info
but-ton, and then tap Forget This Device.
Apple Wireless Keyboard May Need Handholding
Apple Wireless Keyboard, which ships with all new Macs, uses Bluetooth for connectivity, and
can be paired with multiple computers and devices. But it can be tricky to connect the
key-board with the one you want if more than one paired device is in radio range.
After re-enabling Bluetooth on the iPhone, I turned the keyboard off and then back on to see
which device it associated with. The Mac grabbed it first. From the Mac’s system menu bar, I
opened the Bluetooth menu and chose Disconnect from the keyboard’s submenu.
Then, on the iPhone, in the Bluetooth settings, I tapped the keyboard’s item in the My
Devices list, and the iPhone associated with the keyboard. This is a little tedious, I know, but
it’s manageable if you want to use the keyboard with multiple devices.
WARNING! If you walk away from a Bluetooth keyboard while it’s still on, it
can maintain a connection over a long distance. I was mystified as to why I couldn’t get an onscreen keyboard to appear on my iPad when two rooms away from an Apple Wireless Keyboard until I recalled I hadn’t turned it off.
Hands-Free Profile
The Hands-Free Profile in Bluetooth lets you have audio conversations using the mic and headphones (or speakers) on a variety of devices, such as over-the-ear or in-ear headsets. You pair a device just as described in
Pairing Any Device, earlier.
On an iPhone, you can answer incoming calls by tapping the answer but-ton on the headset. When you place a call, the last chosen mic/headphone
is used, but you can pick from the available options, even as the call is
underway, by tapping the Audio button. In the example in Figure 34, I
Picking an audio source also works to let you use a headset for other pro-grams, such as Skype or FaceTime, that don’t require a cellular network or an iPhone.
Full support: Apple has supported this profile in all iPhones, in the iPad since the iPad 2, in all iPad minis, and in the iPod touch starting in its 4th generation model.
Audio Devices
iOS supports two of the three common audio playback profiles for Blue-tooth: one for stereo audio playback, and another that allows remote
control (pause, play, and stop).
Note:
The technical names for these two profiles—useful if you’re examining the spec
of Bluetooth gear to buy—are the Advanced Audio Distribution Profile (A2DP) and the
Audio/Video Remote Control Profile (AVRCP).
Once you’ve paired stereo headphones, you can use them just as
you would headphones plugged into any iOS device. You can tap the start,
stop, and other controls in an app playing back audio, or, if your Blue-tooth headphones or headset has these controls, you can handle those options remotely.
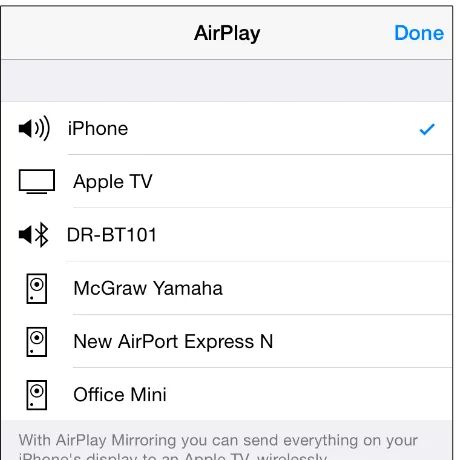
Apps that allow audio playback should show a special AirPlay
icon when multiple audio output options are available. You can also swipe
up to reveal the Control Center and change all iOS audio output to an-other audio device. (See Stream Music and Video with AirPlay for more
about that technology.)
Tap the icon to pick an audio destination, which includes the device itself
(to use its built-in speakers), one or more active Bluetooth headphones, and any Apple TVs or AirPlay speakers connected to your network (Figure 35).
Figure 35: Tap the AirPlay button in the audio playback controls to choose among available audio output destinations.
You can stop using Bluetooth headphones with one of three methods:
■
Turn off the Bluetooth headphones using the power button.■
In Settings > Bluetooth, in the entry for the headphones, tap the infobutton, tap Forget This Device, and then tap OK.
■
Move the iOS device and the Bluetooth headphones out of range of each other. I like this option least, because Bluetooth can work over a long range. If you leave your headphones at home and take your mobiledevice with you, then this option makes sense.