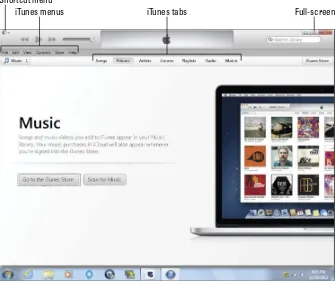
▸ Baca selengkapnya: c++ how to program (10th edition) pdf
(2)(3)by Tony Bove
FOR
DUMmIES
‰111 River Street Hoboken, NJ 07030-5774
www.wiley.com
Copyright © 2013 by John Wiley & Sons, Inc., Hoboken, New Jersey
Published by John Wiley & Sons, Inc., Hoboken, New Jersey Published simultaneously in Canada
No part of this publication may be reproduced, stored in a retrieval system or transmitted in any form or by any means, electronic, mechanical, photocopying, recording, scanning or otherwise, except as permitted under Sections 107 or 108 of the 1976 United States Copyright Act, without either the prior written permission of the Publisher, or authorization through payment of the appropriate per-copy fee to the Copyright Clearance Center, 222 Rosewood Drive, Danvers, MA 01923, (978) 750-8400, fax (978) 646-8600. Requests to the Publisher for permission should be addressed to the Permissions Department, John Wiley & Sons, Inc., 111 River Street, Hoboken, NJ 07030, (201) 748-6011, fax (201) 748-6008, or online at http:// www.wiley.com/go/permissions.
Trademarks: Wiley, the Wiley logo, For Dummies, the Dummies Man logo, A Reference for the Rest of Us!, The Dummies Way, Dummies Daily, The Fun and Easy Way, Dummies.com, Making Everything Easier, and related trade dress are trademarks or registered trademarks of John Wiley & Sons, Inc. and/or its affili-ates in the United Staffili-ates and other countries, and may not be used without written permission. iPod and iTunes are registered trademarks of Apple, Inc. All other trademarks are the property of their respective owners. John Wiley & Sons, Inc. is not associated with any product or vendor mentioned in this book.
LIMIT OF LIABILITY/DISCLAIMER OF WARRANTY: THE PUBLISHER AND THE AUTHOR MAKE NO REPRESENTATIONS OR WARRANTIES WITH RESPECT TO THE ACCURACY OR COMPLETENESS OF THE CONTENTS OF THIS WORK AND SPECIFICALLY DISCLAIM ALL WARRANTIES, INCLUDING WITH-OUT LIMITATION WARRANTIES OF FITNESS FOR A PARTICULAR PURPOSE. NO WARRANTY MAY BE CREATED OR EXTENDED BY SALES OR PROMOTIONAL MATERIALS. THE ADVICE AND STRATEGIES CONTAINED HEREIN MAY NOT BE SUITABLE FOR EVERY SITUATION. THIS WORK IS SOLD WITH THE UNDERSTANDING THAT THE PUBLISHER IS NOT ENGAGED IN RENDERING LEGAL, ACCOUNTING, OR OTHER PROFESSIONAL SERVICES. IF PROFESSIONAL ASSISTANCE IS REQUIRED, THE SERVICES OF A COMPETENT PROFESSIONAL PERSON SHOULD BE SOUGHT. NEITHER THE PUBLISHER NOR THE AUTHOR SHALL BE LIABLE FOR DAMAGES ARISING HEREFROM. THE FACT THAT AN ORGANIZA-TION OR WEBSITE IS REFERRED TO IN THIS WORK AS A CITAORGANIZA-TION AND/OR A POTENTIAL SOURCE OF FURTHER INFORMATION DOES NOT MEAN THAT THE AUTHOR OR THE PUBLISHER ENDORSES THE INFORMATION THE ORGANIZATION OR WEBSITE MAY PROVIDE OR RECOMMENDATIONS IT MAY MAKE. FURTHER, READERS SHOULD BE AWARE THAT INTERNET WEBSITES LISTED IN THIS WORK MAY HAVE CHANGED OR DISAPPEARED BETWEEN WHEN THIS WORK WAS WRITTEN AND WHEN IT IS READ. FULFILLMENT OF EACH COUPON OFFER IS THE SOLE RESPONSIBILITY OF THE OFFEROR.
For general information on our other products and services, please contact our Customer Care Department within the U.S. at 877-762-2974, outside the U.S. at 317-572-3993, or fax 317-572-4002. For technical support, please visit www.wiley.com/techsupport.
Wiley publishes in a variety of print and electronic formats and by print-on-demand. Some material included with standard print versions of this book may not be included in e-books or in print-on-demand. If this book refers to media such as a CD or DVD that is not included in the version you purchased, you may download this material at http://booksupport.wiley.com. For more information about Wiley products, visit www.wiley.com.
Library of Congress Control Number: 2012956419
ISBN 978-1-118-50864-0 (pbk); ISBN 978-1-118-55537-8 (ebk); ISBN 978-1-118-55550-7 (ebk); ISBN 978-1-118-50867-1 (ebk)
Tony Bove has written about every iPad, iPod, and iPhone model and every update to iTunes from the very beginning, and not only provides free tips on his website (www.tonybove.com/tonytips) but also developed an app (Tony’s Tips for iPhone Users). Tony is a technical publications manager for a software company and has written more than two dozen books on computing, desktop publishing, and multimedia, including iPod touch For Dummies, iLife® ’11 For Dummies, iPad Application Development
For Dummies, iPhone Application Development All-in-One For Dummies (all from Wiley), Just Say No to Microsoft (No Starch Press), The GarageBand Book
(Wiley), The Art of Desktop Publishing (Bantam), and a series of books about Macromedia Director, Adobe Illustrator, and PageMaker. Tony also founded
Desktop Publishing/Publish magazine and the Inside Report on New Media
newsletter, and he wrote the weekly Macintosh column for Computer Currents
for a decade, as well as articles and columns for a variety of publications including NeXTWORLD, the Chicago Tribune Sunday Technology Section,
Macintosh Today, the Prodigy online network, and NewMedia. Tracing the personal computer revolution back to the 1960s counterculture, Tony produced a CD-ROM interactive “rockumentary” in 1996, Haight-Ashbury in the Sixties (which explains his taste in music in this book’s examples). He also developed the Rockument music site, www.rockument.com, with commentary and podcasts focused on rock music history. As a founding member of the Flying Other Brothers, which toured professionally for a decade and released three commercial CDs (52-Week High,San Francisco Sounds, and Estimated Charges), Tony performed with Hall of Fame rock musicians.
Dedication
This book is dedicated to my sons, nieces, nephews, their cousins, and all their children . . . the iPod generation.
Author’s Acknowledgments
outside the U.S. at 317-572-3993, or fax 317-572-4002.
Some of the people who helped bring this book to market include the following:
Acquisitions and Editorial
Project Editor: Jean Nelson
Executive Editor: Bob Woerner
Copy Editor: Jean Nelson
Technical Editor: Dennis Cohen
Editorial Manager: Jodi Jensen
Editorial Assistants: Leslie Saxman, Annie Sullivan
Sr. Editorial Assistant: Cherie Case
Cover Photo: © ariwasabi/iStockphoto.com
Cartoons: Rich Tennant (www.the5thwave.com)
Composition Services
Senior Project Coordinator: Kristie Rees
Layout and Graphics: Carrie A. Cesavice, Amy Hassos, Joyce Haughey
Proofreaders: ConText Editorial Services, Inc., Dwight Ramsey
Indexer: BIM Indexing & Proofreading Services
Publishing and Editorial for Technology Dummies
Richard Swadley, Vice President and Executive Group Publisher
Andy Cummings, Vice President and Publisher
Mary Bednarek, Executive Acquisitions Director
Mary C. Corder, Editorial Director
Publishing for Consumer Dummies
Kathleen Nebenhaus, Vice President and Executive Publisher
Composition Services
Introduction ... 1
Part I: Touching All the Basics ... 7
Chapter 1: Powering Your iPod ... 9
Chapter 2: Setting Up iTunes and Your iPod ... 23
Chapter 3: Putting Your Finger on It ... 35
Chapter 4: Clocking, Locking, Connecting, and Personalizing ... 59
Part II: Managing Your Library ... 87
Chapter 5: Getting Started with iTunes ... 89
Chapter 6: Exploring the iTunes Store ... 109
Chapter 7: Getting in Sync with Your iTunes Library ... 127
Chapter 8: Syncing Your Day in the Life ... 149
Chapter 9: Putting iTunes to Work ... 161
Chapter 10: Playing Content in iTunes ... 175
Chapter 11: Gimme Shelter for My Media ... 191
Part III: Playing It Back with Interest ... 205
Chapter 12: The Songs Remain the Same ... 207
Chapter 13: Bring Videos, Books, and Podcasts ... 229
Chapter 14: Pocketing Your Pictures ... 239
Part IV: Touching the Online World ... 259
Chapter 15: Surfin’ Safari ... 261
Chapter 16: The Postman Always Rings Once ... 275
Chapter 17: Earth, Wind, and Finance ... 287
Part V: Staying in Touch and Up-to-Date ... 305
Chapter 18: A Day in the Social Life... 307
Chapter 19: Resetting, Updating, and Restoring ... 333
Part VI: The Part of Tens ... 341
Chapter 20: Eleven Tangible Tips ... 343
Chapter 21: Ten Apps That Shook the iPod World... 351
Introduction ... 1
About This Book ... 1
Conventions Used in This Book ... 2
A Quick Peek Ahead ... 3
Part I: Touching All the Basics ... 3
Part II: Managing Your Library ... 3
Part III: Playing It Back with Interest ... 4
Part IV: Touching the Online World ... 4
Part V: Staying in Touch and Up-to-Date ... 4
Part VI: The Part of Tens ... 4
Bonus Chapters and Tips... 4
Icons Used in This Book ... 5
Part I: Touching All the Basics ... 7
Chapter 1: Powering Your iPod . . . .9
Comparing iPod Models ... 10
Getting in touch with iPod touch ... 11
Going mano a mano with iPod nano ... 12
Doing the iPod shuffle ... 13
Twirling the iPod classic ... 14
Thinking Outside the Box ... 14
Applying Power to an iPod ... 16
Connecting to a computer or power adapter ... 16
Turning it on and off ... 17
Facing Charges of Battery ... 18
Recharging your battery ... 18
Saving power ... 21
Chapter 2: Setting Up iTunes and Your iPod . . . .23
Installing iTunes ... 24
Installing on a Windows PC ... 24
Installing on a Mac ... 26
Setting Up an Pod touch ... 27
Chapter 3: Putting Your Finger on It . . . .35
Going on a Quick Tour of the iPod touch ... 36
Sliding to the Home screen ... 37
Tapping the apps from Apple ... 39
Searching for anything ... 40
Checking the status bar ... 41
Dragging down notifications ... 42
Multitasking your apps ... 42
Switching orientation ... 44
Cleaning Up Your iPod touch Home Screens ... 44
Rearranging icons on your Home screens ... 44
Organizing apps into folders ... 45
Tickling the iPod touch Keyboard ... 46
Typing text, numbers, and symbols (using Notes) ... 47
Editing text and handling word suggestions ... 48
Copying (or cutting) and pasting ... 49
Take a letter, Siri ... 50
Setting keyboard options ... 52
Tapping Your iPad nano ... 54
Thumbing Your iPod Classic or iPod Shuffle ... 56
Chapter 4: Clocking, Locking, Connecting, and Personalizing . . . .59
There’s No Time Like the Right Time ... 60
On an iPod touch ... 60
On an iPod nano ... 62
On an iPod classic ... 63
Rock Around the Clocks ... 64
Checking the time in Paris and Bangkok... 64
Getting alarmed ... 66
Timing your steps ... 69
Using the stopwatch ... 70
Setting the sleep timer ... 72
Working Out with Your iPod nano ... 73
Setting your personal info ... 73
Walking to new wellness ... 74
Running for your life (and health) ... 74
Setting the Passcode for Your Lock ... 76
Getting Personal ... 78
Adjusting the backlight of your iPod classic ... 79
Brightening and wallpapering ... 79
Sound effects and ringtones ... 81
Location, location, location ... 82
Setting restrictions ... 83
Setting and changing notifications ... 84
Going Online with Your iPod touch ... 85
Turning Wi-Fi on or off ... 85
Part II: Managing Your Library ... 87
Chapter 5: Getting Started with iTunes . . . .89
Welcome to the iTunes Machine ... 90
Adding Audio Files ... 92
Adding Videos ... 93
Browsing Your Library Content ... 93
Browsing albums... 95
Browsing songs ... 96
Browsing other content ... 98
Browsing apps and iPod games ... 100
Playing Audio CD Tracks ... 101
Importing Audio CDs ... 103
Changing import preferences and settings ... 103
Editing the CD info and joining tracks ... 107
Let it rip ... 107
Chapter 6: Exploring the iTunes Store . . . .109
Setting Up an Account ... 110
Shopping with iTunes ... 113
Cruising in the multimedia mall ... 113
Browsing other content ... 116
Browsing and subscribing to podcasts ... 116
Updating podcasts ... 118
Buying and downloading items ... 119
Resuming interrupted downloads ... 120
Appearing at the App Store ... 121
Shopping with Your iPod touch ... 122
Browsing and downloading content ... 123
Browsing and downloading apps ... 124
Updating Apps ... 125
Chapter 7: Getting in Sync with Your iTunes Library . . . .127
Syncing Differently ... 128
Syncing everything ... 129
Sizing up your syncing ... 132
Syncing wirelessly or not at all ... 133
Enabling other sync options... 134
Making the iTunes Match... 135
Choosing What to Sync ... 135
The “everything but the kitchen sync” method ... 135
Getting picky about playlists, artists, and genres ... 136
Picking podcast episodes and books ... 138
Choosing movies and TV shows for an iPod touch ... 140
Syncing and arranging apps f0r an iPod touch ... 142
Manually Managing Music and Videos ... 145
Autofilling it up ... 145
Copying items manually to your iPod ... 147
Chapter 8: Syncing Your Day in the Life . . . .149
Organizing Your Personal Info ... 149
Syncing Your Personal Info Using iTunes ... 151
When You Sync Upon iCloud ... 154
Setting up on a Mac ... 154
Setting up on Windows ... 155
Syncing your iPod touch with iCloud ... 155
Finding a lost iPod touch ... 157
Setting Up Mail Accounts on Your iPod touch ... 157
Changing and Deleting Mail Accounts ... 160
Chapter 9: Putting iTunes to Work . . . .161
Retrieving Song Information from the Internet ... 162
Editing Content Information ... 162
Editing fields for a single item ... 163
Adding a rating ... 166
Changing the media type ... 167
Editing multiple items at once ... 167
Displaying and Sorting Content ... 169
Searching for Content ... 171
Deleting Content ... 172
Adding Cover Art ... 173
Chapter 10: Playing Content in iTunes . . . .175
Playing Songs ... 176
Using the MiniPlayer and AirPlay ... 179
Cross-fading song playback ... 180
Creating your own playlists ... 181
Adding a touch of Genius ... 185
Playing Podcasts and Audio Books ... 187
Playing Videos ... 188
Chapter 11: Gimme Shelter for My Media . . . .191
Burning Your Own Discs ... 192
Using recordable CDs and DVDs ... 193
Creating a disc burn playlist ... 193
Burning a disc ... 196
Choosing your burn settings ... 197
Subscribing to iTunes Match ... 198
Studying Files in an iTunes Library ... 201
Finding the iTunes library ... 201
Locating a media file ... 202
Copying media files... 202
Part III: Playing It Back with Interest ... 205
Chapter 12: The Songs Remain the Same . . . .207
Locating “A Song for You” ... 207
Going with the Cover Flow... 207
Browsing music on an iPod touch ... 209
Browsing music on an iPod nano or iPod classic ... 210
Controlling Song Playback on an iPod touch ... 212
Downloading songs from iTunes Match ... 214
Repeating songs ... 214
Shuffling song order ... 215
Controlling Song Playback on an iPod nano ... 216
Controlling Song Playback on an iPod classic ... 218
Repeating iPod classic songs ... 219
Shuffling the iPod classic ... 219
Playing an iPod shuffle ... 220
Starting playback ... 220
Controlling playback ... 221
Using VoiceOver... 221
Consulting the iTunes Genius ... 223
Giving Genius a lesson in your tastes ... 223
Creating a Genius playlist on an iPod touch ... 224
Creating a Genius playlist on an iPod nano ... 225
Creating a Genius playlist on an iPod classic ... 226
Selecting Genius Mixes ... 227
Chapter 13: Bring Videos, Books, and Podcasts . . . .229
Everything’s Coming Up Videos ... 229
Playback at your fingertips on an iPod touch ... 230
Scaling the picture on an iPod touch ... 231
Playback under your thumb on an iPod classic ... 232
One Chapter at a Time: Audio Books, iTunes U, and Podcasts ... 233
Playing on an iPod touch ... 233
Playing on an iPod nano ... 235
Playing on an iPod classic ... 236
Playing the FM Radio in an iPod nano ... 236
Chapter 14: Pocketing Your Pictures . . . .239
Syncing with Photo Albums and Folders ... 239
Transferring pictures to your iPod ... 240
Syncing iPod touch pictures with your computer ... 242
Using Photo Stream ... 243
Viewing Pictures and Slide Shows ... 245
Viewing pictures on an iPod touch ... 246
Editing photos on an iPod touch ... 248
Setting up a slide show on an iPod touch ... 249
Shooting Photos and Videos on an iPod touch ... 252
Sharing Photos and Videos ... 256
Sending a picture by e-mail ... 256
Sharing pictures over social networks and messages ... 257
Selecting and copying multiple pictures... 258
Saving Pictures Attached to Messages on an iPod touch ... 258
Part IV: Touching the Online World ... 259
Chapter 15: Surfin’ Safari . . . .261
Take a Walk on the Web Side with Safari ... 262
Go URL own way ... 262
Reading and bookmarking as you go ... 264
Sharing a web link ... 267
Pearl diving with Google, Yahoo!, or Bing ... 268
Let Your Fingers Do the Surfing ... 269
Scrolling and zooming ... 269
It’s all touch and go ... 270
Surfing multiple pages ... 270
Interacting with pages ... 271
Copying text... 272
Bringing It All Back Home ... 273
Chapter 16: The Postman Always Rings Once . . . .275
Checking E-Mail ... 276
The message is the medium ... 277
Deleting a message ... 279
Setting up your VIPs ... 280
Sending E-Mail ... 280
Message Settings and Sending Options ... 283
What you see is what you got ... 284
Return to sender, address unknown ... 284
If Not Push, Then Fetch ... 285
Chapter 17: Earth, Wind, and Finance . . . .287
Checking for Stormy Weather ... 298
Shaking Your Money-Maker ... 300
Part V: Staying in Touch and Up-to-Date ... 305
Chapter 18: A Day in the Social Life . . . .307
Checking Your Calendar ... 308
Viewing your iPod classic calendar ... 308
Using Calendar on an iPod touch ... 308
A change is gonna come ... 310
Yesterday’s settings (and today’s) ... 312
Using Your Contacts ... 313
Orders to sort and display... 314
Soul searchin’ on an iPod touch ... 315
Adding, editing, and deleting contacts on an iPod touch ... 316
Siri, Can You Hear Me? ... 319
Messaging with Your iPod touch ... 320
Socializing on Networks ... 324
You’ve got a Facebook friend ... 324
Dedicated follower of Twitter ... 327
Joining the Game Center ... 329
Communicating with FaceTime ... 330
Setting up your calling address... 330
Making a video call ... 331
Chapter 19: Resetting, Updating, and Restoring . . . .333
Hitting the Panic Button ... 334
Stopping a frozen iPod touch app ... 334
Resetting an iPod touch ... 334
Resetting your iPod touch settings ... 335
Resetting an iPod nano and iPod classic ... 335
Resetting an iPod shuffle ... 336
Updating Your iPod ... 336
Checking the software version ... 336
Updating with newer software ... 337
Restoring Your iPod ... 338
Restoring previous settings on an iPod touch ... 338
Restoring to factory conditions ... 339
Part VI: The Part of Tens ... 341
Chapter 20: Eleven Tangible Tips . . . .343
Saving the Life of Your Battery ... 343
Keeping Your Screen Clean ... 343
Getting Healthy with Nike+ ... 344
Rating Your Songs on Your iPod ... 344
Deleting Videos from Your iPod touch ... 346
Checking the Traffic in Maps on Your iPod touch ... 346
Adding Keyboards on Your iPod touch ... 346
Keeping Your iPod touch Private ... 348
Saying No to a Pesky Wi-Fi Service ... 349
Capturing an iPod touch Screen Image ... 350
Chapter 21: Ten Apps That Shook the iPod World . . . .351
Remote ... 352
Enigmo ... 352
Tap Tap Revenge ... 352
Angry Birds ... 352
Ocarina ... 353
Dropbox ... 353
Google Mobile ... 353
Shazam and SoundHound ... 353
Stanza and iBooks ... 354
iMovie ... 354
Tony’s Tips for iPhone Users ... 354
L
aunched on October 23, 2001, the iPod is ubiquitous throughout the world. How the first device came to be called “iPod” is still, to this day, a mystery, but the name not only stuck, it also spawned “iPhone” and “iPad.” Some say a freelance copywriter came up with it after thinking of the phrase “Open the pod bay door, Hal!” from the movie 2001: A Space Odyssey. According to a team member quoted by Steve Levy in The Perfect Thing(Simon & Schuster), back in 2001, the late Apple chairman Steve Jobs “just came in and went, ‘iPod.’ We all looked around the room, and that was it.” It’s certainly true that the late Steve Jobs rode hard on its design and user inter-face, making all final decisions. When one of the designers said that, obvi-ously, the device should have a power button to turn the unit on and off, Jobs simply said no. And that was that. (We will all miss his insight.)
There were other MP3 audio players when the iPod was introduced, but none that offered as much capacity for holding music, and none that could change the entire experience of acquiring, playing, and storing your music the way the iPod did. And that’s because the iPod is not alone: It is an integral part of an ecosystem that centers on the iTunes application on your computer, and includes iCloud and the iTunes Store and App Store on the Internet.
iTunes is the center of my media universe and the software that manages content for all my iPods, iPhones, and iPads. I bring all my content into iTunes — from CDs, the iTunes Store, and other sources — and then sync it wirelessly to my iPod touch, iPhones, and iPads for playback. Even though I buy content and apps directly with my iPod touch, everything I obtain is automatically synchronized with my iTunes library on my computer, and just about all my music is synchronized with my iTunes Match library in iCloud.
iTunes was originally developed by Jeff Robbin and Bill Kincaid as an MP3 player called SoundJam MP, and released by Casady & Greene in 1999. It was purchased by Apple in 2000 and redesigned and released as iTunes. Since then, Apple has released numerous updates of iTunes to support new devices, fix bugs, and add new features to improve your content library and your iPod experience. All the important features are covered in this book. iTunes is getting better all the time, and this book gets you started.
About This Book
I didn’t have enough pages to cover every detail of every function, and I intentionally left out some detail so that you won’t be befuddled with techno-speak when it isn’t necessary. I wrote brief but comprehensive descriptions and included lots of cool tips on how to get the most out of your iPod touch.
At the time I wrote this book, I covered the most recent iPod models and the latest version of iTunes. Although I did my best to keep up for this print edition, Apple occasionally slips in a new model or new version of iTunes between book editions. If you’ve bought a new iPod with features not cov-ered in the book, or if your version of iTunes looks a little different, be sure to check out the free Tony’s Tips section of my website (www.tonybove. com/tips) for more tips, bonus chapters, and updates on the latest releases from Apple.
Conventions Used in This Book
Like any book that covers computers, mobile devices, and information tech-nology, this book uses certain conventions:
✓ Choosing from a screen or menu: With an iPod touch, when I write “Choose Settings➪General from the Home screen,” you tap Settings on the Home screen and then tap General on the Settings screen.
With an iPod classic or iPod nano, when you see “Choose Settings➪ Brightness from the iPod main menu,” you scroll (rotate your finger clockwise around) the click wheel to highlight Settings on the main menu, press the Select button (the center button) to choose Settings, and then highlight and choose Brightness from the Settings menu.
With iTunes, when I write “Choose iTunes➪Preferences in iTunes,” you click iTunes in the menu bar at the top of the display and then click Preferences in the iTunes menu that appears.
✓ Sliding, scrolling, and flicking on an iPod touch: When you see “Scroll the screen” I mean you need to drag your finger to slide the screen slowly. When I write “scroll the list on the iPod touch Settings screen,” I mean you should drag your finger over the list so that it slides horizon-tally or vertically. When I write “Flick the screen,” you should flick the screen with your finger to slide it quickly.
✓ Keyboard shortcuts on the computer: When you see ⌘-I, press the ⌘ key on a Mac keyboard along with the appropriate shortcut key. (In this case, after selecting a content item or app, press ⌘-I, which opens the Information window in iTunes.) In Windows, the same keyboard short-cut is Ctrl-I (which means press the Ctrl key along with the I key). Don’t worry — I always tell you what the equivalent Windows keys are.
✓ Step lists: When you come across steps that you need to do in iTunes or on the iPod touch, the action is in bold, and the explanatory part fol-lows. If you know what to do, read the action and skip the explanation. But if you need a little help along the way, check out the explanation.
✓ Pop-up menus: I use the term pop-up menu for menus on the Mac that literally pop up from dialogs and windows; in Windows, the same type of menu actually drops down and is called a drop-down menu. I use the term pop-up menu for both.
A Quick Peek Ahead
This book is organized into six parts, and each part covers a different aspect of using your iPod touch and iTunes. Here’s a quick preview of what you can find in each part.
Part I: Touching All the Basics
This part gets you started with your iPod: powering it up, recharging its bat-tery, connecting it to your computer, and so on. You discover how to set up your iPod and install iTunes. You also find out how to use an iPod touch multi-touch interface and onscreen keyboard. I also impart all the techniques I use as an iPod road warrior: organizing apps into folders, setting your alarm and multiple clocks for time zones, keeping time with your stopwatch, chang-ing your display settchang-ings, settchang-ing the passcode to lock up the device so others can’t use it, and setting restrictions on content and the use of applications.
Part II: Managing Your Library
Part III: Playing It Back with Interest
In this part, I show you how to locate and play music on your iPod shuffle, and all types of content on your iPod touch, iPod classic, and iPod nano — music, audio books, podcasts, iTunes U courses, movies, TV shows, videos, and slide shows of your own photos. You also discover how to take photos and record videos with an iPod touch.
Part IV: Touching the Online World
This part describes how to use your iPod touch and the Safari application to surf the web. You also find out how to check and send e-mail, look at your stock portfolio, and check the weather in your city and other cities. I also show you how to display maps and driving directions.
Part V: Staying in Touch and Up-to-Date
In this part, I explain how to use your iPod touch to locate and communicate with friends on Facebook, Twitter, and Game Center; use the Messages app to send and receive text; and use the FaceTime app to make and receive video calls. I also show you how to enter and edit calendar entries, how to enter and sort contacts, and how to use the Siri personal assistant on your iPod touch. You also find out how to update or restore your iPod, and reset its settings.
Part VI: The Part of Tens
In this book’s Part of Tens chapters, I provide ten tips that can help make your iPod experience a completely satisfying one, and I describe ten iPod touch apps that will rock your world.
Bonus Chapters and Tips
Lucky reader! You can take advantage of my previous forays into iPodland by checking out the online bonus chapters and free tips associated with this book in the Tony’s Tips section of my website (www.tonybove.com/tips). Scattered through those tips and bonus chapters, you’ll find even more great informational nuggets. Topics include the following:
✓ Choosing audio encoding formats and quality settings for importing music
✓ Adjusting the volume and equalizing the sound
✓ Preparing photo libraries, videos, address books, and calendars
✓ Managing multiple iTunes libraries and copying your library to other hard drives or computers
Icons Used in This Book
The icons in this book are important visual cues for information you need.
Remember icons highlight important things you need to keep in mind.
Technical Stuff icons highlight technical details you can skip unless you want to bring out your inner technical geek.
Tip icons highlight tips and techniques that save you time and energy — and maybe even money.
Warning icons save your butt by preventing disasters. Don’t bypass a Warning without reading it. This is your only warning!
I
I start you out with a power punch in Chapter 1: opening the box and powering up the iPod. You also find out how to get the most from your battery.
Chapter 2 describes how to set up your iPod and install the iOS operating system software on an iPod touch. It also describes how to install iTunes — on a Mac or Windows PC.
1
Powering Your iPod
In This Chapter
▶ Comparing iPod models
▶ Connecting to a power adapter, dock, or computer
▶ Using and recharging your battery
▶ Saving power and battery life
T
he iPod has evolved into a range of mobile devices — from the current iPod shuffle, iPod nano, iPod classic, and iPod touch models described in this chapter, to the iPhone and iPad models described in books such as iPhone For Dummies and iPad For Dummies. Along the way, Apple has not only completely changed the way people play music, audio books, and videos, but also has changed the way people shoot photos and videos, play games, check e-mail, use computer applications, and use theInternet.
But don’t just take my word for it. “It’s hard to remem-ber what I did before the iPod,” said Grammy Award– winner Mary J. Blige in an Apple press release. “iPod is more than just a music player; it’s an extension of your personality and a great way to take your favorite music with you everywhere you go.” Pope Benedict XVI has an iPod engraved with his coat of arms. President Barack Obama gave the U.K.’s Queen Elizabeth II an iPod preloaded with rare songs by Richard Rodgers. And when Bono of U2 gave an iPod shuffle to George H. W. Bush, the former president joked, “I get the shuffle and then I shuffle the shuffle.”
The convenience of carrying music on an iPod is phenomenal.
whereas the $249 160GB iPod classic, which is designed more for playing music, can hold around 40,000 songs — that’s more than 8 weeks of nonstop rock around the clock. (Prices may vary as Apple introduces new models.)
This chapter introduces the iPod models, and includes how to power them up and connect them to your computer, which are essential tasks.
Comparing iPod Models
The iPod was first invented for playing music, but now you can download movies and TV shows and select from a library of hundreds of thousands of applications (known as apps) for the iPod touch that offer everything from soup to nuts. The iPod touch can also shoot videos and still pictures. You can keep track of your calendar and contacts with an iPod classic as well as store loads of music, but with an iPod touch, you can also enter and edit calendar and contact entries, check and send e-mail, visit your favorite web-sites, get maps, obtain driving directions, read e-books and periodicals, take iTunes U courses, check the current weather, and even check your stock portfolio.
Introduced way back in the Stone Age of digital music (2001), each model of the iPod family has grown by several generations, now including:
✓ The iPod touch (fifth generation): This one looks and acts like an iPhone, but without cellular phone calls. It relies on Wi-Fi, which is short for wireless fidelity, to connect to networks offering the Internet.
✓ The iPod classic: Following the original iPod design, the iPod classic offers the highest music capacity.
✓ The iPod nano: This is the ultra-portable iPod with the mighty 2.5-inch display that is small enough to hide in your palm and large enough to show videos. It comes in a variety of colors, and responds to multi-touch gestures like the iPod touch.
✓ The tiny iPod shuffle: This is an iPod designed just for audio, which you can clip to your sleeve.
Getting in touch with iPod touch
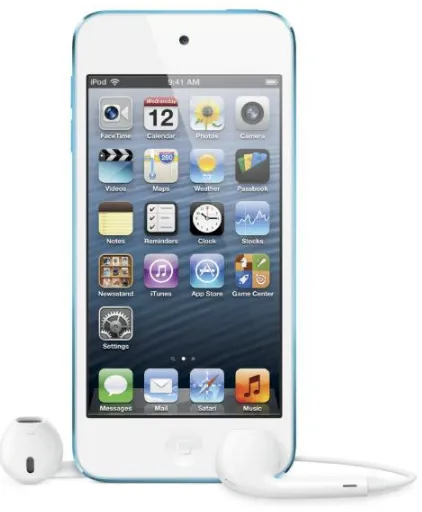
I want to call it a device, but it’s so much more — the iPod touch, shown in Figure 1-1, puts the entire world in your pocket. It’s your passport to millions of songs as well as movies, TV shows, and other content on the iTunes Store. It lets you communicate with your friends and family with FaceTime video calls and instant messaging, and participate in social and gaming networks such as Facebook and the Game Center. It records stunning HD video as well as photos and lets you edit them before sharing them. And, of course, it offers a library of hundreds of thousands of applications (known as apps) that offer everything from soup to nuts, including thousands of games — but I get into that later in this chapter.
Figure 1-1: iPod touch in all its glory.
4-inch, widescreen, multi-touch Retina display that offers a stunning 1136-x-640 pixel resolution at 326 pixels per inch — so many pixels that the human eye can’t distinguish individual ones.
The newest iPod touch also offers the 5-megapixel iSight camera on the back for recording HD (1080p) video at up to 30 frames per second (with audio). And you can use a front-facing 1.2-megapixel video camera for taking photos, recording HD (720p) videos, and making FaceTime video calls over the Internet.
The Siri intelligent personal assistant is also included with the newest iPod touch. With Siri and an Internet connection, you can talk in a normal voice to ask for directions, look up contacts, search the Internet, schedule appoint-ments, and so on, as I describe in Chapter 18. For example, you can ask Siri for baseball scores. Any app that has a keyboard, such as Notes (as I show in Chapter 3), can use Siri to understand the text you speak, so that instead of typing, you can speak and your words will be entered as text.
Apple offers the following sizes of iPod touch models as of this writing, and they all use the same battery that offers up to 40 hours of music playback or 8 hours of video playback:
✓ The 32GB model holds about 7,000 songs, 40,000 photos, or about 40 hours of video. (With 7,000 songs, you could play a full week of non-stop music.)
✓ The 64GB model holds about 14,000 songs, 90,000 photos, or about 80 hours of video.
The newest model iPod touch can do nearly everything an iPhone can do, except make cellular-service phone calls or pinpoint its exact location with the Global Positioning System (GPS). Even so, the iPod touch can find its approximate location with Internet-based location services, and you can make the equivalent of a “phone call” using FaceTime, the Skype app, and an Internet connection, as I describe in Chapter 18. It also offers stereo Bluetooth for using wireless headphones and microphones.
Going mano a mano with iPod nano
Apple has brought its multi-touch technology to a screen the size of a credit card. The iPod nano is the thinnest iPod ever made and comes in a full spectrum of colors. It plays music, videos, podcasts, audio books, and music videos.
Figure 1-2: iPod nano plays FM radio as well as videos and music.
The battery in the iPod nano gives it the power to play up to 30 hours of music — all day and all of the night — or 3.5 hours of video.
Doing the iPod shuffle
If the regular iPod models aren’t small enough to fit into your lifestyle or your budget, try the ultra-tiny 2GB iPod shuffle for $49 (see Figure 1-3). Its built-in clip lets you attach it to your clothing or almost anything. The iPod shuffle has no display but offers buttons on the front to control playback. This design keeps the size and weight to a minimum.
Figure 1-3: iPod shuffle is the iPod you can wear.
The iPod shuffle can also talk to you with the VoiceOver feature. Press the VoiceOver button on top of your iPod shuffle to hear the title and artist of the song. VoiceOver even tells you whether your battery needs charging.
Twirling the iPod classic
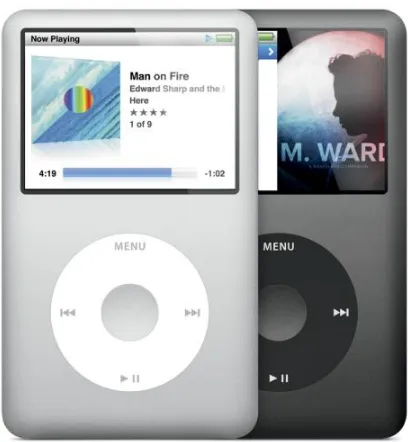
The iPod classic, shown in Figure 1-4, is an undeniable classic that Apple has kept in its product line for a good reason: Customers like it. It uses the same click wheel and buttons as previous models, combining the scroll wheel with pressure-sensitive buttons underneath the top, bottom, left, and right areas of the circular pad of the wheel. With the iPod classic, it’s all about music storage on the road — Apple provides a single slim, 4.9-ounce 160GB model in black or silver that can hold 40,000 songs, 25,000 photos, or about 200 hours of video; and its battery offers up to 36 hours of music playback or 6 hours of video playback.
Figure 1-4: iPod classic can hold 40, 000 songs.
Thinking Outside the Box
Apple excels at packaging. Don’t destroy the elegant box while opening it. Keep the box in case, heaven forbid, you need to return the iPod to Apple — the box ensures that you can safely return it for a new battery or replacement.
The iPod touch and iPod nano models come with stereo Apple EarPods, which are as good as some of the better earphones on the market —
classic come with the Apple Earphones, which are suitable for most people. So you might be fine with what you get — except that if you want to use remote control buttons for playback or a voice microphone close to your mouth (which is useful for iPod touch voice calls and voice recording), you can get the Apple EarPods with Remote and Mic in the accessories section of the Apple Store. And, of course, there are many alternatives — a visit to a local Apple Store, or any electronics department or store (such as Fry’s) can boggle your mind with displays of accessories, and you can order them online at the online Apple Store (easily accessed from www.apple.com) or other sites such as Amazon.com (www.amazon.com).
The iPod touch, iPod classic, and iPod nano are each supplied with a cable that connects your iPod (or a dock for the iPod) to your computer or to the AC power adapter using a Universal Serial Bus (USB) connection — a way of attaching things to computers and bussing data around while providing power. The iPod touch and iPod nano cables have a USB connector on one end and Apple’s Lightning connector on the other end to connect either to a Lightning-compatible dock or directly to the iPod nano or iPod touch. The iPod shuffle includes a special cable to connect to a USB power adapter or to your computer. The iPod classic uses a cable with a USB connector on one end and Apple’s older flat dock connector on the other end, which is compat-ible with the older docks.
You may want to have around a few things that are not in the box. For example, even though you don’t really need an AC power adapter or dock (because you can connect the iPod directly to your computer to recharge your battery), a power adapter or dock is useful for keeping the battery charged without having to connect the iPod to your computer.
Although you can store your apps, content library, personal information, and settings for an iPod touch in Apple’s iCloud, you may still want to use a computer and iTunes to manage these things and keep your iPod touch in sync with them. You need a computer and iTunes to manage and back up the content on an iPod nano, iPod shuffle, or iPod classic. Basically, that com-puter has to be a Mac running the most recent version of OS X (the operating system) or a PC running Windows XP, Vista, Windows 7, or Windows 8.
Applying Power to an iPod
All iPod models come with essentially the same requirement: power. You can supply power to your iPod (and charge your battery at the same time) by using the provided cable and your computer, or you can use an optional AC power adapter that works with voltages in North America and many parts of Europe and Asia.
Connecting to a computer or power adapter
An iPod can draw power from a computer or from a power adapter. There are also accessories such as docks that offer power and power strips with USB ports for recharging devices.
A dock can be convenient as a base station when you’re not traveling with your iPod because you can remove any travel case and just slip it into the dock without connecting cables. Just connect it to an Apple or a third-party dock and then use the cable supplied with your iPod to connect the dock to your computer or power adapter. You can pick up a dock at an Apple Store, order one online, or take advantage of third-party dock offerings. Some docks, such as the Apple Universal Dock, keep your iPod classic or iPod nano in an upright position while connected. Some docks also provide connections for a home stereo or headphones, and some docks offer built-in speakers.
On the bottom of the iPod touch and iPod nano is the Lightning connector for connecting the USB cable or Lightning-compatible dock. You find the older, larger flat connector on the bottom of the iPod classic. The iPod shuffle uses the earphone connector with a special USB cable.
To connect your iPod touch, iPod nano, or iPod classic to your computer or power adapter, plug the Lightning connector or flat connector of the cable into the iPod (or into a dock holding your iPod), and then plug the USB con-nector on the other end of the cable into the USB 2.0 or USB 3.0 port on your computer or the USB connector on the power adapter.
The iPod shuffle is supplied with a special USB cable that plugs into the ear-phone connection of the iPod shuffle and draws power from the USB connection on the computer or from a USB power adapter. Plug one end of the included cable into the earphone connection of iPod shuffle and the other end into a USB 2.0 or USB 3.0 connection on your computer or power adapter.
Why USB 2.0 or USB 3.0 port? What happened to 1.0? Most PCs and all cur-rent Macs already have either USB 3.0 or USB 2.0, which is all you need to sync an iPod with your computer. Although you can use a low-speed USB 1.0 or 1.1 connection to sync an iPod, it’s slower than molasses on a subzero morning for syncing.
To find out more about previous generations of iPods, including detailed information about USB and FireWire cables and connections, see Bonus Chapter 1 in the free tips section of the author’s website (www.tonybove. com/tips).
Turning it on and off
Touch any button to turn on an iPod classic. To turn off an iPod classic, press and hold the Play/Pause button. To keep an iPod classic from turning on by accident, you can lock it with the Hold switch on the top. The Hold switch locks the iPod buttons so that you don’t accidentally activate them — slide the Hold switch so that it exposes an orange layer underneath. To unlock the buttons, slide the Hold switch so that it hides the orange layer underneath.
If your iPod classic shows a display but doesn’t respond to your button-press-ing, don’t panic. Just check the Hold switch and make sure that it’s set to one side so that the orange layer underneath disappears (the normal position).
To turn on an iPod shuffle, slide the three-way switch to expose the green layer underneath. To turn it off, slide the three-way switch to hide the green layer. With the three-way switch or On/Off switch, iPod shuffle models don’t need a Hold switch.
To turn on an iPod nano, press the Sleep/Wake button on top. Press it again to turn it off. To conserve battery life, the screen goes dark anyway if you don’t touch it for a while — press the Sleep/Wake button to turn it back on.
Awaken your iPod touch by pressing the sleep/wake button, which is located on the top of the iPod touch. The iPod touch presents the Slide to Unlock slider at the bottom of the screen, and stays locked until you slide your finger across the slider to unlock it. If you press the sleep/wake button again, it puts the iPod touch back to sleep and locks its controls to save battery power.
After awakening but before unlocking your iPod touch, you can press the physical Home button twice quickly to display music controls. Slide the volume control to set the volume; tap the play/pause, back, or forward but-tons to control playback (for details on music playback, see Chapter 12). You can also tap a camera icon to launch the Camera app. See Chapter 14 for details on taking photos and videos.
iPods can function in temperatures as cold as 50° F (Fahrenheit) and as warm as 95° F, but they work best at room temperature (closer to 68° F). If you leave your iPod out in the cold all night, it might have trouble waking, and it might even display a low-battery message. Plug the iPod into a power source, wait until it warms up, and try it again. If it still doesn’t wake up or respond properly, try resetting the iPod as I describe in Chapter 19.
To save battery power, you should plug an iPod into AC power or your com-puter before turning it back on from a completely off state. And speaking of battery details, check out the next section.
Facing Charges of Battery
You can take a 6-hour flight from New York to California and watch videos on your iPod touch the entire time without recharging. The iPod models are sup-plied with built-in rechargeable lithium-ion batteries that offer the following playback time:
✓ The iPod shuffle offers 15 hours of music.
✓ The iPod nano offers 30 hours of music or 3.5 hours of video.
✓ The iPod classic offers 36 hours of music or 6 hours of video or photo display with music.
✓ The iPod touch offers 40 hours of music, or 8 hours of video, browsing the Internet using Wi-Fi, or displaying photo slide shows with music.
To find out more about the batteries in previous generations of iPods, see Bonus Chapter 1 in the free tips section of the author’s website (www. tonybove.com/tips).
Recharging your battery
Need power when you’re on the run? Look for a power outlet in the airport ter-minal or hotel lobby and plug in your iPod with your AC power adapter — the battery fast-charges to 80 percent capacity in 2 hours. After that, the battery receives a trickle charge for the rest of the time until it’s fully charged.
Don’t fry your iPod with some generic power adapter. Use only the power adapter from Apple or a certified iPod adapter, such as the power accesso-ries from Belkin, Griffin, Monster, XtremeMac, and other reputable vendors.
You can use your iPod while the battery is charging, or you can disconnect it and use it before the battery is fully charged. A battery icon with a progress bar in the upper-right corner of the iPod touch, iPod nano, or iPod classic display indicates how much power is left. When you charge the battery, the battery icon displays a lightning bolt. The battery icon is completely filled in when the battery is fully charged, and it slowly empties into just an outline as the battery is used up. When you awaken an iPod touch that’s plugged in to power, you see a large battery icon indicating how much juice you have. When you charge the battery, the large battery icon includes a lightning bolt.
You can check the battery of an iPod shuffle by turning it on or by connecting it to your computer. You can check the battery status without interrupting playback by quickly turning the iPod shuffle off and then on again. The tiny battery status light next to the headphone connector tells you how much charge you have:
✓ Green: The iPod shuffle is fully charged (if connected to a computer) or charged at least 50 percent.
✓ Orange: The iPod shuffle battery is still charging (if connected to a com-puter) or is as low as 25 percent. If the iPod shuffle is connected to your computer and blinking orange, this means that iTunes is synchronizing it — don’t disconnect the iPod shuffle until it stops blinking.
✓ Red: Very little charge is left and you need to recharge it.
If no light is visible, the iPod shuffle is completely out of power, and you need to recharge it to use it.
To hear the VoiceOver feature speak your battery status (“full,” “75 percent,” “50 percent,” “25 percent,” or “low”), click and hold the center button of the earbud controls.
The iPod built-in rechargeable battery is, essentially, a life-or-death proposi-tion. After it’s dead, it can be replaced, but Apple charges a replacement fee plus shipping. If your warranty is still active, you should have Apple replace it under the warranty program (which may cost nothing except perhaps shipping — and with AppleCare service, even the shipping may be free). Don’t try to replace it yourself because opening your iPod invalidates the warranty.
Keeping an iPod in a snug carrying case when charging is tempting, but it’s also potentially disastrous. You could damage the unit by overheating it and frying its circuits, rendering it as useful as a paperweight. To get around this problem, you can purchase one of the heat-dissipating carrying cases avail-able in the Apple Store.
If you don’t use your iPod for a month, even while it’s connected to power and retaining a charge, it can become catatonic. Perhaps it gets depressed from being left alone too long. At that point, it may not start — you have to completely drain and recharge the battery. To drain the battery, use it for
Maintaining battery mojo
There are ways to keep your battery healthy.I recommend a lean diet of topping off your bat-tery whenever it is convenient.
Using and recharging 100 percent of battery capacity is called a charge cycle. You can charge the battery many times, but there is a limit to how many full charge cycles you can do before needing to replace the battery.
Each time you complete a charge cycle (100 percent recharge), it diminishes battery capac-ity slightly. Apple estimates that the battery loses 20 percent of its capacity (meaning it holds 80 percent of the charge) after 400 full charge cycles. Recharging your battery when it’s only half empty does not count as a full charge cycle, but as half a charge cycle. That means you can use half its power one day and then recharge it fully, and then use half the next day and recharge it fully again, and this would count as one charge cycle, not two.
It’s a good idea to calibrate the battery once soon after you get your iPod; that is, run it all the
way down (a full discharge) and then charge it all the way up (which takes at least 4 hours for an iPod touch or iPod classic, or 3 hours for an iPod nano or iPod shuffle). Although this doesn’t actually change battery performance, it does improve the battery gauge so that the gauge displays a more accurate reading. This calibration occurs anyway if you fully recharge the battery, but if you’ve never done that, you can calibrate by disconnecting the iPod from any power for 24 hours to make sure the battery is empty and then fully recharging the battery.
Lithium-ion batteries typically last 3 years or more, but are vulnerable to high temperatures, which decrease their life spans considerably. Don’t leave your iPod in a hot place, such as on a sunny car dashboard, for very long (don’t leave it out in the rain, either — water can easily damage it).
many hours or leave it unconnected to power for 24 hours. Then, to fully recharge the battery, connect it to power for at least 4 hours without using it (or longer if you are using it).
Saving power
The iPod classic and older models include a hard drive — and whatever causes the hard drive to spin causes a drain on power. iPod nano, iPod shuffle, and iPod touch models use a flash drive, which uses less power but still uses power when playing content. The iPod touch also uses power doing things like accessing the Internet, using Bluetooth devices, keeping up with notifications, and running apps. Keeping these activities to a minimum can help you save power.
The following are tips on saving power while using your iPod:
✓ Pause. Pause playback when you’re not listening. Pausing (stopping) playback is the easiest way to conserve power.
✓ Lock it (with the iPod nano or iPod touch). Press the sleep/wake button on top to immediately put it to sleep and lock its controls to save bat-tery power. You can set your iPod touch to automatically go to sleep by choosing Settings➪General➪Auto-Lock from the Home screen, and then choosing 1 Minute, 2 Minutes, 3 Minutes, 4 Minutes, or 5 Minutes (or Never, to prevent automatic sleep).
✓ Hold it (with the iPod classic). Flip the Hold switch on the iPod classic to the locked position (with the orange layer showing underneath) to make sure that controls aren’t accidentally activated. You don’t want your iPod playing music in your pocket and draining the battery when you’re not listening.
✓ Back away from the light. Turn down the brightness on an iPod touch by choosing Settings➪Brightness and dragging the bright-ness slider to the left. Turn it down on an iPod nano by tapping Settings➪General➪Brightness. Use the backlight sparingly on the iPod classic — select Backlight Timer from the iPod Settings menu to limit backlighting to a number of seconds or set it to Off. (Choose Settings from the main menu.) Don’t use the backlight in daylight if you don’t need it.
✓ Let the postman ring twice (with an iPod touch). Check e-mail less fre-quently. You may want to turn off Push and change your Fetch settings, as I describe in Chapter 16. Turn off instant notifications from Facebook and other sources — see Chapter 4 for details.
✓ Put a cap on Bluetooth (with an iPod touch or iPod nano). Turn off Bluetooth (choose Settings➪General➪Bluetooth and tap the On button to turn it off) if you’re not using a Bluetooth device.
✓ Drop back in from the Internet (with an iPod touch). Turn off Wi-Fi when not browsing the Internet or using Maps: Choose Settings➪Wi-Fi and tap the On button to turn it off.
✓ Fasten your seat belt (with an iPod touch). Turn on Airplane Mode to automatically turn off Wi-Fi and Bluetooth at once, before the flight attendant reminds you to do it: Choose Settings and tap Off to turn Airplane Mode on.
✓ Turn it off completely. To turn off an iPod nano, press the Sleep/Wake button. To turn off an iPod classic, press and hold the Play/Pause button. To turn off an iPod shuffle, slide the switch to the off position, hiding the green layer underneath the switch. You can turn the iPod touch completely off by holding down the sleep/wake button for about 2 seconds, until you see the Slide to Power Off slider; then slide your finger across the slider to turn it off. You can then turn it back on by pressing and holding the sleep/wake button.
Starting an iPod touch or iPod classic that was completely turned off takes quite a bit of power — more than if it woke from sleep. If you do turn it off, plug it in to AC power or your computer before turning it back on.
✓ You may continue. Play songs continuously without using the iPod con-trols. Selecting songs and using the back and forward buttons require more energy. Also, turn off your iPod equalizer (EQ) if you turned it on — choose Settings➪Music and tap EQ, and then tap Off.
2
Setting Up iTunes and Your iPod
In This Chapter
▶ Installing iTunes on a Windows PC
▶ Installing iTunes on a Mac
▶ Setting up your iPod touch
▶ Setting up any iPod with iTunes
i
Tunes manages your library of content and apps on your computer. It gives you the power to grab music from CDs and other sources and con-vert video to play on iPads and iPhones as well as iPods. iTunes also pro-vides a quick and easy browsing experience for accessing the iTunes Store and App Store from your computer.iTunes is essential for setting up an iPod classic, iPod nano, or iPod shuffle, and for updating its software and synchroniz-ing content to it. You have more choices with an iPod touch — you can set up an iPod touch wirelessly using the iCloud service (as I describe in this chapter). You can also sync an iPod touch and update its software wirelessly with iCloud (as I describe in Chapter 8). But iTunes lets you do all that without an Internet connection, and provides finer control and more options for syncing content. You can also use iTunes to restore the device to its original factory settings if you need to (see Chapter 19 for details).
Installing iTunes
Setting up iTunes is a quick and easy process. The most up-to-date version of iTunes as of this writing is version 11. However, software updates occur rapidly, so you may end up installing a newer version by the time you read this. (If you already have iTunes installed, see Chapter 21 for instructions on updating it.) You can visit the Apple website to download the most up-to-date version of iTunes, which recognizes all iPod models.
Installing on a Windows PC
Before installing iTunes, make sure that you’re logged on as a Windows administrator user. Quit all other applications before installing and be sure to disable any antivirus software.
To install iTunes for Windows, follow these steps:
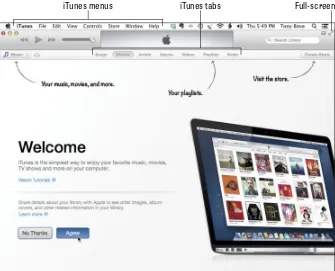
1. Download the iTunes installer from the Apple site.
Browse the iTunes page on the Apple website (www.apple.com/ itunes) and click the Download iTunes button, as shown in Figure 2-1. You can then optionally enter your e-mail address, and click Download Now. Follow your browser’s instructions to download the installer file (iTunes64Setup.exe for Windows 7) to your hard drive.
2. Run the iTunes installer.
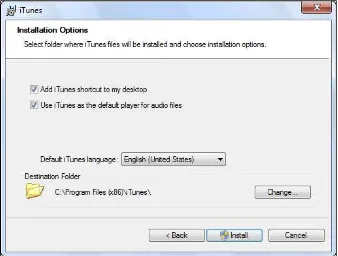
Double-click the installer file to install iTunes. At the Welcome screen, click the Next button. After clicking Next, the installer displays the iTunes installation options, as shown in Figure 2-2.
3. Choose your iTunes installation options.
You can turn the following options on or off (as shown in Figure 2-2):
• Add iTunes Shortcut to My Desktop: You can install a shortcut for your Windows desktop for iTunes.
• Use iTunes as the Default Player for Audio Files: I suggest turning this option on, allowing iTunes to be the default audio content player for all audio files it recognizes. If you’re happy with another audio player on your PC, you can deselect this option, leaving your default player setting unaffected.
4. Choose the destination folder for iTunes.
5. Click the Install button to finish.
After you click Install, the installer finishes the installation and displays the Complete dialog.
6. Click the Finish button.
Restarting your Windows PC after installing software is always a good idea.
Figure 2-1: Download the newest version of iTunes from the Apple website.
iTunes is now installed on your PC. To start using iTunes, double-click the iTunes desktop shortcut or use your Start menu to locate iTunes and launch it.
The first time you launch iTunes, an Apple license agreement appears. Feel free to scroll down to read the agreement, if only to appreciate legal minds at work. Whatever you do, you must click the Agree button to continue. After clicking Agree, the iTunes window appears with helpful links to tutorials on downloading music and importing music from CDs — unless you are replac-ing an older version of iTunes, in which case your iTunes window appears with your library of content.
Installing on a Mac
As a Mac user, you should already have iTunes installed because all Macs sold since 2003 come preinstalled with iTunes and OS X. The version of iTunes that’s provided with the Mac might be the newest version; then again, it might not be. If iTunes displays a dialog with the message that a new ver-sion of iTunes is available and asks whether you would like to download it, choose Yes to download the new version. OS X not only downloads iTunes but also installs it automatically after you provide the administrator’s pass-word and agree to Apple’s software license (of course).
You can set your Mac to automatically download the latest version of iTunes when it becomes available. Choose Preferences from the iTunes menu, click the General tab, and select the Check for New Software Updates Automatically check box at the bottom of the General preferences to turn it on.
The Mac App Store can update your version of iTunes. Launch App Store on your Mac and click the Updates button at the top of the screen to see the Updates screen. Your Mac checks for application updates, and if your ver-sion of iTunes is not the current verver-sion, an iTunes update appears on the Updates screen. Click the Update button for the iTunes update.
You can also set your Mac to check for all system software and Apple appli-cations (including iTunes). Choose System Preferences from the Apple menu, and then choose Software Update from the System Preferences window. Select the Automatically Check for Updates check box to turn it on. You can also click the Check Now button to check for a new version immediately. If one exists, it appears in a window for you to select. Click the check mark to select it, and then click the Install button to download and install it.
After installing iTunes, launch it by double-clicking the iTunes application or clicking the iTunes icon in the Dock. The first time you launch iTunes, an Apple license agreement appears. You must click the Agree button to con-tinue. After clicking Agree, iTunes displays the iTunes window with links to tutorials on buying and importing music.
You can set up any model iPod using iTunes, as I describe in the upcom-ing “Settupcom-ing Up an iPod Usupcom-ing iTunes” section. However, if you have an iPod touch, you can also set it up wirelessly using the Internet and Apple’s iCloud service, as I describe in the next section.
Setting Up an Pod touch
After adding power, a new iPod touch comes alive and displays “iPod” and a slider with the word “Configure” or “Set Up” in different languages, as shown in Figure 2-3, left side). Follow these steps to set up your device to meet your needs:
1. Slide your finger across the slider with the word “Configure” or “Set Up” in different languages.
After sliding across the slider, a brand new iPod touch shows the lan-guage screen. An iPod touch that has been set up before shows the Wi-Fi Networks screen, and you can jump to Step 4.
2. Tap your language choice (if it’s not already selected), and then tap the right-arrow icon in the top-right corner of the language screen.
After selecting a language, the Country or Region screen appears, show-ing a map of the world.
3. Tap your country or region (if it’s not already selected), and then tap Next.
To see more countries and regions, tap the Show More button. After tap-ping Next, the Wi-Fi Networks screen appears for choosing a Wi-Fi net-work, as shown in Figure 2-3, center.
If you don’t have a Wi-Fi network at your location, and no networks are within range (that you can log in to), you need to connect your iPod touch to your computer and use iTunes to continue with setup and sync-ing. Skip these steps and jump to the section, “Setting Up Any iPod Using iTunes,” later in this chapter.
4. Tap the network name if it is not already selected, and then tap Next in the upper-right corner of the screen.
Figure 2-3: The iPod startup screen (left), choosing a Wi-Fi network (center), and enabling Location Services (right).
5. Tap a password for the Wi-Fi network if needed or log in to the net-work with your ID and password, and then tap Next in the upper-right corner of the screen.
Public networks typically require a username or ID and a password. Private networks are usually set up with a password — type the pass-word for access.
After choosing a Wi-Fi network, the Location Services screen appears, as shown in Figure 2-3, right side.
6. Tap Enable Location Services, and then tap Next in the upper-right corner.
By choosing to enable Location Services, you are giving your iPod touch the chance to figure out the appropriate language and country for using your iPod touch. Apple offers country-specific iTunes Stores and many different languages. If you don’t enable Location Services, you see screens that let you choose your language and your country. After tap-ping Next, the Set Up iPod touch screen appears, as shown in Figure 2-4, left side.
7. Choose one of the following options (refer to Figure 2-4, left side):
Figure 2-4: Set up or Restore (left), sign in or create an Apple ID (center), and use iCloud (right).
• Restore from iCloud Backup: Select this option if you previously backed up your settings for an iPod touch, iPad, or iPhone to iCloud (as I describe in Chapter 19). You can then pick an iPod touch, iPad, or iPhone name from the pop-up menu to restore the previous device’s name and settings. Your automatic sync settings are restored from the previous backup, and you can change your sync settings as I show you in Chapter 7.
• Restore from iTunes Backup: Select this option to restore a previ-ous device’s name and settings from an iTunes backup. You can then pick an iPod touch, iPad, or iPhone name from the pop-up menu. Skip to the next section, “Setting Up Any iPod Using iTunes,” to use the iTunes backup.
After this step, the iPod touch displays the Apple ID screen shown in Figure 2-4, center.
8. Sign in with your Apple ID or create a free Apple ID.
Your Apple ID automatically sets up the iPod touch with your account in the iCloud service and the iTunes Store, which includes the App Store. Here’s what you do:
• If you don’t have an Apple ID of any kind, tap the Create a Free Apple ID option. You see a screen for entering your birthday (which is used as a question for retrieving your password if you forget it) and then a screen for entering an Apple ID and password combination. You then see a Terms and Conditions screen, and you have to tap Agree to continue. For details about setting up an iTunes Store account, see Chapter 6.
After signing in with your Apple ID, or creating a free Apple ID, the iPod touch displays the Set Up iCloud screen shown in Figure 2-4, right side.
9. Tap Use iCloud and tap Next in the upper-right corner.
Tap Use iCloud to set up the free portion of your iCloud service, which you can use to sync your iPod touch with content and personal settings (as I show in Chapter 8).
If you did not use iCloud in this step, you’re finished — and you need to continue setting up your iPod touch with iTunes on your computer, as I describe in the next section. If you are using iCloud, the iCloud Backup screen appears after you tap Next.
10. Choose iCloud or your computer for backup, and then tap Next.
Both iTunes on your computer and the iCloud service can back up your iPod touch settings when you sync the device, so that you can restore the settings you use to customize the device and its apps, including Wi-Fi network settings, the keyboard dictionary, and settings for con-tacts, calendars, and e-mail accounts. This backup comes in handy if you want to apply the settings to a new iPod touch or to one that you had to restore to its factory condition.
If you generally sync your iPod touch with your computer using iTunes, tap the Back Up to My Computer option. If you sync your iPod touch from iCloud, as I describe in Chapter 8, you can tap Back Up to iCloud. Then tap Next to finish setting up your iPod touch. If you chose to use iCloud in Step 9, the Find My iPod touch screen appears.
11. Turn on Find My iPod touch, and then tap Next.
This option appears if you chose to use iCloud in Step 9. Tap the Use Find My iPod touch option to turn it on, or tap Don’t Use Find My iPod touch to turn this option off. For details about this option, see Chapter 8. After this step, the Messaging screen appears.
12. Deselect e-mail addresses that other people should not use to reach you with Messages or FaceTime, and then tap Next.