Richard Wagner
Yahoo!
®
SiteBuilder
FOR
Yahoo!
®
SiteBuilder
FOR
Richard Wagner
Yahoo!
®
SiteBuilder
FOR
Copyright © 2005 by Wiley Publishing, Inc., Indianapolis, Indiana Published by Wiley Publishing, Inc., Indianapolis, Indiana Published simultaneously in Canada
No part of this publication may be reproduced, stored in a retrieval system or transmitted in any form or by any means, electronic, mechanical, photocopying, recording, scanning or otherwise, except as permitted under Sections 107 or 108 of the 1976 United States Copyright Act, without either the prior written permis-sion of the Publisher, or authorization through payment of the appropriate per-copy fee to the Copyright Clearance Center, 222 Rosewood Drive, Danvers, MA 01923, (978) 750-8400, fax (978) 646-8600. Requests to the Publisher for permission should be addressed to the Legal Department, Wiley Publishing, Inc., 10475 Crosspoint Blvd., Indianapolis, IN 46256, (317) 572-3447, fax (317) 572-4355, or online at http:// www.wiley.com/go/permissions.
Trademarks:Wiley, the Wiley Publishing logo, For Dummies, the Dummies Man logo, A Reference for the Rest of Us!, The Dummies Way, Dummies Daily, The Fun and Easy Way, Dummies.com, and related trade dress are trademarks or registered trademarks of John Wiley & Sons, Inc. and/or its affiliates in the United States and other countries, and may not be used without written permission. Yahoo! is a registered trade-mark of Yahoo, Inc. All other tradetrade-marks are the property of their respective owners. Wiley Publishing, Inc., is not associated with any product or vendor mentioned in this book.
LIMIT OF LIABILITY/DISCLAIMER OF WARRANTY: THE PUBLISHER AND THE AUTHOR MAKE NO REP-RESENTATIONS OR WARRANTIES WITH RESPECT TO THE ACCURACY OR COMPLETENESS OF THE CONTENTS OF THIS WORK AND SPECIFICALLY DISCLAIM ALL WARRANTIES, INCLUDING WITHOUT LIMITATION WARRANTIES OF FITNESS FOR A PARTICULAR PURPOSE. NO WARRANTY MAY BE CREATED OR EXTENDED BY SALES OR PROMOTIONAL MATERIALS. THE ADVICE AND STRATEGIES CONTAINED HEREIN MAY NOT BE SUITABLE FOR EVERY SITUATION. THIS WORK IS SOLD WITH THE UNDER-STANDING THAT THE PUBLISHER IS NOT ENGAGED IN RENDERING LEGAL, ACCOUNTING, OR OTHER PROFESSIONAL SERVICES. IF PROFESSIONAL ASSISTANCE IS REQUIRED, THE SERVICES OF A COM-PETENT PROFESSIONAL PERSON SHOULD BE SOUGHT. NEITHER THE PUBLISHER NOR THE AUTHOR SHALL BE LIABLE FOR DAMAGES ARISING HEREFROM. THE FACT THAT AN ORGANIZATION OR WEBSITE IS REFERRED TO IN THIS WORK AS A CITATION AND/OR A POTENTIAL SOURCE OF FURTHER INFORMATION DOES NOT MEAN THAT THE AUTHOR OR THE PUBLISHER ENDORSES THE INFORMA-TION THE ORGANIZAINFORMA-TION OR WEBSITE MAY PROVIDE OR RECOMMENDAINFORMA-TIONS IT MAY MAKE. FURTHER, READERS SHOULD BE AWARE THAT INTERNET WEBSITES LISTED IN THIS WORK MAY HAVE CHANGED OR DISAPPEARED BETWEEN WHEN THIS WORK WAS WRITTEN AND WHEN IT IS READ.
For general information on our other products and services, please contact our Customer Care Department within the U.S. at 800-762-2974, outside the U.S. at 317-572-3993, or fax 317-572-4002. For technical support, please visit www.wiley.com/techsupport.
Wiley also publishes its books in a variety of electronic formats. Some content that appears in print may not be available in electronic books.
Library of Congress Control Number: 2005924597 ISBN-13: 978-0-7645-9800-5
ISBN-10: 0-7645-9800-7
Manufactured in the United States of America 10 9 8 7 6 5 4 3 2 1
About the Author
Dedication
To the Jboys.Author’s Acknowledgments
Acquisitions, Editorial, and Media Development
Project Editor:Paul Levesque
Acquisitions Editor:Steven Hayes
Copy Editor:Rebecca Senninger
Technical Editor:Lee Musick
Editorial Manager:Leah Cameron
Permissions Editor:Laura Moss
Media Development Specialist:Travis Silvers
Media Development Manager:Laura VanWinkle
Media Development Supervisor:
Richard Graves
Editorial Assistant:Amanda Foxworth
Cartoons:Rich Tennant (www.the5thwave.com)
Composition Services
Project Coordinator:Maridee Ennis
Layout and Graphics:Carl Byers, Andrea Dahl, Heather Ryan, Erin Zeltner
Proofreaders: Laura Albert, Leeann Harney, Joe Niesen, TECHBOOKS Production Services
Indexer:TECHBOOKS Production Services
Publishing and Editorial for Technology Dummies
Richard Swadley,Vice President and Executive Group Publisher
Andy Cummings,Vice President and Publisher
Mary Bednarek,Executive Acquisitions Director
Mary C. Corder,Editorial Director
Publishing for Consumer Dummies
Diane Graves Steele,Vice President and Publisher
Joyce Pepple,Acquisitions Director
Composition Services
Gerry Fahey,Vice President of Production Services
Contents at a Glance
Introduction ...1
Part I: Getting to Know Yahoo! SiteBuilder ...7
Chapter 1: Yahoo! Let’s Go Site Building ...9
Chapter 2: Publishing Your First Site: Around the World (Wide Web) in 16 Minutes ...21
Chapter 3: Building a Purpose-Driven Web Site ...35
Chapter 4: Trickle-Down Site Building: Working with Sites, Pages, and Elements ...45
Chapter 5: Designers At Your Beck and Call: Using SiteBuilder Templates ...73
Part II: Creating “Cool” Web Pages ...83
Chapter 6: Nuts and Bolts: Working with Text and Links ...85
Chapter 7: Picture Perfect ...111
Chapter 8: Off to the Woodshop: Building Tables ...129
Chapter 9: Making Columbus and Magellan Jealous: Adding Navigation Instantly ...141
Chapter 10: Giving Your Site More Than Lip Service: Using Forms ...157
Part III: Going Further: Developing
“Wicked Cool” Web Pages ...177
Chapter 11: Yahoo! Add-Ons: Drag-and-Drop Productivity ...179
Chapter 12: The Wow Factor: Adding Multimedia and Page Effects ...199
Chapter 13: For Geeks Only? Adding HTML and JavaScript Code to Your Pages ...221
Part IV: Managing Your Web Site ...249
Chapter 14: Becoming a Webmaster: Administering Your Site Online ...251
Chapter 15: From Rags to Riches: Selling Products on Your Site ...265
Part V: The Part of Tens ...289
Chapter 16: Ten Design Tips to Rival the “Big Boys” ...291
Chapter 17: Ten SiteBuilder Tips You Really Need to Know ...299
Appendix: What’s on the CD ...311
Index ...315
Table of Contents
Introduction...1
Conventions Used in This Book ...1
Text formatting ...2
Commands ...2
What You’re Forbidden to Read ...2
Foolish Assumptions ...3
How This Book Is Organized ...3
Part I: Getting to Know Yahoo! SiteBuilder ...3
Part II: Creating “Cool” Web Pages ...3
Part III: Going Further: Developing “Wicked Cool” Web Pages ...3
Part IV: Managing Your Web Site ...4
Part V: The Part of Tens ...4
Icons Used in This Book ...4
Where to Go from Here ...5
Part I: Getting to Know Yahoo! SiteBuilder ...7
Chapter 1: Yahoo! Let’s Go Site Building . . . .9
Discovering How Web Publishing Works ...9
Creating and designing on your computer ...10
Publishing your site ...12
Visiting your site from anywhere ...13
Repeating the process ...13
Signing Up for Yahoo! Web Hosting ...13
Downloading and Installing Yahoo! SiteBuilder ...15
Exploring Yahoo! SiteBuilder ...16
SiteBuilder panes ...17
SiteBuilder toolbar ...18
Chapter 2: Publishing Your First Site: Around
the World (Wide Web) in 16 Minutes . . . .21
Getting Started in Web Publishing ...21
Stop #1: Creating a Web Site with the Site Creation Wizard ...22
Stop #2: Editing Your Pages ...27
Stop #3: Previewing Your Site ...32
Stop #4: Publishing Your Site to Yahoo! Web Hosting ...32
Creating a Purpose-Driven Site ...36
Organizing Your Site ...37
Mocking up your site structure ...38
Filling in the missing pieces ...39
Avoiding deep hierarchies ...39
Planning for effective feedback ...40
Writing Content for Your Web Site ...41
Evaluating Your Site ...43
Chapter 4: Trickle-Down Site Building: Working with Sites,
Pages, and Elements . . . .45
Working with Your Web Site ...46
Creating a new site ...46
Importing a Web site you’ve previously created ...52
Opening an existing site ...54
Saving your site ...55
Closing a site ...55
Deleting a site ...55
Previewing your site before you publish ...55
Ready for the Big Leagues: Publishing Your Web Site ...56
Working with Web Pages ...58
Creating a new Web page ...58
Saving a Web page ...60
Opening a Web page ...61
Closing one or more Web pages ...61
Deleting a Web page ...61
Copying a Web page ...62
Renaming a Web page ...62
Modifying Page Properties ...62
Specifying meta data ...63
Modifying the page layout ...64
Working with Page Elements ...66
Selecting elements ...66
Moving elements ...66
Other common element-based tasks ...67
Layering elements ...68
Aligning and spacing page elements ...70
Chapter 5: Designers At Your Beck and Call:
Using SiteBuilder Templates . . . .73
Exploring SiteBuilder Templates ...74
What is a SiteBuilder template? ...74
Need More? Downloading Additional Templates ...76
Creating Your Own Template Page ...78
Using Templates or Going Solo? ...80
Part II: Creating “Cool” Web Pages ...83
Chapter 6: Nuts and Bolts: Working with Text and Links . . . .85
Working with Text ...85
Adding text to a page ...86
Adding text from another source to your page ...87
Editing text on a page ...88
Moving text around a page ...89
Resizing your text container ...90
Caught Ya: Checking Your Spelling ...91
Automatically alerting you of spelling mistakes ...91
Checking your spelling manually ...92
Setting spell checking preferences ...94
Tweaking the Look of Your Text ...95
Deciding which font style to use ...95
Setting the font style and size ...96
Giving your text some style ...97
Changing text color ...98
Stylin’ Your Paragraphs ...99
Making lists ...99
Indenting your text ...102
Formatting Your Text Boxes ...102
Changing the background color of your text box ...103
Resetting the text background ...103
But Your Honor . . . I was justified! ...103
Getting Jumpy: Adding Links to Your Text ...104
Linking to another page in your site ...105
Linking to a page elsewhere on the Web ...106
Linking to an e-mail address ...107
Linking to a file ...108
Editing and Removing a Link ...109
Chapter 7: Picture Perfect . . . .111
Be Choosy: Why All Graphics Aren’t Created Equal ...111
Choosing the best Web graphic types ...112
Sizing your images appropriately ...114
Adding a Picture to a Page ...115
Using SiteBuilder clip art ...115
Using your own images ...116
Moving a Picture Around the Page ...118
Changing the image ...119
Assigning Alt Text ...119
Specifying a mouse-over image ...120
Assigning a Link to Your Picture ...122
Sizing Up a Picture ...122
Resizing a picture ...123
Returning a picture to its original size ...123
Creating a Thumbnail Picture ...124
Turning a Picture into a Background Image ...125
Chapter 8: Off to the Woodshop: Building Tables . . . .129
Inserting a Table on a Page ...129
The quick-and-easy approach: Using the toolbar ...130
The detail-oriented approach: Using the Create New Table dialog box ...131
Filling Your Table with Content ...132
Adjusting the Table Formatting Properties ...133
Selecting Table Cells ...134
Tweaking the Table ...134
Inserting a new row ...134
Inserting a new column ...136
Deleting a row or column ...137
Merging two cells ...138
Splitting a cell ...139
Chapter 9: Making Columbus and Magellan Jealous:
Adding Navigation Instantly . . . .141
Navigating Your Web Site ...142
Effective Navigation Bar Design ...143
Consistency ...143
Navigation bar placement ...143
Crystal-clear labeling ...143
Short, descriptive labeling ...144
Adding a Basic Navigation Bar to Your Web Site ...145
Adding a navigation bar when you create your site ...145
Creating a navigation bar after your site is built ...146
Use It Again, Sam: Inserting Your Navigation Bar into Another Page ...149
Standardizing the Location of Your Navigation Bar ...149
Tweaking Your Navigation Bar ...150
Creating Customized Navigation Bars ...152
Adding a template-based navigation bar ...152
Creating a text-based navigation bar ...152
Chapter 10: Giving Your Site More Than Lip Service:
Using Forms . . . .157
How Forms Work: Discovering the “Form Factor” ...158
Instant Forms: Adding Pre-Built Forms to Your Page ...161
The Contact Us form ...161
The Feedback form ...162
Made-to-Order Forms: Creating a Form from Scratch ...163
Working with Form Elements ...165
Adding a text field or text area ...167
Adding a list box ...168
Adding a check box ...169
Adding a group of radio buttons ...170
Adding Submit and Reset Buttons ...172
What a Form Response Looks Like ...173
After the Click: Tweaking the Form Settings ...173
Sending the form responses to a different e-mail address ...174
Specifying your own confirmation and error page ...174
Part III: Going Further: Developing
“Wicked Cool” Web Pages ...177
Chapter 11: Yahoo! Add-Ons: Drag-and-Drop Productivity . . . .179
Working with Add-Ons ...180
Inserting an add-on ...181
Previewing your add-on ...181
Accessing the properties of your add-on ...182
Cutting, copying, and pasting add-ons ...182
Inserting a Counter ...182
Displaying a Time and Date Stamp ...184
Providing a Yahoo! Map ...186
Offering Yahoo! Directions ...188
Searching the Web with a Yahoo! Search Box ...189
Searching Your Site with a Site Search ...190
Understanding the two pieces of Site Search ...191
Inserting a Site Search add-on ...191
Removing the Site Search add-on from your site ...194
Showing Your Online Persona with a Presence Indicator ...194
Keeping an Eye on the Bottom Dollar: Loan Calculator ...196
Chapter 12: The Wow Factor: Adding Multimedia and
Page Effects . . . .199
Multimedia: Going Beyond Mere Pictures ...199
Working with video clips ...200
Working with audio ...202
Viewing the Page Effects pane ...206
Accessing the Page Effects properties ...206
Cutting, copying, and pasting page effects ...207
Adding SiteBuilder’s Page Effects ...207
Dancing with the Border Patrol ...207
Jumping with Bouncing Images ...209
Hitchin’ a ride with the Flyby ...210
Tagging along with the mouse: Text Tail and Image Tail effects ...212
Adding random acts of effects with Random Apparitions ...215
Staying put with an Edge-Locked Picture ...216
Adding IE Page Transitions ...218
Knowing When and When Not to Use Page Effects ...219
Multimedia issues ...219
Page effects issues ...219
Chapter 13: For Geeks Only? Adding HTML and
JavaScript Code to Your Pages . . . .221
Looking Behind the Curtain: HTML and JavaScript ...222
Letting SiteBuilder get its hands dirty, not yours ...222
Yup, you can “do code,” but why? ...227
Peeking into the HTML Behind Your Web Page ...227
HTML element ...229
Page level HTML ...230
Page element HTML ...232
Adding Yahoo! HTML Add-Ons to Your Web Site ...233
Adding News Headlines, Stock Quotes, or Weather ...234
Incorporating a pull-down menu ...236
Opening a Guestbook ...239
Using Third-Party Scripts in Your Web Site ...244
Adding Iframes to Your Web Page ...245
Part IV: Managing Your Web Site ...249
Chapter 14: Becoming a Webmaster:
Administering Your Site Online . . . .251
Connecting Major Tom to Ground Control ...252
Viewing Site Activity ...254
Checking Your Site’s Status ...257
Working with the File Manager ...257
Uploading a file ...258
Deleting a file ...260
Chapter 15: From Rags to Riches: Selling Products on Your Site . . .265
Working with PayPal Buttons ...266
Adding a PayPal Buy Now button ...267
Adding a PayPal Donations button ...270
Building an Online Store with Yahoo! Merchant Solutions ...271
Adding a new field to the product catalog ...272
Adding products to your product catalog ...276
Publishing your product catalog ...279
Enabling your product catalog for use with SiteBuilder ...279
Importing your online catalog ...280
Creating a store page ...281
Adding a Shopping Cart button ...284
Completing the final merchant requirements ...285
Publishing your site ...286
Additional Store Catalog Tasks ...286
Adding a product module ...286
Adding store tags ...287
Viewing product module properties ...287
Refreshing your catalog information ...288
Deleting your catalog ...288
Part V: The Part of Tens ...289
Chapter 16: Ten Design Tips to Rival the “Big Boys” . . . .291
Don’t Reinvent the Wheel ...292
Eliminate Counters, Clichés, and All Things Cute ...292
Don’t Let Your Site Grow Mold ...293
Hobbit-Size Your Pages ...294
Hey, They’re Free: Test with Multiple Browsers ...294
Don’t Forget About the Text ...295
Take the Ten-Second Test-Drive ...295
Design for Technology Laggards, but Leave Behind the Stone Age ...296
Publishing Your Text as an Image ...296
Never, Ever, Ever, Ever Assume ...297
Chapter 17: Ten SiteBuilder Tips You Really Need to Know . . . .299
Using the Insert Palette ...299
Avoiding the Pain When Working with Panes ...301
Automatically Saving Your Work ...302
Working with Multiple Pages Open ...303
Automatically Restoring Your Session ...305
Managing Multiple Sites ...305
Embracing Gridlock ...306
Turning gridlines on and off ...307
Snapping to the grid ...308
Adjusting the grid size ...308
Changing the Look and Feel of SiteBuilder ...308
Previewing with Multiple Browsers ...309
Appendix: What’s on the CD ...311
Index...315
Introduction
T
he term “best of both worlds” has a nice ring to it, doesn’t it? All the sugary taste without the carbs. A roomy SUV that gets great gas mileage. An all-in-one-kitchen-knife-bought-from-an-infomercial-for-just-three-easy-payments that actually works.When you think about creating a Web site for yourself or your business, you undoubtedly want the “best of both worlds” principle to apply here as well. You want to be able to create a really cool Web site by yourself without being forced to get a graduate degree in Web programming or computer human interface design.
Yahoo! SiteBuilder is a highly popular software tool for people who want to do just that. Using SiteBuilder, you can create a Web site that looks far more sophisticated than many low-end, design-in-a-browser alternatives but with-out diving deep into the nitty-gritty details of something called HyperText Markup Language (HTML).
Yahoo! SiteBuilder For Dummiesserves as your friendly tour guide to help you create, design, and manage your SiteBuilder Web site. It gives you just the information you need to know to create “wicked cool” sites without resorting to that geeky stuff.
Using the dynamic duo of Yahoo! SiteBuilder and Yahoo! SiteBuilder For Dummies,you can make the “best of both words” goal a reality. But why stop there? I have so many more euphemisms and trite sayings to conquer with this combo. You’ll have your cake and eat it too. Your rolling stone will start to gather moss. Your watched pot will actually boil. Your road-crossing chicken will . . . well, you get the idea.
Conventions Used in This Book
Text formatting
I use the following formatting conventions:
⻬Italicsare used for term definitions.
⻬Boldfaceis used to indicate words that you’re supposed to type.
⻬Monofonttext is used for Web addresses; text that you see on-screen; and, on very rare occasions, JavaScript or HTML programming code.
Commands
When referring to a menu item inside of Yahoo! SiteBuilder, I use a shortcut. For example, I abbreviate the Copy command on the Edit menu to Edit➪Copy. Also, when I suggest pressing two keys at the same time, such as the Ctrl key and the C key, I use a plus sign like this: Ctrl+C.
What You’re Forbidden to Read
In this book, you explore what you need to know to create great-looking Web sites with Yahoo! SiteBuilder. However, on your first reading of this book, I do cover some topics that you are absolutely, positively forbidden to read. — okay, okay, not forbidden, just topics that you can feel free to skip if you want to. The sections that you have an official waiver for skipping are
⻬Any text that is marked with the Technical Stuff icon.Paragraphs with this icon are more technical in nature. It is undoubtedly fascinating infor-mation, but you won’t miss anything if you gloss over it.
Foolish Assumptions
In Yahoo! SiteBuilder For Dummies,I assume that you have basic knowledge of how to use Microsoft Windows and get around the Web with a popular browser such as Microsoft Internet Explorer. However, I don’t assume that you have any prior know-how involving the creation of Web sites when you start the book.
How This Book Is Organized
Yahoo! SiteBuilder For Dummies is divided into five parts.
Part I: Getting to Know Yahoo! SiteBuilder
As you start your tour of Yahoo! SiteBuilder, you get to know the software and the basics of creating and publishing a Web site. You also focus on how to design a site so that it looks good and is easy to navigate. I give special atten-tion to how you can design your Web site effectively using Yahoo!
SiteBuilder’s built-in templates.
Part II: Creating “Cool” Web Pages
While Part I focuses on the design of your Web site, Part II looks at the con-tent that goes into your Web pages. You dive into the basic building blocks of Web pages: text, links, pictures, tables, navigation bars, and forms.
Part III: Going Further: Developing
“Wicked Cool” Web Pages
In Part III, you discover how to add cool functionality to your site — such as Yahoo! Search, Yahoo! Directions, and page effects — but I show you how to do so without making these features look gimmicky.
Part IV: Managing Your Web Site
Designing and creating your Web site may be your major task at the start, but after you get your site up and running, you need to effectively manage it. Part IV looks at how to manage your Yahoo! SiteBuilder Web site through the Yahoo! Web Hosting Control Panel. Finally, you tackle the world of e-commerce, look-ing at how to turn your Web site into an electronic storefront.
Part V: The Part of Tens
In the final part, you get quick tips for effective Web site design and tricks and techniques for using Yahoo! SiteBuilder.
About the CD
The CD tucked inside the back cover of this book is loaded with a full version of Yahoo! SiteBuilder 2.2, along with a complete bundle of SiteBuilder tem-plates. (Talk about convenient!) For more CD details — including installation stuff — check out this book’s appendix.
Icons Used in This Book
Throughout the book, you’ll be bedazzled with nifty little icons that are beside important paragraphs. These pictures indicate special kinds of infor-mation that you’ll find amazingly useful:
The Tip icon points you to key techniques, tidbits, or shortcuts that can save you time and effort.
The Remember icon draws attention to something in the text that is absolutely, positively, definitively, kind of, sort of important. What’s more, if you have a photographic mind and love memorizing entire sections of text, I recommend focusing your mental skills on these particular paragraphs.
The Technical Stuff icon highlights nonessential but interesting stuff that no one but geeks and geek-wanna-bes really cares about.
Where to Go from Here
My guess is that you are so mesmerized by this book’s prose by now that you want nothing more than to keep reading from cover to cover. If you do, you’ll find the topics are ordered logically. However, Yahoo! SiteBuilder For Dummies is designed as a reference book, so you don’t have to read the book from start to finish. If you have a specific topic that you want to immediately dive into, consider the following jumping-off points:
⻬To install Yahoo! SiteBuilder, check out Chapter 1.
⻬For a basic overview of the Web site publishing process, skip to Chapter 2.
⻬To create a Web site that will make the industry leading designers beg you for tips, check out Chapter 3 and 16.
⻬To create a basic Web page, see Chapter 4.
⻬To use the Yahoo! SiteBuilder Control Panel, check out Chapter 14.
Part I
awkward introductions, I typically retreat to the corner by myself, munching on chips, veggies, and dip, all the while everyone around me is chatting and happily involved with others. Many people find learning how to create a Web site can be much like my social woes. They make an attempt to do so, but don’t like what happens, and then become too intimidated to try again.
Chapter 1
Yahoo! Let’s Go Site Building
In This Chapter
䊳Exploring how Web site publishing works 䊳Signing up with Yahoo! Web hosting
䊳Getting Yahoo! SiteBuilder ready to roll on your computer 䊳Scoping out and sizing up SiteBuilder
Z
eitgeist. Angst. Mercedes. Porsche.I am embarrassed to say that those four words pretty much composed the extent of my German vocabulary prior to a business trip to Zurich a few years back. Because of my lack of knowledge, I felt nervous, even inadequate, about living several weeks in Switzerland, Austria, and Germany. Oh, I’d talk to my well-traveled friends, and they’d reas-sure me that I could learn enough of the language to get by. I even bought a Learn-German-in-a-Day book and studied en route. But I was still tense stepping off that plane into the unknown.As you start out your journey into Web site building, you may feel much the same way I did before my European excursion. Perhaps you know a few terms — such as URL, domain name, JPG, andhypertext. Maybe you’ve even talked with friends who’ve had success creating a business or personal Web site. Perhaps you’ve even created a Web site before with one of those quick and easy online Web builders out there but are ready for something better.
This chapter helps you as you “step off that plane into the unknown,” so to speak. It helps you get acquainted with what Web publishing and Yahoo! SiteBuilder are all about and also helps you understand the basics about how it all works.
Tolkien classics in New Zealand. In the process, they pulled together count-less clips from the general shoot, CGI effects, and miniature shoots to form a single, complete film. Then, for each of the three films, an original film was sent off and copied and then delivered to movie theaters across the world. Moviegoers then traveled by the millions to their local cinemas to watch the film Jackson made.
The Web publishing model has many parallels to making a film — though fortunately without Orcs and Gollum trying to mess you up along the way. You create a home Web site by pulling together information from a variety of sources. After you have the site ready, you publish the various parts as a single unit to a computer that can be accessed worldwide. Then people can flock by the millions (or the thousands or the tens) to their browsers to visit the site you made. As you can see, the basic process for Web publishing is
⻬Create and design in the comforts of your home or office
⻬Publish your site and go public
⻬Visit your site from anywhere
⻬Repeat the process for changes
Figure 1-1 illustrates the process. I describe each step in the following sections.
Creating and designing on your computer
The first step is to create and design your Web site on your desktop or laptop computer (which I refer from here on out as your localcomputer). A Web site consists of several different kind of files and resources, all of which I conve-niently describe for you in this section. Your Web site building software, such as SiteBuilder, then pulls all these pieces together to form a single Web site.
You
r
C
ompute
r
Cr
eate
Design
View
Repeat p
r
o
c
ess to update
Publish
Yahoo
!
Web Hosting
Figure 1-1:
Web pages
A Web site contains one or more Web pages. A Web page is written in HTML (HyperText Markup Language) format and has a filename with an .htmor .htmlextension. An HTML file is just a normal text file, but each one con-tains a lot of information, such as the following:
⻬Text you want to display on-screen in a Web browser
⻬References to images, multimedia controls, and other resources that you also want to display on a Web page
⻬Links to other pages
⻬A set of instructions that tells the browser how to arrange and display all of this content
You can work with Web pages in two ways — using a “visual” editor that allows you to create and edit the page visually (in the process hiding all the complex HTML code from you) or using a “code” editor that enables you to work directly with the HTML code itself. Some editors, such as Macromedia Dreamweaver and Microsoft FrontPage, are hybrids and provide support for both visual and code editing.
SiteBuilder has a visual page editor (called the Design pane) built into it, free-ing you from worryfree-ing about the yucky complexities of HTML. See Chapters 4, 6, and 8 for details of how to work with Web pages inside of SiteBuilder.
Images
The Web may have started out as a text-based world, but it has emerged as an image-driven medium of communication. Go to any nice-looking site, and you see all sorts of images scattered around the text.
You can either use images you created yourself — taken with your digital camera or drawn using a software program of some kind — or images received from another source (though, as Chapter 7 discusses, you want to make sure you can freely use the image). SiteBuilder’s templates, which I explore in Chapter 5, come with many nice-looking graphical elements for you to incorporate into your Web site design.
Today’s Web sites often use navigation bars that incorporate both text and graphics. Chapter 9 shows you how to create navigation bars in SiteBuilder.
You don’t create, edit, or manipulate images inside of SiteBuilder. SiteBuilder hands that job off to another graphics software package, such as Adobe Photoshop, Microsoft Office Picture Manager, or even Microsoft Paint. After you have a Web-ready image, you can add it to your Web page inside of SiteBuilder. Once again, Chapter 7 covers all those details.
The Web is more than just a giant bulletin board that visitors can browse. A visitor can also interact with the site, providing feedback, ordering products, or requesting more information. A Web page can contain form elements, such as edit boxes, drop-down lists, or buttons, to enable this kind of interaction. Chapter 10 explores how to create and work with forms inside of SiteBuilder. And if you’re interested in selling products on the Web, check out Chapter 15.
Embedded media
While text and images make up the bulk of the content on Web pages, you can also embed other resources in a Web page. Popular choices are video or audio clips and Java applets. Chapter 12 discusses how to add multimedia resources to your Web page. Finally, you can also embed HTML code and JavaScript scripts (see Chapter 13) in your page to add functionality and services not provided inside SiteBuilder — such as a guestbook, news headlines, and stock quotes.
Yahoo! Add-Ons
A major benefit to using SiteBuilder and Yahoo! Web hosting is that you can incorporate Yahoo! service-oriented add-ons into your Web pages. (Add-ons let you add neat interactive features such as a Yahoo! Map or Yahoo! Search box into your page right inside of SiteBuilder. Chapter 11 has more on add-ons, including how to add features to your Web site. )
Linked resources
A final batch of resources that can be part of a Web site are non-HTML docu-ments and other files that a visitor can link to. Technically, these files don’t appear as part of a Web page, but you link to (and open) them from other Web pages inside of your Web site. Common examples include Adobe Acrobat (PDF) files, PowerPoint presentations, and Microsoft Word documents. See Chapter 6 for more on how to link to these documents.
Publishing your site
Visiting your site from anywhere
After you publish your Web site, it’s available for anyone in the world to access. A Yahoo! server stores your Web site files somewhere out in cyber-space for you to access them. Physically, it doesn’t matter where that Yahoo! server is — it could be a facility in Sunnyvale, California; or Dallas, Texas; or Atlanta, Georgia — all that matters is that when people type your site’s Web address in the Address bar of their browser or click a link that goes there, they’re accessing your Web site on that particular server.
Repeating the process
As I discuss in Chapter 16, you’ll want to regularly update your Web site to ensure that it doesn’t grow stale and start to grow mold. When you update your site, you make the changes and additions in SiteBuilder on your local computer and then republish the updates, overwriting the files that are on the Yahoo! Web server.
Signing Up for Yahoo! Web Hosting
Before you can publish a SiteBuilder Web site, your first step is to sign up for Yahoo! Web hosting. Do so by following these steps:
Make sure you have a Yahoo ID before beginning this process.
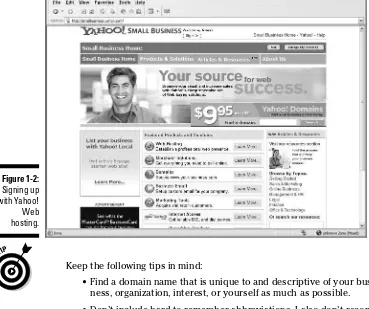
1. With your browser, go to smallbusiness.yahoo.com.
The Yahoo! Small Business home page makes an appearance (see Figure 1-2).
2. Click the Web Hosting link to begin the signup process.
A new page appears in your browser, outlining the various Web hosting options available to you.
3. Click the Sign Up button for the Web hosting plan that best suits your needs.
4. On the next page, enter the desired domain name for your Web site.
Your domain is a unique name that identifies a Web site, such as yahoo. com. Domain names have two or more parts separated by dots. The part to the right of the dot represents the general type (.com, .net, .org); the part to the left of the dot is meant to be the name that describes or identifies your site.
Keep the following tips in mind:
• Find a domain name that is unique to and descriptive of your busi-ness, organization, interest, or yourself as much as possible.
• Don’t include hard-to-remember abbreviations. I also don’t recom-mend using hyphens, simply because people easily forget about them.
• Be descriptive, but don’t make it toooo long.
• Above all, make your domain name easy for people to remember.
Yahoo! searches to see if your choice is still available — meaning that nobody else has registered it before. If it is available, you can continue. If not, you need to search again.
5. Continue through the registration process, providing necessary pay-ment and contact information to complete the order.
After your order is completed, you first receive a confirmation e-mail of your order. and then within a few hours, you receive a second e-mail let-ting you know that your account is active and ready to roll.
After your account is activated, you can access the Yahoo! Web Hosting Control Panel, which I discuss in Chapter 14.
Figure 1-2:
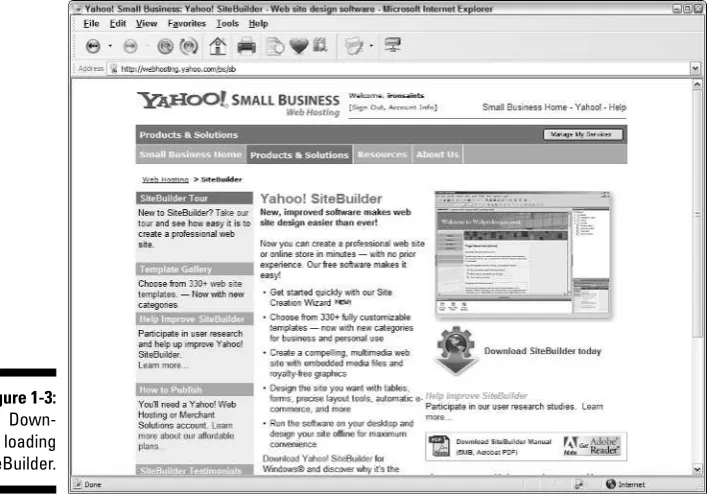
Downloading and Installing
Yahoo! SiteBuilder
After you sign up for Yahoo! Web hosting, your next step is to download and install SiteBuilder onto your computer. No need to wait for your account to become active; jump right in by following these steps:
1. With your Web browser, go to webhosting.yahoo.com/ps/sb.
The Yahoo! SiteBuilder page displays, as shown in Figure 1-3.
2. Click the Download SiteBuilder Today link.
The Download page loads in your browser, at your service.
3. Click the Download link.
If you’re not signed into your Yahoo! account, you need to enter your Yahoo! ID and password before downloading SiteBuilder.
4. Save the download file to an appropriate folder on your computer.
5. When the download completes, double-click the ysitebuilder.exe file in your download folder.
Figure 1-3:
Down-loading SiteBuilder.
and configure SiteBuilder.
The installer places SiteBuilder into your Program Files directory and adds an icon on your Windows desktop and Windows Start menu.
Exploring Yahoo! SiteBuilder
The rest of this book is devoted to building Web sites using SiteBuilder. But before getting into the specifics of how to do this or do that, take a moment to start up SiteBuilder and just get a feel for what the workspace looks like.
Follow these steps to launch SiteBuilder and take it through its paces:
1. Double-click the Yahoo! SiteBuilder icon on your Windows desktop.
The main SiteBuilder window opens, as shown in Figure 1-4.
You can also launch SiteBuilder by choosing All Programs➪Yahoo! SiteBuilder➪Yahoo! SiteBuilder from the Windows Start menu.
For the purposes of exploring SiteBuilder, continue with the following steps. Your focus here isn’t how to create a Web site just yet; you’re simply exploring SiteBuilder and getting a sense of what the tool is like.
2. In SiteBuilder, click the Create a New Site link in the Help pane on the left.
You can use the Help pane to perform several tasks, such as create a Web site, import a Web site you’ve already created in another program, or open a Web site you’ve already started.
3. Click the Start button in the Site Creation Wizard.
The contents of the Help pane change, starting the wizard.
4. In the Name of My Web Site box, enter dummysite.
5. Click the Next button.
The wizard takes you to Step 2.
6. Click the A Blank Page option and then click the Next button.
As shown in Figure 1-5, SiteBuilder creates a blank, single-page Web site, enough for your exploration purposes.
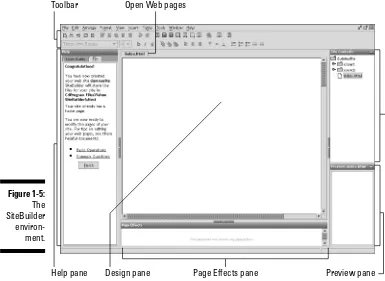
SiteBuilder panes
Your main work area is the Design pane,the center of the SiteBuilder work-space. The Design pane enables you to create a Web page in a “point-and-click” manner by adding different page elements to the page and then arranging them as you wish. You can have multiple Web pages open, each one of which has a tab at the top of the editor. See Chapters 4, 6, 7, and 8 for the full details on working with the Design pane.
In addition to the Design pane, you can find other panes as part of the workspace:
⻬Site Contents:The Site Contents pane shows you a folder view of your Web site contents, including Web pages (.htmlfiles), clip art graphics, sounds, and other files you have as part of your site. Chapter 4 shows you how to use the Site Contents pane to manage all your Web site resources.
⻬Preview:The Preview pane displays the currently selected item in the Site Contents pane. If nothing is selected, it displays the current page in the Design pane.
Figure 1-4:
Building a Web site starts right here.
⻬Page Effects:Some effects you can add to your page, such as a bouncing image or a background sound, don’t display in the Design pane. That’s because they’re event-based effects that kick in when the page is being viewed “live” in the browser. Placeholders represent these effects in the Page Effects pane. Chapter 12 tells you all about how to work with page effects.
⻬Help:The Help panel serves as the go-to place within SiteBuilder, allow-ing you to access the User Guide and other helpful information.
SiteBuilder toolbar
Just like in any Windows application, commands are available from the top menu, toolbar, contextual menus, and even keyboard shortcuts. In this book, I refer most often to the toolbar (see Figure 1-6), though you can use whichever of these options you prefer.
Page Effects pane Design pane
Help pane Preview pane
Site Contents pane
Figure 1-5:
The toolbar contains the commands you use most often during the Web site building process. These include the following:
⻬New Page without Templatecreates a new blank page.
⻬New Page with Templatecreates a new page based on a template you specify.
⻬New Sitelaunches the Site Creation Wizard.
⻬Open Pageallows you to open a page in your Web site.
⻬Save Pagesaves changes to the active Web page in your site.
⻬Preview in Browserdisplays the active Web page in your default Web browser.
⻬Propertiesshows the properties for the active page element in the Design pane.
⻬Cutdeletes the selection and places it on the Clipboard.
⻬Copyadds the selection to the Clipboard.
⻬Pasteinserts the contents of the Clipboard into the current page or page element.
⻬Deleteremoves the selection without adding it to the Clipboard.
⻬Undoundoes the last action you made.
⻬Redoredoes the action that you undid.
⻬Insert Textadds a text element to the middle of the current page.
⻬Insert Imageadds an image element to the current page.
⻬Insert Backgroundadds a background color or image to your current page and adds a Background icon to the Page Effects pane.
⻬Insert Navigation Bardisplays a drop-down list of navigation bars avail-able for your site or an option to create a new navigation bar.
active page.
⻬Insert Tableadds a table grid to the current page.
⻬Open the Insert Palettedisplays the Insert palette for dropping page elements onto your page.
⻬Link Toenables you to create Web links from the selected text or image.
⻬Download All Templatesenables you to retrieve additional SiteBuilder templates from Yahoo.com.
⻬Publish Siteuploads Web pages from your computer to Yahoo! Web Hosting.
⻬Helpdisplays SiteBuilder Help in the Help pane.
Chapter 2
Publishing Your First Site:
Around the World (Wide
Web) in 16 Minutes
In This Chapter
䊳Creating a site from scratch and publishing it in minutes 䊳Discovering the basic processes of Web site publishing
P
hileas Fogg is so “last century.” (Or was it the century before that?) It took him 80 days to make his way around the world. That timeframe may have been impressive in his day, but you and I can take a circumnaviga-tional supersonic flight around the world in far less than 80 hours, let alone days. So, too, in the early days of the Web, site builders would have to spend several hours or days hand-coding their Web pages and then copying these files onto a server using some geeky FTP tool. In contrast, using SiteBuilder, you can create a nice-looking Web site presence in a mere 16 minutes. In fact, I show you how to do that in this chapter.Of course, as you work with SiteBuilder on your actual site, you’ll want to spend much more time and energy thoughtfully designing, producing con-tent, and fine-tuning your site. But you’ll be glad to know that the mechanics of creating a SiteBuilder Web site are as quick as reading just a few pages from a Jules Verne classic.
In this chapter, I’m your personal valet — or, keeping with the Phileas Fogg imagery, your Passepartout— to help you make it around the world of Web site publishing before Big Ben strikes the stroke of midnight.
Getting Started in Web Publishing
detail; that’s what the rest of the book is all about! However, I think as you go through this exercise in Web publishing, you become better equipped to get your hands around exactly what Web site publishing is all about.
Before starting your little road race, you need to have two steps done (both of which I tell you about in Chapter 1):
⻬Signed up for a Yahoo! Web Hosting Plan.
⻬Launched SiteBuilder.
After you do those two tasks, get out your stopwatch, and get ready to let out the clutch.
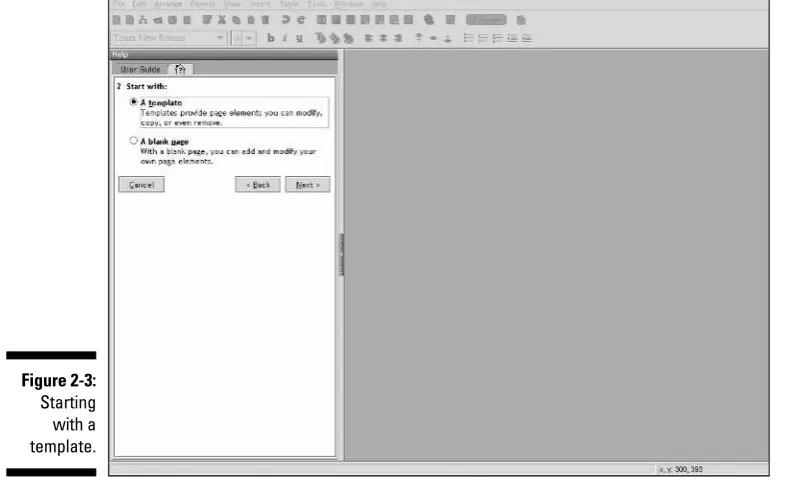
Stop #1: Creating a Web Site
with the Site Creation Wizard
Estimated Time: 4 minutes
Your first stop on your Around the Web Tour is to create a new Web site using SiteBuilder. SiteBuilder walks you through a step-by-step process using its Site Creation Wizard. After you finish your process, your Web site pages are created and ready for editing.
So go ahead and do the following to get the show on the road:
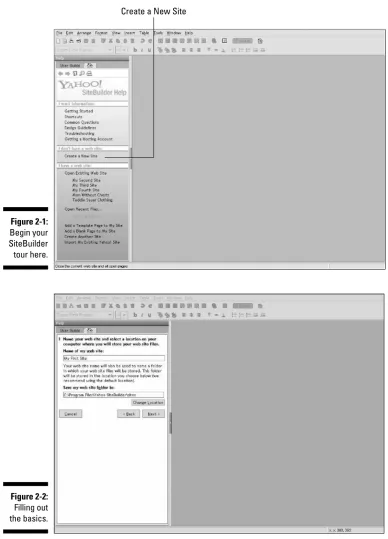
1. From the Help pane inside of SiteBuilder, click the Create a New Site link, as shown in Figure 2-1.
The Help pane updates to display the opening page of the Site Creation Wizard.
2. In the opening page of the Site Creation Wizard, click the Start button to continue.
The Help pane updates to show the next step in the site creation process, as shown in Figure 2-2.
3. Enter My First Siteor any other appropriate name in the Name of My Web Site text box.
The site you create in this chapter is for instructional purposes only, so just indicate that in the name you choose.
4. Click the Next button to continue.
Figure 2-2:
Filling out the basics.
Create a New Site
Figure 2-1:
Begin your SiteBuilder tour here.
5. Stick with the default A Template option, and click the Next button.
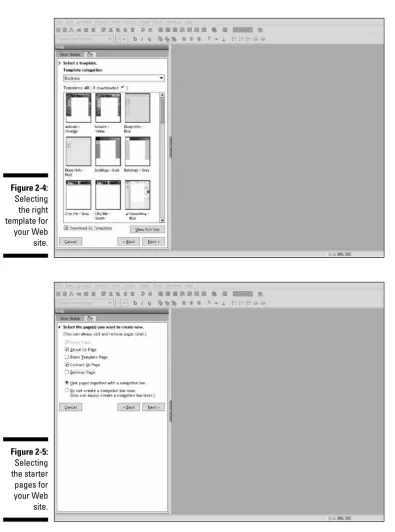
The Help pane updates to allow you to select the template of your choice. (See Figure 2-4. )
The Templates list displays the available templates, both ones that you’ve downloaded to your computer all ready as well as ones that have not yet been downloaded. For the Around the Web Tour, choose one that comes with SiteBuilder.
6. Select Business from the Template Categories drop-down list.
7. Select the Consulting – Blue template from the Templates list box.
Don’t worry if you’re not a consulting company or don’t like the tem-plate design; you can always change it immediately after this exercise.
8. Click Next to continue.
The Help pane updates to display the last page of the wizard, as shown in Figure 2-5.
Figure 2-3:
Figure 2-5:
Selecting the starter pages for your Web site.
Figure 2-4:
Selecting the right template for your Web site.
SiteBuilder to create for you at this time. For the Around the Web Tour, you can narrow it down to just three initial pages: the Home Page, the About Us Page, and the Contact Us Page.
9. Uncheck the Services Page box.
If you own a small business, the Services page comes in handy for describing your company’s services. For this step-by-step example, how-ever, you don’t need to include this page.
10. Click the Next button to create your Web site.
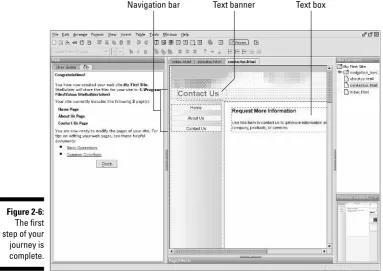
SiteBuilder creates your Web site, opens each page inside the Design pane, and displays the Web site in the Site Contents pane. Figure 2-6 shows the final results.
For the full scoop on creating and working with your Web site, see Chapter 3.
Navigation bar Text banner Text box
Figure 2-6:
Stop #2: Editing Your Pages
Estimated Time: 7 minutesYour second stop on the Around the Web Tour is the Design pane, where you can edit the three pages that SiteBuilder created for you as part of your Web site. You can do four basic page-building tasks here: editing text, deleting text elements, adding an image, and creating a link.
To edit your home page
1. Click the index.htmltab at the top of the Design pane.
The tabs allow you to move between your open pages. The index.html page is the home page for the Web site.
Take a look around at the various elements that appear on the page, including the text banner, navigation bar, text boxes for descriptive text, and images. Figure 2-7 shows the page before you make any changes.
2. Click the Your Company Name Here text box to select it.
Figure 2-7:
Your home page in the Design pane.
Alternatively, if you’re up for it, you can triple-click inside the box to select all the text.
4. Type XYZ Creationsover the selected text.
Feel free to use your own company or personal name instead.
5. Click the topmost text element (box) in the content area of the page to select it.
6. Overwrite the Page Name Here (Home) text with a welcome message, such as Welcome to XYZ Creations.
7. Select the Paragraph Title Here (What’s New?) text, and press the Delete key. Press Delete once more to get rid of the blank line.
In doing so, you are deleting the extra sample text that you don’t need for these simple steps.
8. Overwrite the sample paragraph text with a “coming soon” message, such as Coming soon. Web site under construction. Check back after I finish reading Yahoo! SiteBuilder For Dummies.
9. Remove the rest of the sample text in the text element.
SiteBuilder provides sample text to help you get started on your home page. You can delete the extra text elements for this exercise.
10. Select the text box underneath the one you just modified, and press the Delete key. Repeat this process for the other two elements.
Your basic vanilla home page is ready. It should look something like what you see in Figure 2-8.
To edit your About Us page
1. Click the aboutus.htmltab on the top of the Design pane.
The About Us page makes an appearance.
2. Double-click the About Our Business text element to edit the text inside it.
3. Leave the About Our Business heading as is, and overwrite the remainder of the text with XYZ Creations is the leading provider of XYZs in the world.
Or, if you’re describing your actual business, modify the text of this paragraph as you like. However, because your tour is on a tight sched-ule, I recommend keeping it to just a sentence or two.
4. Resize the text element box to fit the amount of text inside of it.
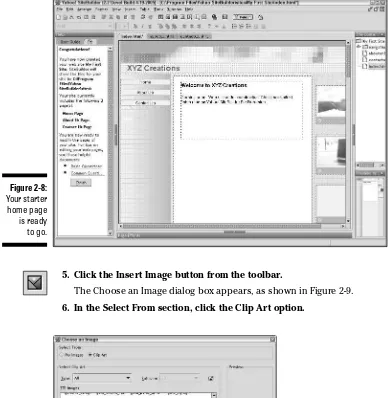
5. Click the Insert Image button from the toolbar.
The Choose an Image dialog box appears, as shown in Figure 2-9.
6. In the Select From section, click the Clip Art option.
Figure 2-9:
Adding a sample image.
Figure 2-8:
Your starter home page is ready
to go.
image from the list.
8. Click OK.
The image is placed in the center of your page.
9. Click the image, drag it down, and position it under the text element box.
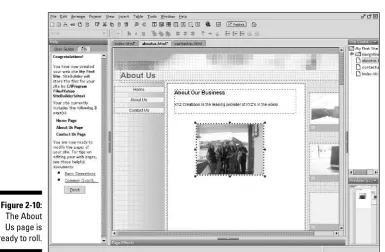
Your basic vanilla About Us page is all set to go. (See Figure 2-10.)
See Chapter 7 for full details on working with images.
To edit your Contact Us page
1. Click the contactus.htmltab at the top of the Design pane.
2. Double-click the Request More Information text element to edit the text inside of it.
3. Leave the Request More Information heading as is, and overwrite the remainder of the text with E-mail us for more information about the best XYZs this side of Texas.
Use this text as the basis for a link to your e-mail address. Therefore, when the link is clicked in the browser, the visitor’s e-mail software opens with a new message addressed to you.
Figure 2-10:
4. Select E-mail uswith your mouse.
5. Click the Link To button on the toolbar.
The Link dialog box appears.
6. In the Select the Type of Link drop-down menu, choose An Email Address from the list.
The Link dialog box changes its options, as shown in Figure 2-11.
7. In the An Email Address text box, enter your e-mail address.
8. Click the Create button.
Your Contact Us page is ready to go, as shown in Figure 2-12.
Figure 2-12:
The Contact Us page is rarin’ to go.
Figure 2-11:
Creating a link to your e-mail address.
Your Web site is now ready to go. Notice that I ignored talking about the navigation bar(a graphical bar of links in your site) on the left-hand side of the pages. That’s because SiteBuilder already set up the links for you.
Before continuing, choose File➪Save All Pages to save all the pages in your site.
Stop #3: Previewing Your Site
Estimated Time: 2 minutesYour third stop on the Around the Web Tour is a preview of your site before you publish. SiteBuilder enables you to open your Web site inside your browser before publishing. This preview feature allows you to catch mistakes before you actually “go live” with your Web site.
To preview your site
1. Click the Preview in Browser button on the toolbar.
SiteBuilder opens the current page shown in the Design pane in your default Web browser.
2. Click each of the pages in the navigation bar to view each of them.
Under normal circumstances, you spend a lot of time going back and forth between designing your Web site and previewing it and testing it and redesign-ing your Web site and previewredesign-ing it and testredesign-ing it and . . . you get the point.
Stop #4: Publishing Your Site
to Yahoo! Web Hosting
Estimated Time: 2 minutes, 59 seconds
Now that you’ve created your site, edited your pages, and previewed your site locally, you’re ready for the home stretch of the Around the Web Tour. And looking at the clock, you’ve not a moment to spare! Follow these steps to complete the experience:
Unless you’re all ready logged into Yahoo!, the Sign In to Yahoo! dialog box appears, as shown in Figure 2-13.
2. Enter your Yahoo! ID and password in the Sign In to Yahoo! dialog box and then click OK.
The Publish Site dialog box appears, as shown in Figure 2-14.
3. Click the Publish All Files option.
4. Click OK.
SiteBuilder starts the transfer process and notifies you when the publish is complete. (See Figure 2-15.)
5. Click the link in the dialog box to take you to a live view of your Web site.
Figure 2-16 shows how the Web site looks after it’s been published.
Figure 2-15:
Publishing success before the sounds of Big Ben.
Figure 2-14:
Publishing your Web site.
Figure 2-13:
Log in to Yahoo! before publishing.
See Chapter 3 for more on publishing your Web site.
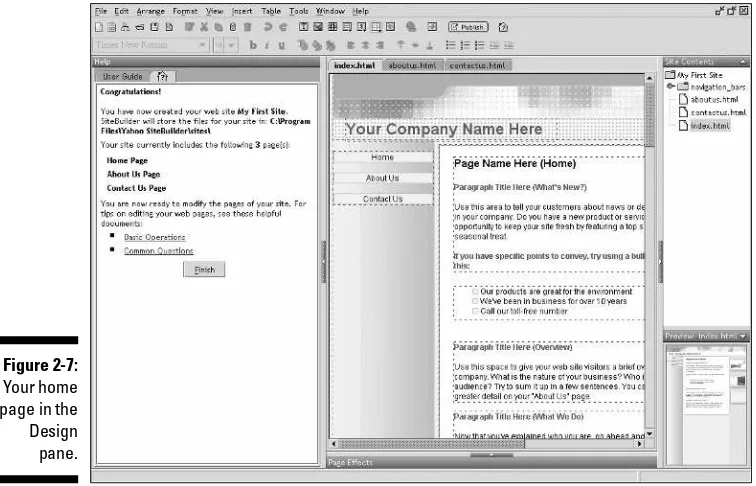
Going Forward
Congratulations! Or, as Passepartout would undoubtedly say, “Félicitations! Magnificient!”True, the site you published is basic; it is vanilla. But you’ve done it successfully in less than 16 minutes.
You’ve gotten the basic mechanics of what Web site publishing is all about. With that backdrop, you’re ready to roll up your sleeves and get down to business — creating a genuine, killer Web site using SiteBuilder.
Figure 2-16:
Chapter 3
Building a Purpose-Driven
Web Site
In This Chapter
䊳Creating a site with purpose 䊳Organizing your site effectively 䊳Creating smart content
䊳Making your site accessible to everyone 䊳Evaluating your site
P
oor Karl Marx; the man was misdirected. He sought revolution through the political and economic systems when all along, he should have been a geek and invented the Web. Everybody knows that the Web has become the great equalizer. (Hmmm, does that make Web surfing “the opiate of the masses?”)Indeed, whether you’re a “mom and pop” shop or a large global conglomerate, the Web levels the playing field. Yes, the “big boys” can spend megabucks on advertising, focus groups, and faster servers. But in spite of those advantages, you don’t need that much to put together a Web site that is every bit as effective.
In this chapter, you explore some of the basic practices you should under-take as you start to build your Web site. This chapter is all about the upfront work you should think about beforeyou jump in and use SiteBuilder. Then, after you have a handle on this preliminary stuff, you’re ready to create something I call a purpose-drivenWeb site — one that unifies the visual design, content, site organization, and messaging to reach the people you most want to reach.
Creating a Purpose-Driven Site
The single most important factor to keep in mind as you work with
SiteBuilder is to create a site that is driven by a specific purpose. If you just start creating a site without this upfront effort, your site (and its effective-ness) can suffer as a result. You don’t have to spend a lot of time and money in research, focus groups, and the like. Instead, simply carve out a few hours from your schedule, and devote that time to exploring what you want out of your Web site. You’ll be glad you put the effort into it.
As you do so, consider the following issues:
⻬Identify a specific purpose:If you’re taking the time and effort to learn how to use SiteBuilder to create a Web site, you must have a reason. Identify your purpose and your goals. If you have a business site, are you trying to attract new customers? Or are you trying to better serve your existing ones? Or are you trying to provide a balance between the two?
After you identify your site’s purpose, gear every part of the Web site toward achieving that purpose — including understanding what your priorities are, what your messaging should be, and what Yahoo! add-on features and templates you want.
⻬Define your target visitor:Consider who is going to be most interested in coming to your site. Develop a list of various types of people and then narrow it down to just one or two archetypes. After you identify the kind of visitor you expect your Web site to attract, most of the questions con-cerning what kind of design, content, and services you want to offer simply fall into place.
Don’t forget to consider the technical expertise and technology-adoption behavior of the target visitor. Your understanding of the target visitor in this area is sure to have an impact on your site design.
Make sure you account for people coming to your site with disabilities.
⻬Give a professional feel to your site:As Chapter 16 stresses, one of the most important objectives is to create a professional-looking Web site. But unless you’re targeting stuffy old Ivy League professor types, “pro-fessional” doesn’t mean stuffy and stiff-collared. Instead, professional simply means “well done.”
⻬Define a “presence:”After you consider your site’s purpose and target audience, identify the way in which you want your Web site to appear to visitors, and develop an aura throughout your Web site that supports that objective. Consider the following potential “tones:”
• Conservative and traditional
• No-nonsense and practical
• Informal and friendly
Tailor every visual element on your Web site toward this decision, including
• The SiteBuilder template you standardize on. (See Chapter 5.)
• The graphic style. (Photos can convey a more conservative tone, while clip art and illustrations are effective in creating an informal aura.)
• The writing style.
• The visual elements. (Conservative and friendlier sites need to pro-vide intuitive labels and navigation, while a cutting-edge site can have an aura of mystery by taking a more abstract approach.)
⻬Evaluate competing sites:As you consider your own purpose-driven site, take a look around the Web at sites that directly or indirectly com-pete with yours. How effective are they at communicating to a similar target visitor? What mistakes do they make that you can avoid?
Bookmark these sites you find, and see how their Web sites evolve over time.
Organizing Your Site
Web sites can be logically thought of as hierarchies or as pyramid-like struc-tures. Your home page is at the top of the heap, with three to six second-level sections, and subsections within each of these. Therefore, as you begin plan-ning your Web site, you need to give forethought to the hierarchical structure of your Web site. The hierarchy helps you determine which pages to include on your navigation bar, what pages to bundle together in separate sections, and how the visitor can navigate through your Web site.
For example, consider the following structures of two basic sites, shown in Figures 3-1 and 3-2.
Contact Us
Services About Us
Home
Figure 3-1:
Basic two-level Web site.
Pictures are sometimes worth a thousand words, but now and then the best way to grasp a concept is to read some solid prose. For some solid ideas on how best to organize your site, read on to the end of this section.
Mocking up your site structure
The best way to define your Web site structure is to develop a list of all potential pages, topics, or services you wish to include. As you brainstorm, ask yourself what the target visitor should expect to find when arriving at your home page.
After you have a working list of ideas, mock up your site, using either a low-tech or high-low-tech option:
⻬Old-fashioned index cards.Get a stack of 4 x 6 index cards, and write down these major topics or pages you wish to include in your site. Then spread them out on a table, look for logical groupings, and begin to orga-nize them into a hierarchy. A natural hierarchy begins to develop as you see the various pages and topics presented to you in this manner.
⻬Charting software.If you just can’t imagine the thought of doing a cre-ative task away from your computer, then use any charting software you may have to create a hierarchical chart. Visio is a popular package, but that’s really overkill. Instead, if you have Microsoft PowerPoint, use its built-in Organization Chart tool. This easy-to-use tool (see Figure 3-3) gives you an ideal visual aid to assist in creating your Web site structure.
Home
PencilWalker
Figure 3-2:
Filling in the missing pieces
After you define the basic structure, you want to identify additional Web site pages or features that may not immediately show up. These include
⻬Section pages.As you visually group your pages into clusters, you often encounter the need for a section-level page — one that doesn’t provide much content in and of itself but is needed as a centralized starting point for a subsection.
⻬Links.You also want to sketch out the links that you want to include across your site’s pages. Remember, while Web sites are hierarchical, links are positively nonlinear. Sketching or printing the site structure and drawing lines to identify these links is helpful.
Avoiding deep hierarchies
Be careful not to make the hierarchy too deep. If you have a lot of topics, it is better to be broad at the higher level than to have many layers of pages. Studies have shown that visitors easily get lost when they descend more
Figure 3-3:
Taking advantage of the built-in chartbuilt-ing tool of PowerPoint.
section in which you’d like to include the following Web pages: aboutus.html, companyhistory.html, investors.html, contactus.html, maps.html, directions.html, and phonelist.html. Logically, the purest hierarchy is shown in Figure 3-4, but its added layers will make it more difficult for visi-tors. (I even added two extra grouping pages — background.htmland visitus.html.) In contrast, Figure 3-5 shows an alternative site hierarchy, which flattens the structure levels and avoids deep nesting.
Planning for effective feedback
In addition, you should provide feedback on your Web pages that indicates where the visitor is on your site. Fortunately, some of the SiteBuilder naviga-tion bars change the button state of the active page. In this way, visitors can quickly discern their location.
Another handy technique is to include a listing of the hierarchy just under the page header. For example, consider the following heading for a feedback page:
Sound Off to Us
Home \ Contact Us \ Sound Off to Us
aboutus.html
background.html
visitus.html phonelist.html companyhistory.html investors.html
maps.html directions.html contactus.html
Figure 3-4:
As you can see, underneath the page header’s Text element is a second Text element that visually shows where the visitor is in the site’s hierarchy. It even includes links to each of the pages above the current one. Used in combina-tion with a SiteBuilder navigacombina-tion bar, a visitor can never get lost in your Web site.
Writing Content for Your Web Site
Many people find developing a site’s structure to be an almost intuitive process — the pages naturally start to group themselves into a tree-like hierarchy. However, to many Web site builders, “intuitive” is not a term that comes to mind when you talk about what content should be on a page and how to best present it.
Writing content for a page is one of those tasks that you often have to slog through a few times before you really feel like you got it right. Even if content development is more “art” than “science,” keep in mind these general princi-ples as you work your way through this book:
⻬Write descriptive headings.Make sure visitors can quickly scan the text heading of your page and instantly know exactly what they can expect on it. Don’t be cute; be clear.
companyhistory.html investors.html
maps.html
phonelist.html directions.html
aboutus.html
contactus.html
Figure 3-5:
A more visitor-friendly site structure.