•
•
•
•
•
Mac Programming
for
Absolute Beginners
Wallace Wang
and Xcode on the Mac
i
Mac Programming for
Absolute Beginners
■ ■ ■
Wallace Wang
ii
All rights reserved. No part of this work may be reproduced or transmitted in any form or by any means, electronic or mechanical, including photocopying, recording, or by any information storage or retrieval system, without the prior written permission of the copyright owner and the publisher.
ISBN-13 (pbk): 978-1-4302-3336-7
ISBN-13 (electronic): 978-1-4302-3337-4
Printed and bound in the United States of America (POD)
Trademarked names, logos, and images may appear in this book. Rather than use a trademark symbol with every occurrence of a trademarked name, logo, or image we use the names, logos, and images only in an editorial fashion and to the benefit of the trademark owner, with no intention of infringement of the trademark.
The use in this publication of trade names, trademarks, service marks, and similar terms, even if they are not identified as such, is not to be taken as an expression of opinion as to whether or not they are subject to proprietary rights.
President and Publisher: Paul Manning Lead Editor: Michelle Lowman
Development Editor: Jim Markham Technical Reviewer: James Bucanek
Editorial Board: Steve Anglin, Mark Beckner, Ewan Buckingham, Gary Cornell, Jonathan Gennick, Jonathan Hassell, Michelle Lowman, Matthew Moodie, Jeffrey Pepper, Frank Pohlmann, Douglas Pundick, Ben Renow-Clarke, Dominic Shakeshaft, Matt Wade, Tom Welsh
Coordinating Editor: Jennifer L. Blackwell Copy Editors: Kim Wimpsett and Bill McManus Compositor: MacPS, LLC
Indexer: BIM Indexing & Proofreading Services Artist: April Milne
Cover Designer: Anna Ishchenko
Distributed to the book trade worldwide by Springer Science+Business Media, LLC., 233 Spring Street, 6th Floor, New York, NY 10013. Phone 1-800-SPRINGER, fax (201) 348-4505, e-mail [email protected], or visit www.springeronline.com.
For information on translations, please e-mail [email protected], or visit www.apress.com.
Apress and friends of ED books may be purchased in bulk for academic, corporate, or promotional use. eBook versions and licenses are also available for most titles. For more information, reference our Special Bulk Sales–eBook Licensing web page at
www.apress.com/info/bulksales.
The information in this book is distributed on an “as is” basis, without warranty. Although every precaution has been taken in the preparation of this work, neither the author(s) nor Apress shall have any liability to any person or entity with respect to any loss or damage caused or alleged to be caused directly or indirectly by the information contained in this work.
The source code for this book is available to readers at www.apress.com.
iv
Contents at a Glance
■
Contents ... v
■
About the Author ... xii
■
About the Technical Reviewer ... xiii
■
Acknowledgments ... xiv
■
Introduction ... xv
■
Chapter 1: Understanding Programming ... 1
■
Chapter 2: Understanding Apple’s Programming Tools ... 17
■
Chapter 3: The Basic Steps to Creating a Mac Program ... 29
■
Chapter 4: Getting Help ... 47
■
Chapter 5: Learning Objective-C ... 63
■
Chapter 6: Making Decisions with Branches ... 83
■
Chapter 7: Repeating Code with Loops ... 99
■
Chapter 8: Understanding the Cocoa Framework ... 111
■
Chapter 9: Manipulating Strings ... 123
■
Chapter 10: Arrays ... 139
■
Chapter 11: Dictionaries and Sets ... 157
■
Chapter 12: Creating Classes and Objects ... 173
■
Chapter 13: Inheritance, Method Overriding, and Events ... 203
■
Chapter 14: Creating a User Interface ... 215
■
Chapter 15: Choosing Commands with Buttons ... 231
■
Chapter 16: Making Choices with Radio Buttons and Check Boxes ... 249
■
Chapter 17: Making Choices with Pop-Up Buttons ... 263
■
Chapter 18: Inputting and Outputting Data with Labels,
Text Fields, and Combo Boxes ... 279
■
Chapter 19: Inputting Data with Sliders, Date Pickers, and Steppers ... 299
■
Chapter 20: Using Built-In Dialog Boxes ... 315
■
Chapter 21: Creating Pull-Down Menus ... 331
■
Chapter 22: Designing Your Own Programs ... 343
■
Chapter 23: Working with Xcode ... 361
■
Chapter 24: Debugging Your Program ... 371
■
Index ... 385
v
Contents
■
Contents at a Glance ... iv
■
About the Author ... xii
■
About the Technical Reviewer ... xiii
■
Acknowledgments ... xiv
■
Introduction ... xv
■
Chapter 1: Understanding Programming ... 1
Programming Principles ... 2
Dividing Programs into Parts ... 5
Event-Driven Programming ... 7
Object-Oriented Programming ... 8
Understanding Programming Languages ... 11
The Building Blocks of Programming Languages ... 12
Programming Frameworks ... 13
Mac Programming Today ... 14
Summary ... 16
■
Chapter 2: Understanding Apple’s Programming Tools ... 17
Understanding Editors ... 17
Understanding Xcode ... 18
Deciphering the Xcode User Interface ... 19
Running Xcode ... 20
Creating a New Project in Xcode ... 21
Examining Project Files in Xcode ... 24
Compiling a Program ... 26
Summary ... 27
■
Chapter 3: The Basic Steps to Creating a Mac Program ... 29
A Bare-Bones Program Example ... 30
A Simple User Interface Example ... 33
An Interactive User Interface Example ... 37
Writing Objective-C Code ... 38
Connecting the User Interface ... 40
vi
An Advanced Interactive User Interface Example ... 42
Summary ... 45
■
Chapter 4: Getting Help ... 47
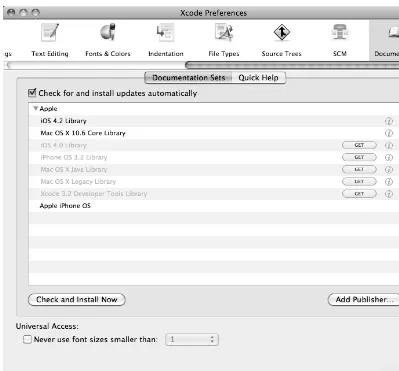
Installing Help Topics ... 47
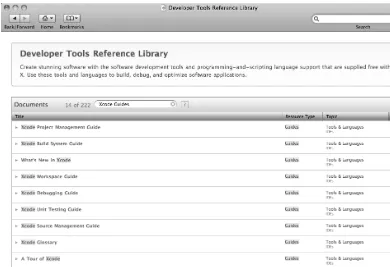
Getting Help About Xcode ... 48
Getting Help About Core Library ... 49
Searching for Help ... 54
Getting Quick Help ... 55
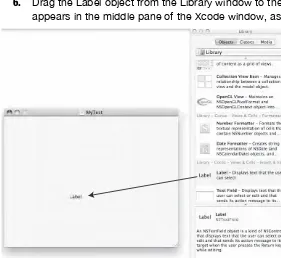
Viewing Documentation for Selected Text ... 56
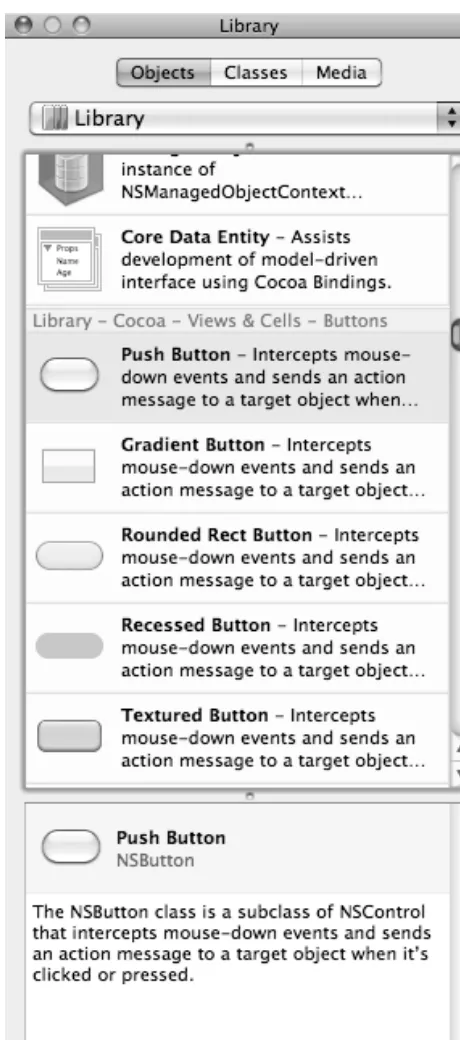
Getting Help with Library Windows ... 57
Help While Writing Code ... 59
Color-Coding ... 59
Customizing the Editor ... 60
Using Code Completion ... 60
Summary ... 61
■
Chapter 5: Learning Objective-C ... 63
Differences in Writing a Mac Objective-C Program ... 63
Understanding Objective-C Symbols ... 65
Defining the End of Each Line with a Semicolon ... 66
Defining the Beginning and End of Code with Curly Brackets ... 67
Defining Compiler Directives with the # Symbol ... 68
Defining Comments with // ... 68
Identifying Objects with [ and ] ... 69
Defining Pointers with * ... 70
Manipulating Data with Variables ... 71
Declaring Variables ... 71
Assigning Data to a Variable ... 73
The Scope of a Variable ... 73
A Program Example Using Variables ... 75
Using Constants ... 76
Using Mathematical Operators ... 78
Using Strings ... 79
Summary ... 81
■
Chapter 6: Making Decisions with Branches ... 83
Understanding Boolean Expressions ... 84
Boolean Comparison Operators ... 86
Boolean Logical Operators ... 87
Branches ... 90
The Simplest if Statement ... 90
Following Multiple Instructions in an if Statement ... 91
The if-else Statement ... 92
The if-else if Statement ... 92
The switch Statement ... 94
Summary ... 98
■
Chapter 7: Repeating Code with Loops ... 99
Loops That Run a Fixed Number of Times ... 100
Quitting a for Loop Prematurely ... 102
vii
Skipping in a for Loop ... 103
Loops That Run Zero or More Times ... 104
The while Loop ... 104
The do-while Loop ... 105
Quitting a while or do-while Loop Prematurely ... 106
Skipping a while or do-while Loop ... 107
Nested Loops ... 107
Summary ... 109
■
Chapter 8: Understanding the Cocoa Framework ... 111
An Overview of How Object-Oriented Programming Works ... 112
Starting with a Class ... 113
Reducing Bugs ... 114
Reusing Code ... 114
Defining Classes ... 114
Creating an Object ... 115
Storing Data in an Object ... 116
A Sample Program for Manipulating Objects ... 117
Looking Up Method and Property Names for NS Classes ... 118
Summary ... 121
■
Chapter 9: Manipulating Strings ... 123
Declaring a String Variable ... 123
Getting the Length of a String ... 124
Comparing Two Strings ... 125
Checking for Prefixes and Suffixes ... 125
Converting to Uppercase and Lowercase ... 126
Converting Strings to Numbers ... 127
Searching for a Substring ... 129
The location Field ... 129
The length Field ... 129
Searching and Replacing ... 130
Replacing Part of a String at a Specific Location ... 130
Searching for and Replacing Part of a String ... 132
Deleting Part of a String ... 133
Extracting a Substring ... 134
Extracting a Substring with a Location and Length ... 134
Extracting a Substring to the End of a String ... 135
Appending a Substring ... 136
Inserting a String ... 137
Summary ... 138
■
Chapter 10: Arrays ... 139
Creating an Array ... 140
Finding the Right Method to Use ... 141
Storing Objects in an Array ... 143
Additional Methods for Filling an Array ... 145
Counting the Items Stored in an Array ... 145
Accessing an Item in an Array ... 146
Accessing All Items in an Array ... 147
viii
Adding Items to an Array ... 149
Inserting Items into an Array ... 151
Deleting Items from an Array ... 152
Deleting the Last Item in an Array ... 152
Deleting an Item from a Specific Index Position ... 152
Deleting Every Item from an Array ... 153
Deleting All Instances of an Item from an Array ... 153
Summary ... 155
■
Chapter 11: Dictionaries and Sets ... 157
Dictionary Basics ... 157
Creating and Putting Data in a Dictionary ... 158
Counting the Items Stored in a Dictionary ... 159
Retrieving an Item from a Dictionary ... 160
Deleting Data from a Dictionary ... 161
Copying a Dictionary ... 162
Copying Dictionary Data Into an Array ... 163
Sorting Keys ... 164
Access All Items in a Dictionary ... 165
Using Sets ... 166
Creating and Putting Data in a Set ... 166
Counting the Number of Items in a Set ... 167
Checking Whether Data Is in a Set ... 167
Adding and Removing Data in a Set ... 168
Accessing All Items in a Set ... 169
Getting the Intersection of Two Sets ... 170
Identifying a Subset of a Set ... 170
Summary ... 172
■
Chapter 12: Creating Classes and Objects ... 173
Creating a Class ... 174
Understanding the Code in a Class ... 176
Deleting Class Files ... 177
A Program Example of a Class ... 178
Creating Methods ... 180
Passing Parameters ... 183
Returning Values from a Method ... 188
Passing by Reference ... 192
Creating Class Properties ... 195
Defining Properties ... 196
Accessing and Getting Values in Properties ... 197
Summary ... 200
■
Chapter 13: Inheritance, Method Overriding, and Events ... 203
Object Inheritance ... 203
Method Overriding ... 207
Responding to Events ... 209
Understanding the Application Delegate ... 210
Summary ... 214
ix
■
Chapter 14: Creating a User Interface ... 215
Getting to Know Interface Builder ... 215
Creating a New User Interface .xib File ... 216
Understanding the Parts of a .XIB File ... 218
Placeholder Objects ... 219
Interface Objects ... 219
Toggling the View of Placeholder and Interface Objects ... 220
Designing a User Interface ... 221
Customizing User Interface Objects ... 226
Moving and Resizing User Interface Objects ... 226
Autosizing and Anchoring User Interface Objects ... 227
Summary ... 229
■
Chapter 15: Choosing Commands with Buttons ... 231
Creating a Button ... 232
Creating a Button Title ... 235
Adding a Graphic Image ... 237
Customizing the Visual Behavior of a Button ... 239
Making Buttons Easier to Use ... 240
Creating Tooltips ... 240
Adding Sound ... 241
Choosing a Button with a Keystroke Combination ... 241
Connecting a Button to an IBAction ... 242
Alternate Dragging Option ... 245
Breaking a Link to an IBAction Method ... 246
Summary ... 248
■
Chapter 16: Making Choices with Radio Buttons and Check Boxes ... 249
Radio Buttons ... 250
Creating and Adding Radio Buttons ... 250
Creating a Radio Button Title ... 253
Defining a Radio Button’s State ... 253
Determining Which Radio Button a User Selected ... 253
Check Boxes ... 257
Creating Check Boxes ... 257
Defining a Check Box’s Title and State ... 259
Summary ... 262
■
Chapter 17: Making Choices with Pop-Up Buttons ... 263
Pop-Up Button Basics ... 263
Creating a Pop-Up Button List in Interface Builder ... 266
Adding (and Deleting) Items on a Pop-Up Button List ... 267
Renaming an Item in a Pop-Up Button List ... 270
Modifying a Pop-Up Button’s List with Code ... 270
Determining What a User Selected ... 274
Summary ... 277
■
Chapter 18: Inputting and Outputting Data with Labels,
Text Fields, and Combo Boxes ... 279
Using Labels ... 279
x
Adding a Label to Your User Interface ... 280
Editing Text on a Label ... 281
Using Text Fields ... 287
Adding a Text Field to Your User Interface ... 287
Editing Text in a Text Field ... 289
Retrieving Data from a Text Field ... 289
Using Combo Boxes ... 290
Adding a Combo Box to Your User Interface ... 290
Creating a List for a Combo Box ... 292
Retrieving a Value from a Combo Box ... 292
Wrapping Labels and Text Fields ... 295
Summary ... 296
■
Chapter 19: Inputting Data with Sliders, Date Pickers, and Steppers ... 299
Using Sliders ... 300
Defining Values ... 301
Displaying Tick Marks ... 302
Retrieving and Displaying a Slider’s Value ... 303
Using a Date Picker ... 305
Retrieving a Date from a Date Picker ... 308
Using Steppers ... 310
Summary ... 314
■
Chapter 20: Using Built-In Dialog Boxes ... 315
Using Alert Dialog Boxes ... 315
Displaying Text on a Dialog Box ... 317
Displaying a Suppression Check Box ... 317
Displaying Buttons on a Dialog Box ... 318
Creating an Open Panel ... 321
Limiting File Types ... 325
Allowing Multiple File Selections ... 325
Creating a Save Panel ... 327
Limiting File Types ... 329
Summary ... 329
■
Chapter 21: Creating Pull-Down Menus ... 331
Editing Pull-Down Menus ... 331
Editing a Menu or Menu Item ... 332
Moving a Menu or Menu Item ... 333
Deleting Menus and Menu Items ... 335
Creating New Menus and Menu Items ... 335
Linking Menu Commands ... 339
Assigning Keystrokes to a Menu Item ... 341
Summary ... 342
■
Chapter 22: Designing Your Own Programs ... 343
Identifying the Right Problem ... 344
What Programs Do Well ... 344
Designing the Program Structure ... 345
The Model ... 346
xi
The View ... 346
Be Conventional ... 348
Be Imitative ... 349
Be Unusual ... 350
Thinking in Objects ... 351
Picking a Data Structure ... 352
Creating an Algorithm ... 353
Defining an Algorithm ... 354
Writing Pseudocode ... 355
Writing Actual Code ... 355
Prototyping Your Program ... 357
Writing and Testing Your Program ... 358
Summary ... 359
■
Chapter 23: Working with Xcode ... 361
Creating New Folders ... 361
Fast Navigation Shortcuts ... 362
Using the File History Pop-Up Button ... 363
Using the Properties and Methods Pop-Up Button ... 364
Using the Classes Menu ... 365
Using the Include Menu ... 365
Switching Between the .h File and .m File ... 366
Making Code Easier to Read ... 366
Folding (or Unfolding) All Methods and Functions ... 367
Folding (or Unfolding) a Single Block of Code ... 367
Folding (or Unfolding) a Block of Comments ... 367
Unfolding Everything ... 368
Splitting the Xcode Window ... 368
Summary ... 369
■
Chapter 24: Debugging Your Program ... 371
Debugging a Program ... 371
Syntax Errors ... 372
Logic Errors ... 374
Run-Time Errors ... 375
Viewing Problems When Debugging ... 375
Simple Debugging Tips ... 376
Comment Out Your Code ... 376
Check the Value of Variables with NSLog ... 377
Using Breakpoints When Debugging ... 377
Placing (and Removing) a Breakpoint ... 377
Using the Debugger ... 378
Stepping Through Code ... 379
Summary ... 382
xii
About the Author
Wallace Wang is a former Windows enthusiast who took one look at Vista and realized that the future of computing belonged to the Macintosh. He’s written more than 40 computer books including Microsoft Office for Dummies, Beginning Programming for Dummies, Steal This Computer Book, My New Mac, and My New iPad. In addition to programming the Macintosh and iPhone/iPad, he also performs stand-up comedy, having appeared on A&E’s Evening at the Improv as well as having performed in Las Vegas at the Riviera Comedy Club at the Riviera Hotel & Casino.
When he’s not writing computer books or performing stand-up comedy, he also enjoys blogging about screenwriting at his site The 15 Minute Movie Method
xiii
About the Technical
Reviewer
xiv
Acknowledgments
This book would never have been written without the help of all the wonderful people at Apress who worked to make sure this book could be the best beginner’s tutorial for novice Macintosh programmers. A big round of thanks goes to Michelle Lowman, Jim Markham, Kim Wimpsett, Bill McManus, Jennifer L. Blackwell, and James Bucanek for keeping this project on track and making it fun at the same time.
Another big round of thanks goes to Bill Gladstone and Margot Hutchison at Waterside Productions for always looking out for new opportunities in the book publishing and computer industry.
Thanks also goes to all the stand-up comedians I’ve met, who have made those horrible crowds at comedy clubs more bearable: Darrell Joyce (http://darrelljoyce.com), Leo “the Man, the Myth, the Legend” Fontaine, Chris Clobber, Bob Zany (www.bobzany.com), Russ Rivas
(http://russrivas.com), Doug James, Don Learned, Dante, and Dobie “The Uranus King” Maxwell (www.dobiemaxwell.com). Another round of thanks goes to Steve Schirripa (who appeared in HBO’s hit show The Sopranos) for giving me my break in performing at the Riviera Hotel and Casino in Las Vegas, one of the few old-time casinos left that hasn’t been imploded (yet) to make room for another luxury hotel and casino designed to take money away from people unable to calculate the odds so heavily stacked against them.
xv
Introduction
If you’re an experienced programmer, a beginner just learning to program, or a complete novice who knows nothing about programming at all, this book is for you. No matter what your skill level may be, you can learn how to write programs for the Macintosh starting today.
What makes programming for the Macintosh so appealing is that the programming tools are free (courtesy of Apple), and by learning the basics of programming the Macintosh, you can easily apply your skills and experience to programming the iPhone, iPod touch, and iPad as well. Although this book focuses on programming the Macintosh, what you learn here can build a solid foundation to help you take the next step toward writing your own iPhone/iPod touch/iPad apps in the future.
The introduction of a new computer platform has always ushered in new (and lucrative) opportunities for programmers. In the early 1980s, the hottest platform was the Apple II
computer. If you wanted to make money writing programs, you wrote programs to sell to Apple II computer owners, such as Dan Bricklin did, an MBA graduate student at the time, when he wrote the first spreadsheet program, VisiCalc.
Then the next big computing platform occurred in the mid-1980s with the IBM PC and MS-DOS. People made fortunes off the IBM PC including Bill Gates and Microsoft, which went from a small, startup company to the most dominant computer company in the world. The IBM PC made millionaires out of hundreds of people including Scott Cook, a former marketing director at Proctor & Gamble, who developed the popular money manager program, Quicken.
Microsoft helped usher in the next computer platform when it shifted from MS-DOS to Windows and put a friendly graphical user interface on IBM PCs. Once again, programming Windows became the number-one way that programmers and nonprogrammers alike made fortunes by writing and selling their own Windows programs. Microsoft took advantage of the shift to Windows by releasing several Windows-only programs that have become fixtures of the business world such as Outlook, Access, Word, PowerPoint, and Excel.
Now with the growing market for Apple products, thousands of people, just like you, are eager to start writing programs to take advantage of the Macintosh’s rising market share along with the dominant position of the iPhone and the iPad in the smartphone and tablet categories.
Besides experienced developers, amateurs, hobbyists, and professionals in other fields are also interested in writing their own games, utilities, and business software specific to their particular niche.
Many programmers have gone from knowing nothing about programming to earning thousands of dollars a day by creating useful and frivolous iPhone/iPad apps or Macintosh programs. As the Macintosh, iPhone, and iPad continue gaining market share and adding new features, more people will use one or more of these products, increasing the potential market for you.
All this means that it’s a perfect time for you to start learning how to program your
xvi
Code Conventions Used in This Book
Most of this book prints text in the font you're reading right now. However, you'll run across text formatted in different ways. To make it easy to tell the difference between explanatory text and actual programming instructions, you may see a different font like this:
NSString *newString;
This type of text highlights code that you can examine or type in. This font also highlights messages you may see on your screen.
Throughout this book, you'll be typing in sample programs. Sometimes you'll only need to modify part of an existing sample program, so to emphasize the new code you need to type in, you may see bold text like this:
NSString *newString;
newString = [largeString substringWithRange: NSMakeRange(5, 4)];
The bold text emphasizes the new code you need to add while the non-bold text represents the existing code you can leave alone. By seeing the existing code, you can easily see where you need to add any new code.
What to Expect from This Book
There are plenty of programming books on the market, but what makes this book different is that it assumes you’re a complete novice with a great idea for a program but don’t know the first step for getting started. For that reason, this book will minimize all the technical jargon about
Objective-C, Xcode 3.2, and Cocoa frameworks and instead focus on helping you achieve specific tasks such as displaying a command button or accepting text from the user.
Of course, you will eventually need to know what Objective-C, Xcode, and the Cocoa frameworks can do, but you won’t get buried in a lot of technical jargon. Since this book starts you at the very beginning, it also won’t contain detailed technical information needed to create super-sophisticated programs that involve graphics or sound. If you just want to get started and learn the basics of programming using Apple’s programming tools, this book is for you. If you’re already an experienced Windows programmer and want to get started programming the Macintosh, this book can be especially helpful in teaching you the basics of using Apple’s programming tools in a hurry.
If you’ve never programmed before in your life or if you’re already familiar with
programming but not with Macintosh programming, then this book is for you. Even if you’re experienced with Macintosh programming, you may still find this book handy as a reference to help you achieve certain results without having to wade through several books to find an answer.
To help you learn the different principles behind Macintosh programming, this book also provides plenty of short example programs that you can run and study. Because each sample program is so short, you’ll be able to focus just on learning a new feature of programming while reducing the possibility of typos and other errors. As a result, you’re more likely to get each short sample program working right away, which can increase your confidence and enjoyment as you learn how to program.
1
Chapter
Understanding
Programming
Programming is nothing more than writing instructions for a computer to follow. If you’ve ever written down the steps for a recipe or scribbled driving directions on the back of an envelope, you’ve already gone through the basic steps of writing a program. The key is simply knowing what you want to accomplish and then making sure you write the correct instructions that will achieve that goal.
Although programming is theoretically simple, it’s the details that can trip you up. First, you need to know exactly what you want. If you wanted a recipe for cooking chicken chow mein, following a recipe for cooking baked salmon won’t do you any good. Second, you need to write down every instruction necessary to get you from your starting point to your desired result. If you skip a step or write steps out of order, you won’t get the same result. Try driving to a restaurant where your list of driving instructions omits telling you when to turn on a specific road. It doesn’t matter if 99 percent of the instructions are right; if just one instruction is wrong, you won’t get you to your desired goal.
The simpler your goal, the easier it will be to achieve. Writing a program that displays a calculator on the screen is far simpler than writing a program to monitor the safety systems of a nuclear power plant. The more complex your program, the more
instructions you’ll need to write, and the more instructions you need to write, the greater the chance you’ll forget an instruction, write an instruction incorrectly, or write
instructions in the wrong order.
Programming is nothing more than a way to control a computer to solve a problem, whether that computer is a laptop, mobile phone, or tablet device. Before you can start writing your own programs, you need to understand the basic principles of programming in the first place.
Programming Principles
To write a program, you have to write instructions that the computer can follow. No matter what a program does or how big it may be, every program in the world consists of nothing more than step-by-step instructions for the computer to follow, one at a time. The simplest program can consist of a single line:
PRINT "Hello, world!"
NOTE: The sample code in this part of the chapter uses the BASIC programming language to make programming concepts easier to understand. What you'll be learning later in this book is a different programming language called Objective-C, which is a bit harder to understand than BASIC.
Obviously, a program that consists of a single line won’t be able to do much, so most programs consist of multiples lines of instructions (or code):
PRINT "Hello, world!"
PRINT "Now the program is done."
This two-line program starts with the first line, follows the instructions on the second line, and then stops. Of course, you can keep adding more instructions to a program until you have a million instructions that the computer can follow sequentially, one at a time.
Listing instructions sequentially is the basis for programming, but it’s not always the best way to organize instructions. For example, if you wanted to print the same message five times, you could use the following:
PRINT "Hello, world!" PRINT "Hello, world!" PRINT "Hello, world!" PRINT "Hello, world!" PRINT "Hello, world!"
Writing the same five instructions is tedious and redundant, but it works. What happens if you wanted to print this same message 1,000 times? Then you’d have to write the same instruction 1,000 times.
Writing the same instruction multiple times is clumsy. To make programming easier, you really want to write the least number of instructions that get the most work done. One way to avoid writing the same instruction multiple times is to organize your instructions using something called a loop.
The idea behind a loop is to repeat one or more instructions multiple times, but only by writing those instructions down once. A typical loop might look like this:
FOR I = 1 TO 5
The first instruction tells the computer to repeat the loop five times. The second instruction tells the computer to print the message “Hello, world!” on the screen. The third instruction just defines the end of the loop.
Now if you wanted to make the computer print a message 1,000 times, you don’t need to write the same instruction 1,000 times. Instead, you just need to modify how many times the loop repeats:
FOR I = 1 TO 1000
PRINT "Hello, world!" END FOR
Although loops are slightly more confusing to read and understand than a sequential series of instructions, loops make it easier to repeat instructions without writing the same instructions multiple times.
Most programs don’t exclusively list instructions sequentially or in loops, but they use a combination of both:
PRINT "Getting ready to print." PRINT "Program is now starting." FOR I = 1 TO 1000
PRINT "Hello, world!" END FOR
In this example, the computer follows the first two lines sequentially and then follows the last three instructions repetitively in a loop. Generally, listing instructions sequentially is fine when you need the computer to follow those instructions only once. When you need the computer to run instructions multiple times, that’s when you need to use a loop. What makes computers powerful isn’t just the ability to follow instructions sequentially or in a loop, but in making decisions. Decisions mean that the computer needs to evaluate some condition and then, based on that condition, decide what to do next. For example, you might write a program that locks someone out of a computer until that person types the correct password. If the person types the correct password, then the program needs to give that person access. However, if the person types an incorrect password, then the program needs to block access to the computer. An example of this type of decision making might look like this:
ASK "Enter the password:", Password IF Password = "OPEN" THEN
Grant access to the computer ELSE
Block access to the computer
In this example, the computer asks for a password, and when the user types a
password, the computer checks to see whether it matches the word OPEN. If the user typed OPEN, then the computer grants that person access to the computer. If the user did not type OPEN, then the computer blocks access.
every time. However, if you include decision-making instructions, also known as
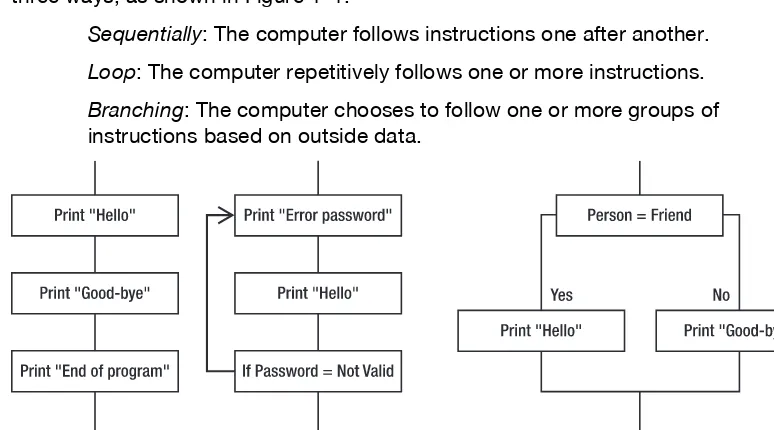
branching instructions, then the computer can respond according to what the user does. Consider a video game. No video game could be written entirely with instructions organized sequentially because then the game would play exactly the same way every time. Instead, a video game needs to adapt to the player’s actions at all times. If the player moves an object to the left, the video game needs to respond differently than if the player moves an object to the right or gets killed. Using branching instructions gives computers the ability to react differently so the program never runs exactly the same. To write a computer program, you need to organize instructions in one of the following three ways, as shown in Figure 1–1:
Sequentially: The computer follows instructions one after another. Loop: The computer repetitively follows one or more instructions. Branching: The computer chooses to follow one or more groups of instructions based on outside data.
Figure 1–1. The three basic building blocks of programming
Although simple programs may organize instructions only sequentially, every large program organizes instructions sequentially, in loops, and in branches. What makes programming more of an art and less of a science is that there is no single best way to write a program. In fact, it’s perfectly possible to write two different programs that behave the same.
Because there is no single “right” way to write a program, there are only guidelines to help you write programs easily. Ultimately what matters is only that you write a program that works.
Second, programmers try to write programs that perform tasks efficiently, making the program run as fast as possible. This often means condensing multiple instructions as much as possible, using tricks, or exploiting little known features that are difficult to understand and confusing even to most other programmers.
In the beginning, strive toward making your programs as clear, logical, and
understandable as possible, even if you have to write more instructions or type longer instructions to do it. Later, as you gain more experience in programming, you can work on creating the smallest, fastest, most efficient programs possible, but remember that your ultimate goal is to write programs that just work.
Dividing Programs into Parts
Since small programs have fewer instructions, they are much easier to read, understand, and modify. Unfortunately, small programs can solve only small problems. To solve complicated problems, you need to write bigger programs with more instructions. The more instructions you type, the greater the chance you’ll make a mistake (called a bug). Even worse is that the larger a program gets, the harder it can be to understand how it works in order to modify it later.
To avoid writing a single, massive program, programmers simply divide a large program into smaller parts called subprograms. The idea is that each subprogram solves a single problem. Connect all of these subprograms together, and you can create a single large program, as shown in Figure 1–2. This is like building a house out of bricks rather than trying to carve an entire house out of one massive rock.
Figure 1–2. Dividing a large program into multiple subprograms
Dividing a large program into smaller parts provides several benefits. First, writing smaller subprograms is fast and easy, and small subprograms make it easy to read, understand, and modify the instructions.
Second, subprograms act like building blocks that work together, so multiple programmers can work on different subprograms and then combine their separate subprograms to create a large program.
means wading through all the instructions stored in a large program and trying to find which instructions you need to change.
A fourth benefit of subprograms is that if you write a useful subprogram, you can plug that subprogram into other programs, thereby reducing the need to write everything from scratch.
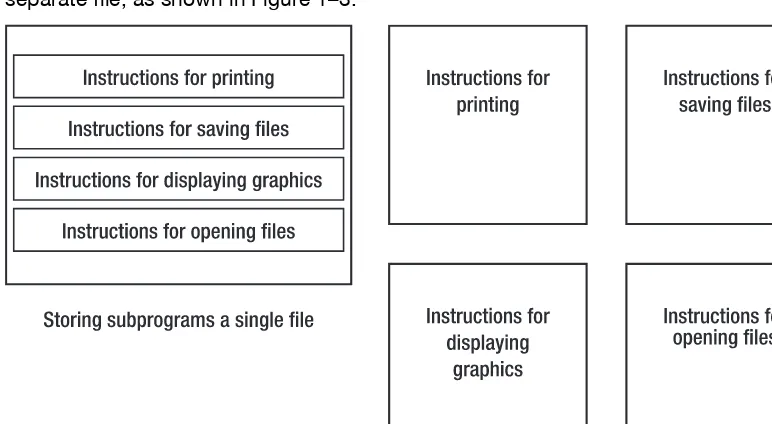
When you divide a large program into multiple subprograms, you have a choice. You can store all your programs in a single file, or you can store each subprogram in a separate file, as shown in Figure 1–3.
Figure 1–3. You can store subprograms in one file or in multiple files.
Storing all your subprograms in a single file makes it easy to find and modify any part of your program. However, the larger your program, the more instructions you’ll need to write, which can make searching through a single large file as clumsy as flipping through the pages of a dictionary.
Storing all your subprograms in separate files means you need to keep track of which files contain which subprogram. However, the benefit is that modifying a subprogram is much easier because once you open the correct file, you see the instructions for only a single subprogram, not for a dozen or more other subprograms.
Event-Driven Programming
In the early days of computers, most programs forced people to use a program by typing one command at a time. For example, if you had a program that calculated the trajectory of a rocket, the program might first ask you the destination followed by the rocket’s size, weight, and position from the target. If you wanted to type in the rocket’s weight before typing in the rocket’s height, the program wouldn’t let you because such programs tightly controlled how the computer behaved at any given time.
All of this changed when computers started displaying windows and pull-down menus so users could choose what to do at any given time. Suddenly every program had to wait for the user to do something such as selecting one of many available menu commands. Since the user could do multiple actions such as typing or clicking the mouse, programs had to constantly wait for the user to do something before reacting. Every time the user did something, that was considered an event. If the user clicked the left mouse button, that was a completely different event than if the user clicked the right mouse button. Instead of dictating what the user could do at any given time, programs now had to respond to different events that the user did. Such programs came to be known as event-driven programming.
Instead of following instructions from start to finish, event-driven programs divided a large program into multiple subprograms where each subprogram responded to a different event. If the user clicked the left mouse, the subprogram that handled left mouse clicks would run its instructions. If the user clicked the right mouse, the subprogram that handled right mouse clicks would run its instructions.
With event-driven programming, a large program might be divided into multiple subprograms where some of those subprograms contained instructions that ran only when a certain event occurred, as shown in Figure 1–4.
Object-Oriented Programming
Dividing a large program into multiple subprograms made it easy to create and modify a program. However, trying to understand how such a large program worked often proved confusing since there was no simple way to determine which subprograms worked together or what overall task they were meant to solve.
To solve this problem, programmers grouped related subprograms and data in a single location. By using this grouped collection of subprograms and data, programmers could create objects, which represent a single element of the problem you’re trying to solve. Instead of focusing on different tasks, object-oriented programming often focuses on mimicking objects in the real world. An object-oriented video game program might divide a program into objects such as monsters, the player character, and other moving items such as falling boulders.
Each object would contain subprograms for manipulating that object along with data that defines the characteristics of that object, such as its location on the screen or the color of the item to display on the screen.
One idea behind object-oriented programming is to divide a large program into logical objects that mimic the physical problem you’re trying to solve. So rather than write a bunch of subprograms that break a problem into individual tasks, object-oriented programming divides a problem into physical parts.
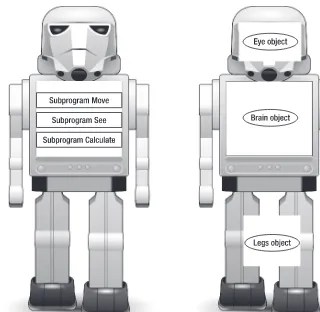
Suppose you need to write a program for controlling a robot. Dividing this problem into tasks, you might create one subprogram to move the robot, a second subprogram to tell the robot how to see nearby obstacles, and a third subprogram to calculate the best path to follow.
Dividing this same robot program into objects might create a Legs object (for moving the robot), an Eye object for seeing nearby obstacles, and a Brain object (for calculating the best path to avoid obstacles), as shown in Figure 1–5.
A second idea behind object-oriented programming is to make it easy to reuse and modify a large program. Suppose we replace our robot’s legs with treads. Now we’d have to modify the subprogram for moving the robot since treads behave differently than legs. Next, we’d have to modify the subprogram for calculating the best path around obstacles since treads force a robot to go around obstacles, while legs allow a robot to walk over small obstacles and go around larger obstacles.
Figure 1–5. How subprograms and objects might divide a program into parts
The Brain object wouldn’t need to change since it needs to tell the Treads object only where to move, not how to move. Since most programs are constantly modified to fix bugs or add new features, object-oriented programming allows you to create a large program out of separate building blocks (objects) and modify a program by modifying only a single object.
The key to object-oriented programming is to isolate parts of a program and promote reusability through three features known as encapsulation, inheritance, and
polymorphism.
Encapsulation
To avoid this problem, object-oriented programming encapsulates, or hides, data inside an object. Each object contains both the data it needs and the subprograms allowed to manipulate that data, as shown in Figure 1–6.
Figure 1–6. Objects group related subprograms and data together.
Encapsulation simply eliminates the risk that an unrelated part of a program can change data used by another subprogram.
Polymorphism
When you divide a large program into subprograms, each subprogram needs a unique name. Normally this won’t cause any problems, but sometimes you may need to create subprograms that perform similar tasks.
For example, suppose you’re creating a video game where the player controls a car and the computer controls a monster throwing rocks at the car. To make the car, monster, and rocks move on the screen, you might want to create a subprogram named Move.
Unfortunately, a car needs to move differently on the screen than a monster or a thrown rock. You could create three subprograms and name them MoveCar, MoveMonster, and MoveRock. However, a simpler solution is to just give all three subprograms the same name such as Move.
In traditional programming, you can never give the same name to two or more
subprograms since the computer would never know which subprogram you want to run. However, in object-oriented programming, you can use duplicate subprogram names because of polymorphism.
The reason why polymorphism works is because each Move subprogram gets stored in a separate object such as one object that represents the car, a second object that
Car.Move Monster.Move Rock.Move
By identifying both the object that you want to manipulate and the subprogram that you want to use, object-oriented programming can correctly identify which set of
instructions to run even though a subprogram has the identical name to another subprogram.
Essentially, polymorphism lets you create descriptive subprogram names and reuse that descriptive name as often as you like.
Inheritance
If you create a particularly useful subprogram, you might want to reuse that subprogram again. The simple answer is to make a copy of a subprogram and modify this copy. The problem with copying subprograms is that you now have two or more identical copies of the same subprogram stored in different locations. Such duplication not only wastes space but, more importantly, can cause problems if you need to modify the original subprogram.
Suppose you create a useful subprogram and then make five different copies to use in other parts of your program, with minor modifications made to each additional
subprogram copy. Now what happens if you find an error in your original subprogram? Fixing that one subprogram will be fairly straightforward, but now you have to fix that same error five more times in each of the five additional copies you made earlier. Inheritance eliminates this problem because instead of forcing a programmer to create duplicate, physical copies of a subprogram, inheritance creates virtual copies of a subprogram. The original instructions remain in one physical location, but multiple objects can now access those instructions whenever they need them.
Think of inheritance like the difference between text in a printed book and text on a web page. Only one person can read a printed book at a time. If multiple people want to read that same book, you’ll need to make physical copies.
However, text on a web page can be accessed by multiple people, even though there’s only one copy of that text stored on a single computer.
The main idea behind inheritance is to make it easy to reuse parts of your program without creating duplicate copies.
Understanding Programming Languages
Once you understand how programming has gradually evolved and how Mac programming requires understanding all of these different programming techniques, you’re almost ready to start programming. Next, you need to know that giving
There are thousands of different programming languages with names like FORTH, Ada, BASIC, C#, Prolog, and Modula-3. However, the programming language you’ll be learning in this book is called Objective-C.
Currently, one of the most popular programming language is C. Two huge advantages of C are its efficiency and its portability. Efficiency means that programs written in C are extremely small and run fast. Portability means that almost every computer in the world understands C. As a result,you can write a program in C and copy it to a different operating system, such as taking a C program for Windows and copying it to a
Macintosh. You'll need to rewrite the C code to create a user interface that's unique to each operating system, but a large portion of your program's C code can remain intact with little or no modifications at all.
Since C is an old programming language, it lacks object-oriented programming features, which makes C unsuitable for creating and maintaining large programs. One popular variation of C is called C++, which adds object-oriented programming features. Although C++ is popular, Objective-C also offers object-oriented features and is much simpler and thus easier to learn.
To write Mac programs, you can use any programming langauge, although the most popular ones are C, C++, and Objective-C. However, Apple has officially endorsed Objective-C as the main programming language for the Mac, so if you’re going to learn how to program the Mac, your best choice is to learn and use Objective-C.
NOTE: If you already know C or C++, you’ll find that Objective-C is similar enough that you can learn it quickly. If you don’t know any programming language at all, Objective-C may look a bit cryptic at first, but after you use it for a while, you’ll soon understand how it works.
The Building Blocks of Programming Languages
Every programming language consists of special commands that are part of the language. These commands tell the computer to do something:
In this example, PRINT represents a command that tells the computer to print something on the screen. By themselves, commands usually won’t do anything interesting, so you have to combine commands with additional data to create a single instruction or a statement. A statement simply tells the computer to do something useful:
PRINT "This is a message from your computer"
Learning a programming language means learning the right commands so you can tell the computer what to do, such as print a message on the screen or add two numbers together. To make programming as easy as possible, many programming languages use
However, many programming languages also use symbols that represent different features.
Sometimes a symbol represents a command to make the computer do something. Common symbols are mathematical symbols for addition (+), subtraction (-), multiplication (*), and division (/).
Other times symbols are meant to define the beginning or end of something: int age;
or
[super init]
Some programming languages rely almost exclusively on commands to make the instructions more readable:
BEGIN
Writeln ('This is a message'); END;
Other programming languages, such as Objective-C, tend to rely more on symbols to make writing a program faster, but with the drawback that the statements tend to look more cryptic:
{
printf ("This is a message"); }
Unlike human languages where you can misspell a word or forget to end a sentence with a period and people can still understand what you’re saying, programming languages are not so forgiving. With a programming language, every command must be spelled correctly, and every symbol must be used where needed. Misspell a single command, use the wrong symbol, or put the right symbol in the wrong place, and your entire program will fail to work.
Programming
Frameworks
Commands (and symbols) let you give a computer instructions, but no programming language can provide every possible command you might need to create all types of programs. To provide additional commands, programmers can create subprograms that perform a specific task.
Programmers can even create bigger subprograms out of commands and smaller subprograms. By creating subprograms, you can create your own commands needed to make the computer do exactly what you need.
One library might contain subprograms for displaying graphics. Another library might contain subprograms for saving data to a disk and retrieving it again. Still another library might contain subprograms for calculating mathematical formulas. By using commands to create subprograms, programmers can create an endless variety of additional building blocks for making any type of program.
To make programming the Mac, iPhone, and iPad easier, Apple has created libraries or frameworks of useful subprograms that you can use in your own programs.
There are two reasons for reusing an existing framework. First, reusing a framework keeps you from having to write your own instructions to accomplish a task that somebody else has already solved. Not only does a framework provide a ready-made solution, but a framework has also been tested by others, so you can just use the framework and be assured that it will work correctly.
A second reason to use an existing framework is for consistency. Apple provides frameworks for defining the appearance of a program on the screen, known as the user interface. This defines how a program should behave, from displaying windows on the screen to letting you resize or close a window by clicking the mouse.
It’s perfectly possible to write your own instructions for displaying windows on the screen, but chances are good that writing your own instructions would take time to create and test, and the end result would be windows that may not look or behave identically as other Mac programs.
However, by reusing an existing framework, you can create your own program quickly and ensure that your program behaves the same way that other programs behave. Although programming the Mac might sound complicated, Apple provides dozens of different frameworks that help you create programs quickly and easily. All you have to do is write the custom instructions that make your program solve a specific, unique problem.
Mac Programming Today
Figure 1–7. The three parts of a typical program
Here’s the hard way to write a Mac program. First, use the commands in Objective-C to create your user interface. After you spend time writing multiple instructions to create your user interface, you need to test it to make sure it works.
Second, use Objective-C commands to create the model for accepting data,
manipulating it somehow, and calculating a new result. Now spend more time testing these instructions to make sure they work.
Third, use Objective-C commands to create the controller to link the user interface to the model. Now spend more time making sure the controller works correctly with the user interface and the model.
In the old-fashioned way of programming, you had to write three separate chunks of instructions to create the user interface, controller, and model, and then you’d test each chunk separately to make sure they worked. Finally, you had to put all three chunks of instructions together and test everything again to make sure it all worked together. Such a process is obviously tedious, error-prone, and slow. Since you have to create everything from scratch using Objective-C commands, this can feel like trying to build a wall by pasting together individual granules of sand.
Here’s the faster way to write a Mac program, which is what you’ll be learning in this book. Instead of creating everything from scratch, you’ll just need to focus on writing instructions that calculate a useful result. By focusing on writing instructions to create the model portion of your program, you’re essentially simplifying the amount of programming work you need to do.
First, every time you create a new program, you’ll get to choose from a template. A template provides the basic skeleton of a user interface that can display windows and pull-down menus found in most programs.
Since the template already provides the Objective-C commands for creating a user interface, you can spend your time customizing this user interface. Ordinarily,
By eliminating the need to write a separate set of instructions for designing your user interface, you’ll only need to write instructions to make your program do something useful. Even better, you won’t have to waste time testing your user interface because there are no Objective-C instructions to examine since everything just works, so your program looks and behaves exactly like other Mac programs.
To create the controller and model portions of your program, you’ll need to write instructions in Objective-C. Rather than rely on commands alone, you can save time by using subprograms stored in frameworks provided by Apple. By using these
frameworks, you can use subprograms that have already been tested for accomplishing a variety of complicated tasks such as saving a file.
To respond to the actions of the user, you’ll need to organize your instructions into subprograms that run only when certain events occur, such as when the user clicks the mouse. To further help you organize your program, you can create objects using Objective-C’s object-oriented features.
The end result is that writing a Mac program eliminates as much of the tedious part of programming as possible, freeing you to focus only on the creative part that makes your program unique.
Although this may sound like a lot of information to master just to write a Mac program, don’t worry. From program templates to drag-and-drop user interface designs to frameworks, Apple streamlines the programming process so you can create a fully functioning program with a minimum of effort.
Summary
To learn how to write programs for the Mac, you need to learn three separate skills. First, you need to understand the basic principles of programming. That includes organizing instructions in sequences, loops, or branches.
Second, you need to learn a specific programming language. For the Mac, you’ll be learning Objective-C. Objective-C is designed more for program efficiency and less for human readability, which means that writing and reading Objective-C instructions can look cryptic at times.
Third, you need to know how to use Apple’s programming tools for writing Objective-C instructions and how to use Apple’s frameworks so you can focus solely on writing instructions that make your program work (which you’ll learn more about in Chapter 2). Once you learn how to program the Mac, you can easily use your skill to write programs for the iPhone, iPod touch, and iPad as well. Whether you want to write your own software to sell or you want to sell your programming skills to create custom software for others, you’ll find that programming is a skill anyone can learn.
17
Chapter
Understanding Apple’s
Programming Tools
To write a program, you need at least two tools: an editor and a compiler. An editor acts like a word processor and lets you write instructions using a programming language such as Objective-C. A compiler converts your instructions (called code) and compiles (or translates) them into a language that computers can understand, which is called machine code. When you buy a program, that program is stored in a file that contains nothing but machine code.
Every time you run a program on your computer, whether it’s a word processor or a web browser, you’re using a program that someone wrote in an editor using a programming language and converted into machine code using a compiler.
Understanding Editors
To create a program, you’ll need to write, save, and edit instructions (your code) using a programming language such as Objective-C. In the early days of programming, an editor (also called a text editor) looked and behaved like a word processor, but without the need for fancy formatting commands. After you edited and saved a program in an editor, you had to exit the editor and run a compiler to test whether your program worked. If your program didn’t work, you had to load your editor again, open the file that you saved your instructions in, make any changes, and save the file once more. Then you had to run the compiler once again.
This process of constantly loading and exiting from the editor and compiler wasted time. The more time you wasted switching back and forth between your editor and your compiler, the less time you had to work on your program.
To fix this problem, computer scientists created a special program called an integrated development environment (IDE). The idea behind an IDE is that you need to load a single programming tool only once. You can write, edit, and save your program in the IDE and
then compile it without having to exit the editor and load the compiler since everything is integrated in a single program.
Besides making programming faster and easier, IDEs had a second benefit. If you ran a compiler separately from the editor and your program had an error or bug in it, the compiler could identify the line in your program only where the error occurred. To fix this problem, you had to load your editor again, open your program, and move the cursor to the line where the error occurred so you could fix it. Once again, this process wasted time.
Since an IDE never forces you to quit and load a separate program, the moment the compiler discovers a bug in your program, it can highlight that error in the editor so you can fix it right away. An IDE simply combines the features of multiple tools into a single program.
To write programs for the Mac, you’ll be using two free tools provided by Apple called Xcode and Interface Builder. Xcode combines the features of an editor and a compiler (along with other tools) so you’ll be able to create and edit programs written in
Objective-C. Interface Builder lets you visually design your program’s user interface. By using both Xcode and Interface Builder, you’ll be able to design your user interface and connect it to your Objective-C code to make the whole thing work.
Understanding Xcode
To write Mac programs, you have to use Xcode, which you can download for free from the Apple Developer Center site (http://developer.apple.com). The first time you see Xcode, it might look intimidating because of all the menu commands, windows, and icons that appear everywhere. The idea of trying to master every feature of Xcode can be as intimidating as learning to fly for the first time by stepping in the cockpit of a 747 jumbo jet.
NOTE: Interface Builder is a program bundled with Xcode, so when you download Xcode from Apple’s developer’s site, you get both Interface Builder and Xcode in the same file.
Don’t worry. Although Xcode provides hundreds of options and features, you don’t have to learn them all right away, or even at all. To write a Mac program, you only need to learn how to use a handful of features. Later as you get more experienced with Mac programming, you can take advantage of Xcode’s other features, but only when you’re ready.
The three basic uses for Xcode are as follows: Creating and editing Objective-C code
Before you can start writing Mac programs, you need to understand how to use Xcode. The first task is to learn and understand the Xcode user interface. The second task is to learn how and when to use different features of Xcode when writing your own program.
Deciphering the Xcode User Interface
Unlike other types of programs you may have used before, such as a word processor or web browser, Xcode lets you customize the user interface to display only the information you want at any given time. This makes Xcode flexible enough for everyone but also means that one copy of Xcode can look wildly different than another copy of Xcode. The part of Xcode that always remains the same is its pull-down menus, which consists of the following:
File: Commands for creating, opening, saving, and printing your programs
Edit: Commands for copying, deleting, and moving items when writing code in Objective-C or when designing your program’s user interface
View: Commands for hiding or displaying icons or windows that display additional information
Product: Commands for compiling and testing your program Build: Commands for compiling your programs
Run: Commands for testing and debugging your program
Window: Commands for manipulating Xcode’s windows that may display additional commands
Help: Commands for getting help using Xcode or writing Objective-C code
In addition to commands stored on pull-down menus, Xcode also offers numerous icons that display different types of information. Since these icons are small and not always intuitive as to what they do, most icons duplicate commands already available through the pull-down menus. The idea is that once you get used to using different commands regularly, you may find it faster to click an icon that performs the same function, rather than constantly going through the pull-down menus over and over again.
Figure 2–1. The Xcode user interface consists of pull-down menus, icons, and panes.
Running Xcode
When you install most programs on your Mac, such as Microsoft Word or iTunes, that program appears in the Applications folder. However, when you install Xcode on your computer, it usually appears in a special Developer folder.
To locate Xcode on your Mac, follow these steps:
1. Open the Finder window.
2. Click your hard disk icon (usually called Macintosh HD) located under the DEVICES category.
3. Choose View ➤ as List. A list of folders appears in the right pane of the Finder window.
5. Click the gray arrow that appears to the left of the Applications folder. The Xcode icon appears as one of many files stored in the Applications folder, as shown in Figure 2–2.
Figure 2–2. Finding Xcode on a Mac
NOTE: To make finding and running Xcode easier in the future, you may want to drag the Xcode icon onto the Dock. This will give you one-click access to starting Xcode whenever you need it.
Creating a New Project in Xcode
In the early days of programming, most programs were fairly small so they could easily fit into a single file. As programs grew larger and more complicated, programmers started to store different parts of a program in separate files. Each file represented a different part of a program, and all the files taken as a whole were called a project. A project file simply keeps track of all the files needed to create a single program.