The Definitive Guide to
CentOS
Peter Membrey, Tim Verhoeven,
and
Ralph Angenendt
Foreword by Dag Wieers, CentOS Project
The Definitive Guide
to CentOS
All rights reserved. No part of this work may be reproduced or transmitted in any form or by any means, electronic or mechanical, including photocopying, recording, or by any information storage or retrieval system, without the prior written permission of the copyright owner and the publisher.
ISBN-13 (pbk): 978-1-4302-1930-9 ISBN-13 (electronic): 978-1-4302-1931-6
Printed and bound in the United States of America 9 8 7 6 5 4 3 2 1
Trademarked names may appear in this book. Rather than use a trademark symbol with every occurrence of a trademarked name, we use the names only in an editorial fashion and to the benefit of the trademark owner, with no intention of infringement of the trademark.
Lead Editor: Michelle Lowman
Technical Reviewers: Bert de Bruijn, Karanbir Singh
Editorial Board: Clay Andres, Steve Anglin, Mark Beckner, Ewan Buckingham, Tony Campbell, Gary Cornell, Jonathan Gennick, Michelle Lowman, Matthew Moodie, Jeffrey Pepper, Frank Pohlmann, Ben Renow-Clarke, Dominic Shakeshaft, Matt Wade, Tom Welsh Project Manager: Beth Christmas
Copy Editor: Kim Wimpsett
Associate Production Director: Kari Brooks-Copony Production Editor: Candace English
Compositor: Lynn L’Heureux Proofreader: April Eddy
Indexer: BIM Indexing & Proofreading Services Artist: April Milne
Cover Designer: Kurt Krames
Manufacturing Director: Tom Debolski
Distributed to the book trade worldwide by Springer-Verlag New York, Inc., 233 Spring Street, 6th Floor, New York, NY 10013. Phone 1-800-SPRINGER, fax 201-348-4505, e-mail [email protected], or visit http://www.springeronline.com.
For information on translations, please contact Apress directly at 2855 Telegraph Avenue, Suite 600, Berkeley, CA 94705. Phone 510-549-5930, fax 510-549-5939, e-mail [email protected], or visit http:// www.apress.com.
Apress and friends of ED books may be purchased in bulk for academic, corporate, or promotional use. eBook versions and licenses are also available for most titles. For more information, reference our Special Bulk Sales–eBook Licensing web page at http://www.apress.com/info/bulksales.
The information in this book is distributed on an “as is” basis, without warranty. Although every precaution has been taken in the preparation of this work, neither the author(s) nor Apress shall have any liability to any person or entity with respect to any loss or damage caused or alleged to be caused directly or indirectly by the information contained in this work.
v
Contents at a Glance
Foreword . . . .
xviAbout the Authors
. . . xviiiAbout the Technical Reviewer
. . . xixAcknowledgments
. . . xxIntroduction
. . . xxiPart 1
nnn
Getting Started with CentOS
CHAPTER 1
Introducing CentOS
. . . 3CHAPTER 2
Installing CentOS
. . . 13CHAPTER 3
Getting Started with CentOS
. . . 45CHAPTER 4
Using Yum
. . . 61Part 2
nnn
Going into Production
CHAPTER 5
Using Apache
. . . 79CHAPTER 6
Setting Up Mail
. . . 113CHAPTER 7
Understanding DNS
. . . 155CHAPTER 8
Setting Up DHCP
. . . 181CHAPTER 9
Sharing Files with Samba
. . . 199CHAPTER 10
Setting Up Virtual Private Networks
. . . 219Part 3
nnn
Enterprise Features
CHAPTER 11
Using Core Builds
. . . 253CHAPTER 12
Using High Availability
. . . 273CHAPTER 13
Monitoring Your Network Using Nagios
. . . 299vii
Contents
Foreword . . . .
xviAbout the Authors
. . . xviiiAbout the Technical Reviewer
. . . xixAcknowledgments
. . . xxIntroduction
. . . xxiPart 1
nnn
Getting Started with CentOS
CHAPTER 1
Introducing CentOS
. . . 3What Is Enterprise Linux?
. . . 4Extended Support
. . . 4Low-Risk Security Updates
. . . 5ABI/API Stability
. . . 6Regular Updates and Bug Fixes
. . . 6Certification
. . . 7Summary of Enterprise Linux’s Benefits
. . . 7What Is CentOS?
. . . 7How to Read This Book
. . . 11CHAPTER 2
Installing CentOS
. . . 13Hardware Requirements
. . . 13Getting CentOS
. . . 14Checking the Checksums
. . . 17Burning the ISOs
. . . 17Setting Other Installation Options
. . . 37Securely Erasing Your Disks
. . . 37Creating a Custom Partition Layout
. . . 39Using Software RAID
. . . 40Setting IP Manually
. . . 41Summary
. . . 42CHAPTER 3
Getting Started with CentOS
. . . 45CentOS Filesystem Layout
. . . 45Relative and Absolute Paths
. . . 46Filesystem Layout
. . . 46/
. . . 46/root
. . . 47/etc
. . . 47/proc
. . . 47/var
. . . 47/boot
. . . 48/bin and /sbin
. . . 48/dev
. . . 48/home
. . . 49/lib
. . . 49/lost+found
. . . 49/media
. . . 49/mnt
. . . 49/usr
. . . 50/opt
. . . 50/srv
. . . 50/sys
. . . 50/tmp
. . . 50Getting Your Hands on a Command Prompt
. . . 51Getting an SSH Client
. . . 51You’re Logged In; Now What?
. . . 52First, the Prompt
. . . 52Important Commands
. . . 53pwd
. . . 53ls
. . . 54mkdir
. . . 56cd
. . . 57rmdir
. . . 58rm
. . . 58touch
. . . 59nano
. . . 59cat
. . . 60Summary
. . . 60CHAPTER 4
Using Yum
. . . 61What Are RPMs?
. . . 61What Are Yum Repositories?
. . . 62CentOS Repositories
. . . 62Official CentOS Repositories
. . . 63Third-Party Repositories
. . . 64Getting Started with Yum
. . . 64Updating Your Server
. . . 65Installing a Package
. . . 67Installing a Group of Packages
. . . 68Searching for Packages
. . . 70Adding a Custom Repository
. . . 73Setting It Up with RPM
. . . 73How to Do It Without an RPM
. . . 73Yumex
. . . 75Part 2
nnn
Going into Production
CHAPTER 5
Using Apache
. . . 79How Does the Server Work?
. . . 80A Brief Introduction to SSL
. . . 81Why Run Your Own Server?
. . . 82What It Involves
. . . 82When to Let Someone Else Do It
. . . 83What Is a Virtual Private Server (VPS)?
. . . 83Picking a Web Server
. . . 84Installing Apache
. . . 85Configuring the Firewall
. . . 85Making Sure Apache Starts Each Time the Server Reboots
. . . 88Starting Up and Testing Apache
. . . 89Configuring Apache
. . . 91Where Is Everything?
. . . 92Getting Started
. . . 92Configuring ServerAdmin
. . . 93Configuring ServerName
. . . 93Saving the Configuration File
. . . 93Testing Your New Configuration File
. . . 94Restarting Apache
. . . 94.htaccess
. . . 95Enabling .htaccess
. . . 95How to Password Protect a Directory
. . . 95Configuring Password Protection
. . . 96Creating User Accounts
. . . 97Improving Performance
. . . 97Compression
. . . 98Enabling Compression in Apache
. . . 98Why You Don’t Compress Everything
. . . 98Improving Server Performance
. . . 99Things to Watch Out For
. . . 100Setting Up Virtual Hosts
. . . 100Getting Started with Virtual Hosts
. . . 101Creating Your First Virtual Host
. . . 103Using vhosts.d
. . . 103Using SSL
. . . 104Installing mod_ssl
. . . 105Getting Your Shiny New Certificate
. . . 105Signing Your Own Certificate
. . . 108What to Do with an Intermediary Certificate
. . . 109Putting Your New Certificate to Work
. . . 109Removing the Password Protection from the Key
. . . 110Summary
. . . 111CHAPTER 6
Setting Up Mail
. . . 113How Do Mail Servers Work?
. . . 114Why Run Your Own Mail Server?
. . . 116Caveats
. . . 116When Not to Run Your Own Mail Server
. . . 117Which Mail Server to Choose
. . . 117Installing the Mail Server
. . . 118Configuring the Firewall
. . . 120Making Sure Postfix Starts During Boot
. . . 121Configuring Postfix
. . . 123Configuring Your System to Send Mail
. . . 124Configuring Your System to Receive Mail
. . . 132Setting Up Users to Receive Mails
. . . 133Taking a Few Antispam Measures
. . . 136Receiving Mails for Several Domains
. . . 137Authenticating Users
. . . 139Encrypted Connections
. . . 139Usernames, Passwords, and Such
. . . 141Retrieving Mails
. . . 145Configuring Your Firewall
. . . 148Configuring Dovecot
. . . 150Using Webmail
. . . 152CHAPTER 7
Understanding DNS
. . . 155What Is DNS?
. . . 156DNS Was Born
. . . 157The WHOIS System
. . . 159The Root DNS Servers
. . . 160The Resolver
. . . 160The Hosts File
. . . 160nsswitch
. . . 161NSCD
. . . 162What Is BIND?
. . . 164Primary and Secondary Name Servers
. . . 164Installing BIND
. . . 165Setting Up a Caching Name Server
. . . 166Making DNS Available to Other Machines
. . . 168Configuring BIND to Host Domains
. . . 170A Records
. . . 170CNAME Records
. . . 171MX Records
. . . 172NS Records
. . . 173Quick Round-Up
. . . 174Creating a Master Server
. . . 175Creating a Slave Zone
. . . 177Allowing Zone Transfers
. . . 178Gotchas
. . . 178Forgetting to Increment the Serial Number
. . . 179Forgetting the Dot in the Record
. . . 179Summary
. . . 180CHAPTER 8
Setting Up DHCP
. . . 181How Does DHCP Work?
. . . 181DHCP and CentOS
. . . 183Installing DHCP
. . . 183Configuring DHCP
. . . 184A Minimal Configuration
. . . 184Extended Configuration
. . . 186Defining Static IP Addresses
. . . 187Grouping Statements
. . . 189Shared Networks
. . . 191Relaying DHCP Requests
. . . 191PXE Booting
. . . 193Configuring dhcpd for PXE Boot
. . . 194DHCP Integration with DNS
. . . 194Summary
. . . 197CHAPTER 9
Sharing Files with Samba
. . . 199Windows Networking Basics
. . . 199The Basic Protocols
. . . 199Workgroups
. . . 200Windows Domains
. . . 200Active Directory
. . . 200Samba and CentOS Basics
. . . 200Preparing to Set Up Samba
. . . 201Installing Samba
. . . 202Configuring Samba
. . . 202Example Configuration
. . . 203Minimal Stand-Alone Samba Setup
. . . 209Shares and Security
. . . 212Extended Stand-Alone Example
. . . 214Samba As a Domain Member
. . . 215Summary
. . . 218CHAPTER 10
Setting Up Virtual Private Networks
. . . 219What Is a Virtual Private Network?
. . . 221Using SSH for Virtual Private Networks
. . . 222Virtual Private Networks with IPSec
. . . 228IPSec Explained
. . . 229Configuring OpenVPN
. . . 235Looking at an Example
. . . 237Configuring the Server Side
. . . 240Configuring the Client
. . . 242Some Security Considerations
. . . 244Doing It the Even Easier Way
. . . 246Summary
. . . 249Part 3
nnn
Enterprise Features
CHAPTER 11
Using Core Builds
. . . 253What Are Core Builds?
. . . 253What Can’t Core Builds Do?
. . . 254Why Create a Core Build?
. . . 254What Are Kickstart Files?
. . . 255Anatomy of a Kickstart File
. . . 255The Command Section
. . . 256%packages Section
. . . 261The Scripts Section
. . . 263Using a Kickstart File on a Web Server
. . . 267Dynamically Creating Kickstart Files
. . . 268Installing CentOS over HTTP
. . . 270Updating Your Kickstart File to Install CentOS via HTTP
. . . 271Summary
. . . 271CHAPTER 12
Using High Availability
. . . 273Clustering and High Availability
. . . 273Theory of HA
. . . 274Split Brain and Fencing
. . . 275Resources
. . . 276Service or Virtual IP Address
. . . 276HA Cluster Suite Components
. . . 277Preparing Your Cluster
. . . 278Installing CCS
. . . 279Installing HPS
. . . 279Configuring CCS
. . . 279Configuring HPS
. . . 281Building Clusters Using CCS
. . . 283Creating a Basic Cluster with CCS
. . . 283Advanced Configurations Using CCS
. . . 288Advanced Example with CCS
. . . 290Building Clusters Using HPS
. . . 292Creating a Basic Cluster with HPS
. . . 292Advanced Configurations Using HPS
. . . 294Advanced Setup with HPS
. . . 295Summary
. . . 297CHAPTER 13
Monitoring Your Network Using Nagios
. . . 299How Nagios Works
. . . 299Installing Nagios
. . . 300Initial Setup of Nagios
. . . 302Nagios Configuration Overview
. . . 303Objects and Templates
. . . 304Basic Nagios Configuration
. . . 307Contacts and Notifications
. . . 311Advanced Nagios Configuration
. . . 312Summary
. . . 313xvi
Foreword
W
hen I go back in time to when I bought my very first technical book (about Perl 4 programming), I had no idea what it would mean to me. Of course, I had expected to learn about Perl, but indirectly the book opened a whole new world to me. The book introduced me to Unix and taught me valuable things about operating systems in general. It taught me about filesystems and networking, about Perl modules and Perl developers, and about open source and communities.Not only did it help me to discover all these things, but it also made clear what I didn’t know. And although the book didn’t go into detail about a lot of topics, the fact that it gave me a framework, a place to put newfound information and relate it to what I already knew, was more important than anything else in that book.
Over the years I realized that the book itself was not that special, except that it allowed me to start doing things with little hassle, learn from them, and build on that. And the book was excellent in building momentum, with me learning and doing in a rapid whirlpool of instant joy and eagerness for more. And although I was far from being a good Perl programmer when I finished the book, it gave me the confidence to explore without the fear of breaking things.
When you apply the examples of this book, The Definitive Guide to CentOS, I hope you will get the same satisfaction and build that same confidence to help others with CentOS. By reading this book and trying the examples, you become a member of the CentOS community—or, as we say, the C in CentOS. But what is so special about CentOS? Why CentOS?
Well, if you look at the different Linux distributions that exist today, CentOS has a unique appeal because it doesn’t try to consist of the latest and greatest open source soft-ware (which is in itself a never-ending story); it focuses instead on being the most reliable and secure environment that is resistant to change over a seven-year lifetime. And apart from resisting change, about every 24 to 30 months a newer CentOS version pops up with newer software that is again tested for stability and goes unchanged for another seven-year time span. It is up to you to decide when to stay or move to another version at any point in time.
your environment with an estimated 10 million users worldwide running the same soft-ware as you do.
The CentOS project and its community are there to assist you with any problems you might encounter, and when you think the time is right, we want to help you transform from being a CentOS user to a contributing member.
For this not much is needed, other than the willingness to help others as they have helped you. If you learn something valuable, we welcome you to share it on the CentOS wiki, mailing lists, or forums. Or simply blog about your experience and interact with your peers.
The collective work of writing this book is a milestone for the CentOS community— not only because it is the first book of its kind but mostly because it is the result of a joint effort of the community; Peter Membrey, Ralph Angenendt, Tim Verhoeven, and Bert de Bruijn are contributing members of our community. I am pleased that this book is a good start to learning CentOS and an entry point to the larger worlds of Linux and open source. But most of all, I sincerely hope it does not answer all your questions but instead inspires you to question more.
Dag Wieers
Infrastructure Support and Event Advocacy
xviii
About the Authors
nPETER MEMBREY lives in Hong Kong and is actively promoting open source in all its various forms and guises, especially in education. He has had the honor of working for Red Hat and received his first RHCE at the tender age of 17. He is now a Chartered IT Professional and one of the world’s first professionally registered ICT Techni-cians. Currently studying for a master’s degree in IT, he hopes to study locally and earn a PhD in the not-too-distant future. He lives with his wife Sarah and is desperately trying (and sadly failing) to come to grips with Cantonese.
nTIM VERHOEVEN is a Linux system administrator during the day and a core member of the CentOS Project during his free time. He has been working with Linux for more then ten years and has been involved with the CentOS Project since 2007. He is interested in all things related to enterprise Linux. He lives in Belgium and has an engineering degree in computer science.
nRALPH ANGENENDT has been working as a systems and network administrator since 1998. After being introduced to Linux in 1995, Ralph’s interest in non-Unix-like operating sys-tems dropped dramatically, so his work environment mostly consists of Linux servers. Besides having a sweet tooth for domesticating mail servers, Ralph has a strong interest in automated system administration. That’s the reason why the networks he is responsible for run Cfengine: to ease the pains of administrating growing sites.
xix
About the Technical Reviewer
xx
Acknowledgments
I
t’s not until you actually try to write a book that you realize just how many people are involved in its creation. It goes without saying that without the support I received from Apress, this book wouldn’t be here. I’d therefore like to specifically thank Michelle Lowman and Beth Christmas for their patience and tolerance going well beyond the call of duty—I hope you like the results!I would also like to thank the CentOS community for everything they have done. Their continued hard work is what makes CentOS such a great operating system, and I really hope that this book will give something back to the community that has given me so much. Thanks to everyone at the project who has been involved in the book’s develop-ment, including Karanbir Singh, Bert de Bruijn, Tim Verhoeven, Ralph Angenendt, and Dag Wieers.
I am very fortunate to be studying at the University of Liverpool, which is an expe-rience that has completely changed my life. I would like to show my gratitude to Britt Janssen and Ranjay Ghai, who worked solidly for nearly two months on my application and whose hard work made everything possible.
Last but certainly not least, I would like to make a special acknowledgment to two people without whom I would not be where I am today. So, special thanks to Mr. David Uden and Dr. Malcolm Herbert—two people who put their trust in me many years ago and without whom I have no doubt I would be doing something very different today.
Peter Membrey
xxi
Introduction
A
lthough CentOS has a huge number of benefits over other operating systems, we can-not escape the fact that it’s also free. With virtual machines starting to replace traditional hosted services, people are finding that having their own server is not only much more flexible but also often cheaper.But running your own server is very different from simply using a hosted service, and this is where TheDefinitive Guide to CentOS comes in. It has been written to help new-comers to the platform get up and running in production as quickly and as painlessly as possible. Each of the chapters has a specific task-oriented goal and explains how to do the majority of tasks that people are looking to do.
Just like CentOS itself, we hope to be able to improve and refine this definitive guide. We would be grateful for any and all feedback with regard to the book and how it could be improved to better suit the needs of new users. Your experiences are hard won, and we would love to hear what you have to say. After all, TheDefinitive Guide to CentOS is here to help, and who better to advise and provide feedback than the very people who have made their first steps with it?
This book will let you hit the ground running, and the CentOS community will ensure that you are able to keep in the race!
Who This Book Is For
The Definitive Guide to CentOS is for anyone who wants to build a production system with the CentOS operating system. Previous Linux administration experience is help-ful but not required. We’ll show you how to get started and how to build on existing knowledge.
How the Book Is Laid Out
The second part is the largest section and has chapters dedicated to specific topics such as setting up a web server or an e-mail server. These are all task-oriented chapters so that you can immediately start doing what you need to do. Generally speaking, these chapters can be read in any order, although it might make sense to read certain chap-ters before others, such as reading about DNS before trying to configure subdomains in Apache.
The third part contains more advanced topics that will be of interest to people deploying CentOS in an enterprise environment. The topics will still be of interest to many people, but the concepts are somewhat more advanced than those in the previous part and may require multiple servers and so forth.
Getting Started with
CentOS
Part 1 of this book is where you’ll start to learn the basics of CentOS. No previous Linux
knowledge is assumed, because we’ll take things nice and slow. You will learn about CentOS
and why it’s a fantastic operating system that you can trust with your most important
workloads. We’ll cover a step-by-step install in Chapter 2 and talk about some of the more
advanced options that you can use. Chapter 3 provides a quick overview of how to log in to
your new system and move around. It’s not a full guide to working with CentOS, but it will
get you up and running quickly. Chapter 4 covers updating CentOS and hence is critical to
the health of your server.
After you’ve finished this part, you will be able to talk about CentOS and express why you
believe CentOS is a valuable addition to your IT infrastructure. You’ll be able to source CentOS
and install and configure it. You will also know your way around the system and will know
how to update your system.
If you’re already somewhat familiar with Linux, then feel free to skip to the chapter that
interests you most. However, it would be worth reading through this first chapter if you’re
3
Introducing CentOS
T
he CentOS (short for Community ENTerprise Operating System) Linux distribution is an enterprise-grade, freely available, open source operating system that is derived from the source code of Red Hat Enterprise Linux (RHEL) and developed and maintained by the CentOS Project. The CentOS Project is about more than just a Linux distribution. The project’s members are working to provide support, training materials, and, in the future, even certification. Although at its core the project is the CentOS distribution, the CentOS Project encompasses a whole ecosystem of software, developers, and projects. This book focuses on the official CentOS distribution.n
Note
CentOS is built from the source code that Red Hat makes available at ftp://mirrors.kernel. org/redhat/redhat/linux/enterprise. This software has been released under the General Public License (GPL), and the CentOS Project uses this software to build the CentOS distribution. The CentOS Project is not affiliated with, sponsored by, or supported by Red Hat in any way.CentOS is used around the world by people who need a robust and reliable platform to deploy their applications and services. Although support options are available, CentOS is best suited to those who do not need or want commercial support. When you have commercial support, it usually means that you can pick up the phone and speak to some-one or submit a request via a web site. Because you’ve paid for the service, you can expect your problem to be resolved in a reasonable amount of time. If you already have your own in-house expertise or know people who can help you if you get stuck, you probably don’t want to have to pay for support, often at significant expense. But if you prefer to have commercial support available, there are companies that do provide it. A list of com-panies approved by the CentOS Project is currently being worked on and when complete will be viewable on the CentOS web site (http://www.centos.org/).
Before you can really appreciate what CentOS can do for you, you need to explore enterprise Linux (EL) in a bit more depth.
great desktops, they’re not the ideal choice for a production server because the software versions change on a regular basis. Enterprise Linux distributions such as CentOS main-tain specific software versions over an extended period of time, which helps to ensure that you don’t have any nasty surprises (see the “Extended Support” section).
Examples of enterprise Linux are Red Hat Enterprise Linux, SUSE Linux Enterprise Server, Ubuntu LTS, and CentOS. Examples of consumer Linux are Fedora, Ubuntu, OpenSUSE, Gentoo, and Debian.
In this chapter, we’ll discuss why you should use enterprise Linux on your servers (and possibly even your workstations) and how CentOS can provide a brilliant, enter-prise-grade environment for you to deploy your critical services.
What Is Enterprise Linux?
Enterprise Linux has gained an awful lot of attention recently—for very good reason. Linux has a reputation for being updated and improved at an amazingly fast rate. Conventional wisdom would suggest that this is a good thing. After all, it means you’re getting better software, and that can’t be a bad thing, can it? Actually, it can, and this is one of the key areas that enterprise Linux looks to resolve.
Imagine for a moment you have developed a popular web site. You are making loads of money, and the customers keep on coming. You hear about a dangerous exploit going around, so you decide to update your server, at which point everything goes wrong. You discover that the new version of the programming language you used to write your application won’t work with your application, so you’re going to need to make extensive changes to fix it. Not only that, but the database server has been updated as well—only it can’t read the old data because the file format has changed in the new version!
An enterprise Linux distribution aims to provide a robust, stable, and reliable plat-form on which users can deploy their applications. It provides a platplat-form where the previous scenario cannot happen and where you can update as often as you like, safe in the knowledge that your software isn’t going to break.
Extended Support
have to upgrade your machine. This may not sound like much of a problem, but Fedora has a six-month release cycle, which means after updating your server for two years, you suddenly have to jump four releases to have a secure server.
There are two big problems with doing this. First, it’s unlikely there is a safe and easy upgrade path. Usually (but not always), it’s possible to upgrade directly from one release to the next. It’s even possible (though riskier) to update to a release two versions ahead. However, trying to jump four versions is asking for trouble, and even if the upgrade seems to work without a hitch, you may find some strange behavior that you can’t quite explain.
The second problem is that the software versions on the new release are going to be significantly different from the versions you are currently running. If your server is in pro-duction (that is, doing something useful and important), you want it to keep running after the upgrade, and you want as little downtime as possible. It’s quite possible, however, that you will find that the new versions of the software you’ve just upgraded to don’t like your old configuration files. This means you’ll have to rewrite and test them. Sometimes this isn’t a big deal. Other times it can cause many hours of downtime.
Enterprise Linux platforms usually combat these two key issues by releasing new sta-ble versions every couple of years or so. These platforms have significantly longer support periods, ranging on average between five and seven years. This is very important because it gives you plenty of opportunity to update and test new releases.
Low-Risk Security Updates
Enterprise Linux also comes with low-risk security updates. These are updates that are designed to fix a specific issue without making large, sweeping changes to a software application. This is very important in production environments where you need to ensure that your servers are protected against the latest threats and that applying a particular update is not going to adversely affect your machine. Microsoft’s Windows Server 2003 had a particularly nasty issue when installing Service Pack 2 (SP2). After installation and the subsequent reboot, Windows would automatically turn on the firewall. This meant that if you were updating the server using Remote Desktop, you’d suddenly find your-self unable to reconnect to the server, and all of the services it was offering would then be blocked. Although this isn’t a major issue if the server room is down the hall, if you host in a remote data center, then fixing this problem can be very time-consuming and expensive.
ABI/API Stability
Application binary interface (ABI) and application programming interface (API) stability is often underrated, but it’s especially important for third-party applications. Enterprise Linux guarantees that during a given release, neither the ABI nor the API will change. This means that software that will run on the platform when it is first released will continue to run at the end of its life.
Consumer-grade Linux generally comes with a wealth of software. As long as you use this software, everything will be fine—as one application updates, the supporting appli-cations will also be updated. This breaks down, however, when you are using a custom application that expects a certain library. After an update, if that library version changes, your application will probably break. The vendor may not have an updated package available, and the source code may not be available for you to recompile even if you’re comfortable doing that. Basically, it’s not a good idea to rely on software that can change at any time.
Freezing the ABI and API ensures that you don’t have to worry about this. When security flaws are found in a particular piece of software, rather than simply replacing that software with a new version (the cause of breaking your third-party application), enterprise Linux distributions instead back-port the security fix into the current version. This ensures that your software won’t notice the difference, and it also gives you all the security benefits of running the latest version.
There is a downside, however. Because software versions are not updated, various automated security audit solutions get confused and report security issues where there aren’t any. For example, it is common for businesses to pay to have their web servers audited. It would not be appropriate or feasible, however, for these tools to actually try to break into the server. Instead, they tend to look at the version numbers of the software you’re running. Because enterprise Linux does not update the version numbers, these tools often generate a huge list of security vulnerabilities that apply to that version of the software. Unfortunately, there is no way for these automated tools to know that all the issues they’ve raised are actually patched already and the threat is effectively imagined. Happily, though, it is fairly easy to check the history of a particular application to ensure that it is indeed immune to the attacks that have been listed.
Regular Updates and Bug Fixes
In CentOS, these regular updates are referred to as point releases after the way the different versions are named, in other words, “five point two.” They are released approxi-mately every six months, and this is where additional functionality or new technologies are introduced to the distribution. Changes are never made in between point releases.
Certification
Enterprise Linux is also certified to run on certain types of hardware, to run certain soft-ware applications, and to be used in certain environments. Certification helps give users confidence that the operating system will work as advertised. Many hardware vendors such as Dell and HP ensure that their hardware is certified for popular enterprise Linux distributions. For end users who want to run a particular distribution, it’s an easy way to distinguish hardware that is known to work without problems.
Software vendors such as Oracle and IBM certify their products for much the same reasons. Oracle 11g is certified for use on both RHEL 4 and RHEL 5. The same is true for IBM’s DB2 9.5. Software certifications are important because they show that a particular piece of software not only works but works well enough to pass rigorous testing. If soft-ware is certified for your platform, you can be assured that it’s going to perform the way you expect.
Because CentOS maintains binary compatibility with Red Hat Enterprise Linux, it is safe to assume that any certified hardware or software will run on CentOS equally well. Unfortunately, the vendor may not see it that way, and even though its products will work perfectly well, the vendor may not be willing to provide support. If your choice of software is at least partly based on the support the vendor will be providing, you should double-check that you’re still covered on your chosen platform.
Summary of Enterprise Linux’s Benefits
In conclusion, enterprise Linux attempts to provide a platform that is based on stable software, will be updated and supported for an extended period of time, won’t change software versions in the middle of a release, and has low-risk security updates. For these reasons, enterprise Linux is far better suited for production servers than consumer-grade solutions.
What Is CentOS?
CentOS is rebuilt from another enterprise Linux platform, Red Hat Enterprise Linux. RHEL is free—“free” as in speech but not as in beer. In other words, when Red Hat pro-vides the software to a subscriber, it must also include the source code. The subscriber can alter that source code and use it in any way she sees fit. So although the subscriber has the freedom to use and modify the software, it doesn’t necessarily follow that she won’t have to pay for it. If she were to improve on the software and wanted to sell her new version, she could do so, but she would also have to include the source code, if requested, and in most cases under the same license. Because of this, free software helps ensure that when software is improved, those benefits are passed on and not held by a single com-pany or person.
In addition, to download RHEL, you need to have an active RHEL subscription, which is not cheap.
n
Note
Software licenses (especially those claiming to be “free” or “open source”) can become very confusing very fast. The GPL, for example, requires you to release any modifications to a program under the same license. The Berkeley Software Distribution (BSD) license, on the other hand, makes no such requirement. To add to the confusion, some projects create their own licenses that profess to be free software but aren’t recognize as such by the Free Software Foundation. If you’re finding this a little over-whelming, you are not alone! For a detailed list and explanation of the various licenses, take a look at the Free Software Foundation’s web site at http://www.fsf.org/licensing/licenses/index_html.Because Red Hat Enterprise Linux is based entirely on open source software, Red Hat is obliged to release all of the source code to anyone who has a subscription. Red Hat takes this another step further and makes its source code available to anyone. Although the source code is freely available, Red Hat uses trademark protection laws to prevent people from building their own versions of RHEL and then distributing them. CentOS complies fully with Red Hat’s policy on distribution, and the CentOS Project spends considerable time and effort removing all Red Hat logos and trademarks. Once done, the software is rebranded as CentOS and then compiled.
CentOS is made available at no charge and is freely downloadable from the CentOS web site. Although the initial packages come from Red Hat, it takes a lot of work to update and maintain CentOS. The CentOS Project consists of volunteers who perform these rebuilds, test updates, and provide support.
released throughout the life of the release as and when they’re available. Both CentOS and RHEL are supported for seven years from their initial release dates.
Although both operating systems share the same core values, some features are avail-able in one that aren’t availavail-able in the other. First we’ll look at what CentOS can offer over RHEL, and then we’ll cover where RHEL scores over CentOS.
The current version of RHEL has two server distributions: Red Hat Enterprise Linux and Red Hat Enterprise Linux Advanced Platform (RHEL AP). RHEL is identical to RHEL AP software-wise and differs only in cost and support options. RHEL, for example, sup-ports only up to two sockets (in other words, physical processors) and allows for four virtual guests. A virtual guest is a Xen-based virtual machine that can run another com-pletely independent RHEL server. A RHEL license will cover both the main operating system and the four RHEL virtual guests, saving a considerable amount in license fees. RHEL AP, on the other hand, has no restrictions on sockets or virtual guests. RHEL AP also ships with “storage virtualization and high availability capabilities” (Red Hat Global File System and Cluster Suite), which RHEL lacks.
There is also a desktop version of RHEL called (somewhat predictably) RHEL-Desk-top. This product is aimed more at corporate desktops than for home users and provides a robust platform for people to use on a daily basis.
CentOS, however, provides all of these features in a single product, so there aren’t different “flavors” of CentOS. CentOS is built like RHEL AP and does not place any limita-tions on what hardware configuralimita-tions are supported. Whereas with RHEL 5.0 Red Hat started using installation numbers to ensure that customers would be able to install only the software that they had purchased support for, happily CentOS does not use installa-tion keys, and some of the more advanced components (such as virtualizainstalla-tion and cluster storage) are easily installed by simply selecting the relevant box.
CentOS also boasts a very strong worldwide community of more than 6 million sys-tems installed. Because many of the mirrors used by the CentOS Project are donated by third parties, no exact download numbers are currently available. Many systems are installed from the same disc and many companies set up their own local repositories for updates, so it is thought that there are considerably more CentOS systems out there than estimated.
This community actively maintains and contributes to a wiki and mailing lists and provides support on IRC. The wiki contains vast amounts of useful information about CentOS, including details on the core team members, the purpose behind CentOS, fre-quently asked questions, and how-tos, among other things. The wiki should probably be your first stop when you look for help with CentOS. Specific mailing lists (you can find a complete list at http://lists.centos.org) provide coverage of a wide variety of topics such as development, promotion, documentation, and announcements.
but remember that they are volunteers; they have their own lives to live and have no obli-gation to help you. Help them help you by providing well-thought-out questions with lots of information. Generally speaking, the more information you can give about your issue, the greater chance you’ll have of getting a reply.
One of the key goals of the CentOS Project is to maintain binary compatibility with RHEL. This isn’t too difficult, because CentOS is rebuilt from RHEL’s source RPMs. For a lot of users, though, RHEL compatibility is not actually very important if, for example, they are just looking for a solid enterprise system rather than a Red Hat “clone.” Of greater interest is using additional software that doesn’t ship with RHEL. Red Hat does not support third-party software. This in turn means that companies that need full Red Hat support are restricted to what Red Hat offers.
CentOS has some additional repositories of software available. These provide a great deal of flexibility, and it is up to users to decide which path they want to take. The CentOS Plus repository contains packages that replace the original packages that were rebuilt from RHEL’s source code. This breaks binary compatibility, but it does mean you can get your hands on newer software that would otherwise be unavailable. The CentOS Extras repository contains packages that are used in addition to the original packages. Using this repository won’t break binary compatibility, because it won’t update any of the original packages. However, solutions that depend on these packages won’t be able to run on a vanilla RHEL install. To be fair, this is rarely an issue and should not dissuade anyone from using the packages.
Enabling additional repositories affects how your CentOS install will work. The majority of the issues around doing this come down to support and compatibility with RHEL. For most users, these issues aren’t relevant, but it is important to understand what the consequences are of using these extra packages.
Of course, there are some downsides when using CentOS over RHEL. CentOS as a community project cannot provide the same levels of support that a commercial entity such as Red Hat can. There are third-party companies that offer CentOS support, and the CentOS community itself does a fantastic job, but even then, it cannot match what Red Hat is offering. On the other hand, a RHEL subscription can cost more than $2,400!
As a side effect of CentOS being built on RHEL’s source code, the CentOS Project cannot directly fix problems within the main distribution. The CentOS Project does have the means to push out important fixes, however, and this was highlighted recently when a performance issue in Perl was fixed in CentOS a few weeks before it was fixed in RHEL. Although the CentOS Project can, of course, submit bugs and supply patches “upstream” to Red Hat, the members have no control over whether the bug will be fixed. This is one of the sacrifices that must be made in order to ensure full binary compatibility.
CentOS doesn’t have all the hardware and software certifications that are available on RHEL. Vendors spend considerable amounts of money to have their wares tested and approved. However, although officially CentOS isn’t certified because it is built from RHEL sources, anything that runs RHEL can run CentOS equally well. This means that even though vendors may not openly state that their kit is certified for CentOS, if it is cer-tified on RHEL, it will work fine.
In response to the intellectual property (IP) infringement issues raised a few years ago by SCO, Red Hat put into place an indemnification program. This stated that should there be any problems found relating to IP in Red Hat Enterprise Linux, Red Hat would sort out the problem. This means Red Hat will either secure the rights to use the IP or remove the offending code and replace it with fresh code that does not infringe the IP. This gives com-panies an iron-clad safety net so that they can use RHEL without fear of being targeted for IP infringement. CentOS as a community project does not offer such a guarantee. For most people, this is a nonissue anyway. However, if this protection is important to you or your company, it’s a good idea to read up on what protection Red Hat can offer.
Remember that CentOS is an enterprise Linux distribution. This means it is designed for stability and reliability. It does not support the latest and greatest hardware, and it rarely contains bleeding-edge software either. If your hardware is supported and CentOS provides the software you need on a daily basis, you will find CentOS to be the ideal dis-tribution for a desktop machine as well as a server. You will have long-term support, and you won’t have to install 100 new packages every other day.
How to Read This Book
This book is divided into three parts. Part 1 covers the very basics, such as getting hold of CentOS, installing it, and then finding your way around it. This is where you should start if you’re new to Linux, because these chapters won’t make any assumptions about prior Linux knowledge. Part 2 is about taking your new server into production. You don’t need to read these chapters in order, and you can go straight to the chapter you need to get started. Part 3 covers how to perform some higher-level tasks with CentOS, normally what you might need in a data center or an enterprise environment. We’ll be covering high availability, core builds, and how to package your own RPMs for distribution.
13
Installing CentOS
C
entOS is very easy to install, and for the vast majority of users, the default settings will work very well. At this stage, especially if you’re new to Linux, some options might not be obvious, and certain features (such as software RAID) might not be applicable to you. We’re also conscious that for many readers CentOS will already be installed and running. So, in this chapter, first we’re going to go through a plain-vanilla install without any of the interesting bits. This will get you up and running in the shortest time possible and will allow you to then jump ahead to any of the later chapters that interest you.Of course, we also want to give a good deal of coverage to the installer itself. Some users will certainly want to use software RAID, disable IPv6, or securely erase their hard disks before they start the install. We’ll cover these features after we’ve done the basic install. This will let you go directly to the topic of interest without having to read through how to install every option that CentOS has to offer.
n
Note
We’ll be concentrating on the most current version of CentOS (at the time of writing, Centos 5.2). The install procedure is somewhat similar for older versions of CentOS; however, because this book is for people new to the platform, it’s most likely that you’ll want CentOS 5. Manuals and installation instructions for older versions are available on the CentOS web site at http://www.centos.org.Hardware Requirements
n
Note
Red Hat provides only a 64-bit PPC version of Red Hat Enterprise Linux and doesn’t support SPARC hardware, but the CentOS Project is planning to rebuild CentOS so that it runs on 32-bit PPC processors and SPARC hardware. Because there is no direct upstream support for these platforms, these will be variants based on Red Hat Enterprise Linux rather than the 100 percent compatible versions that are based on the platforms that Red Hat supports.The minimum install requirements for CentOS are surprisingly modest. A text-only install can be completed with as little as 128MB of RAM. Depending on your needs, this could potentially be a perfectly capable production server. The CentOS Project provides a list of tested minimum requirements for an install, but for the majority of production uses, you will want something a bit beefier. The requirements (which you can also find at
http://centos.org/product.html) are as follows:
• i386orx86-64processor
• 128MBofRAMfortextinstalloni386(allothersare512MB) • 1.2GBofdiskspace
CentOS will install on pretty much any commodity hardware (including virtual envi-ronments such as VMware and Virtual Box). However, as an enterprise-grade distribution, CentOS does not have the latest and greatest hardware support, although each point release does add better hardware support, including back-ported drivers. The easiest way to tell whether CentOS is supported is simply to install it or try the LiveCD. However, if you are purchasing hardware specifically for CentOS, please visit the Hardware Certification List and research any hardware choices first.
Getting CentOS
There are few ways to get your hands on the latest CentOS release. Although most people will want to download it from one of the CentOS mirror sites, you can also buy an official CD set or DVD from various vendors. For a list of CentOS-approved vendors, see http://
www.centos.org/vendors. These vendors support the CentOS Project by making a donation
for every set sold, so please consider buying from these vendors.
Once you’ve selected your mirror, you’ll need to pick the version of CentOS that you want to install. There will be directories for individual versions, but those without a point in the name always go to the latest version. Currently, 5 goes to 5.2, but when the next point release is released, 5 will then go to 5.3.
You should then go into the isos directory. You’ll need to decide which architecture you want to download—either 32-bit or 64-bit. Although a 32-bit release will run without problems on a 64-bit machine, the reverse is not possible. If you’re in any doubt, down-load the 32-bit (i386) version for now.
n
Note
For most purposes it doesn’t matter which architecture you install. Generally speaking, the main benefits of the x86-64 version are that it can support large amounts of memory (more than 4GB) and that under certain workloads it has better performance. For most people, however, the i386 version is the still the version of choice (see Figure 2-1).The easiest install media is without a doubt the DVD image. This contains all the software in the CD set with the added bonus that you don’t need to swap CDs during the install.
The CD set is very useful when you don’t have access to a DVD-ROM such as on an older server or if you don’t have a DVD writer handy to burn the DVD image. In fact, because of the large amount of software that is available as part of the standard CentOS distribution, it can be somewhat difficult to work out which CDs are needed in advance. If you’re going to use the CD set, make sure you download and burn all six images just in case.
It’s worth noting that you can also download the netinstall image. This is a bare-bones image that contains just enough software to start the install process. The actual installer and package library are then pulled from the network.
The LiveCD provides a full desktop working environment and comes complete with
theOpenOffice.orgsuite,Firefoxwebbrowser,Thunderbirdmailclient,andtheGaim
instant messaging client, among others. It’s not only a great way to try CentOS as a desk-top replacement, but it also makes a great restore and rescue disc (although a dedicated rescue system is currently being developed by the CentOS Project).
The mirrors also include tracker files for BitTorrent. This can provide faster down-loads than directly downloading the images from the mirror. As with all torrents, though, the download speed depends on how many other people are sharing the files.
Checking the Checksums
When the CentOS Project releases files for public download, they generate a checksum. Two types of checksum are generated: MD5 and SHA1. MD5 remains the most popular in use on the Internet today, although SHA1 is catching up fast. You should use SHA1 if possible because it is more accurate and hence recommended over MD5. You can verify the checksums on Windows with numerous free tools (such as the one at http://www. fastsum.com/). If you’re using Mac OS X, you can verify the checksum with the built-in command-line tool md5 or sha1. On Linux you can use md5sum or sha1sum.
Burning the ISOs
Fortunately, Mac OS X comes with CD-burning tools as standard. If you insert a blank CD or DVD into your drive, it will pop up a dialog box asking you what you want to do with it. From the list, select Disk Utility. If this doesn’t come up or you’ve already set another default, you can find Disk Utility in Applications ➤ Utilities. Once the program is running, click the Burn button (it looks like the radiation symbol). You will then be asked to select which image you want to burn to the disc. Select the CentOS image, and click OK. Mac OS X should now burn the image to the disc for you.
Unfortunately, Windows XP doesn’t come with its own built-in tool for burning ISO images. A very popular tool is Nero, which you can download from http://www.nero.com. A free trial is available, which should give you plenty of time to burn your CentOS images. You will need to have the .NET 3.0 Framework to run Nero 9, but Nero has thoughtfully provided a direct link from its download page. By default, Nero 9 installs a lot of applica-tions. To burn the ISO images, the only component you need to install is Nero Burning ROM.
Once you’ve downloaded and installed it, start Nero from your Start menu. After it starts, cancel the New Compilation Wizard, and select Burn Image from the Recorder menu. You’ll then be asked to select the image you want to burn. Select the CentOS ISO, and then click Open. Nero will then burn the image to disc.
For Linux, my preferred tool of choice is cdrecord. This tool is available packaged for most distributions and can be easily installed through your platform’s own installer. Nor-mally cdrecord is very smart and works out the correct settings for your DVD writer. To use cdrecord, you can run the following command:
Here’s an example:
cdrecord CentOS-5.2-386-bin-DVD.iso
cdrecord should then find your DVD writer and burn the image. Although various graphical tools are available on Linux (such as K3b), cdrecord is really easy to use and can be run without having to install any extra dependencies.
Performing a Super-Quick CentOS Install
For our super-quick CentOS install, we’ll assume that you’re installing from the DVD image. This doesn’t make any real difference apart from the disc swapping during the actual install stage.
First you need to boot from DVD. Depending on your machine, this may already be the default. If not, on newer machines, an option is often displayed during the memory check stage (POST) to boot from a different device. Click this button, and select the option for the DVD drive. This might be displayed as “removable media,” or it might actu-ally list your DVD drive by name. BIOSs tend to vary on how they display device names, but it should be fairly obvious from what is offered. If your hardware is a bit older, you may need to go into the BIOS itself and change the boot order. If you do have to change the boot order, it’s a good idea to change it back once you’re done. There’s usually a sec-tion in the BIOS on boot order or boot priority. Because each BIOS is different, we can’t provide exact instructions here, but a quick look at the manual (assuming you didn’t toss
it,ofcourse)orGoogleshouldhelpyouout.
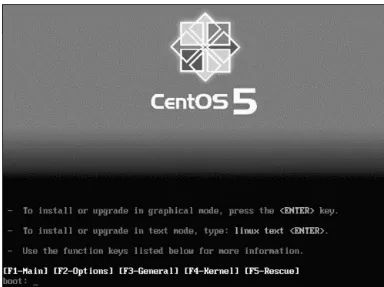
Once you have booted from the DVD, you’ll get a nice CentOS screen displaying the
twobasicinstalloptions:graphicalortext(seeFigure2-2).Generallyspeaking,youwant
Figure 2-2. CentOS boot screen
Figure 2-3. Media check
Generallyspeaking,yourdiscislikelytobefine,especiallyifyou’vejustuseditto
install another machine. Most of the time this option is skipped, but it is a handy feature to have if you end up needing it. For now, though, we will assume that your disc burned correctly, and we’ll skip the media check by pressing Tab and then Enter. If you are feel-ing masochistic and have some time on your hands, feel free to just press Enter.
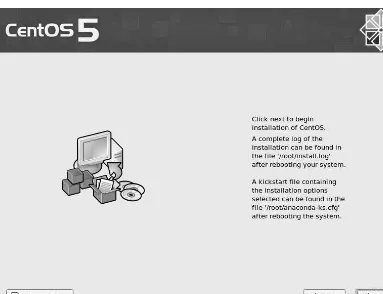
The next screen you should see (after the graphical installer has started) is a rather empty welcome screen (see Figure 2-4). You have only two options on this page; you can either read the release notes or click Next and continue with the install. In CentOS, the release notes are only pointers to the full release notes available on the CentOS wiki at
http://wiki.centos.org. Because we’re on the fast track, just hit Next.
Figure 2-4. Graphical installer start screen
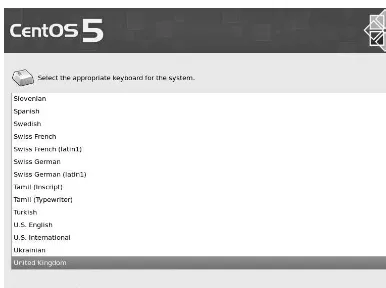
You’ll now be asked which keymap you want to use (see Figure 2-6). We prefer to select the United Kingdom keymap regardless of the actual keyboard we’re using because we touch type and get easily confused when characters aren’t where our fingers expect them to be. If you’re not sure which keyboard you’re using, then sticking with the default is probably a safe bet. Once you’ve selected your keyboard, click Next.
Figure 2-6. Selecting your keyboard
Figure 2-7. Initialization warning
Assuming you clicked Yes (or you weren’t asked the question because the disk was already initialized), you will now be given some choices for partitioning the disks (see Figure 2-8). From the first drop-down menu, you can select how you’d like the installer to set up the disks. The default is to remove any Linux partitions and create the default lay-out. This is what you want if your machine is a fresh install. However, if you had a Linux distribution installed previously, you probably don’t want to blitz your data partitions. If you do have important data on the disk or you don’t want to remove the Linux partitions, you will need to do a custom layout. We’ll cover more details about using this option later in this chapter.
You can also tell the installer to remove all partitions and create the default layout. This is the same as the default except that it will also remove any Windows partitions. If you’re replacing a server and want to remove everything, this is a good bet. It’s also pos-sible to use the free space on a disk to create the default layout, or if all else fails, you can select a custom layout.
Figure 2-8. Selecting the partitioning scheme
You can also tell the installer which disks you want to work with. They will be shown in the order that the kernel detected them. To make things clearer, it will also tell you the size of the disk and the manufacturer. For the most part, this will help you decide which disks you need to work with. You should select only the disks that you want the install to perform the partitioning tasks on. In other words, make sure you unselect your data disks! You can also select the option “Review and modify partitioning layout” to see what exactly the installer has in mind for your disks. We talk about this again later in the “Cus-tom Partition Layout” section when we cover the Cus“Cus-tom Layout option.
n
Note
Sometimes hardware information is not reported correctly. This can happen when using hardware RAID or when the hard disks are not reporting SMART data. If you can’t figure out which disks are which and there is important data on them, get hold of someone who knows for sure. You don’t want to accidentally erase irreplaceable data.around 100MB, while another partition for Logical Volume Manager (LVM) will take up the remainder of the space.
LVM is a great piece of software that allows you to separate the underlying physical partitions and disks from the logical partitions that you format and use in Linux. As usual, we look at this in a lot more depth later in the book, but for now just know that it lets you create logical partitions from a combination of physical disks. This in turn means you can create logical partitions that span more than one disk, which can greatly simplify how you set up and use your disks. It’s also a great way of handling disks from a storage area net-work (SAN) or providing storage space to Xen virtual machines. For now, though, let’s just accept that LVM is a good thing.
Because you haven’t selected “Review and modify partitioning layout,” the next screen you see will ask you to configure your network settings (see Figure 2-9). You should see a list of network cards and an Edit option next to them. By default all the set-tings are set to DHCP. For most home networks and corporate environments, a DHCP server will be able to provide a working address. However, best practice states that you should configure IP addresses of servers manually. This ensures that should DHCP fail, you will still be able to contact your server. For our quick install, we’ll be leaving the IP address set to DHCP here, but we’ll cover how to set the IP address manually later in the “Setting IP Manually” section.
One thing that is certainly worth changing is the hostname. When using DHCP, the default is to request the hostname from the DHCP server. This usually results in being assigned a rather cryptic name at best or localhost at worst. Either way, it won’t prevent you from shutting down the wrong machine because you thought you were connected to the test box instead of the production server. Select Manually, enter the hostname of your choice, and then click Next.
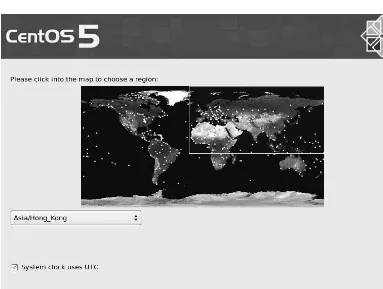
The next screen (Figure 2-10) lets you set the time zone for your server. You can move the red box over the map of Earth and highlight the country you’re in. It will then zoom in, and you can pick your location from the options it provides. If this seems a bit difficult, you can also select the time zone from the drop-down menu under the map. Once you get used to it, the map is actually a very quick way of setting the time zone. By default the option “System clock uses UTC” is selected. This means that the hardware clock will track UTC time, and the system will apply the time zone difference. This is generally standard practice for servers. Once you’ve selected a time zone that you’re happy with, click Next.
Figure 2-10. Selecting your time zone
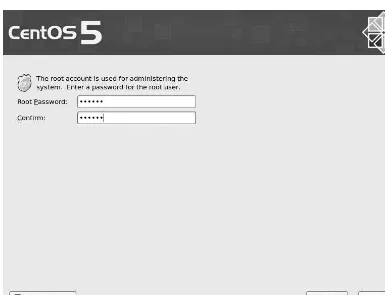
and as long as possible while preserving your sanity. Ideally, use a mixture of uppercase and lowercase letters, numbers, and punctuation. Once you’ve entered the password twice, click Next to continue.
Figure 2-11. Choosing a root password
The next page is where things get more interesting (see Figure 2-12). From here you can pick the type of machine you’re installing. Each of these options automatically selects a set of packages for installation. Most are fairly straightforward. For example, Desktop
–GnomeinstallsadesktopenvironmentusingGnome, and Desktop – KDE installs a similar environment but with KDE instead.
with RHEL, the project builds its software from the same blueprints as Red Hat. There is a lot of software that Red Hat does not distribute that would be very useful (and in some cases, essential) to have installed. The CentOS Extras repository provides additional software to the software packages released by Red Hat. We will cover the different reposi-tories in more depth later in the book. For now, let’s go with what we have selected and click Next.
Figure 2-12. Selecting base packages for your CentOS install
When the install has completed, you will see a screen telling you that everything went as planned and that you should remove the CD and reboot the system (see Figure 2-13). Congratulations! CentOS is now installed on your machine!
Figure 2-13. Clicking Next to install CentOS
Reboot the machine, and it should start booting into CentOS (but don’t forget to take out the DVD first, or else you’ll start the install process again). This can take a couple of minutes, and you’ll see a lot of text being printed on the screen. This is actually great for debugging and seeing what your system is doing, but for now you can safely ignore it.
Figure 2-14. Some last-minute configuration
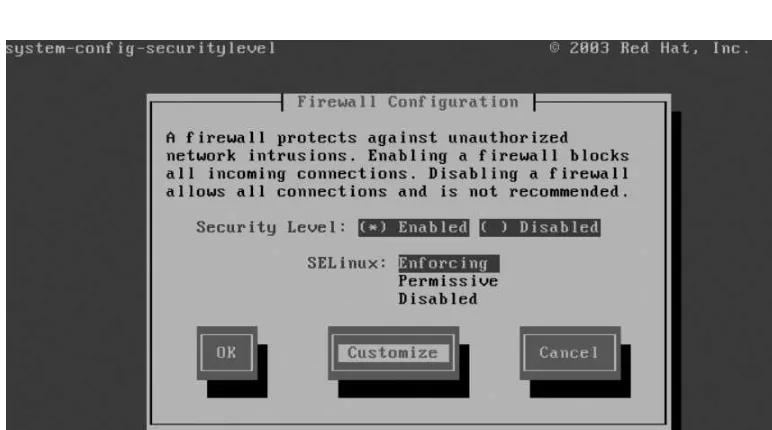
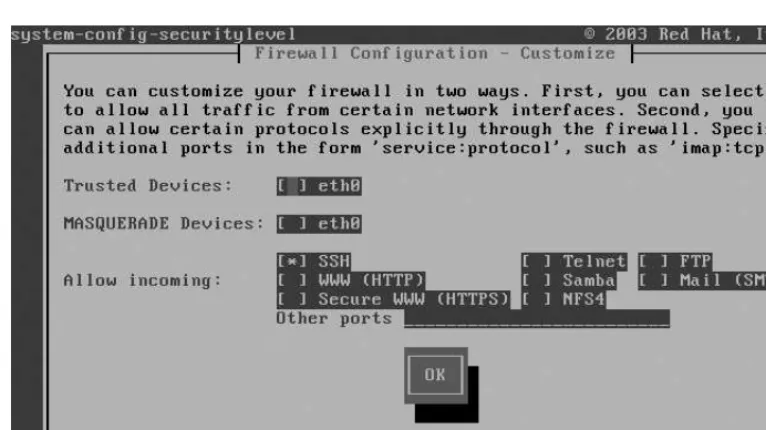
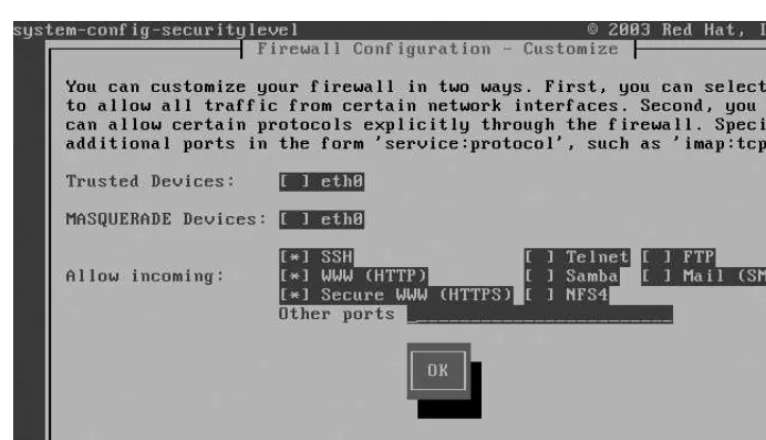
The next screen will help you configure your firewall. By default CentOS enables the firewall and allows SSH to pass through (see Figure 2-15). This is a pretty safe default and is ideal for an initial setup. You can disable the firewall if you really want, but there really isn’t a good reason to do this. Instead of disabling the firewall, simply select the services that you want other people to access from the list. If the service you want to allow isn’t in the list, click the Other Ports drop-down arrow. From here you can allow access based on port number and protocol. Once you’re happy with the settings, click Forward.
Figure 2-15. Configuring the firewall
Figure 2-16. Enabling SELinux
However, there is a downside. SELinux has a nasty habit of blocking behavior that was commonplace and hence expected previously. It is possible, for example, to set up Apache to display the contents of a directory via the Web but for seemingly random files not to be shown in the list, even though they can be seen in the directory listing on the server. Some applications simply don’t work with SELinux out of the box. Many consul-tants and sysadmins just disable SELinux as a standard installation procedure.
Kdump (see Figure 2-17) is a way for your system to record far more in-depth infor-mation after a system crash than is normally possible. The only real downside with turning it on is how much memory Kdump will take away from your system. It isn’t used much currently, and with the CentOS kernel being heavily tested for robustness, ker-nel crashes aren’t often seen. However, you can of course enable Kdump if you start to have problems with your system and you do want to collect more information. For now, though, we aren’t going to enable it, so just click Forward.
Figure 2-17. Enabling Kdump