Opening a New Database
Before you start, go round up some of your music CDs, cassettes, eight-track tapes, vinyl recordings and reel-to-reel tapes you have collected over the years. You young people will be slightlydisadvantaged in this regard. This tutorial will use your music collection as the focus of your first database in Access 97 or 2000. You can even insert a CD into your CD player while you work on this tutorial. Creating and using databases is not rocket science.
There are numerous options for opening a new document. For this tutorial, we will use the "Start" button on the Windows toolbar and scroll up to "New Office Document". As in other Office products, Access allows all kinds of options for opening a new document. You'll determine your preferences soon enough.
If you just installed Access, the first time you open the application, the Office Assistant may appear on your screen. Click on "Start using Microsoft Access" to start the program. In Access 2000, you would get this window. However, the window below will appear if you started Access with the Start => New Office Document procedure. Either way, choose "Blank Access database" and move on. We don't want to use the wizards at this time. By the way, this may look slightly different with Access 97. You get to use your intuition if things aren't exactly the same.
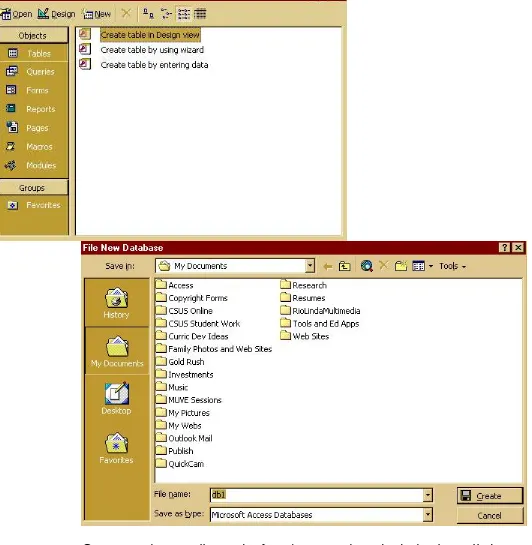
Once saved, you will see the Database window which displays all the different objects you can create in a database. The object with which you will become most familiar is the Table. Most people recognize databases as tables of data arranged in some organized format.
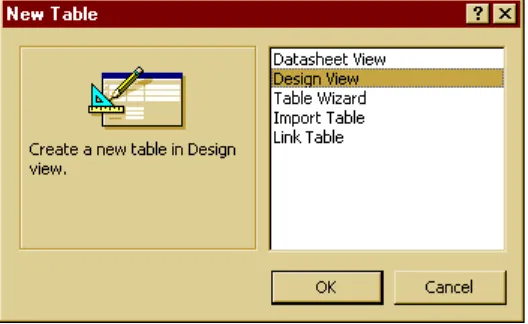
There are really only two appropriate choices for you: "Datasheet View" and "Design View". "Datasheet View" looks like a traditional table…almost like a spreadsheet. If you've used Microsoft Works database application, you'll recognize the "Datasheet View" as a table where you can enter data into cells. However, "Design View" is where you really want to create your data base fields, because you can determine data controls easier. So, select "Create table in Design View" and hit New. You'll get to "Datasheet View" soon enough. If you see this window below, just click on Design View and hit OK.
If you need a break, take one now. When you return, click on the link below to move on to "Creating Tables in Design View" and more database fun.
Creating Tables in Design View
Creating Tables in Design View
So that you will see how a relational database works, we're going to create two simple tables and then create a relationship between them. Since the first table we create will be about the artists in your music collection, that table will be called the Artist Table. A Table is an entity (thing) that has attributes (fields) that fit together. The second table will be the Recordings Table. Its attributes will be about the characteristics of the specific recordings in your collection.
Now you're ready to enter some Field Names. A field is a specific category that should have a name that makes sense. In a music collection database, "Artist" or "Artists" would be good field names.
*Just a Note: It's important to realize that just about everything in Access deals with objects that can be clicked on or selected. That means that you make things happen by selecting things and pushing buttons in toolbars. The novice must remember the first law o TTechnodynamicsT: cor every action" there is an euual but opposite undo action. Use TCtrl+ZT whenever you need it. Also" you may discover that there's usually a button somewhere on the toolbar that takes you back. Your intuitive gi ts will come alive when using most Ofce products and Access is no exception. Enjoy the act that you have these gi ts" and thank Bill Gates and his programmers or being so perceptive as to recognize that people think this way.
The cursor is patiently (patient cursor is a good
compressed confict) waiting or you to enter something in the Tcield NameT column. Enter TArtist(s)T and press Enter or Tab.
Your cursor moves to the TData TypeT column and selects
TTextT as your de ault type o data. That's the most
common type o data you'll use. Below is what you have so ar.
Just hit TTabT or TEnterT or now and watch the cursor
You may ignore the TDescriptionT column. It is simply what it says it is. Type a description i you choose and move on by pressing TEnter or TTabT once again.
Your cursor moves on to the Tcield NameT column in the
next row and awaits your command. Enter TGenreT and move on.
Hit TTabT or TEnterT making TTextT your de ault TData
TypeT and stop right there.
We're going to make a simple pop-up menu called a
TLookupT" and we'll use a wizard to help us.
Just click in the Data Type column next to the word TTextT
and scroll down until you see TLookup WizardT in the drop-down menu. The image at the right is what it looks like.
Click on TLookup WizardT and you get to make some easy
decisions about the music you listen to.
In the Lookup Wizard window" click the lower radio button
Hit TNext>T to go on. The next window is pretty intuitive. Choose a name or the Lookup Table and hit TcinishT.
How about saving this document be ore the whole
system crashes? Control + S will do the trick. You'll be asked to give your table a name. You can use the de ault name TTable 1T i you want. This is just practice. I'd call it TArtists TableT.
You'll think you know what you're doing until you hit
Enter" but Access will ask you i you want to define a Primary Key. Just say TNoT. We'll do that next.
Defining a riimai ee
At this point" you've created two fields. We'll create one more called the Primary Key. A Primary Key is a field that identifies each record in your table as uniuue. In order to establish
relationships between tables" your table needs a Primary Key. Access can set the Primary Key or you" or you can do it
yoursel . In this case" we'll do it ourselves.
In the next Tcield NameT column" enter ArtistID and press
Tab to get to the next column. Click on the little triangle in the TData TypeT column" scroll down and select
to the TEditT menu and click on TEdit => Primary KeyT. Now you've established a uniuue number that is
automatically generated or you that makes each artist's record you enter uniuue.
TBig deal"T you say. You'll see why a ter we create the
next table and link the two together. Below is what you have so ar.
Adding Records
Be ore we take a break" let's add some records to our new table. In TDesign ViewT" go to TView => Datasheet ViewT in the menu bar. Now" simply enter the name o a ew artists in your music collection and choose their Genre o music rom your drop-down menu. You'll notice that the AutoNumber eature works great" establishing a new number or each new artist you enter. Below is what mine looks like so ar. The ArtistID field with its AutoNumber and Primary Key makes each record uniuue.
Take a break i you like" but don't orget to save. When you come back" we'll create the next table and link them together.
Go on to Making the Recordings Table.
You have come a long way. Now we're going to make a table that keeps track o the recordings in your collection. In the TDatabase WindowT" Choose TCreate table in Design viewT again. Hit TNewT and ollow the steps we did in the first lesson.
Below are the names o the fields you will need.
You'll notice that the RecordingNumberID is the Primary Key. Just as we did in the Artist Table" you can establish the Primary Key last. Essentially" the RecordingNumberID is what I use to make each record uniuue. I recommend that you use the Access TAuto NumberT eature as we did last time we
established a Primary Key. I you're really serious about your music" you can use the Recording number issued on the CD or recording cover or case. I you choose the latter" your TData TypeT will be TTextT as you see in the example above" rather than TAuto NumberT" but it will still need to be your Primary Key as it is uniuue.
Enter TTitlesT in the Tcield NameT column" hit Enter or
Tab" and leave the TData TypeT as Text.
Do the same or TRecording LabelT.
Let's use the Lookup Wizard or TcormatT so we can make
I you're not sure how to use the Lookup Wizard" go back to the last lesson.
cor the ArtistID" choose TNumberT or your TData TypeT.
While TArtistIDT won't be the Primary Key in this table" that's the field that will be linked to the Primary Key in the Artist Table. Notice the two fields have the same name" yet they are in diferent tables. In Access" we establish relationships by identi ying matching fields in two or more tables.
cinally" or the TArtist(s)T field" just use Text as your TData TypeT. You can create a value list with the Lookup Wizard as you have done be ore" but you would need to modi y the list when you add a new artist to your collection a ter you get paid next month. Better to enter the artists as text.
By now" you've realized that no one can tell you
everything there is to know about Access. Experimenting with Access truly expands your Zoped (Zone o Proximal Development). cool around with it. I also recommend getting several books on Access. Probably the best I've
seen or beginners is Teach Yourself Access 97 Visually
by IDG books. Most uuality brick-and-mortar bookstores will sell books on Access 97 and 2000 in their computer
section. Running Microsoft Access 97 is the one I use or
the tough uuestions.
Save your table as Recordings Table.
Making the Primary Key for the Recordings Table
Let's add some records to our new Recordings Table. Click on TView => Datasheet ViewT and you'll switch to TDatasheet ViewT where you may enter your records. Enter a ew records and save your table. You must enter the correct ArtistID in the Recordings Table. I you don't" you will have problems creating a relationshipe between your two tables.
By the way" there are icons in the toolbar that allow you to switch views. More Zoped.
Now" we're ready to establish a relationship between the two tables.
Foiming Relationships
Save and close all your tables and make sure the Database Window is open.
Click on the little relationships icon in the toolbar or go to
TTools => Relationships...T in the menu bar. A large" blank
window opens. Now you will see another little icon in the
Choose each table by selecting and clicking on the TAddT button once or each table.
The last step is to create the relationship between the
Primary Key in the Artists Table and the matching field in the Recordings Table. You will see this screen below once you've added tables to the Relationship window.
Click and drag the ArtistID field in the Artists Table to the
matching field (ArtistID) in the Recordings Table. You just drop the one field on top o the other. Access essentially does the rest.
Below is the new window you will see.
Click on the option that allows you to TEn orce Re erential
You now have a One-to-Many relationship between your two tables.
Click OK and you're done. Make sure you save your
work. Below is what you will see.
Relationships in Access can get messy and con using! (Not like in real li e" eh?) cor an explanation o the Primary Key concept
along with examples and illustrations" see the website TAccess
to RelationshipsT in this series o tutorials.
Now" you can enter records into either o your Tables. The next lesson will show you how to make a orm or easier data entry. cor now" you've earned a break.
Go on to Creating a corm.
Creating a Form
We have created two tables in our Music Database. The first table is called Artist and the second is named Recordings. We've
Click on the Form Tab, select "Create form by using wizard" and click on "New".
You'll need only three fields from the Recordings Table. When you see the window below, click on the pull-down menu to select the Recordings Table.
Click "Next" to move to the window you see below.
will probably have a form similar to the one below where you can enter your own records.
Explore your new form. Enter some records and enjoy your new relational database. You need to realize that you can move between records on both the form and the Recordings Table subform.
The next part of this tutorial will show you how you can use Access to locate data quickly and efficiently. When you're ready, click below to move on.
Searching the database.
1. Open the database.
2. In the Database Window, click on the Forms tab and hit New. 3. Choose "Form Wizard" to make your form.
4. Follow the directions given to you by the Wizard.
5. If you want to change the appearance of the Form, you can do that after the form is finished by simply clicking on "View" and choosing "Design View" in the main menu.
6. Data entry is much simpler for students, especially elementary students, when using a form because the teacher chooses which fields are to be displayed on the form.
Because students may be slow at the keyboard or they may make many spelling errors, often we need to help them enter data. We can do this by creating
pull-down menus for data entry. Below is a review of how to do this.
1. If the database is not open, open it.
2. Go to the Database Window and click on Tables. 3. Open a Table you have for your database.
4. When your table opens, you will be in Datasheet View.
5. Make sure you don't have the Form you created in the "Form" review section above opened. If you do, simply close the Form you created before you proceed to the next step.
6. Go to the Windows menu and select "View" and then choose "Design View".
7. Your "Design View" window will appear.
8. In this view, you may change the rules for data entry.
9. To change the selections in a drop-down menu or to add drop-down menus to your database, simply follow the instructions below.
10.In the Data Type column, click on the item you want to change. 11.Click on the Lookup tab at the bottom of the "Design View" window. 12.In Display Control choose Combo Box from the choices.
13.In Row Source Type choose Value List from the choices.
14.In Row Source enter the choices you want to give your students followed by a semi-colon with no spaces. You may create entries with spaces, but before and after the semi-colons there must be no spaces.
15.Select "Save" from the "File" menu and you're done. Go back to "Datasheet View" and see how it works.
After students have entered data and you feel the data is accurate, you and your class will be ready to put the database to the test. You do this by searching, filtering, and querying the database so that your students gain information and make important connections. Below is a review of these procedures.
1. The simplest search is a "Find" procedure. Open a table in your database
and make sure you're in Datasheet View. Click the binoculars in the toolbar or go to the Windows menu and choose "Edit" and select "Find" or press Ctrl +F. The dialogue box that opens will give you the options that allow you to find something in the whole database. Uncheck the "Search only the current field" check box to find a word in the entire database. You can also "Match" any part of a field. You'll need to select these options on your machines for each "Find" you perform.
2. Sorting is also a way to search. Open a table in your database and make
sure you're in Datasheet View. To sort by ascending or descending order, click in the field you want and click on "Records" and choose "Sort Ascending" or "Sort Descending." You can sort two or more fields if you place them adjacent to one another. Select the fields you want to sort. Choose "Sort Ascending" or "Sort Descending" and the sort will be carried out with the leftmost field sorted first. The "Sort" icons on the toolbar eliminate the need to use the "Records" menu bar item.
3. Filtering is even more powerful. To filter the database, select a word in
your database. Click on "Filter by Selection" in the toolbar . If you select a word in the middle of the entry, all words that match are filtered for you. Remove your filter when finished by clicking the
"Apply/Remove Filter" icon .
4. Filtering by Form is more powerful yet. Click on "Filter by Form"
and then select or enter the words you want to filter. By surrounding the word you want to filter with asterisks, you can narrow your search significantly. Clicking "Apply/Remove Filter" icon clears the "Filter by Form" for new searches.
5. Queries are similar to "Filtering by Form" but you can select only the
fields you want your students to see, and you can save the Query. Use the Query Wizard for a more general view which you can "Filter", or use the "Design View" query for more specifics. In either case, you may use the "Filter by Form" procedures for more specific searches. To run a Query immediately after creating it, click on the Exclamation Point in
the toolbar. To run a query once it's saved, simply go to the Database
Making a "Report" of your database is easy. This is probably the most intuitive portion of database use. In the Database Window, simply click on "Reports" and use the Wizard to help you design your Report. You can use "Design View" to do this as well, depending upon your emerging interest and developing zoped with regard to databases.
After you complete your Report, you may, of course, print it, but you also have the option of making it into a Word 97 or 2000 report by clicking on the Office
Links icon on the toolbar. After a few moments, Office will have translated