Graphics and Animation on iOS
Vandad Nahavandipoor
Graphics and Animation on iOS by Vandad Nahavandipoor
Copyright © 2011 Vandad Nahavandipoor. All rights reserved. Printed in the United States of America.
Published by O’Reilly Media, Inc., 1005 Gravenstein Highway North, Sebastopol, CA 95472. O’Reilly books may be purchased for educational, business, or sales promotional use. Online editions are also available for most titles (http://my.safaribooksonline.com). For more information, contact our corporate/institutional sales department: (800) 998-9938 or [email protected].
Editor: Andy Oram
Production Editor: Kristen Borg
Proofreader: O’Reilly Production Services
Cover Designer: Karen Montgomery
Interior Designer: David Futato
Illustrator: Robert Romano
Printing History:
May 2011: First Edition.
Nutshell Handbook, the Nutshell Handbook logo, and the O’Reilly logo are registered trademarks of O’Reilly Media, Inc. Graphics and Animation on iOS, the image of an Asian civet, and related trade dress are trademarks of O’Reilly Media, Inc.
Many of the designations used by manufacturers and sellers to distinguish their products are claimed as trademarks. Where those designations appear in this book, and O’Reilly Media, Inc., was aware of a trademark claim, the designations have been printed in caps or initial caps.
While every precaution has been taken in the preparation of this book, the publisher and authors assume no responsibility for errors or omissions, or for damages resulting from the use of the information con-tained herein.
Table of Contents
Preface . . . vii
Graphics and Animations . . . 1
Basic Concepts for Adapting to Different Screen Sizes 2Creating the Project Structure in Xcode 3
Enumerating and Loading Fonts 10
Drawing Text 12
Constructing, Setting, and Using Colors 13
Drawing Images 18
Drawing Lines 20
Constructing Paths 27
Drawing Rectangles 31
Adding Shadows to Shapes 34
Creating and Drawing Gradients 40
Displacing Shapes on Graphic Contexts 48
Scaling Shapes Drawn on Graphic Contexts 51
Rotating Shapes Drawn on Graphic Contexts 54
Animating and Moving Views 54
Animating and Scaling Views 65
Animating and Rotating Views 66
Preface
Face it—animations make apps really attractive to users. If your app presents a simple user interface, but only does what it says it does, chances are that users will choose a competitor’s app, one with a better user interface that makes use of iOS SDK’s fantastic animation and graphics capabilities.
This book is written to teach programmers how to incorporate smooth animations, along with skills such as loading custom fonts and drawing images in their apps.
Audience
This book is written for programmers who are fairly new to Cocoa and iOS program-ming. However, it is assumed that you know basic Objective-C and have done some Cocoa programming. I also assume you know some elementary principles of computer graphics, such as coordinates and the RGB color scheme.
Conventions Used in This Book
The following typographical conventions are used in this book: Italic
Indicates new terms, URLs, email addresses, filenames, and file extensions.
Constant width
Used for program listings, as well as within paragraphs to refer to program elements such as variable or function names, databases, data types, environment variables, statements, and keywords.
Constant width bold
Shows commands or other text that should be typed literally by the user. Constant width italic
Shows text that should be replaced with user-supplied values or by values deter-mined by context.
This icon signifies a tip, suggestion, or general note.
This icon indicates a warning or caution.
Using Code Examples
This book is here to help you get your job done. In general, you may use the code in this book in your programs and documentation. You do not need to contact us for permission unless you’re reproducing a significant portion of the code. For example, writing a program that uses several chunks of code from this book does not require permission. Selling or distributing a CD-ROM of examples from O’Reilly books does require permission. Answering a question by citing this book and quoting example code does not require permission. Incorporating a significant amount of example code from this book into your product’s documentation does require permission.
We appreciate, but do not require, attribution. An attribution usually includes the title, author, publisher, and ISBN. For example: “Graphics and Animation on iOS by Vandad Nahavandipoor (O’Reilly). Copyright 2011 Vandad Nahavandipoor, 978-1-449-30567-3.”
If you feel your use of code examples falls outside fair use or the permission given above, feel free to contact us at [email protected].
Safari® Books Online
Safari Books Online is an on-demand digital library that lets you easily search over 7,500 technology and creative reference books and videos to find the answers you need quickly.
With a subscription, you can read any page and watch any video from our library online. Read books on your cell phone and mobile devices. Access new titles before they are available for print, and get exclusive access to manuscripts in development and post feedback for the authors. Copy and paste code samples, organize your favorites, down-load chapters, bookmark key sections, create notes, print out pages, and benefit from tons of other time-saving features.
How to Contact Us
Please address comments and questions concerning this book to the publisher: O’Reilly Media, Inc.
1005 Gravenstein Highway North Sebastopol, CA 95472
800-998-9938 (in the United States or Canada) 707-829-0515 (international or local)
707-829-0104 (fax)
We have a web page for this book, where we list errata, examples, and any additional information. You can access this page at:
http://www.oreilly.com/catalog/9781449305673
To comment or ask technical questions about this book, send email to:
For more information about our books, courses, conferences, and news, see our website at http://www.oreilly.com.
Find us on Facebook: http://facebook.com/oreilly
Follow us on Twitter: http://twitter.com/oreillymedia
Watch us on YouTube: http://www.youtube.com/oreillymedia
Acknowledgments
In 2007, after iOS became so popular among programmers, I started to learn how to program in iOS SDK using an Xcode that was much less advanced than what we use today. My first impression after seeing some iOS apps was: “My God, they look gor-geous!” I had never seen such smooth interfaces, graphics, and animations rendered on a mobile device before, and the big touch-screen added to that excitement. If you are thinking of writing iOS apps that require smooth animations and graphics render-ing, then this is the book for you.
Although I did my part to write this book, I feel the need to thank my wonderful col-leagues and friends, Andy Oram and Brian Jepson of O’Reilly, for their continuous support and help in every project we have worked on together so far, including the book you are reading right now.
I would also like to thank Sarah Schneider, Rachel James, Betsy Waliszewski, and Gretchen Giles of O’Reilly for always being very helpful and responsive to my annoying requests to create SVN repositories, change book titles, and so on. Thanks also go to Gary McCarville, Kirk Pattinson, Shaun Puckrin, Sushil Shirke, Simon Whitty, Mark Harris, and Shency Revindran for being great friends and colleagues.
Graphics and Animations
You’ve certainly seen applications with beautiful graphics effects on iPhones or iPads. And you’ve probably also encountered impressive animations in games and other apps. When the iOS runtime and Cocoa programming frameworks combine, they make an amazing variety of graphics and animation effects possible with relatively simple cod-ing. The quality of these graphics and animations depends partly, of course, on the aesthetic sensitivities of the programmer and artistic collaborators. But in this short book, you’ll see how much you can accomplish with modest programming skills. I’ll dispense with conceptual background, preferring to introduce ideas such as color spaces, transformation, and the graphics context as we go along. I’ll just mention a few basics before leaping into code.
In Cocoa Touch, an app is made up of windows and views. An app with a UI has at least one window that contains, in turn, one or more views. In Cocoa Touch, a window is an instance of UIWindow. Usually, an app will open to the main window and the
programmer will then add views to the window to represent different parts of the UI: parts such as buttons, labels, images, and custom controls. All these UI-related com-ponents are handled and drawn by UIKit.
Some of these things might sound relatively difficult to understand, but I promise you that as we proceed through this book, you will understand them step-by-step with the many examples I will give.
Apple has provided developers with powerful frameworks that handle graphics and animations in iOS and OS X. Some of these frameworks and technologies are: UIKit
The high-level framework that allows developers to create views, windows, but-tons, and other UI related components. It also incorporates some of the low-level APIs into an easier-to-use high-level API.
Quartz 2D
The main engine running under the hood to facilitate drawing in iOS; UIKit uses Quartz.
Core Graphics
A framework that supports the graphics context (more on this later), loading im-ages, drawing imim-ages, and so on.
Core Animation
A framework that, as its name implies, facilitates animations in iOS.
Basic Concepts for Adapting to Different Screen Sizes
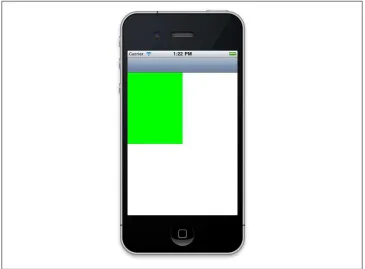
When drawing on a screen, one of the most important concepts to grasp is the relation between points and pixels. I’m sure you’re familiar with pixels, but what are points? They’re the device-independent counterpart of pixels. For instance, compare the iPhone 3GS to the iPhone 4. Both devices have 3.5-inch displays. However, the number of pixels that iPhone 3GS can draw in portrait mode is 320×480. The same screen size on the iPhone 4 is capable of drawing twice as many, or 640×960, pixels in portrait mode.
Now imagine you are writing an iPhone app that has only one screen, and that you are simply filling the whole screen with the color green. Imagine that you naïvely specify a rectangular area of 320×480 pixels. When iPhone 3GS users run your app, they will be quite happy because “it does what it says it does”—fill the entire screen with the color green. iPhone 4 users, on the other hand, will be quite unhappy: what they will see is quite different, as shown in Figure 1.
To remedy this problem, Apple introduced device-independent drawing methods to help developers focus on how their shapes and graphics have to appear on a device instead of worrying about the screen sizes and resolutions of different devices that run the same code. To fix the issue we saw in Figure 1, the developer of the app can simply use the relevant APIs to specify the green rectangle in points instead of pixels. That will allow the same code to run on the iPhone 3GS and the iPhone 4, ensuring that the screen on the iPhone 4 will be filled with the rectangle. For this reason, many of the methods that you will see in this book will rely on points (or as Apple calls them, logical points) instead of pixels.
Creating the Project Structure in Xcode
In this book, we will be using view objects of type UIView to draw shapes, strings, and everything else that’s visible on the screen.
I assume you have the latest Xcode from Apple. If not, please head to Xcode’s website in order to download it.
In order to be able to incorporate some of these code snippets in an application, I will first show you the required steps to create a new project in Xcode and subclass
UIView, where we can place our code:
1. Open Xcode.
2. From the File menu, select New→Project.
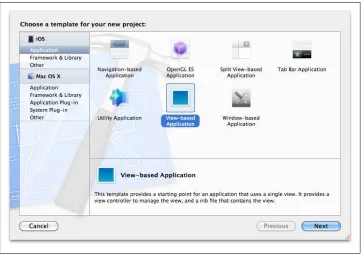
3. On the left side of the screen, make sure the iOS category is selected. Select Ap-plication under that category (see Figure 2).
Figure 1. Device-dependent pixel rendering yields different results on different devices
4. On the right side of the screen, select View-based Application, and press Next (see
Figure 2).
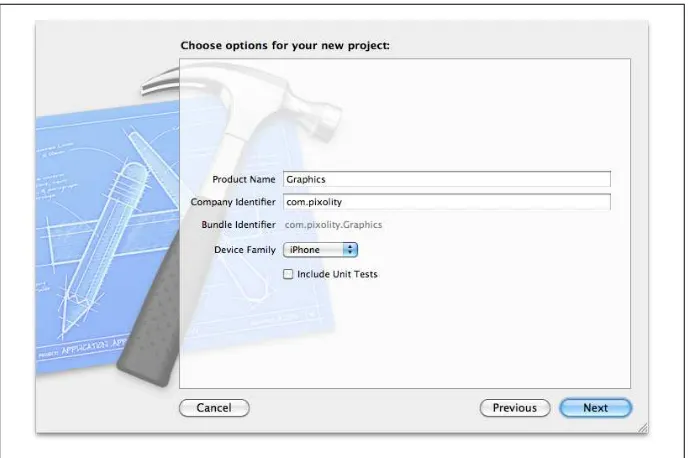
5. In the Product Name box (Figure 3), select a name for your project. I’ve entered Graphics and I suggest you enter the same name to avoid confusion later on. 6. In the Company Identifier box, enter a bundle identifier prefix, which will be
pre-pended to the Product Name you chose. This is usually com.company. I have chosen com.pixolity.
7. In the Device Family, select iPhone, and then press Next.
8. On the next screen (Figure 4), select where you want to save your project. I’ve selected Desktop. Press Create.
Now your Xcode project is open. On the left side of Xcode, expand the Graphics group to reveal all the files that Xcode created for us when we created the project. Now we shall create a view object for our view controller. Please follow these steps to do so:
1. Select the Graphics group from the left hand side in Xcode. 2. Right click on the Graphics group and select New File….
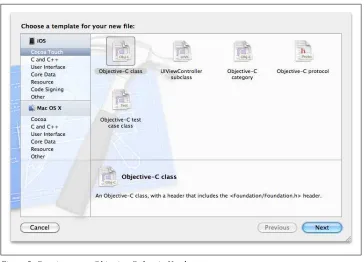
3. In the New File dialog box, make sure iOS is selected as the category on the left side, and select Cocoa Touch as the subcategory (see Figure 5).
Figure 3. Setting the options for a new project in Xcode
Figure 4. Saving the view-based Xcode project to the desktop
4. On the right side, select Objective-C class, and then press Next (see Figure 5).
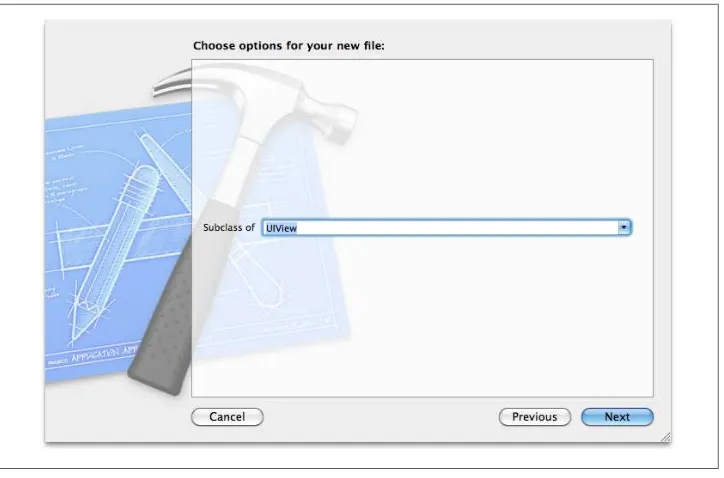
5. In the next screen (Figure 6), make sure that the Subclass box has UIView written inside it, and then press Next.
6. In the Save As dialog, set the file name to GraphicsViewControllerView.m. 7. Select Graphics in the Group drop-down box (see Figure 7).
8. Make sure the “Add to targets” checkbox is checked for the project that we created earlier, and then press Save (see Figure 7).
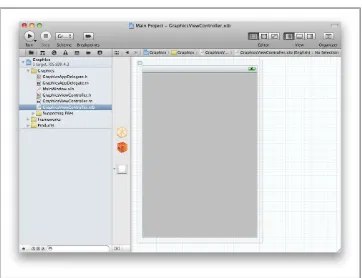
9. On the left side of Xcode’s main window, click on the GraphicsViewController.m file. Interface Builder will be displayed on the right side of Xcode’s screen, as shown in Figure 8. We will not be using the .xib file at this point.
10. From the Xcode menu, select View→Utilities→File Inspector. The file inspector will be displayed, by default, on the right side of Xcode’s window.
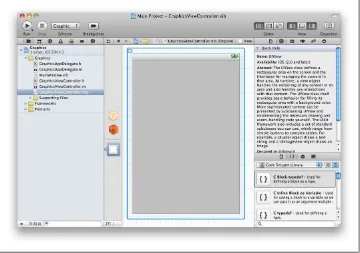
11. Click somewhere inside the gray view that is created for you in Interface Builder. The contents displayed in File Inspector (on the right) will change to reflect your selection (see Figure 9).
Figure 6. Creating a subclass of UIView
Figure 7. Saving a subclass of UIView
12. In File Inspector, choose the Identity Inspector tab on top (see Figure 10). 13. In the Class box, under the Custom Class section, enter GraphicsViewController
View (the view object we created before), and press Return on your keyboard.
Figure 8. Selecting our view controller’s xib file
Now we are ready to start coding. What we did was simply creating a view class of type
UIView so that later on in this book, we can change the code in that class. Then we used Interface Builder to set our view controller’s view class to the same view object that we created. This means that now our view controller’s view will be an instance of the
Figure 9. The file inspector in Interface Builder
Figure 10. The Identity Inspector, showing our view controller’s view object’s information
You have probably already looked at the contents of the view object that Xcode gen-erated. One of the most important methods inside this object is drawRect:. Cocoa
Touch automatically calls this method whenever it is time to draw the view, and uses it to ask the view object to draw its contents on the graphical context that Cocoa Touch automatically prepares for the view. A graphical context can be thought of as a canvas, offering an enormous number of properties such as pen color, pen thickness, etc. Given the context, you can start painting straight away inside the drawRect: method, and Cocoa Touch will make sure that the attributes and properties of the context are applied to your drawings. We will talk about this more later, but now, let’s move on to more interesting subjects.
Enumerating and Loading Fonts
Fonts are fundamental to displaying text on a graphical user interface. The UIKit framework provides programmers with high-level APIs that facilitate the enumerating, loading, and use of fonts. Fonts are encapsulated in the UIFont class in Cocoa Touch.
Each iOS device comes with built-in system fonts. Fonts are organized into families, and each family contains faces. For instance, Helvetica is a font family, and Helvetica Bold is one of the faces of the Helvetica family. To be able to load a font, you must know the font’s face (that is, its name)—and to know the face, you have to know the family. So first, let’s enumerate all the font families that are installed on the device, using the familyNames class method of the UIFont class:
- (void) enumerateFonts{
for (NSString *familyName in [UIFont familyNames]){ NSLog(@"Font Family = %@", familyName);
}
}
Running this program in iOS Simulator, I get results similar to this: ...
Font Family = Heiti TC
Font Family = Sinhala Sangam MN Font Family = Kannada Sangam MN Font Family = Georgia
Font Family = Heiti J Font Family = Times New Roman Font Family = Snell Roundhand Font Family = Geeza Pro Font Family = Helvetica Neue ...
- (void) enumerateFonts{
for (NSString *familyName in [UIFont familyNames]){ NSLog(@"Font Family = %@", familyName);
for (NSString *fontName in
[UIFont fontNamesForFamilyName:familyName]){
NSLog(@"\t%@", fontName);
}
}
}
Running this code in iOS Simulator gives me the following results: ...
So as you can see, Helvetica Neue is the font family and HelveticaNeue-Bold is one of the font names in this family. Now that we know the font name, we can load the fonts into objects of type UIFont using the fontWithName:size: class method of the UIFont
class:
UIFont *helveticaBold =
[UIFont fontWithName:@"HelveticaNeue-Bold" size:12.0f];
If the result of the fontWithName:size: class method of the UIFont class
is nil, the given font name could not be found. Make sure that the font name you have provided is available in the system by first enumerating all the font families and then all font names available in each family.
You can also use the systemFontOfSize: instance method of the UIFont class (or its bold alternative, boldSystemFontOfSize:) to load local system fonts, whatever they might be,
from the device that is running your code. The default system font for iOS devices is Helvetica.
After you have loaded fonts, you can proceed to “Drawing Text” on page 12, where we will use the fonts that we loaded here in order to draw text on a graphical context.
Drawing Text
To draw text, we can use some really handy methods that are built into the NSString
class, such as drawAtPoint:withFont:. Before we proceed further, make sure that you
have followed the instructions in “Creating the Project Structure in Xcode” on page 3. You should now have a view object, subclassed from UIView, named GraphicsViewControllerView. Open that file. If the drawRect: instance method of the
view object is commented out, remove the comments until you have that method in your view object:
#import "GraphicsViewControllerView.h"
@implementation GraphicsViewControllerView
- (id)initWithFrame:(CGRect)frame{ self = [super initWithFrame:frame]; if (self) {
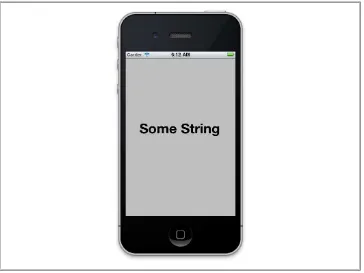
The drawRect: method is where we’ll do our drawing, as mentioned before. Here, we
can start loading our font, and then draw a simple string on the screen at point 40 on the x axis and 180 on the y axis (Figure 11):
NSString *myString = @"Some String";
[myString drawAtPoint:CGPointMake(40, 180) withFont:helveticaBold];
}
In “Constructing, Setting, and Using Colors” on page 13, we will learn how to con-struct colors and use them to draw colorful texts on our view objects.
Constructing, Setting, and Using Colors
UIKit provides programmers with a high-level abstraction of colors, encapsulated in the UIColor object. This class has a few really handy class methods such as redColor,
blueColor, brownColor, and yellowColor. However, if the color you are looking for isn’t
one of the options provided by such explicitly named UIColor methods, you can always
use the colorWithRed:green:blue:alpha: class method of UIColor class to load the color that you are looking for. The return value of this class method is a value of type
UIColor. The parameters of this method are:
red
The amount of red to use in the color. This value can be anything between 0.0f to 1.0f, where 0.0f omits all red and 1.0f makes the red component as dark as
pos-sible.
green
The amount of green to mix with the red in the color. This value also ranges from
0.0f to 1.0f.
Figure 11. A random string drawn on the graphical context of a view
blue
The amount of blue to mix with the red and green in the color. This value also ranges from 0.0f to 1.0f.
alpha
The opaqueness of the color. This value can range from 0.0f to 1.0f, with 1.0f
making the color completely opaque and 0.0f making the color completely trans-parent (in other words, invisible).
After you have an object of type UIColor, you can use its set instance method to make
the current graphics context use that color for subsequent drawing.
You can use the colorWithRed:green:blue:alpha: class method of the UIColor class to load primary colors like red by simply passing 1.0f as the red parameter, and 0.0f for the green and blue parameters. The
alpha is up to you.
If you look at Figure 11, you will notice that the background color of the view object we have created by default is a really ugly gray color. Let’s change that, shall we? Simply find the viewDidLoad instance method of your view controller, GraphicsViewControl ler, and set the background color of your view to white as shown here:
- (void)viewDidLoad{ [super viewDidLoad];
self.view.backgroundColor = [UIColor whiteColor]; }
We will be using instance methods of the NSString class to draw text on
the current graphics context, as we shall soon discuss.
Now let’s load a magenta color into an object of type UIColor and then draw the text I Learn Really Fast on our view’s graphical context using a bold Helvetica font of size
30 (see “Enumerating and Loading Fonts” on page 10 for loading fonts): - (void)drawRect:(CGRect)rect{
// Drawing code
/* Load the color */ UIColor *magentaColor = [UIColor colorWithRed:0.5f green:0.0f blue:0.5f alpha:1.0f];
/* Load the font */ UIFont *helveticaBold =
[UIFont fontWithName:@"HelveticaNeue-Bold" size:30.0f];
/* Our string to be drawn */
NSString *myString = @"I Learn Really Fast";
/* Draw the string using the font. The color has already been set */
[myString drawAtPoint:CGPointMake(25, 190) withFont:helveticaBold];
}
The results are shown in Figure 12.
Figure 12. String drawn with a color on a graphical context
We can also use the drawInRect:withFont: instance method of the NSString class to draw text inside a rectangular space. The text will get stretched to fit into that rectangle. UIKit will even wrap the text if it doesn’t fit horizontally within the given rectangle. Rectangular bounds are encapsulated in CGRect structures. You can use the CGRect Make function to create the bounds of a rectangle. This function takes four parameters:
x
The x position of the origin point of the rectangle in relation to the graphics context. In iOS, this is the number of points heading right, starting from the left side of the rectangle.
y
The y position of the origin point of the rectangle in relation to the graphics context. In iOS, this is the number of points heading down, starting from the top of the rectangle.
width
The width of the rectangle in points.
height
The height of the rectangle in points. - (void)drawRect:(CGRect)rect{
[UIFont boldSystemFontOfSize:30];
/* Our string to be drawn */
NSString *myString = @"I Learn Really Fast";
/* Draw the string using the font. The color has already been set */
[myString drawInRect:CGRectMake(100, /* x */ 120, /* y */
its red, green, blue, and alpha components. To get the components that make up a UIColor object, follow these steps:
1. Use the CGColor instance method of our instance of the UIColor class. This will give
us a color object of type CGColorRef, which is a Core Graphics Color Reference
object.
2. Use the CGColorGetComponents function to get the components that construct the
color object.
3. Use the CGColorGetNumberOfComponents function to determine the number of com-ponents that were used to construct the color (red + green + etc.) if need be. Here is an example:
/* Load the color */ UIColor *steelBlueColor = [UIColor colorWithRed:0.3f green:0.4f blue:0.6f alpha:1.0f];
CGColorRef colorRef = [steelBlueColor CGColor];
Figure 13. Drawing a string in rectangular space
const CGFloat *components =
counter < componentsCount; counter++){
NSLog(@"Component %lu = %.02f", (unsigned long)counter + 1, components[counter]);
}
The output that I get in the console window after running this code is: Component 1 = 0.30
Component 2 = 0.40 Component 3 = 0.60 Component 4 = 1.00
Drawing Images
UIKit helps you draw images with ease. All you have to do is to load your images in instances of type UIImage. The UIImage class provides various class and instance
meth-ods to load your images. Here are some of the important ones in iOS:
imageNamed: class method
Loads the image (and caches the image if it can load it properly). The parameter to this method is the name of the image in the bundle, such as Tree Texture.png.
imageWithData: class method
Loads an image from the data encapsulated in an instance of a NSData object that was passed as the parameter to this method.
initWithContentsOfFile: instance method (for initialization)
Uses the given parameter as the path to an image that has to be loaded and used to initialize the image object.
This path should be the full path to the image in the app bundle.
initWithData: instance method (for initialization)
Uses the given parameter of type NSData to initialize the image. This data should
You can search for xcode filetype:png in Google Images to find Xcode’s icon as a PNG file. We will be drawing this image on a graphics context to demonstrate how to draw images in this section of the book. I’ve already found the file and dragged and dropped that image into my iOS app. Now I have an image called xcode.png in my app bundle. The image is shown in Figure 14.
Figure 14. Xcode’s icon, found by searching in Google
- (void)drawRect:(CGRect)rect{ // Drawing code
UIImage *image = [UIImage imageNamed:@"Xcode.png"];
if (image != nil){
NSLog(@"Successfully loaded the image."); } else {
NSLog(@"Failed to load the image."); }
}
If you have the Xcode.png image in your app bundle, running this code will print
Successfully loaded the image. in the console. If you don’t have the image, Failed to load the image. will get printed. For the remainder of this section, I assume you have
this image in your app bundle. Feel free to place other images in your app bundle and refer to those images instead of Xcode.png, which I will be using in example code.
The two easiest ways to draw an image of type UIImage on a graphics context are:
drawAtPoint: instance method of UIImage class
Draws the image at its original size at the given point. Construct the point using the CGPointMake function.
drawInRect: instance method of UIImage class
Draws the image in the given rectangular space. To construct this rectangular space, use the CGRectMake function:
- (void)drawRect:(CGRect)rect{ // Drawing code
/* Assuming the image is in your app bundle and we can load it */
UIImage *xcodeIcon =
[UIImage imageNamed:@"Xcode.png"];
[xcodeIcon drawAtPoint:CGPointMake(0.0f,
The drawAtPoint: call shown above will draw the image at its full size at point (0, 20),
and the drawInRect: call will draw the image at point (50, 10) at 40×35 points, as shown in Figure 15.
Aspect ratio is the ratio between the width and the height of an image (or a computer screen). Let’s assume you have an image that is 100×100 pixels. If you draw this image at point (0, 0) with a size of (100, 200), you can immediately see on the screen that the image is stretched in height (200 pixels instead of 100). The drawInRect: instance method of
UIImage leaves it up to you how you want to draw your images. In other words, it is you who has to specify the x, y, width, and height of your image as it appears on the screen.
Drawing Lines
Lines have to be drawn using paths. Specify the start and end points, and then ask Core Graphics to fill that path for you. Core Graphics realizes that you have created a line on that path, and will paint that path for you using the color that you specified (see
“Constructing, Setting, and Using Colors” on page 13).
We will be talking about paths more in-depth later (see “Constructing Paths” on page 27), but for now let’s focus on using paths to create straight lines. To do this, follow these steps:
1. Choose a color on your graphics context (see “Constructing, Setting, and Using Colors” on page 13).
2. Retrieve the handle to the graphics context, using the UIGraphicsGetCurrent Context function.
3. Set the starting point for your line using the CGContextMoveToPoint procedure.
4. Move your pen on the graphics context using the CGContextAddLineToPoint
proce-dure to specify the ending point of your line.
5. Create the path that you have laid out using the CGContextStrokePath procedure. This procedure will draw the path using the current color that has been set on the graphics context.
Figure 15. Drawing an image on a graphics context can be accomplished with two different methods
Optionally, you can use the CGContextSetLineWidth procedure to set the width of the
lines that you are drawing on a given graphics context. The first parameter to this procedure is the graphics context that you are drawing on, and the second parameter is the width of the line, expressed as a floating-point number (CGFloat).
In iOS, the line width is measured in logical points.
Here is an example:
/* Get the current graphics context */ CGContextRef currentContext =
/* Use the context's current color to draw the line */
CGContextStrokePath(currentContext);
}
Running this code in iOS Simulator will show you results similar to those in Figure 16.
Let me show you another example. As mentioned earlier, the CGContextAddLineTo Point procedure specifies the end point of the current line. Now what if we have already
drawn a line from point (20, 20) to point (100, 100), and want to draw a line from (100, 100) to (300, 100)? You might think that after drawing the first line, we have to move our pen to point (100, 100) using the CGContextMoveToPoint procedure, and then draw
will work, there is a more efficient way to do this. After you call the CGContextAddLine ToPoint procedure to specify the ending point of your current line, your pen’s position
will change to what you pass to this method. In other words, after you issue a method using the pen, it leaves the pen’s position at the ending point of whatever it drew. So to draw another line from the current ending point to another point, all you have to do is to call the CGContextAddLineToPoint procedure again with another ending point. Here
is an example:
- (void)drawRect:(CGRect)rect{ // Drawing code
/* Set the color that we want to use to draw the line */ [[UIColor brownColor] set];
/* Get the current graphics context */ CGContextRef currentContext =
UIGraphicsGetCurrentContext();
/* Set the width for the lines */ CGContextSetLineWidth(currentContext, 5.0f);
Figure 16. Drawing a line on a current graphics context
/* Start the line at this point */ CGContextMoveToPoint(currentContext, 20.0f,
20.0f);
/* And end it at this point */
CGContextAddLineToPoint(currentContext, 100.0f, 100.0f);
/* Extend the line to another point */ CGContextAddLineToPoint(currentContext, 300.0f, 100.0f);
/* Use the context's current color to draw the lines */
CGContextStrokePath(currentContext);
}
The results are shown in Figure 17. You can see that both lines are successfully drawn without us having to move the pen for the second line.
The point where two lines meet is, not surprisingly, called a join. With Core Graphics, you can specify what type of join you want to have between lines that are connected to each other. To make your choice, you must use the CGContextSetLineJoin procedure.
It takes two parameters: a graphics context on which you are setting the join type, and the join type itself, which must be of type CGLineJoin. CGLineJoin is an enumeration of
the following values:
kCGLineJoinMiter
Joins will be made out of sharp corners. This is the default join type.
kCGLineJoinBevel
Joins will be squared off on the corner.
kCGLineJoinRound
As the name implies, this makes round joins.
Let’s have a look at an example. Let’s say we want to write a program that can draw “rooftops” on a graphics context (three of them, one for each join type), and also draws text below each rooftop describing the type of join it is using. Something similar to
Figure 18 will be the result.
Figure 18. Three types of line joins in Core Graphics
To accomplish this, I’ve written a method named drawRooftopAtTopPointof:text ToDisplay:lineJoin:, which takes three parameters:
1. A point at which the top of the rooftop should be placed 2. The text to display inside the rooftop
3. The join type to be used.
/* Get the current graphics context */ CGContextRef currentContext =
drawAtPoint:CGPointMake(paramTopPoint.x - 40.0f, paramTopPoint.y + 60.0f) withFont:[UIFont boldSystemFontOfSize:30.0f]];
}
Now let’s call this method in the drawRect: instance method of our view object where
we have a graphics context:
A series of points placed together can form a shape. A series of shapes put together builds a path. Paths can easily be managed by Core Graphics. In “Drawing Lines” on page 20, we worked indirectly with paths using CGContext functions. But
Core Graphics also has functions that work directly with paths, as we shall soon see. Paths belong to whichever graphics context they are drawn on. Paths do not have boundaries or specific shapes, unlike the shapes we draw on them. But paths do have bounding boxes. Please bear in mind that boundaries are not the same as bounding boxes. Boundaries are limits above which you cannot draw on a canvas, while the bounding box of a path is the smallest rectangle that contains all the shapes, points, and other objects that have been drawn on that specific path. Think of paths as stamps and think of your graphics context as the envelope. Your envelope could be the same every time you mail something to your friend, but what you put on that context (the stamp or the path) can be different.
After you finish drawing on a path, you can then draw that path on the graphics context. Developers familiar with game programming know the concept of buffers, which draw their scenes and, at appropriate times, flush the images onto the screen. Paths are those buffers. They are like blank canvases that can be drawn on graphics contexts when the time is right.
The first step in directly working with paths is to create them. The method creating the path returns a handle that you use whenever you want to draw something on that path, passing the handle to Core Graphics for reference. After you create the path, you can add different points, lines, and shapes to it and then draw the path. You can either fill the path or paint it with a stroke on a graphics context. Here are the methods you have to work with:
CGPathCreateMutable function
Creates a new mutable path of type CGMutablePathRef and returns its handle. We
should dispose of this path once we are done with it, as you will soon see.
CGPathMoveToPoint procedure
Moves the current pen position on the path to the point specified by a parameter of type CGPoint.
CGPathAddLineToPoint procedure
Draws a line segment from the current pen position to the specified position (again, specified by a value of type CGPoint).
CGContextAddPath procedure
Adds a given path (specified by a path handle) to a graphics context, ready for drawing.
CGContextDrawPath procedure
Draws a given path on the graphics context.
CGPathRelease procedure
Releases the memory allocated for a path handle.
CGPathAddRect procedure
Adds a rectangle to a path. The rectangle’s boundaries are specified by a CGRect
structure.
There are three important drawing methods that you can ask the CGContextDrawPath
procedure to perform:
kCGPathStroke
Draws a line (stroke) to mark the boundary or edge of the path, using the currently selected stroke color.
kCGPathFill
Fills the area surrounded by the path with the currently selected fill color.
kCGPathFillStroke
Combines stroke and fill. Uses the currently selected fill color to fill the path, and the currently selected stroke color to draw the edge of the path. We’ll see an ex-ample of this method in the following section.
For this example, I have removed the status bar from the application in iOS Simulator. If you don’t want to bother doing this, please continue to the example code. With a status bar, the output of this code will only be slightly different from the screenshot I’ll show. To hide the status bar, find the Info.plist file in your Xcode project and add a key to it named UIStatusBarHidden with the value of YES, as shown in Fig-ure 19. This will force your app’s status bar to be hidden when it opens.
Figure 19. Hiding the status bar in an iOS app using the Info.plist file
- (void)drawRect:(CGRect)rect{ // Drawing code
/* Create the path */
CGMutablePathRef path = CGPathCreateMutable();
/* How big is our screen? We want the X to cover the whole screen */
CGRect screenBounds = [[UIScreen mainScreen] bounds];
/* Start from top-left */ CGPathMoveToPoint(path, NULL,
screenBounds.origin.x, screenBounds.origin.y);
/* Draw a line from top-left to bottom-right of the screen */ CGPathAddLineToPoint(path, NULL,
screenBounds.size.width, screenBounds.size.height);
/* Start another line from top-right */ CGPathMoveToPoint(path,
NULL,
screenBounds.size.width, screenBounds.origin.y);
/* Draw a line from top-right to bottom-left */ CGPathAddLineToPoint(path,
/* Finally release the path object */ CGPathRelease(path);
}
The NULL parameters getting passed to procedures such as CGPath MoveToPoint represent possible transformations that can be used when
drawing the shapes and lines on a given path. For information about transformations, refer to “Displacing Shapes on Graphic Con-texts” on page 48, “Scaling Shapes Drawn on Graphic Con-texts” on page 51, and “Rotating Shapes Drawn on Graphic Con-texts” on page 54.
You can see how easy it is to draw a path on a context. All you really have to remember is how to create a new mutable path (CGPathCreateMutable), add that path to your
graphics context (CGContextAddPath), and draw it on a graphics context (CGContextDraw Path). If you run this code, you will get an output similar to that shown in Figure 20.
Drawing Rectangles
As we learned in “Constructing Paths” on page 27, you can construct and use paths quite easily. One of the procedures that you can use on paths in Core Graphics is
CGPathAddRect, which lets you draw rectangles as part of paths. Here is an example: - (void)drawRect:(CGRect)rect{
// Drawing code
/* Create the path first. Just the path handle. */ CGMutablePathRef path = CGPathCreateMutable();
/* Here are our rectangle boundaries */ CGRect rectangle = CGRectMake(10.0f, 10.0f, 200.0f, 300.0f);
/* Add the rectangle to the path */ CGPathAddRect(path,
NULL, rectangle);
Figure 20. Drawing on a graphics context using paths
/* Get the handle to the current context */
Here, we are drawing a rectangle on the path, filling it with cornflower blue, and strok-ing the edges of the rectangle with brown. Figure 21 shows how the output will look when we run our program.
If you have multiple rectangles to draw, you can pass an array of CGRect objects to the CGPathAddRects procedure. Here is an example:
- (void)drawRect:(CGRect)rect{ // Drawing code
/* Create the path first. Just the path handle. */ CGMutablePathRef path = CGPathCreateMutable();
/* Here are our first rectangle boundaries */ CGRect rectangle1 = CGRectMake(10.0f, 10.0f, 200.0f, 300.0f);
/* Put both rectangles into an array */ CGRect rectangles[2] = {
rectangle1, rectangle2 };
/* Add the rectangles to the path */ CGPathAddRects(path,
NULL,
(const CGRect *)&rectangles, 2);
/* Get the handle to the current context */ CGContextRef currentContext =
UIGraphicsGetCurrentContext();
/* Add the path to the context */ CGContextAddPath(currentContext, path);
/* Set the fill color to cornflower blue */ [[UIColor colorWithRed:0.20f
green:0.60f blue:0.80f
alpha:1.0f] setFill];
Figure 21. Drawing a rectangle using paths
/* Set the stroke color to black */
Figure 22 shows how the output of this code will look when run in iOS Simulator. The parameters that we pass to the CGPathAddRects procedure are (in this order):
1. The handle to the path where we will add the rectangles.
2. The transformation, if any, to use on to the rectangles. (For information about transformations, refer to “Displacing Shapes on Graphic Contexts” on page 48,
“Scaling Shapes Drawn on Graphic Contexts” on page 51, and “Rotating Shapes Drawn on Graphic Contexts” on page 54.)
3. A reference to the array holding the CGRect rectangles.
4. The number of rectangles in the array that we passed in the previous parameter. It is very important that you pass exactly as many rectangles as you have in your array, to avoid unknown behavior by this procedure.
Adding Shadows to Shapes
It is easy to draw shadows using Core Graphics. The graphics context is the element that bears the shadow. What that means is that you need to apply the shadow to the context, draw the shapes that need the shadow, and then remove the shadow from the context (or set a new context). We will see an example of this soon.
In Core Graphics, we can use two procedures to apply a shadow to a graphics context:
CGContextSetShadow procedure
This procedure, which creates black or gray shadows, accepts three parameters: • The graphics context on which the shadow has to be applied.
• The blur value that has to be applied to the shadow, specified as a floating point value (CGFloat). Specifying 0.0f will cause the shadow to be a solid shape. The
higher this value goes, the more blurred the shadow will get. We will see an example of this soon.
CGContextSetShadowWithColor procedure
This procedure accepts the exact same parameters as CGContextSetShadow, with one
addition. This fourth parameter, of type CGColorRef, sets the color of the shadow. At the beginning of this section, I mentioned that the graphics context retains its shadow properties until we explicitly remove the shadow. Let me make that point clearer by showing you an example. Let us go ahead and write code that allows us to draw two rectangles, the first one with a shadow and the second one without a shadow. We will draw the first one in this way:
- (void) drawRectAtTopOfScreen{
/* Get the handle to the current context */ CGContextRef currentContext =
UIGraphicsGetCurrentContext();
Figure 22. Drawing multiple rectangles at once
CGContextSetShadowWithColor(currentContext,
CGSizeMake(10.0f, 10.0f), 20.0f,
[[UIColor grayColor] CGColor]);
/* Create the path first. Just the path handle. */ CGMutablePathRef path = CGPathCreateMutable();
/* Here are our rectangle boundaries */ CGRect firstRect = CGRectMake(55.0f, 60.0f,
If we call this method in the drawRect: instance method of our view object, we will see
the rectangle drawn on the screen with a nice shadow just like we wanted it, as shown in Figure 23.
Now let’s go ahead and draw a second rectangle after the first one. We won’t ask for a shadow, but we’ll leave the shadow property of the graphics context the way it was for the first rectangle:
- (void) drawRectAtBottomOfScreen{
/* Get the handle to the current context */ CGContextRef currentContext =
UIGraphicsGetCurrentContext();
CGRect secondRect = CGRectMake(150.0f, 250.0f, 100.0f, 100.0f); CGPathAddRect(secondPath,
NULL, secondRect);
CGContextAddPath(currentContext, secondPath);
[[UIColor purpleColor] setFill];
CGContextDrawPath(currentContext, kCGPathFill);
CGPathRelease(secondPath);
}
- (void)drawRect:(CGRect)rect{ // Drawing code
[self drawRectAtTopOfScreen]; [self drawRectAtBottomOfScreen];
}
Figure 23. Shadow applied to a rectangle
The drawRect: method first calls the drawRectAtTopOfScreen method, and right after
that, calls the drawRectAtBottomOfScreen method. We haven’t asked for a shadow for
the drawRectAtBottomOfScreen rectangle, yet if you run the app, you will see something
similar to what is shown in Figure 24.
Figure 24. Shadow applied to a second rectangle is not on purpose
It’s immediately obvious that the shadow is applied to the second rectangle at the bottom of the screen. To avoid this, we will save the state of the graphics context before applying the shadow effect, and then restore the state when we want to remove the shadow effect.
Broadly speaking, saving and restoring the state of a graphics context is not limited to shadows only. Restoring the state of a graphics context restores everything (fill color, font, line thickness, etc.) to the values they had before you set them. So for instance, if you applied fill and stroke colors in the meantime, those colors will be reset.
You can save the state of a graphics context through the CGContextSaveGState procedure and restore the previous state through the CGContextRestoreGState procedure. So if we
modify the drawRectAtTopOfScreen procedure by saving the state of the graphics context
- (void) drawRectAtTopOfScreen{ CGMutablePathRef path = CGPathCreateMutable();
/* Here are our rectangle boundaries */ CGRect firstRect = CGRectMake(55.0f, 60.0f,
Creating and Drawing Gradients
After learning about colors in “Constructing, Setting, and Using Colors” on page 13, we’re ready to put our skills to better use than drawing simple rectangles and colorful text!
Core Graphics allows programmers to create two types of gradients: axial and radial. (We will only discuss axial gradients in this book.) Axial gradients are gradients that start from one point with one color and end at another point with another color (al-though they can start and stop with the same color, which does not make them much of a gradient). “Axial” means relating to an axis. The two points (start and end point) create a line segment, which will be the axis on which the gradient will be drawn. An example of an axial gradient is shown in Figure 26.
In order to create an axial gradient, you must call the CGGradientCreateWithColor Components function. The return value of this function will be the new gradient of type CGGradientRef. This is the handle to the gradient. Once you are done with the gradient,
you must call the CGGradientRelease procedure, passing the handle to the gradient that
you had previously retrieved from CGGradientCreateWithColorComponents.
The CGGradientCreateWithColorComponents function takes four parameters:
A color space
This is a container for a range of colors, and must be of type CGColorSpaceRef. For
this parameter, we can just pass the return value of the CGColorSpaceCreate DeviceRGB function, which will give us an RGB color space.
An array of color components (for details, see “Constructing, Setting, and Using Col-ors” on page 13)
This array has to contain red, green, blue, and alpha values, all represented as
CGFloat values. The number of elements in the array is tightly linked to the next two parameters. Essentially, you have to include enough values in this array to specify the number of locations in the fourth parameter. So if you ask for two locations (the start and end point), you have to provide two colors in the array here. And since each color is made out of red, green, blue, and alpha, this array has to have 2×4 items: four for the first color and four for the second. Don’t worry if you didn’t get all this, you will eventually understand it through the examples that follow in this section.
Figure 26. An axial gradient, starting from the color blue and ending in the color green
Locations of colors in the array of colors
This parameter controls how quickly the gradient shifts from one color to another. The number of elements must be the same as the value of the fourth parameter. If we ask for four colors, for example, and we want the first color to be the starting color and the last color to be the ending color in the gradient, we have to provide an array of two items of type CGFloats, with the first item set to 0.0f (as in the
first item in the array of colors) and the second item set to 3.0f (as in the fourth item in the array of colors). The values of the two intermediate colors determine how the gradient actually inserts colors to get from the start to the end. Again, don’t worry if this is too difficult to grasp. I will give you many examples to help you fully understand the concept.
Number of locations
This specifies how many colors and locations we want.
Let’s have a look at an example. Suppose we want to draw the same gradient we saw in Figure 26? Here’s how:
1. Pick the start and end points of the gradient—the axis along which it will shift. In this case, I’ve chosen to move from left to right. Think of this as changing color as you move along a hypothetical horizontal line. Along that line, we will spread the colors so that every perpendicular line to this horizontal line contains only one color. In this case, the perpendicular lines would be every vertical line in Fig-ure 26. Look at those vertical lines closely. Every single one contains only one color, which runs all the way from top to the bottom. That’s how axial gradients work. OK, that’s enough theory—let’s go to the second step.
2. Now we have to create a color space to pass to the first parameter of the
CGGradientCreateWithColorComponents function, as mentioned before:
CGColorSpaceRef colorSpace = CGColorSpaceCreateDeviceRGB();
We will release this color space once we are done with it.
3. Select blue as the starting point (left) and green as the ending point (right), ac-cording to the colors chosen in Figure 26. The names I’ve selected (startColorCom ponents and endColorComponents) are arbitrarily chosen to help us remember what we’re doing with each color. We’ll actually use array positions to specify which one is the start and which one is the end:
UIColor *startColor = [UIColor blueColor]; CGFloat *startColorComponents =
UIColor *endColor = [UIColor greenColor]; CGFloat *endColorComponents =
(CGFloat *)CGColorGetComponents([endColor CGColor]);
If you don’t remember the concept behind color components, I suggest that you look at the section “Constructing, Setting, and Using Col-ors” on page 13, before you continue reading these instructions.
4. After retrieving the components of each color, we place them all in one flat array to pass to the CGGradientCreateWithColorComponents function:
CGFloat colorComponents[8] = {
/* Four components of the blue color (RGBA) */ startColorComponents[0],
startColorComponents[1], startColorComponents[2],
startColorComponents[3], /* First color = blue */
/* Four components of the green color (RGBA) */ endColorComponents[0],
endColorComponents[1], endColorComponents[2],
endColorComponents[3], /* Second color = green */
};
5. Because we have only two colors in this array, we need to specify that the first is positioned at the very beginning of the gradient (position 0.0) and the second at the very end (position 1.0). So let’s place these indices in an array to pass to the
CGGradientCreateWithColorComponents function:
CGFloat colorIndices[2] = {
0.0f, /* Color 0 in the colorComponents array */ 1.0f, /* Color 1 in the colorComponents array */ };
6. Now all we have to do is to actually call the CGGradientCreateWithColor Components function with all these values that we generated:
CGGradientRef gradient =
7. Fantastic! Now we have our gradient object in the gradient variable. Before we
forget, we have to release the color space that we created using the CGColorSpace CreateDeviceRGB function:
CGColorSpaceRelease(colorSpace);
Now we’ll use the CGContextDrawLinearGradient procedure to draw the axial gradient
on a graphics context. This procedure takes five parameters: Graphics context
Specifies the graphics context on which the axial gradient will be drawn. Axial gradient
The handle to the axial gradient object. We created this gradient object using the
CGGradientCreateWithColorComponents function.
Start point
A point on the graphics context, specified by a CGPoint, that indicates the start point of the gradient.
End point
A point on the graphics context, specified by a CGPoint, that indicates the end point
of the gradient. Gradient drawing options
Specifies what happens if your start or end point isn’t at the edge of the graphical context. You can use your start or end color to fill the space that lies outside the gradient. Specify one of the following values for this parameter:
kCGGradientDrawsAfterEndLocation
Extends the gradient to all points after the ending point of the gradient.
kCGGradientDrawsBeforeStartLocation
Extends the gradient to all points before the starting point of the gradient.
0
Does not extend the gradient in any way.
To extend colors on both sides, specify both the “after” and “before” parameters as a logical OR (using the | operator). We’ll see an example later:
CGRect screenBounds = [[UIScreen mainScreen] bounds];
The gradient handle we are releasing at the end of this code was created in another code block in an earlier example.
The output of this code will obviously look similar to that shown in Figure 26. Because we started the gradient from the leftmost point of our view and stretched it all the way to the rightmost point, we couldn’t take advantage of the values that could be passed to the final Gradient drawing options parameter of the CGContextDrawLinearGradient
procedure. Let’s remedy that, shall we? How about we draw a gradient that looks sim-ilar to that which is shown in Figure 27?
Figure 27. An axial gradient with start and end point color extensions
We will use the same procedure explained earlier in this section to code the result: - (void)drawRect:(CGRect)rect{
// Drawing code
CGContextRef currentContext = UIGraphicsGetCurrentContext();
CGContextSaveGState(currentContext);
CGColorSpaceRef colorSpace = CGColorSpaceCreateDeviceRGB();
UIColor *startColor = [UIColor orangeColor]; CGFloat *startColorComponents =
(CGFloat *)CGColorGetComponents([startColor CGColor]);
UIColor *endColor = [UIColor blueColor]; CGFloat *endColorComponents =
(CGFloat *)CGColorGetComponents([endColor CGColor]);
CGFloat colorComponents[8] = {
/* Four components of the orange color (RGBA) */ startColorComponents[0],
startColorComponents[1], startColorComponents[2],
startColorComponents[3], /* First color = orange */
/* Four components of the blue color (RGBA) */ endColorComponents[0],
endColorComponents[1], endColorComponents[2],
endColorComponents[3], /* Second color = blue */
};
CGFloat colorIndices[2] = {
0.0f, /* Color 0 in the colorComponents array */
kCGGradientDrawsBeforeStartLocation | kCGGradientDrawsAfterEndLocation);
CGGradientRelease(gradient);
CGContextRestoreGState(currentContext);
}
It might be difficult to understand how mixing kCGGradientDrawsBeforeStartLocation
and kCGGradientDrawsAfterEndLocation values passed to the CGContextDrawLinear Gradient procedure is creating a diagonal effect like that shown in Figure 27. So let’s
remove those values and set that parameter of the CGContextDrawLinearGradient pro-cedure to 0 like we had it before. Figure 28 shows what the results will be.
Figure 28. Axial gradient without stretched colors
It’s easy to conclude that the gradient in Figure 28 is the same gradient that we see in
Figure 27. However, the gradient in Figure 27 extends the start and end points’ colors all the way across the graphics context, which is why you can see the whole screen covered with color.
Displacing Shapes on Graphic Contexts
“Drawing Rectangles” on page 31 mentioned transformations. These are exactly what the name suggests: changes to the way a graphic is displayed. Transformations in Core Graphics are objects that you apply to shapes before they get drawn. For instance, you can create a translation transformation. Translating what, you might be asking? A translation transformation is a mechanism by which you can displace a shape or a graphics context.
Other types of transformations include rotation (see “Rotating Shapes Drawn on Graphic Contexts” on page 54) and scaling (see “Scaling Shapes Drawn on Graphic Contexts” on page 51). These are all examples of affine transformations, which map each point in the origin to another point in the final version. All the transformations we discuss in this book will be affine transformations.
A translation transformation translates the current position of a shape on a path or graphics context to another relative place. For instance, if you draw a point at location (10, 20), apply a translation transformation of (30, 40) to it, and then draw it, the point will be drawn at (40, 60), because 40 is the sum of 10+30 and 60 is the sum of 20+40. In order to create a new translation transformation, we must use the CGAffine TransformMakeTranslation function, which will return an affine transformation of type CGAffineTransform. The two parameters to this function specify the x and the y trans-lation in points.
In “Drawing Rectangles” on page 31, we saw that the CGPathAddRect procedure accepts,
as its second parameter, a transformation object of type CGAffineTransform. To displace
a rectangle from its original place to another, you can simply create an affine transfor-mation specifying the changes you want to make in the x and y coordinates, and pass the transformation to the second parameter of the CGPathAddRect procedure as shown
here:
- (void)drawRect:(CGRect)rect{ // Drawing code
/* Create the path first. Just the path handle. */ CGMutablePathRef path = CGPathCreateMutable();
/* Here are our rectangle boundaries */ CGRect rectangle = CGRectMake(10.0f, 10.0f, 200.0f, 300.0f);
/* We want to displace the rectangle to the right by 100 points but want to keep the y position
untouched */
CGAffineTransform transform =
/* Add the rectangle to the path */
Figure 29 shows the output of this block of code when placed inside a view object. Compare Figure 29 with Figure 21. Can you see the difference? Check the source code for both figures and you’ll see that the x and y points specified for both rectangles in both code blocks are the same. It is just that in Figure 29, we have applied an affine translation transformation to the rectangle when we added it to the path.
In addition to applying transformations to shapes that get drawn to a path, we can apply transformations to graphics contexts using the CGContextTranslateCTM
proce-dure. This applies a translation transformation on the current transformation matrix (CTM). The current transformation matrix, although its name might be complex, is quite simple to understand. Think of CTM as how your graphics context’s center is set up, and how each point that you draw gets projected onto the screen. For instance, when you ask Core Graphics to draw a point at (0, 0), Core Graphics finds the center of the screen by looking at the CTM. The CTM will then do some calculations and tell Core Graphics that point (0, 0) is indeed at the top-left corner of the screen. Using procedures such as CGContextTranslateCTM, you can change how CTM is configured
and subsequently force every shape drawn on the graphics context to be shifted to another place on the canvas. Here is an example where we achieve the exact same effect we saw in Figure 29 by applying a translation transformation to the CTM instead of directly to our rectangle:
- (void)drawRect:(CGRect)rect{ // Drawing code
/* Create the path first. Just the path handle. */ CGMutablePathRef path = CGPathCreateMutable();
/* Here are our rectangle boundaries */ CGRect rectangle = CGRectMake(10.0f, 10.0f, 200.0f, 300.0f);
/* Add the rectangle to the path */ CGPathAddRect(path,
NULL, rectangle);
/* Get the handle to the current context */ CGContextRef currentContext =
/* Save the state of the context to revert back to how it was at this state, later */ CGContextSaveGState(currentContext);
/* Translate the current transformation matrix to the right by 100 points */
After running this program, you will notice that the results are exactly like those shown in Figure 29.
Scaling Shapes Drawn on Graphic Contexts
“Displacing Shapes on Graphic Contexts” on page 48 explained what a transformation is, and how to apply it to shapes and graphics contexts. One of the transformations that you can apply is scaling. You can easily ask Core Graphics to scale a shape, such as a circle, to 100 times its original size.
To create an affine scale transformation, use the CGAffineTransformMakeScale function,
which returns a transformation object of type CGAffineTransform. If you want to apply