Build Awesome Command-Line Applications in Ruby
Some command-line applications save time and are a joy to use. Others just make you want to tear your hair out. David Copeland has written a guide to writing the kind of command-line apps that will make your users want to hug you. From providing a humane command-line interface, to being self-documenting, to inte-grating seamlessly with the rest of the command-line universe—this book will show you how to take your scripts from adequate to awesome.
➤ Avdi Grimm
Ruby developer, author, Exceptional Ruby, and blogger, Virtuous Code This book proves that text mode is not the just the domain of batch scripts and glue code. Beyond the extensive survey of current Ruby CLI tools, David brings an unmatched focus on user experience and testing. Every full-stack developer should learn how to build the kinds of apps covered in this book.
➤ Wynn Netherland CTO, Pure Charity
I know of no other Ruby book that covers the content in this useful work, espe-cially with its eye toward making Ruby command-line applications better citizens. ➤ Noel Rappin
This well-written book teaches ideas that are really important: that Ruby is a powerful language for writing command-line tools; that CLI tools, unlike GUI tools, can be combined in an infinite number of ways; that the effort required to automate small recurrent tasks pays off; and that there are time-tested best practices for succeeding with command-line tool development. Not only are the scripts in this volume awesome, so is the book.
➤ Staffan Nöteberg
Author, Pomodoro Technique Illustrated
I want a few people on my team to have this book now. I especially can’t wait to get this in the hands of our software lead, who’s a whiz at shell scripts and would be delighted to see how much easier and more reliable option parsing is in Ruby. ➤ Ian Dees
Ruby developer and coauthor, Using JRuby
This book teaches you how to write command-line tools your mother would be proud of.
➤ Matt Wynne
Build Awesome Command-Line
Applications in Ruby 2
Control Your Computer, Simplify Your Life
David Copeland
Many of the designations used by manufacturers and sellers to distinguish their products are claimed as trademarks. Where those designations appear in this book, and The Pragmatic Programmers, LLC was aware of a trademark claim, the designations have been printed in initial capital letters or in all capitals. The Pragmatic Starter Kit, The Pragmatic Programmer, Pragmatic Programming, Pragmatic Bookshelf, PragProg and the linking g device are trade-marks of The Pragmatic Programmers, LLC.
Every precaution was taken in the preparation of this book. However, the publisher assumes no responsibility for errors or omissions, or for damages that may result from the use of information (including program listings) contained herein.
Our Pragmatic courses, workshops, and other products can help you and your team create better software and have more fun. For more information, as well as the latest Pragmatic titles, please visit us at http://pragprog.com.
The team that produced this book includes:
Fahmida Y. Rashid (project manager) David J. Kelly (typesetter)
Janet Furlow (producer) Juliet Benda (rights) Ellie Callahan (support)
Copyright © 2013 The Pragmatic Programmers, LLC.
All rights reserved.
No part of this publication may be reproduced, stored in a retrieval system, or transmitted, in any form, or by any means, electronic, mechanical, photocopying, recording, or otherwise, without the prior consent of the publisher. Printed in the United States of America.
ISBN-13: 978-1-937785-75-8
Contents
Introduction . . . vii
1. Have a Clear and Concise Purpose . . . 1
Problem 1: Backing Up Data 2
1.1
1.2 Problem 2: Managing Tasks 5
1.3 What Makes an Awesome Command-Line App 10
1.4 Moving On 11
2. Be Easy to Use . . . 13
Understanding the Command Line: Options, Arguments,
and Commands 13
2.1
2.2 Building an Easy-to-Use Command-Line Interface 18
2.3 Building an Easy-to-Use Command-Suite Interface 23
2.4 Moving On 31
3. Be Helpful . . . 33
Documenting a Command-Line Interface 33
3.1
3.2 Documenting a Command Suite 38
3.3 Including a Man Page 42
3.4 Writing Good Help Text and Documentation 47
3.5 Moving On 51
4. Play Well with Others . . . 53
Using Exit Codes to Report Success or Failure 54
4.1
4.2 Using the Standard Output and Error Streams
Appropriately 59
4.3 Formatting Output for Use As Input to Another
Program 63
4.4 Trapping Signals Sent from Other Apps 67
5. Delight Casual Users . . . 71
Choosing Names for Options and Commands 72
5.1
5.2 Choosing Default Values for Flags and Arguments 76
5.3 Deciding Default Behavior 82
5.4 Moving On 86
6. Make Configuration Easy . . . 89
Why External Configuration? 89
6.1
6.2 Reading External Configuration from Files 90
6.3 Using Configuration Files with Command Suites 94
6.4 Design Considerations When Using Configuration 98
6.5 Moving On 99
7. Distribute Painlessly . . . 101
Distributing with RubyGems 101
7.1
7.2 Distributing Without RubyGems 108
7.3 Collaborating with Other Developers 110
7.4 Moving On 115
8. Test, Test, Test. . . 117
Testing User Behavior with Acceptance Tests 118
8.1
8.2 Testing in Isolation with Unit Tests 131
8.3 A Word About Test-Driven Development 138
8.4 Moving On 139
9. Be Easy to Maintain . . . 141
9.1 Dividing Code into Multiple Files 141
9.2 Designing Code for Maintainability 146
9.3 Moving On 151
10. Add Color, Formatting, and Interactivity . . . 153
Adding Color Using ANSI Escape Sequences 154
10.1
10.2 Formatting Output with Tables 159
10.3 Providing Interactive User Input with readline 164
10.4 Moving On 173
A1. Common Command-Line Gems and Libraries . . . . 175
A1.1 Alternatives for Simple Command-Line Apps 176
A1.2 Alternatives for Command Suites 184
A1.3 Other Relevant Libraries 189
A2. Bibliography . . . 193
Index . . . 195
Introduction
Graphical user interfaces (GUIs) are great for a lot of things; they are typically much kinder to newcomers than the stark glow of a cold, blinking cursor. This comes at a price: you can get only so proficient at a GUI before you have to learn its esoteric keyboard shortcuts. Even then, you will hit the limits of productivity and efficiency. GUIs are notoriously hard to script and automate, and when you can, your script tends not to be very portable.
This is all beside the point; we are software developers, and we write programs. What could be more natural than using code to get our work done? Consider the following command sequence:
> cd ~/Projects/cli > vi chapter2.md
While these two commands might strike you as opaque, they are a highly efficient means of editing a file.
For most of my career, the command line meant a UNIX shell, like bash. The
bash shell provides some basic built-in commands, as well as access to many other standard (and nonstandard) commands that are shipped with any UNIX system. These commands are single-purpose, require no user interaction, and come with easy-to-use (but hard-to-learn) user interfaces. These attributes let you piece them together in a near-infinite number of ways. Automating sophisticated behavior, performing complicated analysis, and parsing a myriad of text files can be done easily and expediently. This was life for me early on in my career. And it was good.
by ever more complex integrated development environments (IDEs). The simplicity of the command line was starting to get lost.
The problem is, there are too many tasks that don’t fit the model of these tools; it’s just too darn easy to go out to the shell and get things done. So, while I never bought into the concept that IDEs and sophisticated GUI tools were an advancement of the command line, I made peace with the facts of life and settled into a comfortable pattern: Java was for “real” code, and the command line (along with Perl and Ruby) was for automation, one-off scripts, and other things that helped me get repetitive things done quickly.
In the mid 2000s, I started to take notice of Ruby, Rails, and the amazing community built up around these tools. To my surprise (and delight), almost everything was command-line driven. Dynamic languages like Ruby don’t lend themselves too well to IDEs (some even argue that an IDE makes no sense for such languages), and the burgeoning developer community wasn’t on the radar of any top-tier tool makers. The community embraced the com-mand line and created comcom-mand-line applications for everything. Although Perl had been doing this for years, this was the first time I’d noticed such a strong embrace of the command line in the “post-Java” world.
What was more interesting was the taste and polish put into these command-line apps. Most featured a full-blown help system, often with command-based navigation of features, but still stayed true to the “UNIX way” of simplicity and interoperability. Take gem, for example. It’s the command used to install other Ruby apps and libraries into your system:
$ gem help
RubyGems is a sophisticated package manager for Ruby. This is a basic help message containing pointers to more information.
Usage:
gem -h/--help gem -v/--version
gem command [arguments...] [options...]
Examples:
gem install rake gem list --local
gem build package.gemspec gem help install
Further help:
gem help commands list all 'gem' commands
gem help examples show some examples of usage
gem help platforms show information about platforms
gem help <COMMAND> show help on COMMAND (e.g. 'gem help install')
gem server present a web page at
http://localhost:8808/
with info about installed gems Further information:
http://rubygems.rubyforge.org
This is just a small part of the very complete documentation available, and it’s all there, right from the command line. It’s clear that a lot of thought was put into making this tool polished; this was no one-off, hacky script. Much like the design philosophy of Ruby on Rails, there was clear care given to the user experience of the programmer. These tools aren’t one-off scripts someone pieced together; they are made for “real” work.
What this told me was that the command line is far from the anachronism that Java tool vendors would have us believe; it’s here to stay. The future of development won’t just be manipulating buttons and toolbars and dragging and dropping icons to create code; the efficiency and productivity inherent to a command-line interface will always have a place in a good developer’s tool chest. There are developers who demand polish and usability from their command-line tools, and there are developers who are interested in delivering it!
That’s what this book is about: delivering awesome command-line applications (and how easy it is to do so in Ruby). It’s for any programmer who wants to unlock the potential of a command-line interface but who also wants to create a polished and robust application with a real user interface that is easy to grasp and use.
How This Book Is Organized
In the next ten chapters, we’ll discuss every detail of command-line application development, from user input, program output, and code organization to error handling, testing, and distribution. We’ll learn about this by building and enhancing two example applications. Over the course of the book, we’ll make them better and better to learn what an awesome command-line app is. We’ll see that Ruby makes it very easy to do, thanks to its great syntax and features, as well as several open source libraries.
apps and introduces the two main styles of app: a simple UNIX-like style and the more complex “command-suite” style, as exemplified by commands like
git or gem.
In Chapter 3, Be Helpful, on page 33, we’ll learn how to provide excellent help and usage documentation; command-line apps are harder to discover and learn compared to GUIs, so this is one of the most important things to get right. We’ll follow that up with Chapter 4, Play Well with Others, on page 53, where we’ll learn how to make our apps interoperable with any other system.
At this point, we’ll know how to make a good command-line app. Chapter 5, Delight Casual Users, on page 71 is where we take things to the next level and learn how easy it is to add polish to our apps. We’ll continue this trend in Chapter 6, Make Configuration Easy, on page 89, where we’ll learn how to make our apps easy to use for users with many different tastes and prefer-ences.
Chapter 7, Distribute Painlessly, on page 101 will cover everything you need to distribute your application with RubyGems so that others can use it (we’ll also cover installation in tightly controlled environments where RubyGems isn’t an option).
In Chapter 8, Test, Test, Test, on page 117, we’ll learn all about testing com-mand-line apps, including some techniques to keep your tests from making a mess of your system. With the ability to test our apps comes the ability to refactor them so they are easier to maintain and enhance. Chapter 9, Be Easy to Maintain, on page 141 will cover some conventions around code organization, as well as some design patterns that are most useful to command-line apps.
We’ll finish by pushing the envelope of what command-line apps should do in Chapter 10, Add Color, Formatting, and Interactivity, on page 153. We’ll learn all about colored, formatted output, as well as interacting with the user using Readline.
Many open source libraries and tools help make command-line apps in Ruby. We’ll look at some of them, such as OptionParser, GLI, and Cucumber, in great detail. But you don’t have to limit yourself to just these tools. Appendix 1, Common Command-Line Gems and Libraries, on page 175 will go over many of the other popular libraries so you can use the best tool for you.
Who This Book Is For
This book is aimed at both developers and system administrators who have some familiarity with Ruby and who find themselves automating things on the command line (or who wish they could).
• If you’re a developer who finds yourself faced with automation tasks but aren’t familiar with the various conventions and techniques around the command line, this book will help you. A problem you might have is the maintenance of a “quick hack” script you wrote that has lived long past its prime. This book will give you the tools and techniques to make your next script longer-lived, polished, and bulletproof…all without spending a lot of time on it.
• If you’re a sysadmin, you might find shell scripting limiting or frustrating. If you’re pushing bash to the limit in your automation tasks, this book will open up a whole new world for you. Writing command-line apps in Ruby is also a great way to really learn Ruby and become a better programmer, since you can apply it directly to your day-to-day tasks.
What You’ll Need
The only thing you’ll need to follow along is a Ruby installation and a UNIX-like shell. You’ll need to have either Ruby 2.0 or 2.1 for all the examples in this book to work, and the bash shell is recommended (although we aren’t going to be seeing many shell-specific features). If you download the code from the book’s website,1 you’ll notice at the top of the archive is a Gemfile. This should contain a list of all the gems you need to run the example apps, and you can use this file, along with Bundler,2 to install everything in one
step. If you don’t know what any of that means, don’t worry; the book will tell you when to install any needed gems. If things aren’t working right, you can use the Gemfile to see which versions of gems I used when writing the book.
For writing command-line apps and following along with the examples, Mac and Linux users just need a text editor and a terminal or shell application (I’m assuming you’ll have Ruby installed already; most Linux distributions include it). I highly recommend that you use RVM3 and create a gemset for
the examples in this book. RVM allows you to install any version of Ruby alongside your system version and to isolate gems from one another, which is very handy when learning new technologies.
For Windows users, the examples and code should work from the command prompt; however, you might have a better experience installing Cygwin4 or
MSYS5 and using one of those for your shell. If you haven’t installed Ruby, the easiest way to do that is to use the Ruby Installer.6 For the most part,
everything in this book is compatible with Windows, with the exception of the following:
• For apps with the suffix .rb, you will need to associate the file extension with Ruby. You should be able to do this when running the Ruby Installer. For apps that have no suffix, assuming you’ve set up the association to the .rb
extension, you will need to run the app via the ruby command, like so: c:\> ruby my_app.rb
To simplify things, you could create a .bat file to wrap this up:
@echo off
ruby my_app.rb %*
The %* ensures that all the command-line parameters you give to your
.bat will get passed along to your app.
• Aruba, the tool we’ll be using to run acceptance tests of our command-line apps, is not well supported on Windows at the time of this writing. We’ll cover this in more detail when we get to the chapter on testing, which is Chapter 8, Test, Test, Test, on page 117.
Other than that, if there’s something a Windows user will need to do a bit differently, we’ll point it out, but generally speaking, things work well on both UNIX-like platforms and Windows.
Conventions Used in the Book
There are three important things to know about the layout and conventions used in this book: the level of background knowledge you’ll need on Ruby, UNIX, and OO; the way we’ll work with code; and where testing fits into all this.
Ruby, UNIX, and Object Orientation
Since this is a book about writing command-line apps in Ruby, you’re going to need to know a bit about the Ruby language and the UNIX environment. We’ve kept the code examples as clear as we can so that even with a passing familiarity with Ruby and UNIX, you’ll be able to follow along.
Later in the book, we’ll start to use more of the object-oriented features of Ruby, so knowing what classes and objects are will be helpful. Again, we’ve
5. http://www.mingw.org/wiki/MSYS 6. http://rubyinstaller.org/
kept it as simple as we could so you can focus on the tools and techniques without getting distracted by some of Ruby’s more esoteric features.
If you’re very new to Ruby or just want to brush up, please consider the Ruby Koans7 and the “Pickaxe Book” (Programming Ruby: The Pragmatic
Program-mer’s Guide [TFH09]).
Code
It’s also worth pointing out that this book is about code. There is a lot of code, and we’ll do our best to take each new bit of it step by step. Much of the code in this book will be from two example applications that we’ll enhance and improve over time. To point out new things that we’re changing, we’ll use a subtle but important callout. Consider some Ruby code like so:
if !filename.nil?
File.open(filename) do |file| file.readlines do |line|
puts line.upcase
end end end
We might want to change that if to an unless to avoid the negative test.
unless filename.nil?
➤
File.open(filename) do |file| file.readlines do |line|
puts line.upcase
end end end
Do you see the arrow next to the new unless statement? Look for those every time there’s new code. Occasionally, we’ll introduce a larger change to the code we’re working on. In those cases, we’ll call out particular lines for refer-ence, like so:
def upper_case_file(filename) ❶
unless filename.nil? ❷
File.open(filename) do |file| file.readlines do |line|
puts line.upcase ❸
end end end end
We can then discuss particular lines using a numbered list:
❶ Here we define a new method named upper_case_file.
❷ We check for nil here, so we don’t get an exception from File.open.
❸ Finally, we uppercase the line we read from the file before printing it with
puts.
Testing
The Ruby community loves testing; test-driven development is at the heart of many great Ruby applications, and the community has a wide variety of tools to make testing very easy. We’ll even be looking at some in Chapter 8, Test, Test, Test, on page 117. We won’t, however, be doing much testing until then. While you should absolutely test everything you do, it can be somewhat distracting to explain a concept or best practice in the context of a unit test, especially with some of the unique features and challenges of a command-line application.
So, don’t take the lack of testing as an endorsement of cowboy coding.8. We’re
omitting the tests so you can take in the important parts of making an awe-some command-line application. Once you’re comfortable with these best practices, the information we’ll discuss about testing will leave you with all the skills you need to test-drive your next command-line app.
Online Resources
At the website for this book,9 you’ll find the following:
• The full source code for all the sample programs used in this book.
• An errata page, listing any mistakes in the current edition (let’s hope that will be empty!).
• A discussion forum where you can communicate directly with the author and other Ruby developers. You are free to use the source code in your own applications as you see fit.
Note: If you’re reading the ebook, you can also click the little gray rectangle before the code listings to download that source file directly.
8. http://en.wikipedia.org/wiki/Cowboy_coding 9. http://pragprog.com/titles/dccar2
Acknowledgments
This book started as part of the Pragmatic Programmers’ “PragProWriMo,” which isn’t much more than some budding authors posting their daily writing stats to a forum10 every day during the month of November. This book is very
different from the 170 pages I produced in November 2010, but I wrote almost every day, proving that I could actually produce a book’s worth of material and that writing command-line applications in Ruby was a large enough topic to fill a book!
I had no particular plans to do anything with the manuscript I wrote, but when Travis Swicegood, author of Pragmatic Version Control with Git [Swi08], posted in the forum that his PragProWriMo manuscript had been accepted for development, I thought I’d submit mine as well. So, while Travis wasn’t the inspiration for the material in this book, he certainly was the inspiration for turning this material into a book.
There are a lot of people to thank, but I have to start with my wife, Amy, who has been amazingly supportive and encouraging. She even let me install Ruby, vim, and Cygwin on her Windows laptop for testing.
I’d like to thank my editor, John Osborn, for his patience and advice as well as for inadvertently giving me a crash course in technical writing.
Next, I’d like to thank all the technical reviewers who gave me invaluable feedback on my manuscript at various stages of its development. They include Paul Barry, Daniel Bretoi, Trevor Burnham, Jeff Cohen, Ian Dees, Avdi Grimm, Wynn Netherland, Staffan Nöteberg, Noel Rappin, Eric Sendlebach, Christo-pher Sexton, and Matt Wynne.
Finally, I’d like to thank the many programmers who’ve contributed to the open source projects I mention in the book, including, but probably not lim-ited to, the following: Aslak Hellesøy, TJ Holowaychuk, Ara Howard, Yehuda Katz, James Mead, William Morgan, Ryan Tomayko, Chris Wanstrath, and, of course Yukihiro “Matz” Matsumoto, who created such a wonderful language in which to write command-line apps.
With all that being said, let’s get down to business and start making our command-line apps a lot more awesome!
CHAPTER
1
Have a Clear and Concise Purpose
You need to solve a problem. It might be that you need two systems to talk to each other that weren’t designed for it. Or you may need to run some automated yet complex task periodically. Or, you may want to build simple productivity tools to help you work. This is where the command line shines, and these are the kinds of problems you’ll learn to solve in this book.
Although it may seem obvious that a focused, single-purpose app is more desirable than one with a “kitchen sink” full of features, it’s especially important for command-line apps. The way in which command-line apps get input, are configured, and produce output is incredibly simple and, in some ways, limiting. As such, a system of many single-purpose apps is better than a system of fewer (or one) complex apps. Simple, single-purpose apps are easier to understand, are easier to learn, are easier to maintain, and lead to more flexible systems.
Think of your command-line tasks as a set of layers: with the basic foundation of the standard UNIX tools, you can create more complex but still focused command-line apps. Those can be used for even more complex apps, each built on simpler tools below. The popular version control system git follows this design: many of git’s commands are “plumbing” and are not intended for regular use. These commands are then used to build “porcelain” commands, which are still simple and single-purpose but are built using the “plumbing.” This design comes in handy because, every once in a while, you need to use the “plumbing” directly. You can do this because git was designed around tools that each have a clear and concise purpose.
iteration in this chapter. The first version of each app will be naive and then quickly revised to be more single-purpose, so we can see firsthand the level of function we want our apps to have.
1.1
Problem 1: Backing Up Data
Suppose our small development team is starting work on our company’s flagship web application. This application is heavily data-driven and highly complex, with many features and edge cases. To build it, we’re going to use an Agile methodology, where we work in two-week “sprints.” In each sprint, we’ll have a list of “user stories” representing the work we’re doing. To officially complete a user story, we’ll need to demonstrate that story functioning properly in a shared development environment.
To be able to demonstrate working features, we’ll have a set of databases with specially chosen data that can simulate all of our edge cases and user flows. Setting up this data is time-consuming because our app is complex, so even though this data is fake, we want to treat it like real production data and back it up. Since we’re constantly changing the data as we work, we want to save the state of each database every single day of the current iteration. We also want to keep a backup of the state of each database at the end of every iteration. So, if we’re on the fifth day of our third iteration, we want to be able to access a backup for iterations 1 and 2, as well as backups for the first four days of the third iteration.
Like with most teams, at our company, we can’t rely on a system administrator to back it up for us; we’re a fledgling start-up, and resources are limited. A command-line app to the rescue! We need an app that will do the following:
• Do a complete dump of any MySQL database
• Name the backup file based on the date of the backup
• Allow the creation of our “end-of-iteration” backup, using a different naming scheme
• Compress the backup files
• Delete backups from completed iterations
Let’s take a quick stab at it. We’ll set up a Hash that contains information about all the databases we want to back up, loop over it, and then use Ruby’s backtick operator to call mysqldump, followed by gzip1. We’ll also examine the
first argument given to our app; if it’s present, we’ll take that to mean we
want to do an “end-of-iteration” backup. Here’s what our initial implementation looks like:
have_a_purpose/db_backup/bin/db_backup_initial.rb #!/usr/bin/env ruby
databases = { big_client: {
database: 'big_client', username: 'big', password: 'big', },
small_client: {
database: 'small_client', username: 'small', password: 'p@ssWord!', }
}
end_of_iter = ARGV.shift
databases.each do |name,config|
if end_of_iter.nil?
backup_file = config[:database] + '_' + Time.now.strftime('%Y%m%d')
else
backup_file = config[:database] + '_' + end_of_iter
end
mysqldump = "mysqldump -u#{config[:username]} -p#{config[:password]} " + "#{config[:database]}"
`#{mysqldump} > #{backup_file}.sql` `gzip #{backup_file}.sql`
end
If you’re wondering what’s going on the very first line, see Shebang: How the System Knows an App Is a Ruby Script, on page 4. Notice how we use ARGV, which is an Array that Ruby sets with all the command-line arguments to detect whether this is an “end-of-iteration” backup. In that case, we assume that whatever the argument was should go into the filename, instead of the current date. We’d call it like so:
$ db_backup_initial.rb
# => creates big_client_20110103.sql.gz # => creates small_client_20110103.sql.gz $ db_backup_initial.rb iteration_3
# => creates big_client_iteration_3.sql.gz # => creates small_client_iteration_3.sql.gz
Shebang: How the System Knows an App Is a Ruby Script
Compiled programs include information in the executable file that tells that operating system how to start the program. Since programs written in a scripting language, like Ruby, don’t need to be compiled, the operating system must have some other way to know how to run these types of apps. On UNIX systems, this is done via the first line of code, commonly referred to as the shebang line.a
The shebang line starts with a number sign (#), followed by an exclamation point (!), followed by the path to an interpreter that will be used to execute the program. This path must be an absolute path, and this requirement can cause problems on some systems. Suppose we have a simple app like so:
#!/usr/bin/ruby puts "Hello World!"
For this app to work on any other system, there must be a Ruby interpreter located at /usr/bin/ruby. This might not be where Ruby is installed, and for systems that use RVM (an increasingly high number do so), Ruby will never be available in /usr/bin.
To solve this, the program /usr/bin/env, which is much more likely to be installed at that location, can be used to provide a level of indirection. env takes an argument, which is the name of a command to run. It searches the path for this command and runs it. So, we can change our program to use a shebang like so:
#!/usr/bin/env ruby puts "Hello world!"
This way, as long as Ruby is in our path somewhere, the app will run fine. Further, since the number sign is the comment character for Ruby, the shebang is ignored if you execute your app with Ruby directly: ruby my_app.rb.
a. http://en.wikipedia.org/wiki/Shebang_(Unix)
There are a lot of problems with this app and lots of room for improvement. The rest of the book will deal with these problems, but we’re going to solve the biggest one right now. This app doesn’t have a clear and concise purpose. It may appear to—after all, it is backing up and compressing our databases —but let’s imagine a likely scenario: adding a third database to back up.
To make this change, we’ll get the database name, username, and password from the command line instead of an internal Hash, like this:
have_a_purpose/db_backup/bin/db_backup.rb #!/usr/bin/env ruby
database = ARGV.shift username = ARGV.shift password = ARGV.shift end_of_iter = ARGV.shift
if end_of_iter.nil?
backup_file = database + Time.now.strftime("%Y%m%d")
else
backup_file = database + end_of_iter
end
`mysqldump -u#{username} -p#{password} #{database} > #{backup_file}.sql` `gzip #{backup_file}.sql`
Now, to perform our backup, we call it like so:
$ db_backup.rb big_client big big
# => creates big_client_20110103.sql.gz $ db_backup.rb small_client small "p@ssWord!"
# => creates small_client_20110103.sql.gz $ db_backup.rb big_client big big iteration_3
# => creates big_client_iteration_3.sql.gz
$ db_backup.rb medium_client medium "med_pass" iteration_4
# => creates medium_client_iteration_4.sql.gz
It may seem like we’ve complicated things, but our app is a lot simpler now and therefore easier to maintain, enhance, and understand. To set up our backups, we’d likely use cron (which is a UNIX tool for regularly scheduling things to be run) and have it run our app three times, once for each database.
We’ll improve on db_backup.rb throughout the book, turning it into an awesome command-line app. Of course, automating specialized tasks is only one use of the command line. The command line can also be an excellent interface for simple productivity tools. As developers, we tend to be on the command line a lot, whether editing code, running a build, or testing new tools. Given that, it’s nice to be able to manage our work without leaving the command line.
1.2
Problem 2: Managing Tasks
Most software development organizations use some sort of task management or trouble-ticket system. Tools like JIRA, Bugzilla, and Pivotal Tracker provide a wealth of features for managing the most complex workflows and tasks, all from your web browser. A common technique when programming is to take a large task and break it down into smaller tasks, possibly even breaking
those tasks down. Suppose we’re working on a new feature for our company’s
flagship web application. We’re going to add a Terms of Service page and need to modify the account sign-up page to require that the user accept the new terms of service.
In our company-wide task management tool, we might see a task like “Add Terms of Service Checkbox to Signup Page.” That’s the perfect level of granu-larity to track the work by our bosses and other interested stakeholders, but it’s too coarse to drive our work. So, we’ll make a task list of what needs to be done:
• Add new field to database for “accepted terms on date.” • Get DBA approval for new field.
• Add checkbox to HTML form.
• Add logic to make sure the box is checked before signing up is complete. • Perform peer code review when all work is done.
Tracking such fine-grained and short-lived tasks in our web-based task manager is going to be too cumbersome. We could write this on a scrap of paper or a text file, but it would be better to have a simple tool to allow us to create, list, and complete tasks in order. That way, any time we come back to our computer, we can easily see how much progress we’ve made and what’s next to do.
To keep things single-purpose, we’ll create three command-line apps, each doing the one thing we need to manage tasks. todo-new.rb will let us add a new task, todo-list.rb will list our current tasks, and todo-done.rb will complete a task.
They will all work off a shared text file, named todo.txt in the current directory, and work like so:
$ todo-new.rb "Add new field to database for 'accepted terms on date'"
Task added
$ todo-new.rb "Get DBA approval for new field."
Task added $ todo-list.rb
1 - Add new field to database for 'accepted terms on date' Created: 2011-06-03 13:45
2 - Get DBA approval for new field. Created: 2011-06-03 13:46 $ todo-done.rb 1
Task 1 completed $ todo-list.rb
1 - Add new field to database for 'accepted terms on date' Created: 2011-06-03 13:45
Completed: 2011-06-03 14:00 2 - Get DBA approval for new field.
We’ll start with todo-new.rb, which will read in the task from the command line and append it to todo.txt, along with a timestamp.
have_a_purpose/todo/bin/todo-new.rb #!/usr/bin/env ruby
new_task = ARGV.shift
File.open('todo.txt','a') do |file| file.puts "#{new_task},#{Time.now}" puts "Task added."
end
This is pretty straightforward; we’re using a comma-separated-values format for the file that stores our tasks. todo-list.rb will now read that file, printing out what it finds and generating the ID number.
have_a_purpose/todo/bin/todo-list.rb #!/usr/bin/env ruby
File.open('todo.txt','r') do |file| counter = 1
file.readlines.each do |line|
name,created,completed = line.chomp.split(/,/) printf("%3d - %s\n",counter,name)
printf(" Created : %s\n",created)
unless completed.nil?
printf(" Completed : %s\n",completed)
end
counter += 1
end end
Finally, for todo-done.rb, we’ll read the file in and write it back out, stopping when we get the task the user wants to complete and including a timestamp for the completed date as well:
have_a_purpose/todo/bin/todo-done.rb #!/usr/bin/env ruby
task_number = ARGV.shift.to_i
File.open('todo.txt','r') do |file|
File.open('todo.txt.new','w') do |new_file| counter = 1
file.readlines.each do |line|
name,created,completed = line.chomp.split(/,/)
if task_number == counter
new_file.puts("#{name},#{created},#{Time.now}") puts "Task #{counter} completed"
else
new_file.puts("#{name},#{created},#{completed}")
end
counter += 1
end end end
`mv todo.txt.new todo.txt`
As with db_backup_initial.rb, this set of command-line apps has some problems. The most important, however, is that we’ve gone too far making apps clear and concise. We have three apps that share a lot of logic. Suppose we want to add a new field to our tasks. We’ll have to make a similar change to all three apps to do it, and we’ll have to take extra care to keep them in sync.
Let’s turn this app into a command suite. A command suite is an app that provides a set of commands, each representing a different function of a related concept. In our case, we want an app named todo that has the clear and concise purpose of managing tasks but that does so through a command-style interface, like so:
$ todo new "Add new field to database for 'accepted terms on date'"
Task added
$ todo new "Get DBA approval for new field."
Task added $ todo list
1 - Add new field to database for 'accepted terms on date' Created: 2011-06-03 13:45
2 - Get DBA approval for new field. Created: 2011-06-03 13:46 $ todo done 1
Task 1 completed $ todo list
1 - Add new field to database for 'accepted terms on date' Created: 2011-06-03 13:45
Completed: 2011-06-03 14:00 2 - Get DBA approval for new field.
Created: 2011-06-03 13:46
have_a_purpose/todo/bin/todo #!/usr/bin/env ruby TODO_FILE = 'todo.txt'
def read_todo(line) line.chomp.split(/,/)
end
def write_todo(file,name,created=Time.now,completed='') file.puts("#{name},#{created},#{completed}")
end
command = ARGV.shift
case command
when 'new'
new_task = ARGV.shift
File.open(TODO_FILE,'a') do |file| write_todo(file,new_task) puts "Task added."
end when 'list'
File.open(TODO_FILE,'r') do |file| counter = 1
file.readlines.each do |line|
name,created,completed = read_todo(line) printf("%3d - %s\n",counter,name) printf(" Created : %s\n",created)
unless completed.nil?
printf(" Completed : %s\n",completed)
end
counter += 1
end end when 'done'
task_number = ARGV.shift.to_i File.open(TODO_FILE,'r') do |file|
File.open("#{TODO_FILE}.new",'w') do |new_file| counter = 1
file.readlines.each do |line|
name,created,completed = read_todo(line)
if task_number == counter
write_todo(new_file,name,created,Time.now) puts "Task #{counter} completed"
else
write_todo(new_file,name,created,completed)
end
counter += 1
end end end
`mv #{TODO_FILE}.new #{TODO_FILE}`
end
Notice how the methods read_todo and write_todo encapsulate the format of tasks in our file? If we ever needed to change them, we can do it in just one place. We’ve also put the name of the file into a constant (TODO_FILE), so that can easily be changed as well.
1.3
What Makes an Awesome Command-Line App
Since the rest of this book is about what makes an awesome command-line app, it’s worth seeing a broad overview of what we’re talking about. In general, an awesome command-line app has the following characteristics:
Easy to use The command-line can be an unforgiving place to be, so the easier an app is to use, the better.
Helpful Being easy to use isn’t enough; the user will need clear direction on
how to use an app and how to fix things they might’ve done wrong.
Plays well with others The more an app can interoperate with other apps and systems, the more useful it will be, and the fewer special customiza-tions that will be needed.
Has sensible defaults but is configurable Users appreciate apps that have a clear goal and opinion on how to do something. Apps that try to be all things to all people are confusing and difficult to master. Awesome apps, however, allow advanced users to tinker under the hood and use the app in ways not imagined by the author. Striking this balance is important.
Installs painlessly Apps that can be installed with one command, on any environment, are more likely to be used.
Fails gracefully Users will misuse apps, trying to make them do things they weren’t designed to do, in environments where they were never designed to run. Awesome apps take this in stride and give useful error messages without being destructive. This is because they’re developed with a com-prehensive test suite.
Gets new features and bug fixes easily Awesome command-line apps aren’t awesome just to use; they are awesome to hack on. An awesome app’s internal structure is geared around quickly fixing bugs and easily adding new features.
1.4
Moving On
The example apps we saw in this chapter don’t have many aspects of an awesome command-line app. They’re downright awful, in fact, but we have to start somewhere, and these are simple enough and general enough that we can demonstrate everything we need to know about making an awesome command-line app by enhancing them.
In this chapter, we learned the absolute most important thing for a command-line app: have a clear, concise purpose that solves a problem we have. Next, we’ll learn how to make our app easier to use by implementing a more canonical command-line interface. As we work through the book, we’ll make refinement after refinement, starting our focus on the general users of our app, then focusing on power users, and then worrying about other developers helping us with our app, before finally finishing with tools and techniques to help us maintain the app.
Be Easy to Use
After installing your app, the first experience a user has with it will be the actual command-line interface. If the interface is difficult, counterintuitive, or, well, ugly, it’s not going to inspire a lot of confidence, and your users will have a hard time using it to achieve its clear and concise purpose. Conversely, if it’s easy to use, your interface will give your application an edge with its audience.
Fortunately, it’s easy to get the command-line interface right, once you know the proper tools and techniques. The UNIX command line has a long and storied history, and there are now many conventions and idioms for how to invoke a command-line app. If your app follows these conventions, your users will have an easier time using it. We’ll see that even a highly complex app can have a succinct and memorable interface.
In this chapter, we’ll learn to use standard library and open source commu-nity tools that make it incredibly simple to create a conventional, idiomatic command-line interface whether it’s a simple backup script or a complex command-line task management system. We’ll learn how to make a simple command-line interface using Ruby’s OptionParser class and then tackle a more sophisticated command-suite application, which we’ll build using the open source GLI library. But first, we need to get familiar with the proper names of the elements of a typical command-line interface: its options, arguments, and commands.
2.1
Understanding the Command Line: Options, Arguments, and Commands
To tell a command-line application how to do its work, you typically need to enter more than just the name of its executable. For example, we must tell
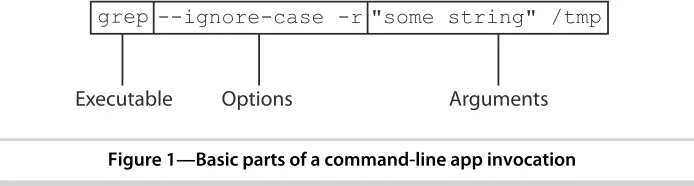
and a database name in order to do its work. The primary way to give an app the information it needs is via options and arguments, as depicted in Figure 1, Basic parts of a command-line app invocation, on page 14. Note that this format isn’t imposed by the operating system but is based on the GNU stan-dard for command-line apps.1 Before we learn how to make a command-line
interface that can parse and accept options and arguments, we need to delve a bit deeper into their idioms and conventions. We’ll start with options and move on to arguments. After that, we’ll discuss commands, which are a dis-tinguishing feature of command suites.
grep --ignore-case -r "some string" /tmp
Executable
Options
Arguments
Figure 1—Basic parts of a command-line app invocation
Options
Options are the way in which a user modifies the behavior of your app. Con-sider the two invocations of ls shown here. In the first, we omit options and see the default behavior. In the second, we use the -l option to modify the listing format.
$ ls
one.jpg two.jpg three.jpg
$ ls -l
-rw-r--r-- 1 davec staff 14005 Jul 13 19:06 one.jpg -rw-r--r-- 1 davec staff 14005 Jul 11 13:06 two.jpg -rw-r--r-- 1 davec staff 14005 Jun 10 09:45 three.jpg
Options come in two forms: long and short.
Short-form options Short-form options are preceded by a dash and are only one character long, for example -l. Short-form options can be combined after a single dash, as in the following example. For example, the following two lines of code produce exactly the same result:
ls -l -a -t
ls -lat
1. http://www.gnu.org/prep/standards/html_node/Command_002dLine-Interfaces.html
Long-form options Long-form options are preceded by two dashes and, strictly speaking, consist of two or more characters. However, long-form options are usually complete words (or even several words, separated by dashes). The reason for this is to be explicit about what the option means; with a short-form option, the single letter is often a mnemonic. With long-form options, the convention is to spell the word for what the option does. In the command curl --basic http://www.google.com, for example, --basic is a single, long-form option. Unlike short options, long options cannot be combined; each must be entered separately, separated by spaces on the command line.
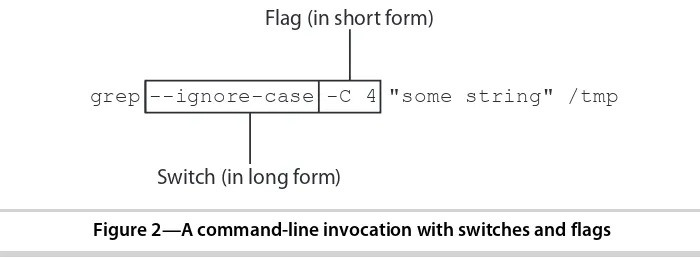
Command-line options can be one of two types: switches, which are used to turn options on and off and do not take arguments, and flags, which take arguments, as shown in Figure 2, A command-line invocation with switches and flags, on page 15. Flags typically require arguments but, strictly speaking, don’t need to do so. They just need to accept them. We’ll talk more about this in Chapter 5, Delight Casual Users, on page 71.
grep --ignore-case "some string" /tmp
Switch (in long form)
Flag (in short form)
-C 4
Figure 2—A command-line invocation with switches and flags
Typically, if a switch is in the long-form (for example --foo), which turns “on” some behavior, there is also another switch preceded with no- (for example
--no-foo) that turns “off” the behavior.
Finally, long-form flags take their argument via an equal sign, whereas in the short form of a flag, an equal sign is typically not used. For example, the curl
command, which makes HTTP requests, provides both short-form and long-form flags to specify an HTTP request method: -X and --request, respectively. The following example invocations show how to properly pass arguments to those flags:
Although some apps do not require an equal sign between a long-form flag and its argument, your apps should always accept an equal sign, because this is the idiomatic way of giving a flag its argument. We’ll see later in this chapter that the tools provided by Ruby and its open source ecosystem make it easy to ensure your app follows this convention.
Arguments
As shown in Figure 1, Basic parts of a command-line app invocation, on page 14, arguments are the elements of a command line that aren’t options. Rather, arguments represent the objects that the command-line app will operate on. Typically, these objects are file or directory names, but this depends on the app. We might design our database backup app to treat the arguments as the names of the databases to back up.
Not all command-line apps take arguments, while others take an arbitrary number of them. Typically, if your app operates on a file, it’s customary to accept any number of filenames as arguments and to operate on them one at a time.
Commands
Figure 1, Basic parts of a command-line app invocation, on page 14 shows a diagram of a basic command-line invocation with the main elements of the command line labeled.
For simple command-line applications, options and arguments are all you need to create an interface that users will find easy to use. Some apps, how-ever, are a bit more complicated. Consider git, the popular distributed version control system. git packs a lot of functionality. It can add files to a repository, send them to a remote repository, examine a repository, or fetch changes from another user’s repository. Originally, git was packaged as a collection of individual command-line apps. For example, to commit changes, you would execute the git-commit application. To fetch files from a remote repository, you would execute git-fetch. While each command provided its own options and arguments, there was some overlap.
For example, almost every git command provided a --no-pager option, which told
git not to send output through a pager like more. Under the covers, there was a lot of shared code as well. Eventually, git was repackaged as a single exe-cutable that operated as a command suite. Instead of running git-commit, you run git commit. The single-purpose command-line app git-commit now becomes a command to the new command-suite app, git.
A command in a command-line invocation isn’t like an option or an argument; it has a more specific meaning. A command is how you specify the action to take from among a potentially large or complex set of available actions. If you look around the Ruby ecosystem, you’ll see that the use of command suites is quite common. gem, rails, and bundler are all types of command suites.
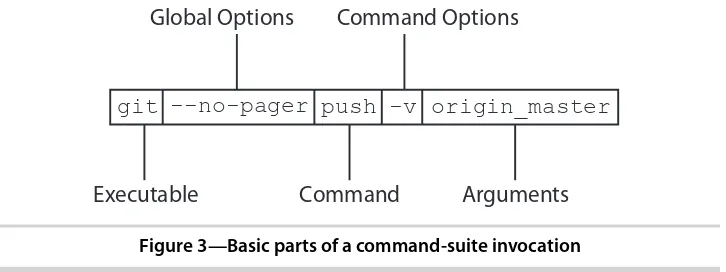
Figure 3, Basic parts of a command-suite invocation, on page 17 shows a command-suite invocation, with the command’s position on the command line highlighted.
git --no-pager
origin_master
Executable
Command
Arguments
push -v
Global Options
Command Options
Figure 3—Basic parts of a command-suite invocation
You won’t always design your app as a command suite; only if your app is complex enough that different behaviors are warranted will you use this style of interface. Further, if you do decide to design your app as a command suite, your app should require a command (we’ll talk about how your app should behave when the command is omitted in Chapter 3, Be Helpful, on page 33).
The command names in your command suite should be short but expressive, with short forms available for commonly used or lengthier commands. For example, Subversion, the version control system used by many developers, accepts the short-form co in place of its checkout command.
A command suite can still accept options; however, their position on the command line affects how they are interpreted.
Global options Options that you enter before the command are known as
Command options Options that follow a command are known as command-specific options or simply command options. These options have meaning only in the context of their command. Note that they can also have the same names as global options. For example, if our to-do list app took a global option -f to indicate where to find the to-do list’s file, the list com-mand might also take an -f to indicate a “full” listing.
The command-line invocation would be todo -f ~/my_todos.txt list -f. Since the first -f comes before the command and is a global option, we won’t confuse it for the second -f, which is a command option.
Most command-line apps follow the conventions we’ve just discussed. If your app follows them as well, users will have an easier time learning and using your app’s interface. For example, if your app accepts long-form flags but doesn’t allow the use of an equal sign to separate the flag from its argument, users will be frustrated.
The good news is that it’s very easy to create a Ruby app that follows all of the conventions we’ve discussed in this section. We’ll start by enhancing our Chapter 1 database backup app from Chapter 1, Have a Clear and Concise Purpose, on page 1 to demonstrate how to make an easy-to-use, conventional command-line application using OptionParser. After that, we’ll use GLI to enhance our to-do list app, creating an idiomatic command suite that’s easy for our users to use and easy for us to implement.
2.2
Building an Easy-to-Use Command-Line Interface
If you’ve done a lot of shell scripting (or even written a command-line tool in C), you’re probably familiar with getopt,2 which is a C library for parsing the command line and an obvious choice as a tool for creating your interface. Although Ruby includes a wrapper for getopt, you shouldn’t use it, because there’s a better built-in option: OptionParser. As you’ll see, OptionParser is not only easy to use but is much more sophisticated than getopt and will result in a superior command-line interface for your app. OptionParser code is also easy to read and modify, making enhancements to your app simple to implement.
Before we see how to use OptionParser, let’s first consider the input our applica-tion needs to do its job and the command line that will provide it. We’ll use the backup application, db_backup.rb, which we introduced in Chapter 1, Have a Clear and Concise Purpose, on page 1. What kind of options might our application need?
2. http://en.wikipedia.org/wiki/Getopt
Right now, it needs the name of a database and some way of knowing when we’re doing an “end-of-iteration” backup instead of a normal, daily backup. The app will also need a way to authenticate users of the database server we’re backing up; this means a way for the user to provide a username and password.
Since our app will mostly be used for making daily backups, we’ll make that its default behavior. This means we can provide a switch to perform an “end-of-iteration” backup. We’ll use -i to name the switch, which provides a nice mnemonic (i for “iteration”). For the database user and password, -u and -p
are obvious choices as flags for the username and password, respectively, as arguments.
To specify the database name, our app could use a flag, for example -d, but the database name actually makes more sense as an argument. The reason is that it really is the object that our backup app operates on. Let’s look at a few examples of how users will use our app:
$ db_backup.rb small_client
# => does a daily backup of the "small_client" database
$ db_backup.rb -u davec -p P@55WorD medium_client
# => does a daily backup of the "medium_client" database, using the # given username and password to login
$ db_backup.rb -i big_client
# => Do an "end of iteration" backup for the database "big_client"
Now that we know what we’re aiming for, let’s see how to build this interface withOptionParser.
Building a Command-Line Interface with
OptionParserTo create a simple command-line interface with OptionParser, create an instance of the class and pass it a block. Inside that block, we create the elements of our interface using OptionParser methods. We’ll use on to define each option in our command line.
The on itself takes a block, which is called when the user invokes the option it defines. For flags, the block is given the argument the user provided. The simplest thing to do in this block is to simply store the option used into a
be_easy_to_use/db_backup/bin/db_backup.rb #!/usr/bin/env ruby
# Bring OptionParser into the namespace require 'optparse'
options = {}
option_parser = OptionParser.new do |opts|
# Create a switch
opts.on("-i","--iteration") do
options[:iteration] = true
end
# Create a flag
opts.on("-u USER") do |user| options[:user] = user
end
opts.on("-p PASSWORD") do |password| options[:password] = password
end
end
option_parser.parse! puts options.inspect
As you can see by inspecting the code, each call to on maps to one of the command-line options we want our app to accept. What’s not clear is how
OptionParser knows which are switches and which are flags. There is great flexibility in the arguments to on, so the type of the argument, as well as its contents, controls how OptionParser will behave. For example, if a string is passed and it starts with a dash followed by one or more nonspace characters, it’s treated as a switch. If there is a space and another string, it’s treated as a flag. If multiple option names are given (as we do in the line
opts.on("-i","–iteration")), then these two options mean the same thing.
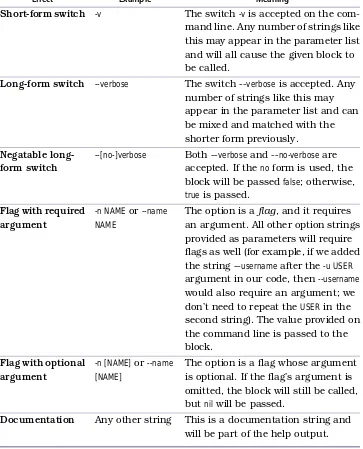
Table 1, Overview of OptionParser parameters to on, on page 21 provides an overview of how a parameter to on will be interpreted; you can add as many parameters as you like, in any order. The complete documentation on how these parameters are interpreted is available on the rdoc for the make_switch
method.3
3. http://ruby-doc.org/stdlib-2.0.0/libdoc/optparse/rdoc/OptionParser.html#method-i-make_switch
Meaning Example
Effect
The switch -v is accepted on the com-mand line. Any number of strings like
-v
Short-form switch
this may appear in the parameter list and will all cause the given block to be called.
The switch ––verbose is accepted. Any number of strings like this may
--verbose
Long-form switch
appear in the parameter list and can be mixed and matched with the shorter form previously.
Both ––verbose and ––no-verbose are accepted. If the no form is used, the
--[no-]verbose
Negatable long-form switch
block will be passed false; otherwise,
true is passed.
The option is a flag, and it requires an argument. All other option strings
-n NAME or --name
NAME
Flag with required argument
provided as parameters will require flags as well (for example, if we added the string ––username after the -u USER
argument in our code, then --username would also require an argument; we don’t need to repeat the USER in the second string). The value provided on the command line is passed to the block.
The option is a flag whose argument is optional. If the flag’s argument is
-n [NAME] or --name
[NAME]
Flag with optional argument
omitted, the block will still be called, but nil will be passed.
This is a documentation string and will be part of the help output. Any other string
Documentation
Table 1—Overview of OptionParser parameters to on
Validating Arguments to Flags
Suppose we know that the usernames of all the database users in our systems are of the form first.last. To help our users, we can validate the value of the argument to -u before even connecting to the database. Since the block given to an on method call is invoked whenever a user enters the option it defines, we can check within the block for the presence of a period in the username value, as the following code illustrates:
be_easy_to_use/db_backup/bin/db_backup.rb opts.on("-u USER") do |user|
unless user =~ /^.+\..+$/
raise ArgumentError,"USER must be in 'first.last' format"
end
options[:user] = user
end
Here, we raise an exception if the argument doesn’t match our regular expression; this will cause the entire option-parsing process to stop, and our app will exit with the error message we passed to raise.
You can probably imagine that in a complex command-line app, you might end up with a lot of argument validation. Even though it’s only a few lines of extra code, it can start to add up. Fortunately, OptionParser is far more flexible than what we’ve seen so far. The on method is quite sophisticated and can provide a lot of validations for us. For example, we could replace the code we just wrote with the following to achieve the same result:
be_easy_to_use/db_backup/bin/db_backup.rb opts.on("-u USER",
➤ /^.+\..+$/) do |user|
options[:user] = user
end
The presence of a regular expression as an argument to on indicates to
OptionParser that it should validate the user-provided argument against this regular expression. Also note that if you include any capturing groups in your regexp (by using parentheses to delineate sections of the regexp), those values will be extracted and passed to the block as an Array. The raw value from the command line will be at index 0, and the extracted values will fill out the rest of the array.
You don’t have to use regular expressions for validation, however. By including an Array in the argument list to on, you can indicate the complete list of acceptable values. By using a Hash, OptionParser will use the keys as the acceptable values and send the mapped value to the block, like so:
servers = { 'dev' => '127.0.0.1', 'qa' => 'qa001.example.com', 'prod' => 'www.example.com' }
opts.on('--server SERVER',servers) do |address| # for --server=dev, address would be '127.0.0.1' # for --server=prod, address would be 'www.example.com'
end
Finally, if you provide a classname in the argument list, OptionParser will attempt to convert the string from the command line into an instance of the given class. For example, if you include the constant Integer in the argument list to
on, OptionParser will attempt to parse the flag’s argument into an Integer instance for you. There is support for many conversions. See Type Conversions in OptionParser, on page 24 for the others available and how to make your own using the accept method.
By using OptionParser, we’ve written very little code but created an idiomatic UNIX-style interface that will be familiar to anyone using our app. We’ve seen how to use this to improve our backup app, but how can we create a similarly idiomatic interface for our to-do list app? Our to-do list app is actually a series of commands: “create a new task,” “list the tasks,” “complete a task.” This sounds like a job for the command-suite pattern.
OptionParser works great for a simple app like our backup app; however, it isn’t a great fit for parsing the command line of a command suite; it can be done, but it requires jumping through a lot more hoops. Fortunately, several open source libraries are available to make this job easy for us. We’ll look at one of them, GLI, in the next section.
2.3
Building an Easy-to-Use Command-Suite Interface
Command suites are more complex by nature than a basic automation or single-purpose command-line app. Since command suites bundle a lot of functionality, it’s even more important that they be easy to use. Helping users navigate the commands and their options is crucial.
Let’s revisit our to-do list app we discussed in Chapter 1, Have a Clear and Concise Purpose, on page 1. We’ve discussed that the command-suite pattern is the best approach, and we have already identified three commands the app will need: “new,” “list,” and “done” to create a new task, list the existing tasks, and complete a task, respectively.
Type Conversions in OptionParser
While strictly speaking it is not a user-facing feature, OptionParser provides a sophisti-cated facility for automatically converting flag arguments to a type other than String. The most common conversion is to a number, which can be done by including Integer, Float, or Numeric as an argument to on, like so:
ops.on('--verbosity LEVEL',Integer) do|verbosity|
# verbosity is not a string, but an Integer
end
OptionParser provides built-in conversions for the following: Integer, Float, Numeric, Decimal-Integer, OctalInteger, DecimalNumeric, FalseClass, and TrueClass. Regexp support is provided, and it looks for a string starting and ending with a slash (/), for example --matches "/^bar/". OptionParser will also parse an Array, treating each comma as an item delimiter; for example, --items "foo,bar,blah" yields the list ["foo","bar","blah"].
You can write your own conversions as well, by passing the object and a block to the accept method on an OptionParser. The object is what you’d also pass to on to trigger the conversion (typically it would be a class). The block takes a string argument and returns the converted type.
You could use it to convert a string into a Hash like so:
opts.accept(Hash) do |string| hash = {}
string.split(',').each do |pair| key,value = pair.split(/:/) hash[key] = value
end
hash
end
opts.on('--custom ATTRS',Hash) do |hash| custom_attributes = hash
end
A command like foo --custom foo:bar,baz:quux will result in custom_attributes getting the value { 'foo' => 'bar', 'baz' => 'quux' }.
Automatic conversions like these can be very handy for complex applications.
“file”). It would be handy if our “new” command allowed us to set a priority or place a new task directly at the top of our list. -p is a good name for a flag that accepts a priority as an argument, and we’ll use -f to name a switch that means “first in the list.”
We’ll allow our list command to take a sort option, so it will need a flag named
-s. done won’t need any special flags right now. Let’s see a few examples of the interface we want to create:
$ todo new "Rake leaves"
# => Creates a new todo in the default location
$ todo -f /home/davec/work.txt new "Refactor database"
# => Creates a new todo in /home/davec/work.txt instead # of the default
$ todo -f /home/davec/work.txt new "Do design review" -f
# => Create the task "Do design review" as the first # task in our task list in /home/davec/work.txt
$ todo list -s name
# => List all of our todos, sorted by name
$ todo done 3
# => Complete task #3
Unfortunately, OptionParser was not built with command suites in mind, and we can’t directly use it to create this sort of interface. To understand why, look at our third invocation of the new command: both the “filename” global flag and the command-specific “first” switch have the same name: -f. If we ask OptionParser to parse that command line, we won’t be able to tell which -f is which.
A command-line interface like this is too complex to do “by hand.” What we need is a tool custom-built for parsing the command line of a command suite.
Building a Command Suite with GLI
Fortunately, many open source tools are available to help us parse the com-mand-suite interface we’ve designed for our to-do list app. Three common ones are commander,4 thor,5 and GLI.6 They are all quite capable, but we’re going to use GLI here. GLI is actively maintained, has extensive documenta-tion, and was special-built for making command-suite apps very easily (not to mention written by the author of this book). Its syntax is similar to com-mander and thor, with all three being inspired by rake; therefore, much of what we’ll learn here is applicable to the other libraries (we’ll see how to use them in a bit more depth in Appendix 1, Common Command-Line Gems and Libraries, on page 175).
Rather than modify our existing app with GLI library calls, we’ll take advantage of a feature of GLI called scaffolding. We’ll use it to bootstrap our app’s UI and show us immediately how to declare our user interface.
4. http://visionmedia.github.com/commander/ 5. https://github.com/wycats/thor
Building a Skeleton App with GLI’s scaffold
Once we install GLI, we can use it to bootstrap our app. The gli application is itself a command suite, and we’ll use the scaffold command to get started. gli scaffold takes an arbitrary number of arguments, each representing a command for our new command suite. You don’t have to think of all your commands up front. Adding them later is simple, but for now, as the following console session shows, it’s easy to set up the commands you know you will need. For our to-do app, these include new, list, and done.
$ gem install gli
Successfully installed gli-2.8.0 1 gem installed
$ gli scaffold todo new list done
Creating dir ./todo/lib... Creating dir