Indianapolis, IN 46256 www.wiley.com
Copyright © 2011 by Wiley Publishing, Inc., Indianapolis, Indiana Published simultaneously in Canada
ISBN: 978-1-118-01711-1 ISBN: 978-1-118-08729-9 (ebk) ISBN: 978-1-118-08749-7 (ebk) ISBN: 978-1-118-08780-0 (ebk)
Manufactured in the United States of America 10 9 8 7 6 5 4 3 2 1
No part of this publication may be reproduced, stored in a retrieval system or transmitted in any form or by any means, electronic, mechanical, photocopying, recording, scanning or otherwise, except as permitted under Sections 107 or 108 of the 1976 United States Copyright Act, without either the prior written permission of the Publisher, or authorization through payment of the appropriate per-copy fee to the Copyright Clearance Center, 222 Rosewood Drive, Danvers, MA 01923, (978) 750-8400, fax (978) 646-8600. Requests to the Publisher for permission should be addressed to the Permissions Department, John Wiley & Sons, Inc., 111 River Street, Hoboken, NJ 07030, (201) 748-6011, fax (201) 748-6008, or online at http://www.wiley.com/go/permissions.
Limit of Liability/Disclaimer of Warranty: The publisher and the author make no representations or warranties with respect to the accuracy or completeness of the contents of this work and specifically disclaim all warranties, including without limitation warranties of fitness for a particular purpose. No warranty may be created or extended by sales or promotional materials. The advice and strategies contained herein may not be suitable for every situation. This work is sold with the understanding that the publisher is not engaged in rendering legal, accounting, or other professional services. If professional assistance is required, the services of a competent professional person should be sought. Neither the publisher nor the author shall be liable for dam-ages arising herefrom. The fact that an organization or Web site is referred to in this work as a citation and/or a potential source of further information does not mean that the author or the publisher endorses the information the organization or Web site may provide or recommendations it may make. Further, readers should be aware that Internet Web sites listed in this work may have changed or disappeared between when this work was written and when it is read.
For general information on our other products and services please contact our Customer Care Department within the United States at (877) 762-2974, outside the United States at (317) 572-3993 or fax (317) 572-4002.
Wiley also publishes its books in a variety of electronic formats. Some content that appears in print may not be available in electronic books.
Library of Congress Control Number: 2011921777
contentS
INTRODUCTION xv
getting StArted With Android progrAmming
chApter 1: 1
What is Android?
2
Android Versions 2
Features of Android 3
Architecture of Android 3
Android Devices in the Market 4
The Android Market 6
Obtaining the Required Tools
6
Eclipse 7
Android SDK 7
Android Development Tools (ADT) 7
Creating Android Virtual Devices (AVDs) 11
Creating Your First Android Application 14
Anatomy of an Android Application 22
Summary
25
ActivitieS And intentS 2
chApter 2: 7
Understanding Activities
27
Applying Styles and Themes to Activity 32
Hiding the Activity Title 33
Displaying a Dialog Window 34
Displaying a Progress Dialog 39
Linking Activities Using intents
43
Resolving Intent Filter Collision 48
Returning Results from an Intent 50
Passing Data Using an Intent Object 54
Calling Built-in Applications Using intents
56
Understanding the Intent Object 64
Using Intent Filters 65
Adding Categories 71
Displaying notifications
73
x
getting to knoW the Android uSer interFAce
chApter 3: 81
Understanding the Components of a Screen
81
Views and ViewGroups 82
LinearLayout 83
AbsoluteLayout 87
TableLayout 89
RelativeLayout 91
FrameLayout 93
ScrollView 95
Adapting to Display Orientation
97
Anchoring Views 98
Resizing and Repositioning 101
Managing Changes to Screen Orientation
104
Persisting State Information during Changes in Configuration 108
Detecting Orientation Changes 109
Controlling the Orientation of the Activity 110
Creating the User interface Programmatically
111
Listening for Ui notifications
114
Overriding Methods Defined in an Activity 114
Registering Events for Views 119
Summary
122
deSigning your uSer interFAce uSing vieWS
chApter 4: 125
Basic Views
126
TextView View 126
Button, ImageButton, EditText, CheckBox, ToggleButton, RadioButton,
and RadioGroup Views 127
ProgressBar View 135
AutoCompleteTextView View 141
Picker Views
144
TimePicker View 144
Displaying the TimePicker in a Dialog Window 147
DatePicker View 149
Displaying the DatePicker View in a Dialog Window 153
List Views
156
ListView View 156
Customizing the ListView 159
Using the Spinner View 162
xi COnTenTS
diSplAying pictureS And menuS With vieWS
chApter 5: 169
Using image Views to Display Pictures
169
Gallery and ImageView Views 170
ImageSwitcher 177
GridView 181
Using Menus with Views
185
Creating the Helper Methods 186
Options Menu 188
Context Menu 190
Some Additional Views
193
AnalogClock and DigitalClock Views 194
WebView 194
Summary
200
dAtA perSiStence 20
chApter 6: 3
Saving and Loading User Preferences
203
Using getSharedPreferences() 204
Using getPreferences() 208
Persisting Data to Files
209
Saving to Internal Storage 209
Saving to External Storage (SD Card) 214
Choosing the Best Storage Option 216
Using Static Resources 217
Creating and Using Databases
218
Creating the DBAdapter Helper Class 218
Using the Database Programmatically 224
Adding Contacts 224
Retrieving All the Contacts 225
Retrieving a Single Contact 226
Updating a Contact 227
Deleting a Contact 228
Upgrading the Database 230
Pre-Creating the Database 230
Bundling the Database with an Application 231
Summary
234
content providerS 23
chApter 7: 7
Sharing Data in Android
237
Using a Content Provider
238
xii
Projections 246
Filtering 246
Sorting 247
Creating Your Own Content Providers
247
Using the Content Provider 256
Summary
260
meSSAging And netWorking 26
chApter 8: 3
SMS Messaging
263
Sending SMS Messages Programmatically 264
Getting Feedback After Sending the Message 267
Sending SMS Messages Using Intent 269
Receiving SMS Messages 270
Updating an Activity from a BroadcastReceiver 273
Invoking an Activity from a BroadcastReceiver 277
Caveats and Warnings 280
Sending e-Mail
281
networking
284
Downloading Binary Data 286
Downloading Text Files 288
Accessing Web Services 291
Performing Asynchronous Calls 296
Summary
297
locAtion-BASed ServiceS 3
chApter 9: 01
Displaying Maps
302
Creating the Project 302
Obtaining the Maps API Key 303
Displaying the Map 305
Displaying the Zoom Control 308
Changing Views 310
Navigating to a Specific Location 312
Adding Markers 315
Getting the Location That Was Touched 318
Geocoding and Reverse Geocoding 320
getting Location Data
322
Monitoring a Location 327
xiii COnTenTS
developing Android ServiceS 3
chApter 10: 31
Creating Your Own Services
331
Performing Long-Running Tasks in a Service 336
Performing Repeated Tasks in a Service 341
Executing Asynchronous Tasks on
Separate Threads Using IntentService 343
Communicating between a Service and an Activity
346
Binding Activities to Services
350
Summary
356
puBliShing Android ApplicAtionS 35
chApter 11: 9
Preparing for Publishing
359
Versioning 360
Digitally Signing Your Android Applications 362
Deploying APK Files
367
Using the adb.exe Tool 367
Using a Web Server 369
Publishing on the Android Market 372
Creating a Developer Profile 372
Submitting Your Apps 373
Summary
378
uSing eclipSe For Android development 3
Appendix A: 81
getting Around in eclipse
381
Workspaces 381
Package Explorer 382
Using Projects from Other Workspaces 383
Editors 385
Perspectives 387
Auto Import of Namespaces 387
Code Completion 388
Refactoring 388
Debugging
389
Setting Breakpoints 389
Exceptions 390
uSing the Android emulAtor 39
Appendix B: 3
Uses of the Android emulator
393
xiv
emulating Real Devices
398
SD Card emulation
399
emulating Devices with Different Screen Sizes
401
emulating Physical Capabilities
402
Sending SMS Messages to the emulator
403
Making Phone Calls
406
Transferring Files into and out of the emulator
407
Resetting the emulator
409
AnSWerS to exerciSeS
Appendix c: 411
Chapter 1 Answers
411
Chapter 2 Answers
411
Chapter 3 Answers
412
Chapter 4 Answers
412
Chapter 5 Answers
412
Chapter 6 Answers
413
Chapter 7 Answers
413
Chapter 8 Answers
413
Chapter 9 Answers
413
Chapter 10 Answers
414
Chapter 11 Answers
414
xvi
WhAt thiS Book coverS
This book covers the fundamentals of Android programming using the Android SDK. It is divided into 11 chapters and three appendices.
Chapter 1: Getting Started with Android Programming covers the basics of the Android OS and its current state. You will learn about the features of Android devices, as well as some of the popular devices in the market. You will then learn how to download and install all the required tools to develop Android applications and then test them on the Android Emulator.
Chapter 2: Activities and Intents gets you acquainted with the two fundamental concepts in Android programming: activities and intents. Activities are the building blocks of an Android application. You will learn how to link activities together to form a complete Android application using intents, the glue to links activities and one of the unique characteristics of the Android OS.
Chapter 3: Getting to Know the Android User Interface covers the various components that make up the UI of an Android application. You will learn about the various layouts you can use to build the UI of your application, and the numerous events that are associated with the UI when users interact with the application.
Chapter 4: Designing Your User Interface Using Views walks you through the various basic views you can use to build your Android UI. You will learn three main groups of views: basic views, picker views, and list views.
Chapter 5: Displaying Pictures and Menus with Views continues the exploration of views. Here, you will learn how to display images using the various image views, as well as display options and con-text menus in your application. This chapter ends with some additional cool views that you can use to spice up your application.
Chapter 6: Data Persistence shows you how to save, or store, data in your Android application. In addition to learning the various techniques to store user data, you will also learn file manipulation and how to save files onto internal and external storage (SD card). In addition, you will learn how to create and use a SQLite database in your Android application.
Chapter 7: Content Providers discusses how data can be shared among different applications on an Android device. You will learn how to use a content provider and then build one yourself.
Chapter 8: Messaging and Networking explores two of the most interesting topics in mobile pro-gramming — sending SMS messages and network propro-gramming. You will learn how to programmat-ically send and receive SMS and e-mail messages; and how to connect to web servers to download data. Finally, you will see how Web services can be consumed in an Android application.
Chapter 9: Location-Based Services demonstrates how to build a location-based service application using Google Maps. You will also learn how to obtain geographical location data and then display the location on the map.
xx
After you join, you can post new messages and respond to messages that other users post. You can read messages at any time on the Web. If you want to have new messages from a particular forum e-mailed to you, click the Subscribe to This Forum icon by the forum name in the forum listing.
WhAt iS Android?
Android is a mobile operating system that is based on a modified version of Linux. It was originally developed by a startup of the same name, Android, Inc. In 2005, as part of its strategy to enter the mobile space, Google purchased Android and took over its development work (as well as its develop-ment team).
Google wanted Android to be open and free; hence, most of the Android code was released under the open-source Apache License, which means that anyone who wants to use Android can do so by downloading the full Android source code. Moreover, vendors (typically hardware manufacturers) can add their own proprietary extensions to Android and customize Android to differentiate their products from others. This simple development model makes Android very attractive and has thus piqued the interest of many vendors. This has been especially true for companies affected by the phe-nomenon of Apple’s iPhone, a hugely successful product that revolutionized the smartphone industry. Such companies include Motorola and Sony Ericsson, which for many years have been developing their own mobile operating systems. When the iPhone was launched, many of these manufacturers had to scramble to find new ways of revitalizing their products. These manufacturers see Android as a solution — they will continue to design their own hardware and use Android as the operating sys-tem that powers it.
The main advantage of adopting Android is that it offers a unified approach to application development. Developers need only develop for Android, and their applications should be able to run on numerous different devices, as long as the devices are powered using Android. In the world of smartphones, appli-cations are the most important part of the success chain. Device manufacturers therefore see Android as their best hope to challenge the onslaught of the iPhone, which already commands a large base of applications.
Android versions
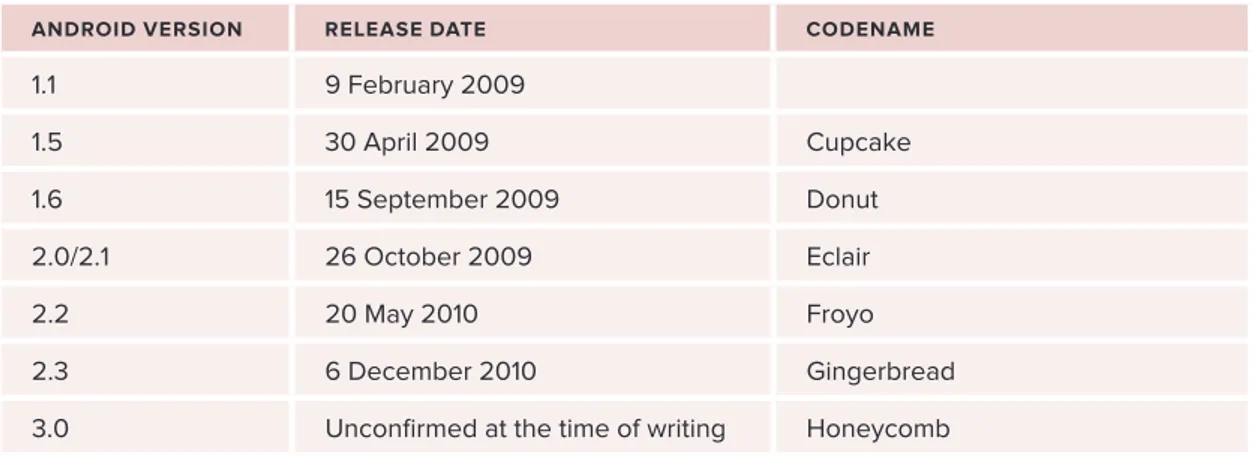
Android has gone through quite a number of updates since its first release. Table 1-1 shows the vari-ous versions of Android and their codenames.
tABle 1-1: A Brief History of Android Versions
Android verSion releASe dAte codenAme
1.1 9 February 2009
1.5 30 April 2009 Cupcake
1.6 15 September 2009 Donut
2.0/2.1 26 October 2009 Eclair
2.2 20 May 2010 Froyo
2.3 6 December 2010 Gingerbread
The Android OS is roughly divided into five sections in four main layers:
Linux kernel
➤ — This is the kernel on which Android is based. This layer contains all the low-level device drivers for the various hardware components of an Android device.
Libraries
➤ — These contain all the code that provides the main features of an Android OS. For example, the SQLite library provides database support so that an application can use it for data storage. The WebKit library provides functionalities for web browsing.
Android
➤ runtime — At the same layer as the libraries, the Android runtime provides a set of core libraries that enable developers to write Android apps using the Java programming language. The Android runtime also includes the Dalvik virtual machine, which enables every Android appli-cation to run in its own process, with its own instance of the Dalvik virtual machine (Android applications are compiled into the Dalvik executables). Dalvik is a specialized virtual machine designed specifically for Android and optimized for battery-powered mobile devices with limited memory and CPU.
Application
➤ framework — Exposes the various capabilities of the Android OS to application developers so that they can make use of them in their applications.
Applications
➤ — At this top layer, you will find applications that ship with the Android device (such as Phone, Contacts, Browser, etc.), as well as applications that you download and install from the Android Market. Any applications that you write are located at this layer.
Android devices in the market
Android devices come in all shapes and sizes. As of late November 2010, the Android OS can be seen powering the following types of devices:
Chances are good that you own at least one of the preceding devices. Figure 1-2 shows (clockwise) the Samsung Galaxy S, the HTC Desire HD, and the LG Optimus One smartphones.
Another popular category of devices that manufacturers are rushing out is the tablet. Tablet sizes typically start at seven inches, measured diagonally. Figure 1-3 shows the Samsung Galaxy Tab and the Dell Streak, which is a five-inch phone tablet.
What is Android?
❘
5Besides smartphones and tablets, Android is also beginning to appear in dedicated devices, such as e-book readers. Figure 1-4 shows the Barnes and Noble’s NOOKcolor, which is a color e-Book reader running the Android OS.
In addition to these popular mobile devices, Android is also slowly finding its way into your living room. People of Lava, a Swedish company, has developed an Android-based TV, call the Scandinavia Android TV (see Figure 1-5).
Google has also ventured into a proprietary smart TV platform based on Android and co-developed with companies such as Intel, Sony, and Logitech. Figure 1-6 shows Sony’s Google TV.
Figure 1-3 Figure 1-4
Obtaining the Required Tools
❘
7eclipse
The first step towards developing any applications is obtaining the integrated development environment (IDE). In the case of Android, the recommended IDE is Eclipse, a multi-language software development environment featuring an extensible plug-in system. It can be used to develop various types of applica-tions, using languages such as Java, Ada, C, C++, COBOL, Python, etc.
For Android development, you should download the Eclipse IDE for Java EE Developers (www.eclipse .org/downloads/packages/eclipse-ide-java-ee-developers/heliossr1). Six editions are available: Windows (32 and 64-bit), Mac OS X (Cocoa 32 and 64), and Linux (32 and 64-bit). Simply select the rel-evant one for your operating system. All the examples in this book were tested using the 32-bit version of Eclipse for Windows.
Once the Eclipse IDE is downloaded, unzip its content (the eclipse folder) into a folder, say C:\Android\. Figure 1-7 shows the content of the eclipse folder.
Android Sdk
The next important piece of software you need to download is, of course, the Android SDK. The Android SDK contains a debugger, libraries, an emulator, documentation, sample code, and tutorials.
You can download the Android SDK from http://developer.android.com/sdk/ index.html.
Once the SDK is downloaded, unzip its content (the android-sdk-windows folder) into the C:\Android\ folder, or whatever name you have given to the folder you just created.
Android development tools (Adt)
The Android Development Tools (ADT) plug-in for Eclipse is an extension to the Eclipse IDE that supports the creation and debugging of Android applications. Using the ADT, you will be able to do the following in Eclipse:
Create new Android application projects. ➤
Access the tools for accessing your Android emulators and devices. ➤
Compile and debug Android applications. ➤
Export Android applications into Android Packages (APK). ➤
Create digital certificates for code-signing your APK. ➤
To install the ADT, first launch Eclipse by double-clicking on the eclipse.exe file located in the eclipse folder.
When Eclipse is first started, you will be prompted for a folder to use as your workspace. In Eclipse, a workspace is a folder where you store all your projects. Take the default suggested and click OK.
Once Eclipse is up and running, select the Help ➪ Install New Software… menu item (see Figure 1-8).
In the Install window that appears, type http://dl-ssl.google.com/android/eclipse in the text box (see Figure 1-9) and click Add….
After a while, you will see the Developer Tools item appear in the middle of the window (see Figure 1-10). Expand it, and it will reveal its content: Android DDMS, Android Development Tools, and Android Hierarchy Viewer. Check all of them and click Next.
Figure 1-8
Obtaining the Required Tools
❘
9Figure 1-10
When you see the installation details, as shown in Figure 1-11, click Next.
Obtaining the Required Tools
❘
11Figure 1-14
In the Preferences window that appears, select Android. You will see an error message saying that the SDK has not been set up (see Figure 1-15). Click OK to dismiss it.
Figure 1-15
Enter the location of the Android SDK folder. In this example, it would be C:\Android\ android-sdk-windows. Click OK.
creating Android virtual devices (Avds)
Obtaining the Required Tools
❘
17Figure 1-22
Figure 1-23
Obtaining the Required Tools
❘
19Figure 1-25
10 .
The Android Emulator will now be started (if the emulator is locked, you need to slide the unlock button to unlock it first). Figure 1-26 shows the application running on the Android Emulator.Figure 1-26
Figure 1-27
12 .
Click the application Launcher icon to display the list of applications installed on the device. Note that the HelloWorld application is now installed in the application launcher (see Figure 1-28).In Android, an Activity is a window that contains the user interface of your applications. An application can have zero or more activities; in this example, the application contains one activity: MainActivity. This MainActivity is the entry point of the application, which is displayed when the application is started. Chapter 2 discusses activities in more detail.
In this simple example, you modified the main.xml file to display the string “This is my first Android Application!” and a button. The main.xml file contains the user interface of the activity, which is dis-played when MainActivity is loaded.
When you debug the application on the Android Emulator, the application is automatically installed on the emulator. And that’s it — you have developed your first Android application!
The next section unravels how all the various files in your Android project work together to make your application come alive.
Anatomy of an Android Application
Now that you have created your first Hello World Android application, it is time to dissect the innards of the Android project and examine all the parts that make everything work.
First, note the various files that make up an Android project in the Package Explorer in Eclipse (see Figure 1-30).
The various folders and their files are as follows:
src
➤ — Contains the .java source files for your project. In this example, there is one file, MainActivity.java. The MainActivity.java file is the source file for your activity. You will write the code for your application in this file.
Android 2.3
➤ library — This item contains one file, android.jar, which contains all the class libraries needed for an Android application.
gen
➤ — Contains the R.java file, a compiler-generated file that references all the resources found in your project. You should not modify this file.
assets
➤ — This folder contains all the assets used by your application, such as HTML, text files, databases, etc.
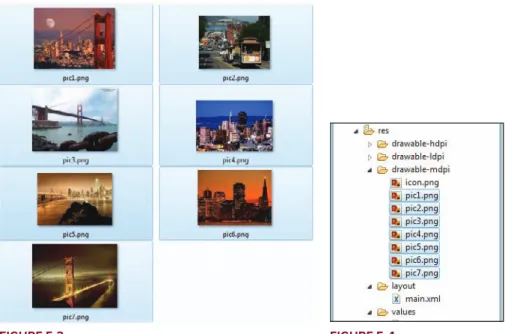
res
➤ — This folder contains all the resources used in your application. It also contains a few other subfolders: drawable-<resolution>, layout, and values. Chapter 3 talks more about how you can support devices with different screen resolutions and densities.
AndroidManifest.xml
➤ — This is the manifest file for your Android application. Here you spec-ify the permissions needed by your application, as well as other features (such as intent-filters, receivers, etc.). Chapter 2 discusses the use of the AndroidManifest.xml file in more details.
Obtaining the Required Tools
❘
23The main.xml file defines the user interface for your activity. Observe the following in bold:
<TextView
android:layout_width=”fill_parent” android:layout_height=”wrap_content” android:text=”@string/hello” />
The @string in this case refers to the strings.xml file located in the res/values folder. Hence, @string/hello refers to the hello string defined in the strings.xml file, which is “Hello World, MainActivity!”:
<?xml version=”1.0” encoding=”utf-8”?> <resources>
<string name=”hello”>Hello World, MainActivity!</string>
<string name=”app_name”>HelloWorld</string> </resources>
It is recommended that you store all the string constants in your application in this strings.xml file and reference these strings using the @string identifier. That way, if you ever need to localize your application to another language, all you need to do is replace the strings stored in the strings.xml file with the targeted language and recompile your application.
Observe the content of the AndroidManifest.xml file:
<?xml version=”1.0” encoding=”utf-8”?>
<manifest xmlns:android=”http://schemas.android.com/apk/res/android” package=”net.learn2develop.HelloWorld”
android:versionCode=”1” android:versionName=”1.0”>
<application android:icon=”@drawable/icon” android:label=”@string/app_name”>
<activity android:name=”.MainActivity”
<uses-sdk android:minSdkVersion=”9” /> </manifest>
The AndroidManifest.xml file contains detailed information about the application:
It defines the package name of the application as
➤ net.learn2develop.HelloWorld.
The version code of the application is 1. This value is used to identify the version number of ➤
your application. It can be used to programmatically determine whether an application needs to be upgraded.
The version name of the application is 1.0. This string value is mainly used for display to the ➤
user. You should use the format: <major>.<minor>.<point> for this value.
The application uses the image named
import android.app.Activity; import android.os.Bundle;
public class MainActivity extends Activity {
/** Called when the activity is first created. */
@Override
public void onCreate(Bundle savedInstanceState) { super.onCreate(savedInstanceState);
setContentView(R.layout.main); }
}
Your activity class would then load its UI component using the XML file defined in your res/layout folder. In this example, you would load the UI from the main.xml file:
setContentView(R.layout.main);
Every activity you have in your application must be declared in your AndroidManifest.xml file, like this:
<?xml version=”1.0” encoding=”utf-8”?>
<manifest xmlns:android=”http://schemas.android.com/apk/res/android” package=”net.learn2develop.Activities”
android:versionCode=”1” android:versionName=”1.0”>
<application android:icon=”@drawable/icon” android:label=”@string/app_name”>
<uses-sdk android:minSdkVersion=”9” /> </manifest>
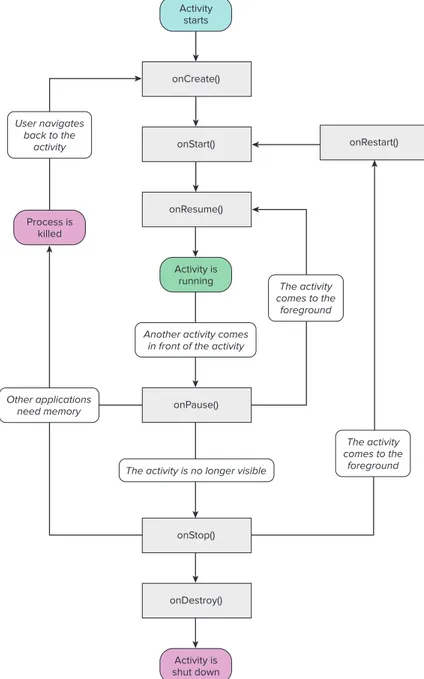
The Activity base class defines a series of events that governs the life cycle of an activity. The Activity class defines the following events:
onCreate()
➤ — Called when the activity is first created onStart()
➤ — Called when the activity becomes visible to the user onResume()
➤ — Called when the activity starts interacting with the user onPause()
➤ — Called when the current activity is being paused and the previous activity is being resumed
onStop()
➤ — Called when the activity is no longer visible to the user onDestroy()
➤ — Called before the activity is destroyed by the system (either manually or by the system to conserve memory)
onRestart()
Understanding Activities
❘
29By default, the activity created for you contains the onCreate() event. Within this event handler is the code that helps to display the UI elements of your screen.
Figure 2-1 shows the life cycle of an activity and the various stages it goes through — from when the activity is started until it ends.
Activity starts
Activity is running Process is
killed
The activity comes to the
foreground
Activity is shut down onCreate()
onStart()
onResume()
onDestroy()
Another activity comes in front of the activity
Other applications need memory
The activity is no longer visible User navigates
back to the activity
onStop() onPause()
The activity comes to the
foreground
onRestart()
Image reproduced from work created and shared by the Android Open Source Project and used according to terms described in the Creative Commons 2.5 Attribution License. See http://developer.android.com/reference/android/app/Activity.html
Understanding Activities
❘
31}
public void onStart()
{
super.onStart();
Log.d(tag, “In the onStart() event”);
}
public void onRestart()
{
super.onRestart();
Log.d(tag, “In the onRestart() event”);
}
public void onResume()
{
super.onResume();
Log.d(tag, “In the onResume() event”);
}
public void onPause()
{
super.onPause();
Log.d(tag, “In the onPause() event”);
}
public void onStop()
{
super.onStop();
Log.d(tag, “In the onStop() event”);
}
public void onDestroy()
{
super.onDestroy();
Log.d(tag, “In the onDestroy() event”);
}
}
3 .
Press F11 to debug the application on the Android Emulator.4 .
When the activity is first loaded, you should see the following in the LogCat window (click on the Debug perspective; see also Figure 2-3):12-28 13:45:28.115: DEBUG/Events(334): In the onCreate() event 12-28 13:45:28.115: DEBUG/Events(334): In the onStart() event 12-28 13:45:28.115: DEBUG/Events(334): In the onResume() event
Understanding Activities
❘
33To apply a dialog theme to an activity, simply modify the <Activity> element in the AndroidManifest.xml file by adding the android:theme attribute:
<?xml version=”1.0” encoding=”utf-8”?>
<manifest xmlns:android=”http://schemas.android.com/apk/res/android” package=”net.learn2develop.Activities”
android:versionCode=”1” android:versionName=”1.0”>
<application android:icon=”@drawable/icon” android:label=”@string/app_name”>
<uses-sdk android:minSdkVersion=”9” /> </manifest>
Doing so will make the activity appear as a dialog, as shown in Figure 2-4.
hiding the Activity title
You can also hide the title of an activity if desired (such as when you just want to display a status update to the user). To do so, use the requestWindowFeature() method and pass it the Window.FEATURE_NO_ TITLE constant, like this:
public class MainActivity extends Activity { String tag = “Events”;
/** Called when the activity is first created. */
@Override
public void onCreate(Bundle savedInstanceState) { super.onCreate(savedInstanceState);
//---hides the title
requestWindowFeature(Window.FEATURE_NO_TITLE);
setContentView(R.layout.main);
Log.d(tag, “In the onCreate() event”); }
}
Understanding Activities
❘
353 .
Add the following statements in bold to the MainActivity.java file: package net.learn2develop.Dialog;public class MainActivity extends Activity {
CharSequence[] items = { “Google”, “Apple”, “Microsoft” };
boolean[] itemsChecked = new boolean [items.length];
/** Called when the activity is first created. */
@Override
public void onCreate(Bundle savedInstanceState) { super.onCreate(savedInstanceState);
setContentView(R.layout.main);
Button btn = (Button) findViewById(R.id.btn_dialog);
btn.setOnClickListener(new View.OnClickListener() {
public void onClick(View v) {
protected Dialog onCreateDialog(int id) {
.setMultiChoiceItems(items, itemsChecked, new
DialogInterface.OnMultiChoiceClickListener() {
@Override
public void onClick(DialogInterface dialog, int which, boolean isChecked) {
Toast.makeText(getBaseContext(),
items[which] + (isChecked ? “ checked!”:
“ unchecked!”),
Toast.LENGTH_SHORT).show();
}
}
)
.create();
}
return null;
}
}
4 .
Press F11 to debug the application on the Android Emulator. Click the button to display the dialog (see Figure 2-6). Checking the various checkboxes will cause the Toast class to display the text of the item checked/unchecked. To dismiss the dialog, click the OK or Cancel button.Figure 2-6
How It Works
To display a dialog, you first override the onCreateDialog() method in the Activity class: @Override
protected Dialog onCreateDialog(int id) { //...
Understanding Activities
❘
37This method is called when you call the showDialog() method:
Button btn = (Button) findViewById(R.id.btn_dialog); btn.setOnClickListener(new View.OnClickListener() { public void onClick(View v) {
showDialog(0);
} });
The onCreateDialog() method is a callback for creating dialogs that are managed by the activity. When you call the showDialog() method, this callback will be invoked. The showDialog() method accepts an integer argument identifying a particular dialog to display.
To create a dialog, you use the AlertDialog class’s Builder constructor. You set the various properties, such as icon, title, and buttons, as well as checkboxes:
public void handleMessage(Message msg) {
_progressDialog.setProgressStyle(ProgressDialog.STYLE_HORIZONTAL);
_progressDialog.setButton(DialogInterface.BUTTON_POSITIVE, “Hide”, new
_progressDialog.setButton(DialogInterface.BUTTON_NEGATIVE, “Cancel”, new
DialogInterface.OnClickListener() {
Understanding Activities
❘
41Figure 2-8
How It Works
To create a progress dialog, you first create an instance of the ProgressDialog class and set its various properties, such as icon, title, and style:
_progressDialog = new ProgressDialog(this); _progressDialog.setIcon(R.drawable.icon);
_progressDialog.setTitle(“Downloading files...”);
_progressDialog.setProgressStyle(ProgressDialog.STYLE_HORIZONTAL);
You then set the two buttons that you want to display inside the progress dialog:
_progressDialog.setButton(DialogInterface.BUTTON_POSITIVE, “Hide”, new DialogInterface.OnClickListener() {
public void onClick(DialogInterface dialog, int whichButton)
{
Toast.makeText(getBaseContext(),
“Hide clicked!”, Toast.LENGTH_SHORT).show(); }
});
_progressDialog.setButton(DialogInterface.BUTTON_NEGATIVE, “Cancel”, new DialogInterface.OnClickListener() {
public void onClick(DialogInterface dialog, int whichButton)
{
Toast.makeText(getBaseContext(),
} });
return _progressDialog; }
The preceding causes a progress dialog to appear (see Figure 2-9).
Figure 2-9
To display the progress status in the progress dialog, you need to use a Handler object to run a back-ground thread:
_progress = 0;
_progressDialog.setProgress(0); _progressHandler.sendEmptyMessage(0);
The background thread counts up to 100, with each count delayed by 100 milliseconds:
_progressHandler = new Handler() {
public void handleMessage(Message msg) { super.handleMessage(msg);
if (_progress >= 100) { _progressDialog.dismiss(); } else {
_progress++;
_progressDialog.incrementProgressBy(1);
_progressHandler.sendEmptyMessageDelayed(0, 100); }
} };
4 .
Make a copy of the main.xml file by right-clicking on it and selecting Copy. Then, right-click on the res/layout folder and select Paste. Name the file activity2.xml. The res/layout folder will now contain the activity2.xml file (see Figure 2-12).Figure 2-10
5 .
Modify the activity2.xml file as follows:<?xml version=”1.0” encoding=”utf-8”?>
<LinearLayout xmlns:android=”http://schemas.android.com/apk/res/android” android:orientation=”vertical”
android:layout_width=”fill_parent” android:layout_height=”fill_parent” >
Linking Activities Using intents
❘
45<TextView
android:layout_width=”fill_parent” android:layout_height=”wrap_content” android:text=”This is Activity 2!” />
</LinearLayout>
6 .
In the Activity2.java file, add the following statements in bold: package net.learn2develop.Activities;import android.app.Activity; import android.os.Bundle;
public class Activity2 extends Activity {
@Override
public void onCreate(Bundle savedInstanceState) {
super.onCreate(savedInstanceState);
setContentView(R.layout.activity2);
} }
7 .
Modify the MainActivity.java file as shown in bold: package net.learn2develop.Activities;import android.app.Activity; import android.os.Bundle; import android.util.Log; import android.view.Window;
import android.view.KeyEvent; import android.content.Intent;
public class MainActivity extends Activity { String tag = “Events”;
/** Called when the activity is first created. */
@Override
public void onCreate(Bundle savedInstanceState) { super.onCreate(savedInstanceState);
//---hides the title
//requestWindowFeature(Window.FEATURE_NO_TITLE); setContentView(R.layout.main);
Log.d(tag, “In the onCreate() event”); }
public boolean onKeyDown(int keyCode, KeyEvent event)
{
if (keyCode == KeyEvent.KEYCODE_DPAD_CENTER)
{
}
return false;
}
public void onStart() { //... } public void onRestart() { //... } public void onResume() { //... } public void onPause() { //... } public void onStop() { //... } public void onDestroy() { //... } }
8 .
Press F11 to debug the application on the Android Emulator. When the first activity is loaded, click the center of the directional pad (see Figure 2-13; on a real device this can be achieved by pressing down the trackball). The second activity will now be loaded.Figure 2-13
How It Works
As you have learned, an activity is made up of a UI component (for example, main.xml) and a class component (for example, MainActivity.java). Hence, if you want to add another activity to a project, you need to create these two components.
In the AndroidManifest.xml file, specifically you have added the following:
Linking Activities Using intents
❘
47Here, you have added a new activity to the application. Note the following:
The name of the new activity added is “
➤ Activity2”.
The label for the activity is named “
➤ Activity 2”.
The intent filter name for the activity is “
➤ net.learn2develop.ACTIVITY2”. Other activities that wish to call this activity will invoke it via this name. Ideally, you should use the reverse domain name of your company as the intent filter name in order to reduce the chances of another application having the same intent filter. The next section discusses what happens when two or more activities have the same intent filter.
The category for the intent filter is “
➤ android.intent.category.DEFAULT”. You need to add this to the intent filter so that this activity can be started by another activity using the startActivity() method (more on this shortly).
In the MainActivity.java file, you implemented the onKeyDown event handler. This event is fired when-ever the user presses one of the keys on the device. When the user presses the center key on the direc-tional pad (as represented by the KeyEvent.KEYCODE_DPAD_CENTER constant), you use the startActivity() method to display Activity2 by creating an instance of the Intent class and passing it the intent filter name of Activity2 (which is net.learn2develop.ACTIVITY2):
public boolean onKeyDown(int keyCode, KeyEvent event) {
Activities in Android can be invoked by any application running on the device. For example, you can create a new Android project and then display Activity2 by using its net.learn2develop.ACTIVITY2 intent filter. This is one of the fundamental concepts in Android that enables an application to invoke another easily.
If the activity that you want to invoke is defined within the same project, you can rewrite the preceding statement like this:
startActivity(new Intent(this, Activity2.class));
resolving intent Filter collision
In the previous section, you learned that the <intent-filter> element defines how your activity can be invoked by another activity. What happens if another activity (in either the same or a separate application) has the same filter name? For example, suppose your application has another activity named Activity3, with the following entry in the AndroidManifest.xml file:
<?xml version=”1.0” encoding=”utf-8”?>
<manifest xmlns:android=”http://schemas.android.com/apk/res/android” package=”net.learn2develop.Activities”
android:versionCode=”1” android:versionName=”1.0”>
<application android:icon=”@drawable/icon” android:label=”@string/app_name”>
<activity android:name=”.MainActivity”
<uses-sdk android:minSdkVersion=”9” /> </manifest>
If you call the startActivity() method with the following intent, then the Android OS will display a selection as shown in Figure 2-14:
startActivity(new Intent(“net.learn2develop.ACTIVITY2”));
If you check the “Use by default for this action” item and then select an activity, then the next time the intent “net.learn2develop.ACTIVITY2” is called again, it will always launch the previous activ-ity that you have selected.
To clear away this default, go to the Settings application in Android and select Applications ➪
Linking Activities Using intents
❘
49Figure 2-14
Linking Activities Using intents
❘
51btn.setOnClickListener(new View.OnClickListener()
{
3 .
Add the following statements in bold to the MainActivity.java file: package net.learn2develop.Activities;public class MainActivity extends Activity { String tag = “Events”;
int request_Code = 1;
/** Called when the activity is first created. */
@Override
public void onCreate(Bundle savedInstanceState) { super.onCreate(savedInstanceState);
//---hides the title
//requestWindowFeature(Window.FEATURE_NO_TITLE);
setContentView(R.layout.main);
Log.d(tag, “In the onCreate() event”); }
public boolean onKeyDown(int keyCode, KeyEvent event) {
if (keyCode == KeyEvent.KEYCODE_DPAD_CENTER) {
//startActivity(new Intent(“net.learn2develop.ACTIVITY2”)); //startActivity(new Intent(this, Activity2.class));
“net.learn2develop.ACTIVITY2”),
request_Code);
}
return false; }
public void onActivityResult(int requestCode, int resultCode, Intent data)
{
if (requestCode == request_Code) {
if (resultCode == RESULT_OK) {
Toast.makeText(this,data.getData().toString(),
Toast.LENGTH_SHORT).show();
}
}
}
public void onStart() { //... } public void onRestart() { //... } public void onResume() { //... } public void onPause() { //... } public void onStop() { //... } public void onDestroy() { //... } }
4 .
Press F11 to debug the application on the Android Emulator. When the first activity is loaded, click the center button on the directional pad. Activity2 will now be loaded. Enter your name (see Figure 2-16) and click the OK button. You will see that the first activity now displays the name you have entered using the Toast class.Calling Built-in Applications Using intents
❘
572 .
Add the following statements in bold to the main.xml file:<?xml version=”1.0” encoding=”utf-8”?>
<LinearLayout xmlns:android=”http://schemas.android.com/apk/res/android” android:orientation=”vertical”
android:layout_width=”fill_parent” android:layout_height=”fill_parent” >
<Button
android:id=”@+id/btn_webbrowser” android:layout_width=”fill_parent” android:layout_height=”wrap_content” android:text=”Web Browser” /> <Button
android:id=”@+id/btn_makecalls” android:layout_width=”fill_parent” android:layout_height=”wrap_content” android:text=”Make Calls” />
<Button
android:id=”@+id/btn_showMap” android:layout_width=”fill_parent” android:layout_height=”wrap_content” android:text=”Show Map” />
<Button
android:id=”@+id/btn_chooseContact” android:layout_width=”fill_parent” android:layout_height=”wrap_content” android:text=”Choose Contact” />
</LinearLayout>
3 .
Add the following statements in bold to the MainActivity.java file: package net.learn2develop.Intents;public class MainActivity extends Activity {
Button b1, b2, b3, b4;
int request_Code = 1;
/** Called when the activity is first created. */
@Override
public void onCreate(Bundle savedInstanceState) { super.onCreate(savedInstanceState);
setContentView(R.layout.main);
b1 = (Button) findViewById(R.id.btn_webbrowser);
b1.setOnClickListener(new OnClickListener()
{
b2.setOnClickListener(new OnClickListener()
{
b3.setOnClickListener(new OnClickListener()
{
b4.setOnClickListener(new OnClickListener()
{
public void onActivityResult(int requestCode, int resultCode, Intent data)
{
if (requestCode == request_Code)
{
if (resultCode == RESULT_OK)
Figure 2-21
How It Works
In this example, you saw how you can use the Intent class to invoke some of the built-in applications in Android (such as Maps, Phone, Contacts, and Browser).
Calling Built-in Applications Using intents
❘
63In this case, the contacts and their phone numbers are displayed (see Figure 2-22).
Figure 2-22
Because you are expecting a result from the Contacts application, you invoke it using the startActivityForResult() method, passing in the Intent object and a request code. You need to implement the onActivityResult() method in order to obtain a result from the activity:
public void onActivityResult(int requestCode, int resultCode, Intent data)
{
if (requestCode == request_Code) {
if (resultCode == RESULT_OK) {
Toast.makeText(this,data.getData().toString(), Toast.LENGTH_SHORT).show();
Intent i = new Intent(
android.content.Intent.ACTION_VIEW, Uri.parse(data.getData().toString())); startActivity(i);
} } }
In the case of the Contacts application, when you choose a particular contact (using the ACTION_PICK constant), an URL containing the contact selected is returned, like this:
Obtaining this URL is not very useful unless you know what to do with it. Therefore, in this case, you can create another Intent object to view it:
Intent i = new Intent(
android.content.Intent.ACTION_VIEW, Uri.parse(data.getData().toString())); startActivity(i);
This will show details about the selected contact.
understanding the intent object
So far, you have seen the use of the Intent object to call other activities. This is a good time to recap and gain a more detailed understanding of how the Intent object performs its magic.
First, you see that you can call another activity by passing its action to the constructor of an Intent object:
startActivity(new Intent(“net.learn2develop.ACTIVITY2”));
The action (in this example “net.learn2develop.ACTIVITY2”) is also known as the component name. This is used to identify the target activity/application that you want to invoke. You can also rewrite the component name by specifying the class name of the activity if it resides in your project, like this:
startActivity(new Intent(this, Activity2.class));
You can also create an Intent object by passing in an action constant and data, such as the following:
Intent i = new
Intent(android.content.Intent.ACTION_VIEW,
Uri.parse(“http://www.amazon.com”));
startActivity(i);
The action portion defines what you want to do, while the data portion contains the data for the tar-get activity to act upon. You can also pass the data to the Intent object using the setData() method:
Intent i = new
Intent(android.content.Intent.ACTION_VIEW);
i.setData(Uri.parse(“http://www.amazon.com”));
In this example, you indicate that you want to view a web page with the specified URL. The Android OS will look for all activities that are able to satisfy your request. This process is known as intent resolution. The next section discusses in more detail how your activities can be the target of other activities.
For some intents, there is no need to specify the data. For example, to select a contact from the Contacts application, you specify the action and then indicate the MIME type using the setType() method:
Intent i = new
2 .
Add the following statements in bold to the AndroidManifest.xml file:<?xml version=”1.0” encoding=”utf-8”?>
<manifest xmlns:android=”http://schemas.android.com/apk/res/android” package=”net.learn2develop.Intents”
android:versionCode=”1” android:versionName=”1.0”>
<application android:icon=”@drawable/icon” android:label=”@string/app_name”>
<activity android:name=”.MainActivity”
<uses-sdk android:minSdkVersion=”9” />
<uses-permission android:name=”android.permission.CALL_PHONE” />
<uses-permission android:name=”android.permission.INTERNET” />
</manifest>
3 .
Add the following statements in bold to the main.xml file:<?xml version=”1.0” encoding=”utf-8”?>
<LinearLayout xmlns:android=”http://schemas.android.com/apk/res/android” android:orientation=”vertical”
android:layout_width=”fill_parent” android:layout_height=”fill_parent” > <Button
android:id=”@+id/btn_webbrowser” android:layout_width=”fill_parent” android:layout_height=”wrap_content” android:text=”Web Browser” /> <Button
android:id=”@+id/btn_makecalls” android:layout_width=”fill_parent” android:layout_height=”wrap_content” android:text=”Make Calls” />
<Button
android:id=”@+id/btn_showMap” android:layout_width=”fill_parent” android:layout_height=”wrap_content” android:text=”Show Map” />
<Button
Calling Built-in Applications Using intents
❘
67android:layout_width=”fill_parent” android:layout_height=”wrap_content” android:text=”Choose Contact” />
<Button
android:id=”@+id/btn_launchMyBrowser” android:layout_width=”fill_parent” android:layout_height=”wrap_content” android:text=”Launch My Browser” />
</LinearLayout>
4 .
Add the following statements in bold to the MainActivity.java file: package net.learn2develop.Intents;public class MainActivity extends Activity {
Button b1, b2, b3, b4, b5;
int request_Code = 1;
/** Called when the activity is first created. */
@Override
});
b5.setOnClickListener(new OnClickListener()
{
public void onActivityResult(int requestCode, int resultCode, Intent data) {
//... }
}
5 .
Add the following statements in bold to the browser.xml file:<?xml version=”1.0” encoding=”utf-8”?>
<LinearLayout xmlns:android=”http://schemas.android.com/apk/res/android”
android:orientation=”vertical” android:layout_width=”fill_parent” android:layout_height=”fill_parent” > <WebView
android:id=”@+id/WebView01”
android:layout_width=”wrap_content” android:layout_height=”wrap_content” /> </LinearLayout>
6 .
Add the following statements in bold to the MyBrowserActivity.java file: package net.learn2develop.Intents;Calling Built-in Applications Using intents
❘
69/** Called when the activity is first created. */ @Override
public void onCreate(Bundle savedInstanceState) {
super.onCreate(savedInstanceState);
setContentView(R.layout.browser);
Uri url = getIntent().getData();
WebView webView = (WebView) findViewById(R.id.WebView01);
webView.setWebViewClient(new Callback());
webView.loadUrl(url.toString());
}
private class Callback extends WebViewClient {
@Override
public boolean shouldOverrideUrlLoading(WebView view, String url) {
return(false);
}
} }
7 .
Press F11 to debug the application on the Android Emulator.8 .
Click the Launch my Browser button and you should see the new activity displaying the Amazon.com web page (see Figure 2-24).How It Works
In this example, you created a new activity named MyBrowserActivity. You first needed to declare it in the AndroidManifest.xml file:
<activity android:name=”.MyBrowserActivity” android:label=”@string/app_name”>
<intent-filter>
<action android:name=”android.intent.action.VIEW” />
<action android:name=”net.learn2develop.MyBrowser” />
<category android:name=”android.intent.category.DEFAULT” />
<data android:scheme=”http” />
</intent-filter>
</activity>
In the <intent-filter> element, you declared it to have two actions, one category, and one data. This means that all other activities can invoke this activity using either the “android.intent.action.VIEW” or the “net.learn2develop.MyBrowser” action. For all activities that you want others to call using the start Activity() or startActivityForResult() methods, they need to have the “android.intent.category .DEFAULT” category. If not, your activity will not be callable by others. The <data> element specifies the type of data expected by the activity. In this case, it expects the data to start with the “http://” prefix.
The preceding intent filter could also be rewritten as follows:
<activity android:name=”.MyBrowserActivity” android:label=”@string/app_name”>
<intent-filter>
<action android:name=”android.intent.action.VIEW” />
<category android:name=”android.intent.category.DEFAULT” />
<data android:scheme=”http” />
</intent-filter>
<intent-filter>
<action android:name=”net.learn2develop.MyBrowser” />
<category android:name=”android.intent.category.DEFAULT” />
<data android:scheme=”http” />
</intent-filter>
</activity>
Writing the intent filter this way makes it much more readable and logically groups the action, category, and data within an intent filter.
If you now use the ACTION_VIEW action with the data shown here, Android will display a selection (as shown in Figure 2-25):
Intent i = new
Intent(android.content.Intent.ACTION_VIEW,
Uri.parse(“http://www.amazon.com”)); startActivity(i);
Calling Built-in Applications Using intents
❘
71Figure 2-25
Adding categories
You can group your activities into categories by using the <category> element in the intent filter. Suppose you have added the following <category> element to the AndroidManifest.xml file:
<?xml version=”1.0” encoding=”utf-8”?>
<manifest xmlns:android=”http://schemas.android.com/apk/res/android” package=”net.learn2develop.Intents”
android:versionCode=”1” android:versionName=”1.0”>
<application android:icon=”@drawable/icon” android:label=”@string/app_name”>
<activity android:name=”.MainActivity” android:label=”@string/app_name”>
<intent-filter>
<action android:name=”android.intent.action.MAIN” />
<category android:name=”android.intent.category.LAUNCHER” />
</intent-filter>
</activity>
<activity android:name=”.MyBrowserActivity” android:label=”@string/app_name”>
<intent-filter>
<action android:name=”android.intent.action.VIEW” />
<action android:name=”net.learn2develop.MyBrowser” />
<category android:name=”android.intent.category.DEFAULT” />
<data android:scheme=”http” />
</intent-filter>
</activity>
</application>
<uses-sdk android:minSdkVersion=”9” />
<uses-permission android:name=”android.permission.CALL_PHONE” />
<uses-permission android:name=”android.permission.INTERNET” /> </manifest>
In this case, the following code will invoke the MyBrowerActivity activity:
Intent i = new
Intent(android.content.Intent.ACTION_VIEW, Uri.parse(“http://www.amazon.com”)); i.addCategory(“net.learn2develop.Apps”);
startActivity(i);
You add the category to the Intent object using the addCategory() method. If you omit the addCategory() statement, the preceding code will still invoke the MyBrowerActivity activity because it will still match the default category “android.intent.category.DEFAULT”.
However, if you specify a category that does not match the category defined in the intent filter, it will not work:
The preceding category (“net.learn2develop.OtherApps”) does not match any in the intent filter, so a run-time exception will be raised.
If you add the preceding category in the intent filter of MyBrowerActivity, then the preceding code will work:
You can add multiple categories to an Intent object; for example, the following statements add the “net.learn2develop.SomeOtherApps” category to the Intent object: