ISBN: 3-89864-281-X
Translation copyright © 2005 John Wiley & Sons Ltd,
The Atrium, Southern Gate, Chichester, West Sussex PO19 8SQ, England
Telephone (+44) 1243 779777
Email (for orders and customer service enquiries): [email protected] Visit our Home Page on www.wileyeurope.com or www.wiley.com
All Rights Reserved. No part of this publication may be reproduced, stored in a retrieval system or transmitted in any form or by any means, electronic, mechanical, photocopying, recording, scanning or otherwise, except under the terms of the Copyright, Designs and Patents Act 1988 or under the terms of a licence issued by the Copyright Licensing Agency Ltd, 90 Tottenham Court Road, London W1T 4LP, UK, without the permission in writing of the Publisher, with the exception of any material supplied specifically for the purpose of being entered and executed on a computer system for exclusive use by the purchaser of the publication.Requests to the Publisher should be addressed to the Permissions
Department, John Wiley & Sons Ltd, The Atrium, Southern Gate, Chichester, West Sussex PO19 8SQ, England, or emailed to [email protected], or faxed to (+44) 1243 770620.
This publication is designed to provide accurate and authoritative information in regard to the subject matter covered. It is sold on the understanding that the Publisher is not engaged in rendering profes-sional services. If profesprofes-sional advice or other expert assistance is required, the services of a competent professional should be sought.
Other Wiley Editorial Offices
John Wiley & Sons Inc., 111 River Street, Hoboken, NJ 07030, USA
Jossey-Bass, 989 Market Street, San Francisco, CA 94103-1741, USA
Wiley-VCH Verlag GmbH, Boschstr. 12, D-69469 Weinheim, Germany
John Wiley & Sons Australia Ltd, 33 Park Road, Milton, Queensland 4064, Australia
John Wiley & Sons (Asia) Pte Ltd, 2 Clementi Loop #02-01, Jin Xing Distripark, Singapore 129809
John Wiley & Sons Canada Ltd, 22 Worcester Road, Etobicoke, Ontario, Canada M9W 1L1
Wiley also publishes its books in a variety of electronic formats. Some content that appears in print may not be available in electronic books.
British Library Cataloguing in Publication Data
Author Berthold Daum
Executive Editor Gaynor Redvers-Mutton
Production Editors Felicia Robinson Juliet Booker
Book Producer
Ryan Publishing Group, Inc.
Copy Editor Linda Recktenwald
Compositor Gina Rexrode
Illustrator Nathan Clement
Vice President & Executive Group Publisher Richard Swadley
Vice President & Publishing Director Sarah Stevens
Vice President and Publisher Joseph B. Wikert
Berthold Daumhas a Ph.D. in Mathematics and is a professional Java and XML developer who has been using Eclipse since it was first developed. Mr. Daum specializes in innovative electronic business technology and electronic content production; his clients include SAP Integrated Services AG and Software AG. His experience in software training and ability to anticipate the needs of professional developers has been demonstrated in his previous books, including Eclipse 2 for Java Developers(Wiley) and Modeling Business Objects with XML Schema(Morgan-Kaufmann).
The first version of Eclipse was released in November 2001. Eclipse was announced by IBM as a $40 mil-lion donation to the Open Source community. The first reactions to this gift, however, were mixed. While many Java programmers hailed the release of Eclipse enthusiastically (when would one not be enthusi-astic about a $40 million present?), Sun Microsystems was initially less than amused.
In the meantime, Eclipse has taken the Java world (and not only the Java world) by storm, despite the fact that Sun Microsystems is still not onboard. Eclipse is now completely managed by eclipse.org, an independent, nonprofit organization in which, however, IBM plays a major role. Despite the fact that the membership fee is quite hefty ($250.00 per year) and commitment is asked in the form of staff members working actively toward the development of Eclipse, the membership circle is not at all small: the Eclipse consortium has about 150 member companies, and people from Ericsson, Genuitec LLC, IBM, Hewlett Packard, Intel, MontaVista Software, QNX Software Systems Ltd., SAP AG, SAS, Serena Software, and the University of Washington belong to the board (Microsoft, you guessed it, is not a member).
So, the question is, what is Eclipse? Is it a Java IDE? Is it a new GUI for Java applications? Is it an application platform or framework?
Eclipse.org refers toEclipse as a platform for “everything and nothing in particular.” That we can use Eclipse to develop Java programs (in fact, it is one of the finest Java IDEs) is just a special appli-cation of this platform. But its real appliappli-cation domain reaches far beyond Java development. Because of its plug-in architecture, Eclipse is as adaptable as a chameleon and can find a habitat in quite different environments. The Eclipse Java IDE is, in fact, only an eminent example of an Eclipse plug-in. A large number of other plug-ins have already been developed for Eclipse by various companies and developers or are currently in development (see Appendix A for a small selection of such developments). For example, there is a plug-in for a C++ IDE, while plug-ins for other programming languages such as RPG and COBOL are in preparation. In this book, however, we will concentrate on Java development with Eclipse.
Eclipse is more than a pure development environment. With its SWT and JFace libraries it provides an alternative to Sun’s Java libraries, AWT and Swing. SWT and JFace allow the creation of Java applica-tions that closely match native applicaapplica-tions (i.e., applicaapplica-tions written in C or C++) in both “look and feel” and in responsiveness. In contrast, applications implemented on the basis of Swing often lack responsiveness and sometimes differ—despite the possibility to switch skins—from the “look and feel” of a native application. Such applications are notoriously hard to sell, because end users expect applica-tions that fulfill the standards of the host platform. SWT and JFace could therefore be a breakthrough for Java applications on the desktop. No wonder, therefore, that there is a heated debate for and against SWT/JFace in the respective discussion forums (for example, www.javalobby.com) and that the SWT was voted as the “most innovative Java component.”
components to implement features such as the Java IDE or the workbench, but they can also be used for your own applications. In particular, the Rich Client Platform that was introduced with Eclipse 3 provides a generic framework for a wide class of applications. The Eclipse license model allows users to embed these components into their own applications, to modify them, and to deploy them as part of their own applications—all without paying a cent in license fees. The complete Eclipse code is available as source code, can be browsed online, and can be used within you own projects.
The Eclipse Culture
Of course, Eclipse was not just “invented”: it has a history. The author of this book, who has used Visual Age for Java for years, can detect many of the Visual Age construction elements within Eclipse. In fact, the same company that stood behind the development of Visual Age is also responsible for the develop-ment of Eclipse. This company is OTI (www.oti.com). As long ago as 1988, OTI developed a collabora-tive development environment for Smalltalk called ENVY, which was later licensed to IBM under the name Visual Age. What followed was the development of Visual Age for Java, but this was still imple-mented in Smalltalk. Now, OTI has started the next generation of development tools with Eclipse. Of course, we find many of the design elements of Visual Age in Eclipse. The difference is, however, that Eclipse is implemented in Java and that it features a much more open architecture than Visual Age.
Eclipse was licensed by IBM and than donated to the Open Source community. This was not done without self-interest: Eclipse basically is nothing more than the community edition of IBM’s WebSphere Studio Application Developer (WSAD). The core platform and the core plug-ins are all the same. The main differ-ence is that Eclipse 3.0 consists of about 90 plug-ins, while WSAD features about 500–700 plug-ins, thus offering greatly extended functionality, such as plug-ins for developing web and database applications.
About This Book
It is practically impossible to write a single book about Eclipse. The sheer complexity of Eclipse would require quite a few books. I have tried to emphasize those topics where Eclipse makes significant contri-butions to the Java world. In particular, these are the new GUI libraries (SWT and JFace) and the use of Eclipse as a platform and framework for desktop applications. What had to be excluded from this book are WebSphere-specific topics such as J2EE and servlet development. Developing desktop applications is currently one of the strong points of Eclipse.
How This Book Is Organized
The novice to Eclipse—or even an experienced Java programmer—is at first overwhelmed by the sheer number of functions. But the functions visible to the user are only the tip of the iceberg. If we start to explore the inner workings of Eclipse, its API, we can get lost easily. Currently the Eclipse download has a size of 83 MB.
Faced with this huge amount of information, this book uses a pragmatic approach. Following the motto that “perception works from the outside to the inside,” I first investigate how Eclipse presents itself to the end user. The benefit is twofold: first, each programmer is an end user of the Eclipse Java IDE; second, the various components of the Eclipse workbench, such as editors, views, menus, dialogs, and much more, can also be used in personal applications. Experienced programmers, however, may find an introduction into the Java IDE trivial and superfluous. Nevertheless, it is useful to get well acquainted with the Eclipse user interface, because many of the concepts and details can be later utilized when designing you own applications.
In Chapters 1 through 7 of this book I first introduce practical work with Eclipse, in particular with the Java development environment. Eclipse presents itself as a very powerful Java IDE that continues the positive traditions of Visual Age for Java but also introduces new concepts such as code completion, strong refactoring facilities, assistants that make intelligent proposals for fixing program errors, and a local history that allows a return to previous code versions.
In these chapters I also discuss the organization of the workbench, the resources of the Eclipse workspace such as projects, folders, and files, how these resources are related to the native file system, and the tools for navigation. I explain what perspectives are and how they can be used effectively. The Eclipse Java debugger and the integration of JUnit into Eclipse are discussed, and a short introduction about Eclipse’s support for working in a team is given.
The examples used in this part are still all based on AWT and Swing.
However, this will quickly change in the second part of the book, Chapters 8 through 10. Here, I intro-duce the secrets of the SWT and JFace libraries. For SWT, event processing is discussed, along with the various GUI elements such as text fields, tables, buttons, and trees; the various layout options; graphics operations and how Java2D can coexist with the SWT; and printer output. I also explain the specialties of thread and resource management in the context of the SWT and the integration of SWT widgets with Swing facilities.
In the case of the JFace library, I present the higher user interface levels such as windows, dialogs, viewers, actions, menus, text processing, wizards, and preferences. As an example, an MP3 player that can be deployed independently of the Eclipse platform is implemented completely with SWT and JFace. An interesting detail in this example is how the SWT library is used in a multithreaded application.
system are introduced. All these components are available to the application programmer as building blocks, a fact that can speed up application development considerably.
Then, I show how your own products can be packaged for deployment. Eclipse offers integrated support for all tasks here, too: from the creation of a feature, to the creation of nation language fragment and the definition of an update site, to the automated installation of updates. As an example, a universal and fully functional plug-in for spell checking on Eclipse platforms is implemented.
Finally, I discuss the Rich Client Platform (RCP) that was introduced with Eclipse 3 and serves as a generic platform for a wide range of applications. The board game Hex is implemented as an example of such an RCP application.
In Appendix A some more interesting third-party plug-ins are listed. In Appendix B I discuss the migra-tion to another version of the Eclipse platform. Appendix C contains download addresses for the third-party software and the source code used in the examples.
Acknowledgements
Books are always teamwork, even if only the author’s name appears below the title. This is also the case with this book, and here is the place to acknowledge the contribution of all the other team members.
Special thanks go to the publisher John Wiley & Sons and Wrox, in particular to Gaynor Redvers-Mutton who acted as the publishing editor. Thanks go also to the publisher of the original German edition, dpunkt verlag, and the responsible editor there, René Schönfeldt.
Thanks also to Tim Ryan’s group who handled the production of this book, especially Linda Recktenwald for copyediting, Gina Rexrode for composition, and Nathan Clement for his technical illustrations.
Many important tips that found their way into this book came from the (anonymous) reviewers but also from developers and employees of OTI who had looked at the first manuscript version. Many thanks! And of course, without the development of Eclipse this book would not have been written, and Eclipse is indeed a tool that I wouldn’t want to miss. Thanks again!
Introduction
ix
Chapter 1: Introduction to Eclipse
1
Installing Eclipse
1
The First Application: Hello World
5
Perspectives
5
Projects
7
Create a New Class
7
Launch
9
The Most Important Preferences for Java Development
10
Workbench Preferences
11
Installed JREs
12
Compiler Preferences
14
Formatting Code
15
Templates
16
Tasks and Problems
18
Problems, Problems
19
General Tasks
21
Bookmarks
22
The Scrapbook
22
Summary
24
Chapter 2: Effective Programming with Eclipse
25
Little Helpers
25
System Information
25
Help and Hover
26
Java Information Views
27
Automatic Code Completion
28
The Correction Assistant
33
Convenience Functions of the Java Editor
35
Source Code Navigation
36
Refactoring Code
38
Local History
43
Comparing Resources
43
Replacing with an Older Version
43
Restore Deleted Resource
43
Summary
44
Chapter 3: The Art of (Visual) Composition
45
Installation
45
Invocation
46
Preferences
46
Composition
46
Beans and Bean Properties
48
Generic Beans
48
Properties
48
Layouts
49
Event Processing
49
Summary
50
Chapter 4: Organizing Your Code
51
The Workbench
51
Resources
52
Resource Types
52
Where Resources Are Stored
52
Synchronizing Resources
53
Navigation
53
Associations
54
Packages
55
Folders and Packages
55
Navigation
56
Hierarchy
56
The Outline View
57
Representation
58
Context Functions
59
Searching
60
The Search Function
60
Find and Replace
62
Opening and Closing Windows
65
Maximizing Windows
65
Minimizing Views
65
Managing Perspectives
65
Defining New Perspectives
65
Configuring Perspectives
66
Importing Files
67
Project Properties
69
The Java Browsing Perspective
71
Summary
72
Chapter 5: Project One: Duke Speaks
73
Setting Up the Project
73
A Short Excursion into Speech Synthesis
74
Extending the FreeTTS System
75
Animation Events
75
The Animator
77
Embedding into FreeTTS
81
Connection with the Java Audio System
83
The User Interface
84
The Animated Face
85
The Control Panel
87
The Model
87
The Presentation
91
The Complete Application
106
Exporting the application
109
Bibliography
110
Summary
110
Chapter 6: Project Development
113
Debugging
113
The Debug Configuration
113
The Debug Perspective
114
Controlling Program Execution
115
Managing Breakpoints
117
The Java Console
118
Remote Debugging
119
JUnit
120
Documentation
125
Try It Out: Javadoc Options
126
Try It Out: Command-Line Options
126
Summary
128
Chapter 7: Advanced Topics of Project Development
129
Developing in a Team
129
Setting Up a Repository
130
Projects in the Repository
132
Version Management
133
Working in a Team
133
Other Functions
135
External Tools
135
Refresh
135
Environment
135
Associations
135
Summary
136
Chapter 8: The SWT Library
137
SWT Function Group Overview
138
SWT—Pros and Cons
139
Advantages of SWT
140
Disadvantages of SWT
140
The SWT Package
141
Events
141
Listeners
141
Adapters
142
Events
142
Overview of Listeners, Adapters, and Events
143
Widgets
145
The Widget Class
146
The Control Class
146
Visual Overview
146
Displays, Shells, and Monitors
146
Dialogs
152
Composites, Groups, and Canvas
155
Text Fields and Labels
159
Tables, Lists, and Combos
161
Trees
166
Sashes
167
Tabbed Folders
168
Toolbars
169
Moveable Tool Groups (CoolBar)
170
Menus
170
Custom Widgets
174
The Browser Widget
177
Layouts
177
Visual Overview
178
The FillLayout Class
178
The RowLayout Class
179
The GridLayout Class
180
The FormLayout Class
182
The StackLayout class
184
Graphics
185
The Graphics Context
185
Colors
186
Fonts
187
Images
189
The Cursor
190
Widgets That Swing
191
Embedded Contents
192
Events
192
Output to a Printer
196
Data Transfer
198
The Clipboard
198
Drag and Drop
199
Resource Management
200
Windows32 Support (OLE)
201
SWT on the Pocket PC
202
Accessibility
202
Summary
203
Chapter 9: JFace
205
Resource Management
205
The FontRegistry Class
205
Dialogs and Windows
206
Some Dialog Subclasses
207
Implementing Your Own Dialog Classes
210
Making Dialogs Persistent
213
Viewers
214
The Viewer Event Model
215
The Viewer Hierarchy
215
Cell Editors
217
Data Transfer
218
Text Processing
218
Text Processing Base Classes
218
The ProjectionViewer
226
Comfortable Text Fields and Combos
226
Actions and Menus
226
The IAction Interface
226
The Managers
227
Wizards
228
The Wizard Class
228
The WizardPage Class
229
The WizardSelectionPage Class
230
The WizardDialog Class
230
Preferences
230
The PreferenceStore and PreferenceConverter Classes
231
The PreferencePage Class
232
Field Editors
232
Preference Page Trees
233
Summary
235
Chapter 10: Project Two: Jukebox
237
Design Goals and How to Achieve Them
237
Installing the Project
238
The Player Module
241
Layout
241
Threads
242
The Player.java Class
243
BasicPlayerListener
260
Content Provider
273
Playlist Switch
273
Selections
274
The Description Window
275
The DescriptionWindow Class
276
The Playlist Viewer
278
The PlaylistWindow Class
278
The PlaylistViewer Class
281
Nested Grid Layout
289
Toolbar
290
File-Selection Dialogs
292
Menu
293
The PlaylistLabelProvider Class
295
Returning a Warning Icon
296
Cell Text
297
The FileCellEditor Class
299
The Description Editor
300
The DescriptionCellEditor Class
300
The DescriptionEditorDialog Class
302
Code Scanner
303
Content Assistant
304
SourceViewer Configuration
307
SourceViewer
308
Deploying the Jukebox
311
Summary
311
Chapter 11: Developing Plug-ins for the Eclipse Platform
313
The Architecture of the Eclipse Platform
314
Extension Points
314
OSGi
314
A Minimal Platform
315
Rich Client Platform vs. IDE
315
Resource Management
315
User Interface
316
Help System
316
Team Support
316
Other Plug-in Groups
317
Architecture Summary
317
The Core Classes of the Eclipse Platform
318
The Preferences Class
319
Path Specifications
319
Monitoring Long-Running Processes
320
The Eclipse Workspace
320
Resources
320
Markers
324
Reacting to Resource Changes
325
Managing Long-Running Processes
326
Configuring Plug-ins
327
The Plug-in Development Perspective
327
The Plug-in Manifest
329
The Most Important SDK Extension Points
332
The Schema Editor
341
Components of the Eclipse User Interface
344
Forms
344
The Eclipse Workbench
350
The Architecture of the Eclipse Workbench
351
Event Processing in the Eclipse Workbench
352
Editors
355
Views
362
Actions
367
Dialogs
372
Workbench Wizards
374
Preferences and Property Pages
377
Defining Perspectives
377
The Help System
379
Cheat Sheets
383
Summary
385
Chapter 12: Developing Your Own Eclipse-Based Products
387
Embedded Ant
388
Configuration
388
Editing Ant Scripts
389
Plug-ins and Fragments
390
Features
391
Creating and Editing Features
391
Installing from an Update Site
399
Adding an Update Site
400
Installing Features
400
Updating Features
400
Managing the Configuration
400
Install Handlers
401
Internationalizing Products
401
Text Constants in Programs
402
Text Constants in Manifest Files
403
Help Texts and Cheat Sheets
404
Deploying National Language Resource Bundles
405
Patches
405
Summary
405
Chapter 13: Project Three: A Spell Checker as an Eclipse Plug-in
407
The Spell Checker Core Classes
408
The Engine
408
Overview
409
Setting Up the Project
410
The Plug-in Configuration
412
The Manifest plugin.xml
413
The Schema documentTokenizer.exsd
417
Imported Files
419
The Plugin Class
419
Dictionary URL
421
Initializing Preferences
422
The Manager
423
The Check Spelling Action
424
The SpellCheckingTarget Class
425
Factory Method
426
Selections
427
Document Management
428
Text Replacement
429
Disposal
430
The CheckSpellingActionDelegate Class
431
The Correction Window
439
The SpellCorrectionView Class
439
View Actions
449
Managing Images
450
Running the Engine
457
Managing Engines
458
Creating Engines
459
Processing Bad Words
462
Operations
462
Analyzing Documents
463
Configuring the Spell Checker
463
Preferences
463
Domain Model
464
The GUI
466
Reading from the PreferenceStore
471
The Help System
473
The Help Table of Contents
473
Context-Sensitive Help
473
Active Help
474
Running the Help Action
476
A Plug-in for Java Properties
477
Setting Up the Project
477
The Manifest
478
Tokenizer Extension
478
Manifest
479
The Plugin Class
480
The Preferences
481
The Preference Page
482
The Java-Properties Tokenizer
483
The Help System
483
Internationalizing the Spell Checker
484
Text Constants in Java Code
484
Text Constants in Manifest Files
487
Creating a Language Fragment
487
Deploying the Spell Checker
490
Defining the Spell Checker Feature
490
Configuring Ant Scripts
492
Defining the Language Feature
495
Defining the Update Site
497
Installation
498
Chapter 14: The Rich Client Platform
501
Definition and Motivation
501
Plug-ins and the RCP
502
Creating an Application
503
The IPlatformRunnable Interface
503
The WorkbenchAdvisor Class
503
Testing a Rich Client Application
507
Deploying a Rich Client Application
507
Advanced Product Customization
508
The Global Welcome Screen
508
Summary
509
Chapter 15: Project 4: The Hex Game as a Rich Client Application
511
Overview
511
Setting Up the Project
512
The Manifest plugin.xml
512
Required Eclipse Plug-ins
514
Declaring the Application
514
Defining a Perspective
515
Defining a View
515
Product Customization
515
Linking the Welcome Screen
515
Adding Help
516
The Completed Manifest
516
The RcpApplication Class
517
The RcpWorkbenchAdvisor Class
518
The RcpPerspective Class
519
The IGame and IStatusListener Interfaces
520
The IStatusListener Interface
520
The IGame Interface
520
The HexView Class
521
The Game Engine
527
The Welcome Screen
531
Test
534
Deployment
534
Chapter 16: Conclusions and Outlook
537
Programming Style
537
Executable Prototypes
538
Automated Tests
538
Refinements
538
Embrace Change
540
Save Energy
541
Java 1.5
541
Summary
542
Appendix A: Useful Plug-ins for Eclipse
545
Appendix B: Migrating Projects to a New Eclipse Version
551
Projects
551
Plug-ins
552
Migration to Eclipse 3
552
Appendix C: Important Downloads
555
Project One: Duke Speaks
555
Project Two: Jukebox
555
Project Three: A Spell Checker as an Eclipse Plug-In
555
Book Web Site
556
Appendix D: Bibliography
557
Introduction to Eclipse
In this chapter you install and configure Eclipse. I then use the classical HelloWorldexample to show how to effectively create Java programs under Eclipse. I first discuss the most important workbench preferences and then introduce various utilities for code creation.
Installing Eclipse
Installing Eclipse is very easy. In most cases, the only thing to do is to unpack the downloaded ZIP file onto a disk drive with sufficient free space. What do you need to run Eclipse? The following list shows what is required:
❑ A suitable platform.Eclipse 3.0 runs on a wide variety of platforms: Windows, Linux, Solaris, QNX, AIX, HP-UX, and Mac OS X. However, in this book I mostly refer to the Windows platform and occasionally give hints for the Linux platform.
❑ Sufficient disk space.300 MB should be enough.
❑ Sufficient RAM.256 MB should be fine.
❑ Java SDK 1.4.If this SDK is not installed on your machine, you can download it from
www.javasoft.comand install it by following the instructions given on this site. You
should specify the binsubdirectory of the SDK in your PATHenvironment variable so that you can call the Java Virtual Machine (JVM) by issuing the command javafrom the command prompt.
❑ Eclipse SDK 3.0 for your platform.
❑ The Eclipse example files (eclipse-examples-3.0) for your platform.
To install Eclipse, follow these steps:
1.
Unpack the Eclipse SDK into the target directory. For example, on Windows that could be the root directory C:\. In effect, the Eclipse libraries will be contained in directory C:\eclipse. Under Linux you could use the /opt/directory so that the Eclipse files would be stored under/opt/eclipse/.
2.
Immediately afterwards, unpack the Eclipse example files into the same root directory. By doing so, the example files are automatically placed into the just-created eclipsesubdirectory.3.
That’s all. Under Windows you can now invoke Eclipse by clicking the icon with the darkened sun (in the eclipsesubdirectory). Under Linux you would issue the shell command/eclipseunder the directory /opt/eclipse/.
Eclipse then prompts you with the Workspace Launcher. Here you can select the location of the Eclipse workspace. This workspace will later contain all of your Eclipse projects. Usually the
\workspace\folder is located in the Eclipse root directory \eclipse\. However, it makes
more sense to install the workspace in a location separate from the Eclipse installation. This makes later upgrades to new Eclipse version easier (see also Appendix A). In addition, it becomes easier to back up the workspace.
For example, you may want to specify ...\Own Files\eclipse-workspaceunder Windows and /root/eclipse-workspaceunder Linux. The Eclipse Workspace Launcher is shown in Figure 1.1. Note that later when running Eclipse you can easily switch to a different workspace by invoking the function File > Open workspace.
Figure 1.1
4.
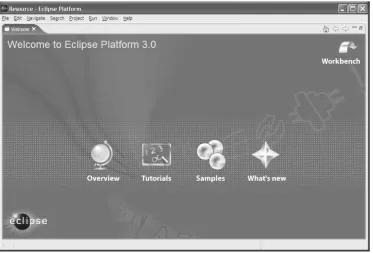
After a short while you should see the Welcome screen. Here you have the choice of various information sources such as help pages, tutorials, sample programs, and others:❑ In the Overview section you will find relevant chapters from the various user guides in the Eclipse help system.
❑ In the Tutorials section you can learn how to create a simple Java program, a simple SWT application, and an Eclipse plug-in, and you will learn how to create and deploy an Eclipse feature. These tutorials come in form of Cheat Sheetsthat can be followed in a step-by-step fashion.
❑ The Samples section contains ready-to-run example programs. These include samples for using the SWT and the Eclipse workbench. If you select such an example program, it will automatically be downloaded from www.eclipse.org (provided that you have established a connection to the Internet) and installed into the Eclipse workbench. Depending on your interests and requirements, it may be worthwhile to take a close look at the code of such an example program.
❑ In the What’s New section you will find a compilation of the new features contained in Eclipse 3 and also a migration guide for converting the Eclipse 2 application into Eclipse 3 (see also Appendix B). Furthermore, there is a link to the Eclipse Community page and a link to the Eclipse Update site, where you can update your Eclipse installation online.
Figure 1.3
5.
It is a good idea to create a desktop shortcut for Eclipse. Under Windows simply pull the Eclipse icon onto the desktop by pressing the right mouse button. From the context menu select Create Shortcut Here. Now you can add additional command-line options to this shortcut, for example, the -vm option discussed below. To do so, right-click the shortcut and select Properties from the context menu.To learn which command-line options are available for Eclipse, check the Eclipse help system by choosing Help > Help Contents. Then select Workbench User Guide, expand the Tasks item, and choose Running Eclipse.
Under Linux you can similarly create a desktop shortcut under KDE or Gnome and add the required command-line options.
A further list of command line options is found at Help > Help Contents > Platform Plug-in Developer Guide > Reference > Other reference information > Runtime options. This section lists all command line parameters and the corresponding System Property keys. (For
example, the key osgi.instance.datais equivalent to the command line parameter -data.) These keys can be used to configure Eclipse via the configuration file \eclipse\
configuration\config.ini. Modifying this file allows you starting Eclipse in different
6.
One of the most important command-line options deals with the selection of the Java Virtual Machine (JVM) under which the Eclipse platform is executed. If you don’t want to use the stan-dard JVM (the one executed when invoking the javacommand), you can specify a different JVM by using the command-line option -vm.When the Eclipse loader is invoked it uses a three-stage strategy to determine the JVM under which the platform is executed. If a JVM is explicitly specified with the command-line option -vm, then this VM is used. Otherwise, the loader will look for a specific Java Runtime Environment (JRE) that was deployed with the Eclipse platform. Such a JRE must be located in the directory \eclipse\jre\. If such a JRE does not exist (as in our case), then the location of the VM is derived from the PATHenvironment variable.
By the way, this strategy affects only the JVM under which the platform is executed. Which JVM and which SDK are used for Java development is specified separately in the Eclipse workbench.
The command-line option -vmargscan be used to specify parameters for the Java Virtual Machine. For example:
eclipse.exe -vm C:\java13\bin\javaw -vmargs -Xmx256M
Here Eclipse is started with a specific JVM and sets the JVM heap to 256 MB. With very large projects this can help to prevent instabilities of the workbench.
Another important command-line parameter is the parameter-datafor specifying the location of the workspace. In this case, the Workspace Launcher dialog discussed previously is skipped. This parameter allows you to create different Eclipse desktop shortcuts for different
workspaces.
The F irst Application: Hello Wor ld
Until now you haven’t seen much of a Java development environment. Eclipse—which is advertised as a platform for everything and nothing in particular—shows, in fact, nothing in particular when invoked for the first time. You are now going to change this radically.
Perspectives
Figure 1.4
Use the Open Perspective icon to open new perspectives. By the way, by clicking the perspective bar with the right mouse button and invoking the function Dock On, you can change the position of the per-spective bar. If you were used to Eclipse 2.1, you may want to dock the perper-spective bar at the left border of the Eclipse workbench.
From the list that appears, select Java.You should then see the screen shown in Figure 1.5.
The Java perspective shows the windows (Package Explorer, Hierarchy), menu items, and toolbar icons that are typical for Java development. On the left you see a new icon denoting the Java perspective. Above this icon is the icon for the Resource perspective that was active before you opened the Java per-spective. You can quickly switch between different perspectives by clicking these icons.
Projects
Now it’s time to say Hello to the world and to create your first program. To do so, first create a new Java project. On the toolbar click the Create a Java Project icon, as shown in Figure 1.6. By clicking the icons of this group you can create new Java projects, packages, classes, interfaces, and JUnit Test Cases.
Figure 1.6
In the dialog that appears, name the project with HelloWorld. The Package Explorer now shows an entry for the new project.
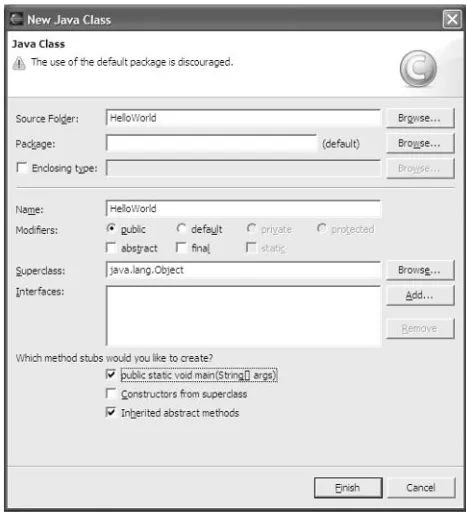
Create a New Class
In the next step click the C icon on the toolbar (Create a Java Class). In the following dialog make sure that
❑ The Source Folder is specified as HelloWorld.
❑ The name of the new class is specified as HelloWorld.
❑ publicis selected as Modifier.
❑ java.lang.Objectis specified as Superclass.
❑ The option to public static void main()is checked.
Figure 1.7
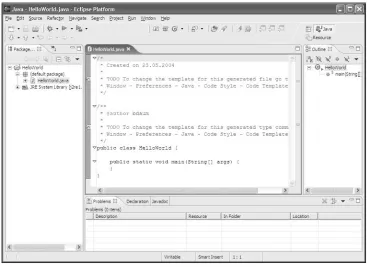
After you click the Finish button, the Eclipse workbench looks a bit more like a workbench in use (Figure 1.8).
The Package Explorer shows the contents of the new project, including the libraries of the Java runtime environment. At any time you can open the classes belonging to these libraries and look at their source code. The center window holds the Java source editor, which currently contains the pregenerated code for the HelloWorld class. At the right-hand side you can see the Outline window showing the current class with its methods. You quickly navigate to any method or variable in the source editor by clicking it in the Outline View.
Now you complete the pregenerated code. You change the main()method in the following way:
Figure 1.8
By doing this you have finished the programming work for your first project. Save the new class
HelloWorldto disk by clicking the floppy disk icon on the toolbar. (Alternatively, you can use the
keyboard shortcut Ctrl+S.) This will also compile this class. The program is now ready for execution.
Launch
The Run icon is positioned on the right side of the bug icon. Here, you activate the drop-down menu by clicking the arrow at the right of the Run icon. From this drop-down menu select Run As > Java Application to start program execution. Now, a new tag with the label Console should appear in the Tasks View area. With a click on that tag you can open the Console View (see Figure 1.9), which should display the text “Hello World.” Done!
During this first execution, Eclipse creates a new Run Configuration named HelloWorld. A list of all available Run Configurations is found under the arrow on the right side of the Run icon. The Run icon itself is always associated with the Run Configuration that was executed last. To execute the program again, simply click the Run icon.
Figure 1.9
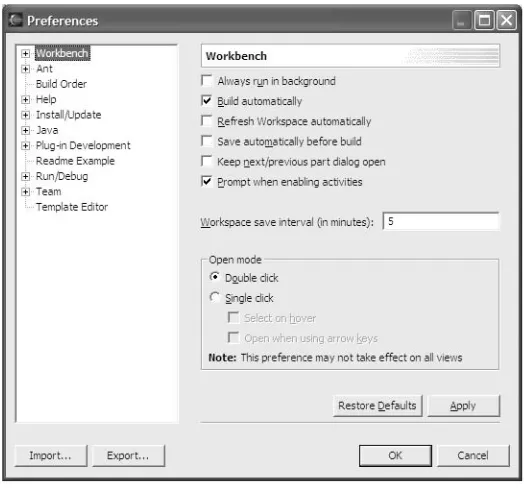
The Most Impor tant Preferences for Java
Development
Before you continue in your programming efforts, you should first explore your working environment. The Window > Preferences menu gives you access to all Eclipse preferences (see Figure 1.10).
Figure 1.10
At first sight, the sheer mass of preferences shown in this dialog may be overwhelming, because each plug-in may contribute its own set of preference categories to this dialog. In this chapter, I will discuss only those preferences that are most relevant in the context of this book. You should take the time to step systematically through all preference categories to get an overview of the possibilities. Some of the cate-gories have subcatecate-gories. To expand a category, click the +sign in front of the category name.
Some of the preference settings will make sense only during the discussion of the corresponding Eclipse function. In such cases I will postpone the discussion of the preference settings to the discussion of the corresponding workbench function.
Workbench Preferences
be added to the sequence. Use the Backspace key to delete entries. To add a new key sequence, don’t select an entry in the Assignments list; simply enter the key sequences in the described way, and then press the Add button.
On the Advanced page of the Key Bindings preferences you can enable an assistant that will help you with completing multistroke keyboard shortcuts.
Installed JREs
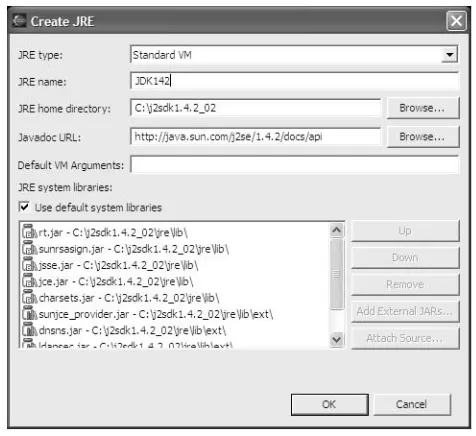
You probably don’t always want to create Java applications that require a Java 1.3 or Java 1.4 platform. In some cases you may need to run on Java 1.2 platforms. Within the preference category Java, in the subcategory Installed JREs, you can list all Java Runtime Environments that are installed on the host computer (see Figure 1.11).
Figure 1.11
In this preference category you can declare all the Java Runtime Environments (SDK or JRE) that are installed on the host computer for Eclipse. Among the JREs listed here, Checkmark One is the default JRE. This JRE will be assigned to all new Java projects. You will learn later how this can be changed in the project settings and how different JREs can be used in different Launch Configurations.
Figure 1.12
A new JRE is added to the Eclipse workbench. I have provided the name and location of the JRE home directory. The location of the corresponding Javadoc is preset by Eclipse and points to the JavaSoft Web site. If the documentation is available locally, you should modify this entry accordingly. The entry Default VM Arguments may specify VM command-line parameters to be used with this VM.
For further customization you could uncheck the Use Default System Libraries item. This would allow you to add further JAR libraries. If any of the JARs does not contain source code, you can attach external source code by pressing Attach Source.
If you want to add a version 1.1 JRE (this is necessary when you want to run your application on a Microsoft VM), you must also change the JRE type to the value Standard 1.1.x VM.
Of course, it is possible to execute an application on a JVM that is different from the JVM under which the application was developed. For example, if you developed an application under Java SDK 1.1.8 and want to test how the application performs under a version 1.3.1 JVM, you must change the runtime environment before executing the program. You can do this by choosing the appropriate JVM in the Eclipse Launch Configurator. You can open the Launch Configurator by invoking the menu function Run > Run.
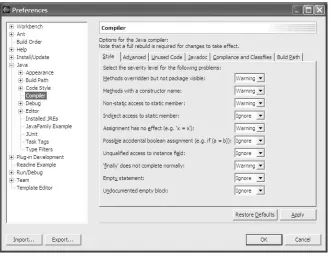
Compiler Preferences
Now take a closer look at the compiler preferences. In the Preferences dialog select the category Java and the subcategory Compiler. Note that all adjustments made here affect the whole workbench. On project level (see the “Project Properties” section in Chapter 4), however, you have the possibility of overriding the global settings made here under Preferences.
Warnings and Errors
On the right-hand side of the Java > Compiler category you see a tabbed notebook. The Style, Advanced, Unused Code, and Javadoc pages show which compiler events create errors or warnings and which compiler events should be ignored (see Figure 1.13).
Figure 1.13
and remove garbage from your code. Just try the following: set Parameter Is Never Read to Warning and press OK. The project is recompiled. At the program line
public static void main(String[] args) {
you now see a warning icon, and in the Problems window you see the entry
The argument args is never read
Quite right! The HelloWorldprogram did not make use of the parameter that contains the command-line arguments.
Classfiles and JDK Compliance
On the Compliance & Classfiles page you can specify which symbolic information, such as variable names and line numbers, is to be included in the generated classfiles. This information is required for debugging, and therefore you may want to leave the proposed settings unchanged. However, for a well-tested program it may make sense to remove this information from the classfiles; generated files are much smaller without the symbol tables.
On the same page you can determine whether the compiler must comply with the Java 1.4 or Java 1.3 syntax. With Java 1.4, one new instruction was added to the language: assert. Consequently, the word “assert” can no longer be used as a field or method name. In addition, assertrequires support from the JVM. Classes that use this instruction cannot be executed by older JVMs. Since assertis not used in the first example program, leave this setting at the proposed value of Java 1.3.
Formatting Code
Formatting code can be very helpful, because it is easier to detect violations of the control structures of a program (such as open ifor whilestatements) when the program is formatted. In the preference category Java > Code Style > Code Formatter you can configure how the Eclipse code formatter works, as shown in Figure 1.14. The best method is to try some of the settings and to select those that work best for your application. To modify these settings you must first create a new profile (by pressing the New button). Then you can edit this profile by pressing the Editbutton. You can create multiple profiles and switch easily among them. When you publish your code, for example, you may use different profiles for different sorts of publications.
Figure 1.14
Templates
When you created the new HelloWorldclass, text similar to the following was generated at the top of the new compilation unit:
/*
* Created on 27.04.2004 *
* To change this generated comment go to
* Window - Preferences - Java - Code Style - Code Templates */
/**
* @author Berthold Daum *
* To change this generated comment go to
* Window - Preferences - Java - Code Style - Code Templates */
Figure 1.15
For various events, such as the creation of a new type, a new method, or a new constructor, you can specify which code is to be generated.
Select the Types entry and press the Edit button. In the dialog that appears replace the text provided by Eclipse with the string “created first in project.” Then press the Insert Variable button. From the list select the variable named project_name. The result should look like that shown in Figure 1.16.
After you have committed these changes, new classes and interfaces will be created with a comment containing the user name and the project name.
Figure 1.16
Later you may also change the entry for New Java File. The predefined text is shown here:
/*
* Created on ${date} *
* To change the template for this generated file go to * Window - Preferences - Java - Code Style - Code Templates */
${package_declaration} ${typecomment}
${type_declaration}
The variables used here define the sequence of the different code parts. For example, you just specified what happens under typecommentin the previous template. Here, delete only the text lines To
change...Code Templates, and leave everything else as is.
Tasks and Problems
Eclipse uses the Tasksand Problemsviews to notify the user about pending tasks. The Problems view lists problems such as errors or warnings. By clicking on such an entry you can quickly navigate to an erro-neous program line.
Problems, Problems
In the Compiler Preferences section of this chapter, you saw the Problems window in action. The entries in the Problems window correlated to pending problems in the Eclipse workbench. In Figure 1.17 I pur-posely created a syntax error by inserting a blank into the parameter name args. This resulted in three error messages.
Problem marker in the Package Explorer
Problem marker in the Outline View Problem marker
for whole file
Problem indicator for whole file
Problem markers at faulty line
Bad syntax Filter Problem position in the whole file
Entries in the Problems View
Figure 1.17
After you double-click the problem entries, the faulty expressions are underlined in red. Red error mark-ers on the source editor’s left margin mark the faulty lines. The markmark-ers on the right margin show the position of the errors relative to the whole file. To scroll to the error position, it is only necessary to pull the scroll bar to the markers. Clicking the markers works just as well.
Error messages are represented by a white cross in a red circle. In contrast, warnings are represented by a yellow triangle. The third problem type is information tasks, which are represented by a blue
icharacter.
loca-editor, and the editor window will be positioned on the error location. Just try it, and click on one of the entries in the Problems view.
As the workbench gets busier, the Problems view often overflows with errors and warnings. At times it can become difficult to find the Problems entries that are related to the current project or file, because the Problems view by default shows all problems and other tasks within the whole workspace. Of course, you can suppress some of the warnings by setting the compiler options accordingly (see the “Compiler Preferences” section). But there is another way to reduce the information overload: by using the Problems Filter (Figure 1.18). You can open the Problems Filter dialog by clicking the Filter button in the toolbar of the Problems window.
Figure 1.18
Here, in the Problems Filter, you may restrict the entries shown in the Problems view to specific types. For example, you may opt to show only Java problems. The entry types shown in this window depend on the installed plug-ins.
In addition, you can restrict the entries by their origin. The On Any Resource option shows all problems and tasks from the whole workbench. On Any Resource in Same Project shows only problems from the current project. An interesting option is also the definition of a Working Set—a freely configurable and named set of resources. Select On Any Resource in Same Project if you want to see only the tasks and problems of the project on which you are currently working.
You also have the option of filtering problems according their severity. To do so, mark the Where Problem Severity Is check box and also the Error check box. By doing so you can suppress all warnings and information entries.
General Tasks
Task entries generated by the compiler are only a specific type of task entry. In addition, you have the option of creating entries manually. When writing code it often happens that you want to postpone a certain task to a later time. In this case, you can create a task entry that later reminds you of the unfin-ished work.
If you work in a team, you should always create tasks that are important for other team member, too, in this way (as a comment in the source code) so the tasks can be exchanged as part of the source code.
This task entry was created by the user. By clicking the status field you can mark the entry as completed. You can click the Delete button to delete one or several selected tasks. You can create task entries that are not related to specific locations with the New Entry button. For example, you could create a task called Don’t Forget to Buy Milk!
A function that was introduced with Eclipse 2.1 is even simpler. Just type a comment starting with one of the words TODO,FIXME, or XXXin a new line. This line will automatically appear in the Tasks window as soon as you save the source code. By the way, in Preferences > Java > Task Tags you may define alter-native or additional tags such as TUNE, UGLY, etc. Of course, these workbench-wide definitions can be overridden at the project level.
Bookmarks
Eclipse also has a construct that is quite similar to tasks: bookmarks. In the same way that you created a task entry, you can also create a bookmark. Such a bookmark, however, does not appear in the Tasks view but appears in a separate Bookmark view. Since this view is not a standard part of the Java perspective, you first must open it. Select Window > Show View > Other > Basic > Bookmarks (see also the “Arranging Editors and Views” section in Chapter 4). Bookmarks should be used when you want to mark a specific position in the code but it is not related to a pending task.
The Scrapbook
Eclipse also inherited the Scrapbookfrom Visual Age. A scrapbook page is nothing other than a small file in which you can try out Java expressions or just jot down a new idea.
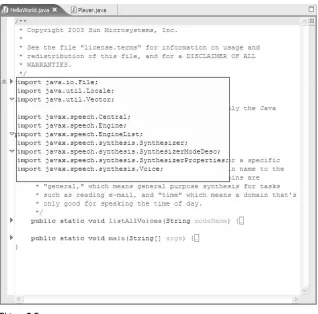
You can create a new scrapbook page by invoking the function File > New > Other.In the wizard select Java > Java Run/Debug > Scrapbook Page. In the dialog that appears specify a name for the new page and, if necessary, the target folder. The result is the creation of a new empty scrapbook page in the target folder. Scrapbook pages have the file extension .jpage.
Now, how do you use a scrapbook page? You simply type in arbitrary Java expressions. If you use external types in these expressions, you either have to qualify the type names fully or add import
statements. The context function Set Imports allows you to add importstatements for single types or whole packages.
Figure 1.20
The selected expression is executed with the help of the Execute context function. The scrapbook context function appears on the workbench’s toolbar at the far right.
It is not necessary to save the scrapbook page before executing the selected code. The selected code is compiled by the Execute function. In the case of a compilation or execution error, Eclipse shows the error message in a pop-up window. You may insert it into the current scrapbook content by pressing
Ctrl+Shift+D. You can easily remove it again by applying the Undo function (Ctrl+Z).
Executeis not the only function that you can use to run a Java expression. In cases where you want to know the result of an expression, it would be better to use the Display function. For example, executing the expression
6*7
with the Display function returns the result
Eclipse shows the result in a pop-up window. You may insert it into the current scrapbook content by pressing Ctrl+Shift+D. You can easily remove it again by applying the Undo function (Ctrl+Z).
A further function for executing selected expressions is Inspect. This function first appears in a pop-up window, but by pressing Ctrl+Shift+I you can move it to the separate Expressions View (see Figure 1.21) that opens automatically when needed. This function is particularly useful when the result of the exe-cuted expression is a complex object. In the Expressions window you can open the resultant object and analyze it in detail.
Figure 1.21
The results shown here are displayed in a pop-up window after applying the Inspect function on the expression new java.util.ArrayList(3);.
Summar y
After this first chapter you should be able to create, compile, and run simple Java program with Eclipse. You should now know how to install Eclipse, create projects, and launch programs. You have become acquainted with the most important preferences and should take some time now to browse through the remaining preferences. However, the purpose of some preferences may become clear only during the course of this book.
Source code annotations such as tasks and problem markers are powerful concepts during the develop-ment of a software project. In Chapter 16 you will see that these concepts can be used to adopt a more natural programming style.
Effective Programming with
Eclipse
Eclipse provides the Java programmer with a variety of productivity tools. In this chapter I will present some of these tools such as the various assistants for error correction and automatic code completion, the possibilities for code navigation and code refactoring, and the Local History that allows tracing back changes in the source code to earlier versions.
Little Helpers
Eclipse is equipped with a variety of useful helpers, which—when used correctly—can save a substantial amount of typing and also reduce the number of bugs in your programs. In this section I introduce most of these little helpers.
System Information
Under the Help > About Eclipse Platform menu item you will find some sections that may be important for your daily work. In particular, the Configuration Details button opens a text file that contains all essential information about the current configuration of the Eclipse platform:
❑ The System Properties section contains information about the Java platform under which the Eclipse workbench is executing. In addition, it displays information about the host operating system.
❑ The Features section lists the installed features. Afeatureusually consists of a set of plug-ins that work together to provide specific functionality. For example, the Java IDE is a feature.
❑ The User Preferences section lists the active user preferences under which the platform is running.
❑ The Update Manager Log section lists information about the tasks performed by the Update Manager, such as installing new features or checking existing configurations.
❑ The last section, Error Log, is especially important. Here you find a protocol of all error events that occurred during the execution of the Eclipse platform. If you develop you own plug-ins, this section will prove especially useful. A more comfortable way to view these error messages, however, is with the Error Log View. You can open this view via Window > Show View > Other > PDE Runtime > Error Log. Physically, this error information is stored in
the .metadata/.logfile in the workspace directory.
Help and Hover
Eclipse features a classical help system that is activated on demand. In addition, Eclipse is equipped with a Hover Info that autonomously provides the user with explanations about screen items.
Help
At this stage I don’t want to dig too deep into the Eclipse help system. You simply need to know that you can invoke Eclipse help via the Help > Help Contents menu item. Like many other programs, Eclipse uses a client-server solution for its help system. Under the cover, Tomcat works as the help server, and a standard or custom Web browser is used to display the help to the end user.
In a vanilla Eclipse software development kit (SDK), you will find the following help chapters:
1.
Workbench User Guide2.
Java Development User Guide3.
Platform Plug-in Developer Guide4.
JDT Plug-in Developer Guide5.
PDE GuideYou can add more chapters by installing additional plug-ins. For chapters 1 – 7 of this book, the first two help chapters are the most relevant. For the remainder of this book,the help chapters 3 and 5 will also become important.
Since Eclipse 2.0, the Eclipse help function has been equipped with a search function. With the Search Scope function you can restrict the search to specific chapters and sections in the help system.
Intro View
Context-Sensitive Help
In addition to the explicit help function, you can call help within Eclipse at any time simply by pressing the F1 key—provided the currently active plug-in supports this function. After pressing F1 you get a pop-up window (Infopop), where you can select a relevant help topic and jump directly to it. In this context the Show in Table of Contents button in the help system (the second button to the left of the printer symbol) is useful. It synchronizes the table of contents with the currently displayed help page so that you can see in which context the current help topic is located.
Hover
You probably know hover infos already from other applications: when the mouse hovers over a GUI element, a small pop-up window appears after a short delay that informs you of the purpose and function of the GUI element. Eclipse uses this technique as follows:
❑ All buttons on the various toolbars are equipped with hover infos.
❑ For files opened in the editor, you can display the full path information by hovering over the tag of the respective editor page.
❑ All task and problem markers are equipped with hover infos. You can display the text associ-ated with a particular marker by hovering over the marker, so you don’t have to look up the marker in the Tasks window.
❑ Finally, hover infos exist for source code as well. Just place the mouse over the type name
Stringin our HelloWorldexample. After a short delay you will see a hover info containing
the Javadoc of class java.lang.String. Similarly, you will see the Javadoc for method
java.io.PrintStream.printlnwhen you hover over the word println. Using this
technique, you can quickly find out in which class a certain method is defined, instead of browsing up and down the class hierarchies.
If you press the Ctrl key while hovering over source text, your hover info will show the item’s source code instead of the Javadoc!
If the information to be displayed in the pop-up window is too long, you may want to press F2. This will transfer the focus to the pop-up window and equip this window with scroll bars.
Java Information Views
Another possibility to display Javadoc information is the Javadoc View. You can open this view by invoking the function Window>Show View>Other...>Java>Javadoc. The view shows the Javadoc infor-mation belonging to the currently selected Java element in human-readable form in a separate scrollable window. I recommendend this view especially for classes containing complex Javadoc comments such as the class java.util.regex.Pattern!
You can open another useful window with Window > Show View >Other > Java > Declaration; it shows the declaration of the currently selected Java element.
Figure 2.1 shows the Call Hierarchy View after executing the context function Open Call Hierarchy when method createToolbar()was selected. By clicking one of the hierarchy symbols in the view’s toolbar, you can switch between the hierarchy of calling or of called methods.
Figure 2.1
Automatic Code Completion
The functions for automatic code completion in Eclipse are very powerful and include the source menu functions but also the Code Assistant introduced in the following section.
The Code Assistant
One of the most powerful utilities for writing code in Eclipse is the Code Assistant. Tedious typing and searching in Javadoc or source code can be replaced by just a few keystrokes. Try the following:
In the HelloWorldexample open under
System.out.println("HelloWorld");
and enter a new line. In this new line type just three characters
Sys
and press Ctrl+Spacebar. In the pop-up list that appears, select the class Systemfrom the Package
java.langby double-clicking it. Now enter a period. A fraction of a second later, another pop-up list
appears. From this list select the field out of type PrintStream. Once again enter a period, and once again you will get a pop-up list; select the method println. The cursor is now positioned within the parentheses for the method parameters. You can now complete this method call by entering the string “Hello Eclipse.” All that remains to do is to type the semicolon at the very end of the expression. The new line should now look like this: