•
Table of
Contents
•
Index
An Introduction to Programming Using Visual
Basic® 2005, Sixth Edition
By David I. Schneider - University of Maryland
Publisher
:
Prentice Hall
Pub Date
:
March 03, 2006
Print ISBN-10
:
0-13-030654-1
Print ISBN-13
:
978-0-13-030654-8
eText ISBN-10
:
0-13-186104-2
eText ISBN-13
:
978-0-13-186104-6
Pages
:
752
Based on the newest version of Microsoft's VB. NET, this revision of Schneider's best-selling text is designed for students with no prior computer programming experience. The author uses Visual Basic .NET to explore the fundamentals of programming, building a strong foundation that will give students a sustainable
•
Table of
Contents
•
Index
An Introduction to Programming Using Visual
Basic® 2005, Sixth Edition
By David I. Schneider - University of Maryland
Publisher
:
Prentice Hall
Pub Date
:
March 03, 2006
Print ISBN-10
:
0-13-030654-1
Print ISBN-13
:
978-0-13-030654-8
eText ISBN-10
:
0-13-186104-2
eText ISBN-13
:
978-0-13-186104-6
Pages
:
752
Copyright
Preface
xi
Acknowledgments
xiii
The Companion Website for Students and Instructors
xv
Using This Book for a Short or Condensed Course
xvi
Chapter 1. An Introduction to Computers and Visual Basic 2005
1
Section 1.1. An Introduction to Computers
2
Chapter 3. Fundamentals of Programming in Visual Basic
41
Chapter 3 Programming Projects
128
Control
462
Chapter 10. Database Management
517
Section 10.1. An Introduction to Databases
518
Section 10.2. Relational Databases and SQL
531
Chapter 10 Summary
548
Chapter 10 Programming Projects
549
Chapter 11. Object-Oriented Programming
551
Section 11.1. Classes and Objects
552
Section 11.2. Arrays of Objects; Events; Containment
569
Section 11.3. Inheritance
582
Appendix C. Converting from Visual Basic 6.0 to Visual Basic
2005
621
Section 3.1
621
Section 3.2
621
Section 3.3
622
Section 3.5
623
Appendix D. Visual Basic Debugging Tools
627
The Three Program Modes
627
Stepping through an Elementary Program: Chapter 3
630
Stepping through a Program Containing a General Procedure:
Chapter 4
632
Communicating between Arguments and Parameters
633
Stepping through Programs Containing Selection Structures:
Chapter 5
633
Stepping through a Program Containing a Do Loop: Chapter 6
635
Answers: To Selected Odd-Numbered Exercises
637
Chapter 10
714
Chapter 11
720
Inside Front Cover
InsideFrontCover
Copyright
[Page iv]
Library of Congress Cataloging-in-Publication Data on
File
Vice President and Editorial Director, ECS:
Marcia J. Horton
Executive Editor:
Tracy Dunkelberger
Editorial Assistant:
Christianna Lee
Executive Managing Editor:
Vince O'Brien
Managing Editor:
Camille Trentacoste
Production Editor:
Rose Kernan
Director of Creative Services:
Paul Belfanti
Cover Designer:
Jonathan Boylan
Managing Editor, AV Management and Production:
Patricia Burns
Art Editor:
Xioahong Zhu
Manufacturing Manager:
Alexis Heydt-Long
Manufacturing Buyer:
Lisa McDowell
Marketing Manager:
Robin O'Brien
© 2006, 2003, 1999, 1998, 1997, 1995 Pearson Education, Inc.
Pearson Prentice Hall
Pearson Education, Inc.
Upper Saddle River, NJ 07458
All rights reserved. No part of this book may be reproduced, in
any form or by any means, without permission in writing from
the publisher.
The author and publisher of this book have used their best
efforts in preparing this book. These efforts include the
development, research, and testing of the theories and
programs to determine their effectiveness. The author and
publisher make no warranty of any kind, expressed or implied,
with regard to these programs or the documentation contained
in this book. The author and publisher shall not be liable in any
event for incidental or consequential damages in connection
with, or arising out of, the furnishing, performance, or use of
these programs.
Printed in the United States of America
10 9 8 7 6 5 4 3 2 1
Pearson Education Ltd.,
London
Pearson Education Australia Pty. Ltd.,
Sydney
Pearson Education Singapore, Pte. Ltd.
Pearson Education North Asia Ltd.,
Hong Kong
Pearson Education Canada, Inc.,
Toronto
Pearson Educacíon de Mexico, S.A. de C.V.
Pearson EducationJapan,
Tokyo
Pearson Education Malaysia, Pte. Ltd.
Preface
Since its introduction in 1991, Visual Basic has been the most
widely used programming language in the world. The latest
incarnation of Visual Basic is called Visual Basic 2005. Visual
Basic programmers are enthusiastically embracing the new
features of the language. Likewise, students learning their first
programming language will find Visual Basic 2005 the ideal tool
to understand the development of computer programs.
My objectives when writing this text were as follows:
1.
To develop focused chapters
. Rather than covering many
topics superficially, I concentrate on important subjects and
cover them thoroughly.
2.
To use examples and exercises that students can appreciate
and with which they can relate, and feel comfortable
. I
frequently use real data. Examples do not have so many
embellishments that students are distracted from the
programming techniques illustrated.
3.
To produce compactly written text that students will find
both readable and informative
. The main points of each
topic are discussed first, and then the peripheral details are
presented as comments.
4.
To teach good programming practices that are in step with
modern programming methodology
. Problem-solving
techniques and structured programming are discussed early
and used throughout the book. The style follows
object-oriented programming principles.
5.
To provide insights into the major applications of
[Page xi (continued)]
Unique and Distinguishing Features
Exercises for Most Sections
Each section that teaches programming has an exercise set.
The exercises both reinforce the understanding of the key ideas
of the section and challenge the student to explore applications.
Most of the exercise sets require the student to trace programs,
find errors, and write programs. The answers to all the
odd-numbered exercises in
Chapters 1
through 8 and selected
odd-numbered exercises from
Chapters 9
,
10
, and
11
are given at
the end of the text.
Practice Problems
Practice Problems are carefully selected exercises located at the
end of a section, just before the exercise set. Complete
solutions are given following the exercise set. The practice
problems often focus on points that are potentially confusing or
are best appreciated after the student has worked on them. The
reader should seriously attempt the practice problems and
study their solutions before moving on to the exercises.
Programming Projects
Beginning with
Chapter 3
, chapters contain programming
projects provide the flexibility to adapt the course to the
interests and abilities of the students. Some programming
projects in later chapters can be assigned as
end-of-the-semester projects.
[Page xii]
Comments
Extensions and fine points of new topics are deferred to the
"Comments" portion at the end of each section so that they will
not interfere with the flow of the presentation.
Case Studies
Each of the four case studies focuses on an important
programming application. The problems are analyzed and the
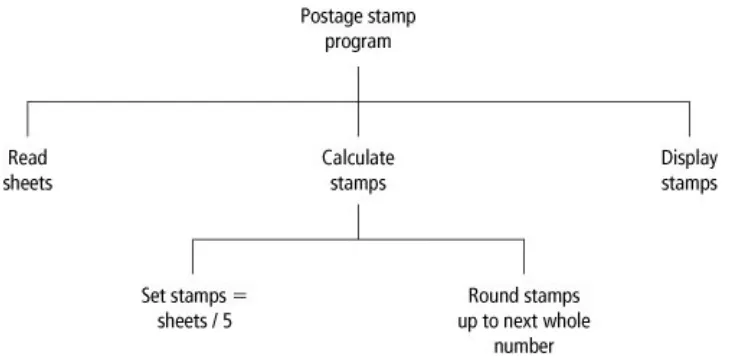
programs are developed with top-down charts and pseudocode.
The programs can be found on the companion website at
www.prenhall.com/schneider
.
Chapter Summaries
In
Chapters 3
through
11
, the key results are stated and the
important terms are summarized at the end of the chapter.
Procedures
The early introduction of procedures in
Chapter 4
allows
being applied to complex problems. However, the text is written
so that the presentation of procedures easily can be postponed
until decision and repetition structures have been presented. In
Chapters 5
and
6
(and
Sections 7.1
and
7.2
), all programs
using procedures appear at the ends of sections and can be
deferred or omitted.
Arrays
Arrays are introduced gently in two sections. The first section
presents the basic definitions and avoids procedures. The
second section presents the techniques for manipulating arrays
and shows how to pass arrays to procedures.
How To Appendix
Appendix B
provides a compact, step-by-step reference on how
to carry out standard tasks in the Visual Basic environment.
Appendix on Debugging
Placing of the discussion of Visual Basic's sophisticated
debugger in
Appendix D
allows the instructor flexibility in
deciding when to cover this topic.
Companion Website
The companion website contains all the examples, case studies,
and data files referenced in the book as well as additional
Instructor Resource Center
The Instructor Resource Center contains solutions to every
exercise and programming project, a test item file for each
chapter, PowerPoint lecture slides, and data files for all the
examples and programs featured in the book. Contact your local
Prentice Hall Sales Representative for information on how to
download these resources.
[Page xii (continued)]
What's New in the Sixth Edition
1.
Suggestions from students and reviewers have been
incorporated as much as possible.
2.
The real-life data in the examples and exercises have been
updated and revised.
3.
The version of Visual Basic has been upgraded from VB.NET
to Visual Basic 2005 and the relevant new features of Visual
Basic 2005 have been explained.
4.
A section on graphics has been added
Acknowledgments
Many talented instructors, students, and programmers provided
helpful comments and constructive suggestions during the
preparation of this text. For their contributions to the quality of
the first four editions of the book I extend my gratitude to A.
Abonomah, University of Akron; Timothy Babbitt, Rochester
Institute of Technology; William Barnett, Northwestern State
University; Sherry Barriclow, Grand Valley State University;
Robert Berman, Wayne State University; William Burrows,
University of Washington; David Chao, San Francisco State
University; Christopher Chisolm, University of Nebraska,
Omaha; Robert Coil, Cincinnati State Technical and Community
College; Gary Cornell, University of Connecticut; Ronit Dancis;
John DaPonte, Southern Connecticut State University; Ward
Deutschman, Briarcliff; Ralph Duffy, North Seattle Community
College; Charles Fairchild; Pat Fenton, West Valley College;
David Fichbohm, Golden Gate University; Robert Fritz, American
River College; Matthew Goddard, New Hampshire Technical
College; Mickie Goodro, Casper College; Wade T. Graves,
Grayson Community College; Christine Griffin; Gary Haw, MIPS
Software Development Inc.; Shelly Hawkins, Microsoft; Tom
Janicki, Kent State University; Dana Johnson, North Dakota
State University; Dan Joseph, Rochester Institute of
Technology; Del Kimber, Clemson University; Wanda Kunkle,
Rowan College; Paul Lecoq, San Francisco Community College;
David Leitch, Devry Institute; David Letcher, The College of New
Jersey; Kieran Mathieson, Oakland University; Charlie Miri,
Delaware Tech; George Nezlek, DePaul University; Ron Notes,
Hebrew Academy of Greater Washington; Mike Paul, Berry
Institute of Technology, Kansas City; Jac Van Deventer,
Washington State University; Randy Weinberg, St. Cloud State
University; Laurie Werner, Miami University; Melinda, White,
Santa Fe Community College; Ronald Williams, Central
Piedmont Community College; Amit Kalani, CIStems Solutions
LLC; Priti Kalani, MobiEcast Corporation; Chris Panell, Heald
College; Kevin Parker, Idaho State University; TJ Racoosin,
rSolutions; and Bill Tinker, Aries Software.
The current edition benefited greatly from the valuable
comments of the following knowledgeable reviewers:
Joe Mast, Eastern Mennonite University
Joe Brady, University of Delaware
Jim McKeown, Dakota State University
Syd Shewchuk, Heald College
Sara Rushinek, University of Miami
Chakib Chraibi, Barry University
Many people are involved in the successful publication of a
book. I wish to thank the dedicated team at Prentice Hall whose
support and diligence made this textbook possible, especially
Marcia Horton, editor-in-chief, and Camille Trentacoste,
managing editor.
I also express my thanks to Marc Leager, a talented
programmer, who helped with the development of the book, and
provided valuable insights and careful proofreading. I am
grateful to Shaun Szot for his valuable proofreading. Production
editor, Rose Kernan, and compositor Rebecca Evans did a
fantastic job producing the book and keeping it on schedule.
The Companion Website for Students
and Instructors
[Page xv (continued)]
How to Access the Companion Website
All the programs from the examples, case studies, TXT files for
the exercises, database files and BMP images can be
downloaded by students and instructors at
www.prenhall.com/schneider
.
[Page xv (continued)]
Students
The companion website, located at
www.prenhall.com/schneider
, contains all the programs from
the examples and case studies set forth in this textbook, most
of the TXT files needed for the exercises, all databases needed
for the exercises, and several BMP (picture) files. All these files
are contained in the folder "Programs" in the subfolders "Ch03",
"Ch04", "Ch05", and so on. Each chapter file contains a
subfolder named "Text files for Exercises" which contains TXT
files needed for that chapter's exercises. The folder "Ch09" has
a subfolder named "Pictures" that contains the BMP files. The
folder "Ch10" has a subfolder named "MajorDatabases"
containing all the databases needed for the exercises.
Each program is contained in a folder with a name in the for
chaptersectionnumber
. For instance, the program in Chapter 3,
program's folder named "bin."
Students can access additional Visual Basic 2005 resources via
helpful NetSearch Terms and Destination Links located on the
companion website.
[Page xv (continued)]
Instructors
Essential instructor resources including solutions to the
exercises, PowerPoint lecture slides, all the example programs
and data files used by students throughout the book, and
Using This Book for a Short or
Condensed Course
This book provides more than enough material for a complete
semester course. The topics must be trimmed for courses
lasting considerably less than a full semester. The following
syllabus provides one possible way to present an abbreviated
introduction to programming.
1 An Introduction to Computers and Visual Basic 2005
1.2 Using Windows
1.3 Files and Folders
3 Fundamentals of Programming in Visual Basic
3.1 Visual Basic Controls
3.2 Visual Basic Events
3.3 Numbers
3.4 Strings
3.5 Input and Output
4 Procedures
4.1 Sub Procedures, Part I
4.2 Sub Procedures, Part II
5 Decisions
5.1 Relational and Logical Operators
5.2 If Blocks
5.3 Select Case Blocks
6 Repetition
6.1 Do Loops
6.2 Processing Lists of Data with Do Loops
6.3 For... Next Loops
7 Arrays
7.1 Creating and Accessing Arrays
7.2 Using Arrays (Omit Merging Two Ordered Arrays)
7.3 Some Additional Types of Arrays (Omit Control Arrays)
9 Additional Controls and Objects
9.1 List Boxes, Combo Boxes, and the File-Opening Control
Chapter 1. An Introduction to Computers
and Visual Basic 2005
(This item omitted from WebBook edition)
1.1 An Introduction to Computers 2
1.2 Using Windows 4
Mouse Pointers
Mouse Actions
Windows and Its Little Windows
Using Notepad
1.3 Files and Folders 12
Using Windows Explorer
Using the Open and Save As Dialog Boxes
Read-Only Attribute
1.4 An Introduction to Visual Basic 2005 18
Why Windows and Why Visual Basic?
How You Develop a Visual Basic Application
The Different Versions of Visual Basic
1.5 Biographical History of Computing 21
1930s
1940s
1950s
1960s
1970s
1980s
[Page 2]
1.1. An Introduction to Computers
An Introduction to Programming Using Visual Basic 2005
is a
book about problem solving using computers. The programming
language used is Visual Basic 2005 (hereafter shortened to
Visual Basic), but the principles taught apply to many modern
programming languages. The examples and exercises present a
sampling of the ways that computers are used in society.
Computers are so common today that you certainly have heard
some of the terminology applied to them. Here are some
questions that you might have about computers and
programming.
Question
:
What is meant by a "personal" computer?
Answer:
The word "personal" does not mean that the computer
is intended for personal, as opposed to business, purposes.
Rather, it indicates that the machine is operated by one person
at a time instead of by many people.
Question
:
What are the main components of a personal
computer?
Answer:
Hidden from view inside the system unit are several
components, including the microprocessor, memory, and hard
drive of the computer. The
central processing unit
(CPU),
sometimes referred to as the
microprocessor
, can be thought of
as the computer's brain, which carries out all of the
computations. The
memory
, often referred to as
random access
memory
(RAM), stores instructions and data while they are
being used by the computer. When the computer's power is
turned off, the contents of memory are lost. A
hard disk drive
is
the system unit there are also device cards, such as a graphics
card, sound card, network card, and a modem. A
graphics card
is used to send an image to the monitor, and a
sound card
is
used to send audio to a set of speakers attached to the
computer.
Network cards
can be used to connect to a
local area
network
(LAN) of computers, while a
modem
uses a telephone
line to connect to any computer that can be reached by a phone
call.
The personal computer also has several
input
and
output
devices
, which are used to communicate with the computer.
Standard input devices include the keyboard and mouse.
Standard output devices include the monitor and printer.
Instructions are entered into the computer by typing them on
the keyboard, clicking a mouse, or loading them from a file
located on a disk drive or downloaded from a network.
Information processed by the computer can be displayed on the
monitor, printed on the printer, or recorded on a disk drive.
Question:
What are some uses of computers in our society?
Answer:
The dramatic decrease in the cost of hardware and
software technology has made computers widely available to
consumers and corporations alike. Whenever we make a phone
call, a computer determines how to route the call and calculates
the cost of the call. Banks store all customer transactions on
computers and process these transactions to revise the balance
for each customer. Airlines record all reservations with
[Page 3]
Question:
What are some topics covered in this text that
students could use immediately?
Answer:
Computer files can be created to hold lists of names,
addresses, and phone numbers, which can be alphabetized and
displayed in their entirety or selectively. Mathematical
computations can be carried out for science, business, and
engineering courses. Personal financial transactions, such as
bank deposits and loans, can be recorded, organized, and
analyzed.
Question:
How do we communicate with the computer?
Answer
: Many languages are used to communicate with the
computer. At the lowest level, there is machine language, which
is understood directly by the microprocessor, but is awkward for
humans. Visual Basic is an example of a higher-level language.
It consists of instructions to which people can relate, such as
Click, If, and Do.
Question:
How do we get computers to perform complicated
tasks?
Answer
: Tasks are broken down into a sequence of instructions
that can be expressed in a computer language. (This text uses
the language Visual Basic.) This sequence of instructions is
called a
program
. Programs can range in size from two or three
instructions to millions of instructions. Instructions are typed on
the keyboard, or read in from a file on a disk, and stored in the
computer's memory. The process of executing the instructions
is called
running
the program.
Question:
What is a server?
computer. A server is a computer that provides resources such
as files, printers, or Internet access to other computers. Since a
server needs to be continuously available to other computers,
additional components are usually added to it to increase its
reliability in the event of a power failure or other unexpected
event.
Question:
Are there certain features that all programs have in
common?
Answer:
Most programs do three things: take in data,
manipulate them, and give desired information. These
operations are referred to as input, processing, and output. The
input data might be held in a portion of the program, reside on
a disk drive, or be provided by the computer operator in
response to requests made by the computer while the program
is running. The processing of the input data occurs inside the
computer and can take from a fraction of a second to many
hours. The output data are either displayed on the monitor,
printed on the printer, or recorded on a disk. As a simple
example, consider a program that computes sales tax. An item
of input data is the cost of the thing purchased. The processing
consists of multiplying the cost by a certain percentage. An item
of output data is the resulting product, the amount of sales tax
to be paid.
Question:
What are the meanings of the terms "hardware" and
"software?"
Answer:
Hardware
refers to the physical components of the
computer, including all peripherals, the central processing unit,
disk drives, and all mechanical and electrical devices. Programs
are referred to as
software.
[Page 4]
and "user?"
Answer:
A
programmer
is a person who solves problems by
writing programs on a computer. After analyzing the problem
and developing a plan for solving it, he or she writes and tests
the program that instructs the computer how to carry out the
plan. The program might be run many times, either by the
programmer or by others. A
user
is any person who uses a
program. While working through this text, you will function both
as a programmer and as a user.
Question:
What is meant by problem solving?
Answer:
Problems are solved by carefully reading them to
determine what data are given and what outputs are requested.
Then a step-by-step procedure is devised to process the given
data and produce the requested output. This procedure is called
an
algorithm
. Finally, a computer program is written to carry
out the algorithm. Algorithms are discussed in
Section 2.2
.
Question:
What types of problems are solved in this text?
Answer:
Carrying out business computations, creating and
maintaining records, alphabetizing lists, and displaying tabular
data are some of the types of problems we will solve.
Question:
How did Visual Basic 2005 evolve?
Answer:
In the early 1960s, two mathematics professors at
Dartmouth College developed BASIC to provide their students
with an easily learned language that could tackle complicated
programming projects. As the popularity of BASIC grew,
refinements were introduced that permitted structured
programming, which increases the reliability of programs. Visual
Basic 1.0 is a version of BASIC developed in 1991 by the
Microsoft Corporation to allow easy, visual-oriented
It is targeted for what is known as the .NET run time, which is a
program that executes Visual Basic 2005 as well as programs
from other languages that are targeted for the .NET run time.
This will ultimately allow programs written in Visual Basic to be
run on devices other than computers, such as cell phones and
handheld devices. Other features of Visual Basic include full
object-oriented programming capabilities and the development
of Web services. Object-oriented programming is discussed in
[Page 4 (continued)]
1.2. Using Windows
Programs such as Visual Basic, which are designed for Microsoft
Windows, are easy to useonce you learn a little jargon and a
few basic techniques. This section explains the jargon, giving
you enough understanding of Windows to get you started in
Visual Basic. Although Windows may seem intimidating if you've
never used it before, you need to learn only a few basic
techniques, which are covered in this section.
[Page 5]
Mouse Pointers
When you use Windows, think of yourself as the conductor and
Windows as the orchestra. The conductor in an orchestra points
to various members and does something with his or her baton;
then the orchestra members respond in certain ways. For a
Windows user, the baton is called the
pointing device
; most
often it is a
mouse
. As you move the mouse across your desk,
a pointer moves along the screen in sync with your movements.
Two basic types of mouse pointers you will see in Windows are
an arrow and an hourglass.
The
arrow
is the ordinary mouse pointer you use to point at
various Windows objects before activating them. You will
usually be told to "Move the pointer to ...." This really means
"Move the mouse around your desk until the mouse pointer is at
...."
around when you move the mouse, but you can't tell Windows
to do anything until it finishes what it's doing and the mouse
pointer no longer resembles an hourglass. (Sometimes you can
press the Esc key to tell Windows to stop what it is doing.)
Note:
The mouse pointer can take on many other shapes,
depending on which application you are using and what task
you are performing. For instance, when entering text in a word
processor or Visual Basic, the mouse pointer appears as a thin,
large, uppercase I (referred to as an I-beam).
Mouse Actions
After you move the (arrow) pointer to a place where you want
something to happen, you need to do something with the
mouse. There are five basic things you can do with a
mousepoint, hover, click, double-click, and drag.
Pointing
means moving your mouse across your desk until the
mouse pointer is over the desired object on the screen.
Hovering
means lingering the mouse at a particular place and
waiting for a message or menu to appear.
Clicking
(sometimes people say single-clicking) means
pressing and releasing the left mouse button once. Whenever a
sentence begins "Click on ...," you need to
1.
move the mouse pointer until it is at the object you are
supposed to click on and
2.
press and release the left mouse button.
"Click inside the ...." This means to move the mouse pointer
until it is inside the boundaries of the object, and then click.
Double-clicking
means clicking the left mouse button twice in
quick succession (that is, pressing it, releasing it, pressing it,
and releasing it again quickly so that Windows doesn't think you
single-clicked twice). Whenever a sentence begins "Double-click
on ...", you need to
1.
move the mouse pointer until it is at the object you are
supposed to double-click on and
2.
press and release the left mouse button twice in quick
succession.
[Page 6]
For example, you might be instructed to "Double-click on the
little box at the far left side of your screen."
Note:
An important Windows convention is that clicking selects
an object so you can give Windows or the document further
directions about it, but double-clicking tells Windows to perform
a default operation. For example, double-clicking on a folder will
open that folder.
Dragging
usually moves a Windows object. If you see a
sentence that begins "Drag the ...", you need to
1.
move the mouse pointer until it is at the object,
2.
press the left mouse button and hold it down,
3.
move the mouse pointer until the object moves to where
4.
finally, release the mouse button.
Sometimes this whole activity is called
drag and drop
.
Windows Start Button
Clicking on the
Start
button at the bottom left corner of the
screen displays a menu that you can use to run programs, shut
down Windows, and carry out several other tasks. The Start
menu also can be accessed by pressing a special key labeled
with the Windows logo (located next to the Alt key) or by
pressing Ctrl + Esc. (In the notation "key1 + key2", the plus
sign (+) instructs you to hold down key1 and then press key2.
There are many useful key combinations of this type.)
Windows and Its Little Windows
Windows gets its name from the way it organizes your screen
into rectangular regions. When you run a program, the program
runs inside a bordered rectangular box. Unfortunately Windows
jargon calls all of these windows, so there's only a lowercase
"w" to distinguish them from the operating system called
Windows.
When Windows' attention is focused on a specific window, the
Title bar at the top of the window is blue and the window is said
to be
active
. (Inactive windows have a gray Title bar.) The
Using Notepad
We will explore the Windows application Notepad to illustrate
the Windows environment. Notepad is used extensively in this
text to create text files for programs. Most of the concepts
learned here carry over to Visual Basic and other Windows
applications.
To invoke Notepad from Windows, click the Start button, click
on Run, type "Notepad" into the box labeled "Name:", and click
the OK button. The window in
Figure 1.1
will appear. As its
name suggests, Notepad is an elementary word processor. You
can type text into the Notepad window, edit the text, print the
text on the printer, and save the text for later recall.
[Page 7]
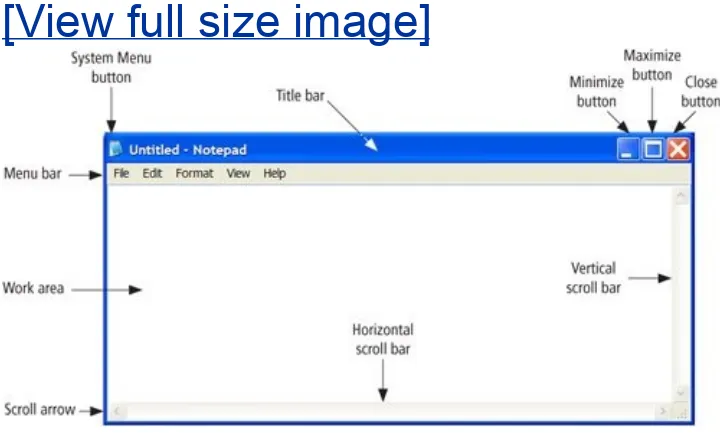
Figure 1.1. The Notepad window.
The blinking vertical line is called the
cursor
. Each letter you
type will appear at the cursor. The Notepad window is divided
into four parts. The part containing the cursor is called the
Work area
. It is the largest and most important part of the
window because documents are typed into this window.
The
Title bar
at the top of the screen holds the name of the
document currently being written. Until the document is given a
name, the document is called "Untitled." The three buttons on
the right side of the title bar can be used to maximize,
minimize, or close the window. You can click on the
Maximize
button
to make the Notepad window fill the entire screen, click
on the
Minimize button
to change the Notepad window into a
button on the taskbar, or click on the
Close button
to exit
Notepad. As long as a window isn't maximized or minimized,
you can usually move it around the screen by dragging its title
bar. (Recall that this means to move the mouse pointer until it
is in the title bar, hold down the left mouse button, move the
mouse until the window is where you want it to be, and then
release the mouse button.)
Note 1:
After you have maximized a window, the Maximize
button changes to a pair of rectangles called the
Restore
button
. Click on this button to return the window to its
previous size.
Note 2:
If the Notepad window has been minimized, it can be
restored to its previous size by clicking on the button that was
created on the task bar when the application was opened. (The
three tasks discussed in this paragraph also can be carried out
with the
System Menu button
in the upper-left corner of the
window.)
You can change the Notepad window to suit your needs. To
adjust the size, do the following:
1.
Move the mouse pointer until it is at the place on the
a double-headed arrow.
2.
Drag the border to the left or right or up or down to make
the window smaller or larger.
3.
When you are satisfied with the new size of the window,
release the left mouse button.
[Page 8]
If the Work area contains more information than can fit on the
screen, you need a way to move through this information so
you can see it all. For example, you will certainly be writing
instructions in Visual Basic that are longer than one screen. You
can use the mouse to scroll through your instructions with small
steps or giant steps.
A Vertical scroll bar
lets you move from
the top to the bottom of the window; a
Horizontal scroll bar
lets you move between the left and right margins of the
window. Use this Scroll bar when the contents of the window
are too wide to fit on the screen.
Figure 1.1
shows both Vertical
and Horizontal scroll bars.
A scroll bar has two arrows at the end of a channel and
sometimes contains a box called the
Scroll box
. The Scroll box
is the key to moving rapidly; the arrows are the key to moving
in smaller increments. Dragging the Scroll box enables you to
quickly move long distances to an approximate location in your
document. For example, if you drag the Scroll box to the middle
of the channel, you'll scroll to approximately the middle of your
document.
The
Menu bar
just below the Title bar is used to call up menus,
or lists of tasks. Several of these tasks are described in this
section.
way they would be written with a typewriter. In computerese,
writing a document is referred to as editing the document;
therefore, Notepad is called a
text editor
.
After Notepad has been invoked, the following routine will
introduce you to using Notepad:
1.
Click on the Work area of Notepad.
2.
Type a few words into Notepad.
3.
Press the
Home key
to move the cursor back to the
beginning of the line. In general, the Home key moves the
cursor to the beginning of the line on which it currently is
located.
4.
Now press the
End
key. The cursor will move to the end of
the line.
5.
Type some letters, and then press the
Backspace
key a
few times. It will erase letters one at a time. Another
method of deleting a letter is to move the cursor to that
letter and press the
Del
key. (Del stands for "Delete.") The
backspace key erases the character to the left of the
cursor, and the Del key erases the character to the right of
the cursor.
6.
Hold down the
Ctrl
key (Ctrl stands for "Control"), and
press the
Del
key. This key combination (denoted Ctrl +
Del) erases the portion of the line to the right of the cursor.
7.
Type more characters than can fit on one line of the screen.
Notice that the leftmost characters scroll off the screen to
make room for the new characters.
press and release W. (This key combination is abbreviated
Alt/Format/Word Wrap or Alt/O/W. The slash character (/),
officially called a
solidus
, instructs you to release the
character preceding it, before pressing the character
following it.) Notice that Notepad divided the long line so
that it fits in Notepad's window.
9.
Click Format on the Menu bar, and notice that there is a
check mark in front of Word Wrap. To remove the check
mark, turn the Word Wrap feature off by clicking once on
Word Wrap.
[Page 9]
10.
The
Enter
key is used to begin a new line on the screen.
11.
The
Alt
key activates the Menu bar and causes a letter
from each menu item to be underlined. Then, pressing one
of the underlined letters, such as F, E, O, V, or H, selects a
menu. (From the Menu bar, a menu also can be selected by
pressing the right arrow key to highlight the name and
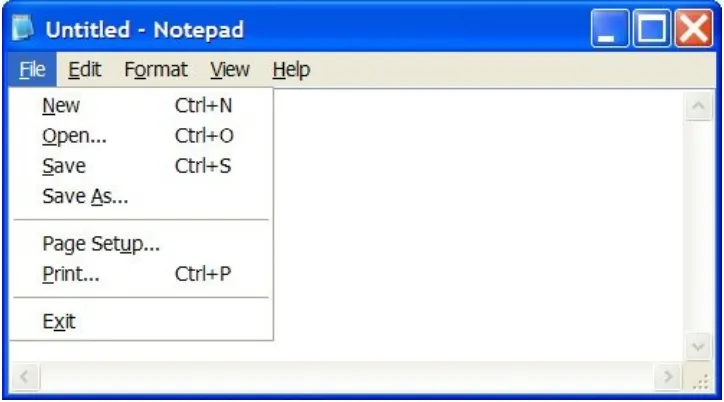
then pressing the Enter key.) As shown in
Figure 1.2
, after
a menu is opened, each option has one letter underlined.
You can press an underlined letter to select an option.
(Underlined letters are called
access keys
.) For instance,
pressing A from the file menu selects the option "Save As".
Selections also can be made with the cursor-movement
keys and the Enter key.
Note 1:
You can select menus and options without the use
of keys by clicking on them with the mouse.
Note 2:
You can close a menu, without making a selection,
by clicking anywhere outside the menu or pressing the Esc
key twice.
12.
The
Esc
key (Esc stands for "Escape") is used to return to
the Work area.
13.
Press Alt/F/N. The dialog box in
Figure 1.3
will appear and
ask you if you want to save the current document. Decline
by pressing N or clicking on the No button.
Figure 1.3. A "Do you want to save the
changes?" dialog box.
14.
Type the following information into Notepad. (It gives the
names of employees, their hourly wages, and the number
of hours worked in the past week.) This document is used
in
Section 3.5
Mike Jones
7.35
35
John Smith
6.75
33
[Page 10]
15.
Store the document as a file on a disk. To save the
document, press Alt/File/Save As. A dialog box appears,
requesting a file name for the document. The cursor is in a
narrow rectangular box labeled "File name:". Type a drive
letter, a colon, a backslash (\), and a name, and then press
the Enter key or click on Save. For instance, you might
type C:\PAYROLL. The document will then be stored on
drive C. This process is called
saving
the document.
Notepad automatically adds a period and the extension
txt
Note:
If you want to save the document in a specific folder
(directory) of the disk, include the folder's name. For
instance, you might type C:\Myfiles\PAYROLL. See
Section
1.3
for a discussion of folders.
16.
Press the key combination Alt/File/New to clear
PAYROLL.TXT from Notepad.
17.
To restore PAYROLL.TXT as the document in Notepad, press
Alt/File/Open, type something like C:\PAYROLL in the "File
name:" box, and then press the Enter key.
18.
Move the cursor to the beginning of the document, and
then press Alt/Edit/Find (or Ctrl + F) to invoke the Find
dialog box. This dialog box contains several objects that
will be discussed in this book. The text to be found should
be typed into the rectangle containing the cursor. Such a
rectangle is called a text box. The phrase "Find what:",
which identifies the type of information that should be
placed into the text box, is referred to as the
text
of a
label.
19.
Type "smith" into the text box, and then click on the "Find
Next" button. Clicking on it carries out a task. Text boxes,
labels, and buttons are discussed in
Section 3.2
.
20.
The small square to the left of the words "Match case" is
called a check box. Click on it to see it checked, and then
click again to remove the check mark.
21.
The object captioned "Direction" is called a group box. It
contains a pair of objects called radio buttons. Click on the
"Up" radio button to select it, and then click on the "Down"
radio button. Only one radio button at a time can be
discussed in
Section 9.2
.
22.
Press Alt/File/Exit to exit Notepad.
Comments
1.
Two useful key combinations that we have not discussed yet
are the following:
a.
Ctrl + Home moves the cursor to the beginning of the
document.
b.
Ctrl + End moves the cursor to the end of the
document.
[Page 11]
2.
Notepad can perform many of the tasks of word processors,
such as search and block operations. However, these
features needn't concern us presently. A discussion of them
can be found in
Appendix B
, under "
HOW TO: Use the
Editor
."
Practice Problems 1.2
(Solutions to practice problems always follow the
exercises.) Assume that you are using Windows Notepad:
1.Give two ways to open the Edit menu.
Exercises 1.2
1.What does an hourglass pointer mean? 2.Describe "clicking" in your own words.
3.Describe "double-clicking" in your own words. 4.Describe "dragging" in your own words.
5.What is the blinking vertical line in Notepad called, and what is its purpose? 6.How can you tell when a window is active?
7.What is the difference between "Windows" and "windows?" 8.What is the purpose of the vertical scroll bar in Notepad?
9.By what name is a Notepad document known before it is named as part of beingsaved on disk?
In Exercises 10 through 24, give the key (or key
combination) that performs the task in Windows
Notepad.
10.Remove a pull-down menu from the screen.
11.Erase the character to the left of the cursor. 12.Access the Start menu.
13.Erase the character to the right of the cursor.
15.Move the cursor to the end of the line containing the cursor. 16.Exit Notepad.
17.Move the cursor to the beginning of the document. 18.Move the cursor to the end of the document.
19.Move from the Work area to the Menu bar. 20.Move from the Menu bar to the Work area.
21.Cancel a dialog box.
22.Move from one option rectangle of a dialog box to another rectangle.
23.Save the current document on a disk.
24.Clear the current document from the Work area and start a new document.
[Page 12]
Solutions to Practice Problems 1.2
1.Press Alt/Edit, or click on the word Edit in the toolbar to display the Edit menu. The
jargon says the menu is "dropped down" or "pulled down."
2.Press the down-arrow key to highlight the item, then press the Enter key. Or, press
[Page 12 (continued)]
1.3. Files and Folders
Modern computers have a hard disk, a diskette drive, and a CD
(or DVD) drive. The hard disk is permanently housed inside the
computer. You can read information from all three drives, but
can write information easily only to the hard disk and to
diskettes. We use the word
disk
to refer to either the hard disk,
a diskette, a CD, or DVD. Each drive is identified by a letter.
Normally, the hard drive is identified by C, the diskette drive by
A, and the CD (or DVD) drive by D or E. Disk management is
handled by Windows.
Disks hold not only programs, but also collections of data stored
in files. The term
file
refers to either a program file, a text file,
or some other kind of data file. We created a text file in
Section
1.2
. Each file has a name consisting of a base name followed by
an optional extension consisting of a period and one or more
characters. The term
filename
refers to the combination of the
base name, the period, and the extension. A filename can
contain up to 215 characters, typically consisting of letters,
digits, spaces, periods, and other assorted characters. (The only
characters that cannot be used in filenames are \, /, :, *, ?, <,
>,", and |) Extensions are normally used to identify the type of
file. For example, spreadsheets created with Excel have the
extension
xls
(eXceL Spreadsheet), documents created with
Word have the extension
doc
(DOCument), and files created
with Notepad have the extension
txt
(TeXT document). Some
examples of filenames are "Annual Sales.xls," "Letter to
Mom.doc," and "Phone.txt".
Neither Windows nor Visual Basic distinguishes between
uppercase and lowercase letters in folder and filenames. For
instance, the names COSTS02.TXT, Costs02.Txt, and
book for filenames.
Because a disk is capable of holding thousands of files, locating
a specific file can be quite time consuming. Therefore, related
files are grouped into collections called
folders
. For instance,
one folder might hold all your Visual Basic programs, and
another the documents created with your word processor.
Think of a disk as a large folder, called the
root folder
, that
contains several smaller folders, each with its own name. (The
naming of folders follows the same rules as the naming of files.)
Each of these smaller folders can contain yet other named
folders. Any folder contained inside another folder is said to be
a
subfolder
of that folder. Each folder is identified by listing its
name preceded by the names of the successively larger folders
that contain it, with each folder name preceded by a backslash.
Such a sequence is called a
path
. For instance, the path
\Sales\NY02\July identifies the folder July, contained in the
folder NY02, which in turn is contained in the folder Sales. Think
of a file, along with its name, as written on a slip of paper that
can be placed into either the root folder or one of the smaller
folders. The combination of a drive letter followed by a colon, a
path, and a filename is called a
filespec
, an abbreviation of
"file specification." Some examples of filespecs are
C:\VB01\VB.EXE and A:\Personal\INCOME02.TXT.
[Page 13]
In early operating systems such as MS-DOS, folders were called
directories
. Many Visual Basic objects and commands still refer
to folders as directories. The terms "root folder" and "path" are
a reference to the "tree" metaphor commonly used to describe
a computer's disk. In this metaphor, the large folder at the
lowest level of the disk is called the "root" folder. The smaller
folders contained in the root folder can be thought of as
branches, and so on. Finally, a file in one of these folders can be
thought of as a leaf on a branch. The leaf is reached by starting
at the root and following a "path" through the branches.
A program called Windows Explorer helps you view, organize,
and manage the folders and files on your disks. We will learn
how to use Windows Explorer to create, rename, copy, move,
and delete folders and files.
Using Windows Explorer
To invoke Windows Explorer, click the Windows Start button,
click on Run, type in the word "Explorer", and click on the OK
button. The appearance of the Explorer window depends on the
version of Windows being used and the values of certain
settings.
Figure 1.4
(on the next page) shows a possible
Explorer window for Windows XP. The Folders pane on the left
side of the window contains a folder tree with the My
Documents folder highlighted. (Only one folder at a time can be
highlighted. The icon for a highlighted folder appears to be
physically open, and its name appears in the title bar at the top
of the Explorer window.) The contents of the highlighted folder
are displayed in the right pane of the Explorer window. In
Figure 1.4
, the highlighted folder contains six subfolders and
two files. To highlight a different folder, just click on it with the
left mouse button.
Figure 1.4. An Explorer window for Windows XP
(This item is displayed on page 14 in the print version)
In the Folders pane, you can click on a plus box to expand the
folder tree so that it reveals the subfolders of the folder next to
the plus box. You click on a minus box to reverse the process.
This process allows you to locate any file.
In
Figure 1.4
, the folders and files in the right pane are
displayed in the so-called
Details view
. This view is invoked by
pressing Alt/V/D. Also, in
Figure 1.4
, the extensions of the
filenames are shown. By default, Windows shows only the base
names of files. The following steps get it to also display the
extensions:
1.
From Windows Explorer, press Alt/T/O to display the Folders
Options dialog box.
2.
Click on the View tab in the dialog box.
3.
If there is a check mark in the box next to "Hide extensions
for known file types," click on the box to remove the check
mark.
4.
Click on the OK button to close the Folders Options dialog
To create a new folder
:
1.
Highlight the folder that is to contain the new folder as a
subfolder.
2.
On the File menu, point to New, and then click Folder. (Or
press Alt/File/New/Folder.) The new folder appears with the
temporary name New Folder.
3.
Type a name for the folder, and then press the Enter key.
(The allowable names for folders are the same as for files.
However, folder names do not usually have an extension.)
[Page 15]
To rename a folder or file:
1.
Click on the folder or file in the right pane with the right
mouse button.
2.
In the Context menu that appears, click Rename. The
current name will appear highlighted inside a rectangle.
3.
Type the new name, and then press the Enter key.
To delete a folder or file:
1.
Click on the folder or file with the right mouse button.
2.
In the Context menu that appears, click Delete. A "Confirm
Folder Delete" or a "Confirm File Delete" dialog box
containing the name of the folder or file will appear.
Or
1.
Click on the file or folder with the left mouse button.
2.
Press the Delete key.
To copy a folder or file:
1.
Click on the folder or file to be copied with the right mouse
button.
2.
In the Context menu that appears, click on Copy.
3.
Point to the folder where the copy is to be placed.
4.
Click on the second folder with the right mouse button.
5.
In the Context menu that appears, click on Paste.
To move a folder or file:
1.
Click on the folder or file to be moved with the right mouse
button.
2.
In the Context menu that appears, click on Cut.
3.
Point to the folder where the copy is to be moved.
4.
Click on the second folder with the right mouse button.
You also can carry out some of the preceding operations by
"drag and drop." For details, see the Help Topics accessed
through the Windows Explorer Help menu. For instance, you
can delete a folder or file by dragging it to the Recycle Bin and
releasing the left mouse button.
Using the Open and Save As Dialog Boxes
In
Section 1.2
, we used the Open and Save As dialog boxes by
just typing in the filespec for the desired file. These dialog
boxes provide many features that assist with the locating of
folders and files.
Figure 1.5
shows an Open dialog box obtained
from Windows XP. In the Save As dialog box, "Look in:" is
replaced with "Save in:", and "Files of type:" is replaced with
"Save as type:".
[Page 16]
Figure 1.5. An Open dialog box from Windows XP.
You can begin the search by clicking on one of the icons in the
Places bar. In
Figure 1.5
, the My Computer icon was pressed.
The following steps would be used to locate the file with filespec
"C:\VB Programs\3-5-3\bin\Debug\PAYROLL.TXT":
1.
Double-click on "Local Disk (C:)" to obtain a list of all the
folders and files on the hard drive C:. (The text in the "Look
in:" box will now read "Local Disk (C:)".
2.
Double-click on the folder named "VB Programs" to obtain a
list of its subfolders and files.
3.
In succession, double-click on "3-5-3," then on "bin," and
finally on "Debug." The subfolders and files in the folder
4.
Double-click on PAYROLL.TXT to open it.
The Save As dialog box operates in a similar way. However,
after the desired folder is displayed in the "Save in:" box at the
top of the dialog box, you would type the base name of the file
into the "File name:" box.
[Page 17]
Practice Problems 1.3
1.Where is the file having filespec "C:\TODAY.TXT" located?
2.Is "C:\Sales\New York" a filespec or a path?
Exercises 1.3
1.Explain why "Who is there?" is not a valid filename.
2.Explain why "FOUR STAR HOTEL ****" is not a valid filename.
3.What is wrong with the filespec "C:/Sports/TENNIS.DOC"?
4.Why do files on CDs usually have their read-only attribute turned on?
7.Must the two files with filespecs "A:\DATA.TXT" and "A:\Info\DATA.TXT" be identical; that is, copies of one another?
8.What is the difference between a filespec and a filename?
From Windows Explorer, highlight a folder on your
computer that contains many files, and then press
Alt/V/D to select the Details option from the View menu.
In Exercises 9-12, give the effect of clicking on the
specified column head in the right-hand pane.
9.Size 10.Type
11.Modified 12.Name
13.
The companion website for this book has a folder named Programs\Ch09\Pictures. Use Windows Explorer to obtain a list of the files in this folder, and then press Alt/V/H to select the Thumbnails option from the View menu. Describe what you see in the right pane.
14.Open the folder on your hard disk named My Documents. How many subfolders does the folder contain directly? How many files does the folder contain directly?
In Exercises 15 and 16, carry out the stated tasks.
15.
a. Take a blank diskette, and create two folders named Laurel and Hardy. b. Create a subfolder of Laurel called Stan.
c. Use Notepad to create a file containing the sentence "Here's another nice mess you've gotten me into." and save the file with the name QUOTE.TXT in the folder Laurel.
e. Rename the new copy of the file QUOTE.TXT as LINE.TXT. f. Delete the original copy of the file QUOTE.TXT.
[Page 18]
16.
a. Take a blank diskette, create a folder named Slogans, and create two subfolders of Slogans named Coke and CocaCola.
b. Use Notepad to create a file containing the sentence "It's the real thing.", and save the file with the name COKE1970.TXT in the folder Coke.
c. Use Notepad to create a file containing the phrase "The ideal brain tonic.", and save the file with the name COKE1892.TXT in the folder Coke.
d. Copy the two files in Coke into the folder CocaCola. e. Delete the folder Coke.
f. Rename the folder CocaCola as Coke.
Solutions to Practice Problems 1.3
1.The file is located in the root folder of the C drive.
2.