Beginning
Game
Development
with
Python
and
Pygame
From Novice to Professional
Will McGugan
Beginning Game
Development with
Python and Pygame
From Novice to Professional
■ ■ ■
All rights reserved. No part of this work may be reproduced or transmitted in any form or by any means, electronic or mechanical, including photocopying, recording, or by any information storage or retrieval system, without the prior written permission of the copyright owner and the publisher.
ISBN-13 (pbk): 978-1-59059-872-6
ISBN-10 (pbk): 1-59059-872-5
Printed and bound in the United States of America 9 8 7 6 5 4 3 2 1
Trademarked names may appear in this book. Rather than use a trademark symbol with every occurrence of a trademarked name, we use the names only in an editorial fashion and to the benefit of the trademark owner, with no intention of infringement of the trademark.
Lead Editor: Jason Gilmore Technical Reviewer: Richard Jones
Editorial Board: Steve Anglin, Ewan Buckingham, Tony Campbell, Gary Cornell, Jonathan Gennick, Jason Gilmore, Kevin Goff, Jonathan Hassell, Matthew Moodie, Joseph Ottinger, Jeffrey Pepper, Ben Renow-Clarke, Dominic Shakeshaft, Matt Wade, Tom Welsh
Project Manager: Kylie Johnston Copy Editor: Liz Welch
Assistant Production Director: Kari Brooks-Copony Production Editor: Kelly Winquist
Compositor: Pat Christenson Proofreader: Erin Poe Indexer: Becky Hornyak Cover Designer: Kurt Krames
Manufacturing Director: Tom Debolski
Distributed to the book trade worldwide by Springer-Verlag New York, Inc., 233 Spring Street, 6th Floor, New York, NY 10013. Phone 1-800-SPRINGER, fax 201-348-4505, e-mail orders-ny@springer-sbm.com, or visit http://www.springeronline.com.
For information on translations, please contact Apress directly at 2855 Telegraph Avenue, Suite 600, Berkeley, CA 94705. Phone 510-549-5930, fax 510-549-5939, e-mail info@apress.com, or visit http:// www.apress.com.
The information in this book is distributed on an “as is” basis, without warranty. Although every precaution has been taken in the preparation of this work, neither the author(s) nor Apress shall have any liability to any person or entity with respect to any loss or damage caused or alleged to be caused directly or indirectly by the information contained in this work.
Contents at a Glance
About the Author
. . . xvAbout the Technical Reviewer
. . . .xviiAcknowledgments
. . . xixIntroduction
. . . xxi■
CHAPTER 1
Introducing Python
. . . 1■
CHAPTER 2
Exploring Python
. . . 19■
CHAPTER 3
Introducing Pygame
. . . 41■
CHAPTER 4
Creating Visuals
. . . 67■
CHAPTER 5
Making Things Move
. . . 91■
CHAPTER 6
Accepting User Input
. . . 111■
CHAPTER 7
Take Me to Your Leader
. . . 139■
CHAPTER 8
Moving into the Third Dimension
. . . 165■
CHAPTER 9
Exploring the Third Dimension
. . . 181■
CHAPTER 10
Making Things Go Boom
. . . 211■
CHAPTER 11
Lights, Camera, Action!
. . . 235■
CHAPTER 12
Setting the Scene with OpenGL
. . . 263■
APPENDIX A
Game Object Reference
. . . 285■
APPENDIX B
Packaging Your Game
. . . 293Contents
About the Author
. . . xvAbout the Technical Reviewer
. . . xviiAcknowledgments
. . . xixIntroduction
. . . xxi■
CHAPTER 1
Introducing Python
. . . 1Your First Look at Python
. . . 1Numbers
. . . 2Strings
. . . 5Lists and Tuples
. . . 11Loops
. . . 16Python in Practice
. . . 18Summary
. . . 18■
CHAPTER 2
Exploring Python
. . . 19Creating Scripts
. . . 19Working with Logic
. . . 20Understanding Booleans
. . . 20Understanding Functions
. . . 23Defining Functions
. . . 24Introducing Object-Oriented Programming
. . . 26Using Classes
. . . 27Python in Practice
. . . 31Using the Standard Library
. . . 35Introducing import
. . . 35Useful Modules for Games
. . . 36Summary
. . . 39■
CHAPTER 3
Introducing Pygame
. . . 41History of Pygame
. . . 42Hello World Revisited
. . . 44Understanding Events
. . . 50Retrieving Events
. . . 50Handling Mouse Motion Events
. . . 53Handling Mouse Button Events
. . . 53Handling Keyboard Events
. . . 54Filtering Events
. . . 56Posting Events
. . . 56Opening a Display
. . . 57Full-Screen Displays
. . . 57Resizable Pygame Windows
. . . 59Windows with No Borders
. . . 61Additional Display Flags
. . . 61Using the Font Module
. . . 62When Pygame Goes Wrong
. . . 63Pygame in Action
. . . 64Summary
. . . 65■
CHAPTER 4
Creating Visuals
. . . 67Using Pixel Power
. . . 67Working with Color
. . . 68Representing Color in Pygame
. . . 69Scaling Colors
. . . 71Blending Colors
. . . 73Using Images
. . . 75Storing Images
. . . 76Working with Surface Objects
. . . 76Drawing with Pygame
. . . 83pygame.draw.rect
. . . 83pygame.draw.polygon
. . . 84pygame.draw.circle
. . . 85pygame.draw.ellipse
. . . 86pygame.draw.arc
. . . 87pygame.draw.line
. . . 87pgame.draw.lines
. . . 88■
CHAPTER 5
Making Things Move
. . . 91Understanding Frame Rate
. . . 91Moving in a Straight Line
. . . 92It’s About Time
. . . 93Diagonal Movement
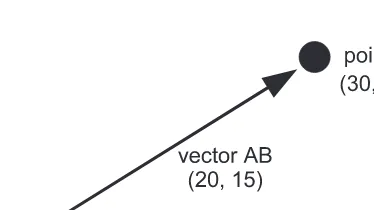
. . . 97Exploring Vectors
. . . 98Creating Vectors
. . . 99Storing Vectors
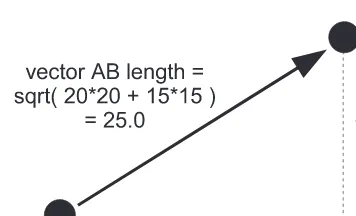
. . . 99Vector Magnitude
. . . 100Unit Vectors
. . . 102Vector Addition
. . . 103Vector Subtraction
. . . 105Vector Negation
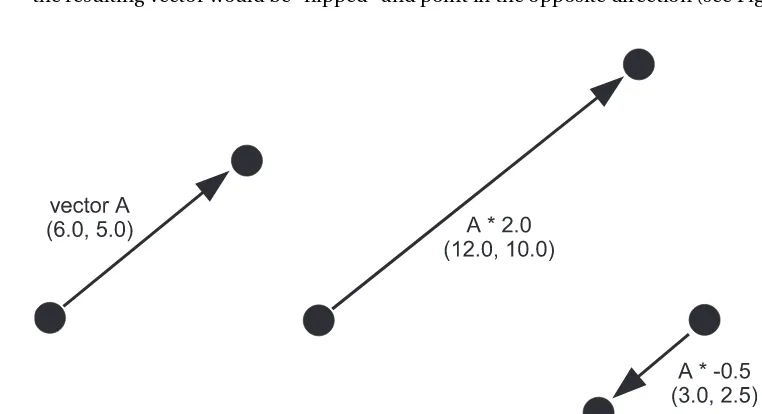
. . . 105Vector Multiplication and Division
. . . 106Game Objects Vector Class
. . . 107Using Vectors to Create Movement
. . . 108Diagonal Movement
. . . 108Summary
. . . 110■
CHAPTER 6
Accepting User Input
. . . 111Controlling the Game
. . . 111Understanding Keyboard Control
. . . 112Detecting Key Presses
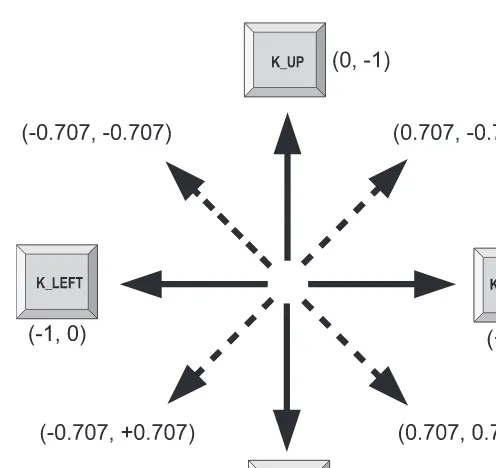
. . . 112Directional Movement with Keys
. . . 115Rotational Movement with Keys
. . . 118Implementing Mouse Control
. . . 120Rotational Movement with the Mouse
. . . 121Mouse Gameplay
. . . 124Implementing Joystick Control
. . . 124Joystick Basics
. . . 125Joystick Direction Controls
. . . 128Joystick Objects
. . . 133Seeing Joysticks in Action
. . . 133Summary
. . . 137■
CHAPTER 7
Take Me to Your Leader
. . . 139Exploring AI
. . . 140Implementing State Machines
. . . 141Game Entities
. . . 143Building Worlds
. . . 144Ant Entity Class
. . . 147Building the Brains
. . . 148Summary
. . . 163■
CHAPTER 8
Moving into the Third Dimension
. . . 165Creating the Illusion of Depth
. . . 165Understanding 3D Space
. . . 167Using 3D Vectors
. . . 169Time-Based Movement in 3D
. . . 170Projecting 3D Points
. . . 171Parallel Projections
. . . 172Perspective Projections
. . . 172A 3D World
. . . 175Summary
. . . 179■
CHAPTER 9
Exploring the Third Dimension
. . . 181What Is a Matrix?
. . . 181Using the Matrix Class
. . . 183Introducing OpenGL
. . . 196Installing PyOpenGL
. . . 196Initializing OpenGL
. . . 197OpenGL Primer
. . . 197Seeing OpenGL in Action
. . . 203Summary
. . . 210■
CHAPTER 10
Making Things Go Boom
. . . 211What Is Sound?
. . . 211Storing Sound
. . . 212Sound Formats
. . . 213Creating Sound Effects
. . . 214Playing Sounds with Pygame
. . . 216Sound Objects
. . . 217Sound Channels
. . . 218Mixer Functions
. . . 221Hearing the Mixer in Action
. . . 221Playing Music with Pygame
. . . 226Obtaining Music
. . . 226Playing Music
. . . 227Hearing Music in Action
. . . 228Summary
. . . 233■
CHAPTER 11
Lights, Camera, Action!
. . . 235Working with Textures
. . . 235Uploading Textures with OpenGL
. . . 235Texture Coordinates
. . . 238Rendering Textures
. . . 239Deleting Textures
. . . 240Seeing Textures in Action
. . . 240Mip Mapping
. . . 244Texture Parameters
. . . 245Working with Models
. . . 248Storing Models
. . . 248OBJ Format for 3D Models
. . . 249Seeing Models in Action
. . . 250Summary
. . . 260■
CHAPTER 12
Setting the Scene with OpenGL
. . . 263Understanding Lighting
. . . 263Enabling Lighting
. . . 264Setting Light Parameters
. . . 264Working with Materials
. . . 266Tweaking Parameters
. . . 266Managing Lights
. . . 267Understanding Blending
. . . 267Using Blending
. . . 267Seeing Blending in Action
. . . 271Understanding Fog
. . . 275Fog Parameters
. . . 275Seeing Fog in Action
. . . 276Rendering the Backdrop
. . . 277Skyboxes
. . . 278Where to Go for Help
. . . 282Summary
. . . 283■
APPENDIX A
Game Object Reference
. . . 285Importing
. . . 285Contributing
. . . 285gameobjects.color.Color
. . . 285Constructor
. . . 286Attributes
. . . 286Methods
. . . 286Class Methods
. . . 287gameobjects.matrix44.Matrix44
. . . 287Constructor
. . . 287Attributes
. . . 287Methods
. . . 288Class Methods
. . . 289gameobjects.vector2.Vector2
. . . 290Constructor
. . . 290Attributes
. . . 290Methods
. . . 290Class Methods
. . . 291gameobjects.vector3.Vector3
. . . 291Constructor
. . . 291Attributes
. . . 291Methods
. . . 292■
APPENDIX B
Packaging Your Game
. . . 293Creating Windows Packages
. . . 293Using py2exe
. . . 294Building the Installer
. . . 294Creating Packages for Linux
. . . 296Creating Packages for the Mac
. . . 296About the Author
About the Technical Reviewer
Acknowledgments
I
thank the Apress team for giving me the wonderful opportunity to write a book—something that has been my dream for many years. Many thanks to Jason Gilmore, whose enthusiastic response to my proposal and guidance as my editor was much appreciated. I also thank Kylie Johnston for her diligence and hard work. Liz Welch’s eagle eye kept this book free from spell-ing and grammar mistakes. Richard Jones did an excellent job as my technical reviewer and kept this book technically correct—the best kind of correct.I can’t go without thanking my parents, Bill and Audrey, and my sisters, Ruth and Jen, for their unwavering support and encouragement throughout the months of writing. Thanks, Mum and Dad, for buying me the Spectrum 48K computer that put me on this path and for always being there for me.
Introduction
I
have accumulated a large collection of game development books over the years, virtually all of which are an inch or two thicker than this book—even though they cover similar subjects and techniques. The disparity is not because my writing is terse or I use a smaller font—it is because traditional game development tools tend to require a large amount of technical knowledge that the reader must first absorb before building even the simplest of games. Even seasoned game developers find the technical requirements of starting a game to be enough of a barrier that they are less likely to work on game ideas that are unproven or potentially not commercial-worthy. Game development may have become easier over the years, with simplified programming inter-faces and more programmers wishing to share their knowledge, but writing a game is still a significant undertaking.When I discovered Python, it lowered a number of barriers to writing software, because I could work faster and accomplish more with less effort, and when combined with Pygame I could experiment with game ideas and build a complete game from scratch in record time. The beauty of Pygame is that it makes the various tasks in creating a game (setting up a display, drawing to the screen, playing sound, etc.) only as complicated as they need to be—and it turns out that’s not particularly complicated at all! Many one-liners in Pygame would take dozens of lines in C++, the traditional tool of game developers.
Although Python and Pygame are superb tools for rapid game development, there is little in the way of books or web tutorials for Python game programmers, who often have no choice but to mentally translate from another language to Python when researching a new topic in game development. This book was conceived to fill that gap and allow the beginner game pro-grammer to get up to speed with Python and learn the fundamentals of game programming without having to first learn C++, C#, Java, or another language first. It was also my opportunity to explain 3D game programming in a way that is accessible to nonmathematicians—some-thing that is not easy to find in other books.
In short, this is the book I would have wanted to have when I started out in game development!
Who This Book Is For
How This Book Is Structured
Beginning Game Development with Python and Pygame is divided into 12 chapters, each of which builds on the previous chapter—with a few notable exceptions. I’ve structured it so that you can get results quickly and see something on screen, which you may appreciate if you are as impatient as I am. Virtually all the listings are self-contained, and hopefully entertaining, lit-tle projects that run independently. Since experimentation is the best way to learn, you are encouraged to play with the sample code and modify it to produce different effects. You can also use any of the code in your own projects—with my blessing!
The first two chapters introduce the Python language in a fairly conversational manner. If you read them with a Python prompt in front of you, you should find you can quickly pick up the language. These two chapters don’t make a complete language tutorial, but will cover enough for you to be able to understand the Python code in the book and write some of your own. Occasionally, new syntaxes and language features are introduced in the rest of the book, but I explain them where they are first used. If you are proficient in Python, you can skip straight to Chapter 3.
Chapter 3 is your first introduction to Pygame and covers its history and capabilities. It also explains the basics of setting up a graphical display and handling events, skills that are essential for any game. You will become intimately familiar with the code introduced in this chapter, as it is used in all the sample code for the rest of the book.
Chapter 4 dives straight into creating visuals and the various ways in which you can draw to the screen with Pygame. Chapter 5 explores the techniques that game programmers use to make those images move. You should find the discussion on time-based movement to be par-ticularly valuable, as it is essential for any kind of animation in a game.
Chapter 6 tells you all you need to know to interface your game with virtually any gaming device. The sample code in this chapter will have you moving a character around with the key-board, mouse, and joystick.
Chapter 7 is a little unusual in that it is more self-contained than the others and doesn’t depend as much on previous chapters. It covers the subject of artificial intelligence and includes a fully working simulation of an ant’s nest, but the techniques I explain in this chapter can be used to add seemingly intelligent characters to any game.
Chapters 8 and 9 are a gentle introduction to working with three-dimensional graphics in Pygame, which is an essential topic since most games have 3D elements these days—even if they are not full 3D games. I explain the math in visual terms that make it easier to grasp, and you should find that it is not as an intimidating a subject as it first appears.
Chapter 10 takes a break from 3D graphics to discuss how to use Pygame to add sound effects and music, and even includes a fully working jukebox application.
The final two chapters build on Chapters 8 and 9 to advance your knowledge of 3D graph-ics, and explain how to take advantage of the dedicated game hardware on your graphics card. By the end of Chapter 11 you will have enough knowledge to render and manipulate a three-dimensional object on the screen. Chapter 12 explores several techniques you can use to create even more impressive 3D visuals and generate special effects.
Prerequisites
To run the code in this book, you will need at least version 2.4 of Python and version 1.7.1 of Pygame, which you can download from www.python.org and www.pygame.org, respectively. If you want to run the 3D sample code, you will also need PyOpenGL, which you can download from pyopengl.sourceforge.net. All are free software, and this book contains instructions on how to install them and get started.
Downloading the Code
The source code for this book is available to readers at www.apress.com in the Source Code section of this book’s home page. Please feel free to visit the book’s home page on the Apress web site and download all the code there. You can also check for errata and find related titles from Apress.
Contacting the Author
I am happy to respond to any questions regarding this book’s content and source code. Feel free to e-mail me at will@willmcgugan.com, or alternatively post a comment on my blog:
www.willmcgugan.com.
■ ■ ■
Introducing Python
T
he language we are going to use to make games is Python, so called because the original author of the language was a fan of the UK television series Monty Python. Python is popular in game development, but it is also used to create everything from applications to web sites. Even NASA and Google rely heavily on Python.There are plenty of alternative languages that can be used to create games, but I have chosen Python because it has the tendency to take care of the details and leave you—the pro-grammer—to concentrate on solving problems. For our purposes, solving problems means displaying game characters on the screen, making them look great, and having them interact with a virtual environment.
This chapter is a friendly introduction to Python; it will get you up to speed with the lan-guage so that you can read the sample code and start writing code of your own. If you are familiar with Python, then feel free to skip the first two chapters. Read on if you are completely new to Python or if you would like a refresher course.
To start working with Python, you will first need to install a Python interpreter for your computer. There are versions for PC, Linux, and Mac. We will be using version 2.4 of Python, which is not quite the most recent version but is supported by all the code libraries we will be using.
■
Note
By the time this book is published, it is likely that all the libraries used in this book will support a more recent version of Python. You don’t have to get the latest version, but if you do want to try out the new features then you can because new versions will run files created for older versions.Your First Look at Python
Once you have installed Python on your system, you can run it like any other program. If you have Windows, it is simply a matter of double-clicking the icon or selecting it in the Start menu. For other systems with a command line, just type python to launch Python in interactive mode.
When you first run the Python interpreter, you will see something like the following:
ActivePython 2.4.3 Build 12 (ActiveState Software Inc.) based on
Python 2.4.3 (#69, Apr 11 2006, 15:32:42) [MSC v.1310 32 bit (Intel)] on win32 Type "help", "copyright", "credits" or "license" for more information.
>>> _
The text may vary depending on the version of Python you are running and the platform (Win-dows, Mac, Linux, etc.) you are running it on. But the important part is the three chevrons (>>>), which is the Python prompt—it is your invitation to type in some code, which Python will then attempt to run.
A long-standing tradition in computer language tutorials is that the first program you write displays the text “Hello, World!” on the screen—and who am I to break with tradition! So take a deep breath and type print 'Hello, World!' after the prompt. The Python window will now display this on the prompt line:
>>> print 'Hello, World!'
If you hit the Enter key, Python will run the line of code you just entered, and if all goes well you will see this on the screen:
>>> print 'Hello, World!' Hello, World!
>>> _
Python has executed your line of code, displayed the result, and given you a new prompt to enter more code. So how exactly does our line of code work? The word print is a statement that tells Python to print what follows to the screen. Following the print statement is a string, which is simply a collection of letters and/or digits. Python treats anything between quotes (') as a string. Try entering your own text between the quote marks and you should find that Python will print it to the screen just as before.
Numbers
We will come back to strings later, but for now let’s start with the most simple piece of informa-tion that Python can work with: numbers. Python is so good at working with numbers that you can use it almost like a calculator. To see it in action, type the following into Python (you don’t need to type the prompt, since Python displays it for you):
>>> 2+2
and / for divide. These symbols are known as operators. You will probably use +, –, *, and / the
In the real world there is only one kind of number, but computers—and consequently Python—have several ways of representing numbers. The two most commonly used types of number are the integer and the float. Integers are whole numbers with no decimal point, whereas floats do have a decimal point and can store fractional values. Often it is obvious which one you should use—for instance, if your game has the concept of lives, you would use an integer to store them because you are not likely to have half a life or 3.673 lives. Float values are more often used for real-world values that need precision—for example, in a racing game your car may have a speed of 92.4302 miles per hour, which you would store in a float.
So far the numbers you have entered have been integers. To tell Python a number is a float, simply include a decimal point. For example, 5 and 10 are integers, but 5. and 10.0 are floats. Something to watch out for is that if you do math with integers, the result is always an integer and the fractional part is discarded. To see this in action, type the following:
>> 3/2 1
Relax, Python has not gone crazy—it does understand numbers. The reason you get the result 1 and not 1.5 is because 3 and 2 are integers and the result is also an integer, so Python discards the fractional part of the result. To get the result you would expect, simply make one or both of the numbers a float:
>>> 3./2
In addition to the basic math there are a number of other things you can do with numbers. Parentheses are used to ensure that something is calculated first; here is an example:
>>> 3./2.+1. 2.5
The first line calculates 3 divided by 2 first and then adds 1, giving the result 2.5. The second line calculates 2 plus 1 first, and so the result works out as 3 divided by 3, which is 1.
Another operator at your disposal is the power operator, which raises a value to a power. For instance, 2 to the power of 3 is the same as 2*2*2. The power operator is ** and works on integers and floats. Here are two examples of the power operator in action:
>>> 2**3 8
>>> 3.**4 81.0
This would be an opportune time to introduce you to longs, which is another type of num-ber Python knows about. Because of the way integers are stored, they have a maximum value and a minimum value. The value varies depending on the computer you are using, but my computer can store integers in the range –2,147,483,648 to 2,147,483,647—which is a little over 4 thousand million possible values!
So integers have a very large range, and you may not even need to store any numbers larger than the maximum or smaller than the minimum, but if you do, Python will automatically replace them with long numbers. A long can store numbers of any size, as long as they can fit in memory! This may not sound like much, but most languages make long numbers very difficult to use. You can recognize long numbers by the L at the end; for example, 8589934592L is a long. Let’s create a long by calculating 2 to the power of 100, which is 2*2*2*2…*2 repeated 100 times.
>>> 2**100
1267650600228229401496703205376L
Now that is a big number! If you are feeling brave, try calculating 2**1000 or even 2**10000 and watch your screen fill up with massive numbers.
Let’s introduce you to one more operator before the next section. The modulus (%) opera-tor calculates the remainder of a division. For example, 15 modulus 6 is 3, because 6 goes into 15 two times with 3 left over. Let’s ask Python to do this for us:
>>> 15%6 3
With this handful of operators, you now have the ability to calculate anything that can be calculated, whether it is a 15 percent tip on two plates of fugu-sashi or the damage done by an orc hitting armor with a +1 axe.
I don’t know much about orcs, but let’s calculate that tip on two plates of fugu-sashi (raw blowfish, a delicacy in Japan that I hope to try one day). Fugu is quite expensive, anything up to $200, because if it isn’t prepared by specially trained chefs, eating it can be fatal! Let’s say we find a restaurant in Tokyo that serves a tempting plate of fugu for $100. We can use Python to calculate the tip for us:
This calculates 15 percent of the price of two $100 plates—a $30 tip. Good enough for this res-taurant but the numbers will change depending on where we buy our fugu and the quality of the service. We can make this clearer and more flexible by using variables. A variable is a label for a value, and when you create a variable you can use it in place of the number itself. In our tip calculation we could have three variables: the price of the fugu, the number of plates, and the tip percentage. To create a variable, type its name followed by an equal sign (=), then the value you want to give it:
>>> price = 100. >>> plates = 2. >>> tip = 15.
■
Caution
Python variables are case sensitive, which means that if the variable names are capitalized dif-ferently, Python will treat them as being completely unique—which means Apples, APPLES, and ApPlEs are treated as three different variables.We can now use these three variables in place of numbers. Let’s calculate our tip again:
>>> (price*plates)*(tip/100.) 30.0
This calculates the same value, but now it is a little clearer because we can tell at a glance what the numbers represent. It’s also a lot more flexible, because we can change the variables and redo the calculation. Let’s say we have fugu for breakfast the following morning, but at a cheaper restaurant ($75 a plate), where the service is not quite as good and only worth a 5 per-cent tip:
>>> price = 75. >>> tip = 5.
>>> (price*plates)*(tip/100.) 7.5
That’s a $7.50 tip because the waiter was slow to bring the sake, and I hate to wait for my sake.
Strings
Another piece of information that Python can store is the string. A string is a collection of charac-ters (a character is a letter, number, symbol, etc.) and can be used to store literally any kind of information. A string could contain an image, a sound file, or even a video, but the most common use for strings is to store text. To enter a string in Python, enclose it in either single quotes (') or double quotes ("). Here are two strings; both contain exactly the same information:
So why have more than one way of creating a string? Good question; let’s say we want to store the sentence I said "hocus pocus" to the wizard in a string. If we put the entire sen-tence in a string with double quotes, Python has no way of knowing that you want to end the string after the word wizard, and will assume that the string ends at the space after said. Let’s try it and see what happens:
>>> print "I said "hocus pocus" to the wizard." Traceback ( File "<interactive input>", line 1 print "I said "hocus pocus" to the wizard." ^
SyntaxError: invalid syntax
Python has thrown an exception. More about exceptions later in the book, but for now if you see an exception like this Python is telling you that something is wrong with the code you entered. We can get around the problem of including quotes in strings by using the alternative quote symbol. Let’s try the same sentence, but with single quotes (') this time:
>>> print 'I said "hocus pocus" to the wizard.' I said "hocus pocus" to the wizard.
Python is quite happy with this, and does not throw an exception this time. This is probably the easiest way around the quote problem, but there are alternatives. If you type a backslash char-acter (\) before a quote, it tells Python that you don’t want to end the string here—you just want to include the quote symbol in the string. Here is an example:
>>> print "I said \"hocus pocus\" to the wizard." I said "hocus pocus" to the wizard.
This solves the problem in a different way, but the result is the same. At the risk of burdening you with too much information, there is one more way of defining strings: if you begin a string with triple single (''') or triple double quotes ("""), Python knows not to end the string until it reaches another set of the same type of triple quotes. This is useful because text rarely contains three quotes in row. Here’s our wizard string again using triple quotes:
>>> print """I said "hocus pocus" to the wizard.""" I said "hocus pocus" to the wizard.
Concatenating Strings
So now you have several ways of creating strings, but what can you do with them? Just like numbers, strings have operators that can be used to create new strings. If you add two strings together, you get a new string containing the first string with the second string appended to the end. You can add strings with the + operator just like you do with numbers; let’s try it:
Python has added two strings together and displayed the result. Adding strings together like this is called string concatenation. You can concatenate any two strings together, but you can’t concatenate a string with a number. Let’s try it anyway to see what happens:
>>> "high "+5
Traceback (most recent call last):
File "<interactive input>", line 1, in ?
TypeError: cannot concatenate 'str' and 'int' objects
Here we have tried to produce the string 'high 5' by adding the number 5 to a string. This doesn’t make sense to Python, and it lets you know by throwing another exception. If you do want to add a number to a string, you have to first convert the number to a string. You can eas-ily create strings from numbers by constructing a new string from that number. Here’s how you would create our high 5 string.
>>> "high "+str(5) 'high 5'
This works because str(5) constructs a string from the number 5, which Python will happily concatenate with another string.
You can also use the multiply (*) operator with strings, but you can only multiply strings by integers. Take a guess at what the following line of Python code will do:
>>> 'eek! '*10
You can see that Python can be quite intuitive; if you multiply a string by 10 it will repeat it 10 times. Strings do not support all mathematical operators such as / and –, because it’s not intuitive what they would do. What could "apples"–"oranges" possibly mean?
Parsing Strings
Since a string can be thought of as a collection of characters, it is often useful to be able to refer to parts of it rather than as a whole. Python does this with the index operator, which consists of square brackets [], containing the offset of the character. The first character is [0], the second is [1], the third is [2], and so forth. Starting at 0 rather than 1 may seem a little odd, but it is a tradition among computer languages, and you will find it actually simplifies things when you write more Python code. Let’s see string indexing in action. First we will create a variable con-taining a string, which we do just like numbers:
>>> my_string = 'fugu-sashi' >>> print my_string
'fugu-sashi'
Normally you would give strings a better name, but for this little example we will just call it
Python does not allow spaces in variable names). We can pick out individual letters from the string with the index operator:
>>> my_string[0] 'f'
>>> my_string[3] 'u'
my_string[0] gives you a string with the first character in fugu-sashi, which is f. The sec-ond line gives you the fourth character, since the first character is offset 0 and not 1. Try to think of the offset not as the number of the character itself, but as the spaces between characters (see Figure 1-1); this will make the indexing a little more intuitive.
Figure 1-1. String indexing
Let’s say we want to find the last character in a string. You can see from Figure 1-1 that the last character is “i” at offset 9, but what if we don’t know the string ahead of time? We could have extracted the string from a file, or the player may have typed it in a high score table. To find the last offset, we first need to find the length of the string, which we can do with the len function. Think of a function as stored Python code; you pass the function some information, which it uses to carry out an action and then return, possibly with new information. This is exactly what len does; we give it a string and it returns the length of that string. Let’s try the len
function on my_string:
>>> len(my_string) 10
There are 10 characters in my_string, but we can’t use 10 as an offset because it is right at the end of the string. To get the end character, we need the offset before 10, which is simply 9, so we subtract 1. Here’s how to use len to find the last character in a string:
>>> my_string[len(my_string)-1] 'i'
Figure 1-2. Negative indexing
We can now find the last character with a little less code:
>>> my_string[-1] 'i'
Slicing Strings
In addition to extracting individual characters in a string, you can pick out groups of characters by slicing strings. Slicing works a lot like indexing, but you use two offsets separated by a colon (:) character. The first offset is where Python should start slicing from; the second offset is where it should stop slicing. Again, think of the offsets as the spaces between the characters, not as the characters themselves.
>>> my_string[2:4] 'gu'
>>> my_string[5:10] 'sashi'
The first line tells Python to slice between offset 2 and 4. You can see from the diagram that there are two characters between these offsets: g and u. Python returns them as a single string,
'gu'. The second line slices the string between offsets 5 and 10 and returns the string 'sashi'. If you leave out the first offset, Python uses the start of the string; if you leave out the second, it uses the end of the string.
>>> my_string[:4] 'fugu'
>>> my_string[5:] 'sashi'
Slicing can take one more value that is used as the step value. If the step value is 1 or you don’t supply it, Python will simply return the slice between the first two offsets. If you slice with a step value of 2, then a string with every second character of the original will be returned. A step of 3 will return every third character, and so on. Here are some examples of this kind of slicing:
>>> my_string[::2] 'fg-ah'
The first line slices from the beginning to the end of the string (because the first two offsets are omitted), but since the step value is 2, it takes every second character. The second line starts from offset 1 (at u) and slices to the end, taking every third character. The step value in a slice can also be negative, which has an interesting effect. When Python sees a negative step, it reverses the order of the slicing so that it goes down from the second offset to the first. You can use this feature to easily reverse a string:
>>> my_string[::-1] 'ihsas-uguf' >>> my_string[::-2] 'issuu'
The first line simply returns a string with the characters in reverse order. Because the step value is negative, it goes from the end of the string to the beginning.
String Methods
Along with these operators, strings have a number of methods, which are functions contained within Python objects and that carry out some action on them. Python strings contain a num-ber of useful methods to help you work with strings. Here are a just few of them, applied to our fugu string:
>>> my_string.upper() 'FUGU-SASHI'
>>> my_string.capitalize() 'Fugu-sashi'
>>> my_string.title() 'Fugu-Sashi'
Here we are applying various methods to a string. Each one returns a new string modified in some way. We can see that upper returns a string with all letters converted to uppercase,
capitalize returns a new string with the first character converted to a capital, and title
returns a new string with the first character of each word converted to a capital. These methods don’t require any other information, but the parentheses are still necessary to tell Python to call the function.
Lists and Tuples
Like most languages, Python has ways of storing groups of objects, which is fortunate because a game with only one alien, one bullet, or one weapon would be quite dull! Python objects that store other objects are known as collections, and one of the simplest and most often used col-lection is the list. Let’s start by creating an empty list:
>>> my_list=[]
The square brackets create an empty list, which is then assigned to the variable my_list. To add something to a list you can use the append method, which tacks any Python object you give it onto the end. Let’s pretend our list is going to hold our shopping for the week, and add a cou-ple of items:
>>> my_list.append('chopsticks') >>> my_list.append('soy sauce')
Here we have added two strings to my_list, but we could just as easily have added any other of Python’s objects, including other lists. If you now type my_list at the Python prompt, it will display the contents of it for you:
>>> my_list
['chopsticks', 'soy sauce']
Here we can see that the two strings are now stored inside the list. We cannot live on chop-sticks and soy sauce alone, so let’s add a few more items to our shopping list:
>>> my_list.append('wasabi') >>> my_list.append('fugu') >>> my_list.append('sake') >>> my_list.append('apple pie') >>> my_list
['chopsticks', 'soy sauce', 'wasabi', 'fugu', 'sake', 'apple pie']
Modifying List Items
Python lists are mutable, which means you can change them after they have been created. So as well as retrieving the contents of a list with the index operator, you can change the item at any index by assigning a new item to it. Let’s say we specifically want to get dark soy sauce; we can change the second item by assigning it a new value with the assignment operator (=):
>>> my_list[1]='dark soy sauce' >>> my_list
Removing List Items
Along with changing items in a list, you can remove items from it. Let’s say we want to remove
apple pie because it just doesn’t seem to fit with the rest of our shopping list. We can do this with the del operator, which will remove any item from our list—in this case, it is the last item, so we will use negative indexing:
>>> del my_list[-1] >>> my_list
['chopsticks', 'dark soy sauce', 'wasabi', 'fugu', 'sake']
Lists support a number of operators that work in a similar way to strings. Let’s look at slic-ing and indexslic-ing, which you should find very familiar:
>>> my_list[2] 'wasabi' >>> my_list[-1] 'sake'
The first line returns the string at offset 2, which is the third slot in our shopping list. Just like strings, the first item in a list is always 0. The second line uses negative indexing, and just like strings [-1] returns the last item.
Slicing lists works similar to slicing strings, with the exception that they return a new list rather than a string. Let’s slice our shopping list into two portions:
>>> my_list[:2]
['chopsticks', 'dark soy sauce'] >>> my_list[2:]
['wasabi', 'fugu', 'sake'] >>>
In the first slice we have asked Python to give us all the items from the beginning of the list to offset 2; in the second slice we have asked for everything from offset 2 to the end of the list. List offsets work just like string offsets, so try to think of them as the spaces between objects in the list and not the objects themselves. Therefore, offset 0 is before the first item and offset 1 is after the first item and before the second.
You can also add lists together with the + operator. When you add lists together, it creates a single list containing the items from both lists. Let’s create a new list and add it to our shop-ping list:
>>> my_list2 = ['ramen', 'shiitake mushrooms'] >>> my_list += my_list2
>>> my_list
['chopsticks', 'dark soy sauce', 'wasabi', 'fugu', 'sake', 'ramen', ➥
'shiitake mushrooms']
uses the += operator, which is useful shorthand: my_list+=my_list2 is the same as
my_list=my_list+my_list2, which has the effect of adding the two lists together and storing the result back in my_list.
List Methods
Along with these operators, lists support a number of methods. Let’s use the sort method to sort our shopping list into alphabetical order:
>>> my_list.sort() >>> my_list
['chopsticks', 'dark soy sauce', 'fugu', 'ramen', 'sake', ➥
'shiitake mushrooms', 'wasabi']
The sort method sorts the contents of the list. The order depends on the contents of the list, but for a list of strings the sort is in alphabetical order.
You will notice that Python doesn’t print anything after the call to sort; this is because the
sort does not return a sorted list but just sorts the list it was called on. The second line is nec-essary to ask Python to display the contents of our list.
Let’s say we are going shopping and we want to take an item off the list and go looking for it in the supermarket. We can do this with the pop method, which removes an item from the list and returns it:
>>> my_list.pop(0) 'chopsticks'
We have asked my_list to “pop” the item at offset 0, which is chopsticks. If we now display the contents of the shopping list, we should see that the first item has indeed been removed:
>>> my_list
['fugu', 'ramen', 'sake', 'shiitake mushrooms', 'soy sauce', 'wasabi']
There are more list methods than we have covered here; see Table 1-1 for more.
Table 1-1. Methods in Pythons Lists
Method Description
append Appends items to the list
count Counts the number of times an item occurs in a list
extend Adds items from another collection
index Finds the offset of a string
insert Inserts an item into the list
pop Removes an item at an offset from the list and returns it
remove Removes a particular item from a list
reverse Reverses the list
Tuples
Another collection we are going to introduce in this section is the tuple. Tuples are similar to lists with the exception that they are immutable; that is, like strings, once they have been cre-ated the contents cannot be changed. Tuples are generally used in preference to lists when the information they contain is tied together in some way—for example, a tuple could represent a phone number and area code because both parts are required to dial. They are created in a similar way to lists, but use parentheses, (), rather than square brackets. Let’s create a tuple that stores the phone number of our favorite sushi takeaway:
>>> my_tuple=('555', 'EATFUGU') >>> my_tuple
('555', 'EATFUGU')
Here we have created a tuple with two strings containing the area code and number of our fugu takeaway. To prove a tuple is immutable, let’s try appending an item to it:
>>> my_tuple.append('ramen') Traceback (most recent call last):
File "<interactive input>", line 1, in ?
AttributeError: 'tuple' object has no attribute 'append'
Python has thrown an AttributeError exception, letting you know that tuples do not support
append. You will get similar results if you try to do anything that modifies the tuple. Tuples do support all the indexing and slicing operators, however, because these operators don’t modify the tuple.
>>> my_tuple[0] '555'
>>> my_tuple[1] 'EATFUGU'
Unpacking
Since tuples are often used to pass around group values, Python gives you a simple way of extracting them called unpacking. Let’s unpack our tuple into two variables: one for the area code and one for the number.
>>> my_tuple=('555', 'EATFUGU') >>> area_code, number = my_tuple >>> area_code
'555' >>> number 'EATFUGU'
list equivalent, which is ['555', 'EATFUGU']. You can also do the reverse and create a tuple by calling tuple on a list— for example, tuple(['555', 'EATFUGU']) returns our original tuple.
You will learn the best places to use tuples over lists in the following chapters; for now use the rule of thumb that you should use a tuple if you never need to modify the contents.
■
Note
Creating a tuple with one or zero items is a little different from lists. This is because Python also uses parentheses to define the priority in mathlike expressions. To define a tuple with just one item, add a comma after the item; to define an empty tuple, just include the comma by itself in parentheses. For example,('ramen',) is a tuple with one item, and (,) is an empty tuple.
Dictionaries
The final collection type we are going to look at is the dictionary. The previous collections we looked at have all been sequence collections, because the values are in a sequence from first to last and you access them by their position within the list. Dictionaries are mapping collections because they map one piece of information to another. We could use a dictionary to store the prices of our shopping list by mapping the name of the food item to its price. Let’s say that fugu costs $100 and ramen costs $5; we can create a dictionary that holds this information as follows:
>>> my_dictionary={'ramen': 5.0, 'fugu': 100.0}
The curly braces create a dictionary. Inside the braces we have the string 'ramen' followed by a colon, then the number 5.0 (price in dollars). This tells Python that the string maps to the number; in other words, we can look up the price if we have the name of the food item. Multi-ple items in a dictionary are separated with a comma; in this examMulti-ple we have a second item that maps 'fugu' to the value 100.0.
To retrieve that information, we use the square brackets ([]) operator again, passing in the key we want to search for (in this case the key is either fugu or ramen). The dictionary returns thevalue associated with the key—the price of the item. Let’s look up our two keys:
>>> my_dictionary['fugu'] 100.0
>>> my_dictionary['ramen'] 5.0
You can also add new items to the dictionary by assigning new values to it:
>>> my_dictionary['chopsticks']=7.50 >>> my_dictionary['sake']=19.95 >>> my_dictionary
{'sake': 19.0, 'ramen': 5.0, 'chopsticks': 7.5, 'fugu': 100.0}
and what you see displayed is in no particular order. The important thing is that Python remembers what key maps to what value—which it does very well!
Loops
A loop is a way of running through a piece of code more than once. Loops are pretty fundamen-tal in programming languages, and you will find that almost every line of code you write in a game is inside some kind of loop. Like many other programming languages, Python has two types of loop to handle all your looping needs: the while loop and the for loop.
While Loops
A while loop is used when you repeat a piece of code only when a condition is true. Let’s use a simple while loop to display the numbers from 1 to 5. We’ll start by entering the following lines in the interpreter:
>>> count=1
>>> while count<=5: ...
When you hit Enter after the second line, you will notice that instead of the usual Python prompt you now see three periods (...). This is because the colon at the end of the line indi-cates that there is more code to follow. In the case of a while loop, it is the code that we want to be repeated.
All languages need some way to mark the beginning and end of code blocks. Some use sym-bols like curly braces ({ }), and others use words like do and end. Python does things slightly differently and uses indentation to define blocks. To tell Python that a line of code is part of the block and not the rest of the code, insert a tab before the line (by pressing the Tab key):
... print count ... count+=1
■
Note
On some systems you may find that a tab is automatically inserted on the first line of a block. This can be convenient if there is a lot of code in a block. Delete the tab and press Enter as normal to end the block.Even-Table 1-2. Comparison Operators
■
Caution
Be careful with your loops! If you use a condition that is always true, such as 2>1, Python will keep going round the loop forever. If you do end up in this pickle, hit Ctrl+Z (Ctrl+C for Linux and Mac OS X) to stop Python in its tracks. Every programmer has been stuck in an infinite loop at least once!For Loops
While loops have their uses and it is important you know how to use them, but often the for loop is a better choice. A for loop runs through an iterable Python object, giving you a new value until there are no more items remaining. You have met iterables before: lists, tuples, dic-tionaries, and even strings are all iterable objects. Let’s rewrite the while loop example as a for loop:
>>> for count in range(1,6): ... print count
Here we are iterating over the result of the range function, which creates a list of values from the first parameter up to—but not including—the second parameter. The interpreter can tell us exactly what the call to range produces:
>>> range(1,6) [1, 2, 3, 4, 5]
As you can see, the call to range has created a list containing the numbers 1 through 5, which is exactly what we want to display inside our loop. When Python first goes through the for loop, it picks the first value from the list and assigns it to the variable count; it then runs the code in the loop, which simply prints the current value of count to the screen. The loop finishes after five passes, when it reaches the end of the list.
■
Tip
You can use the range method like this, but a better choice is probably xrange, which works identi-cally to range but doesn’t create the entire list in memory. This is important if you want to use a for loop to iterate over very large ranges.Operator Description
< Less than
<= Less than or equal to
> Greater than
>= Greater than or equal to
== Equal to
Python in Practice
Before we move on to the next chapter, let’s put what we have learned to some practical use. Mental arithmetic has never been one of my strong points, so I’d like to write a small piece of Python code to run through our shopping list and find the total price. We’ll start by creating a list containing our groceries for the week and a dictionary that maps the name of each item on to its price:
>>> shopping=['fugu', 'ramen', 'sake', 'shiitake mushrooms', 'soy sauce', 'wasabi'] >>> prices={'fugu':100.0, 'ramen':5.0, 'sake':45.0, 'shiitake mushrooms':3.5,➥
'soy sauce':7.50, 'wasabi':10.0} >>> total=0.00
OK, great. We now have two Python collections that store all the information regarding our groceries, and a variable to store the total. What we need to do now is loop through shopping, look up each price in prices, and add it to total:
>>> for item in shopping: ... total+= prices[item] >>> total
171.0
That’s all it takes! The variable total now holds the sum of every item in our shopping list, and we can see the grand total is a very reasonable $171. Don’t worry, the sample code in the following chapters will be much more entertaining than a grocery list!
Summary
We have explored some of the basic Python constructs in this first chapter, most of which you will use regularly when writing new code. You can think of what you have learned so far as the most basic tools of the trade when it comes to writing games and other Python programs. The data (numbers and strings) and collections (tuples, list, and dictionaries) are particularly fun-damental because you can store every aspect of a game within them.
■ ■ ■
Exploring Python
I
n the previous chapter we entered our Python code a line at a time, but now we are going to put the interactive interpreter to the side and start creating Python files. In this chapter we will cover more of the building blocks of Python code, and show you how to use classes to help with creating games. We will also explain how to use the code libraries that come with all installa-tions of Python.Creating Scripts
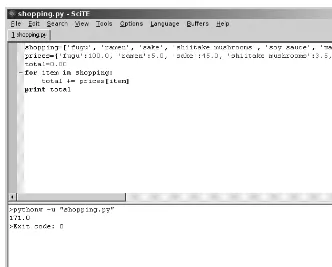
A file containing Python code is called a script. All you need to create scripts is a simple text edi-tor, but it’s best to use a Python-aware editor such as SciTE(see Figure 2-1) or IDLE (which comes with the standard distribution of Python).
Just save your script with a .py extension, so that your operating system knows that it con-tains Python. To run a script, you typically just double-click it, or if you prefer the command line, type python followed by a space and the name of your script. Most Python editors will have a shortcut key to run the script you have been editing.
Figure 2-1. Editing Python code with SciTE (www.scintilla.org/SciTE.html)
Working with Logic
Not just for green-blooded Vulcans, logic is an important part of any software—and that includes games. Any game needs to make decisions based on information it either has been given or has calculated. If a laser blast hits the player’s hover tank, the game has to decide if enough damage has been done to destroy it—and display an explosion animation if it has. This is just an example of a whole host of decisions a computer game has to make in order to con-vince us that it is more than just a dumb machine. So please put on your Spock ears and we will cover logic.
Understanding Booleans
The logic that computers use is boolean logic, so called because it was invented by George Boole way back in the 1800s—a few years before PlayStation hit the street.
You have already seen logic used in the previous chapter as part of a while loop; count<=5
causes Python to skip past the code block. (See Listing 2-1 for a few examples of logical expres-sions.) The important thing to remember with boolean logic is that there are no in-between values: you can’t have 25 percent true and 75 percent false—it’s always one or the other!
Listing 2-1. Simple Logic
score = 100 health = 60 damage = 50 fugu = "tasty" print score != 100 print health - damage > 0 print fugu == "tasty"
Running this simple script produces the following output:
False True True
Boolean values can be treated just like any other Python type, so you could have a variable that refers to a boolean. For example, if we were to add the line is_fugu_tasty = (fugu == "tasty"), then is_fugu_tasty would refer to the value True.
If Statement
Logical expressions come into their own when using if statements. You use if statements to run code only when a condition is true. If the condition is false, then Python jumps past the end of your code block. Here is a simple example of the if statement:
if fugu == "tasty": print "Eat the fugu!"
The condition uses the comparison operator (==) to compare a variable with a string. Assuming we are using the value of fugu from Listing 2-1, this comparison will result in True, which gives Python the green light to run the indented code block.
And Operator
Often you have several conditions you want to check for. Let’s say we want to eat fugu if it is tasty and under $100 a plate. We can combine these two conditions with the and operator:
price = 50.0
Here we will only eat the fugu if fugu is set to "tasty"and the price has a value less than
100.0. Table 2-1 lists how the and operator combines values, but I hope it is self-explanatory. You can find this operator at work in real life; for example, my car will start only if the battery is not dead and I have gas.
Table 2-1. Truth Table for the And Operator
Or Operator
To complement the and operator, we have the or operator, which results in True if either the first or second value is True. Let’s say we want to eat fugu if it is tasty or it is very cheap (after all, who can turn down cheap fugu?):
if fugu == "tasty" or price < 20.0: print "Eat the fugu!"
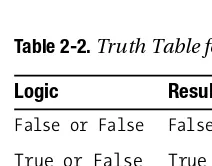
Just like the and operator, the or operator has plenty of applications in real life. My car will stop if I run out of gas or the battery goes dead. See Table 2-2 for the or truth table.
Table 2-2. Truth Table for the Or Operator
Not Operator
The final logic operator we will look at is the not operator, which swaps the state of a boolean value, so True becomes False and False becomes True (see Table 2-3). You can use this to reverse any condition:
if not (fugu == "tasty" and price < 100.0): print "Don't eat the fugu!"
Logic Result
False and False False
True and False False
False and True False
True and True True
Logic Result
False or False False
True or False True
False or True True
Table 2-3. Truth Table for the Not Operator
Else Statement
You may have noticed that the previous snippet is the opposite of our first fugu logic statement. We have an action that occurs when a condition is true and another that runs when that same condition is not true. This is such a common situation that Python has a way of tacking on the alternative action to an if statement. The else statement follows an if statement and intro-duces a new code block that will run only if the condition is false. Let’s see an example of how
else is used:
if fugu == "tasty": print "Eat the fugu!" else:
print "Don't eat the fugu!"
When Python runs this code, it will run the first print statement if the condition is true; else it will run the second condition.
Elif Statement
Often another if statement will follow an else statement. Python combines an else followed by an if into a single statement: the elif statement. Let’s say we want to classify the fugu into three categories based on the price. For sake of argument, we will classify $20–$100 as reason-ably priced fugu, anything above that range as expensive fugu, and anything below that as cheap fugu. Python can do this for us using elif:
if price < 20:
print "Cheap fugu!" elif price < 100:
print "Reasonably priced fugu." else:
print "Expensive fugu!"
Here we have three code blocks, but only one of them runs. If price is less than 20, then the first block will run; if price is less than 100, then the second block will run; and any other value of price will cause the third block to run. You can have as many elif statements as you want after an if, but if you have an else statement it must come at the end.
Understanding Functions
A function is a stored piece of Python code that you can pass information to and potentially get information back from. Python provides a large number of useful functions (see Table 2-4 for
Logic Result
not True False
Table 2-4. Some Built-in Python Functions
Defining Functions
To define a function in Python, you use the def statement followed by the name you want to give to your function. You can use any name you want, but it is a good idea to give it a name that describes what it actually does! Function names are typically in lowercase and may use underscores to divide words. Listing 2-2 is a simple Python function for calculating the tip on a meal of fugu.
Listing 2-2. Calculating the Tip on Fugu
def fugu_tip(price, num_plates, tip): total = price * num_plates tip = total * (tip / 100.) return tip
print fugu_tip(100.0, 2, 15.0) print fugu_tip(50.0, 1, 5.0)
This script produces the following output:
30.0 2.5
When Python first encounters a def statement, it knows to expect a function definition, which consists of the name of the function followed by a list of parameters in parentheses. Just as with for, while, and if statements, a colon is used to introduce a block of code (known as the function body). In the aforementioned statements, the block of code doesn’t run
immedi-Function Description Example
abs Finds the absolute value of a number abs(-3) help Displays usage information for any Python object help([]) len Returns the length of a string or collection len("hello") max Returns the largest value max(3, 5) min Returns the smallest value min(3, 4) range Returns a list containing a range of numbers range(1,6) round Rounds a float to a given precision round(10.2756, 2)