▸ Baca selengkapnya: download 123dok free
(2)jQuery HotsH t
Ten practical projects that exercise your skill, build your
confidence, and help you master jQuery
Dan Wellman
Copyright © 2013 Packt Publishing
All rights reserved. No part of this book may be reproduced, stored in a retrieval system, or transmitted in any form or by any means, without the prior written permission of the publisher, except in the case of brief quotations embedded in critical articles or reviews. Every effort has been made in the preparation of this book to ensure the accuracy of the information presented. However, the information contained in this book is sold without warranty, either express or implied. Neither the author, nor Packt Publishing, and its dealers and distributors will be held liable for any damages caused or alleged to be caused directly or indirectly by this book.
Packt Publishing has endeavored to provide trademark information about all of the companies and products mentioned in this book by the appropriate use of capitals. However, Packt Publishing cannot guarantee the accuracy of this information.
First published: March 2013
Production Reference: 1150313
Published by Packt Publishing Ltd. Livery Place
35 Livery Street
Birmingham B3 2PB, UK. ISBN 978-1-84951-910-6
www.packtpub.com
Credits
Author Dan Wellman
Reviewers Kaiser Ahmed Carlos Estebes Olivier Pons Hajan Selmani
Christopher Stephen Sidell
Acquisition Editor Robin de Jongh
Lead Technical Editor Sweny M. Sukumaran
Technical Editor Veronica Fernandes
Project Coordinator Anurag Banerjee
Proofreader Aaron Nash
Indexer Tejal R. Soni
Production Coordinator Arvindkumar Gupta
Cover Work
Foreword
I am very honored to have the opportunity to write the foreword for a Dan Wellman book. I've been a fan of Dan's since I first read his jQuery UI book. Then I got the opportunity to meet him in Oxford, England in February of 2012. Needless to say when he asked me to write the foreword for his latest book I didn't even think about how I wouldn't have the time to fit it in until the very last minute, but I immediately said yes.
Unlike other traditional jQuery books that dwell on how a jQuery statement is structured and functions, Dan assumes that you are already familiar with jQuery. What he is going to teach you is how to use jQuery for fun. He will walk you through a series of fun projects. Most of these projects will be very useful in your personal and professional websites. The projects include building a jQuery Mobile application, interactive Google Maps, Chrome Extensions, and Infinite Scrolling to name a few.
jQuery has been making web development easier since January 2006 when John Resig debuted jQuery at a New York City Barcamp with two other projects that day. Seven years later it's great to see that you can still learn to accomplish fun things with a library as simple yet as vast as jQuery.
I look forward to reading Dan's next book as I am sure this won't be his last. At least I hope not.
Ralph Whitbeck
About the Author
Dan Wellman
is an author and front-end engineer who lives on the South Coast of the UK and works in London. By day he works for Skype, writing application-grade JavaScript, and by night he writes books and tutorials focused mainly on front-end development. He is also a staff writer for the Tuts+ arm of the Envato network, and occasionally writes for .Net magazine. He's a proud father of four amazing children, and the grateful husband of a wonderful wife. This will be his seventh book.About the Reviewers
Kaiser Ahmed
is a professional web developer. He has gained his B.Sc. from Khulna University of Engineering and Technology (KUET) and M.Sc. in Computer Science and Engineering from United International University, Dhaka. He is also a co-founder of CyberXpress.Net Inc (www.cyberxpress.net), based in Bangladesh.He has been working as Sr. Software Developer at Krembo Interactive and D1SH.COM CORP., Canada, for 2 years.
He has a wide range of technical skills, Internet knowledge, and experience across a spectrum of online development in the service of building and improving online properties for multiple clients. He enjoys creating site architecture and infrastructure, backend development using open source toolset (PHP, MySQL, Apache, Linux and others, that is LAMP), and frontend development with CSS and HTML/XHTML.
I want to thank my loving wife, Maria Akther, for her great support.
Carlos Estebes
is the founder of Ehxioz (http://ehxioz.com/), a Los Angeles-based software development startup that specializes in developing modern web applications and utilizing the latest web development technologies and methodologies. He has over 10 years of web development experience and holds a B.Sc. in Computer Science from California State University, Los Angeles.University of Sciences (IUT) of Aix-en-Provence, France and Ecole d'Ingénieurs des Mines de Gardanne, where he teaches PHP, jQuery, jQuery Mobile, C++, Java fundamentals, advanced VIM techniques, and Eclipse environment. He has already done some technical reviews, including one for Ext JS 4 First Look, Packt Publishing. In 2011, he left a full time job as a Delphi and PHP developer to concentrate on his own company, HQF Development (http://hqf.fr). He currently runs a number of websites, including http://www.livrepizzas.fr,
http://www.papdevis.fr, and http://olivierpons.fr, his own web development blog. He works as a consultant, project manager, and sometimes as a developer.
Hajan Selmani
is a Microsoft MVP in ASP.NET/IIS, a Microsoft Certified Trainer (MCT), and a Microsoft Certified Professional (MCP) with deep knowledge and experience in web development technologies. He works as a coordinator of CodeCademy at Seavus Education and Development Center, software development consultant, technology advisor in a few startups, and also focuses on research and innovation using cutting-edge tools and technologies. He is a regular speaker at code camps, Microsoft conferences, and local user group meetings and events where he actively promotes the latest modern web standards and development practices. He is a board member of MKDOT.NET and leader of MK Web User Group. He holds a Master's degree in Computer Science, Intelligent Systems. He has also reviewed the books ASP.NET jQuery Cookbook, Packt Publishing and Entity Framework 4.1: Expert's Cookbook, Packt Publishing.Christopher Stephen Sidell
is a college student attending UMBC. He has been doing freelance web development work for people for the past few years, starting with HTML and CSS in 2005, JavaScript in 2007, and later adding PHP into the mix in 2008. Since then he has been working with others to create portfolio sites and made projects. He is self-employed and a full-time student at UMBC.www.PacktPub.com
Support files, eBooks, discount offers and more
You might want to visit www.PacktPub.com for support files and downloads related to your book.
Did you know that Packt offers eBook versions of every book published, with PDF and ePub files available? You can upgrade to the eBook version at www.PacktPub.com and as a print book customer, you are entitled to a discount on the eBook copy. Get in touch with us at [email protected] for more details.
At www.PacktPub.com, you can also read a collection of free technical articles, sign up for a range of free newsletters and receive exclusive discounts and offers on Packt books and eBooks.
http://PacktLib.PacktPub.com
Do you need instant solutions to your IT questions? PacktLib is Packt's online digital book library. Here, you can access, read and search across Packt's entire library of books.
Why subscribe?
f Fully searchable across every book published by Packt
f Copy and paste, print and bookmark content
f On demand and accessible via web browser
Free Access for Packt account holders
Table of Contents
Preface 1
Project One: Sliding Puzzle
9
Mission Briefing 9
Laying down the underlying HTML 12 Creating a code wrapper and defining variables 15 Splitting an image into pieces 18 Shuffling the puzzle pieces 20 Making the puzzle pieces draggable 26 Starting and stopping the timer 31 Determining if the puzzle has been solved 34 Remembering best times and adding some final styling 35 Mission Accomplished 38 You Ready To Go Gung HO? A Hotshot Challenge 39
Project Two: A Fixed Position Sidebar with Animated Scrolling
41
Mission Briefing 41
Project Three: An Interactive Google Map
57
Mission Briefing 57
Creating the page and interface 60 Initializing the map 61 Showing the company HQ with a custom overlay 64 Capturing clicks on the map 67 Updating the UI with the start and end locations 70 Handling marker repositions 72 Factoring in weights 74 Displaying the projected distance and cost 76 Mission Accomplished 81 You Ready To Go Gung HO? A Hotshot Challenge 81
Project Four: A jQuery Mobile Single-page App
83
Mission Briefing 83
Building the welcome page 86 Adding a second page 89 Creating the script wrapper 92 Getting some bounties 96 Adding a JsRender template 98 Building the list view 100 Building an item view 108
Handling paging 115
Mission Accomplished 116 You Ready To Go Gung HO? A Hotshot Challenge 116
Project Five: jQuery File Uploader
117
Mission Briefing 117
Table of Contents
Project Six: Extending Chrome with jQuery
147
Mission Briefing 147
Setting up the basic extension structure 149 Adding a manifest and installing the extension 152 Adding a sandboxed JsRender template 154 Posting a message to the sandbox 158 Adding a content script 160 Scraping the page for microdata 162 Adding a mechanism for saving the microdata 165 Mission Accomplished 171 You Ready To Go Gung HO? A Hotshot Challenge 171
Project Seven: Build Your Own jQuery
173
Mission Briefing 173
Installing Git and Make 174 Installing Node.js 178 Installing Grunt.js 179 Configuring the environment 181 Building a custom jQuery 184 Running unit tests with QUnit 185 Mission Accomplished 189 You Ready To Go Gung HO? A Hotshot Challenge 189
Project Eight: Infinite Scrolling with jQuery
191
Mission Briefing 191
Preparing the underlying page 193 Getting the initial feeds 198 Displaying the initial set of results 201 Handling scrolling to the bottom of the page 204 Mission Accomplished 207 You Ready To Go Gung HO? A Hotshot Challenge 208
Project Nine: A jQuery Heat Map
209
Mission Briefing 209
Allowing different layouts to be selected 229 Showing heat maps for each layout 233 Mission Accomplished 237 You Ready To Go Gung HO? A Hotshot Challenge 237
Project Ten: A Sortable, Paged Table with Knockout.js
239
Mission Briefing 239
Rendering the initial table 241
Sorting the table 244
Setting the page size 251 Adding Previous and Next Links 254 Adding numerical page links 256 Managing class names 258 Resetting the page 260 Filtering the table 261 Mission Accomplished 266 You Ready To Go Gung HO? A Hotshot Challenge 267
Preface
Welcome to jQuery Hotshot. This book has been written to provide as much exposure to the different methods and utilities that make up jQuery as possible. You don't need to be a jQuery hotshot to read and understand the projects this book contains, but by the time you've finished the book, you should be a jQuery hotshot.
As well as learning how to use jQuery, we are also going to look at a wide range of related technologies including using some of the more recent HTML5 and related APIs, such as localStorage, how to use and create jQuery plugins, and how to use other jQuery libraries such as jQuery UI, jQuery Mobile, and jQuery templates.
jQuery has been changing the way we write JavaScript for many years. It wasn't the first JavaScript library to gain popularity and widespread usage among developers, but its powerful selector engine, cross-browser compatibility, and easy-to-use syntax quickly propelled it to be one of the most popular and widely-used JavaScript frameworks of all time.
As well as being easy-to-use and abstracting complex and powerful techniques into a simple API, jQuery is also backed by an ever-growing community of developers, and is possibly the only JavaScript library protected by a not-for-profit foundation to ensure that development of the library remains active, and that it remains open source and free for everyone for as long as it's available.
Getting started with jQuery
Every project in this book is built around jQuery; it's the foundation for everything we do. To download a copy of jQuery, we can visit the jQuery site at http://jquery.com/. There are download buttons here to obtain production and development versions of the library, as well as a wealth of other resources including full API documentation, tutorials, and much, much more to help you familiarize yourself with using the library.
One of the core concepts of jQuery is based on selecting one or more elements from the
Document Object Model (DOM) of a web page, and then operating on those elements somehow using the methods exposed by the library.
We'll look at a range of different ways of selecting elements from the page throughout the projects in the book, as well as a wide selection of the different methods we can call on elements, but let's look at a basic example now.
Let's say there is an element on a page that has an id attribute of myElement. We can select this element using its id with the following code:
jQuery("#myElement");
As you can see, we use simple CSS selectors in order to select the elements from the page that we wish to work with. These can range from simple id selectors as in this example, class selectors, or much more complex attribute selectors.
As well as using jQuery to select elements, it is also common to use the $ alias. This would be written using $ instead of jQuery, as follows:
$("#myElement");
Once the element has been selected in this way, we would say that the element is wrapped with jQuery, or that it's a jQuery object containing the element. Using the jQuery (or $) method with a selector always results in a collection of elements being returned.
If there are no elements that match the selector, the collection has a length of 0. When id selectors are used, we would expect the collection to contain a single element. There is no limit as to how many elements may be returned in the collection; it all depends on the selector used.
So to continue our example where we have selected the element whose id attribute is myElement, if we wanted to find out its width in pixels, we could use jQuery's width() method:
$("#myElement").width();
This will return a number which specifies how many pixels wide the element is. However, if we wish to set the width of our element, we could pass the number of pixels that we'd like the element to have its width set to as an argument to the same method:
$("#myElement").width(500);
Of course, there is much more to using jQuery than these simple examples show, and we'll explore much more in the projects contained in this book, but this simplicity is at the heart of the library and is one of the things that have made it so popular.
What this book covers
Project 1, Sliding Puzzle, helps us build a sliding puzzle game. We'll use jQuery and jQuery UI together to produce this fun application and also look at the localStorage API.
Project 2, A Fixed Position Sidebar with Animated Scrolling, helps us implement a popular user interface feature – the fixed-position sidebar. We focus on working with the CSS of elements, animation, and event handling.
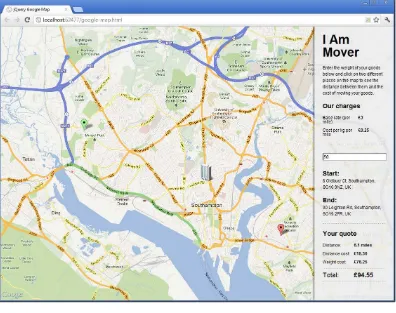
Project 3, An Interactive Google Map, teaches us how to work with Google's extensive Maps API in order to create an interactive map. We look at a range of DOM manipulation methods and look at how to use jQuery alongside other frameworks.
Project 4, A jQuery Mobile Single-page App, takes a look at the excellent jQuery Mobile framework in order to build a mobile application that combines jQuery with the Stack Exchange API. We also look at jQuery's official template engine, JsRender.
Project 5, jQuery File Uploader, uses jQuery UI once again, this time implementing a
Progressbar widget as part of a dynamic front-end file uploader. We also cover writing jQuery plugins by making our uploader a configurable jQuery plugin.
Project 6, Extending Chrome with jQuery, shows us how we can extend the popular Chrome web browser with an extension built with jQuery, HTML, and CSS. Once again we make use of JsRender.
Project 8, Infinite Scrolling with jQuery, takes a look at another popular user-interface feature – infinite scrolling. We focus on jQuery's AJAX capabilities, again use JsRender, and look at the handy imagesLoaded plugin.
Project 9, A jQuery Heat Map, helps us build a jQuery-powered heat map. There are several aspects to this project including the code that captures clicks when pages are visited, and the admin console that aggregates and displays the information to the site administrator.
Project 10, A Sortable, Paged Table with Knockout.js, shows us how to build dynamic applications that keep a user interface in sync with data using jQuery together with the MVVM framework Knockout.js.
What you need for this book
Some of the projects covered in this book can be completed using nothing but a browser and a simple text editor. Of course, a complete IDE is always going to make things easier, with features such as code completion, code coloring, and collapsible blocks. So using an IDE over a simple text editor is recommended.
Other projects rely on additional JavaScript frameworks or community-built plugins. Several projects use third-party services hosted on the Internet in order to consume data. One project requires the use of several additional and highly specialized applications. Where additional software or scripts are required, or API access is needed, these requirements are discussed in the relevant projects and information is included on where to obtain the required code or applications, how to install them, and how to use them sufficiently for the project to be completed.
Who this book is for
Conventions
In this book, you will find several headings appearing frequently.
To give clear instructions of how to complete a procedure or task, we use:
Mission Briefing
This section explains what you will build, with a screenshot of the completed project.
Why Is It Awesome?
This section explains why the project is cool, unique, exciting, and interesting. It describes what advantage the project will give you.
Your Hotshot objectives
This section explains the major tasks required to complete your project.
f Task 1
f Task 2
f Task 3
f Task 4, and so on
Mission Checklist
This section explains any prerequisites for the project, such as resources or libraries that need to be downloaded, and so on.
task 1
This section explains the task that you will perform.
Prepare for Lift Off
This section explains any preliminary work that you may need to do before beginning work on the task.
Engage Thrusters
Objective Complete - Mini Debriefing
This section explains how the steps performed in the previous section allow us to complete the task. This section is mandatory.
Classified Intel
The extra information in this section is relevant to the task.
You will also find a number of styles of text that distinguish between different kinds of information. Here are some examples of these styles, and an explanation of their meaning. Code words in text are shown as follows: "First of all we define a new variable called correctPieces and set its value to 0."
A block of code is set as follows:
<!DOCTYPE html>
<html lang="en"> <head>
<meta charset="utf-8" /> <title></title>
<link rel="stylesheet" href="css/common.css" /> </head>
<body>
<script src="js/jquery-1.9.0.min.js"></script> </body>
</html>
Two independent lines of code will appear as follows:
<div data-role="header">
<a href="bounty-hunter.html" data-icon="home"
A line of code that has overflown to the next due to space constraints would appear as follows:
filter: "!)4k2jB7EKv1OvDDyMLKT2zyrACssKmSCX eX5DeyrzmOdRu8sC5L8d7X3ZpseW5o_nLvVAFfUSf"
When we wish to draw your attention to a particular part of a code block, the relevant lines or items are set in bold:
pieces.appendTo(imgContainer).draggable("destroy");
if (timer) {
timerDisplay.text("00:00:00"); }
timer = setInterval(updateTime, 1000); currentTime.seconds = 0;
currentTime.minutes = 0; currentTime.hours = 0;
pieces.draggable({
Any command-line input or output is written as follows:
cd C:\\msysgit\\msysgit\\share\\msysGit
New terms and important words are shown in bold. Words that you see on the screen, in menus or dialog boxes for example, appear in the text like this: "Clicking on the Next button moves you to the next screen".
Warnings or important notes appear in a box like this.
Tips and tricks appear like this.
Reader feedback
Feedback from our readers is always welcome. Let us know what you think about this book— what you liked or may have disliked. Reader feedback is important for us to develop titles that you really get the most out of.
To send us general feedback, simply send an e-mail to [email protected], and mention the book title via the subject of your message.
If there is a topic that you have expertise in and you are interested in either writing or contributing to a book, see our author guide on www.packtpub.com/authors.
Customer support
Downloading the example code
You can download the example code files for all Packt books you have purchased from your account at http://www.packtpub.com. If you purchased this book elsewhere, you can visit http://www.packtpub.com/support and register to have the files e-mailed directly to you.
Errata
Although we have taken every care to ensure the accuracy of our content, mistakes do happen. If you find a mistake in one of our books—maybe a mistake in the text or the code—we would be grateful if you would report this to us. By doing so, you can save other readers from frustration and help us improve subsequent versions of this book. If you find any errata, please report them by visiting http://www.packtpub.com/submit-errata, selecting your book, clicking on the erratasubmissionform link, and entering the details of your errata. Once your errata are verified, your submission will be accepted and the errata will be uploaded on our website, or added to any list of existing errata, under the Errata section of that title. Any existing errata can be viewed by selecting your title from http://www.packtpub.com/support.
Piracy
Piracy of copyright material on the Internet is an ongoing problem across all media. At Packt, we take the protection of our copyright and licenses very seriously. If you come across any illegal copies of our works, in any form, on the Internet, please provide us with the location address or website name immediately so that we can pursue a remedy.
Please contact us at [email protected] with a link to the suspected pirated material. We appreciate your help in protecting our authors, and our ability to bring you valuable content.
Questions
Project 1
Sliding Puzzle
In our first project we'll get to see a variety of techniques in action, in a fun and relaxed setting. Consider this a gentle warm up for the rest of the book.
We'll see how to make elements draggable using jQuery UI and how we can configure the behavior of the draggable elements. We'll also look at other subjects including sorting algorithms, and client-side storage using the localStorage API.
Mission Briefing
In this project we'll be building a simple but fun puzzle game in which a picture is scrambled and has to be unscrambled back to the original picture by sliding the different pieces around the board – a modern web-based take on a classic game from yesteryear.
To give the player an incentive, we can also look at keeping track of how long it takes the player to solve the puzzle so that the player's best time can be recorded. The following is a screenshot that shows the final result of this project:
Why Is It Awesome?
Games are fun and they can keep people coming back to your site, especially a younger audience. Non-flash browser-based games are taking off in a big way, but getting into the action at the top end of the scale can have a steep learning curve.
This is also a great way to learn how to build a draggable interface in a precise and engaging format that is well suited to its intended purpose and intuitive to use. We can also look at some more advanced draggable concepts such as collision avoidance and precise positioning. We will also be learning how to interact with the localStorage API in order to store and retrieve data between sessions.
Your Hotshot objectives
This project will be broken down into the following tasks, which we'll work through sequentially in order to produce a working end result:
f Laying down the underlying HTML
f Creating a code wrapper and defining variables
f Splitting an image into pieces
f Shuffling the puzzle pieces
f Making the puzzle pieces draggable
f Starting and stopping the timer
f Determining if the puzzle has been solved
f Remembering best times and adding some final styling
Mission Checklist
As well as jQuery, we'll also be using jQuery UI in this project, so now is the time to grab these libraries and put them in place. We can also take a moment to set up our project folder, which is where we can store all of the files that we'll create over the course of the book.
Create a new folder somewhere called jquery-hotshots. Within this folder create three new folders called js, css, and img. All the HTML pages we create will go into the root jquery-hotshots folder, while the other files we use will be distributed amongst the subfolders according to their type.
It's considered best practice to use Google's content delivery network (CDN)
to load jQuery and to link to the file without specifying a protocol. Using a CDN means the file is more likely to be in the visitor's browser cache, making the library much quicker to load.
It is also advisable to provide a fallback in the event that the CDN is not accessible for some reason. We can very easily use the excellent yepnope to load a local version of the script if the CDN version is not found. See the yepnope site, http://yepnopejs.com/, for more information on this and other resource-loading tips and tricks.
To download the jQuery UI components we'll require, visit the download builder at http://jqueryui.com/. We'll be using various other components in later projects, so for simplicity we can just download the complete library using the Stable button. The current version at the time of writing is 1.10.0.
Once the build has been downloaded, you'll need to grab a copy of the jquery-ui-x.x.x.custom.min.js file (where x.x.x is the version number) from the js directory inside the archive, and paste it into your js folder.
Recent versions of jQuery UI, as well as some of the more popular pre-built themes generated with Themeroller, are also available via Google's CDN.
Laying down the underlying HTML
First of all we need to build out the page that'll contain our sliding puzzle. The initial page will be a shell with mostly just a few containers; the draggable elements that will make up the individual pieces of the puzzle can all be created dynamically when required.
Prepare for Lift Off
We'll use a standard starting point for all of the different projects throughout this book, so we'll look at this briefly now to save showing it in every project:
<!DOCTYPE html>
<html lang="en"> <head>
<meta charset="utf-8" /> <title></title>
<body>
<script src="js/jquery-1.9.0.min.js"></script> </body>
</html>
Downloading the example code
You can download the example code files for all Packt books you have purchased from your account at http://www.packtpub.com. If you purchased this book elsewhere, you can visit http://www. packtpub.com/support and register to have the files e-mailed directly to you.
Each project we cover will be contained in a page that starts out exactly like this. Save a copy of the previous file now in your local project folder and call it template.html. At the start of each project I'll say something like "save a copy of the template file as project-name. html". This is the file I'll be referring to.
So in this case, save a copy of the previous HTML (or template.html if you wish) in the main project directory (jquery-hotshots) and call it sliding-puzzle.html. We'll also be using a common style sheet for basic styling that each project will utilize. It contains things such as an HTML5 reset, clearfix, and other utilities, as well as some basic typographical fixtures and theming for consistency between projects. While I won't go into detail on that here, you can take a look at the common.css source file in the accompanying download of this book for more information.
Each project will also need its own style sheet. These will be covered where applicable and will be discussed on a per-project basis as and when required. We can create the custom style sheet we'll be using in this project now.
Create a new file and call it sliding-puzzle.css, then save it in the css folder. We can link to this file in the <head> of the page using the following code:
<link rel="stylesheet" href="css/sliding-puzzle.css" />
This should appear directly after the common.css style sheet reference.
We can also link to the script files that we'll be using in this project. First, the jQuery UI file we downloaded and copied into the js folder can be linked to using the following code:
<script src="js/jquery-ui-1.10.0.custom.min.js"></script>
Lastly we can add the script file we'll use for this project. Create a new file and save it as sliding-puzzle.js in the js folder. We can link to it by adding the following <script> element directly after the jQuery UI reference:
<script src="js/sliding-puzzle.js"></script>
Engage Thrusters
Save a copy of the template file as sliding-puzzle.html in the root project folder and then add the following mark-up to the <body> element (before the jQuery <script> element):
<div id="puzzle" class="clearfix"> <figure>
<img src="img/space-girl-vera.jpg" /> </figure>
<div id="ui">
<p id="time">Current time: <span>00:00:00</span></p> <button id="start">Start!</button>
</div> </div>
Objective Complete - Mini Debriefing
This simple HTML is all that's required to start with. As this is a book about JavaScript, I won't cover the HTML in much detail unless absolutely critical to the project at hand. In this case most of the elements themselves aren't significant.
The main thing is that we have a series of containers with id attributes that make selecting them fast and easy. The only really important element is the <img>, which displays the original image that we'll be turning into the puzzle.
Creating a code wrapper and defining
variables
All of our code will need to be contained within a wrapper function that is executed once the page has finished loading.
Prepare for Lift Off
The steps that we'll complete in this part of the project are as follows:
f Add a wrapper function for our code that will execute as soon as the page has finished loading
f Define the variables that we'll use throughout the script
Engage Thrusters
The first step is to create a wrapper function for our code that will be executed as soon as the page has loaded. Add the following code to a new script file called sliding-puzzle. js, which should be saved in the js directory we created earlier:
$(function () {
//all our code will be in here...
});
Most jQuery code that we see in the wild resides within some kind of wrapper like this. Using $(function(){}); is a shortcut to jQuery's document.ready function, which is fired once the DOM for the page has loaded.
Using $
We wouldn't normally use $ in the global scope like this if we were sharing our code with other developers, as there may be other libraries on the page also using it. Best practice is to alias the $ character within an automatically invoked anonymous function, or an immediately invoked function expression if you prefer. This can be done using the syntax (function($) { … } (jQuery));.
Next we can set some variables near the top of the script file. This is so that we don't have lots of values that we may want to change later distributed throughout the file. Organization is one of the keys to writing maintainable code, and we should always strive
Next add the following code inside the function we just defined, replacing the comment shown in the previous code sample:
var numberOfPieces = 12, aspect = "3:4",
aspectW = parseInt(aspect.split(":")[0]), aspectH = parseInt(aspect.split(":")[1]), container = $("#puzzle"),
imgContainer = container.find("figure"), img = imgContainer.find("img"),
path = img.attr("src"), piece = $("<div/>"),
pieceW = Math.floor(img.width() / aspectW), pieceH = Math.floor(img.height() / aspectH), idCounter = 0,
positions = [], empty = { top: 0, left: 0,
bottom: pieceH, right: pieceW },
previous = {}, timer,
currentTime = {},
timerDisplay = container.find("#time").find("span");
These aren't all of the variables that we'll use, just the majority of them. The list also includes any variables that we'll need to use inside callback functions so that we don't run into scope issues.
Objective Complete - Mini Debriefing
The variables we defined first are a combination of simple (primitive) values and objects or arrays that we'll use throughout the code, and cached jQuery elements. For best performance when using jQuery, it's best to select elements from the page and store them in variables instead of repeatedly selecting them from the page.
It is best practice to define variables at the top of the function they are scoped to because of a phenomenon known as hoisting, in which variables defined deep inside a function, inside a for loop for example, are "hoisted" to the top of the function in some situations, potentially causing errors that are hard to track down.
Defining variables at the top of the function where possible is a simple way to avoid this occurring and is considered a good practice when writing jQuery, or JavaScript in general.
Most of the variables are quite straightforward. We store the number of puzzle pieces we'd like to use and the aspect ratio of the image being used. It's important that the number of pieces can be equally divided by both the width and height components of the ratio. We split the aspect ratio into its component parts using JavaScript's split() function and specifying the colon as the character to split on. We also use the JavaScript parseInt() function to ensure we end up with actual numbers and not strings in the aspectW and aspectH variables.
The next three variables are all different elements selected from the page that we need to manipulate. Following this is a new element that we create using jQuery.
Next we calculate the width and height each piece of the puzzle will need to be sized to, based on the width and height of the original image and the aspect ratio, and we initialize a counter variable that we'll use to add a unique, ordered id attribute to each puzzle piece. We also add an empty array called positions, which we'll use to store the top and left positions of each new piece.
We'll need a way of keeping track of the empty space as the pieces are moved around the board, so we create an object called empty and give it top, left, bottom, and right properties so that we'll know exactly where the blank is space at any given moment. We'll also want to keep track of the previous location of any given piece so we create an empty object called previous that we'll populate with properties when required.
Splitting an image into pieces
Our next task is to divide the image into a specified number of squares to represent the individual pieces of the puzzle. To do this we'll create a series of smaller elements which each show a different part of the image and which can be manipulated individually.
Prepare for Lift Off
The single step required to complete this task is to create a specified number of puzzle pieces and give each a unique background-position and position in order to recreate the image.
Engage Thrusters
We now want to generate the different pieces that make up the puzzle. We can do this with the following code, which should be added directly after the variables we just defined in sliding-puzzle.js:
for (var x = 0, y = aspectH; x < y; x++) { for (var a = 0, b = aspectW; a < b; a++) { var top = pieceH * x,
left = pieceW * a;
piece.clone()
.attr("id", idCounter++) .css({
width: pieceW, height: pieceH, position: "absolute", top: top,
left: left,
backgroundImage: ["url(", path, ")"].join(""), backgroundPosition: [
"-", pieceW * a, "px ", "-", pieceH * x, "px" ].join("")
}).appendTo(imgContainer);
positions.push({ top: top, left: left }); }
Objective Complete - Mini Debriefing
We used a nested set of for loops to create the new puzzle pieces in a grid pattern. The first loop will run for as many rows as required; with a 3:4 aspect-ratio image such as that used in this example, we will need four rows of squares. The inner loop will for run for as many columns as required, which in this case is three.
Within the inner loop we first create two new variables top and left. We need to use these values in a couple of places so it makes sense to create them once and reuse them each time they're required.
The top position is equal to the height of the piece multiplied by the current value of the outer loop's counter variable (x), while the left position is equal to the width of the piece multiplied by the current value of the inner loop's counter variable (a). These variables are used to make the puzzle pieces line up in a grid.
We then copy our stored <div> element using jQuery's clone() method and use the attr() method to set a unique id attribute using the idCounter variable that we initialized in the first part of the project. Notice that we increment the variable at the same time as setting it directly within the attr() method.
We could increment the variable either inside the method as we have done here, or outside of the method; there's no real difference in performance or anything else. I just feel that it's more succinct to update it in situ.
Next we use the css() method to set a style attribute on the new element. We set the width and height of the puzzle piece and position it using our top and left variables, as well as set its backgroundImage and backgroundPosition style properties.
Any style properties that are usually defined using hyphenated words, such as background-image, should be camel-cased when used with jQuery's css() method in conjunction with an object.
The backgroundImage property can be set using our path variable and the rest of the string components of the style, but the backgroundPosition property will need to be calculated individually for each puzzle piece.
The horizontal component of the backgroundPosition style property is equal to the width of the piece multiplied by the value of the inner loop's counter variable (a), while the vertical component is equal to the height of the piece multiplied by the value of the outer loop's counter variable (x).
Classified Intel
Instead of using standard string concatenation to construct the backgroundImage and backgroundPosition strings, we put the values into an array literal and then joined the array using JavaScript's join() method. By specifying an empty string as the value to use to join the string, we ensure that no additional characters are added to the string.
Joining an array of substrings to form a single string is much faster than building a string using the + operator on substrings, and as we're working repetitively inside a loop, we should optimize the code within the loop as much as possible.
Shuffling the puzzle pieces
In this step we need to randomly shuffle the pieces to make it a puzzle so that the visitor can unscramble them. We can also remove the original image as it's no longer required, and remove the first piece to create an empty space so that the other pieces can be moved around.
Prepare for Lift Off
The steps we'll cover in this task are:
f Removing the original image from the page
f Removing the first piece of the puzzle
f Removing the first item in the positions array
f Shuffling the pieces randomly
Engage Thrusters
Completing the first step requires just the following line of code, which should be added directly after the closing curly-bracket of the outer for loop we added to sliding-puzzle.js in the last task:
img.remove();
The second step is equally as simple; the following can be added directly after the previous line of code:
We can also use a single line of code for the next step. Add the following directly after the previous line of code:
positions.shift();
Shuffling the pieces will be slightly more complex; you'll remember from the first part of the project when we added the underlying HTML that one of the elements was a start button. We'll use this button to trigger the shuffle. Add the following code directly after the first two lines we just added (make sure they are still within the outer function wrapper):
$("#start").on("click", function (e) { var pieces = imgContainer.children();
function shuffle(array) { var i = array.length;
if (i === 0) { return false; }
while (--i) {
var j = Math.floor(Math.random() * (i + 1)), tempi = array[i],
tempj = array[j];
array[i] = tempj; array[j] = tempi; }
}
shuffle(pieces);
$.each(pieces, function (i) { pieces.eq(i).css(positions[i]); });
pieces.appendTo(imgContainer);
empty.top = 0; empty.left = 0;
container.find("#ui").find("p").not("#time").remove();
Objective Complete - Mini Debriefing
jQuery's remove() method is used to remove the original image element from the page, which we already selected when we declared our variables at the start of the script. We use the same method to remove the first puzzle piece, which we should do before the pieces are shuffled to avoid removing a key piece, such as a face. As with the image used in this example, an image where the main item of interest is not in the top-left corner is beneficial. As we've removed the first piece from the board, we should also remove the first item in the positions array. We'll use this array when we come to check whether the puzzle has been unscrambled and as there won't be a piece at the first position, we don't need to store its position. We use JavaScript's unshift() method to do this, which simply removes the first item in the array it is called on.
Adding an event handler to the button using on()
We added a click event handler for the button by selecting it and calling the jQuery on() method. The on() method takes two arguments in this example (although it can take three when event delegation is required).
The first argument is the event to listen for and the second is the handler function to be executed each time the event is detected. We are listening for the click event in this case.
The all-encompassing on() method
jQuery's on() method, introduced in version 1.7, replaces the bind(), live(), and delegate() methods, which are now deprecated. Using on() is now the recommended way of attaching event handlers in jQuery.
Within the handler function we first define a variable which stores the children of the <figure> element. Although we need to select the pieces from the page again, we can still use our cached imgContainer variable to avoid creating a new jQuery object.
Shuffling the pieces
Next we define a function called shuffle(), which accepts the array to shuffle as an argument. This function performs a Fisher-Yates shuffle, which is an established pattern for creating a random ordering of a given set of values.
In JavaScript, as well as the true or false Boolean values, other types of variables can be said to be truthy or falsey. The following values are all considered falsey:
f The Boolean value false f The number 0
f An empty string f null
f undefined f NaN
All other values are considered truthy. This is so that non-Boolean values can be used as conditionals. The similarities between the terms falsey and false may lead to confusion; just remember that false is an actual value, and falsey is an aspect of a value, which values other than false also have.
For more information on this subject, see http://james.padolsey.com/ javascript/truthy-falsey/.
Within the loop, which will be executed once for each item in the array except the first item, we want to pick a random item from the array and swap its position in the array with another item. To generate a random number to use as the index of the item to swap, we first generate a random number using JavaScript's Math.random() function and multiply the random number (which will be between 0 and 1) by the length of the array plus 1. This will give us a random number, between 0 and the length of the array.
We then pull the item with the current index out of the array, along with the item at the randomly generated index, and swap them. It may seem complex but this is almost universally regarded as the most efficient way to randomly shuffle the items in the array. It gives us the most random result for the least amount of processing.
Once we have defined the function, we then invoke it, passing in the pieces array as the array to shuffle.
Positioning the pieces
Once the array of elements has been shuffled, we iterate it using jQuery's each() method. This method is passed the array to iterate over, which in this case is the pieces array we have just shuffled. The second argument is an iterator function that will be called for each item in the array.
Within this function we use our positions array to put the shuffled elements in the right place on the page. If we didn't do this, the elements would be shuffled, but would still appear in the same place on the page because of their absolute positioning. We can use the positions array that we updated when creating the new elements to get the correct top and left positions for each of the shuffled elements.
Once the collection of elements have been iterated and their positions set, we then append them back to the page using jQuery's appendTo() method. Again we can specify our imgContainer variable as the argument to appendTo() in order to avoid selecting the container from the page once more.
Positioning the empty space
Lastly we should make sure that the empty space is definitely at 0 top and 0 left, that is the top-left square of the board. If the button is clicked, some pieces are moved and then the button is clicked again, we have to ensure that the empty space is in the right place. We do this by setting both the top and left properties of the empty object to 0.
Making the puzzle pieces draggable
Now it's time to kickstart jQuery UI to make the individual pieces of the puzzle draggable. jQuery UI is a suite of jQuery plugins used to build interactive and efficient user interfaces. It is stable, mature, and is recognized as the official, although not the only UI library for jQuery.
Prepare for Lift Off
In this task we'll cover the following steps:
f Making the puzzle pieces draggable using jQuery UI's Draggable component
f Configuring the draggables so that only pieces directly next to the empty space can be moved
f Configuring the draggables so that pieces can only be moved into the empty space
Engage Thrusters
First we'll make the pieces draggable and set some of the configuration options that the component exposes. This code should be added to sliding-puzzle.js, directly after the code added in the previous task:
pieces.draggable({
containment: "parent", grid: [pieceW, pieceH], start: function (e, ui) {
},
drag: function (e, ui) {
},
stop: function (e, ui) {
} });
The next few steps in this task will see additional code added to the start, drag, and stop callback functions in the previous code sample.
Next add the following code in to the start callback function that we just added:
var current = getPosition(ui.helper);
if (current.left === empty.left) {
ui.helper.draggable("option", "axis", "y"); } else if (current.top === empty.top) {
ui.helper.draggable("option", "axis", "x"); } else {
ui.helper.trigger("mouseup"); return false;
}
if (current.bottom < empty.top || current.top > empty.bottom || current.left > empty.right || current.right < empty.left) { ui.helper.trigger("mouseup"); return false;
}
previous.top = current.top; previous.left = current.left;
Next, add the following code to the drag callback function:
var current = getPosition(ui.helper);
ui.helper.draggable("option", "revert", false);
if (current.top === empty.top && current.left === empty.left) { ui.helper.trigger("mouseup");
return false; }
if (current.top > empty.bottom || current.bottom < empty.top || current.left > empty.right || current.right < empty.left) { ui.helper.trigger("mouseup") .css({
top: previous.top, left: previous.left });
Finally, we should add the following code to the stop callback function:
var current = getPosition(ui.helper);
if (current.top === empty.top && current.left === empty.left) {
empty.top = previous.top; empty.left = previous.left;
empty.bottom = previous.top + pieceH; empty.right = previous.left + pieceW; }
In each of our callbacks we've used a helper function that returns the exact position of the current draggable. We should also add this function after the draggable()method:
function getPosition(el) { return {
top: parseInt(el.css("top")),
bottom: parseInt(el.css("top")) + pieceH, left: parseInt(el.css("left")),
right: parseInt(el.css("left")) + pieceW }
}
Objective Complete - Mini Debriefing
We wrote a lot of code in that last task, so let's break it down and see what we did. We started by making the pieces draggable using the jQuery UI draggable component. We did this by calling the draggable() method, passing in an object literal that sets various options that the draggable component exposes.
First we set the containment option to parent, which stops any of the pieces being dragged out of the <figure> element that they are within. We also set the grid option, which allows us to specify a grid of points that the piece being dragged should snap to. We set an array as the value of this option.
The first item in this array sets the horizontal points on the grid and the second item sets the vertical points on the grid. Setting these options gives the movement of the pieces a more realistic and tactile experience.
When the drag begins
The start callback will be invoked once at the very start of the drag interaction following a mousedown event on a draggable. The stop callback will be invoked once at the very end of a drag interaction, once a mouseup event has registered. The drag callback will fire almost continuously while a piece is being dragged as it is invoked for every pixel the dragged element moves.
Let's look at the start callback first. Each callback is passed two arguments by jQuery UI when it is invoked. The first of these is the event object, which we don't require in this project, while the second is an object containing useful properties about the current draggable.
At the beginning of the function we first get the exact position of the piece that dragging has started on. When we call our getPosition() function, we pass in the helper property of the ui object, which is a jQuery-wrapped reference to the underlying DOM element that has started to be dragged.
Once we have the element's position, we first check whether the element is in the same row as the empty space by comparing the left property of the current object (the object returned by getPosition()) with the left property of the empty object.
If the two properties are equal, we set the axis option of the draggable to y so that it can only move horizontally. Configuration options can be set in any jQuery UI widget or component using the option method.
If it isn't in the same row, we check whether it is in the same column instead by comparing the top properties of the current and empty objects. If these two properties are equal, we instead set the axis option to x so that the piece may only move vertically.
If neither of these conditions is true, the piece cannot be adjacent to the empty space, so we manually trigger a mouseup event to stop the drag using jQuery's trigger() method, and also return false from the function so that our stop handler is not triggered.
We need to make sure that only squares in the same row or column as the empty space are draggable, but we also need to make sure that any pieces that are not directly adjacent to the empty space cannot be dragged either.
To stop any pieces not adjacent to the empty space being dragged, we just check that:
f The bottom of the current piece is less than the top of the empty space
f The top of the current piece is greater than the bottom of the empty space
f The left of the current piece is greater than the right of the empty space
If any of these conditions are true, we again stop the drag by triggering a mouseup event manually, and stop any further event handlers on the draggable being called (but only for the current drag interaction) by returning false.
If the callback function has not returned at this point, we know we are dealing with a draggable that is adjacent to the empty space, thereby constituting a valid drag object. We therefore store its current position at the start of the drag for later use by setting the top and left properties of the previous object that we initialized at the start of the project.
The position of ui.helper
The ui object passed to our callback function actually contains an object called position, which can be used to obtain the current draggable's position. However, because we are using the grid option, the values contained in this object may not be granular enough for our needs.
During the drag
Next we can walk through the drag callback, which will be called every time the position of the current draggable changes. This will occur during a mousedown event.
First of all we need to know where the piece that's being dragged is, so we call our getPosition() helper function again.
Then we want to check whether the piece being dragged is in the empty space. If it is, we can stop the drag in the same way that we did before – by manually triggering a mouseup event and returning false.
During the drag, only valid pieces will be draggable because we've already filtered out any pieces that are not directly adjacent to the empty space. However, we still need to check that the piece being dragged is not being dragged away from the empty space. We do this in the same way that we filtered out pieces not adjacent to the empty space in the start callback.
When the drag ends
Starting and stopping the timer
At this point, our game is fully functional and the puzzle can be unscrambled; however to make it more fun we should introduce an element of competitiveness by incorporating a timer.
Prepare for Lift Off
In this task we'll need to complete the following steps:
f Check the timer isn't already running when the Start button is clicked
f Start the timer from 0
f Increment the timer every second
f Update the display on the page so that the player can see how long the current game has taken so far
Engage Thrusters
To check whether the timer is already running when the Start button is clicked we should add the following code directly after where we appended the shuffled pieces to the page, and directly before the call to draggable():
pieces.appendTo(imgContainer).draggable("destroy");
if (timer) {
clearInterval(timer);
timerDisplay.text("00:00:00"); }
timer = setInterval(updateTime, 1000); currentTime.seconds = 0;
currentTime.minutes = 0; currentTime.hours = 0;
pieces.draggable({
Next we can add the function that increments the timer and updates the display. This code should come directly after where we update currentTime.hours in the previous code:
function updateTime() {
clearInterval(timer);
} else if (currentTime.minutes === 59 && currentTime.seconds === 59) {
currentTime.hours++; currentTime.minutes = 0; currentTime.seconds = 0;
} else if (currentTime.seconds === 59) { currentTime.minutes++;
currentTime.seconds = 0; } else {
currentTime.seconds++; }
newHours = (currentTime.hours <= 9) ? "0" + currentTime.hours :
currentTime.hours;
newMins = (currentTime.minutes <= 9) ? "0" + currentTime.minutes :
currentTime.minutes;
newSecs = (currentTime.seconds <= 9) ? "0" + currentTime.seconds :
currentTime.seconds;
timerDisplay.text([
newHours, ":", newMins, ":", newSecs ].join(""));
}
Objective Complete - Mini Debriefing
The first thing we have to do in this task is check whether a timer is already running. The timer will be stored in one of our "global" variables so we can check it easily. We use an if statement to check whether timer contains a truthy value (see the previous information on JavaScript's truthy and falsey values).
If it does, we know the timer is already running, so we cancel the timer using JavaScript's clearInterval() function, passing in our timer variable as the timer to clear. We can also reset the timer display if the timer is already running. We selected the timer display element from the page and cached it when we initially declared our variables at the start of this project.
The setInterval() function accepts a function to execute after the specified interval as the first argument, and the interval as the second argument. We specify 1000 milliseconds as the interval, which is equal to 1 second, so the function passed as the first argument will be called every second until the timer is cleared.
Once the timer has started we can also reset the values stored in the object we'll use to keep track of the timer – the currentTime object. We set the seconds, minutes, and hours properties of this object to 0. We need an object to keep track of the time because the timer variable itself just contains the ID of the timer.
Next we added the updateTime() function that will be called by our interval every second. All we do in this function is update the relevant properties of the currentTime object, and update the display. We use an if conditional to check which parts of the timer to update. We first check that the timer has not reached 24 hours. I would hope that no one would actually spend that long playing the game, but if the browser is left open for some reason for this length of time, we don't want the time display to say, for example, 24 hours and 1 minute, because at that point, we really should update the display to say 1 day, 0 hours, and 1 minute. But we aren't bothering with days so instead we just stop the timer.
If the timer has not reached this length of time we then check whether the current minutes equal 59 and the current seconds equal 59. If they do we need to increment currentTime. hours by 1 and reset the currentTime.minutes and currentTime.seconds properties back to 0.
If this check fails we then check whether the seconds equal 59. If they do, we increment the currentTime.minutes property and then reset currentTime.seconds back to 0. If this second test also fails we know that all we have to do is increment currentTime.seconds. Next we need to check whether we need to pad any of the time components with a leading 0. We could use another if else conditional for this, but the JavaScript ternary construct is neater and more compact so we use this instead.
First we test whether currentTime.hours is equal to or less than 9 and if so we add 0 to the start of the value. We do the same for currentTime.minutes and currentTime.seconds. Finally, we build the string which we will use to update the timer display. Instead of using boring and slow string concatenation, we again use an awesome array comprising the various parts of the display and then join the array.
The resulting string is set as the value of the <span> element contained in the timerDisplay variable and the element on the page is updated using jQuery's text() method.
Determining if the puzzle has been
solved
In this task we'll focus on determining whether the pieces have been put back into their correct locations, unscrambling and therefore solving the puzzle.
Prepare for Lift Off
The following steps will be covered in this task:
f Checking the order of pieces to see if they match the starting order of the pieces
f Stopping the timer
f Displaying a congratulatory message
Engage Thrusters
First of all we need to decide when we should check whether the puzzle has been completed. A good place to do the check would be on the stop event of the drag.
First add the following new variable directly after the existing current variable at the top of the stop() callback:
var current = getPosition(ui.helper), correctPieces = 0;
Don't forget to add a trailing comma after the first variable, as shown in the previous code sample. Next add the following code directly after the if statement:
$.each(positions, function (i) {
var currentPiece = $("#" + (i + 1)),
currentPosition = getPosition(currentPiece);
if (positions[i].top === currentPosition.top && positions[i].left === currentPosition.left) {
correctPieces++; }
});
if (correctPieces === positions.length) { clearInterval(timer);
$("<p/>", {
text: "Congratulations, you solved the puzzle!" }).appendTo("#ui");
Objective Complete - Mini Debriefing
First of all we defined a new variable called correctPieces and set its value to 0. We then used jQuery's each() method to iterate the positions array that we populated much earlier in the code, when we initially shuffled the pieces.
What we need to do at this point is get each piece from the puzzle and check whether the pieces are in the correct order. However, we can't just select the elements from the page using jQuery's children() method, for example, or find(), because jQuery does not return the elements in the order that they are found in the DOM, especially as we have already dragged them all around their parent container.
What we have to do instead is select each element by its id attribute, and check to see what top and left CSS properties it has in its style attribute. The length of the positions array is the same as the number of pieces so we can iterate this array and use the index argument that jQuery automatically passes to the iterator function.
Within the iterator we first select the current element. The id attributes for each piece will start at 1 instead of 0 because we already removed the first piece from the puzzle, so we add 1 to the index value when selecting each piece. We also get the position of the current element using our existing getPosition() function, passing in the element we just selected.
Next we compare the current piece's top and left properties with the equivalent item from the positions array, and if both the top and left properties match, we increment the correctPieces variable.
Once each piece from the page and each item in the positions array have been compared and the each() method has finished iterating, we then check whether the value of the correctPieces variable is equal to the length of the positions array. If it is, we know that each piece is in the correct place.
We can stop the timer at this point in the same way that we did before – using the
clearInterval() function, and then create the congratulatory message and append it to the element with an id of ui.
Remembering best times and adding
some final styling
Of course, we now need a way to save the player's best time. It would also be handy if we could display an additional message if they beat their stored best time. We'll use the JavaScript localStorage API to store the best time.
We can also add a little extra styling to finish the appearance of the game and lay out the different elements a little better.
Prepare for Lift Off
The steps that we'll cover in this task are as follows:
f Checking whether a best time has been saved
f Checking whether the current best time is better than the saved best time
f Updating the saved best time when the current best time is better than it
f Displaying an additional message when the saved best time is beaten
f Tidying up the presentation of the game with CSS
Engage Thrusters
Everything we need to do in this task can be done in the if statement that is executed once the pieces are back in the correct order. Directly after where we displayed the congratulatory message in the last task add the following code:
var totalSeconds = (currentTime.hours * 60 * 60) + (currentTime.minutes * 60) + currentTime.seconds;
if (localStorage.getItem("puzzleBestTime")) {
var bestTime = localStorage.getItem("puzzleBestTime");
if (totalSeconds < bestTime) {
localStorage.setItem("puzzleBestTime", totalSeconds);
$("<p/>", {
text: "You got a new best time!" }).appendTo("#ui");
} } else {
localStorage.setItem("puzzleBestTime", totalSeconds);
$("<p/>", {
text: "You got a new best time!" }).appendTo("#ui");
We already created the style sheet that we'll use for this – sliding-puzzle.css, so we just need to add the following selectors and style rules to this file:
#puzzle {
width:730px; padding:5px; margin:auto; border:1px solid #aaa; border-radius:5px; background-color:#eee;
}
#puzzle figure {
width:510px; height:676px; border:1px solid #aaa; position:relative; float:left; background-color:#fff; }
#ui { padding:10px 0 0 10px; float:left; } #ui button { margin-bottom: 2em; }
#ui p { font-size:1.7em; }
#start { width:204px; height:50px; font-size:1.75em; }
Objective Complete - Mini Debriefing
First of all we convert the current time into seconds so that we have only a single value to work with and store. The seconds are calculated using the hours, minutes, and seconds properties of the currentTime object used to update the visible timer on the page. The hours property is multiplied by 60 to convert to minutes, and then by 60 again to convert to seconds. The minutes property is multiplied by 60 a single time, then these two values are added to the seconds remaining in the seconds property to give the final total, which we store in the totalSeconds variable.
Next we check the localStorage to see if a key exists with the name puzzleBestTime. If it does, we store the value held in localStorage in the bestTime variable. If the value of our totalSeconds variable is less than the bestTime variable, we have a new high score, which we save in localStorage with the puzzleBestTime name in order to overwrite the old best time. We then display a second congratulatory message to say a new high score has been achieved.
If localStorage doesn't contain a key with this name, this must be the first time the game has been played in this browser, so we set the name of the key and store the value of the currentTime variable as the new best time, and again display the second congratulatory message.
Classified Intel
The localStorage API is one of the more stable JavaScript APIs that fall within the general umbrella term of HTML5, and enjoys wide support by all of the latest versions of all common browsers.
Old browsers, which we may still need to support, such as IE7 or Fire