Praktikum Embedded System (Sistem Tertanam)
Departemen Fisika | Instrumentasi | FMIPA | Universitas Indonesia [ 2016 ]
Modul Pendamping III
Pengantar Pemrograman pada Mikrokontroler AVR dengan menggunakan Bahasa C –Project: Input/Output (I/O) - Push-Button & LED (Light Emitted Diode)
1. Pendahuluan
Sistem Tertanam (Embedded-system) umumnya diimplementasikan untuk tujuan tertentu, seperti halnya pengendalian, pengukuran, system pembacaan sensor dan keperluan pengontrolan lainnya. Proses tersebut dapat terealisasi dengan menggunakan pemrogramman yang akan tanamkan (embedded) ke chip microcontroller/microprocessor, oleh karena itu diperlukan suatu bahasa pemrogramman. Selain bahasa mesin / assembly yang masuk dalam kategori bahasa tingkat rendah (low-level language), namun ada juga bahasa pemrogramman yang familiar digunakan, yakni Pemrogramman berbasis bahasa C. Program ini masuk dalam klasifikasi bahasa tinggat tinggi (high-level language), maka dari itu pemrogrammannya lebih mudah diinterpretasikan daripada bahasa level rendah.
Bahasa pemrograman C merupakan salah satu bahasa pemrograman computer dan embedded-system yang banyak diminati, bahasa ini dibuat pada tahun 1972 oleh Dennis Ritchie yang dipergunakan untuk Sistem Operasi (Operating System) UNIX di Bell Telephone Laboratory.
Perkembangan yang berlangsung dalam dunia computer membuat munculnya versi-versi C lain, yang akhirnya untuk menghindari kebingungan standar yang ada, maka pada tahun 1983 dibuatlah suatu komite yang bernama “American National Standard Institute” (ANSI) yang bertugas membuat sebuah versi standar dari Bahasa C. Tepat pada tahun 1989 berhasil disahkan standar ANSI X3.159-1989 yang dikenal dengan nama ANSI C atau C89. Kemudian pada tahun 1990, ANSI C diadopsi oleh “Organization for Standardization (ISO) dengan perubahan nama ISO/IEC 9899:1990 yang sering disebut ISO C atau C90. Karena versi ANSI C dan ISO C hanya memiliki sedikit perbedaan, pemanggilan C90 dan C89 merujuk pada bahasa yang sama.
2. Pengantar Bahasa C
#include digunakan untuk mengintegrasikan file dalam source code program yang dibuat. /* File will be looked for in the /inc directory of the compiler. */ #include <file_name>
/* File will be looked for in the current project directory. If its not located there, then it will be included from the /inc directory of the compiler. */
#include "file_name"
#define digunakan untuk mendefinisikan suatu “macro”.
Praktikum Embedded System (Sistem Tertanam)
Departemen Fisika | Instrumentasi | FMIPA | Universitas Indonesia [ 2016 ]
Comment “ /* “ atau “ // ” digunakan untuk memberikan komentar dalam bagian program,
dan khusus pada bagian ini tidak akan dieksekusi oleh
compile
.
/* This is a comment */ /* This is a
multiple line comment */ // This is also a comment
Constant berfungsi untuk memberikan suatu nilai dengan tipe data tertentu.
const <type definition> <identifier> = constant expression; /* Global constants declaration */
const char char_constant='a'; const int b=1234+5;
const long long_int_constant1=99L;
const long long_int_constant2=0x10000000; const float pi=3.14;
void main(void) {
/* Local constants declaration */ const long f=22222222;
const float x=1.5; }
Type Conversion dapat menggunakan mekanisme
casting
yang berfungsi untuk
memaksakan suatu variable untuk dikonversi menjadi tipe data sesuai dengan
casting
yang diberikan
.
Contoh berikut ini merupakan, mekanisme
casting
dengan memberikan
niali vaiabel b dikonversi dalam format tipe data integer (int).
void main(void) {
int a, c; long b;
/* The long integer variable b will be treated here as an integer */ c=a+(int) b;
}
Tipe Data
Type Size (Bits) Range
Bit 1 0 , 1
bool, _Bool 8 0 , 1
Char 8 -128 to 127
unsigned char 8 0 to 255
Praktikum Embedded System (Sistem Tertanam)
Departemen Fisika | Instrumentasi | FMIPA | Universitas Indonesia [ 2016 ]
Int 16 -32768 to 32767
short int 16 -32768 to 32767 unsigned int 16 0 to 65535 signed int 16 -32768 to 32767
long int 32 -2147483648 to 2147483647 unsigned long int 32 0 to 4294967295
signed long int 32 -2147483648 to 2147483647
float 32 ±1.175e-38 to ±3.402e38
double 32 ±1.175e-38 to ±3.402e38
Operators yang dapat di
compile
pada system ANSI-C.
+ * / % ++ -- = == ~ ! != < > <= >= & && | || ^ ? : << >> -= += /= %= &= *= ^= |= >>= <<= sizeof
Character: berfungsi sebagai representasi dari fungsi umum pada keyboard yang
dituliskan dalam
representation
dan Hex Value pada program Bahasa-C.
Praktikum Embedded System (Sistem Tertanam)
Departemen Fisika | Instrumentasi | FMIPA | Universitas Indonesia [ 2016 ]
Library Function Reference: berfungsi sebagai
library
referensi yang memiliki fungsi
tertentu dalam file header (contoh stdio.h = standard input output dot header: yang
berfungsi sebagai
library
yang dapat berfungsi sebagai mekanisme I/O pada
peripheral
komputer.
/* Header files are included before using the functions */ #include <stdlib.h> // for abs
#include <stdio.h> // for putsf void main(void)
{
int a,b; a=-99;
/* Here you actually use the functions */ b=abs(a);
putsf("Hello world"); }
Standart Input/Output (format untuk mekanisme komunikasi Mikrokontroler dengan
computer melalui komunikasi serial)
char getchar(void) // menerima suatu nilai variable
returns a character received by the UART, using polling.
void putchar(char c) // mengirimkan nilai karakter c dalam tipe data char transmits the character c using the UART, using polling.
3. Sktruktur Alkgoritma dasar dalam Pemrograman Dasar C
Berikut ini merupakan contoh program dasar dalam ANSI-C, yang menampilkan pada layar monitor tulisan HELLO WORLD.
#include <stdio.h>
void main() {
printf("HELLO WORLD"); /* the classic C test program.. */ while(1) // do forever..
}
Struktur algoritma program untuk membuat Function:
int alfa(char par1, int par2, long par3); int alfa(char par1, int par2, long par3) {
/* Write some statements here */ }
Praktikum Embedded System (Sistem Tertanam)
Departemen Fisika | Instrumentasi | FMIPA | Universitas Indonesia [ 2016 ]
Algoritma Program untuk sistem LOOPING (Perulangan)
WHILE LOOP
#include <stdio.h> void main(void) { char c; c = 0;printf(" Start of program \n");
while(c < 100) // if c less than 100 then .. {
printf("c = %d\n",(int)c); // print c’s value each // time through the loop
c++; // increment c }
printf(" End of program \n"); // indicate that the //program is finished
while(1) // since 1 is always TRUE, then just sit here.. ; }
DO/WHILE LOOP
#include <stdio.h> void main(void) { char c; c = 0;printf(" Start of program \n");
do {
printf("c = %d\n",(int)c); // print c’s value each // time through the loop
c++; // increment c
} while(c < 100); // if c less than 100 then //repeat the operation
printf(" End of program \n"); // indicate that the //program is finished
while(1) // since 1 is always TRUE, then just sit here.. ;
Praktikum Embedded System (Sistem Tertanam)
Departemen Fisika | Instrumentasi | FMIPA | Universitas Indonesia [ 2016 ]
FOR LOOP
#include <stdio.h> void main(void) {
char c;
printf(" Start of program \n");
for(c = 0; c < 100; c++) // if c less than 100 then .. {
printf("c = %d\n",(int)c); // print c’s value each time // through the loop
} // c++ is executed before the // loop returns to the top
printf(" End of program \n"); // indicate that the program is // finished
while(1) // since 1 is always TRUE, then just sit here.. ; }
IF/ELSE
#include <stdio.h> void main(void) { char c;printf(" Start of program \n");
for(c = 0; c < 100; c++) // while c is less than 100 then .. {
if(c < 33)
printf("0<c<33 "); // use if/else to show the range of else if((c >32) && (c < 66)) // numbers that c is in printf("33<c<66 ");
else
printf("66<c<100 ");
printf("c= %d\n",(int)c); // print c’s value each time //through the loop
}
printf(" End of program \n"); // indicate that the program is finished while(1) // since 1 is always TRUE, then just sit here..
; }
SWITCH CASE
#include <stdio.h>
#include <mega128.h> // register definition header file for an Atmel ATMEGA128 void main(void)
{
unsigned char c; while(1)
{
Praktikum Embedded System (Sistem Tertanam)
Departemen Fisika | Instrumentasi | FMIPA | Universitas Indonesia [ 2016 ]
switch(c) {
case '0':
case '1': // you can have multiple cases case '2': // for a set of statements.. case '3':
printf(" c is a number less than 4 \n"); break; // break to skip out of the loop case '5': // or just one is ok..
printf(" c is a 5 \n"); break; default: printf(" c is 4 or is > 5 \n"); } } } }
PROGRAM FOR LOOP DAN IF/ELSE
#include <mega128.h> // register definition file for an Atmel ATMEGA128 #define test_port PORTA
void main(void) {
unsigned char cnt, bit_mask; //variables bit_mask = 1; //start with lowest bit
for (cnt=0;cnt<8;cnt++) //for loop to test 8 bits {
// the instructions below test port bits // and print result
if (test_port & bit_mask)
printf("Bit %d is high.\n",(int)cnt); else
printf("Bit %d is low.\n",(int)cnt); bit_mask <<= 1; //shift bit to be tested }
while(1) // since 1 is always TRUE, then just sit here.. ;
}
4. Pengenalan Umum IDE CvAVR
CodeVisionAVR (CVAVR) merupakan suatu compiler berbasis bahasa C untuk program MCU (Micro-Controller Unit) yang dibuat dalam sistem IDE (Integrated Development Environment), Automatic Program Generator dan In-System Programmer. Compiler ini masuk dalam kategori High Performance ANSI C Compiler yang khusus dipergunakan untuk mikrokontroler dalam keluarga Atmel AVR. Untuk penjelasan lengkap mengenai pengoperasian Compiler Software IDE CvAVR silahkan baca
CodeVisionAVR (CvAVR) User Manual pada rujukan referensi pada
dokumen ini.
Praktikum Embedded System (Sistem Tertanam)
Departemen Fisika | Instrumentasi | FMIPA | Universitas Indonesia [ 2016 ]
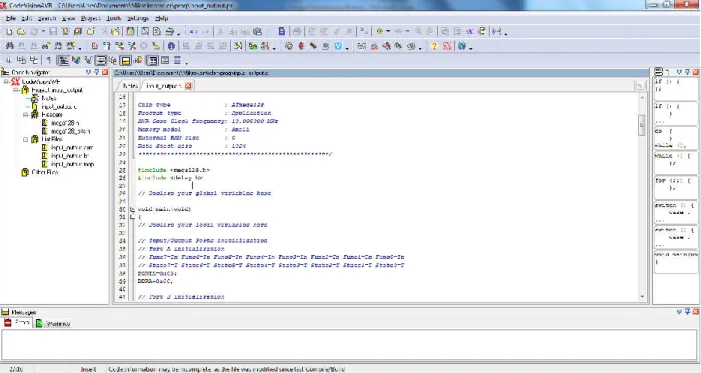
Gambar 1. Tampilan IDE Compiler CvAVR
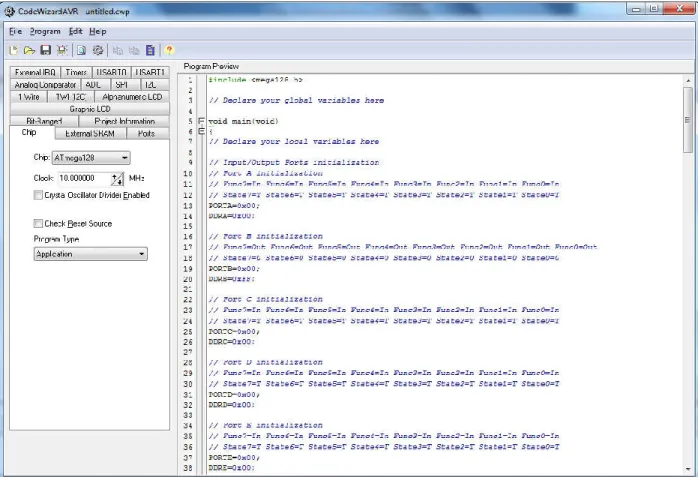
Gambar 2. Code Template yang dapat digunakan untuk membantu menyusun struktur dasar program
Praktikum Embedded System (Sistem Tertanam)
Departemen Fisika | Instrumentasi | FMIPA | Universitas Indonesia [ 2016 ]
Gambar 3. Konfigurasi Compiler CvAVR untuk pemilihan chip mikrokontroler dan Clock yang disesuaikan dengan Hardware yang dipergunakan
Gambar 4. Konfigurasi system Input/Output pada panel IDE CvAVR dengan meng-click “Data Direction” sebagai Input atau Output, system Wizard akan meng-generate program
Praktikum Embedded System (Sistem Tertanam)
Departemen Fisika | Instrumentasi | FMIPA | Universitas Indonesia [ 2016 ]
5. Configurasi Mikrokontroler AVR untuk mekanisme program Input/Output
Register DDRx (Data Direction Register) pada mikrokontroler digunakan untuk mendefinisikan
PORT agar dapat menjadi sebagai Input atau Output. Apabila kita memberikan level logika pada
register DDR bernilai 1 (HIGH) maka PORT tersebut akan dikonfigurasikan sebagai Output,
namun apabila level logika pada register DDR bernilai 0 (LOW) maka Port tersebut
dikonfigurasikan sebagai Input.
Contoh konfigurasi dasar register DDR untuk sistem I/O:
DDRA=0×FF → konfigurasi Port A sebagai Output
DDRA=0×00 → konfigurasi Port A sebagai Input
PINx digunakan untuk mengambil/membaca data dari port mikrokontroler, saat dikonfigurasikan
sebagai INPUT.
Contoh:
PINB=0×FF → maka Pin B = 11111111 (biner) sebagai input
PINB=0×A3 → maka Pin B = 10100011 (biner) sebagai input
PORTx digunakan untuk mengeluarkan atau menulis data ke PORT mikrokontroler saat
dikonfigurasikan sebagai OUTPUT.
Contoh:
PORTB=0×FF → maka Port B = 11111111 (biner) sebagai output
PORTB=0×A3 → maka Port B = 10100011 (biner) sebagai output
6. Contoh Konfigurasi Program Input/Output dengan Program Bahasa C
============================================================================= DDRA=0×07; //PA0-PA2=output dan PA3-PA7 dikonfigurasikan menjadi input
PORTA=0×FF; //memberikan logika HIGH untuk Port A (kondisi awal LED mati) While (1)
{
// PA0-PA2 = LOW dan port lainnya HIGH, agar LED menyala semua PORTA=0×F8;
}
============================================================================= DDRA=0×07; //PA0-PA2 dikonfigurasikan sebagai output, dan PORT lainnya input PORTA=0×FF; //memberikan logika high untuk PA, agar kondisi awal LED mati
Praktikum Embedded System (Sistem Tertanam)
Departemen Fisika | Instrumentasi | FMIPA | Universitas Indonesia [ 2016 ]
While (1) {
PORTA.0=0; //logika LOW untuk PA0 PORTA.1=1; //logika HIGH untuk PA1 PORTA.2=0; //logika LOW untuk PA2 }
============================================================================= #include <delay.h>
void main(void) {
DDRC=0b00000100 // inisialisasi port C dalam format biner while (1) { If(PINC.0==1) { PORTC.2=0; delay_ms(100); } else { PORTC.2=1; delay_ms(100); } } }