Beijing • Cambridge • Farnham • Kln • Sebastopol • Taipei • Tokyo
Android Development
Wouldn’t it be dreamy if there was a book on Android development that could turn me into an expert while keeping me engaged and entertained? But it’s
probably just a fantasy...
Head First Android Development by Jonathan Simon
Copyright © 2011 Jonathan Simon. All rights reserved.
Printed in the United States of America.
Published by O’Reilly Media, Inc., 1005 Gravenstein Highway North, Sebastopol, CA 95472.
O’Reilly Media books may be purchased for educational, business, or sales promotional use. Online editions are also available for most titles (safari.oreilly.com). For more information, contact our corporate/institutional sales department: (800) 998-9938 or [email protected].
Series Creators: Kathy Sierra, Bert Bates
Editor: Brian Sawyer
Cover Designers: Karen Montgomery Production Editor: TK
Indexer: TK
Proofreader: TK
Page Viewers: Felisa
Printing History: October 2011: First Edition.
The O’Reilly logo is a registered trademark of O’Reilly Media, Inc. The Head First series designations, Head First Android Development and related trade dress are trademarks of O’Reilly Media, Inc.
Many of the designations used by manufacturers and sellers to distinguish their products are claimed as trademarks. Where those designations appear in this book, and O’Reilly Media, Inc., was aware of a trademark claim, the designations have been printed in caps or initial caps.
While every precaution has been taken in the preparation of this book, the publisher and the authors assume no responsibility for errors or omissions, or for damages resulting from the use of the information contained herein.
Ella Simon
2002 - 2011
This book is dedicated to our dog...
Our super-cute
dog, Ella, that
sadly passed away.
We love you!!
I miss you Ella!
the author
Author of He ad First Android Development
Before the modern smartphone era,
Jonathan Simon
was coding away at the cool phones of the day, writing low level UI frameworks and debugging tiny screens (back when 176x220 was huge!) with a magnifying glass. Since then, he’s worked with all kinds of phones, even the new ones with big fancy schmancy screens.Before working with mobile devices, Jonathan spent a good six years working on Wall Street designing and building user interfaces for trading systems. And no, it’s not his fault the stock market tanked, honest! He also can’t give you any stock tips. (Sorry!)
When he’s not coding or designing, he’s probably hanging out with his wife, Felisa, or their dog, Billie. Otherwise, he’s probably riding (or building) a bike or perfecting his espresso extraction.
Jonathan Simon
Table of Contents (the real thing)
So you’re thinking: “What makes Android so special?”
Android is a free and open operatingsystem from Google that runs on all kinds of devices from phones, to tablets and even televisions. That’s a ton of different devices you can target with just one platform! (And the market share is gaining too!) Google provides all of the stuff you need to get started building Android apps
for free. You can build your Android apps on Macs, Windows, or Unix and publish your apps for next to nothing (with no need for anyone’s approval). Ready to get started? Great! You’re going to start building your first Android app, but first there are a few things to set up...
Your First App
Table of Contents (Summary)
Intro xi
1 Your first app: Meet Android 1
2 Give your app an action: Adding behavior 41
3 Pictures from space: Work with feeds 79
4 When things take time: Long-running processes 123 5 Run your app everywhere: Multiple-device support
6 Tablets are not just big phones: Optimizing for tablets
7 Building a list-based app: Lists and adapters 167 8 Navigation in Android: Multi-screen apps 205 9 Database persistence: Store your stuff with SQLite 265
10 RelativeLayout: It’s all relative 313
11 Give your app some polish: Tweaking your UI 345 12 Make the most of what you can use: Content proficers 393
table of contents
Your first app
1
meet android
So you’re thinking: “What makes Android so special? ”
Android is a free and open operatingsystem from Google that runs on all kinds of devices from phones, to tablets and even televisions. That’s a ton of different devices you can target with just one platform! (And the market share is gaining too!) Google provides all of the stuff you need to get started building Android apps
for free. You can build your Android apps on Macs, Windows, or Unix and publish your apps for next to nothing (with no need for anyone’s approval). Ready to get started? Great! You’re going to start building your first Android app, but first there are a few things to setup...
Give your app an action
Apps are interactive!
When it comes to apps, it’s what your users can do with your apps that make them love ‘em. As you saw in Chapter 1, Android really separates out the visual definition of your apps (remember all that XML layout and String resource work you just did!) from the behavior that’s defined in Java code. In this chapter, you’re going to add some behavior to the AndroidLove haiku app. And in the process you’ll learn how the XML resources and Java work seamlessly together to give you a great way to build your Android apps!adding behavior
2
Pictures from space!
3
work with feeds
RSS feeds are everywhere!
From weather and stock information to news and blogs, huge amounts of content are distributed in RSS feeds and just waiting to be used in your apps. In fact, the RSS feed publishers want you to use them! In this chapter, you’ll learn how to build your own app that incorporatesWhen things take time
It would be great if everything happened instantly
. Unfortunately, some things just take time. This is especially true on mobile devices, where network latency and the occasionally slow processors in phones can cause things to take abit longer. You can make your apps faster with optimizations, but some things just take time. But you can learn how to manage long-running processes better. In this chapter, you’ll learn how to show active and passive status to your users. You’ll also learn how to perform expensive operations off the UI thread to guarantee your app is always responsive.
long-running processes
4
Run your app everywhere
5
There are a lot of different sized Android devices out
multiple-device support
there.
You’ve got big screens, little screens, and everything in between. And it’s your job to support them all! Sounds crazy, right? You’re probably thinking right now “How can I possibly support all of these different devices?” But with the right strategies, you’ll be able to target all of these devices in no time and withconfidence. In this chapter, you’ll learn how Android classifies all of these different devices into groups based on screen size as well as screen density. Using these groups, you’ll be able to make your app look great on all of these different devices, and all with a manageable amount of work!
Tablets are not just big phones
table of contents
8
Navigation
multi-screen apps
Eventually you’ll need to build apps with more than one
screen.
. So far, all of the apps you’ve built only have a single screen. But the great apps you’re going to build may need more than that! In this chapter, you’ll learn how to do just that. You’ll build an app with a couple of screens, and you’ll learn how to create a new Activity and layout which was previously done for you by the Wizard. You’ll learn how to navigate between screens and even pass data between them. You’ll also learn how to make your own Android context men- the menu that pops up when press the Menu button!9
Store your stuff with SQLite
In memory data storage only gets you so far.
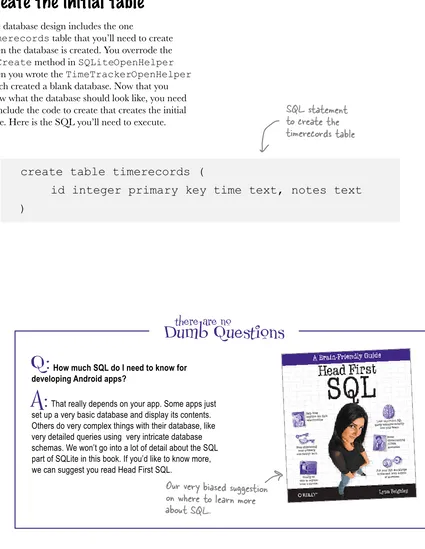
In the last chapter, you built a list adapter that only stored data in memory. But if you want the app toremember data between sessions, you need to persist the data. There are a few ways to persist data in Android including writing directly to files and using the built in SQLite database. In this chapter, you’ll learn to use the more robust SQLite database solution. You learn how to create and manage your own SQLite database. You’ll also learn how to integrate that SQLite datase with the ListView in the TimeTracker app. And don’t worry, if you’re new to SQL, you’ll learn enough to get started and pointers to more information.
database persistence
Building a list-based app
Where would we be without lists?
They display read-only information, provide a way for users to select from large data sets, or even act as navigational device by building up an app with a list-based menu structure. In this chapter, you’ll learn how to build an app with a list. You learn about where lists store data (in Adapters) and how to customize how that data is rendered in your list. You’ll also learn about adding additional layouts to your app (not just the layout that the Wizard creates for you) and turn that into a real view.Giving your app some polish
11
With all the competition in the marketplace, your apps
tweaking your ui
must do more than just work.
They have to look great doingit! Sometimes, basic graphics and layouts will work. But other times, you’ll need to crank it up a notch. In this chapter, you’ll learn about a new layout manager called Relative Layout. It’ll let you lay out your screens in ways that you just can’t do with LinearLayout and help you code your designs just the way you want them. You’ll also learn more techniques for using images to polish up the look and feel of your app. Get your app noticed!
Make the best of what you can use
You don’t want to reinvent the wheel, do you?
Of course you don’t; you’ve got apps to build! Well, one of the awesome benefits of Android is the ease in which you can use bits of other applications with content providers. Android apps can expose functionality they want to share and you can use that in your apps. But this doesn’t work only for market apps; a number of built-in apps (like the Address Book) expose stuff you can use in your apps too. In this chapter, you’ll learn how to use content providers in your app. And who knows, you might like this whole content provider thing so much, you’ll decide to provide some of your own content to other apps!content providers
12
It’s all relative
Intro
In this section we answer the burning ques
tion:
“So why DID they put that in an Android book?”
I can’t believe they put
that
inhow to use this book
Who is this book for?
Who should probably back away from this book?
If you can answer “yes” to all of these:If you can answer “yes” to any of these: this book is for you.
this book is not for you.
[Note from marketing: this book
is for anyone with a credit card.]
Do you prefer stimulating dinner party conversation to dry, dull, academic lectures?
3
Do you want to build mobile apps for an awesome mobile OS that runs on tons of devices?
2
Are you solid with the basic Android development fundamentals and are just looking for a guide to its super-advanced features, like ADL or services?
2
Have you done some Java programming, but don’t consider yourself a master?
1
Have you already mastered Android programming but need a solid reference?
1
Are you afraid to try something different? Would you rather have a root canal than mix stripes with plaid? Do you believe that a technical book can’t be serious if it anthropomorphizes control groups and objective functions?
“How can this be a serious Android development book?” “What’s with all the graphics?”
“Can I actually learn it this way?”
Your brain craves novelty. It’s always searching, scanning, waiting for something unusual. It was built that way, and it helps you stay alive.
So what does your brain do with all the routine, ordinary, normal things you encounter? Everything it can to stop them from interfering with the brain’s real job—recording things that matter. It doesn’t bother saving the boring things; they never make it past the “this is obviously not important” filter.
How does your brain know what’s important? Suppose you’re out for a day hike and a tiger jumps in front of you, what happens inside your head and body?
Neurons fire. Emotions crank up. Chemicals surge. And that’s how your brain knows...
This must be important! Don’t forget it!
But imagine you’re at home, or in a library. It’s a safe, warm, tiger-free zone. You’re studying. Getting ready for an exam. Or trying to learn some tough
technical topic your boss thinks will take a week, ten days at the most. Just one problem. Your brain’s trying to do you a big favor. It’s trying to make sure that this obviously non-important content doesn’t clutter up scarce resources. Resources that are better spent storing the really big things. Like tigers. Like the danger of fire. Like how you should never have posted those “party” photos on your Facebook page. And there’s no simple way to tell your brain, “Hey brain, thank you very much, but no matter how dull this book is, and how little I’m registering on the emotional Richter scale right now, I really do want you to keep this stuff around.”
We know what you’re thinking
We know what your brain is thinking
Your brain think
s
THIS is imp
ortant.
Your brain
thinks THIS isn’t
worth saving.
how to use this book
So what does it take to learn something? F
irst, you have to get it, then make sure y ou
don’t forget it. It’s not about pushing facts into y
our head. Based on the latest research
in cognitive science, neurobiology, and educa
tional psychology, learning takes a lot
more than text on a page. We know what turns y
our brain on.
Some of the Head First learning principles:
Make it visual. Images are far more memorable than wo
rds alone, and make learning
much more effective (up to 89% improvement in recall and tr
ansfer studies). It also makes
things more understandable. Put the words w
ithin or near the graphics they
relate to, rather than on the bottom or on another page, and
learners will be up to twice as
likely to solve problems related to the content.
Use a conversational and personalized style.
In recent studies, students performed up to 40%
better on post-learning tests if the content spoke directly to
the reader, using a first-person, conversational
style rather than taking a formal tone. Tell stories instead of l
ecturing. Use casual language. Don’t take
yourself too seriously. Which would you pay more attention
to: a stimulating dinner party companion, or a
lecture?
Get the learner to think more deeply.
In other words, unless you actively
flex your neurons, nothing much happens in your head. A r
eader has to be motivated,
engaged, curious, and inspired to solve problems, draw concl
usions, and generate new
knowledge. And for that, you need challenges, exercises, an
d thought-provoking questions,
and activities that involve both sides of the brain and multip le senses.
Get—and keep—the reader’s att
ention. We’ve all had the “I really want to learn this but I can’t stay awake past page one” experience. Your brain pays attention t
o things that are out of the ordinary, interesting,
strange, eye-catching, unexpected. Learning a new, tough, t
echnical topic doesn’t have to be boring. Your
brain will learn much more quickly if it’s not.
Touch their emotions. We now know that
your ability to remember something
is largely dependent on its emotional content. You rememb
er what you care about.
You remember when you feel something. No, we’r
e not talking heart-wrenching
stories about a boy and his dog. We’re talking emotions like s
urprise, curiosity, fun,
“what the...?” , and the feeling of “I Rule!” that comes when y
ou solve a puzzle, learn
something everybody else thinks is hard, or realize you know
something that “I’m
more technical than thou” Bob from engineering doesn’t.
Me tacognition: thinking about thinking
I wonder how I can trick my brain into remembering this stuff...
If you really want to learn, and you want to learn more quickly and more deeply, pay attention to how you pay attention. Think about how you think. Learn how you learn.
Most of us did not take courses on metacognition or learning theory when we were growing up. We were expected to learn, but rarely taught to learn.
But we assume that if you’re holding this book, you really want to learn Android. And you probably don’t want to spend a lot of time. If you want to use what you read in this book, you need to remember what you read. And for that, you’ve got to understand it. To get the most from this book, or any book or learning experience, take responsibility for your brain. Your brain on this
content.
The trick is to get your brain to see the new material you’re learning as Really Important. Crucial to your well-being. As important as a tiger. Otherwise, you’re in for a constant battle, with your brain doing its best to keep the new content from sticking.
So just how DO you get your brain to treat Android like it was a hungry tiger?
There’s the slow, tedious way, or the faster, more effective way. The
slow way is about sheer repetition. You obviously know that you are able to learn and remember even the dullest of topics if you keep pounding the same thing into your brain. With enough repetition, your brain says, “This doesn’t feel important to him, but he keeps looking at the same thing over and over and over, so I suppose it must be.”
The faster way is to do anything that increases brain activity, especially different
types of brain activity. The things on the previous page are a big part of the solution, and they’re all things that have been proven to help your brain work in your favor. For example, studies show that putting words within the pictures they describe (as opposed to somewhere else in the page, like a caption or in the body text) causes your brain to try to makes sense of how the words and picture relate, and this causes more neurons to fire. More neurons firing = more chances for your brain to get that this is something worth paying attention to, and possibly recording.
A conversational style helps because people tend to pay more attention when they perceive that they’re in a conversation, since they’re expected to follow along and hold up their end. The amazing thing is, your brain doesn’t necessarily care that the “conversation” is between you and a book! On the other hand, if the writing style is formal and dry, your brain perceives it the same way you experience being lectured to while sitting in a roomful of passive attendees. No need to stay awake.
how to use this book
Here’s what WE did:
We used pictures, because your brain is tuned for visuals, not text. As far as your brain’s concerned, a picture really is worth a thousand words. And when text and pictures work together, we embedded the text in the pictures because your brain works more effectively when the text is within the thing the text refers to, as opposed to in a caption or buried in the text somewhere.
We used redundancy, saying the same thing in different ways and with different media types, and multiple senses, to increase the chance that the content gets coded into more than one area of your brain.
We used concepts and pictures in unexpected ways because your brain is tuned for novelty, and we used pictures and ideas with at least some emotional content, because your brain is tuned to pay attention to the biochemistry of emotions. That which causes you to feel
something is more likely to be remembered, even if that feeling is nothing more than a little
humor, surprise, or interest.
We used a personalized, conversational style, because your brain is tuned to pay more attention when it believes you’re in a conversation than if it thinks you’re passively listening to a presentation. Your brain does this even when you’re reading.
We included more than 80 activities, because your brain is tuned to learn and remember more when you do things than when you read about things. And we made the exercises challenging-yet-do-able, because that’s what most peopleprefer.
We used multiple learning styles, because you might prefer step-by-step procedures, while someone else wants to understand the big picture first, and someone else just wants to see an example. But regardless of your own learning preference, everyone benefits from seeing the same content represented in multiple ways.
We include content for both sides of your brain, because the more of your brain you engage, the more likely you are to learn and remember, and the longer you can stay focused. Since working one side of the brain often means giving the other side a chance to rest, you can be more productive at learning for a longer period of time.
And we included stories and exercises that present more than one point of view,
because your brain is tuned to learn more deeply when it’s forced to make evaluations and judgments.
We included challenges, with exercises, and by asking questions that don’t always have a straight answer, because your brain is tuned to learn and remember when it has to work at something. Think about it—you can’t get your body in shape just by watching people at the gym. But we did our best to make sure that when you’re working hard, it’s on the right things. That you’re not spending one extra dendrite processing a hard-to-understand example, or parsing difficult, jargon-laden, or overly terse text.
So, we did our part. The rest is up to you. These tips are a starting point; listen to your brain and figure out what works for you and what doesn’t. Try new things.
6 Drink water. Lots of it.
Your brain works best in a nice bath of fluid. Dehydration (which can happen before you ever feel thirsty) decreases cognitive function.
9 Get your hands dirty!
There’s only one way to learn to Android: get your hands dirty. And that’s what you’re going to do throughout this book. Android Development is a skill, and the only way to get good at it is to practice. We’re going to give you a lot of practice: every chapter has exercises that pose a problem for you to solve. Don’t just skip over them—a lot of the learning happens when you solve the exercises. We included a solution to each exercise—don’t be afraid to peek at the solution if you get stuck! (It’s easy to get snagged on something small.) But try to solve the problem before you look at the solution. And definitely get it working before you move on to the next part of the book.
8 Feel something.
Your brain needs to know that this matters. Get involved with the stories. Make up your own captions for the photos. Groaning over a bad joke is still better than feeling nothing at all.
7 Listen to your brain.
Pay attention to whether your brain is getting overloaded. If you find yourself starting to skim the surface or forget what you just read, it’s time for a break. Once you go past a certain point, you won’t learn faster by trying to shove more in, and you might even hurt the process.
5 Talk about it. Out loud.
Speaking activates a different part of the brain. If you’re trying to understand something, or increase your chance of remembering it later, say it out loud. Better still, try to explain it out loud to someone else. You’ll learn more quickly, and you might uncover ideas you hadn’t known were there when you were reading about it.
4 Make this the last thing you read before bed. Or at least the last challenging thing.
Part of the learning (especially the transfer to long-term memory) happens after you put the book down. Your brain needs time on its own, to do more processing. If you put in something new during that processing time, some of what you just learned will be lost.
3 Read the “There are No Dumb Questions”
That means all of them. They’re not optional sidebars, they’re part of the core content!
Don’t skip them.
Cut this out and stick
it on your refrigerator.
Here’s what YOU can do to bend
your brain into submission
2 Do the exercises. Write your own notes.
We put them in, but if we did them for you, that would be like having someone else do your workouts for you. And don’t just look at the exercises. Use a pencil. There’s plenty of evidence that physical activity while learning can increase the learning. Don’t just read. Stop and think. When the book asks you a question, don’t just skip to the answer. Imagine that someone really is asking the question. The more deeply you force your brain to think, the better chance you have of learning and remembering.
Slow down. The more you understand, the less you have to memorize.
technical review team
Paul Barry
David Griffith
Frank Maker
Herve Guihot
Technical Reviewers:
Acknowledgments
My editor:
Brian Sawyer kept the ball rolling all through this process. I had to learn a lot to pull this off, and he always made sure I was hooked up with the right folks to help me get it done!
My design editor:
Dawn Griffiths used her keen design sense and Head First touch to make these pages more beautiful and more learner friendly.
My wife:
As with everything else in my life, this book would not have been possible without my totally super awesome wife,
Felisa! She listened to countless hours of discussion on Android, as well as the finer points of teaching it Head First. Undoubtedly, she rocks!
Brian Sawyer
safari books online
Safari® Books Online
When you see a Safari® icon on the cover of your favorite technology book that means the book is available online through the O’Reilly Network Safari Bookshelf.
Your first app
So you’re thinking: “What makes Android so special? ”
Android is a free and open operatingsystem from Google that runs on all kinds of devices fromphones, to tablets and even televisions. That’s a ton of different devices you can target with just one platform. (And the market share is gaining too). Google provides everything you need to get started building Android apps for free. And you can build your Android apps on either Mac, Windows, or Unix and publish your apps for next to nothing (and with no need for anyone’s approval). Ready to get started? Great! You’re going to start building your first Android app, but first there are a few things to setup...
Wait, Android is a Free and Open Source mobile OS?
That’s crazy!
why android
So you want to build an Android app...
Maybe your an Android user, you already know Java and want to get in on the mobile craze, or you just love the open operating system and hardware distribution choices of Android. Whatever your reason, you’ve come to the right place.
Android already runs on a TON of different devices!
With careful planning, you’re app can run on all of these Android powered devices. From phones and tablets, to TVs and
even home automation, Android is spreading quickly.
Your one app
can run on all
these devices...
Tablets.
TVs.
And it’s growing!
-- Google’s Head of Android, Andy Rubin, via Twitter
“Over
500,000
Android devices [are] activated every day”
Just check out the Android Market
The Android Market has a ton of apps. There are or course games (because we all love playing games on our phones), but also really great apps that just make our lives better like navigation and commuting schedule apps.
That’s a LOT of
devices in one day!
There are a lot of mobile platforms out there, but with Android’s presence and growth, everyone is building out their Android apps. Welcome to Android, it’s a great place to be!
Before you dig into your first app, let’s take a look at exactly what Android is and who’s responsible for it...
The Android
Market web view
for an outdoor
the android ecosystem
So tell me about Android...
Android is a mobile operating syetem, but it’s a lot more than that too. There is a whole ecosystem, a complete platform, and community that supports Android apps getting built and on to new Android based
hardware devices.
Google maintains Android
Google maintains Android, but it’s free to use. Device manufacturers and carriers can modify me, and developers can build apps for free.
1 Hardware manufacturers build a device
Hardware manufactures can use the Android operating system and build special hardware around it. Manufacturers can even modify Android to implement custom functionality for their devices.
2
Google gives you the tools
Google freely distributes the tools for you to build your own Android apps. And you can build your apps on multiple platforms: Mac, Windows, Linux...
3 Google also runs a Market
This is where your users can download their apps right to their phones. Google runs one market, but there are also others run by Amazon, and Verizon for example. But the biggest one is still Google’s.
4 Google manages
With all these different devices and OS variations, how do you build anything at all? Where do you even start?
In practice, it’s not so bad!
It’s true that there are a bunch of different Android devices out there, from all kinds of
different manufacturers running different
modifications of Android. Sounds crazy right? While it definitely takes some care tuning your apps for these different devices, you can get started building basic phone apps really easily. And that’s what you’re going to do right now.
Later on in the book, you’ll learn strategies for dealing with different types of devices like phones with different resolutions and even designing for phones and tablets in the same app.
Let’s get started.
the android rockers
Meet Pajama Death
It’s time to introduce you to an awesome rock duo called the Pajama Death! They love Android and love to sing about it!
They write all of their song lyrics in the form of a haiku
Pajama
Death
I dreamed of a phone! Open source and Hackable...
Android for the win!!
They’re about to play their favorite song for you!
This one’s called... Android Love!
But they need your help!
OK, let’s get started...
They want to make an app with the Android Love
lyrics to hand out to their fans. But they are Android
I dreamed of an phone
open source and hackable
Android for the win!
Android Love
getting started
Getting started
Just asking you to build an app isn’t a lot to go on. So the Pajama Death made a napkin sketch of what they want the app to look like. It’s an app showing the haiku, with each line of the haiku on a new line.
This looks great but how do I start building it?
First you’ve got some setup to do
Since this is your first Android app, you’ll need to setup your development environment. Let’s start with a quick look at what you need in your development environment to build Android apps. Form there, you’ll install your own development environment, then build the app for Pajama Death!
Meet the android development environment
The Android development environment is made up of several parts that seamlessly work together for you to build Android apps. Let’s take a closer look at each one.
2.2
Eclipse Integrated Development Enviroment (IDE)
The Eclipse Integrated Development Environment (IDE for short) is where you’ll write your code. Eclipse is a generic IDE, not specific to Android development. It’s managed by the Eclipse foundation.
1
Android Development Tools (ADT)
The Android Development Tools (ADT) is an Eclipse plugin that adds Android specific functionality to Eclipse.
2
Software Development Kit (SDK)
The Android Software Development Kit (SDK) contains all of the lower level tools to build, run and test your Android apps. The ADT is really just a user interface, and the guts of the app building all happens here in the ADT.
3
Android Packages
You can develop and support multiple versions of Android from the same developmentw environment. These packages add functionality to the base SDK to let you develop for that Android
4
Eclipse is managed
by the eclipse
foundation.
Everything else is
managed by google.
You can use Mac,
your development environment
You don’t have to use Eclipse.
But it certainly makes things easier. The full integrated Android development environment works well as a whole to help you easily build Android apps.
But everything you need to build and test your Android apps is the Android SDK and Android Packages. If you really cant live without your favorite development environment,. you can use it in conjunction with the SDK without Eclipse and still build Android apps.
Even though you can use the
SDK without Eclipse, all of the
examples in this book will use
Eclipse and the ADT plugin.
Choosing your IDE
Eclipse may be a fine IDE, but what if you don’t want to use it. You may have your own IDE of
choice that you’d rather use... I will only write code
There’s some major app construction projects up ahead. Don’t go any further until you’ve installed your IDE!
Set up your development environment
You won’t be able to build your apps until your development environment is setup! Follow our nifty Android development environment setup instructions over the next few pages and you’ll be ready to build your apps!
eclipse and the SDK
Download, install and launch eclipse
http://www.eclipse.org/downloads
Eclipse is a free and open source IDE managed by the Eclipsefoundation (started and managed by IBM, but a very open community). You can download Eclipse for free from the eclipse. org. There are a number of different versions of Eclipse optimized for different types of development. You should download the latest version of Eclipse Classic for your Operating System.
After you download Eclipse, follow the installation instructions for your platform and launch Eclipse. When you launch Eclipse for the first time, you will be prompted to enter a workspace location; a directory where all of your Eclipse projects and settings will be stored. Feel free to use the default or enter your own.
Doanload and install the SDK
http://developer.android.com/sdk/index.html
Download the SDK
for your platform
The Android SDK contains the core tools needed to build and run Android apps. This includes the Android emulator, builder, docs and more. You can download the SDK from android.developer.com.
Once you download the SDK zip file, unzip it to your hard drive and the SDK is ready to go.
the eclipse plugin
https://dl-ssl.google.com/android/eclipse
Install the ADT
The Android Development Tools (ADT) are the glue that seamlessly connects the Android specific SDK with Eclipse. The ADT is an Eclipse plugin, and it installs through the standard Eclipse plugin installation mechanism (so this should look very familiar if you’re an experienced Eclipse user).
From your Eclipse window, select Help → Install new software. This will bring up the Available Software window. Since this is being installed from scratch, you’ll need to create a new site for the ADT.
Available
Software
window.
Enter this
URL into the
text field.
Press Add...
Name it
Android.
Configure the ADT
Select “Android” from
the Preferences list.
Enter the path where you
unzipped the Android SDK.
The ADT is just the glue between the SDK and Eclipse, so the ADT needs to know where the SDK is installed. Set the SDK location in the ADT by going to Window → Preferences in Eclipse, selecting Android from the left panel, and selecting the directory where you installed the Android SDK.
Geek Bits
It’s a good idea to add the <SDK-install-directory>/ tools directory to your path. The SDK includes a number of command line tools and it’s convenient to be able to launch them without having to type in complete paths.
installing packages
Install android packages
The SDK is designed to allow you to work with multiple versions of Android in the same development environment. To keep downloads small, the SDK version packages are separated from the SDK. (This also allows you to update to new versions of Android without having to redownload the entire SDK. Pretty slick!)
You can configure the installed packages in the SDK from the Android SDK and AVD Manager (another added bonus of the ADT). Open the manager by selecting Window → Android SDK and AVD Manager.
From the left pane, select “Available Packages”.
Android SDK
and AVD
manager.
Expand this item to
view all the available
packages.
Select
available
packages.
Select
android
2.3.3.
Select “SDK Platform Android 2.3.3” and press “Install Selected”.
Press “Instal
Selected”
Do this!
Q:
What about the samples should I install those?A:
Google put together a set of sample apps that show off a bunch of features and techniques in the platform. They won’t be used in the book, but they are extremely useful. If you want to learn about something not covered in the book, the samples are a great place to start.Q:
And what about Tools? Should I install those too?make your own project
Make a new Android app project
Now that you have your environment setup, it’s time to make your first project.
The Eclipse ADT plugin comes with a Wizard to create new Android apps. All you have to do is enter a few bits of information into the wizard, and it makes a fully functional (but very boring) application for you.
Launch the New Android Project wizard by going to File → New → Android Project, then fill in the fields to make your new project!
Call the project
“AndroidLove”
New Android
Project wizard.
Call the project “AndroidLove”. This
is the app name your users will see.
What’s in an Android project?
Wizards are great because they do a lot of basic setup for you. But what did that wizard do anyway? Here’s a quick look at the basic Android project that the wizard created. To look at the project contents, click on the “Package Explorer” tab in Eclipse.
App Behavior in Java code
The behavior of Android apps is built with Java code. This code controls what happens when buttons are pressed, calls to servers, and any other behavior that your app is doing. Your android projects have a source directory where all of the Java code lives.
The Eclipse
Package
Explorer tab.
Binary assets
Great apps need to do more than just deliver great functionality... they need to look great doing it. You’ll be using images to style your app and give them custom polished looks. The images and other raw binary resources in this directory are included in your app.
Resources and XML layouts
For Android apps, layouts are primarily defined in XML rather than code. All sorts of other properties are defined in XML too - like string values, colors, and more. TheseXML files are stored in the res directory.
Configuration files
run your app
The Android SDK includes an Android emulator desktop application that simulates a complete running Android device. It runs a full basic android operating
system and the default set of Android apps. It’s obviously not a complete hardware Android device, but it’s about as close as you can get with hardware emulation!
Running Android emulator.
You can
simulate touch
screen “presses”
by clicking on
the screen with
your mouse.
The emulator
also includes
hardware
buttons like a
keyboard and
the Android
hard buttons.
Run the project!
Test run your apps using the Android emulator
At this point, your new project is all ready to run! The wizard not only setup a project for you, but also created a very basic runnable Android app. How
To run an Android app from Eclipse, select “Run → Run” and you’ll see a dialog that prompts you for how you want to run the project. Since your project is an Android app, select “Android Application” and click on “OK”.
But instead of seeing an Android app running, you’ll see the following dialog.
Alternatively, you can run your android apps by pressing the “play” button on the Eclipse toolbar.
Play button
Eclipse toolbar.
Test Drive
Select Android
Application
what’s an AVD?
Wait, I thought you said I could run the app right out of the box! Were you lying to me?
The app is fine to run.
The issue isn’t with the app the wizard generated, the issue is that there no way to run it. Your Android development environment can built apps for multiple Android versions, hardware configurations and screen sizes. So when you try and run your app, the Android tools don’t know what type of device you want to run your app on.
The solution is to create Android Virtual Devices (or AVD for short) that defines a particular device’s software version and hardware format to run your app in. You can think of an AVD as like a saved emulator configuration.
Since you don’t have an AVD setup already (and there are no stock AVDs in the Android SDK) you have to make your own.
Click Yes on the dialog to take you to the AVD creation screen.
Do this!
Why won’t the app run?
Setup an emulator configuration
Clicking yes on the dialog to create a new AVD takes you to the Android SDK and AVD Manager window. This is the same place you configured the SDK, but now the “Virtual Devices” panel is selected. From here, you’ll be able to create a new AVD.
Give your configuration a name.
Select Android 2.3.3.
Enter 512 here, this will give
the emilator a 512 MB virtual
SD card, general testing.
Click
“Create
AVD”
Click new.to create
born to run
Now that you have an emulator configuration set up, run the app again. Run it the same was as before by pressing the play button in the toolbar. This will first launch the emulator and automatically install your app on the emulator and start your app.
Your app running in
the emulator!
The emulator you
configured
Test Drive
Head First: Hey there, Android Emulator. I wanted to start by thanking you for joining us tonight.
Android Emulator: Well, since I am software I do have to do what you tell me. Just kidding! Happy to be here, as always.
Head First: Fantastic! Just to clear the air here, there’s been some confusion out in the development community. Are you a real Android device or, dare I say, an imposter?
Android Emulator: I’m neither, actually. I’m not a hardware device, but I’m as close to one as you’re going to get with pure software.
Head First: If you’re not a real device, why exactly should we use you?
Android Emulator: There are some serious benefits to me being fully software. For starters, it’s easy to quickly test and debug your software without having to carry around a hardware device. Plus, since I’m fully virtual, I can run as different devices at the same time. If you didn’t use me you’d have to carry around a bag of phones!
Head First: Sounds complicated. How do you keep it all straight?
Android Emulator: Well that’s exactly what the emulator configurations are for! They tell me everything I need to know, from hardware configuration (like screen size), and device capabilities (like wireless latency), and even the version of Android. Everything I need to know about what device I’m supposed to act like is right there!
Head First: Neat! So not only is it easier to use you than a real device for testing, but I can test on all different kinds of devices and Android versions using you instead of keeping a stack of Android devices
around!
Android Emulator: Precisely my friend. Precisely.
Head First: That all sounds great, but if there’s one thing I’ve learned it’s that nothing is ever that easy. What’s the catch?
Android Emulator: The catch is that since I’m not a real device, there are some subtle differences in how I work than a real hardware device.
Head First: For example?
Android Emulator: Well, GPS is a good example. When I’m running, I sort of spoof a location based on your computers location, but I’m not really using GPS, so I can’t be your only test. Photos are another good example. I don’t have my own camera, so I have to fake it a little.
Head First: Sounds like mostly hardware specific differences.
Android Emulator: Pretty much. I am emulating Android hardware devices after all.
Head First: I think I’ve got it. You’re really useful for basic testing, with a number of different configurations. But if I need to test something hardware specific, nothing beats real world hardware.
Android Emulator: Bingo!
Head First: Great. Thanks for joining us! Now, don’t you have some apps to run?
Android Emulator: Sheesh! Always making me work! Anyway, always a pleasure. I’m off to help more developers test their apps!
The Android Emulator Exposed
This week’s interview:
next steps
This app is OK... but the whole point is to show the haiku lyrics to our fans! This isn’t the haiku!
It’s OK. You’re not that far off...
OK, it’s true. Your app isn’t displaying a haiku. But take a step back and compare the app you have with the app that was sketched out. You’ll see they are pretty close.
Let’s get some feedback!
I dreamed of an phone
open source and hackable
Android for the win!
Android Love
They both have titles.
(And the title in your app
already matches the sketch)
Both have text in
the body, but your
app’s text (the
hello world stuff)
doesn;t match the
sketch.
Check for differences
The app you have and the sketch for the app you want are pretty similar. The only difference is that the main text display is displaying a boring hello world message instead of the haiku. Now you just need to replace the boring string with the haiku and you’ll be done with the app.
Start by looking at the layout
There is an XML layout that was generated by the wizard. This is what control the visual display of your app. Let’s take a look at the layout and locate where the string is being set.
screen layouts
Locate the layout
Android layouts are defined in XML There was one layout created for you by the wizard called main. xml. Navigate to /res/layout/main.xml in the exlipse package explorer and double click on it.
These directories hold
resources for specific
screen resolutions. You’ll
learn more about these
later in the book.
Navigate to the main.xml
file in the Eclipse package explorer. Double click on the file to open it.
Do this!
res
drawable-hdpi
drawable-mdpi
drawable-ldpi
layouts
values
main
.xml
Double click main.xml
I was expecting to see the raw XML, since this is an XML file.
What is this?
The main.xml file
open in Eclipse.
When you double click main.xml and open it, you’ll this new pane opened up in Eclipse.
This is a graphical editor provided by the ADT
Many of the files used to build your Android apps are XML based. The ADT Eclipse plugin includes graphical editors for these files that help you edit them.
Now that you’ve seen the visual representation of the XML layout, you can also view the raw XML that the editor is displaying...
what’s in a layout
The graphical editors are just a facade over the XML underneath. So don’t worry, if you want feel all super-coder, you can always jump in edit the XML source. Or you can use the graphical editors, or a mix of both!
Click the main.xml tab on the
bottom to view the XML.
Here is the same
information from the
graphical display in
text XML format.
The layout XML
Q:
Can I edit the XML text here, or do I have to use the graphic editor.A:
The graphical editor just graphically displayed the contents of the XML text file. If you update the XML code, Android will keep the graphical editor in sync.Q:
Can I use both the graphical editor and the text editor, or do I have to choose?A closer look at the layout XML
<?xml version="1.0" encoding="utf-8"?>
<LinearLayout
xmlns:android="http://schemas.android.com/apk/res/android"
android:orientation="vertical"
android:layout_width="fill_parent"
android:layout_height="fill_parent" >
<TextView
android:layout_width="fill_parent"
android:layout_height="wrap_content"
android:text="@string/hello"
/>
</LinearLayout>
Android XML layouts consist of a number of user interface components called Views, and layout managers called ViewGroups. The generated main.xml layout has one ViewGroup with a single View inside it.
Since the TextView is displaying text, the String must be set in there somehow. Let’s take a closer look...
The main.xml
layout XML code.
The ViewGroup, in this
case a LinearLayout
fills the screen.
The View inside the
layout is a TextView, a
View specifically made
to display text.
main.xml
resource values
Take a closer look at the TextView
Android Views are declared in XML layouts along with a number of attributes to configure them. Let’s take a look at the generated TextView from the layout and look at it’s properties.
These XML properties
define the width and
height of the view.
This attribute sets
the text on the view.
The TextView
declaration
from main.xml
Hold on, not so fast! The property seems to be setting the TextView’s text to “@ string/hello” but the app says “Hello World, HaikuDisplay!”. What gives?
Android loves resource properties
It’s a good practice to move details of your user interface to property files. Developers have long since done this with text strings in their apps to spell check easier or prepare for internationalization. Similar needs hold true for colors, font sizes, image names and more!
The “@string/hello” isn’t the string itself, but rather a pointer into a String property file.
Android value files
Right below layouts in the res folder is a folder called values. This folder contains the Android resource value files for your app. Open the folder and you’ll see a single file named strings.xml. Double click strings.xml to open it.
drawable-hdpi
drawable-mdpi
drawable-ldpi
layouts
strings .xml
Navigate to the strings. xml file in the Eclipse package explorer. Double click on the file to open it.
values
Let’s see what’s inside...
Here is the Android
Resources file with
the app’s strings.
Do this!
res
Layout files
are in here
Geek Bits
The raw XML showing
name/value strings resources.
string values
Open the strings.xml file
Opening the strings.xml file will display another Android graphical editor in the main Eclipse pane. This editor is similar to the graphical layout editor, except that it display Android resources.
If you haven’t
already, navigate
to the res/values/
strings.xml file in
the Eclipse package
explorer Double
click on the file to
open.
The strings.xml file
opened in Eclipse.
Click the strings.
xml tab to view
the XML.
Just another graphical editor
Look at the values
You can edit any of the values by select an item from the list on the left of the pane. Once you select an item, a second panel will display showing the name and the value for that item.
Select a
resource
item to edit
Once selected, a new
panel displays where you
can edit the name and
value of the item.
Select the first element labeled “hello” from the list.
There is the hello
world sting displaying
in the app!
Do this!
editing string values graphical editor, it generates the underlying XML. But that underlying XML is just like any other kind of text file to Eclipse and has to be saved after editing. After you make changes in a graphical editor, make sure to save before you run.
Edit the string
With a resource selected from the Resource Elements list, the name and value are editable on the right panel (In this case labeled “Attributes for hello (String)”. Edit the “hello” Resource Element’s value to the haiku.
The attribute name
and value have
editable text fields.
Changing them here
will update the value
in your app.
Edit the Value of the hello Resource Attribute with the following text “I dreamed of a phone\ nOpen source and hackable\nAndroid for the win!”. (The \n’s make new lines so
the haiku will display on three lines.)
With the “hello” Resource Element updated with the poem, run the app again and make sure it shows your changes.
There’s
the haiku
displaying
in the app!
android toolbox
You built your first app using the tools Google provides to help you get started quickly. Your development environment is up and running with Eclipse, the ADT plugin, and SDK configured to use an up-to-date Android version. And you modified the basic generated app to make it your own. Stay tuned for a new feature that Pajama Death want toadd to the app...
You’re off to a great start!
Great work, Now we have an awesome way for our fans to see the lyrics to our
favorite song!
After seeing this we’ve got some more ideas. We hope you can
Installation Check List
•
Install Eclipse (if you don’t have i
t
installed already).
•
Install the Android SDK.
•
Install the ADT Eclipse Plugin.
•
Install the SDK packages.
•
Configure the ADT.
•
Build your awesome Android app!
Project Contents
•
Screen layouts and resources (defined in
XML)
•
App behavior (defined in Java source
code)
•
Binary assets (like images and fonts)
included directly in the project
•
Configuration files (mostly XML)
Your Android Toolbox
Now that you built your first Android app, you’re starting to build your toolbox of Android skills!
CHAPTE
R 1
Get your Eclipse-based Android
development environment up and running!.
It’s a good idea to add the SDK directory to your path (while you’re in a configuration mindset) so you can easily run Android tools later from the command line.
Setup an emulator configuration for you target Android version. And don’t limit yourself: feel free to setup a bunch of them!
Create new Android projects using the Eclipse “New Android Project” Wizard. From there, modify the generated app to make it your own.
Layouts are defined in XML and you can find them in /res/layouts.
Values (like strings) are defined in Android Resource XML files. They can e found in / res/values.
When you open an Android XML file in Eclipse, you’ll see a graphical editor to help you modify these files. If you want to view or edit the raw XML text, click on the right tab on the bottom of the editor.
Adding behavior
Apps are interactive!
When it comes to apps, it’s what your users can do with your apps that make them love ‘em. As you saw in Chapter 1, Android really separates out the visual definition of your apps (remember all that XML layout and String resource work you just did!) from the behavior that’s defined in Java code. In this chapter, you’re going to add some behavior to the AndroidLove haiku app. And in the process you’ll learn how the XML resources and Java work seamlessly together to give you a great way to build your Android apps!adding behavior
Make your app interactive
We want the app to rock! But right now it just displays the haiku...
Yeah, we want it to do something! I’m thinking we hide the haiku and add a button our fans have to push to show it! Let me sketch it out...
The Pajama Death app update with an action button
Pajama Death sketched out what they were thinking so you could build it. They added a button on top of the haiku, and hide the haiku on launch. Then when you push the button the haiku shows up!
Show me some Android love!
Add a button to
the app to show
the haiku
HIde the
haiku when
the ap loads.
Click!
The haiku is
displayed after
the click
If you’re thinking this looks great, but you have no idea where to start... turn the page!
the plan
Here’s how you’re going to do it
1. Add the button
You’re going to add a new button to your app’s screen. Eventually, this button will show the haiku, but not in this first step. This is the first time you’ll be adding a brand new component to a screen and you’ll learn what components are available and how to add them to your app screens.
You’ve got some work to do. So let’s break it down into a few steps. First off, you’ll be starting with the AndroidLove app project form Chapter 1, and making a few modifications to it.
Open the Android Love project now if you don’t still have it open from Chapter 1.
The AndroidLove
app as you left it
at the end of the
last chapter.
Open the AndroidLove project from Chapter 1 if you don’t already have it open.
The new
button.
Show me some Android love!
2 Hide the haiku text
3. Make the button show the haiku
After adding the button, you’re going to hide the haiku text. The button still won’t do anything and you won’t see the haiku text at all, but hey, you’re making progress! Here you’re going to learn about the different attributes you can set on your widgets from XML.
Next, you’re going to wire up the button to show the haiku. This is going to be your first taste of Java coding as you connect the Java behavior to the XML screens. This is where the magic happens!
The text
is hidden.
Show me some Android love!
Click!
The button
action that
shows the haiku.
Show me some Android love!a new button
Add the button
You worked with the main.xml layout file in Chapter 1 that defines the entire layout for your app’s screen. This is where you’re going to add the new button to your app. Open main.xmlby by double clicking on it. You can find it under /res/layout/main.xml. In Chapter 1, you edited the XML layout in the raw XML source. Now you’re going to add a component using the graphical editor. Click on the ‘Graphical Layout’ tab to view the layout in the graphical editor if it isn’t already showing. Notice all of the Views in the list on the left side of the screen.
Open main.xml now. You can find it under /res/ layout/main.xml.
These are all of
the different
Views available to
you in Android.
You can add views to your screen by dragging
them from the list onto your screen.
Adding a View Up Close
Let’s take a closer look at adding the button using the Graphical Layout editor.
Click on the
Button and
drag it to
the top of
the layout.
Drag the button all
the way to the top
and you’ll see an orange
dotted line where the
button will be added.
After you add the button it’ll look like this.
Here’s the
button you
just added.
The added XML
declaration to
create the Button.
Click on the button on the left panel and drag it to the top of the graphical layout. You’ll notice an dotted line display where the button is going render. Make sure it goes at the top.
1
Now click back to the main.xml showing the XML. You’ll the first View defined in the file is the Button you just added!
button text
Fix the button text
It’s great that the button is on the screen now, but not so great that the button text is showing up as “@+id/Button01”. Let’s see about changing that.
Here’s the button with the
weirdo button text showing
up as “@+id/Button01”
Why is the button text showing up like this?
<TextView android:text=”@string/haiku” android:id=”@+id/haikuTextView” android:layout_width=”fill_parent” android:layout_height=”wrap_content” />
To get to the bottom of this, compare the View XML declarations of the TextView displaying the hauki and the Button you just added. Focus on the text properties of each View.
The haiku TextViewandroid:text property is referring to the haiku string property in strings.xml.
The haiku TextView
XML declaration from
main.xml.
<?xml version="1.0" encoding="utf-8"?>
<resources>
<string name="haiku">I dreamed of a phone \nOpen Source and Hackable \nAndroid for the win!</string>
<string name="app_name">AndroidLove</string>