Contents at a Glance
About the Author ... xi
About the Technical Reviewer ... xii
Acknowledgments ... xiii
Introduction ... xiv
■
Chapter 1: Building the HTML5 Logo – Drawing on Canvas,
with Scaling, and Semantic Tags ... 1
■
Chapter 2: Family Collage: Manipulating Programmer-defined Objects
on a Canvas ... 19
■
Chapter 3: Bouncing Video: Animating and Masking HTML5 Video ... 53
■
Chapter 4: Map Maker: Combining Google Maps and the Canvas ... 89
■
Chapter 5: Map Portal: Using Google Maps to Access Your Media ... 129
■
Chapter 6: Where am I: Using Geolocation, the Google Maps API, and PHP ... 183
■
Chapter 7: Origami Directions: Using Math-Based Line Drawings,
Photographs, and Videos ... 225
■
Chapter 8: Jigsaw Video: Using the Mouse and Touch to Arrange Images ... 283
■
Chapter 9: US States Game: Building a Multiactivity Game ... 321
■
Chapter 10: Web Site Database: Using PHP and MySQL ... 367
Introduction
This book continues my exploration of HTML5. My approach in developing the projects was to combine features such as canvas and video; attempt more intricate drawing, making use of mathematics; and make use of standard programming techniques such as object-oriented programming and separation of content and logic. I was also interested in building applications combining HTML5 and JavaScript with other technologies, including Google Maps, geolocation, and server-side programming.
Each chapter in the book is focused on an application or set of related applications. This is because my experience as a teacher and a learner has shown that concepts and mechanics are best understood in the context of actual use. The applications start off with drawing the HTML5 official logo. As you will find out in Chapter 1, the way I developed this application prompted a use of coordinate transformations. The project in Chapter 2, involving a family collage, was inspired by my growing family and the desire to teach about object-oriented programming. It is a good application for you to use as a foundation to create your own, with your own photos and objects of your own invention. Chapter 3, which shows how to create a bouncing video, was built on other two-dimensional applications I have created, and features two different ways to combine canvas and video.
Chapters 4, 5, and 6 demonstrate use of the Google Maps API (Application Programming Interface), a powerful facility that allows you to incorporate access to Google Maps as part of your own projects. Chapter 4 presents a user interface combining a map and canvas, and includes a custom-designed cursor and the use of alpha (transparency) in drawing paths. The three applications discussed in Chapter 5 all demonstrate the use of mapping as a portal to media. The sequence of applications shows you how to separate content and logic so you can scale up to various applications (e.g., a tour of a region or a geography quiz with many locations). Chapter 6 features geolocation, technology to determine the location of your end-user. I combine this with server-side programming using PHP that allows you to send an e-mail of where you are to someone the end-user chooses.
In Chapter 7, I use the production of directions for origami to show how to combine line drawings, often using mathematical expressions, and video and photographs. You can use this as a model for your own set of directions using drawings, video, and images, or let the reading refresh your memory for topics in algebra and geometry. Chapter 8 was inspired by a project I produced using Adobe Flash, in which a jigsaw puzzle is transformed into a video. In the project in this chapter, you’ll also learn how to make this work on an iPod and iPad, including how to incorporate the handling of finger touch events. Similarly, Chapter 9 was initially inspired by an identify-and-name-the-state game I made using Flash. This chapter includes the challenge of mixing up the states in the form of a jigsaw puzzle, including the feature of saving the puzzle-in-progress using localStorage. The resulting educational game presents a user interface that must handle multiple types of player actions. Chapter 10, the last chapter,
Who Is This Book For?
I do believe my explanations are complete, but I am not claiming, as I did for my previous book, The Essential Guide to HTML5, that this book is for the total beginner. This book is for the developer who has some knowledge of programming and who wants to build (more) substantial applications by combining basic features and combining JavaScript with other technologies. It also can serve as an idea book for someone working with programmers to get an understanding of what is possible.
How Is This Book Structured?
This book consists of ten chapters, each organized around an application or type of application. You can skip around. However, it probably makes sense to read Chapter 4 before 5 or 6. Also, the PHP server-side language is used in a simple way in Chapter 6 and then more fully in Chapter 10. Other cross-references are indicated in the text. Each chapter starts with an introduction to the application, with screenshots of the applications in use. In several cases, the differences between browsers are shown. The chapters continue with a discussion of the critical requirements, where concepts are introduced before diving into the technical details. The next sections describe how the requirements are satisfied, with specific constructs in HTML5, JavaScript, PHP, and/or SQL, and with standard programming techniques. I then show the application coding line by line with comments. Each chapter ends with instructions and tips for testing and uploading the application to a server, and a summary of what you learned.
Building the HTML5 Logo –
Drawing on Canvas, with Scaling,
and Semantic Tags
In this chapter, we will review
• Drawing paths on a canvas
• Placing text on a canvas
• Coordinate transformations
• Fonts for text drawn on canvas and fonts for text in other elements
• Semantic tags
• The range input element
Introduction
The project for this chapter is a presentation of the official HTML5 logo, with accompanying text. The shield and letters of the logo are drawn on a canvas element and the accompanying text demonstrates the use of semantic tags. The viewer can change the size of the logo using a slider input device. It is an appropriate start to this book, a collection of projects making use of HTML5, JavaScript and other technologies, because of the subject matter and because it serves as a good review of basic event-driven programming and other important features in HTML5. The way I developed the project, building on the work of others, is typical of how most of us work. In particular, the circumstances provide motivation for the use of coordinate transformations. Lastly, at the time of writing, Firefox does not fully implement the slider input element. Unfortunately, this also is a common situation and I will discuss the implications.
■
Note If you need an introduction to programming using HTML5 and JavaScript, you can consult my book the
Essential Guide to HTML5 or other books published by Apress or others. There also is considerable material
available online.
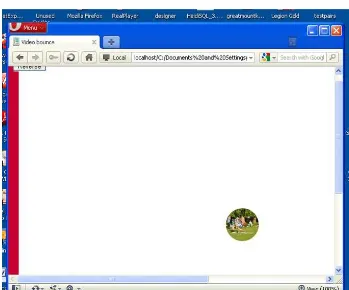
Figure 1-1 shows the opening screen for the logo project on the Chrome browser. (Skip ahead to Figure 1-3 for the appearance on Firefox.)
Figure 1-1. Opening Screen for HTML5 Logo
Notice the slider feature, the accompanying text, which contains what appears to be a hyperlink, and the text in a footer below a yellow line. The footer also includes a hyperlink. As I will explain later, the function and the formatting of the footer and any other semantic element is totally up to me, but providing a reference to the owners of the logo, The World Wide Web Consortium would be deemed an appropriate use.
Figure 1-2. Logo scaled down
The implementation of HTML5 is not complete by any browsers and, as it turns out, Firefox treats all slider inputs as simple text fields. This is termed 'graceful degradation' and it certainly is better than producing nothing at all. Figure 1-3 shows the opening screen in Firefox. Notice the initial value is displayed as 100.
As will be the practice in each chapter, I now explain the critical requirements of the application, more or less independent of the fact that the implementation will be in HTML5, and then describe the features of HTML5, JavaScript, and other technologies as needed that will be used in the
implementation. The Building section includes a table with comments for each line of code and also guidance for building similar applications. The Testing section provides details for uploading and testing. This section is more critical for some projects than others. Lastly, there is a Summary that reviews the programming concepts covered and previews what is next in the book.
Project History and Critical Requirements
The critical requirements for this project are somewhat artificial and not easily stated as something separate from HTML. For example, I wanted to draw the logo as opposed to copying an image from the Web. My design objectives always include wanting to practice programming and prepare examples for my students. The shape of the shield part of the logo seemed amenable to drawing on canvas and the HTML letters could be done using the draw text feature. In addition, there are practical advantages to drawing images instead of using image files. Separate files need to be managed, stored, and downloaded. The image shown in Figure 1-4 is 90KB. The file holding the code for the program is only 4KB. Drawing a logo or other graphic means that the scale and other attributes can be changed dynamically using code.
Figure 1-4. Image of logo
I looked online and found an example of just the shield done by Daniel Davis, who works for Opera. This was great because it meant that I did not have to measure a copy of the logo image to get the coordinates. This begs the question of how he determined the coordinates. I don't know the answer, even though we had a pleasant exchange of emails. One possibility is to download the image and use the grid feature of image processing programs such as Adobe Photoshop or Corel Paint Shop Pro. Another possibility is to use (old-fashioned) transparent graph paper.
However, there was a problem with building on Daniel Davis's work. His application did not include the HTML letters. The solution to this was to position the letters on the screen and then move down so to speak to position the drawing of the shield using the coordinates provided in Daniel's example. The technical term for 'moving down the screen' is performing a coordinate transformation. So the ability to perform coordinate transformations became a critical requirement for this project.
the document below a line. The reference to Daniel Davis was part of the writing in the body. We exchanged notes on font choices and I will discuss that more in the next section.
In order to give the viewer something to do with the logo, I decided to present a means of changing the size. A good device for this is a slider with the minimum and maximum values and steps all specified. So the critical requirements for this application include drawing shapes and letters in a specific font, coordinate transformations, formatting a document with a main section and a footer section, and including hyperlinks.
HTML5, CSS, and JavaScript features
I assume that you, the reader, have some experience with HTML and HTML5 documents. One of the most important new features in HTML5 is the canvas element for drawing. I describe briefly the drawing of filled-in paths of the appropriate color and filled-in text. Next, I describe coordinate transformations, used in this project for the two parts of the logo itself and for scaling, changing the size, of the whole logo. Lastly, I describe the range input element. This produces the slider.
Drawing paths on canvas
Canvas is a type of element introduced in HTML5. All canvas elements have a property (aka attribute) called the 2D context. Typically, a variable is set to this property after the document is loaded:
ctx = document.getElementById('canvas').getContext('2d');
It is important to understand that canvas is a good name: code applies color to the pixels of the canvas, just like paint. Code written later can put a different color on the canvas. The old color does not show through. Even though our code causes rectangles and shapes and letters to appear, these distinct entities do not retain their identity as objects to be re-positioned.
The shield is produced by drawing six filled-in paths in succession with the accumulated results as shown in Figure 1-5. You can refer to this picture when examining the code. Keep in mind that in the coordinates, the first number is the distance from the left edge of the canvas and the second number is the distance from the top edge of the canvas.
Figure 1-5. Sequence of paths for drawing logo
By the way, I chose to show you the sequence with the accumulated results. If I displayed what is drawn, you would not see the white parts making up the left side of the five. You can see it because it is two white filled-in paths on top of the orange.
ctx.fillStyle = "#E34C26";
This particular color, given in the hexadecimal format, where the first two hexadecimal (base 16) digits represent red, the second two hexadecimal digits represent green and the last two represent blue, is provided by the W3C website, along with the other colors, as the particular orange for the background of the shield. It may be counterintuitive, but in this system, white is specified by the value #FFFFFF. Think of this as all colors together make white. The absence of color is black and specified by #000000. The pearly gray used for the right hand side of the 5 in the logo has the value #EBEBEB. This is a high value, close to white. It is not necessary that you memorize any of these values, but it is useful to know black and white, and that a pure red is #FF0000, a pure green is #00FF00 and a pure blue #0000FF. You can use the eyedropper/color picker tool in drawing programs such as Adobe Photoshop, Corel Paint Shop Pro on the on-line tool: http://pixlr.com/ to find out values of colors in images OR you can use the official designation, when available, for official images.
All drawing is done using the 2 dimensional coordinate systems. Shapes are produced using the path methods. These assume a current location, which you can think of as the position of a pen or paint brush over the canvas. The critical methods are moving to a location and setting up a line from the current location to the indicated location. The following set of statements draws the five sided orange shape starting at the lower, left corner. The closePath method closes up the path by drawing a line back to the starting point.
</script> </head>
<body onLoad="init();">
<canvas id="canvas" width="600" height="400"> Your browser does not support the canvas element . </canvas>
</body> </html>
Do practice and experiment with drawing on the canvas if you haven’t done so before, but I will go on. The other shapes are produced in a similar manner. By the way, if you see a line down the middle of the shield, this is an optical illusion.
Placing text on canvas and in the body of a document
Text is drawn on the canvas using methods and attributes of the context. The text can be filled in, using the fillText method or drawn as an outline using the strokeText method. The color is whatever the current fillStyle property or strokeStyle property holds. Another property of the context is the font. This property can contain the size of the text and one or more fonts. The purpose of including more than one font is to provide options to the browser if the first font is unavailable on the computer running the browser. For this project, I use
var fontfamily = "65px 'Gill Sans Ultra Bold', sans-serif";
and in the init function
ctx.font = fontfamily;
This directs the browser to use the Gill Sans Ultra Bold font if it is available and if not, use whatever the default sans-serif font on the computer.
I could have put this all in one statement, but chose to make it a variable. You can decide if my choice of font was close enough to the official W3C logo.
■
Note There are at least two other approaches to take for this example. One possibility is to NOT use text but to
draw the letters as filled-in paths. The other is to locate and acquire a font and place it on the server holding the
HTML5 document and reference it directly using @font-face.
With the font and color set, the methods for drawing text require a string and a position: x and y coordinates. The statement in this project to draw the letters is
ctx.fillText("HTML", 31,60);
footer is the last thing in the document. If I placed the footer before one or both articles, it would no longer be displayed at the foot, that is, the bottom of the document. The style directives for this project are the following:
footer {display:block; border-top: 1px solid orange; margin: 10px;
font-family: "Trebuchet MS", Arial, Helvetica, sans-serif; font-weight: bold;}
article {display:block; font-family: Georgia, "Times New Roman", Times, serif; margin: 5px;}
The styles each set up all instances of these elements to be displayed as blocks. This puts a line break before and after. The footer has a border on the top, which produces the line above the text. Both styles specify a list of four fonts each. So the browser first sees if Trebuchet MS is available, then checks for Arial, then for Helvetica and then, if still unsuccessful, uses the system default sans-serif font for the footer element. Similarly, the browser checks for Georgia, then Times New roman, then Times and then, if unsuccessful, uses the standard serif font. This probably is overkill, but it is the secure way to operate. The footer text is displayed in bold and the articles each have a margin around them of 5 pixels.
Formatting, including fonts, is important. HTML5 provides many features for formatting and for separating formatting from structure and content. You do need to treat the text on the canvas differently than the text in the other elements.
Coordinate transformations
I have given my motivation for using coordinate transformations, specifically to keep using a set of coordinates. To review, a coordinate system is the way to specify positions on the canvas. Positions are specified as distances from an origin point. For the two-dimensional canvas, two coordinates are necessary: the first coordinate, governing the horizontal, often called the x and the second coordinate, governing the vertical, called the y. A pesky fact is that when drawing to screens the y axis is flipped so the vertical is measured from the top of the canvas. The horizontal is measured from the left. This means that the point (100,200) is further down the screen than the point (100,100).
In the logo project, I wrote code to display the letters HTML and then move the origin to draw the rest of the logo. An analogy would be that I know the location of my house from the center of my town and so I can give directions to the center of town and then give directions to my house. The situation in which I draw the letters in the logo and 'move down the screen' requires the translate transformation. The translation is done just in the vertical. The amount of the translation is stored in a variable I named
offsety:
var offsety = 80; …
ctx.fillText("HTML", 31, 60); ctx.translate(0, offsety);
Since I decided to provide a way for the viewer to change the size of the logo, I made use of the scale transformation. Continuing the analogy of directions, this is equivalent to changing the units. You may give some directions in miles (or kilometers) and other directions in yards or feet or meters or, maybe, blocks. The scaling can be done separately for each dimension. In this application, there is a variable called factorvalue that is set by the function invoked when the input is changed. The statement
ctx.scale(factorvalue, factorvalue);
HTML5 provides a way to save the current state of the coordinate system and restore what you have saved. This is important if you need your code to get back to a previous state. The saving and restoring is done using what is termed a stack: last in first out. Restoring the coordinate state is termed popping the stack and saving the coordinate state is pushing something onto the stack. My logo project does not use this in its full power, but it is something to remember to investigate if you are doing more complex applications. In the logo project, my code saves the original state when the document is first loaded. Then before drawing the logo, it restores what was saved and then saves it again so it is available the next time. The code at the start of the function dologo, which draws the logo, starts off as follows:
function dologo() {
// 5 sided orange background ctx.fillStyle = "#E34C26";
// right hand, lighter orange part of the background ctx.fillStyle = "#F06529";
Note that the canvas is cleared (erased) of anything that was previously drawn.
Using the range input element
The input device, which I call a slider, is the new HTML5 input typerange, and is placed in the body of the HTML document. Mine is placed inside an article element. The attributes of this type and other input elements provide ways of specifying the initial value, the minimum and maximum values, the smallest increment adjustment and the action to take if the viewer changes the slider. The code is
<input id="slide" type="range" min="0" max="100" value="100"
The min, max, (initial) value, and the step can be set to whatever you like. Since I was using percentage and since I did not want the logo to get bigger than the initial value or deal with negative values, I used 0 and 100.
In the proper implementation of the slider, the viewer does not see the initial value or the maximum or minimum. My code uses the input as a percentage. The expression this.value is interpreted as the value attribute of THIS element, emphasis given in capitals to convey the switch to English! The term
this has special meaning in JavaScript and several other programming languages. The changescale
function takes the value, specified by the parameter given in the assignment to the onChange attribute, and uses it to set a global variable (a variable declared outside of any function so it persists and is available to any function).
function changescale(val) { factorvalue = val / 100; dologo();
}
It is part of the specification of HTML5 that the browsers will provide form validation, that is, check that the conditions specified by attributes in the input elements are obeyed. This can be a significant productivity boost in terms of reducing the work programmers need to do and a performance boost since the checking probably would be faster when done by the browser. We will discuss it more in Chapter 10 on databases and php. In the HTML5 logo project, an advantage of the slider is that the viewer does not need to be concerned with values but merely moves the device. There is no way to input an illegal value. I do not want to disparage the Firefox browser, and, as I indicated, producing a text box is better than producing nothing, but, at least at the time of writing, it does not display a slider or do any checking. Figure 1-6 shows the results of entering a value of 200 in the input field.
The canvas is of fixed width and height and drawing outside the canvas, which is what is done when the scaling is done to accept numbers and stretch them out to twice the original value, is ignored.
Building the application and making it your own
The project does one thing, draw the logo. A function, dologo, is defined for this purpose. Informally, the outline of the program is
1. init: initialization
2. dologo: draw the logo starting with the HTML letters and then the shield
3. changescale: change the scale
The function called and calling table shows the relationship of the functions. The dologo function is invoked when the document is first loaded and then whenever the scale is changed.
Table 1-1. Functions in the HTML5 Logo project
Function
Invoked / Called By
Calls
init invoked by action of the onLoad attribute in the <body> tag dologo
dologo init and changescale
changescale invoked by action of the onChange attribute in the <input type="range"…> tag dologo
The coding for the dologo function puts together the techniques previously described. In particular, the code brings back the original coordinate system and clears off the canvas.
The global variables in this application are
var ctx;
var factorvalue = 1;
var fontfamily = "65px 'Gill Sans Ultra Bold', sans-serif";
As indicated earlier, it would be possible to not use the fontfamily but use the string directly in the code. It is convenient to make ctx and factorvalue global.
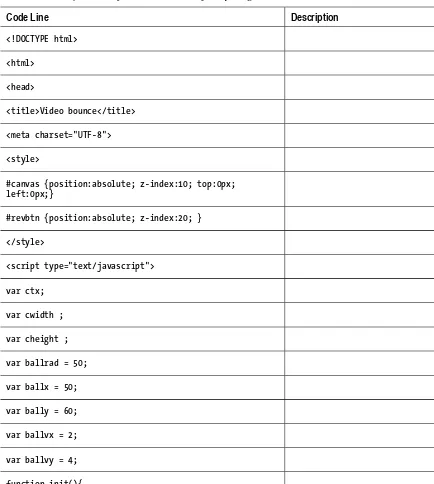
Table 1-2. Complete Code for the HTML5 Logo project
Code Line
Description
<!DOCTYPE html> header
<html> opening html tag
<head> opening head tag
<title>HTML5 Logo </title> complete title element
<meta charset="UTF-8"> meta tag
<style> opening style tag
footer {display:block; border-top: 1px solid orange; margin: 10px; font-family: "Trebuchet MS", Arial, Helvetica, sans-serif; font-weight: bold;}
style for the footer, including the top border and font family
article {display:block; font-family: Georgia, "Times New Roman", Times, serif; margin: 5px;}
style for the 2 articles
</style> close the style element
<script language="JavaScript"> opening script tag. Note: case doesn't matter for the JavaScript.
var ctx; variable to hold the context. Used
in all drawing
var factorvalue = 1; set initial value for scaling
var fontfamily = "65px 'Gill Sans Ultra Bold', sans-serif"; set the fonts for the text drawn on the canvas
function init() { start of init function
ctx = document.getElementById('canvas').getContext('2d'); set ctx
ctx.font = fontfamily; set font for text drawn on canvas
ctx.save(); save the original coordinate state
Code Line
Description
} close function
function dologo() { start of dologo function
var offsety = 80 ; specify amount to adjust the
coordinates to draw the shield part of the logo.
ctx.restore(); restore original state of
coordinates
ctx.save(); save it (push onto stack) so it can
be restored again
ctx.clearRect(0,0,600,400); erase the whole canvas
ctx.scale(factorvalue,factorvalue); scale horizontally and vertically using value set by slider
ctx.fillText("HTML", 31,60); draw the letters: HTML
ctx.translate(0,offsety); move down the screen (canvas)
// 5 sided orange background
ctx.fillStyle = "#E34C26"; set to official bright orange
ctx.beginPath(); start a path
ctx.moveTo(39, 250); move to indicated position at lower left
ctx.lineTo(17, 0); draw line up and more to the left
ctx.lineTo(262, 0); draw line straight over to the right
ctx.lineTo(239, 250); draw line down and slightly to the left
ctx.lineTo(139, 278); draw line to the middle, low point of the shield
Code Line
Description
ctx.fill(); fill in with the indicated color
// right hand, lighter orange part of the // background
ctx.fillStyle = "#F06529"; set color to the official darker orange
ctx.beginPath(); start the path
ctx.moveTo(139, 257); move to middle point, close to the top
ctx.lineTo(220, 234); draw line to the right and slightly up
ctx.lineTo(239, 20); draw line to the right and up
ctx.lineTo(139, 20); draw line to the left (point at the middle)
ctx.closePath(); close path
ctx.fill(); fill in with the indicated color
//light gray, left hand side part of the //five
ctx.fillStyle = "#EBEBEB"; set color to gray
ctx.beginPath(); start path
ctx.moveTo(139, 113); move to middle horizontally, midway vertically
ctx.lineTo(98, 113); draw line to the left
ctx.lineTo(96, 82); draw line up and slightly further left
ctx.lineTo(139, 82); draw line to right
ctx.lineTo(139, 51); draw line up
Code Line
Description
ctx.lineTo(70, 144); draw line to the left and down
ctx.lineTo(139, 144); draw line to the right
ctx.closePath(); close path
ctx.fill(); fill in with indicated color
ctx.beginPath(); start a new path
ctx.moveTo(139, 193); move to middle point
ctx.lineTo(105, 184); draw line to the left and up
ctx.lineTo(103, 159); draw line slightly to the left and up
ctx.lineTo(72, 159); draw line more to the left
ctx.lineTo(76, 207); draw line slightly to the right and down
ctx.lineTo(139, 225); draw line to the left and down
ctx.closePath(); close path
ctx.fill(); fill in the shape in the indicated
color
// white, right hand side of the 5
ctx.fillStyle = "#FFFFFF"; set color to white
ctx.beginPath(); start path
ctx.moveTo(139, 113); start at middle pint
ctx.lineTo(139, 144); draw line down
ctx.lineTo(177, 144); draw line to the right
Code Line
Description
ctx.lineTo(139, 193); draw line more left and down
ctx.lineTo(139, 225); draw line down
ctx.lineTo(202, 207); draw line to the right and up
ctx.lineTo(210, 113); draw line slightly right and up
ctx.closePath(); close path
ctx.fill(); fill in white
ctx.beginPath(); start a new path
ctx.moveTo(139, 51); move to middle point
ctx.lineTo(139, 82); move down
ctx.lineTo(213, 82); move to the right
ctx.lineTo(216, 51); move slightly to the right and up
ctx.closePath(); close path
ctx.fill(); fill in white
} close dologo function
function changescale(val) { open function changevalue with parameter
factorvalue = val / 100; set factorvalue to the input divided by 100
dologo(); invoke function to draw logo
} close changevalue function
</script> close script element
Code Line
Description
<body onLoad="init();"> body tag with attribute set to invoke init
<canvas id="canvas" width="600" height="400"> canvas tag setting dimensions and with id to be used in code
Your browser does not support the canvas element. message to appear if canvas not supported
</canvas> close canvas tag
<article> article tag
Scale percentage: <input id="slide" type="range" min="0" max="100" value="100" onChange="changescale(this.value)" step="10"/>
the slider (range) input with settings
Note: slider treated as text field in some browsers. Comment to note that slider may be text field. It is still usable.
</article> article close tag
<article>Built on <a
href="http://people.opera.com/danield/html5/html5logo/">work by Daniel Davis, et al</a>, but don't blame them for the fonts. Check out the use of <em>font-family</em> in the style element and the <em>fontfamily</em> variable in the script element for safe ways to do fonts. I did the scaling. Note also use of semantic elements.</article>
article tag with some text,
</footer> footer close tag
</body> body close
</html> html close
Testing and uploading the application
This is a simple application to test and upload (and test) because it is a single file. I am told that the logo does display on iPhone4 and iPad2, but the slider is a text box in each case. I also tested it on Safari and Opera on a PC. You can skip ahead to Chapter 8 for a project displaying a jigsaw puzzle turning into a video that does work with finger touches on the iPhone and iPad as well as mouse moves on computers.
Summary
In this chapter, you learned how make a specific drawing and also steps to take in producing other, similar, applications. The features used include
• paths
• text on the canvas and text in semantic elements in the body
• the range input element and its associated change event
• coordinate transformations, namely translate and scale
• specification of sets of fonts
• styles for semantic elements, including the border top to make a line to go before the footer
Family Collage:
Manipulating Programmer-defined
Objects on a Canvas
In this chapter, you will learn about
• Creating and manipulating object-oriented programming for drawing on canvas
• Handling mouse events, including double-click
• Saving the canvas to an image
• Using try and catch to trap errors
• Browser differences involving the location of the code
• Using algebra and geometry to construct shapes and determine when the cursor is over a specific object
• Controlling the icon used for the cursor
Introduction
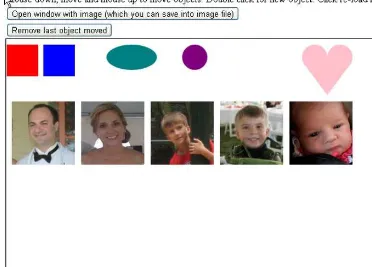
The project for this chapter is a utility for manipulating objects on a canvas to produce a picture. I call it a utility because one person does the programming and gathers photographs and designs and then can offer the program to friends, family members, colleagues and others to produce the compositions / collages. The result can be anything from an abstract design to a collage of photographs. The objects in my example include two rectangles, an oval, a circle, a heart, and five family photographs. It is possible for you, or, perhaps, your end-user/customer/client/player, to make duplicate copies of any of the objects or to remove any of the objects. The end-user positions the object using drag and drop with the mouse. When the picture is judged to be complete, it is possible to create an image that can be
downloaded into a file.
Figure 2-1. Opening screen for Family Pictures
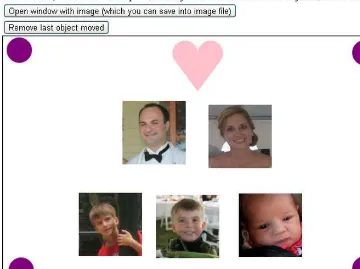
Figure 2-2 shows what I, as an end-user, produced as a final product. I have arranged the photographs to represent my son's family, including my new granddaughter. I deleted the two
Figure 2-2. Sample final product: rearranged objects
I decided on including a heart, not just for sentimental reasons, but because it required me to use algebra and geometry. Don't be afraid of mathematics. It is very useful. I invented, so to speak, a canonical heart. For other shapes, you may be able to find a standard definition in terms of mathematical expressions.
In this situation, I created the set of objects and then I used the program to make a composition. You can plan your application to take family photographs or photographs categorized by another theme and some set of circles, ovals, rectangles, and hearts. When you are finished, you can offer this program to others for them to use. This is analogous to building a game program for players. The end-users for this application may be family members, friends, or colleagues.
Of course, it certainly is possible to use a drawing program such as Adobe Photoshop or Corel Paint Shop Pro to create compositions such as these, but this application provides considerable ease-of-use for its specific purpose. The project also serves as a vehicle to learn important programming techniques as well as features of HTML5 and JavaScript. And, as will be a continual refrain, there are differences among the browsers to discuss.
Critical Requirements
objects. The current framework provides a way to specify rectangles, ovals, hearts and images, but the approach can accommodate other shapes and this is an important lesson of the chapter.
The objective is for the drag and drop operations to be reasonably precise: not merely moving something from one region of the window to another. I will re-visit this topic in the Chapters 8 and 9 on making jigsaw puzzles.
I also made the decision to control the look of the cursor. The cursor when the mouse is not on the canvas is the standard arrow. When on the canvas element, the cursor will be the cross-hairs. When the user presses down on the mouse button and drags an object, the cursor changes to a hand with pointer finger.
When the work is complete, it is a natural desire to save it, perhaps as an image file, so this also is a requirement for the project.
HTML5, CSS, and JavaScript features
We now explore the features of HTML5 and JavaScript that are used for the Family Collage project. The idea is to maintain a list of the material on the canvas. This list will be a JavaScript array. The information will include the position of each item, how it is to be drawn on the canvas and how to determine if the mouse cursor is on the item.
JavaScript objects
Object oriented programming is a standard of computer science and a critical part of most programming languages. Objects have attributes, also called properties, and methods. A method is a function. Put another way, an object has data and code that may make use of the data. HTML and JavaScript have many built-in objects, such as document and window and also arrays and strings. For the Family Picture project, I make use of a basic facility in JavaScript (established before HTML5) for defining my own objects. These sometimes are called user-defined objects, but the term I and others prefer is
programmer-defined objects. This is an important distinction for the Family Collage project in which you, the programmer, may create an application, with pictures and other shapes you identify and design, and then offer it to a family member to use.
The objective of this project is to set up a framework for creating and manipulating different shapes on the canvas, keeping in mind that once something is drawn to the canvas, its identity as a rectangle or image is lost. The first step for each shape is to define what is called a constructor function that stores the information that specifies the shape. The next step is to define the methods, code for using the
information to do what needs to be done.
My approach gives the appearance of moving things on the canvas. In fact, information kept in internal variables is changed and the canvas is cleared and new drawings made each time something happens to change the look of the canvas.
My strategy is to define new types of objects, each of which will have two methods defined
• draw for drawing the object on the canvas
• overcheck for determining if a given position, specifically the mouse position, is on the object
These methods reference the attributes of the object and use these values in mathematical
■
Note Object oriented programming in all its glory has a rich and often daunting vocabulary. Classes are what
define objects. I have hinted here at what is called an interface. Classes can be subclasses of other classes and
this may have been useful for pictures and rectangles. I'm aiming for a more casual tone here. For example, I will
speak of objects and object instances.
Let's move away from generalities and show how this works. I created functions I named Rect, Oval,
Picture and Heart. These will be what are called the constructor functions for the Rect, Oval, Picture and
Heart object instances. It is a convention to give such functions names starting with capital letters.
Rect
The definition of the Rect constructor function is
function Rect(x,y,w,h,c) {
The function is used as follows in the init function invoked when the document is loaded:
var r1 = new Rect(2,10,50,50,"red");
The variable r1 is declared and set to a new object constructed using the function Rect. The built-in term new does the task of creating a new object. The newly constructed object holds the values 2 and 10 for the initial x and y position, accessed using the attribute names x and y and the values 50 and 50 for width and height accessed using the attribute names w and h. The term this refers to the object being constructed. The English meaning and the computer jargon meaning of new and this match. The Rect
function also stores away values for the attributes draw and overcheck. It is not obvious from what you have seen so far, but these values will be used to invoke functions named drawrect and overrect. This is the way to specify methods for the programmer-defined objects. Lastly, the color attribute is set to "red".
Oval
Moving on, the constructor function for Oval is similar.
this.ver = ver; horizontal and vertical axis respectively and, depending on the values, produce an oval that is not a circle. The radsq attribute is calculated and stored to save time in the overoval function.
■
Note Computers are very fast and I am showing my age by storing away and then using the square of the
radius. Still, making this trade-off of extra storage for savings in computation time may be justified.
In my example,
var oval1 = new Oval(200,30,20,2.0,1.0, "teal");
produces the teal colored oval in Figure 2-1. Notice that it is stretched out in the horizontal dimension. In contrast, the purple oval is declared in the following declaration:
var cir1 = new Oval(300,30,20,1.0,1.0,"purple");
The purple circle has the hor and ver values the same and so is a circle. You have every right to ask how or where this information is used to produce an oval or circle. The answer is in the drawoval
function that will be shown later on. Similarly, the checking if a given x,y position is on the oval is performed by the overoval function.
Picture
The constructor for Picture objects stores away position, width and height, and the name of an Image object.
My example has four Picture objects. Here is code for setting up one of them:
var dad = new Image(); dad.src = "daniel1.jpg";
Setting up one of the Picture objects takes more work than Rect objects. I need to write the code to create an Image object. This is a built-in object type in JavaScript. I need to acquire an image file and move it into the same folder as the HTML file and write code to assign the correct file name to the src
attribute of the Image variable. (Alternatively, you can put all images into a subfolder or several subfolders. For example, the string for the src would be "images/daniel1.jpg".) Then I write the line of code that constructs the pic1 variable.
Heart
We have one more of the programmer defined objects to cover. The challenge I set myself was to define values that specify a heart shape. I came up with the following: a heart shape is defined by the position, an x, y pair of values that will be the location of the cleft of the heart; the distance from the cleft to the bottom point, and the radius for the two partial circles representing the curved parts of the heart. You can think of this as a canonical heart. The critical pieces of information are shown in Figure 2-3. If and when you add new types of shapes to your application, you will need to invent or discover the data that defines the shape.
Figure 2-3. Data defining a heart
The constructor function saves the indicated values, along with the color, into any newly
constructed object. You might be suspecting that the drawing and the overcheck will be somewhat more complicated than the functions for rectangles and you would be correct. The constructor function resembles the other constructor function.
function Heart(x,y,h,drx,color) {
Drawing
I have the different method functions to explain, but let's go to where the drawing is done in order to demonstrate how all of this works together. I define an array, initially empty,
var stuff = [];
Then my code adds to this array with statements such as
stuff.push(pic1);
At appropriate times, namely after any changes, the function drawstuff is invoked. It works by erasing the canvas, drawing a rectangle to make a frame, and then iterating over each element in the
stuff array and invoking the draw methods. The function is
function drawstuff() {
Notice that there is no coding that asks, is this an oval, if so do this, or is it a picture, if so do that…. Instead, the draw method that has been established for each member of the array does its work! The same magic happens when checking if a position (the mouse) is on an object. The benefit of this approach increases as more object types are added.
I did realize that since my code never changes the strokeStyle or the lineWidth, I could move those statements to the init function and just do them one time. However, it occurred to me that I might have a shape that does change these values and so to prepare for that possible change in the application at a later time, I would set strokeStyle and lineWidth in drawstuff.
Now I will explain the methods for drawing and the methods for checking if a position is on the object. The drawrect function is pretty straight-forward:
function drawrect() {
ctx.fillStyle = this.color;
ctx.fillRect(this.x, this.y, this.w, this.h); }
Remember the term this refers to the object for which drawrect serves as a method. The drawrect
function is the method for rectangles and for pictures.
Then a scaling transformation is applied, using the hor and ver properties. Now, after setting the
fillStyle to be the color specified in the color attribute, I use the coding for drawing a path made up of a circular arc and filling the path. The last step is to restore the original state of the coordinate system.
function drawoval() {
This is the way ovals that may or may not be circles are drawn on the canvas. Since my code restored the original state of the coordinate system, this has the effect of undoing the scaling and translation transformations.
The drawpic function is the easiest one, just one line:
function drawpic() {
ctx.drawImage(this.imagename,this.x,this.y,this.w,this.h); }
Again, the terms starting with this followed by a dot and then the attribute names reference the stored attributes.
■
Note Please keep in mind that I didn't plan and program this whole application all at once. I did the rectangles
and ovals and later added the pictures and much later the heart. I also added the duplication operation and the
deletion operation much later. Working in stages is the way to go. Planning is important and useful, but you do not
have to have all the details complete at the start.
The drawheart function starts by defining variables to be used later. The leftctrx is the x coordinate of the center of the left arc and the rightctrx is the x coordinate of the center of the right arc. The arcs are each more than a half circle. How much more? I decided to make this be .25* Math.PI and to store this value in the ang attribute.
The tricky thing was to determine where the arc stops on the right side. My code uses trig
Figure 2-4. Added pieces of data used in functions
The path will start at what we are calling the cleft or the cleavage (giggle) and draw the arc on the left, then draw a line to the bottom point, then up to the cx,cy point and then finish with the arc on the right. The function is the following:
function drawheart() {
ctx.arc(leftctrx,this.y,this.drx,0,Math.PI-this.ang,true); ctx.lineTo(this.x,this.y+this.h);
ctx.lineTo(cx,cy);
ctx.arc(rightctrx,this.y,this.drx,this.ang,Math.PI,true); ctx.closePath();
ctx.fill(); }
Checking for mouse over object
Before describing the functions for the overcheck method, I will preview why it is needed. HTML5 and JavaScript provide ways to handle (listen for and respond to) mouse events on the canvas and supply the coordinates of where the event took place. However, our code must do the work of determining what object was involved. Remember: there are no objects actually on the canvas, just the remains, think of it as paint, of whatever drawing was done. My code accomplishes this task by looping through the stuff
array and invoking the overcheck method for each object. As soon as there is a hit (and I will explain the order in which this is done later), my code proceeds with that object as the one selected. The functions in which this checking occurs are startdragging and makenewitem and will be explained in the next section.
There are three functions to explain for the overcheck method since Picture and Rect refer to the same function. Each function takes two parameters. Think of the mx, my as the location of the mouse. The
function overrect (mx,my) {
if ( (mx>=this.x)&&(mx<=(this.x+this.w))&&(my>=this.y)&&(my<=(this.y+this.h))) {return true;}
else {return false;} }
The function defining the overcheck method for ovals is overoval. The overoval function performs the operation of checking if something is within a circle, but in a translated and scaled coordinate system. The check for a point being within a circle could be done by setting the center of the circle to x1,y1 and the point to x2,y2 and see if the distance between the two is less than the radius. I use a variation of this to save time and compare the square of the distance to the radius squared. I define a function distsq that returns the square of the distance. But now I need to figure out how to do this in a translated and scaled coordinate system. The answer is to set x1,y1 to 0,0. This is the location of the center of the oval in the translated coordinate system. Then my code sets x2 and y2 as indicated in the code to what would be the scaled values.
function overoval(mx,my) {
This did not come to me instantly. I worked it out trying values for mx and my located in different positions relative to the oval center. The code does represent what the transformations do in terms of the translation and then the scaling.
The overheart function consists of several distinct if statements. This is a case of not trying for a simple expression but thinking about various situations. The function starts off by setting variables to be used later. The first check made by the function is to determine if the mx,my point is outside the rectangle that is the bounding rectangle for the heart. I wrote the outside function to return true if the position specified by the last two parameters was outside the rectangle indicated by the first four parameters. The
qx,qy point is the upper left corner. qwidth is the width at the widest point and qheight is the total height. I thought of this as a quick check that would return false most of the time. The next two if
statements determine if the mx,my point is contained in either circle. That is, I again use the comparison of the square of the distance from mx,my to the center of each arc to the stored radsq attribute. At this point in the function, that is, if the mx,my position was not close enough to the center of either circle and if my is above (less than) this.y, then the code returns false. Lastly, the code puts the mx value in the equation for each of the sloping lines and compares the result to my. The equation for a line can be written using the slope m and a point on the line x2,y2:
y = m * (x – x2) + y2
function overheart(mx,my) {
//quick test if it is in bounding rectangle if (outside(qx,qy,qwidth,qheight,mx,my)) {
return false;} //compare to two centers
if (distsq(mx,my,leftctrx,this.y)<this.radsq) return true; if (distsq(mx,my,rightctrx,this.y)<this.radsq) return true;
// if outside of circles AND below (higher in the screen) than this.y, return false if (my<this.y) return false;
// compare to each slope var x2 = this.x
The reasoning underlying the outside function is similar to the overrect function. You need to write code comparing the mx,my value to the sides of the rectangle. However, for outside I chose to use the OR operator, ||, and to return its value. This will be true if any of the factors are true and false otherwise.
function outside(x,y,w,h,mx,my) {
return ((mx<x) || (mx > (x+w)) || (my < y) || (my > (y+h))); }
Actually, what I said was true, but misses what could be an important consideration if performance is an issue. The || evaluates each of the conditions starting from the first (leftmost) one. As soon as one of them is true, it stops evaluating and returns true. The && operator does a similar thing. As soon as one of the conditions is false, it returns false.
■
Note This example does not demonstrate the full power of object-oriented programming. In a language such
as Java (or the variant Processing designed for artists), I could have programmed this in such a way to check that
each additional object was defined properly, that is with the x and y attributes for location and methods for
drawing and checking.
User interface
The application requirements for the user interface include dragging, that is, mouse down, mouse move and mouse up, for re-positioning items and double clicking for producing a duplicate copy of an item. I decided to use buttons for the other end-user actions: removing an item from the canvas and creating an image to be saved. The button action is straight-forward. I write two instances of the HTML5 button element with the onClick attributes set to the appropriate function.
<button onClick="saveasimage();">Open window with image (which you can save into image file)
</button></br>
<button onClick="removeobj();">Remove last object moved </button>
The saveasimage function will be explained in the next section. The removeobj function deletes the last moved object from the stuff array. The last moved object is the last one in the array. This makes the coding extremely simple:
function removeobj() { stuff.pop(); drawstuff(); }
A pop for any array deletes the last element. The function then invokes the drawstuff function to display all but the last element. By the way, if the button is clicked at the start of the application, the last element pushed on the stuff array will be deleted. If this is unacceptable, you can add a check to prevent this from happening. The cost is that it needs to be done every time the user clicks on the button.
Fortunately, HTML5 provides the mouse events that we need for this application. In the init
function, I include the following lines:
canvas1 = document.getElementById('canvas');
canvas1.onmousedown = function () { return false; }; canvas1.addEventListener('dblclick',makenewitem,false); canvas1.addEventListener('mousedown',startdragging,false);
The first statement sets the canvas1 variable to reference the canvas element. The second statement is necessary to turn off the default action for the cursor. I also included a style directive for the canvas, which made the positioning absolute and then positioned the canvas 80 pixels from the top. This is ample space for the directions and the buttons.
canvas {position:absolute; top:80px; cursor:crosshair;
}
The third and fourth statements set up event handling for double click and mouse button down
The makenewitem and the startdragging functions start off the same. The code first determines the mouse cursor coordinates and then loops through the stuff array to determine which, if any, object was clicked on. You probably have seen the mouse cursor coordinate code before, in the Essential Guide to HTML5, for example. The looping through the array is done in reverse order. Calls are made to the
overcheck method, defined appropriately for the different types of objects. If there is a hit, then the
makenewitem function calls the clone function to make a copy of that item. The code modifies the x and y slightly so the new item is not directly on top of the original. The new item is added to the array and there is a break to leave the for loop.
As I indicated earlier, the clone function makes a copy of an element in the stuff array. You may ask, why not just write
item = stuff[i];
The answer is that this assignment does not create a new, distinct value. JavaScript merely sets the
item variable to point to the same thing as the ith member of stuff. This is called ‘copy by reference’. We don’t want that. We want a brand new, separate thing that we can change. The way to copy is
So the effect of the two functions is to duplicate whatever element is under the mouse cursor. You or your end-user can then mouse down on the original or the cloned object and move it around.
The startdragged function proceeds as indicated to determine what object was under the mouse. The code then determines what I (and others) call the offsets in x and y of the mouse coordinates versus the x, y position of the object. This is because we want the object to move around maintaining the same relationship between object and mouse. Some folks call this the flypaper effect. It is as if the mouse cursor came down on the object and stuck like flypaper. The offsetx and offsety are global variables. Note that the coding works for objects for which the x, y values refer to the upper left corner (pictures and rectangles), to the center (ovals) and to a specific internal point (hearts).
The coding then performs a series of operations that has the effect of moving this object to the end of the array. The first statement is a copy by reference operation to set the variable item. The next step saves the index for the last element of the stuff array to the global variable thingInMotion. This variable will be used by the function moveit. The splice statement removes the original element and the push
statement adds it to the array at the end. The statement referencing cursor is the way to specify a cursor. The “pointer” refers to one of the built-in options. The last two statements in the function set up the event handling for moving the mouse and releasing the button on the mouse. This event handling will be removed in the dropit function.
function startdragging(ev) {
The moveit function moves the object referenced by thingInMotion and uses the offsetx and
function moveit(ev) {
stuff[thingInMotion].x = mx-offsetx; //adjust for flypaper dragging stuff[thingInMotion].y = my-offsety;
drawstuff(); }
A mousemove event is triggered if the mouse moves a single pixel in any direction. If this seems too much, remember that the computer does it, not you or I. The user gets a smooth response to moving the mouse.
The dropit function is invoked at a mouseup event. The response is to remove, stop the listening for moving and releasing the mouse and then changing the cursor back to the crosshairs.
function dropit(ev) {
canvas1.removeEventListener('mousemove',moveit,false); canvas1.removeEventListener('mouseup',dropit,false);
canvas1.style.cursor = "crosshair"; //change back to crosshair }
To summarize, the user interface for this application involves two buttons and two types of mouse actions. The drag and drop operation is implemented using a set of functions.
Saving the canvas to an image
After creating a composition, the user may want to save it to an image file. The Firefox browser makes this easy. You can right-click on the canvas when using a PC or do the equivalent operation on a MAC and a pop-up menu will appear with the option to Save Image As... However, Chrome, Safari and Opera do not provide that facility. If you right-click, the options concern the HTML document. There is, however, an alternative provided in HTML5.
function saveasimage() { try {
window.open(canvas1.toDataURL("image/png"));} catch(err) {
alert("You need to change browsers OR upload the file to a server."); }
}
Building the application and making it your own
You can make this application your own by identifying your own image files, specifying what rectangles, ovals and hearts you want to include in the collection of objects to be manipulated and, after you have something working, adding new object types. The application has many functions but they each are small and many share attributes with others. An informal summary / outline of the application is
1. init for initialization, including setting up event handling for double click, mouse down, mouse move and mouse up
2. object definition methods: constructor functions, draw functions and overcheck functions
3. event handling functions: mouse events and button onClick
More formally, Table 2-1 lists all the functions and indicates how they are invoked and what functions they invoke. Notice that several functions are invoked as a result of the function being specified as a method of an object type.
Table 2-1. Functions in the HTML5 Family Card project
Function
Invoked / Called By
Calls
init invoked by action of the onLoad attribute in the <body> tag Picture, Rect, Oval, Heart, drawstuff
saveasimage invoked by action of the onClick attribute in a button tag
removeobj invoked by action of the onClick attribute in a button tag drawstuff
Picture invoked in init function
Rect invoked in init function
Oval invoked in init function
Heart invoked in init function
Continued
Function
Invoked / Called By
Calls
drawrect invoked in drawstuff
drawoval invoked in drawstuff
drawpic invoked in drawstuff
overheart invoked in startdragging and makenewitem distsq, outside
overrect invoked in startdragging and makenewitem
overoval invoked in startdragging and makenewitem distsq
distsq invoked by overheart and overoval
drawstuff invoked by makenewitem, moveit, removeobj, init draw method of each item in the stuff array
moveit invoked by action set by addEventListener for mousemove set in startdragging
dropit invoked by action set by addEventListener for mouseup set in startdragging
outside invoked by overheart
makenewitem invoked by action set by addEventListener for dblclick set in init
clone
clone invoked by makenewitem
startdragging invoked by action set by addEventListener for mousedown set in init
Table 2-2. Complete Code for the HTML5 Logo project
Code Line
Description
<!DOCTYPE html > standard heading for HTML5 documents
<html> html tag
<head> head tag
<title>Build family picture</title> complete title
<meta charset="UTF-8"> meta tag
<style> start of style
canvas {position:absolute; top:80px; directive for canvas, setting its position as absolute and its location 80 pixels from the top of the document.
cursor:crosshair; specifying the cursor icon for when the mouse is over the canvas
} close directive
</style> close style
<script language="Javascript"> script tag
var ctx; variable to hold the canvas context
var canvas1; variable to hold the canvas element
var stuff = []; array for all the objects on the canvas
var thingInMotion; reference to object being dragged
var offsetx; horizontal offset for object being
dragged
var offsety; vertical offset for object being dragged
Code Line
Description
canvas1 = document.getElementById('canvas'); sets variable to reference the canvas element
canvas1.onmousedown = function () { return false; } ;
prevents change of cursor to default
canvas1.addEventListener('dblclick',makenewitem,false);
sets up the event handling for double clicks on the canvas
canvas1.addEventListener('mousedown',startdragging,fals e);
sets up the event handling for mouse down on the canvas
ctx = canvas1.getContext("2d"); sets ctx to reference the context of the canvas. Used for all drawing.
var r1 = new Rect(2,10,50,50,"red"); constructs a rectangle