•theavailabledesktopchoices,includingGNOME,KDE,andalternativedesktops •reviewwordprocessors,spreadsheets,presentation,e-mail,graphics,video,andmusic •howtoadministeryoursystem,addusers,manageprintersandperformbackups •howtoparticipateinsocialnetworksusingopensourceclientsforIM,VoIP, •Configurenetworkconnections(GNOME3networkandnetworkmanager),aswell
For your convenience Apress has placed some of the front
matter material after the index. Please use the Bookmarks
Contents at a Glance
Chapter 3: Usage Basics: Login, Desktop, and Help
■
...
43
Chapter 4: Installing and Updating Software: YUM, GNOME Software, PackageKit,
■
Chapter 7: Internet Applications: Web and FTP
■
...
197
Chapter 8: Social Networking: Microblogging, IM, VoIP, and Social Desktop
■
...
219
Chapter 9: GNOME 3
■
...
231
Chapter 15: Network Configuration
■
...
421
Chapter 16: Printing
■
...
443
Introduction
This book examines Fedora for the user. Although administrative tools are covered, the emphasis is on what a user would need to know to perform tasks. The focus here is on what users face when using Fedora, covering topics such as installation, applications, software management, the GNOME and KDE desktops, shell commands, and the Fedora administration and network tools. Desktops are examined in detail, including configuration options. Applications examined include office suites, editors, e-book readers, music and video applications and codecs, e-mail clients, web browsers, FTP clients, microblogging, and IM applications. This book is designed for the Fedora 20 desktop, with all the latest features of interest to users.
Part 1 focuses on getting started, covering Fedora information and resources, Fedora Live DVDs, installing and setting up Fedora, and the basic use and configuration of the desktop. The GNOME 3 System Settings configuration tools, such as power, background, privacy, network, and display, are examined. Also covered are software
management using the YUM software manager and its desktop front ends, the GNOME Software and PackageKit, along with repositories and their use, including the RPM Fusion repository.
Part 2 keys in on such applications as office, multimedia, mail, Internet, and social networking. This part includes coverage of the PulseAudio sound interface and music and video applications. New GNOME applications are included, such as GNOME Music, GNOME Weather, and GNOME Maps.
Part 3 covers the two major desktops, GNOME and KDE, discussing GNOME 3 features, including the activities overviews, the dash, and the top bar. Unique KDE 4 features such as the dashboard and activities are also explored. In addition, the shell interface is examined, including features such as history, file name completion, directory, and file operations, among others. Additional desktops are also discussed, including Xfce, LXDE, Sugar (SoaS), Mate, and Cinnamon.
Part 4 deals with administrative topics, first discussing system tools, such as the GNOME system monitor, the Disk Usage Analyzer, the Disk Utility storage manager, temperature monitors, and SELinux configuration. Then a detailed chapter on Fedora system administration tools such as those for managing users, authorization controls, and Bluetooth, along with service management and file system access, is included. The network configuration chapter covers a variety of network tasks, including configuration of wired and wireless connections, firewalls, and Samba Windows access. Both the GNOME 3 network tool and the older Network Manager editor application are covered. Finally, a chapter on printing examines both the GNOME 3 printers tool and the older system-config-printer
Fedora 20 Introduction
The Fedora release of Linux is maintained and developed by an open source project called the Fedora Project (http://fedoraproject.org). The release consists entirely of open source software. Development is carried out using contributions from Linux developers. The project is designed to work much like other open source projects, with releases keeping pace with the course of rapid online development. The Fedora Project features detailed documentation of certain topics, such as installation and desktop user guides, at http://docs.fedoraproject.org
(see Table 1-1).
http://docs.fedoraproject.org Documentation and support tutorials for Fedora releases
http://fedoraproject.org/en/get-fedora Fedora download page
http://fedoraproject.org/get-fedora-all Fedora download page for all download methods and Fedora versions
http://download.fedoraproject.org Fedora repository, mirror link
http://mirrors.fedoraproject.org Fedora mirrors list
http://fedoraforum.org User discussion support forum, endorsed by the Fedora Project; includes FAQs and news links
www.linuxfoundation.org The Linux Foundation, official Linux development
This chapter covers the information about the Fedora release, where to obtain informaion on it, and what versions are available for download. You can also download and try out the Fedora release on a Live DVD without installing it, even running it from a USB disk.
Fedora Documentation
Documentation for Fedora can be found at http://docs.fedoraproject.org (see Table 1-1). The Fedora installation guide provides a detailed description of all install procedures. The Fedora desktop user guide covers basic desktop operations, such as logging in, using office applications, and accessing the Web. Several dedicated Fedora support sites are available that provide helpful information, including http://fedoraforum.org and http://fedoraproject.org. The http://fedoraforum.org site is a Fedora Project–sponsored forum for end-user support. Here you can post questions and check responses for common problems.
Your Firefox browser will already be configured with links for accessing popular documentation and support sites. On the Firefox Bookmarks toolbar, click the Fedora Project button to display a menu with entries for Fedora Project, Fedora Forum, Fedora Solved, Fedora Weekly News, Planet Fedora, and Join Fedora. The Red Hat menu displays entries for Red Hat, jBoss, OpenSource.com, and The Open Source Way (you may have to set the bookmarks toolbar to display; choose View ➤ Bookmarks Toolbar).
Fedora maintains detailed specialized documentation, such as information on understanding how udev is implemented or how SELinux is configured. For much of the documentation you must rely on installed documentation in /usr/share/doc or on the man and info pages, as well as the context help button for different applications running on your desktop. Web sites for software such as GNOME, KDE, and LibreOffice.org provide extensive applicable documentation. For installation, you can use the Fedora installation guide at
http://docs.fedoraproject.org/en-US/Fedora/20/html/Installation_Guide/.
Fedora 20
The Fedora versions of Linux are entirely free. You can download the most current version from
http://fedoraproject.org or http://download.fedoraproject.org. The http://download.fedoraproject.org
address will link to the best available mirror for you. You can update Fedora using the software update (PackageKit) to access the Fedora repository. Access is automatically configured during installation.
The Fedora distribution is also available online at numerous FTP sites. Fedora maintains download sites at
http://download.fedoraproject.org, along with a mirrors listing at http://mirrors.fedoraproject.org, where you can download the entire current release of Fedora Linux, as well as updates and additional software.
Web Site
Descrription
http://kernel.org Latest Linux kernels
www.redhat.com The Red Hat web site
http://magazine.redhat.com/ Red Hat Magazine, with specialized articles on latest developments
www.centos.org Community Enterprise Operating System, CENTOS (Red Hat–based)
Fedora 20 Desktop Features
Fedora releases feature key updates to critical applications as well as new tools. The following information is derived for the official Fedora release notes. Consult these notes for detailed information about all new changes. The Fedora release notes are located on all the Fedora spins as an HTML file on the top directory. You can also find the release notes at http://docs.fedoraproject.org/en-US/Fedora/20/html/Release_Notes/.
Fedora 20 uses GNOME 3.10 and KDE 4.11.
Fedora provides the Mate and Cinnamon desktops. Mate is a traditional desktop based on GNOME 2, and Cinnamon is the Mint Linux desktop derived from GNOME 3, but with many traditional features, such as the panel and applets.
GNOME Software has replaced PackageKit as the primary front-end software management application. GNOME Software (gnome-software) is designed to work with applications rather than just specific packages. You can still install and use the older PackageKit software manager (Packages and Software Update).
The lock screen displays the time, date, and username. From the lock screen, you can adjust the sound, configure your network connection, and check your power. Press the ESC key to display the login screen.
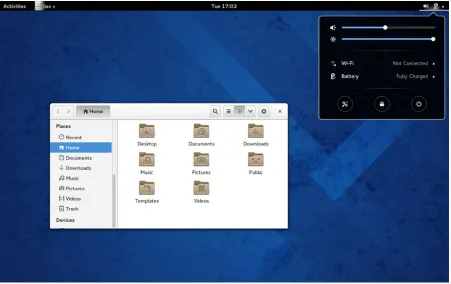
The System Status Area has been combined into one menu showing sound volume, brightness, network connections, the current user, battery power, and buttons for Settings, lock screen, and power off. The user item is only shown if more than one user is set up for the system. The user menu item expands to Log Out and Switch User entries.
For systems with wireless devices, there is a Wi-Fi entry in the System Status Area menu that expands to a menu with options to select a network, turn off the wireless device, and to open the GNOME Network system setting dialog at the wireless tab (Wi-Fi Settings). For systems with a battery, such as laptops, a Battery entry is displayed on the System Status Area menu showing the power level. The Power menu item expands to a menu with an entry to open the Power Settings dialog in System Settings.
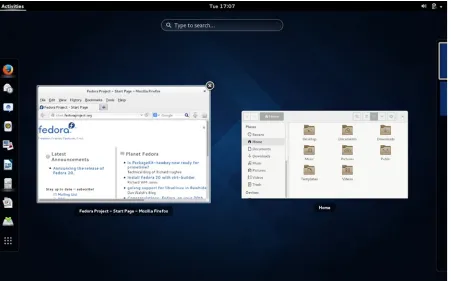
GNOME windows and workspaces can be displayed easily and accessed quickly from the overview.
Sound volume and screen brightness (laptops) are adjusted using sliders on the System Status Area menu.
A search box at the top of the overview allows you to search directly for applications and files. It is also configured to search GNOME Contacts, Documents, and Keys, as well as to conduct a web search. Use the System Settings Search dialog to select the applications that can be searched. You can also add other applications.
The GNOME Tweak Tool lets you perform common desktop configurations, such as placing your home folder on the desktop, changing the theme for icons and windows, changing and adjusting fonts, choosing startup applications, configuring how the date is displayed on the top bar, and setting up static (fixed number) workspaces.
The GNOME Network dialog for System Settings has been enhanced and is now the primary network configuration tool. As with the system-config-network (Network Connections), it is a front end to Network Manager. The older system-config-network can still be installed and used. Both use similar dialog entries.
Several new System Settings dialogs have been added: Notifications, Privacy, Search, and Sharing. Screen Lock is now managed by Privacy.
The Privacy dialog in System Settings lets you configure Screen Lock, Usage & History, and to Purge Trash & Temporary Files.
The Sharing dialog in System Settings lets you allow screen sharing, media sharing in specified folders, and remote logins.
The Notification dialog in System Settings lets you select applications that can display notices.
Chat messages can be responded to on the message tray.
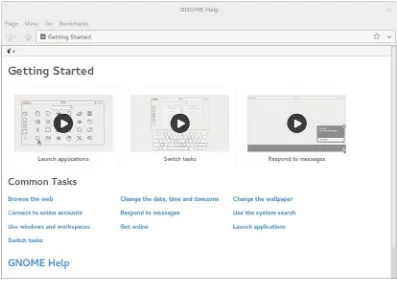
On GNOME Help, the Getting Started page displays animations for common tasks, such as starting applications or accessing files.
Though GNOME workspaces are generated automatically (dynamic) from the overview, you can also use the GNOME Tweak Tool to set up static (fixed-number) workspaces instead.
The GNOME overview features a dash (Activities) that lists icons for your favorite applications and opened applications, letting you access them quickly. You can add applications to the dash. An Applications icon on the dash opens the applications overview. A search box at the top lets you search for applications and files. A Frequent button at the bottom lets you display only frequently accessed applications. A pager to the right lets you move through the icons by page.
In the GNOME-shell, notifications are displayed in the message tray at the bottom of the screen (they are automatically hidden). Use the Super+m key to display it (Windows key+m), or move the mouse forcefully to the bottom edge of the screen.
On all GNOME windows, the toolbar and the title bar have been combined into a header bar, with a single close box on the right side.
The GNOME Files file manager has buttons for two views: icon and list. A button for a View menu lists tasks such as zooming and sorting, and a tool button displays a menu for folder tasks such as a new tab, item selection, and bookmarking. A Files menu on the GNOME applications menu on the top bar contains tasks such as connecting to an FTP site, opening a new window, and configuring bookmarks.
The GNOME Files file manager (Nautilus) features a sidebar with Places, Devices, Computer, Bookmarks, and Network sections. You can quickly access any file system on removable devices, remote networks, and internal drives, as well as your home folders. The file manager supports a preview of file contents, displaying text, video, images, and PDF files. Select the file and press the spacebar.
In System Settings, you can configure use of Online Accounts, such as Google and Facebook. Configuring the Online Accounts sets up configuration for mail and chat (Empathy).
GNOME supports an integrated onscreen keyboard for both access and tablets and the integration of keyboard layouts and input methods.
GNOME Documents supports local and cloud-based documents (Google docs and Microsoft SkyDrive), letting you quickly search and access your documents (text, PDF, presentations, and spreadsheets).
systemd and its unit files have replaced System V and its init scripts. Upstart is no longer used. The GNOME Log Viewer is a front end to journald.
journald has replaced syslogd as the logging daemon. You can use jouralctl to access the logs.
The GNOME print manager (System Settings ➤ Printers) features full support for configuring printers.
KDE provides several desktop improvements, including the system tray, notification area, desktop file indexing, and a reworked activities interface, which makes it easier to manage desktop widget collections.
The GNOME Classic mode (gnome-classic-session package) lets you use a GNOME 2–like interface.
Fedora ISO Images
Fedora disks are released as a set of spins that collect software for different purposes. Currently, there are three major Fedora distribution spins available: the Install DVD for desktops, workstations, and servers; the Desktop Live DVD (GNOME Desktop); and the Fedora KDE Live DVD. The Install DVD spin includes a collection of workstation and server software, but not the entire collection. Spins are created with Revisor, which you can use to develop your own customized spins. You can find out more information about spins at https://fedoraproject.org/wiki/SIGs/Spins.
Fedora Desktop Live DVD: The Fedora GNOME Desktop Live DVD, available in i386 and x86_64 versions
Fedora KDE Live DVD: The Fedora KDE desktop Live DVD, available in i386 and x86_64 versions
Fedora Install DVDs: The Fedora Install DVD, with a more complete selection of software, available in i386 and x86_64 versions; only performs an installation or rescue
Fedora Custom Spins
Custom spins are also available and can be downloaded from http://spins.fedoraproject.org. The official spins are listed at https://fedoraproject.org/wiki/Releases/20/Spins.
Fedora XFCE Desktop Spin: Features the XFCE desktop instead of GNOME Fedora LXDE Desktop Spin: The Lightweight X11 Desktop Environment
Fedora Mate-Compiz Desktop Spin: The Mate Desktop Environment. Mate is an updated version of the GNOME 2 interface
Fedora SoaS Desktop Spin: Sugar on a Stick spin for USB drives featuring the Sugar desktop (OLPC)
Fedora Games Spin: Games available on Fedora
Fedora Security Spin: Fedora Security Lab spin, a safe environment for security testing and recovering a system
Fedora Robotics Spin: Robotic simulation environment Fedora Scientific-KDE Spin: Scientific research
Fedora Jam Audio Spin: Audio and music applications and tools
Multimedia
Although licensed multimedia formats such as MP3 and DVD are still excluded, open source formats are all included, including Vorbis, Ogg, Theora, and FLAC. Multimedia codecs with licensing issues can be directly downloaded with PackageKit, once you have configured YUM to use the RPM Fusion repository on your system. (Just install the
http://rpmfusion.org configuration package for Fedora 20, which is available from that site.) The RPM Fusion repository is not configured by default.
Fedora Live DVD
The Fedora Live DVD lets you run Fedora on any computer using a DVD-ROM drive. You can save files to removable devices such as USB drives. You can temporarily install software, but the install disappears when you shut down. You can also mount partitions from hard drives on the system you are running the Live DVD on. Find out more about the Fedora Live DVD at http://fedoraproject.org/wiki/FedoraLiveCD.
The Live DVD provided by Fedora includes a limited set of software packages. Servers are not included. For desktop support, you use GNOME (there are KDE, LXDE, and Xfce versions). Other than these limitations, you have a fully operational Fedora desktop. The Live DVD enables Network Manager by default, automatically detecting and configuring your network connection. You have the full set of administrative tools, with which you can add users and change configuration settings while the Live DVD is running. When you shut down, the configuration information is lost.
You can log out, but this will display a login screen with a simple login dialog for automatic login and a language menu. The bottom panel of the login screen has menus for setting the language and keyboard. You can shut down or restart from the shutdown menu on the right side of the panel.
Fedora provides GNOME and KDE desktop Live DVD spins, as well as those for LXDE, Xfce, Mate-Compiz, and SoaS, each in 32-bit and 64-bit versions.
Fedora 20 Desktop Spin: Available for i868 and x86_64; includes GNOME desktop and productivity applications
Fedora 20 KDE Spin: Available for i686 and x86_64; includes KDE desktop Fedora 20 XFCE Spin: Features the XFCE desktop instead of GNOME
Fedora 20 LXDE Spin: Features the lightweight LXDE desktop instead of GNOME
Fedora Mate-Compiz Desktop Spin: The Mate Desktop Environment. Mate is an updated version of the GNOME 2 interface
Starting the Live DVD
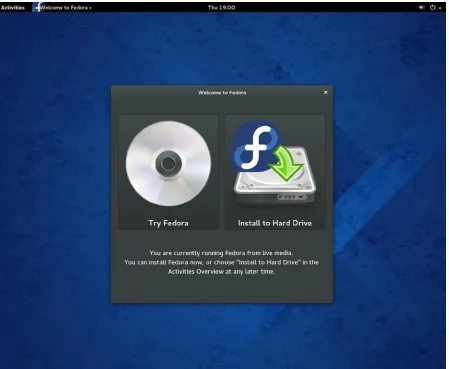
When you first boot, you can press the spacebar to display the boot options. These include booting up the Live DVD directly (the default), booting with basic video, verifying the disk media first, performing a memory test, or booting to another OS already on your hard disk. If you press nothing, the Live DVD starts up automatically. After your system starts up, you will be presented with the standard login screen (the KDE Live DVD will boot directly to the desktop). You will be automatically logged in. The GNOME desktop (see Figure 1-1) will then start up.
Figure 1-1. Fedora Live DVD
An easy way to save data from a Live session is to use a USB drive. On GNOME, the USB drive will appear as an entry on a file manager window sidebar. Double-click it to open a file manager window for the USB drive. You can then copy files generated during the session to the USB drive. Remember to eject the drive before removing it (click the eject button next to the USB drive entry on the file manager sidebar).
Installing Fedora from a Live DVD
The Live DVD can also be used as an installation disk, providing its limited collection of software on a system, that can be expanded and updated from Fedora online repositories (see Chapter 2). In this case, you don’t have to download a complete set of Fedora install CD disks or the install DVD, just the Live DVD. Later, you add packages from
repositories. Double-click the Install to Hard Drive icon on the overview dash to start the installation (see Figure 2-4 in Chapter 2).
USB Live Disk
You can also install Fedora Live ISO images to a USB disk. The procedure is not destructive. Your original data on the USB disk is preserved. To create a Live USB drive, you can either use the liveusb-creator application (liveusb-creator package), or the livecd-iso-to-disk command (livecd-tools package).
liveusb-creator
The liveusb-creator application is a GNOME application with an easy-to-use interface for creating a Live USB image from a Live DVD ISO image file. Once it’s installed, you can start liveusb-creator from Utilities ➤ Fedora LiveUSB Creator to open the Fedora Live USB Creator window. Use the Browse button to locate the USB image or download one using the Download Fedora pop-up menu. The selected image will appear in the pane. Use the Target Device pop-up menu to select the USB drive to use, if there’s more than one. The Persistent Storage slider allows you to create an overlay memory segment on which changes and added data can be saved. When you are ready, just click the Create Live USB button at the bottom of the window.
livecd-iso-to-disk
You can also install Fedora Live images to a USB disk using the livecd-iso-to-disk command to install the image (part of the livecd-tools package). This is a command-line tool that you enter in a terminal window. Use the Live image and the device name of the USB disk as your arguments.
/usr/bin/livecd-iso-to-disk Fedora-20i686-Live-Desktop.iso /dev/sdb1
Each Live DVD also provides a livecd-iso-to-disk script in its LiveOS directory.
Live USB Persistence Storage
If you want to make changes to the Fedora OS on the USB Live version, set up an overlay memory segment on the USB drive. To do this, use the --overlay-size-mb option with the size of the overlay in megabytes. Be sure your USB drive is large enough to accommodate both the overlay memory and the CD image. The following allows for 512MB of persistent data that will be encrypted:
livecd-iso-to-disk --overlay-size-mb 512 Fedora-20i686-Live-Desktop.iso /dev/sbd1
Persistent Home Directory
If you want to save data to a /home directory on the USB Live version, set up a home directory memory segment. To do this, use the --home-size-mb option with the size of the home directory segment in megabytes. Be sure your USB drive is large enough to accommodate the home memory and the CD image, as well as a memory overlay, if you also want to enable changes to the operating system. Your /home directory memory segment will be encrypted by default, to protect your data in case it is lost or stolen. Upon creating your overlay, you will be prompted for a passphrase. Whenever you boot up your USB system, you will be prompted for the passphrase. The following allows for a 1024MB
/home directory that will be encrypted:
livecd-iso-to-disk --home-size-mb 1024 Fedora-20-i686-Live-Desktop.iso /dev/sbd1
If you do not want the data encrypted, add the --unencrypted-home option when creating the disk.
Combining the overlay and the /home memory would require a command such as the following. In all, about 3GB of disk space would be required.
Fedora Logo
The Fedora logo depicts an f encased in a blue circle (see Figure 1-3). The logo is designed to represent three features of the Linux community and development: freedom, communication, and infinite possibilities. The f stands for “freedom,” which melds into the infinity symbol, both encased in a speech bubble evoking communication (voice). The logo, then, represents free and open software with infinite possibilities developed through global communication. The idea is to evoke the spirit and purpose of Linux development as one of infinite freedom given a voice. The logo incorporates the four basic ideals of Fedora: open, free, innovative, and forward vision.
See http://fedoraproject.org/wiki/Logo for more details.
Figure 1-3. Fedora logo
Linux
Linux is a fast, stable, and open source operating system that features development tools, desktops, and a large number of applications, ranging from office suites to multimedia applications. Linux was developed in the early 1990s by Linus Torvalds, along with other programmers around the world. Technically, Linux consists of the operating system program, referred to as the kernel, which is the part originally developed by Torvalds. But it has always been distributed with a large number of software applications. Linux has evolved as part of the open source software movement. Currently, hundreds of open source applications are available for Linux from the Fedora software repository and the Fedora-compliant third-party repository RPM Fusion (http://rpmfusion.org). Most of the GNOME and KDE applications are incorporated into the Fedora repository, using software packages that are Fedora-compliant. You should always check the Fedora repository first for the software you want.
Linux is distributed freely under a GNU General Public License, as specified by the Free Software Foundation, making it available to anyone who wants to use it. GNU (the acronym stands for “GNU’s Not Unix”) is a project initiated and managed by the Free Software Foundation to provide free software to users, programmers, and developers. Linux is copyrighted, not public domain. However, a GNU public license has much the same effect as the software being in the public domain. The GNU General Public License is designed to ensure that Linux remains free and, at the same time, standardized.
Open Source Software
Most Linux software is developed as open source software. This means that the source code for an application is distributed free with the application. Programmers can make their own contributions to a software package’s development, modifying and correcting the source code. Linux is an open source operating system. Its source code is included in all its distributions and is freely available. Much of the software provided for Linux are also open source projects, as are the KDE and GNOME desktops, along with most of their applications. The LibreOffice office suite is an open source project based on the StarOffice office suite. You can find more information about the open source movement at www.opensource.org.
Free Software Foundation. This is the license that Linux is distributed under. The GNU General Public License (GPL) retains the copyright, freely licensing the software with the requirement that the software and any modifications made to it always be available for free. Other public licenses have also been created to support the demands of different kinds of open source projects. The GNU Lesser General Public License (LGPL) lets commercial applications use GNU licensed software libraries. The Qt Public License (QPL) lets open source developers use the Qt libraries essential to the KDE desktop.
Linux is currently copyrighted under a GNU public license provided by the Free Software Foundation, and it is often referred to as GNU software (see www.gnu.org). GNU software is distributed free, provided it is distributed to others for free. GNU software has proved both reliable and effective. Many of the popular Linux utilities, such as C compilers, shells, and editors, are GNU software applications. Installed with your Linux distribution are the GNU C++ and Lisp compilers, Vi and Emacs editors, and BASH and TCSH shells. In addition, there are many open source software projects that are licensed under the GNU General Public License. Chapter 4 describes in detail the process of downloading software applications from online repositories and installing them on your system.
Under the terms of the GNU General Public License, the original author retains the copyright, although anyone can modify the software and redistribute it, provided the source code is included, made public, and provided free of charge. Also, no restriction exists on selling the software or giving it away free. One distributor could charge for the software, while another could provide it free of charge. Major software companies also provide Linux versions of their most popular applications. For example, Oracle provides a Linux version of its Oracle database.
Linux Documentation
Installation and Upgrade
This chapter describes the installation and upgrade procedures for Fedora 20 Linux. Fedora uses the Anaconda installation program. Designed to be simple and fast, it installs a core set of applications. A Fedora 20 installation guide is available online. First check the new Fedora installation guide at http://docs.fedoraproject.org/en-US/ Fedora/20/html/Installation_Guide/index.html.
You can also link to this guide from the Fedora download page (right-side links) at http://fedoraproject.org/ en/get-fedora.
If you are upgrading your system from Fedora 19, check the section for upgrading at the end of this chapter. There are several methods you can use, including a direct upgrade from the online repositories or upgrading using the Install DVD. A clean install, if possible, is always recommended over an upgrade, as conflicts can occur with some software if configuration file formats and supporting software libraries change too much. You can only upgrade to Fedora 20 from a Fedora 19 install. If you want to upgrade from Fedora 18, you first have to upgrade to Fedora 19, before you can upgrade to Fedora 20.
Obtaining the DVDs
To download Fedora 20 for installation from a DVD/CD-ROM drive, you download either the Fedora Install DVD image or a Fedora Live image. The Fedora Install and Live images are large files that have an .iso extension. Once they are downloaded, you burn them to a disk using your CD or DVD writer and burner software, such as the Brasero or K3b on Fedora.
There are ISO images for 64-bit system support and for the standard x86 (32-bit) support. Download the appropriate one. You cannot run a 64-bit version on an x86 (32-bit) system.
To obtain the current version of Fedora, go to the Fedora Project web site and click the Download tab (http://fedoraproject.org) to open the Get Fedora Main tab. There are several tabs you can use. The first holds a download button for the Fedora Live iso images. Desktops tab lists alternate spins, such as the KDE and LXDE versions. The Formats tab lists the DVD ISO image. At the bottom of the page, under the Download heading, the Full Download List link opens a page with other methods for downloading, such as BitTorrent and Jigdo.
Fedora 20 is also available on mirror sites. You can directly access a Fedora mirror site by entering the following URL: http://download.fedoraproject.org. You then need to navigate through the releases and the version
directories (in this case 20) to find the Fedora and Live directories where the Fedora Install and Live iso images are kept.
Install Strategies: Making Use of Repositories
With Fedora 20, for installation, you can use either the Fedora Install DVD or one of two Live DVDs: Live Desktop with GNOME or Live KDE with KDE. The Fedora Install DVD allows you to download from specified repositories during installation, as well as to select the packages you want installed. It also includes a more extensive set of packages on disk than the Live DVD.
One major advantage of the Install DVD is its flexibility in the selection of software packages during installation. The Live DVDs install only a predetermined set of packages. The Fedora Install DVD allows you to select the packages you want to install, offering a much larger selection to choose from. The Fedora Install DVD is an extensive collection of the more popular applications (servers, development, and desktop).
The Fedora Install DVD also allows you to install packages from the Fedora repository, as well as from any associated repository you choose, such as http://rpmfusion.org. With the Fedora Install DVD, you can choose to download additional packages from the Fedora repository that are not included on the Fedora DVD.
Live DVD Advantages
Quick download of small install disk (about 900MB)
Ability to check out the desktop operations on a Live DVD interface Quick installation of basic desktop (cannot select packages)
Ability, after installation, to add current packages from online repositories, as needed
Fedora Install DVD Advantages
Larger collection of initial software packages: servers, administration, multimedia, office (much larger initial download of Fedora DVD image: 3GB)
Ability to install more packages without having a high-speed connection for downloading from repositories
Ability to specify which packages to install
More extensive set of installation packages on hand for later installations
Installation Issues
Before you install, you should be aware of certain installation issues, such as dual-booting on a system with Windows, basic hardware requirements, storage options, and installation sources. Most of these concerns do not apply to a normal installation.
Installing Dual-Boot Systems
Storage Configuration
Fedora Linux is very flexible, using a minimum of about 1GB RAM and 9GB hard disk space for everything. The minimal install uses as little as 100MB.
Linux usually runs on its own hard drive, although it can also run on a hard drive that contains a separate partition for a different operating system such as Windows. You can also install Fedora on specialized storage devices, such as Storage Area Networks (SANs).
If you want to install Linux and Windows on the same hard drive, and you have already installed Windows on your hard drive and configured it to take up the entire hard drive, you can choose to resize its partition to free up unused space during installation. The freed space can then be used for a Linux partition. See the Fedora installation guide for more details. You can also use a partition management software package—such as fdisk, Parted, or Partition Magic—to free up space before installation.
Install Sources (Install DVD)
Fedora supports several methods for installing Linux. You can install from a local source, such as a DVD/CD-ROM or a hard disk, or from a network or Internet source. For a network or Internet source, Fedora supports NFS, FTP, and HTTP installations. With FTP, you can install from an FTP site. With HTTP, you can install from a web site. NFS enables you to install over a local network. For a local source, you can install from a CD-ROM or a hard disk. You can start the installation process by booting from your DVD-ROM or from boot disks that can then use the DVD-ROM or hard disk repository. Fedora documentation covers each of these methods in detail.
To select an install source, you have to boot the install kernel, either from a Fedora 20 Install DVD or CDs, or from a Fedora Install DVD image file (you can also use USB disks and PXE servers). Press the ESC key to display the boot prompt. At the boot prompt, you enter the option linux askmethod, as shown following:
boot: linux askmethod
After you configure your language and keyboard, a dialog appears with options for local DVD/CD/hard drive, NFS directory, and URL (FTP and HTTP installations).
Basic Install with Fedora Live Desktop DVD
If you want to download and install Fedora quickly, you can simply install it from the Fedora Live Desktop DVD, which allows you to see what Fedora is like, without having to install it. Should you then want to install Fedora on your system, you can do so using just the Fedora Live Desktop DVD. You can then later download and install software you want to add from the Fedora repository.
The Fedora Live Desktop DVD includes the GNOME desktop. If you want to use the KDE desktop, you can use the Fedora Live KDE CD. The Fedora Live Desktop and Fedora Live KDE have i686 (32-bit x86 systems) and x86_64 (64-bit systems) versions.
The Fedora Live Desktop DVD installs a basic set of applications. Should you want to install a more complete set or install applications from other software repositories during the install process, you can use the Install DVD. The Install DVD is also a Live disk, and it allows you to run Fedora first. The Install DVD is much larger, though—about 3GB.
By default, the first entry, Start Fedora 20, is selected. Press Enter to start Fedora. Should you need to add options directly to the boot command, press the Tab key. A command line is displayed on which you can enter the options (see Figure 2-2). Current options will already be listed. Use the Backspace key to delete and the arrow keys to move through the line. Press the ESC key to return to the menu.
Figure 2-1. Install menu
Figure 2-2. Install menu with boot options
The first option (Start Fedora Live in basic graphics mode) starts up with basic video. The second (Test this media & start Fedora Live) will test if your DVD/CD media is okay. The third (Run a memory test) performs a hardware memory test. The last (Boot from local drive) will boot a local OS on a connected hard drive, if there is one.
When you first start the Live disk, you can choose whether to try Fedora or to install it (see Figure 2-4). If you want to install Fedora directly on your system, click the Install to Hard Drive icon to start the standard install procedure (Anaconda), as described in this chapter. You will be installing Fedora just as you would from the standard Fedora Install DVD. The only difference is that only the small subset of applications already on the Fedora Live Desktop DVD will be installed. You cannot choose applications during the install process.
Figure 2-3. Install menu’s Troubleshooting options
For more startup options and testing, use the arrow key to move to the Troubleshooting entry. The
You can also install Fedora at any time while you are using the Fedora Live Desktop. On Activities, there is an icon showing the hard disk and Fedora logo image with the label “Install to Hard Drive” (see Figure 2-5).
The install process has fewer options than the DVD install process but performs all necessary tasks. The screens shown are as follows:
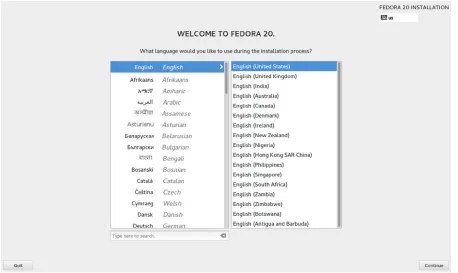
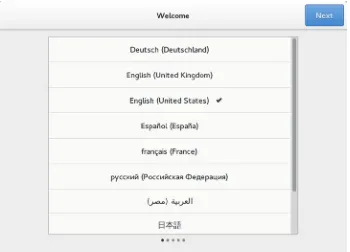
Language: Select your language.
Installation Summary: Configure your installation. The Fedora Live install has four options: Date & Time, Keyboard, Installation Destination, and Network Configuration. A warning emblem is displayed on those options that require configuration. Ordinarily, only the Installation Destination option has a warning emblem. You cannot continue until all options with warnings are configured.
Date & Time: Select your city from the map or the pop-up menu or click the time zone on the map. This option may not have a warning on it but could still be incorrect. Be sure to check it.
Keyboard: Select and configure your keyboard, if you need to.
Installation Destination: Choose the hard drive to install on and set up your partitions. You have the option to manage your own. Once you finish configuring your installation summary items, the installation begins, showing a progress bar.
Network Configuration: Normally, this is automatically configured.
Configuration: As your system installs, you can set up a root password and configure a user.
Root Password: You are prompted to enter a password for the root user. This is your administrative password.
User Creation: Create a user for you to log in as. This should be the administrative user.
When the installation finishes, a simple Quit button will be displayed with a message to restart, to complete the installation. You can close at this point, to return to the Fedora Live Desktop, and then restart, to reboot to your installed system.
On reboot, you enter the Fedora Setup Agent procedure, where you can set the date and time and create a standard user, which you can use to log in for normal use (not as root). More users can be created later. After Setup, your login screen appears, and you can log in to your Fedora system.
Initially, you will have only the same software available as was on the Fedora Live Desktop DVD, but you can use the software manager to install other applications, such as LibreOffice. You may also have to update many of the applications installed from the Fedora Live Desktop DVD. Click the update notification icon on the message tray (lower right), which will appear automatically, to start the update process. Applications and updates are downloaded from the Fedora repository and installed.
Quick Install with the Install DVD
If you are installing from the Install DVD, installation is a straightforward process. The graphical installation is very easy to use. It provides full mouse support and explains each step with detailed instructions on a Help pane (you can also use the Install CDs).
Most systems support booting a DVD-ROM or CD-ROM, although this support may have to be explicitly configured in the system BIOS.
Also, if you know how you want Linux installed on your hard disk partitions, or if you are performing a simple update that uses the same partitions, installing Fedora 20 is a fairly simple process. Fedora 20 features an automatic partitioning function that will perform the partitioning for you.
If you choose package collections from one of the preconfigured packaging installations, you will not have to select packages.
For a quick installation, you can simply start up the installation process, placing your Install DVD in your optical drive and starting up your system. Graphical installation is a matter of following the instructions in each window as you progress. Many of them are self-explanatory. The steps involved are the same as for the Fedora Live install, but with more options at the Installation Summary stage:
Language: Select your language.
Installation Summary: Configure your installation. The Install DVD has several options with three categories: Localization, Software, and System. For Localization, you can configure the Date & Time, the Keyboard, and Language Support. For Software, you configure the Installation Source and Software Selection. For Storage, you configure the Installation Destination and Network Configuration. A warning emblem is displayed on any options that require configuration. Ordinarily, only the Installation Destination option has a warning emblem. You cannot continue until all options with warnings are configured. Date & Time: Select your city from the map or the pop-up menu or click the time zone on the map. This option may not have a warning on it but could still be incorrect. Be sure to check it.
Keyboard: Select and configure your keyboard, if you need to. Language Support: Install additional languages.
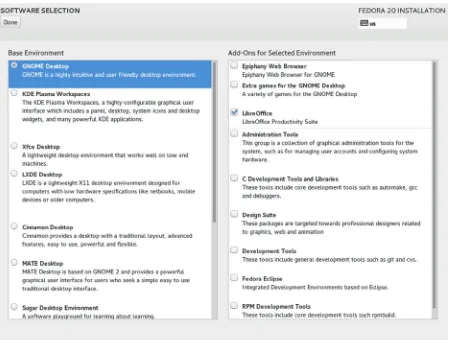
Software Selection: Choose the environment to install: a desktop (GNOME, KDE, Xfce, and LXDE), web server, development workstation, infrastructure server, or minimal install. With each option, you can also choose to install additional packages.
Installation Destination: Choose your hard drive to install on and set up your partitions. You have the option to choose from several default configurations or mange your own. Once you finish configuring your installation summary items, the installation begins, showing a progress bar.
Network Configuration: Configure your network connection. Configuration is the same as with the Live DVD. There are items for the root password and user creation.
Root Password: You are prompted to enter a password for the root user. This is your administrative password.
User Creation: Create a user for you to log in as. This should the administrative user.
After the installation, you will be asked to remove your DVD and click the Reboot button. This will reboot your system (do not reboot yourself ).
On reboot, you will enter a Fedora Setup Agent procedure, where you will be able to set the date and time and create a standard user, which you can use to log in for normal use (not as root). More users can be created later. After the setup, your login screen will appear, and installation will be complete.
Installing Fedora Linux
First check the Fedora 20 installation guide before installing Fedora 20. It provides detailed screen examples.
http://docs.fedoraproject.org/en-US/Fedora/20/html/Installation_Guide/
The installation process used on Fedora is a screen-based program that takes you through all installation steps as one continuous procedure. You can use the mouse or the keyboard to make selections. When you finish with a screen, click the Continue button at the bottom to move to the next screen. If you have to move back to the previous screen, click Back. You can also use Tab, the arrow keys, the spacebar, and Enter to make selections. You have little to do other than make selections and choose options. Some screens provide a list of options from which you make a selection. The installation process will first install Linux on your system. It will then reboot and start a Setup process to let you set the time and date and create a user to log in as. The steps for each part of the procedure are delineated in the following sections.
As each screen appears in the installation, default entries will be selected, usually by the auto-probing capability of the installation program. Selected entries will appear highlighted. If these entries are correct, you can simply click Next to accept them and go on to the next screen.
Starting the Installation Program with the Install DVD
If your computer can boot from the DVD, you can start the installation directly from the Install DVD (or the Install CD). The installation program on the DVD Install disk presents you with a menu listing the following options:
Install Fedora 20
Use the arrow keys to move from one menu entry to the next and then press Enter to select the entry. Should you need to add options, press the Tab key. A command line is displayed on which you can enter the options. Current options will be listed. Use the Backspace key to delete and arrow keys to move through the line. Press the ESC key to return to the menu.
The following Troubleshooting menu enables you to use the basic graphics mode, rescue a Fedora system, test the memory, and boot from a hard drive:
Install Fedora in basic graphics mode Rescue a Fedora system
Run a memory test Boot from local drive Return to main menu
The install program (Anaconda) will automatically detect and configure your video card so that it can run a graphical interface for the install procedure. If it has difficulty configuring the video card, you can choose to use a basic video driver instead, which means you can still use the graphical install. Choose Install Fedora in Basic Graphics Mode from the Troubleshooting menu.
If you already installed Fedora 20, but the system fails for some reason, you can start up from the Install DVD and then choose Rescue a Fedora System from the Troubleshooting menu.
Check Disk Media
If you have doubts about the integrity of your DVD, you can choose to perform a check of the media before
installation. This check can take several minutes. On the Install DVD, this option is on the first screen, and on Fedora Live, it is on the Troubleshooting screen. You can stop the check at any time by pressing the ESC key to enter a shell. Then type the exit command and press Enter to continue with the installation.
Initial Setup
If your basic device and hardware configuration were appropriately detected, a Welcome screen is displayed, with a Continue button on the lower-right corner. Once you’ve completed a step, you click Continue to move on. In some cases, you can click a Back button to return to a previous step.
Tip
■
Your mouse will be automatically detected. If you have a USB mouse that is not being detected, try reinserting
the USB connector several times. If you cannot use your mouse for some reason, you can use the Tab key to move to
different components and buttons. Use the arrow keys to select and enter a list. Press the Enter key to click a selected
button or entry. The Tab key will cycle through entries on a screen sequentially. To return to a button or component, just
continue to press the Tab key.
You are then presented with an Installation summary screen with categories for Localization and System (see Figure 2-7). For Localization, you can configure the Date & Time and the Keyboard. For System, you can configure the Installation Destination and Network Configuration. For Network Configuration, see the section “Network Configuration with the Fedora Install DVD/CDs,” later in this chapter A warning emblem appears on options that have to be configured, usually only the Installation Destination, although you should also check that the date and time are correct. A Quit button at the bottom-left of the screen lets you quit the installation. A Begin Installation button at the bottom right remains grayed out as long as there are warnings. When all options are configured and the warning emblems disappear, this button becomes active, and you can click it to continue the installation.
For the Install DVD, the Installation Summary screen shows a Software category with Installation Source and Software Selection (see Figure 2-7). On the DVD install, Localization also has a Language Support icon. See the section “Software Installation Configuration with the Fedora Install DVD/CDs,” later in this chapter.
With warning emblems present, a warning appears at the bottom of the screen, as follows:
To check and configure your time, date, and time zone, click the Date & Time icon. On the Date & Time screen, you have the option of setting the time zone by using a map or pop-up menu to specify your location (see Figure 2-8). The selected city will appear as the pop-up menu selection. There is a switch that lets you turn off network time (the time obtained from NTP servers). A configure button next to this switch opens a dialog that lets you specify the NTP time servers to use. Click the Done button in the upper-left corner when finished.
On the Installation Summary page, click the Keyboard icon to configure your keyboard (see Figure 2-9). Keyboard layouts are listed on the left scroll box. Clicking the plus button at the bottom of this box lets you add another
language layout. The Keyboard button displays an image showing all the keys. A text box to the right lets you test the keyboard. The Options button lets you specify which keys to use to switch layouts.
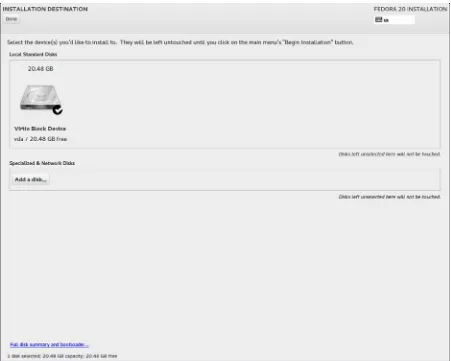
On the Installation Summary screen, click the Installation Destination icon to open the Installation Destination screen, where you can choose the hard disk device on which to perform the installation (see Figure 2-10).
The top icon bar shows your installation devices. The local drives are shown under the Local Standard Disks heading (see Figure 2-11). If you have only a single local hard drive, that drive is automatically selected for you.
At the bottom of the screen, information is displayed about the selected disk (see Figure 2-12). The Full Disk Summary and Options link opens with information about the device, as well as buttons to remove the device and install the bootloader. You can use this dialog to choose not to install the bootloader. If you have several hard disks, you can choose which one to install the bootloader on (should this be an issue). Usually, you install the bootloader on the same device as Fedora.
Figure 2-12. Installation Destination: Information and options Figure 2-11. Installation Destination: Devices
A check box to the right lets you encrypt the device.
On the Installation Options screen, the LVM partition scheme is chosen by default. From the drop-down menu, you can choose a different scheme. The options are LVM, BTRFS (RAID), and Standard (ext4).
Upon pressing Continue from the Installation Options screen, your installation begins with a progress bar at the bottom of the screen (see Figure 2-14).
Figure 2-13. Installation options
Figure 2-14. Installation progress bar
At the same time, you’re prompted to set the root password (see Figure 2-15). A warning emblem is displayed on the Root Password icon on the Configuration screen.
Figure 2-15. Configuration: Root Password
Click the User Creation icon to enter the information for your primary user (see Figure 2-17). You are prompted to enter the name, username, and password. You can also choose to make the user the administrator and to require a password for the user account. Click the Advanced button to open a dialog in which you can specify the home directory, user and group ids, and group memberships (see Figure 2-18). The home directory is already set up by default to be the name of the user in the /home directory. User and group ids are given automatically, but you can set them manually. You can also add groups for the user.
Figure 2-16. Root Password dialog
Once you have finished creating the user, click the Done button to return to the Configuration screen. Both the Root Password and User Creation items show that you have completed those tasks (see Figure 2-19). The installation continues, as shown, on the progress bar at the bottom of the screen.
Figure 2-18. Advanced User Configuration
Figure 2-19. Configuration completed
Automatic Partitioning
If you have a system with a Linux system already on it, and you want to delete the old system, using the space for a new Fedora 20 system, you can choose to delete those partitions and then automatically partition your drive, using the free space. You will initially receive an Installation Options dialog (see Figure 2-21).
Figure 2-20. Installation complete
Figure 2-21. Installation options (full hard drive)
Once you have marked all the old partitions for deletion, you click the Reclaim Space button at the lower right. Your free space is automatically partitioned, and the Installation Summary screen shows automatic partitioning for the Installation Destination item.
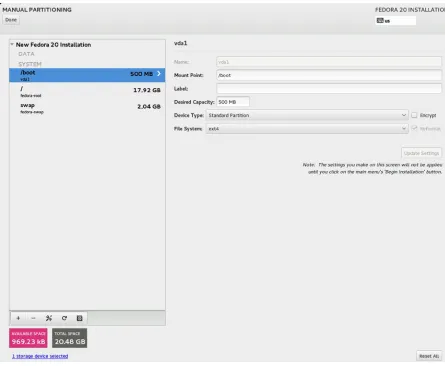
Manual Partitioning: Partitions, BTRFS, RAID, and Logical Volumes
On the Installation Options screen, you are given the option of customizing the disk partitioning. Click the Let Me Customize the Partitioning of the Disks Instead check box, and then click the Continue button. This opens the Manual Partitioning screen (see Figure 2-23). The left-side scroll box lists the partitions as you create them. If your hard drive is blank, it will be empty. The button bar at the bottom of the scroll box has buttons for adding partitions, deleting them, displaying information, and for the Help dialog (right icon), as shown here.
It is highly recommended that you read through the Help dialog, which provides a very detailed explanation of how to configure your partitions.
You are asked to designate the Linux partitions and hard disk configurations you want to use on your hard drives. Fedora provides automatic partitioning options if you just want to use available drives and free space for your Linux system. You can create specific partitions, configure RAID devices, or set up logical volumes (LVM).
No partitions will be changed or formatted until you leave the Manual Partitioning screen and, from the Installation Summary screen, you click the Continue button. You can opt out of the installation any time until that point, and your original partitions will remain untouched. A default layout sets up a swap partition, a boot partition of type ext4 (Linux native) for the kernel, and an LVM partition that will hold all your applications and files.
Initially, with no Linux partition set up and space available, you can click the Click Here to Create These Automatically link, to create a default set of Fedora partitions. These are a boot, root, and swap partition (see
Figure 2-24). The root and swap partitions are LVM volumes. The boot partition is a standard ext4 partition. This is the default set of partitions used, should you skip manual partitioning.
The side pane lists the partitions, showing the device name and size. The right pane shows the configuration for a selected partition. It displays the name, mount point, label, size, device type, file system, and encryption option. You can make changes to any of the entries and click the Apply Changes button, to change the configuration. (No changes are actually made to the hard disk until you begin the software installation.)
If you are reviewing after default partitioning, the hard disk partitions set up for you are displayed. The pane will show the specific partitions that will be created for your system. The default partitioning will set up an ext4 partition to be used as the boot partition. This is a small partition holding the Linux kernel and boot configuration information (/boot directory). An LVM physical volume will also be created, on which an LVM logical group and volumes will be set up. The LVM logical group will be listed at the top, under LVM Volume Groups. The volume group used for the default configuration will have a name such as fedora. You can edit these entries and change the names to ones you prefer, by clicking the Modify button.
Recommended Partitions
If you are manually creating your partitions, you are required to set up at least two Linux partitions: a swap partition and a root partition. The root partition is where the Linux system and application files are installed. In addition, it is recommended that you also set up a boot partition, which would contain only your Linux kernel (/boot directory), and a home partition, which would hold all user files. Separating system files on the root and boot partitions from the user files on the home partition allows you to replace the system files—should they become corrupt—without touching the user files. Similarly, if just your kernel becomes corrupt, you have to replace only the kernel files on your boot partition, leaving the system files on the root partition untouched.
If you are using LVM partitions, as the default setup does, you would require at least two physical partitions: one for the boot partition and the other for the LVM physical partition. The /boot directory requires its own partition, because you cannot boot from an LVM partition. The boot partition will hold the kernel. An LVM partition works something like an extended partition in which you can then set up several logical partitions, called logical volumes. In the default setup, two logical volumes (partitions), one for the root and the other for the swap, are set up on a single physical LVM partition (pv). In Figure 2-24, the LVM Volume Groups entry shows the default root and swap logical volumes.
This strategy of separating system directories into different partitions can be carried further, to ensure a more robust system. For example, the /var directory, which now holds web and FTP server files, can be assigned its own partition, physically separating the servers from the rest of your system. The /usr directory, which holds most user applications, can be placed in its own partition and then shared and mounted by other systems. One drawback to this strategy is that you must know ahead of time the maximum space you want to use for each partition. For system and kernel files, this can be easily determined, but for directories whose disk usage can change dramatically, such as
/home, /var, and even /usr, this can be difficult to determine.
As an alternative to creating separate physical partitions for each directory, you can use logical volumes. A basic partition configuration follows:
Partition
Description
swap No mount point
/ Root partition for system files (and all other files, if the only partition) /boot
/home
Boot partition holding the Linux kernel (approximately 200MB) User home directories and files
Except for the swap partition, when setting up a Linux partition, you must specify a mount point. A mount point
is a directory in which the files on that partition are connected to the overall Linux file structure for your system. The mount point for your root partition is the root directory, represented by a single slash (/). The mount point for your boot partition is the path /boot. For a user’s partition, it’s /home.
The size of the swap partition should be the same as your RAM memory, with a recommended minimum size of 64MB. With 4GB of RAM, you should use a 4GB swap partition.
Creating Partitions
To create a new partition, click the Plus button to display the Add a New Mount Point dialog, where you can choose the mount point and the size. Mount points begin with a slash (/). If you enter a slash, a drop-down menu appears under the Mount Point text box. The common mount points for file systems are /, /boot, /home, /usr, and /var. If you have a root and boot system already configured, only the /home, /usr, and /var entries appear.
There are several kinds of file systems supported during installation: ext2, ext3, ext4, swap, btrfs, xfs, and vfat. The ext2 and ext3 partitions are older forms of the Linux standard partition type, ext4.
To make configuration changes to any partition, select it, make the changes to its entries, and click the Apply Changes button.
Logical Volumes
Fedora supports Logical Volume Management (LVM), which enables you to create logical volumes that you can use instead of hard disk partitions directly. LVM provides a more flexible and powerful way of dealing with disk storage, organizing physical partitions into logical volumes in which memory can be managed easily. Disk storage for a logical volume is treated as one pool of memory, though the volume may in fact contain several hard disk partitions on different hard disks. There is one restriction. The boot partition cannot be a logical volume. You still have to create a separate hard disk partition as your boot partition with the /boot mount point in which your kernel will be installed. If you selected default partitioning, the /boot partition will have already been set up for you, along with an LVM volume partition for the rest of the system. A logical group will be set up with volumes for both the swap and root partitions. The logical group will be labeled with a name such as fedora. You can change these names by editing the logical group and volumes during installation. Click the Modify button to the right of the volume group entry.
Creating logical volumes is now a simple process of specifying the LVM device type and the volume group. The physical LVM partitions that logical volumes are based on are generated automatically by Fedora. For a particular LVM partition (logical volume), you will have a Volume Group entry in which you can specify the volume group it belongs to.
RAID and BTRFS
You also have the option of creating RAID devices. Such devices are for use with the Linux software RAID service, and shouldn’t be used for your motherboard RAID devices, as these are automatically detected. If you have already decided to use the motherboard RAID support, you do not require Software RAID. Linux supports both motherboard/ computer RAID devices (DMRAID), as well as its own Linux Software RAID. The RAID option is visible only if you have selected two or more hard disks.
BTRFS is the new file system format, still under development. If operates much like RAID devices, providing RAID0 (stripe), RAID (mirrors), and RAID10 (optimization) levels of support. You create the BTRFS sub-volumes, and the installer creates the BTRFS volume for you.
Software Installation Configuration with the Fedora Install DVD/CDs
GRUB on Restart
When you reboot, a GRUB bootloader briefly displays a startup message indicating which operating system on your disk will be started. The default is usually your Linux system. If Fedora is the only operating system on your system, GRUB will skip the startup message and the GRUB menu access and start Fedora immediately. Fedora 20 uses GRUB2. You can find out more about GRUB2 at http://fedoraproject.org/wiki/GRUB_2.
If you have encrypted your hard disk partitions, you are then prompted to enter the LUKS passphrase for them. A standard installation will prompt for the same passphrase for your swap and root partitions on your LVM file system. The prompt will use the physical partition name used for the LVM group, in this example, /dev/sda2. There are two prompts: one for the LVM volume for the root file system, and one for the LVM volume swap file system.
The startup screen then shows the progress of your boot procedures. If your graphics card supports kernel mode settings, the Plymouth boot-up screen will be displayed; otherwise, a simple progress bar is shown. You can press the ESC key to see startup messages.
GNOME Initial Setup and GNOME Help
The first time you start up Fedora, the GNOME initial setup is run (see Figure 2-26), from which you confirm your choice of language and keyboard, choose a wireless connection, and configure a cloud connection.
Figure 2-26. GNOME initial setup
Upgrading Fedora Linux
You can only upgrade an existing Fedora 19 system to Fedora 20. If you have Fedora 18, you first have to upgrade to Fedora 19. Be sure to back up your system, including the home, etc., and boot directories. The older methods of upgrading—preupgrade and the Install DVD—are no longer supported and do not work. Instead, you can use FedUp, which upgrades either from the repositories (such as preupgrade) or from a DVD (such as the Install DVD). You can find out more about FedUp at: http://fedoraproject.org/wiki/FedUp.
FedUp downloads all the packages for the new distribution in the background, allowing you to continue to use your system. The updated versions of these packages are downloaded, providing the most recent package versions. Be sure to first update the software on your current system. Fedora 19 software has to be updated to the most recent version, before it can be upgraded to Fedora 20. When you restart your system, the downloaded packages are installed.
On a Fedora 19 system, install the fedup package. This installs the FedUp client, via the fedup-cli command. You run this command from a terminal window as the root user. Open a terminal window; use the su command to log in as the root user; and then enter the fedup-cli command, specifying a network (--network), iso (--iso), or device (--device) source. The --network option downloads from the Fedora repository. You must specify only the version, such as 20 for Fedora 20. For --iso, you can use an ISO DVD image file instead. For --device, you reference a DVD-ROM containing a Fedora Install DVD. The --network option is recommended, as this provides you with the most recent updates from the Fedora repository.
For a --network update, enter the following commands:
su
fedup-cli --network 20
The repositories are located, then the packages are downloaded. You can interrupt the download at any time and restart it later. The download will start up from where it left off, after verifying that those packages already downloaded.
Should you use a device, specify its mount directory. This is usually the /var/run directory, the name of the user, and the name of the DVD, such as “Fedora 20 x86_64.” The DVD mount directory name has spaces, so enclose the entire mount directory in quotes. The following upgrades are from a DVD mounted by the user Richard:
fedup-cli --device "/var/run/richard/Fedora 20 x86_64"
For a download ISO file, specify the full pathname of the ISO file. The full pathname for an ISO file in a user directory begins with /home and the name of the user. Include the full name of the ISO file. The following upgrades are from the Fedora DVD 64-bit ISO file located in the user Richard’s Download directory.
fedup-cli --iso /home/richard/Download/Fedora-20-x86_64-DVD.iso
GRUB is not upgraded by the upgrade process. You have to reinstall and upgrade GRUB2 manually. See the following section on reinstalling the bootloader. Also, check the GRUB2 page (http://fedoraproject.org/wiki/ GRUB_2), and for UEFI systems, see the FedUp page for instructions.
Creating Boot Disks
You can use mkbootdisk to create a boot CD-ROM. Use the --iso option and the --device option with the name of an ISO image file to create (install the mkbootdisk package). You then use CD-ROM-burning software to create the CD-ROM from the image file. The following example creates a CD-ROM image file called mybootcd.iso that can be used as a boot CD-ROM:
mkbootdisk --iso --device mybootcd.iso 3.7.4-204.fc20.x86_64
Booting in Rescue Mode
If you are not able to boot or access your system, it may be due to conflicting configurations, libraries, or applications. In this case, you can boot your Linux system in a rescue mode and then edit configuration files with a text editor, remove the suspect libraries, or reinstall damaged software with yum. To enter the rescue mode, run the Fedora DVD-ROM and then select Rescue a Fedora System from the Troubleshooting menu.
You will boot into the command-line mode with your system’s files mounted at /mnt/sysimage. You will be notified that you can use the chroot command to set the / directory as the root. Issue the following command at the command-line prompt:
chroot /mnt/sysimage
Use the cd command to move between directories. Check /etc and /etc/sysconfig for your configuration files. You can use vi to edit your files and the less command to view them. To reinstall files, use the yum install